Sweet Coconut Rice with Mango Purée

sticky rice w mango n

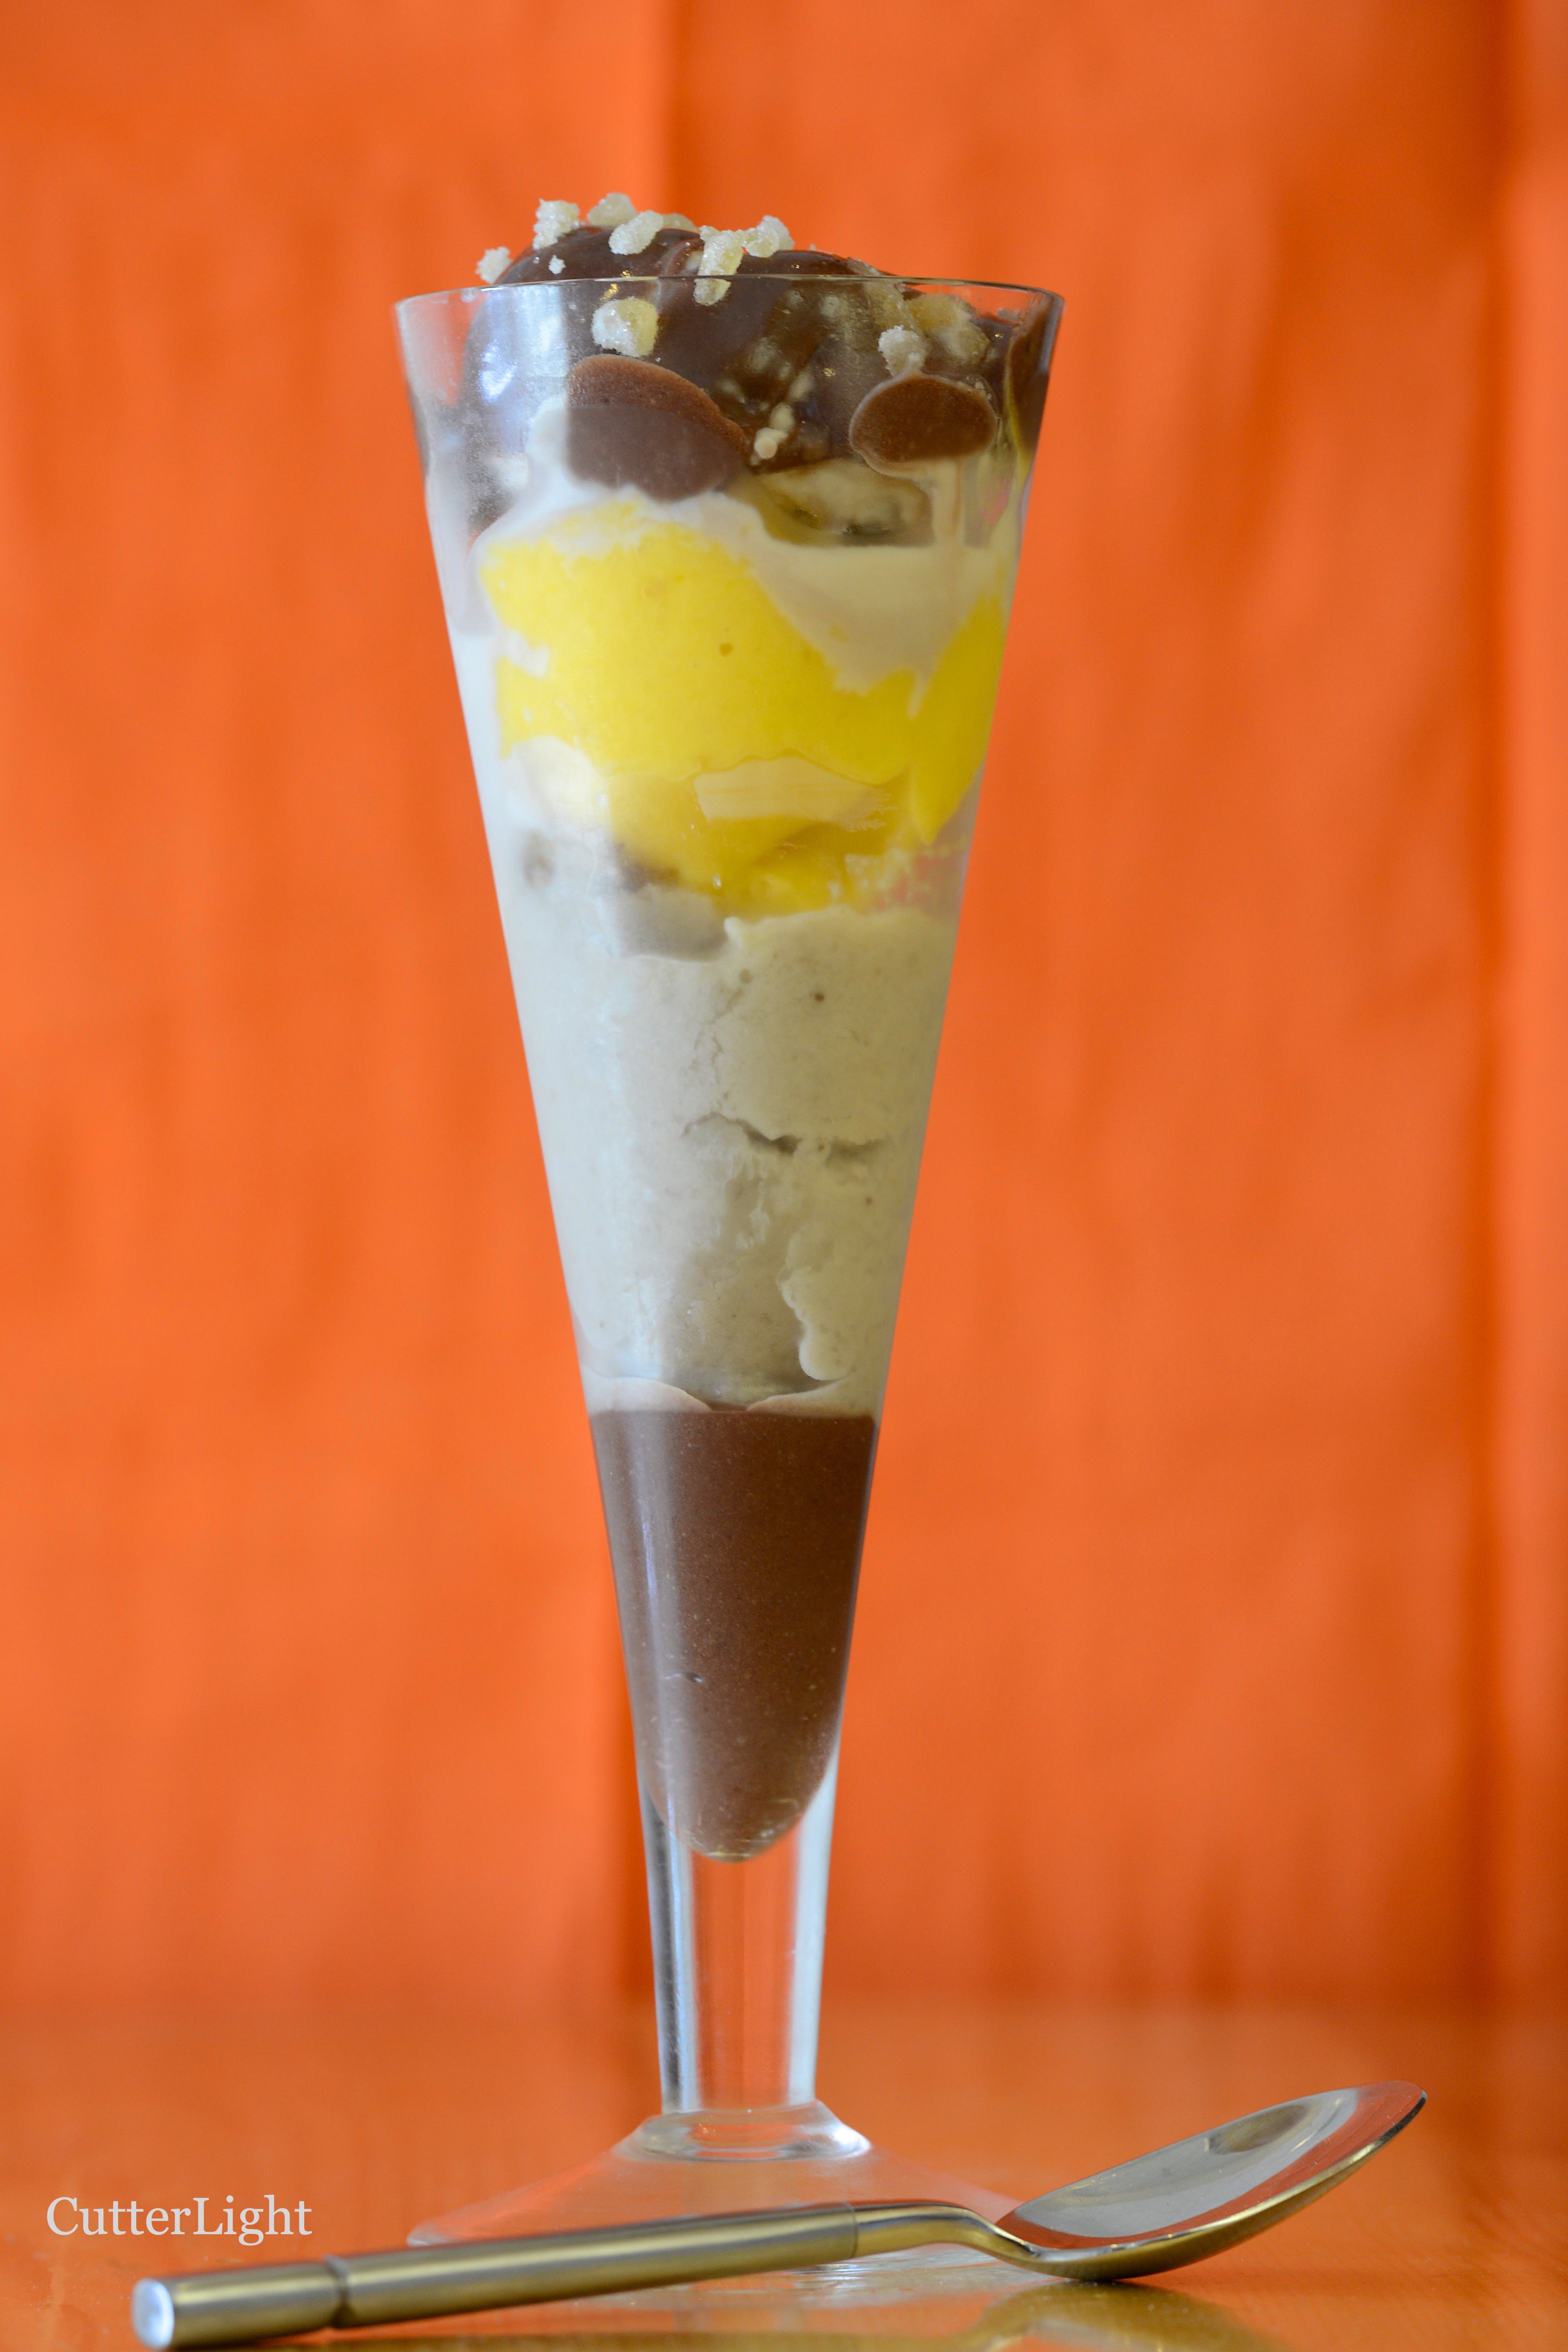
Rich coconut-cream-infused rice topped with scrummy mango purée. Take a bite, close your eyes, and imagine life in the Tropics.

When we are finished teaching in Mongolia, we plan to fully embrace the tiny house movement and live full time in our Lance truck camper traveling all around North America. We have spent several summers living in our camper, which gives us a clear understanding of exactly what 120 square feet of living space means. Primarily relying on electricity generated by driving and by our solar panel has a big influence what type of equipment we use inside our tiny home.

In preparation for living large in a tiny kitchen, we are using this time in our small Mongolian apartment to vet products in order to see if they will meet our needs in our future full time tiny kitchen. Limited electricity, size, durability and multi-function are the top criteria we use to vet products. An additional criterion is whether or not we use a given item on a regular basis. At the end of the day, with a small oven, a small three-burner cooking range and limited counter and storage space, we give a good deal of thought to what we can live without.

Many people all over the world make rice on the stovetop. To eliminate the rice cooker we have relied on for many years, we decided to learn to make rice this way, too. Oh dear. My rice came out consistently bad – mushy, overcooked or undercooked – no matter what I did. With one epic failure after another, I handed the rice-making baton to Jack. He was more successful, but we both agreed that our rice just wasn’t as fluffy as the rice from our rice cooker had been. So we broke down and decided to buy a rice cooker. Now we’re convinced that we need to figure out a way to add this tool to our tiny mobile kitchen.

Our main criterion for a rice cooker was simple – it had to be small. After all, there are only two of us. Standard-sized rice cookers take up too much space and use too much energy. Since we live in Asia, finding a rice cooker shouldn’t be difficult, right? And finding rice cookers was easy. But in shop after shop, most of what we saw were massive in size. The average “small” rice cooker had a 10-cup capacity. Finally, after nearly giving up, we found a dust-covered, last-one-in-stock no-long-in-production Zojirushi rice cooker with a 3-cup capacity. Score!

Zojirushi is a brand we’ve had great success with in the past, so we wasted no time grabbing this cooker. As is the custom here, the sales clerk plugged it in, showed us that it indeed was in working order, and pointed out the six-month store warrantee. Once home, I immediately made a batch of rice to test our new gadget. Hot, steamy, fluffy, perfect rice. Yum!

Remembering a delicious rice dessert Thai friends had turned me on to, I recreated it using the batch of rice “I” just cooked. It is a simple dessert which is not too sweet, is packed full of tropical flavors, and is quick to make.

Sweet Coconut Rice with Mango Purée

Ingredients

  • 1 cup Japanese style short-grained rice, cooked and hot
  • 2/3 cup unsweetened coconut cream (or substitute with coconut milk)
  • 2 tbsp granulated sugar
  • 1 cup cubed mango
  • honey, to taste
  • toasted sesame seeds and crystallized ginger to garnish

Directions

  1. Put hot, cooked rice in a medium-sized bowl.
  2. Heat coconut and sugar over medium heat until sugar is dissolved.
  3. Pour coconut mixture over rice and mix well.
  4. Let coconut mixture sit for 30 minutes, until coconut cream is absorbed into rice.
  5. Purée mango.
  6. Mix in honey to taste.
  7. Scoop coconut rice onto individual serving plates.
  8. Hollow out a bit of the top of the rice in order to make a well for the mango purée.
  9. Fill well will purée and garnish with toasted sesame seeds and crystallized ginger.


Magical All Fruit Ice Cream with a Quick Hot Fudge Topping

All Fruit Ice Creams n

A tropical triple sundae created with all-fruit coconut, mango, and banana ice creams topped with homemade hot fudge and crystallized ginger. Happy Summer Solstice everyone! 

Recently, I came across a recipe for one-ingredient ice cream. As big fan of homemade ice cream, I was curious, so I clicked. Bananas! We used to freeze bananas and dip them in carob when I was a kid (the carob thing is a whole other story). I loved that refreshing summertime treat. This memory brought about other childhood memories of eating all-fruit popsicles. In all of my custard and milk based ice cream making adventures, I don’t know why it never occurred to me to try making an all-fruit “ice cream.” It certainly is more healthful to eat a banana than a cream-based, sweet frozen custard concoction, not that I’m planning to give those up!

I had bananas in my kitchen that were just past the perfect-to-eat stage, which made the banana flavor stronger and sweeter. I sliced the bananas into coins, laid them out on a baking sheet and froze them. After an hour, I popped the frozen pieces into the tall cup that came with my stick blender. It did take some work for the stick blender to smooth out the frozen bananas. But after a couple of rounds of stirring and puréeing with the stick blender, I scooped pure magic into bowls. The consistency of the banana ice cream was creamy and the flavor was sweet and rich.  One ingredient ice cream is delicious!

My culinary sense of adventure and curiosity got the best of me while eating this creamy frozen snack. A banana is a snack, after all. By adding one more ingredient to this creamy base, I could create chocolate banana or peanut butter banana ice cream. From here, my thoughts took off, adding many more ingredients. And toppings. This recipe is versatile!

I thought that since bananas worked so well, other fruits might prove equally appropriate. Here in Ulaanbaatar, we don’t get a huge variety of fruit. But I happened to see frozen mangos at the store. I work with what I can get. The frozen mango worked as well as the banana. The batch of frozen mangos I purchased was on the sour side, so I did add some honey and crystallized ginger to sweeten up the ice cream and give it some pizzazz. This was no longer a one-ingredient recipe, but I was experimenting. It was delicious and tropical.

A proper sundae needs three different flavors, in my opinion. I froze small cubes of coconut milk and processed the frozen cubes just as I had processed the fruit. The coconut milk came out icy, so I added a bit of regular milk to smooth the texture. And since coconut milk doesn’t have much natural sweetness, I added two tablespoons of powdered sugar. The resulting ice cream was tasty and perfectly complemented the mango and banana ice creams.

In order to create the ultimate all-fruit sundae, I whipped up some hot fudge (there goes the healthful dessert), sprinkled some crystallized ginger to finish it off and voilà, a cool, beautiful, tropical summertime dinner… I mean dessert. (Well, in all honesty, we did eat it for dinner.)

Frozen Fruit Ice Cream

Ingredients

  • small chunks of fruit of your choosing, frozen
  • (optional) other flavorings to enhance the fruit like vanilla, ginger, cocoa powder
  • sweetener, to taste (if needed add honey, maple syrup, sugar, etc.)

Directions

  1. Place frozen fruit in food processor or cup of a stick blender and process scraping down sides occasionally until fruit is thick and creamy and there are no chunks remaining.
  2. Mix in optional ingredients.
  3. Serve immediately.

Quick Hot Fudge Sauce

Ingredients

  • 1/3 cup boiling water
  • 4 tbsp unsalted butter
  • 3/4 cup sugar
  • 1/2 tsp vanilla extract
  • 1 cup powdered milk

(or substitute the above with 14 oz sweetened condensed milk)

  • 1/2 cup unsalted butter
  • 1 cup chocolate chips

Directions

  1. Place first 5 ingredients in the metal cup that came with your stick blender to make sweetened condensed milk.
  2. Blend until well mixed and thickened. Set aside.
  3. In medium pan, with medium heat, melt 1/2 cup butter.
  4. Stir in chocolate chips.
  5. Add milk mixture and stir until smooth and silky.
  6. Store leftovers in covered container in the refrigerator.


Gluten Free? Low Carb? Whatever! Just Eat These Fudgy Chocolate Meringues!

meringue fudgy chocolate n

Fudgy meringues with a crispy, melt in your mouth shell will have you attending “Meringues Anonymous” if you’re not careful!

How can four little ingredients be so good together? The combination of the crispy exterior and the moist chocolate middle sans flour resulted in an entire batch of fifteen cookies disappearing in just over 24 hours. I wish I could tell you we had guests…

Although airy and relatively low on calories compared to most confections, these meringues did not come about due to New Year’s self-promises centered around slimmer waistlines. The ignoble truth is that after creating crème brûlée, another custard dish and any number of ice creams, we had on hand countless extra egg whites and, according to Jack, “egg whites, fish and beer are three items that can be consumed without fear of weight gain.”

These meringues are quick and easy to make but do require an overnight stay in the oven to finish drying  in order to create that crispy exterior.

Fudgy Chocolate Meringues

Ingredients

  • 3 egg whites
  • 3/4 cup granulated sugar
  • 2 tbsp dutch processed cocoa
  • 1/2 cup smashed chocolate chips (Place chips in a Ziploc bag and smash with a meat tenderizer)

Directions

  1. Preheat oven to 350 degrees F. Line two baking sheets with parchment paper. Set aside.
  2. Place egg whites and sugar in the bowl of a stand mixer.
  3. Place bowl on top of pot of simmering water, for a double boiler effect.
  4. Whisk eggs and sugar for a couple of minutes until sugar is just dissolved.
  5. Place bowl back on stand mixer. Mix on high speed until eggs are thick and glossy and hold soft peaks.
  6. Sift cocoa onto egg mixture.
  7. Mix on high speed until cocoa is just incorporated.
  8. Fold smashed chocolate chips into egg whites.
  9. Use a cookie scoop to drop batter onto parchment-lined baking sheets.
  10. Bake cookies for 10 minutes. Cookies should puff up and may crack.
  11. Remove cookies and leave oven door open to cool down.
  12. Place cookies back in oven, close oven door and let cookies sit overnight.
  13. The next day, cookies will be cooled completely and can be easily removed from parchment paper. Store in airtight container.

Sweet Nosh – Homemade Lemon Curd and Almond Scones

scone lemon curd and almond n

Creamy, sweet lemon curd is the perfect partner to a freshly baked almond scone for a light breakfast or an afternoon nosh. See lemon curd and scone recipes below.

Any excuse to make lemon curd is a good excuse. I’ve been playing around with a lemon lava cake recipe and decided the ingredient it needed is lemon curd. With the lava cake in mind, I whipped up four cups of this zesty conserve, which happened to be more than my recipe required. What to do? Enjoy the tangy, sweet, creamy curd with a freshly baked batch of almond scones.

I’ve made many iterations of scones in my kitchen, but lemon curd seemed to fit with savory almond flavor as opposed to blends of fruits or other sweet ingredients.

The curd is a cinch to make. The Meyer lemons that grow in our backyard in Sacramento would have been the choice ingredient, but even without our favorite Meyers on hand in our Arctic kitchen, we can make a darn good curd with Nellie & Joe’s brand lemon juice and Penzeys dried lemon peel. The small scones, too, are a snap to make. The time it took from gathering pantry ingredients to pulling freshly baked scones from the oven was only about half an hour – about as long as it takes to have a first cup of Joe and get fully awake on a leisurely weekend or holiday morning.

Pantry Lemon Curd

Ingredients

  • 1 1/2 tbsp Penzeys dried lemon peel
  • 1 1/2 cups granulated sugar
  • 5 eggs
  • 1/2 cup lemon juice
  • pinch salt
  • 1/4 lb unsalted butter, room temperature

Directions

  1. In a medium bowl, mix together lemon peel and sugar.
  2. Whisk eggs into sugar mixture, one at a time.
  3. Whisk in lemon juice and salt.
  4. Pour mixture into a medium pot. Add butter in pieces.
  5. Cook over low heat until thickened, about 10 minutes.
  6. Remove from heat and let cool before serving with fresh-baked almond scones hot from the oven.
  7. Store any leftovers in a covered container in the refrigerator.

Snack-Sized Almond Scones

Ingredients

  • 2 cups all-purpose flour
  • 2 tsp baking powder
  • 1/2 tsp baking soda
  • healthy pinch salt
  • 1/3 cup granulated sugar
  • 2 tbsp frozen butter
  • 1/3 cup whole milk
  • 1/3 cup buttermilk
  • 1 egg
  • 1 tsp almond extract
  • 1/2 cup sliced almonds

Directions

  1. Preheat oven to 350 degrees F. Line a baking sheet with parchment paper.
  2. In a medium mixing bowl, mix flour, baking powder, baking soda, salt, and sugar.
  3. Using a cheese grater, grate butter into flour mixture. Stir until butter is well dispersed in flour.
  4. In a second bowl, whisk together whole milk, buttermilk, egg, and extract.
  5. Pour wet ingredients into dry. Stir together.
  6. Stir in almonds. Dough will be sticky.
  7. Coat your hands with flour and divide dough into thirds.
  8. Flatten each third into a disc about 1-inch tall. Place 3 discs apart on parchment-covered baking sheet. Cut each disc into fourths, but do not separate. This will allow the scones to be broken easily when they are finished baking.
  9. Bake for about 15 minutes. Scones will be very lightly browned when done.
  10. Serve with hot tea and homemade lemon curd.

Swiss Spitzbueben Cookies Featuring Alaskan Wild Blueberry Jam

spitzbueben cookies_n

Two thin, crispy cookies sandwich delicious homemade Alaska blueberry jam. This “anytime” cookie is too good to reserve for holiday cookie trays!

When we received a Christmas package from our friends at Alaskagraphy, we knew that these crispy vanilla cookies would be the perfect canvas for the flavor-packed wild blueberry jam they included. Experiment with your own jam creations!

Swiss Spitzbueben Cookies

Ingredients

  • 5 tbsp unsalted butter, softened
  • 1/2 cup confectioners sugar
  • 1 tsp vanilla extract
  • pinch salt
  • 1 egg white
  • 1 1/2 cups all-purpose flour
  • 1/2 cup Alaskan blueberry jam, or jam of your choosing
  • 2 tbsp confectioners sugar, for dusting

Directions

  1. In bowl of stand mixer, beat butter until soft and fluffy.
  2. Add sugar,  vanilla, and salt. Beat until completely mixed.
  3. Add egg white. Beat until completely mixed.
  4. Add flour. Mix until flour is incorporated completely.
  5. Turn dough out onto plastic wrap. Cover tightly and refrigerate for 30 – 60 minutes.
  6. Preheat oven to 400 degrees F. Cover baking sheets with parchment paper.
  7. Roll dough out on parchment-covered surface to about 1/4 inch thickness.
  8. Cut shapes with cookie cutters. Keep in mind that you need two cookies for each sandwich and the top cookie needs to have a smaller shape cut out in order for jam to show through.
  9. Bake cookies for 6-8 minutes. Cookies should just brown at bottom edges.
  10. Jam needs to be thick. If it is runny, cook down jam over medium heat for a few minutes. Spread jam on bottom cookie and place second cookie with cut-out atop first.
  11. Dust cookies with powdered sugar when cool.

Recipe makes approximately 1 dozen spitzbueben.

Rustic Pear Gallette with Whole Wheat Blend Crust

gallette pear n

The sweet secret to this gallette is a generous layer of homemade cloudberry jam beneath the pears No cloudberries? Try raspberry, blackberry or apricot jam.

A gallette is a beautiful dessert that can whipped up on short notice – a perfect answer to a seasonal abundance of fresh fruit. During the summer, we made a delicious strawberry-port gallette with sliced almonds in the galley of our sailboat. Since it is wintertime, we decided to make the gallette a bit more full-bodied by adding wheat flour and some cornmeal to the crust. We happened to have pears on hand, but many other fruits readily lend themselves to this recipe. Enjoy a slice of pear gallette with a side salad, a favorite cheese and a freshly brewed cup of tea for a satisfying lunch in any season.

Rustic Pear Gallette

Ingredients

  • 1  cup all-purpose flour
  • 3/4 cup whole wheat flour
  • 1/3 cup granulated sugar
  • 1/4 cup coarse cornmeal
  • 1/4 tsp salt
  • 1/2 cup cold butter, cut into small pieces
  • 1/3 cup buttermilk (we made this from powdered)
  • 2 tablespoons cloudberry jam, or jam of your choice
  • 2 D’Anjou pears, thinly sliced
  • 1 egg, beaten
  • 2 tbsp granulated sugar mixed with a pinch of ground cinnamon

Directions

  1. Mix together flours, sugar, cornmeal and salt in a medium bowl.
  2. Using a pastry blender, mix in cold butter. Continue mixing until cold butter is the size of peas.
  3. Slowly mix in buttermilk. Stir with rubber spatula until dough forms into a ball.
  4. Wrap dough in plastic and chill for about 30-45 minutes in refrigerator.
  5. Preheat oven to 350 degrees F.
  6. Cut a piece of parchment paper to fit the size of a baking sheet.
  7. Place chilled dough on center of parchment paper.
  8. Roll dough to about a 15-inch circle. This is a rustic dessert, so no need to be a perfectionist here.
  9. Brush the entire rolled dough with jam.
  10. Arrange pear slices atop dough, leaving a 2-inch border.
  11. Fold border over pears, pressing down any folds of dough.
  12. Brush dough with egg.
  13. Sprinkle dough and pears with sugar and cinnamon mixture.
  14. Bake gallette 40 – 45 minutes, until dough is golden brown and pears are soft.
  15. Serve warm or at room temperature.

Homemade Chocolate Brownie Ice Cream in Chocolate Orange Wafer

brownie chocolate ice cream n

To create this ice cream, we use the same brownie as in our ice cream sandwiches. These brownies work well because they retain their chewy, firm, moist texture when frozen. The edible serving cups are created from a modified fortune cookie recipe infused with orange flavor. See recipes below.

Dig in!

Chocolate Brownie Ice Cream

Ingredients

  • 2 oz. semi-sweet chocolate chips
  • 1/3 cup unsweetened cocoa powder
  • 1 1/2 cups whole milk
  • 2 eggs
  • 1 cup granulated sugar
  • 1 cup heavy whipping cream
  • 1 tsp vanilla extract
  • 1 cup chopped brownies, cut into 1/2 inch cubes (see recipe below)

Directions

  1. Melt chocolate chips in top of double boiler.
  2. Whisk cocoa powder into melted chips until smooth.
  3. Whisk in milk a little at a time until completely blended.
  4. Remove from heat and let cool.
  5. Beat eggs in bowl of a stand mixer until light and fluffy.
  6. Mix in sugar a little at a time until completely blended.
  7. Mix in cream and vanilla. Thoroughly combine.
  8. Pour chocolate mixture into cream mixture and whisk to blend.
  9. Cool completely. I put the mixture in the refrigerator overnight before I use it.
  10. Pour into freezer bowl of ice cream machine. Turn machine on and mix until mixture thickens, about 20 minutes. 5 minutes before ice cream is complete, add chopped brownies to freezer bowl.
  11. Transfer to airtight container and place in freezer until firm, about 2 hours.

Brownies for Ice Cream

Ingredients

  • 2 oz. semi-sweet chocolate chips
  • 1/2 stick unsalted butter
  • 3 eggs
  • pinch salt
  • 1 3/4 cups granulated sugar
  • 1/2 tsp vanilla extract
  • 1/2 cup all-purpose flour

Directions

  1. Preheat oven to 350 degrees F. Grease a 9″ x 9″ baking dish. Set aside.
  2. Melt chocolate and butter in a double boiler over simmering water. Mix completely. Let mixture cool slightly.
  3. Beat eggs and salt in a mixing bowl.
  4. Gradually beat in sugar and vanilla.
  5. Mix in cooled chocolate.
  6. Mix in flour.
  7. Pour batter in baking dish.
  8. Bake for 30 minutes. Brownies are done when a toothpick inserted in the center comes out clean. Let cool completely before using for ice cream recipe.

Edible Chocolate Orange Ice Cream Bowls (makes 4 wafers)

Ingredients

  • 1 egg white
  • pinch salt
  • 1/2 tsp orange zest
  • 1/2 tsp orange extract
  • 1/4 cup granulated sugar
  • 1/4 cup all-purpose flour
  • 1 tbsp orange juice

Directions

  1. Preheat oven to 400 degrees F. Line two baking sheets with parchment paper. Set aside. Have two small teacups or ramekins ready.
  2. Whisk egg white in a medium bowl until foamy, not stiff.
  3. Add salt and whisk to incorporate.
  4. Whisk in orange zest and orange extract.
  5. Whisk in sugar.
  6. Whisk in flour.
  7. Whisk in orange juice.
  8. Drop a teaspoon of batter onto parchment-lined baking sheet.
  9. Spread the batter around in a circular motion with the back of teaspoon until you have about a 4 inch circle. Repeat to make second wafer.
  10. Bake for 6 minutes.
  11. Immediately remove wafers with an offset spatula and place on an upside-down teacup to cool and dry in the shape of a cup.
  12. Repeat with batter for second 2 wafers.
  13. If desired, dip edges of wafers in chocolate.
  14. Let cool completely before using.

Rich, Custardy Eggnog Ice Cream: A Christmas Tradition

eggnog ice cream n

A big mug of freshly brewed coffee and a couple scoops of eggnog ice cream dressed up with shaved nutmeg: Bring it on, Winter!

This ice cream is divine.

Rich Eggnog Ice Cream

Ingredients

  • 2 cups heavy cream
  • 1 cup whole milk
  • 1 tsp ground cinnamon
  • 1/2 tsp freshly grated nutmeg
  • 1/2 tsp ground cloves
  • 8 egg yolks
  • 3/4 cup sugar

Directions

  1. Heat cream and milk in a medium saucepan over medium heat.
  2. Add cinnamon, nutmeg and cloves and heat until mixture almost boils, about 5 – 8 minutes.
  3. Reduce heat to low, using a heat diffuser if necessary.
  4. Meanwhile, beat yolks and sugar until the mixture is light yellow and smooth.
  5. Add 4 tbsp of hot cream mixture to egg mixture and stir until combined. This will temper the eggs.
  6. Slowly add warmed yolk mixture to warm cream. Stir continuously in order to not cook/curdle eggs.
  7. Cook entire mixture over low heat until slightly thickened and mixture coats the back of a spoon. Cool completely. I put the mixture in the refrigerator overnight before I use it.
  8. Pour into freezer bowl of ice cream machine. Turn machine on and mix until mixture thickens, about 20 minutes.
  9. Transfer to airtight container and place in freezer until firm, about 2 hours.

Now THIS is an Ice Cream Sandwich!

brownie butter pecan ice cream sandwich_n

Creamy, homemade butter pecan ice cream sandwiched between chewy, chocolatey, frozen brownies – a guaranteed cure for winter-darkness doldrums! 

Store-bought ice cream sandwiches have the right idea – it’s fun to eat ice cream with your hands. The problem is that the outside layers of the store-bought variety leave much to be desired. We wanted a delicious brownie that would be more than just an edible barrier between ice cream and hands. So we created a not-too-thick brownie that retains its chewiness when it’s frozen. For the ice cream filling, we chose butter pecan to add the texture and flavor of the nuts we like best in brownies. Turned out to be the best ice cream sandwiches we’ve ever had!

Brownie & Butter Pecan Ice Cream Sandwiches

Ingredients

  • 2 oz. semi-sweet chocolate chips
  • 1/2 stick unsalted butter
  • 3 eggs
  • pinch salt
  • 1 3/4 cups granulated sugar
  • 1/2 tsp vanilla extract
  • 1/2 cup all-purpose flour
  • butter pecan ice cream (see recipe below)

Directions

  1. Preheat oven to 350 degrees F. Line two 9″ x 5″ x 3″ loaf pans with foil. Butter the foil. Set pans aside.
  2. Melt chocolate and butter in a double boiler over simmering water. Mix completely. Let mixture cool slightly.
  3. Beat eggs and salt in a mixing bowl.
  4. Gradually beat in sugar and vanilla.
  5. Mix in cooled chocolate.
  6. Mix in flour.
  7. Pour half of the batter in each loaf pan.
  8. Bake for 25 minutes. Brownies are done when a toothpick inserted in the center comes out clean. Let cool for about 15 minutes.
  9. Gently lift brownies with foil out of loaf pans and place in freezer.
  10. Place one of the empty loaf pans in freezer.
  11. Scoop out several scoops of butter pecan ice cream* into a bowl. We used about six.
  12. Stir ice cream with a rubber spatula to soften a little. You want ice cream to be spreadable, but not soupy.
  13. Retrieve one brownie and frozen loaf pan from freezer.
  14. Place brownie back into loaf pan.
  15. Spread all the ice cream evenly on brownie.
  16. Retrieve second brownie from freezer. Remove foil.
  17. Press second brownie atop the ice cream layer. Place sandwich in freezer to set, about 30 minutes.
  18. Remove sandwich from pan and place on cutting board. Using a sharp knife, slice sandwich into slices of desired size.
  19. Let sit for about 5 minutes to slightly thaw before serving.

*If you want a top notch filling for this sandwich, try making your own butter pecan! Here’s how:

Butter Pecan Ice Cream

Ingredients

  • 1 stick unsalted butter
  • 1 cup pecan halves, chopped slightly
  • 1/2 tsp salt
  • 2 large eggs
  • 3/4 cup granulated sugar
  • 2 cups heavy whipping cream
  • 1 cup whole milk

Directions

  1. Melt butter in a heavy pan over low heat.
  2. Add pecans and salt and sauté, stirring constantly until pecans start to brown.
  3. Set pecans aside to cool. Leave melted butter in pan.
  4. Whisk eggs until light and fluffy.
  5. Whisk in sugar a little at a time until completely blended.
  6. Pour in cream and milk and whisk to blend.
  7. Add reserved melted butter from pan. Mix well.
  8. Complete by following the directions of your ice cream maker or method. Add buttered pecans near the end of the ice cream maker’s cycle, when the ice cream has thickened.

Roasted Salted Pistachio and Cherry Biscotti

pistachio cherry biscotti_n

This crisp cookie bursts with the flavors of salty, roasted pistachios and tart, sweet cherries. Its attractive green and red colors would make it a welcome addition to this season’s offerings.

We picked up a bag of roasted and salted shelled pistachios last summer at Costco. The large bag of nuts was quickly opened, but we know that a rapidly expanding waistline can be the price for eating too many pistachios in too short a time. So, we put the bag in a mailing tub to be shipped north only partly consumed and forgot about it till recently. To our surprise, the nuts have remained amazingly tasty. Before they fall from grace, we wanted to make good use of them. Enter a biscotti recipe that celebrates their unique flavor. The roasted and salted aspect adds a delicious juxtaposition to the sweet tanginess of the dried cherries. We think these biscotti should be eaten all year ’round, in spite of their seasonal colors.

Roasted Salted Pistachio and Dried Cherry Biscotti

Ingredients

  • 1 3/4 cups all-purpose flour
  • 1 cup granulated sugar
  • 1/2 cup old-fashioned oats
  • 1 tsp baking powder
  • 1/2 tsp baking soda
  • 1/2 tsp salt
  • 2 large eggs
  • 3 tbsp light olive oil
  • 1 tbsp dried orange zest
  • 2 tsp dried lemon zest
  • 1 1/2 tsp vanilla extract
  • 1/2 tsp almond extract
  • 1 cup dried cherries, coarsely chopped
  • 1 cup roasted and salted pistachios, coarsely chopped

Directions

  1. Preheat oven to 350 degrees F. Line a baking sheet with parchment paper. Set aside.
  2. Combine first 6 ingredients in bowl of stand mixer fitted with a paddle.
  3. Mix on low speed until ingredients are well combined.
  4. In a separate bowl whisk eggs with next 5 ingredients.
  5. Add egg mixture to flour mixture. Beat on low until combined.
  6. Fold in cherries and pistachios.
  7. Transfer dough to a lightly floured surface.
  8. Divide dough in half.
  9. Using floured hands, shape each dough half into a 16″ long log.
  10. Place logs on parchment covered baking sheet, about 5″ apart.
  11. Flatten logs to a strip about 2″ wide, so you have two logs that are 16″ x 2″.
  12. Bake cookies until browned and set, about 30 minutes.
  13. Let cookies cool in pan placed on wire rack for about 15 minutes.
  14. Reduce oven temperature to 250 degrees F.
  15. On a cutting board, using a serrated knife, cut logs into slices, about 2/3″ thick.
  16. Place slices back on the parchment-lined baking sheets, cut side down and close together.
  17. Bake for 20 minutes.
  18. Flip the cookies to the opposite side and bake again for 20 minutes.
  19. Let cool completely before serving. Store in an airtight container at room temperature.

Recipe adapted from BON APPÉTIT