Homemade Dreamy Creamy Orange Vanilla Ice Cream

dreamy creamy orange vanilla ice cream n

Our young hand-models enjoyed orange peel halves stuffed with dreamy creamy orange ice cream in exchange for their work. (Hey, modeling is hard work!)

Today is winter solstice. Two-hundred miles north of the Arctic Circle it is 1 degree F, but the frigid breeze makes it feel like -13. The sun set fifteen days ago and hasn’t peeked above the horizon since. The official beginning of winter is the perfect day to enjoy a taste summer. This ice cream was inspired by the orange covered vanilla popsicles we enjoyed as kids.

Dreamy Creamy Orange Ice Cream

Ingredients

  • 2 large eggs
  • 3/4 cup granulated sugar
  • 2 cups heavy whipping cream
  • 1 cup whole milk
  • ⅓ cup frozen orange juice concentrate, thawed
  • 2 tsp vanilla extract

Directions

  1. Whisk eggs until light and fluffy.
  2. Whisk in sugar a little at a time until completely blended.
  3. Pour in cream and milk and whisk to blend.
  4. Add juice concentrate and vanilla and blend well.
  5. Complete by following the directions of your ice cream maker or method.

Pumpkin Ice Cream – For Pie, Lattes or Shakes!

pumpkin ice cream n

Perfectly spiced pumpkin ice cream adds another layer of delicious pumpkin to a classic fall dessert.

Fall is always accompanied by the need to satisfy pumpkin urges: pumpkin bread, pumpkin lattes, pumpkin risotto and even pumpkin pasta. As we add to our collection of ice cream recipes, pumpkin seemed an appropriate seasonal choice for a dessert that never seems too cold, even if the outside Arctic temperatures are plunging below zero. For this recipe, I turned to Ben and Jerry for advise. If the gurus of ice cream recommend using canned pumpkin, who am I to argue? The only change we made to the master recipe was the use of organic pumpkin from a box instead of non-organic from a BPA-lined can.  After following their recipe to the T, we were really pleased with the creamy texture and spiced-just-right flavor. We enjoyed a scoop atop a piece of freshly baked pumpkin pie and can also imagine it in coffee or in a milkshake.

Pumpkin Ice Cream

Ingredients

  • 2 large eggs
  • 3/4 cup granulated sugar
  • 2 cups heavy whipping cream
  • 1 cup whole milk
  • 1 cup unsweetened organic pumpkin purée
  • 1 tsp freshly grated nutmeg
  • 1 tsp ground cinnamon

Directions

  1. Whisk eggs until light and fluffy.
  2. Whisk in sugar a little at a time until completely blended.
  3. Pour in cream and milk and whisk to blend.
  4. In a large bowl, mix purée, nutmeg and cinnamon. Stir to blend.
  5. Stir half of cream mixture into pumpkin mixture. Mix well.
  6. Pour in remainder of cream mixture and mix well.
  7. Complete by following the directions of your ice cream maker or method.

Almond Lace Ice Cream Cups

almond lace ice cream cups n

Extra rich vanilla ice cream is a delicious accompaniment for these elegant, lacy almond ice cream cups.

Every fall we enjoy making homemade ice cream in a variety of interesting and delicious flavors. And thinking as photographers, we wanted to show off one of this year’s star creations with something less ordinary than a store-bought cone. So, continuing with the almond theme we seem to be on recently, we created a sweet, candy-like bowl featuring the flavor and crunchy texture of this very versatile nut.

The finished ice cream cups came out a beautiful golden brown, supremely crunchy and sturdy enough to handle multiple scoops of ice cream or mounds of fresh fruit and whipped cream. We already have plans to heap them with three flavors of ice cream, sliced bananas and toppings for tomorrow’s dinner – banana splits!

almond lace ice cream cup b n

This almond lace cup is in the final stages of cooling on an upside-down ramekin. 

Almond Lace Ice Cream Cups

Ingredients

  • 4 tbsp unsalted butter
  • ¼ cup light corn syrup
  • ¼ cup packed brown sugar
  • a few drops of almond extract
  • ½ cup sliced almonds
  • 6 tbsp all purpose flour

Directions

  1. Preheat the oven to 350 degrees F. Line a baking sheet with parchment paper. Have 6 teacups or small ramekins ready.
  2. Melt butter in a medium pan over low heat.
  3. Mix in corn syrup and brown sugar. Mix well.
  4. Turn heat off and stir in almond extract, sliced almonds, and flour.
  5. Pour batter onto a parchment-lined baking sheet. Spread evenly.
  6. Bake for 10-12 minutes. The finished product should be golden brown.
  7. Remove from oven and let sit on baking sheet for about 45 seconds.
  8. Cut the large cookie into 6 even rectangles (one slice lengthwise down the middle to create two long pieces. Cut the long pieces into thirds.
  9. Lift each cookie off with an offset spatula (or other long, thin spatula) and drape the cookie on an overturned ramekin or teacup to cool and set in the shape of a bowl.
  10. If the cookies are too firm to shape, you can return the cookies to the oven briefly while they are on the overturned cups in order to let them melt to the right shape. Make sure you watch them, because they will begin to melt quickly.

Arctic Amaretti

amaretti_nA perfect little cookie – crispy on the outside, chewy and sweet on the inside and accented with the wonderful flavor of almond.

I love to read blogs and look at food photos in order to hone my baking and photography  skills. Time and again, I find myself on David Lebovitz’s blog admiring  his well-staged photographs and interesting recipes. A few days ago, he posted a recipe for Italian almond cookies. I’ve never made these, but have fond memories of snacking on these delicious, crunchy treats straight out of the red tin from Cost Plus. The commercially sold cookies had a bit of a chewiness inside and a nice crunch on the outside and I  loved the almond flavor.

When I saw David’s post, I put it at the top of my “must bake” list, in spite of the fact I had neither the almond flour nor apricot jam his recipe called for. Nonetheless, the credit for the basic recipe goes to David. His idea of using jam to enhance the cookie’s chewiness and moisture is terrific.  But I did adapt the recipe to my pantry, which included swapping regular old apricot jam for fantastic Arctic cloudberry (aqpik) jam. Too good to keep for ourselves, we gave most of the batch to our  hard-working office staff who had them finished before lunch.

Arctic Amaretti

Ingredients

  • 2 cups sliced almonds, ground as fine as you can in a food processor (reserve a few slices to decorate cookies)
  • 2/3 cup granulated sugar
  • 2 egg whites
  • 2 tbsp cloudberry jam (any smooth jam would work)
  • pinch of salt
  • 1/2 tsp almond extract

Directions

  1. Preheat oven to 325 degrees F. Cover two baking sheets with parchment paper. Set aside.
  2. In a large bowl, mix together ground almonds and sugar. A whisk makes this job easy.
  3. In the bowl of a stand mixer, whisk egg whites and salt until they form soft peaks.
  4. Fold beaten eggs into almond mixture.
  5. Fold jam and almond extract into mixture. It’s OK if mixture loses volume.
  6. Mix dough until it forms a smooth ball. You may need to knead it a little with your hands.
  7. With a cookie scoop, scoop out dough balls and set them on parchment-lined baking sheets.
  8. Top cookies with reserved almond slices.
  9. Bake for 25 minutes. Cookies will be a light golden brown when done.
  10. Let cool in pans and transfer to wire racks to finish cooling.
  11. Store at room temperature.

Pecan Persimmon Upside Down Cakes

pecan persimmon upside down_nCrunchy on the outside, moist in the middle, and topped with a mixture of caramel and persimmon, this small batch of individual-sized cakes will warm up a chilly fall afternoon.

Hachiya persimmons can be tannic and astringent, according to Full Circle Farms. After eating two raw with breakfast, Jack and I were not excited about the lingering mouthfeel, a term we’ve adopted from our culinary professors. They were beautiful and tasty on the first encounter, but left an acidic dryness. I thought the process of baking the fruit would retain the delicious flavor and eye appeal, and that by releasing sugars, the acidity might be reduced.  Since we only had one persimmon remaining, I opted for mini-cakes baked in a muffin tin. The result was six perfectly-sized individual cakes with a crunchy texture on the outside, a moist and flavorful inside, and caramel-glazedl baked persimmons on the top.

Pecan Persimmon Upside Down Cakes

Ingredients

  • 6 tbsp unsalted butter, room temperature, divided
  • 1/2 cup brown sugar
  • 6 whole half pecans
  • 1 persimmon, sliced and then quartered
  • 1/2 cup granulated sugar
  • 1/2 tsp vanilla
  • 1 egg
  • 1/4 cup whole milk
  • 3/4 cup all-purpose flour
  • 3/4 tsp baking powder
  • pinch salt
  • generous 1/4 cup chopped pecans

Directions

  1. Grease a six muffin tin (regular sized).
  2. Melt 2 tbsp of butter in a pan over medium heat.
  3. Add brown sugar. Stir until sugar is melted and begins to bubble.
  4. Divide sugar mixture into bottom of muffin tin.
  5. Place a half of a pecan into center of sugar mixture, upside down.
  6. Place sliced persimmon quarters in a circular fashion on top of the sugar and pecan. Set aside.
  7. Preheat oven to 350 degrees F.
  8. Beat 4 tbsp butter and granulated sugar until fluffy.
  9. Add in vanilla. Mix thoroughly.
  10. Mix in egg.
  11. Mix in milk. Continue mixing until fully blended.
  12. Sift together flour, baking powder and salt.
  13. Pour sifted mixture into wet ingredients.
  14. Mix until just blended, do not overmix.
  15. Fold in chopped pecans by hand.
  16. Scoop 1/6 of batter on top of each persimmon layer.
  17. Bake for 25 minutes. Cakes are done when they pull away from sides and an inserted toothpick comes out clean.
  18. Let cool for 5 minutes in baking pan.
  19. Invert cakes to present. Enjoy with mugs of steaming hot tea.

Anniversary Crème Brûlée with a Surprise!

two tone creme brulee_n

Crème brûlée – you expect delectable vanilla bean custard topped with the crunch of caramelized sugar. The fun and tasty element to this version is the surprise at the bottom.

For our anniversary, Jack and I dined at the best restaurant in Point Hope. To begin the meal, the sous chef prepared a simple salad while the head chef created individual plates of Alaska sashimi appetizers: thinly sliced Kodiak scallops along with perfect crescents of Alaska Gulf sweet shrimp presented beautifully with a small mound of wasabi and a side dish of soy sauce. The next course was a pair of tender USDA prime filet mignons pan-seared to perfection and served with sautéed shiitake mushrooms and sweet onionsThe main dish was accompanied by baked Yukon gold potatoes and a dollop of dill sour cream.

The pastry chef thought we should enjoy something creamy at the end of this meal, but she wanted to provide a pleasant surprise. As we cracked the caramelized tops and dipped through the vanilla bean infused custard, our spoons hit a layer of chocolate ganache that made the dessert truly special. Marital bliss and a perfect meal – another day in paradise.

Two-Tone Crème Brûlée for Two

Ingredients

  • chocolate ganache (see below)
  • 1/4 cup whole milk
  • 3/4 cup heavy whipping cream
  • 1/3 cup granulated sugar
  • tiny pinch salt
  • 1/2 tsp vanilla paste
  • 3 large egg yolks
  • 2 tsp granulated sugar for topping

Directions

  1. Fill bottoms of two 4-ounce ramekins with chocolate ganache. Ganache should be about 1/4 to 1/2 inch thick. Set ramekins aside.
  2. Preheat oven to 325 degrees F. Place an oven rack in the slightly lower than center position.
  3. Whisk milk, heavy whipping cream, sugar, salt, and vanilla paste in a medium pot over medium heat. Whisk until mixture steams and almost boils. Set aside to cool for 10 minutes.
  4. Whisk eggs in a medium bowl. Stir cream mixture into the eggs one tablespoon at a time until the egg mixture is warmed. Once mixture is warmed, increase addition of cream mixture to 1/4 cup at a time. This will prevent eggs from cooking and scrambling.
  5. Gently pour mixture into two 4-ounce ramekins.
  6. Set ramekins in a baking dish. Pour in enough hot water to reach halfway up the ramekins.
  7. Bake uncovered in preheated oven until desserts are softly set, about 45 minutes. The centers will jiggle.
  8. Remove baking dish with ramekins from oven and let desserts come to room temperature while in water bath on counter.
  9. Chill ramekins in refrigerator for at least 2 hours before serving.
  10. Right before serving, sprinkle 1 teaspoon granulated sugar evenly on each dessert.
  11. Use a kitchen torch to slightly brown and caramelize the granulated sugar. Let cool for ten minutes and serve.

Chocolate Ganache

Ingredients

  • 1/2 cup quality semi-sweet chocolate chips
  • 1/4 cup heavy whipping cream

Directions

  1. Place chocolate chips into a small glass bowl.
  2. Pour cream into a small heavy bottomed pan.
  3. Heat cream until it comes to a boil.
  4. Pour cream over chocolate chips, ensuring all chips are immersed.
  5. Let bowl sit for about 4 minutes.
  6. Whisk mixture just in the center of bowl in order to emulsify the chocolate and the cream. Once emulsion occurs, begin to mix the rest of the melted chips.
  7. Continue whisking until mixture is silky smooth and shiny.

Vanilla Flan with Traditional Caramel Sauce

flan_n

Enjoy this vanilla custard, caramel-topped dish with a freshly brewed cup of coffee or tea to complete a memorable dinner with friends.

Crème caramel (flan) and crème brûlée are classic oven-baked custards. We’ve both loved flan from the first taste. The soft, custardy texture is very satisfying and the way the caramel sauce  drizzles down the side of this dessert when you invert it is just plain fun. When I was in my twenties, I made flan the instant way – squeeze the packet of caramel on the bottom of a dish and pour in the custard. Jack discovered flan in Japan, where it is commonly sold in convenience stores as a complete, packaged snack and less frequently in coffee shops.

After learning to make flan authentically – preparing stovetop caramel from scratch and baking the dessert in a water bath – there is no turning back. The vanilla flavor in this recipe is intense, thanks to the addition of vanilla paste, and the caramel was sweet with just a hint of bitterness just as my Culinary Institute of America teacher said it should. Many flavors could be substituted for the vanilla; try orange, chocolate, cinnamon, or chai for an equally excellent dessert.

Vanilla Flan with Caramel Sauce

Ingredients

  • 1 cup and 1/3 cup granulated sugar, separated
  • 1/4 cup water
  • 1 1/4 cup whole milk
  • 3/4 cup heavy whipping cream
  • 1 tbsp vanilla paste, or 1 vanilla bean, split
  • 3 eggs

Instructions

  1. Place 1 cup granulated sugar and 1/4 cup water in a pot. Gently stir to blend.
  2. Bring mixture to a boil without stirring, putting a lid on pan so that moisture from boiling syrup will wash down sides.
  3. Let mixture continue to boil until it starts to turn a light brown color.
  4. Take pan off heat and allow mixture to cool until it has a honey-like consistency.
  5. Pour caramel into 4 small ramekins. Swirl caramel around so it covers the bottoms of the ramekins. Set aside.
  6. Preheat oven to 300 degrees F.
  7. Warm milk, 1/3 cup sugar and vanilla on stovetop.
  8. Whisk eggs in a medium bowl. Pour warm milk mixture into eggs, whisking continuously. Add cream and continue to whisk until thoroughly mixed.
  9. Pour milk mixture into prepared ramekins.
  10. Place ramekins in a larger pan, for example a roasting pan, and fill the roasting pan until water reaches halfway up the ramekins.
  11. Bake custards in oven for 30 – 40 minutes.
  12. Custards will be done when there is a small wiggle in the custard. Allow ramekins to cool off and wipe them dry. Refrigerate for a couple of hours, or overnight.
  13. To present the dessert, run a small knife around the edges of the ramekins. Place a serving plate on top of the ramekin. Flip the dish and give it a quick jerk in order to remove the flan from the ramekin. The caramel should now be on top and will drizzle over sides to plate.

Lighter than Air: Cream Puffs and Eclairs

cream puffs_n

Friends who share a love of baking and cream-filled pastries dipped in chocolate ganache warmed up a rainy afternoon in our kitchen north of the Arctic Circle.

Perfectly turned out pastry puffs filled with delectable cream and dipped in chocolate ganache are the the stuff of home bakers’ dreams. Cream puffs and eclairs require a special dough called pâte à choux. Worked to exactly the right consistency, this dough bakes up light and flaky and leaves a hollow space in the center of the confection. Although we used traditional vanilla-flavored pastry cream, we also imagined filling these airy profiteroles with fresh whipped cream, homemade ice cream and even savories such as smoked salmon cream.

Making cream puffs and eclairs can’t be rushed. The pâte à choux dough requires time and attention in order to get it to the correct consistency as it cooks on the stove top. Next, it must be carefully piped onto a baking sheet and placed in the oven where it will finish. Creating the pastry cream is fairly easy, and making chocolate ganache is magical.

All that work, and between three bakers, three tasters and steaming mugs of of rooibos almond tea, our eclairs and puffs disappeared in short order.

Pâte à Choux

Ingredients

  • 1/2 cup water
  • 1/2 cup whole milk
  • 1/2 tsp salt
  • 1/2 tsp sugar
  • 4 oz. unsalted butter, softened
  • 1 cup all-purpose flour
  • up to 4 eggs

Directions

  1. Line two baking sheets with parchment paper. Preheat oven to 400 degrees F.
  2. Pour milk and water into medium pan.
  3. Stir in salt and sugar.
  4. Add butter.
  5. Bring mixture to a boil over medium heat.
  6. Take mixture off heat and stir in all the flour. Mixture should look like mashed potatoes.
  7. Return pan to low heat and stir continuously. This will dry out the dough a little.
  8. Dough should come together to form a ball.
  9. Starchy residue at the bottom of the pan is an indicator that the dough is dried out enough.
  10. Take dough off stove and place it in the mixing bowl of a stand mixer. Turn it to low to allow the dough to be cooled off by the mixer.
  11. Mix in eggs one at a time, watching that the dough does not become too thin. The dough should be soft, creamy, and shiny.
  12. Transfer the dough to a piping bag with a large tip.
  13. Pipe ball shapes onto parchment-lined baking sheets, leaving plenty of room for these puffs to double in size.
  14. Bake puffs for 10 minutes.
  15. Turn oven down to 325 degrees F and continue to bake for 15 minutes.
  16. Fill with chilled whipping cream or pastry cream – savory or sweet.

These will freeze nicely.

Lattice Top Apple Pie with Baked-On Cinnamon Sauce

apple pie lattice top n

Cinnamon sauce baked into the lattice-top crust makes this apple pie irresistible. The only debate was whether to enjoy it with a slice of sharp cheddar cheese or a scoop of homemade vanilla bean ice cream. 

Last week’s baking lesson was all about baking with butter: buttery cranberry scones, fluffy butter biscuits, and two kinds of pie – lemon meringue and a lattice-topped apple. After learning how to create the lattice top, which was surprisingly easy, we took a basic apple filling and poured the liquid you would normally mix into the apples over the top of the pie, allowing the flavors to bake into the lattice and surround the apples inside. This apple pie was served hot out of the oven to friends with cinnamon vanilla ice cream as fortification against a chilly day north of the Arctic Circle.

Apple Pie with Baked-on Cinnamon Sauce

Ingredients

  • 5 Granny Smith apples, cored, peeled, and sliced
  • 2 tbsp lemon juice
  • 1/2 cup unsalted butter
  • 3 tbsp all-purpose flour
  • 1/4 cup water
  • 1/2 cup granulated sugar
  • 1/2 cup brown sugar
  • 1 tsp ground cinnamon
  • pastry crust for 9-inch double crust pie

Directions

  1. Preheat oven to 425 degrees F (220 degrees C).
  2. Toss apples in lemon juice. Set aside.
  3. Melt the butter in a saucepan.
  4. Stir in flour to form a paste.
  5. Add water, granulated sugar, brown sugar and cinnamon, and bring to a boil. Reduce temperature and let simmer.
  6. Place the bottom crust in your pan.
  7. Fill with apples, mounded slightly.
  8. Cover with a lattice work crust.
  9. Gently pour the sugar and butter mixture over the crust. Pour slowly so that it does not run off.
  10. Bake 15 minutes in the preheated oven. Reduce the temperature to 350 degrees F (175 degrees C). Continue baking for 35 to 45 minutes, until apples are soft.
  11. Let cool slightly. Serve warm with vanilla ice cream or a slice of sharp cheddar cheese.

Chai Crème Brûlée for Two

chai creme brulee_n

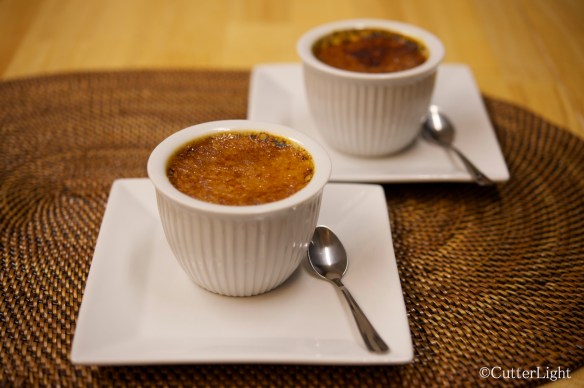
Easy to create, this crème brûlée features a rich custard flavored with vanilla and chai tea and is sealed with a crunchy caramelized top.

We give careful thought before adding any new item to our kitchen. Does the tool merit the space it will take up in Bandon’s galley or in the kitchen of our Arctic home? Will it be durable? Is it practical?

For the past few years, both of us have been eyeing a butane torch – the perfect niche tool for toasting a couple of  homemade marshmallows, singeing  meringue pie tips, and of course, for creating the perfect crème brûlée.

For most people, the addition of an item such as a kitchen torch means driving to a local store and picking one out along with the necessary fuel. For us, getting a canister of butane out to bush Alaska means purchasing a haz-mat certificate and having the item sent by cargo flight out here because the post office doesn’t ship hazardous materials via airplane.

Last night, the torch came out of the box, was fueled up, and put into service to finish a dessert that we and our guests couldn’t get enough of – chai crème brûlée. For this recipe, we began with a traditional crème brûlée custard recipe and infused it with the mildly spicy, sweet flavors of loose leaf chai tea and vanilla paste.  The resulting dessert was more complex and flavorful than typical crème brûlées. Using our new torch so that our guests and we could caramelize the tops of the custard just before serving, this turned out to be the best crème brûlée we and our guests had ever had.

Chai Creme Brulee for Two

Ingredients

  • 1/4 cup whole milk
  • 3/4 cup heavy whipping cream
  • 1/3 cup granulated sugar
  • tiny pinch salt
  • 1/2 tsp vanilla paste
  • 1 tbsp loose chai tea
  • 3 large egg yolks
  • 2 tsp granulated sugar for topping

Directions

  1. Preheat oven to 325 degrees F. Place an oven rack in the slightly lower than center position.
  2. Whisk milk, heavy whipping cream, sugar, salt, vanilla paste and chai tea in a medium pot over medium heat. Whisk until mixture steams and almost boils. Set aside to cool for 10 minutes.
  3. Strain cream mixture to remove tea leaves.
  4. Whisk eggs in a medium bowl. Stir in cream mixture to eggs one tablespoon at a time until the egg mixture is warmed. Once mixture is warmed, increase addition of cream mixture to 1/4 cup at a time. This will prevent eggs from cooking and scrambling.
  5. Pour mixture into two 4-ounce ramekins.
  6. Set ramekins in a baking dish. Pour enough hot water to reach halfway up the ramekins.
  7. Bake uncovered in preheated oven until desserts are softly set, about 45 minutes. The centers will jiggle.
  8. Remove baking dish with ramekins from oven and let desserts come to room temperature while in water bath on counter.
  9. Chill ramekins in refrigerator for at least 2 hours before serving.
  10. Right before serving, sprinkle 1 teaspoon granulated sugar evenly on each dessert.
  11. Use a kitchen torch to slightly brown and caramelize the granulated sugar. Let cool for ten minutes and serve.