Whew! Just made it! Lite Double Chocolate Brownie Cookies

Chewy, chocolatey, small and delicious. What’s not to love?

This lifestyle of picking up shallow roots and moving every few years is not for everyone. It normally suits us. We love digging deep into an interesting place, enjoying what it has to offer, and then heading off to experience a new place. This particular move is the strangest one Jack and I have experienced in our life together. Previous moves have been predicated on well thought-out decisions backed by lots of research. A move toward a new adventure – Alaska – Mongolia – is always exciting to us. A move to a place with a new culture or new food, new fishing and new photography opportunities has always been welcome. Newhalen, where we soon will be living, has a lot to offer, but the cloud of having to leave Chignik Lake has put a giant damper on our excitement. We keep reminding ourselves that Newhalen is a terrific place, complete with salmon runs, hiking in nearly pristine landscapes and the many things we love about living in the Alaska Bush. In our new home, we will get to have our lovely little fishing boat, Gillie, with us. We’ve never lived somewhere where we can launch her and have miles and miles of rivers and lakes to explore right outside our door. That in and of itself should be very appealing, right?

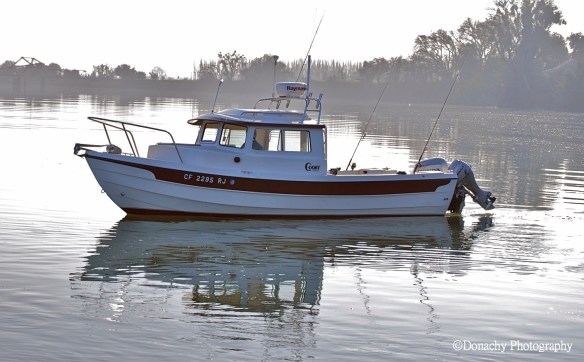
Gillie is one salmon-catching boat. She sleeps the two of us comfortably in her cuddy cabin. There’s even a little dining table in the cabin. Equipped with a Coleman stove, she’ll be the perfect vessel for exploring the lakes and rivers of our new home.

But this time, there’s this whole leaving business that is really a drag. We’ve both loved living in Chignik Lake. It’s been a wonderful place to settle in to. We’ve loved only having to share the scenery, the wildlife and the fishing with the few people who call The Lake home. And I’ve enjoyed working in a building that’s well kept and working with a group of students that are second to none. The students and their families here made this the most fun and the easiest teaching job I’ve ever had. We hadn’t intended on leaving yet. So, the excitement of the move and the new destination has a bit of a pall over it.

Well, nonetheless, onward and upward.

One aspect of moving I get a strange pleasure from is the challenge of using up of all of our pantry items by the move date. This batch of cookies was especially satisfying as the recipe, to the tablespoon, helped me finish off several ingredients that I had just a bit of. The purpose of this recipe was to create cookies that could be used to make ice cream sandwiches with the bag of frozen bananas I still have in the freezer. They are perfect! They are small and have just the right texture for this frozen confection. We’ve found that dolloping the banana ice cream atop the open-faced cookies seems to work best. I also think these cookies taste fantastic straight out of the freezer. The idea to keep them in the freezer so they are out of sight didn’t quite work to keep them out of mind. They turned out too good! A taste of a few of these, and the “moving cloud” dissipates a little. 🙂

To keep them “lite” on calories, the ingredients were thought out, but so were the size. I made the cookies small – about two teaspoonfuls of dough. This way two cookies, with the banana ice cream, is a satisfying dessert. (According to an online calorie calculator, these weighed in at just 45 calories per cookie.) Feel free to adjust the size to your liking. I also thought adding a splash of peppermint extract would be delicious – a la “Thin Mint” Girl Scout cookies. (I loved those straight out of the freezer!) Alas, my pantry no longer has this ingredient.

Lite Double Chocolate Brownie Cookies

Ingredients

  • 1 cup whole wheat pastry flour
  • 1/2 cup Dutch processed cocoa powder
  • 1/2 cup granulated sugar
  • 3/4 tsp baking soda
  • 1/4 tsp baking powder
  • generous pinch salt
  • 6 tbsp vegetable oil, I used canola
  • 2 tbsp milk, I used nonfat
  • 1/4 cup low-fat plain yogurt
  • 1 1/2 tsp pure vanilla extract
  • 1/3 cups semi-sweet chocolate chips

Directions

  1. Preheat oven to 325 degrees F.
  2. Whisk together the first 6 ingredients in a large bowl.
  3. Stir in oil, milk, yogurt and vanilla.
  4. Fold in chocolate chips.
  5. Divide dough into 32 pieces. I formed a long skinny log and chopped it into pieces.
  6. Roll pieces into balls.
  7. Evenly space out 24 balls (4 x 6) on a parchment-covered cookie sheet. If your dough balls are bigger, bake fewer at a time to allow for expansion.
  8. Bake for 9 minutes. They will look slightly underdone.
  9. Allow to cool for 10 minutes before removing them from baking sheet.
  10. Repeat with remaining dough balls.
  11. Store cookies in the freezer in zip-top bags to ensure freshness. Enjoy straight out of the freezer.

Gluten Free? Low Carb? Whatever! Just Eat These Fudgy Chocolate Meringues!

meringue fudgy chocolate n

Fudgy meringues with a crispy, melt in your mouth shell will have you attending “Meringues Anonymous” if you’re not careful!

How can four little ingredients be so good together? The combination of the crispy exterior and the moist chocolate middle sans flour resulted in an entire batch of fifteen cookies disappearing in just over 24 hours. I wish I could tell you we had guests…

Although airy and relatively low on calories compared to most confections, these meringues did not come about due to New Year’s self-promises centered around slimmer waistlines. The ignoble truth is that after creating crème brûlée, another custard dish and any number of ice creams, we had on hand countless extra egg whites and, according to Jack, “egg whites, fish and beer are three items that can be consumed without fear of weight gain.”

These meringues are quick and easy to make but do require an overnight stay in the oven to finish drying  in order to create that crispy exterior.

Fudgy Chocolate Meringues

Ingredients

  • 3 egg whites
  • 3/4 cup granulated sugar
  • 2 tbsp dutch processed cocoa
  • 1/2 cup smashed chocolate chips (Place chips in a Ziploc bag and smash with a meat tenderizer)

Directions

  1. Preheat oven to 350 degrees F. Line two baking sheets with parchment paper. Set aside.
  2. Place egg whites and sugar in the bowl of a stand mixer.
  3. Place bowl on top of pot of simmering water, for a double boiler effect.
  4. Whisk eggs and sugar for a couple of minutes until sugar is just dissolved.
  5. Place bowl back on stand mixer. Mix on high speed until eggs are thick and glossy and hold soft peaks.
  6. Sift cocoa onto egg mixture.
  7. Mix on high speed until cocoa is just incorporated.
  8. Fold smashed chocolate chips into egg whites.
  9. Use a cookie scoop to drop batter onto parchment-lined baking sheets.
  10. Bake cookies for 10 minutes. Cookies should puff up and may crack.
  11. Remove cookies and leave oven door open to cool down.
  12. Place cookies back in oven, close oven door and let cookies sit overnight.
  13. The next day, cookies will be cooled completely and can be easily removed from parchment paper. Store in airtight container.

Swiss Spitzbueben Cookies Featuring Alaskan Wild Blueberry Jam

spitzbueben cookies_n

Two thin, crispy cookies sandwich delicious homemade Alaska blueberry jam. This “anytime” cookie is too good to reserve for holiday cookie trays!

When we received a Christmas package from our friends at Alaskagraphy, we knew that these crispy vanilla cookies would be the perfect canvas for the flavor-packed wild blueberry jam they included. Experiment with your own jam creations!

Swiss Spitzbueben Cookies

Ingredients

  • 5 tbsp unsalted butter, softened
  • 1/2 cup confectioners sugar
  • 1 tsp vanilla extract
  • pinch salt
  • 1 egg white
  • 1 1/2 cups all-purpose flour
  • 1/2 cup Alaskan blueberry jam, or jam of your choosing
  • 2 tbsp confectioners sugar, for dusting

Directions

  1. In bowl of stand mixer, beat butter until soft and fluffy.
  2. Add sugar,  vanilla, and salt. Beat until completely mixed.
  3. Add egg white. Beat until completely mixed.
  4. Add flour. Mix until flour is incorporated completely.
  5. Turn dough out onto plastic wrap. Cover tightly and refrigerate for 30 – 60 minutes.
  6. Preheat oven to 400 degrees F. Cover baking sheets with parchment paper.
  7. Roll dough out on parchment-covered surface to about 1/4 inch thickness.
  8. Cut shapes with cookie cutters. Keep in mind that you need two cookies for each sandwich and the top cookie needs to have a smaller shape cut out in order for jam to show through.
  9. Bake cookies for 6-8 minutes. Cookies should just brown at bottom edges.
  10. Jam needs to be thick. If it is runny, cook down jam over medium heat for a few minutes. Spread jam on bottom cookie and place second cookie with cut-out atop first.
  11. Dust cookies with powdered sugar when cool.

Recipe makes approximately 1 dozen spitzbueben.

Homemade Chocolate Brownie Ice Cream in Chocolate Orange Wafer

brownie chocolate ice cream n

To create this ice cream, we use the same brownie as in our ice cream sandwiches. These brownies work well because they retain their chewy, firm, moist texture when frozen. The edible serving cups are created from a modified fortune cookie recipe infused with orange flavor. See recipes below.

Dig in!

Chocolate Brownie Ice Cream

Ingredients

  • 2 oz. semi-sweet chocolate chips
  • 1/3 cup unsweetened cocoa powder
  • 1 1/2 cups whole milk
  • 2 eggs
  • 1 cup granulated sugar
  • 1 cup heavy whipping cream
  • 1 tsp vanilla extract
  • 1 cup chopped brownies, cut into 1/2 inch cubes (see recipe below)

Directions

  1. Melt chocolate chips in top of double boiler.
  2. Whisk cocoa powder into melted chips until smooth.
  3. Whisk in milk a little at a time until completely blended.
  4. Remove from heat and let cool.
  5. Beat eggs in bowl of a stand mixer until light and fluffy.
  6. Mix in sugar a little at a time until completely blended.
  7. Mix in cream and vanilla. Thoroughly combine.
  8. Pour chocolate mixture into cream mixture and whisk to blend.
  9. Cool completely. I put the mixture in the refrigerator overnight before I use it.
  10. Pour into freezer bowl of ice cream machine. Turn machine on and mix until mixture thickens, about 20 minutes. 5 minutes before ice cream is complete, add chopped brownies to freezer bowl.
  11. Transfer to airtight container and place in freezer until firm, about 2 hours.

Brownies for Ice Cream

Ingredients

  • 2 oz. semi-sweet chocolate chips
  • 1/2 stick unsalted butter
  • 3 eggs
  • pinch salt
  • 1 3/4 cups granulated sugar
  • 1/2 tsp vanilla extract
  • 1/2 cup all-purpose flour

Directions

  1. Preheat oven to 350 degrees F. Grease a 9″ x 9″ baking dish. Set aside.
  2. Melt chocolate and butter in a double boiler over simmering water. Mix completely. Let mixture cool slightly.
  3. Beat eggs and salt in a mixing bowl.
  4. Gradually beat in sugar and vanilla.
  5. Mix in cooled chocolate.
  6. Mix in flour.
  7. Pour batter in baking dish.
  8. Bake for 30 minutes. Brownies are done when a toothpick inserted in the center comes out clean. Let cool completely before using for ice cream recipe.

Edible Chocolate Orange Ice Cream Bowls (makes 4 wafers)

Ingredients

  • 1 egg white
  • pinch salt
  • 1/2 tsp orange zest
  • 1/2 tsp orange extract
  • 1/4 cup granulated sugar
  • 1/4 cup all-purpose flour
  • 1 tbsp orange juice

Directions

  1. Preheat oven to 400 degrees F. Line two baking sheets with parchment paper. Set aside. Have two small teacups or ramekins ready.
  2. Whisk egg white in a medium bowl until foamy, not stiff.
  3. Add salt and whisk to incorporate.
  4. Whisk in orange zest and orange extract.
  5. Whisk in sugar.
  6. Whisk in flour.
  7. Whisk in orange juice.
  8. Drop a teaspoon of batter onto parchment-lined baking sheet.
  9. Spread the batter around in a circular motion with the back of teaspoon until you have about a 4 inch circle. Repeat to make second wafer.
  10. Bake for 6 minutes.
  11. Immediately remove wafers with an offset spatula and place on an upside-down teacup to cool and dry in the shape of a cup.
  12. Repeat with batter for second 2 wafers.
  13. If desired, dip edges of wafers in chocolate.
  14. Let cool completely before using.

Roasted Salted Pistachio and Cherry Biscotti

pistachio cherry biscotti_n

This crisp cookie bursts with the flavors of salty, roasted pistachios and tart, sweet cherries. Its attractive green and red colors would make it a welcome addition to this season’s offerings.

We picked up a bag of roasted and salted shelled pistachios last summer at Costco. The large bag of nuts was quickly opened, but we know that a rapidly expanding waistline can be the price for eating too many pistachios in too short a time. So, we put the bag in a mailing tub to be shipped north only partly consumed and forgot about it till recently. To our surprise, the nuts have remained amazingly tasty. Before they fall from grace, we wanted to make good use of them. Enter a biscotti recipe that celebrates their unique flavor. The roasted and salted aspect adds a delicious juxtaposition to the sweet tanginess of the dried cherries. We think these biscotti should be eaten all year ’round, in spite of their seasonal colors.

Roasted Salted Pistachio and Dried Cherry Biscotti

Ingredients

  • 1 3/4 cups all-purpose flour
  • 1 cup granulated sugar
  • 1/2 cup old-fashioned oats
  • 1 tsp baking powder
  • 1/2 tsp baking soda
  • 1/2 tsp salt
  • 2 large eggs
  • 3 tbsp light olive oil
  • 1 tbsp dried orange zest
  • 2 tsp dried lemon zest
  • 1 1/2 tsp vanilla extract
  • 1/2 tsp almond extract
  • 1 cup dried cherries, coarsely chopped
  • 1 cup roasted and salted pistachios, coarsely chopped

Directions

  1. Preheat oven to 350 degrees F. Line a baking sheet with parchment paper. Set aside.
  2. Combine first 6 ingredients in bowl of stand mixer fitted with a paddle.
  3. Mix on low speed until ingredients are well combined.
  4. In a separate bowl whisk eggs with next 5 ingredients.
  5. Add egg mixture to flour mixture. Beat on low until combined.
  6. Fold in cherries and pistachios.
  7. Transfer dough to a lightly floured surface.
  8. Divide dough in half.
  9. Using floured hands, shape each dough half into a 16″ long log.
  10. Place logs on parchment covered baking sheet, about 5″ apart.
  11. Flatten logs to a strip about 2″ wide, so you have two logs that are 16″ x 2″.
  12. Bake cookies until browned and set, about 30 minutes.
  13. Let cookies cool in pan placed on wire rack for about 15 minutes.
  14. Reduce oven temperature to 250 degrees F.
  15. On a cutting board, using a serrated knife, cut logs into slices, about 2/3″ thick.
  16. Place slices back on the parchment-lined baking sheets, cut side down and close together.
  17. Bake for 20 minutes.
  18. Flip the cookies to the opposite side and bake again for 20 minutes.
  19. Let cool completely before serving. Store in an airtight container at room temperature.

Recipe adapted from BON APPÉTIT

Arctic Amaretti

amaretti_nA perfect little cookie – crispy on the outside, chewy and sweet on the inside and accented with the wonderful flavor of almond.

I love to read blogs and look at food photos in order to hone my baking and photography  skills. Time and again, I find myself on David Lebovitz’s blog admiring  his well-staged photographs and interesting recipes. A few days ago, he posted a recipe for Italian almond cookies. I’ve never made these, but have fond memories of snacking on these delicious, crunchy treats straight out of the red tin from Cost Plus. The commercially sold cookies had a bit of a chewiness inside and a nice crunch on the outside and I  loved the almond flavor.

When I saw David’s post, I put it at the top of my “must bake” list, in spite of the fact I had neither the almond flour nor apricot jam his recipe called for. Nonetheless, the credit for the basic recipe goes to David. His idea of using jam to enhance the cookie’s chewiness and moisture is terrific.  But I did adapt the recipe to my pantry, which included swapping regular old apricot jam for fantastic Arctic cloudberry (aqpik) jam. Too good to keep for ourselves, we gave most of the batch to our  hard-working office staff who had them finished before lunch.

Arctic Amaretti

Ingredients

  • 2 cups sliced almonds, ground as fine as you can in a food processor (reserve a few slices to decorate cookies)
  • 2/3 cup granulated sugar
  • 2 egg whites
  • 2 tbsp cloudberry jam (any smooth jam would work)
  • pinch of salt
  • 1/2 tsp almond extract

Directions

  1. Preheat oven to 325 degrees F. Cover two baking sheets with parchment paper. Set aside.
  2. In a large bowl, mix together ground almonds and sugar. A whisk makes this job easy.
  3. In the bowl of a stand mixer, whisk egg whites and salt until they form soft peaks.
  4. Fold beaten eggs into almond mixture.
  5. Fold jam and almond extract into mixture. It’s OK if mixture loses volume.
  6. Mix dough until it forms a smooth ball. You may need to knead it a little with your hands.
  7. With a cookie scoop, scoop out dough balls and set them on parchment-lined baking sheets.
  8. Top cookies with reserved almond slices.
  9. Bake for 25 minutes. Cookies will be a light golden brown when done.
  10. Let cool in pans and transfer to wire racks to finish cooling.
  11. Store at room temperature.

Coconut Modest Lace Cookies

modest lace cookies n

Chocolate drizzle sets up on a fresh batch of ultra thin, chewy, crispy, modest lace cookies.

Traditionally, lace cookie dough spreads thin and bubbles while it bakes resulting in a delicate confection marked with lacy holes. I was intrigued with a coconut lace cookie recipe I found posted by Giada De Laurentiis. The cookies in the photo on her post looked simultaneously chewy and crispy and I could easily imagine the coconut flavor layered with the semi-sweet chocolate drizzle. Unfortunately, the reviews on her recipe were terrible (too greasy, too sugary, gloppy, lacking distinct flavor), so I contemplated how I could create a similar cookie while avoiding the pitfalls.

After making adjustments to amp up the flavor and improve the texture, the cookies came out of the oven a tasty winner. Although these very thin cookies crisped up around the edges nicely while remaining chewy, they aren’t very “lacy,” so I’ve dubbed them “modest lace.” The coconut shines through deliciously.

Modest Coconut Lace Cookies

Ingredients

  • 3/4 cup packed brown sugar
  • 1/2 cup unsweetened coconut flakes
  • 1/4 cup all purpose flour
  • 1/4 cup unsalted butter, melted
  • 1 tbsp unrefined coconut oil, melted
  • 1 egg, beaten
  • 1/2 tsp vanilla extract
  • pinch salt
  • 1/2 semi-sweet chocolate chips

Directions

  1. Preheat oven to 375 degrees F.
  2. Line two baking sheets with parchment paper. Set aside.
  3. In a large bowl, thoroughly mix together sugar, coconut and flour.
  4. Mix in butter, coconut oil, egg and vanilla to coconut flake mixture.
  5. Drop batter by teaspoonful on baking sheets. These cookies spread, so give them a couple of inches to do so.
  6. Bake cookies for 8 minutes. They should be golden brown in the center and darker brown on the edges.
  7. Slide parchment paper with cookies on it onto wire racks to fully cool.
  8. When cookies are cool, melt chocolate chips in a double boiler. Use a fork to drizzle chocolate onto cooled cookies.
  9. Let chocolate set before serving. Pop the cookies in the freezer to set the chocolate faster.

Makes two dozen cookies.

Cloudberry Cheesecake Cookie Bars

oat wheat aqpik bars_n

Make these! Really, we couldn’t believe how good these jam-and-cream-cheese bars came out. You’ll have to patiently wait while they chill in the refrigerator to get the most flavor. 

The end of our school year provides us with an education on amounts over or under-ordered in our annual shopping. We ended up a little short on all-purpose flour and a little heavy on whole wheat. The challenge with 100% whole wheat is the heaviness and denseness it lends to baked goods. Mixing finely chopped nuts into the whole wheat crust and layering lighter flavors on top solved the problem in a delicious way.

This recipe would work with any jam. Of course, we love cloudberries and as long as we’re in the Arctic these delicious, rare berries will be our fruit of choice.

Cloudberry Cheesecake Cookie Bars

Crust

  • 1/4 cup pecans, finely chopped
  • 2/3 cup whole wheat flour
  • 3 tbsp granulated sugar
  • 4 tbsp unsalted butter, melted

Cheesecake layer

  • 8 oz. cream cheese, softened
  • 1/4 cup granulated sugar
  • 1 egg
  • 1 tsp vanilla extract

Top layers

  • 1/4 cup granulated sugar
  • 1/4 cup whole wheat flour
  • 1/2 cup rolled oats
  • 1/4 cup pecans, finely chopped
  • 4 tbsp unsalted butter, melted
  • 2 cups cloudberry jam

Directions

  1. Preheat oven to 350 degrees F.
  2. Butter 8 x 8 inch glass baking dish. Set aside.
  3. Mix crust ingredients until coarse meal forms.
  4. Press crust mixture into bottom of glass baking dish.
  5. Bake for 15 minutes, or until edges are lightly browned.
  6. Prepare cheesecake layer while crust is baking.
  7. Beat cream cheese, sugar, egg and vanilla until smooth.
  8. Pour cream cheese mixture evenly over baked crust.
  9. Return baking dish to oven and bake for an additional 25 minutes, until layer sets.
  10. Mix the remaining ingredients for top layer (except jam) until crumbly.
  11. Evenly and gently spread jam over cream cheese layer taking care not to disturb the cheese layer.
  12. Sprinkle crumble on top of jam.
  13. Return to oven and bake for another 20 minutes, or until top begins to turn golden brown and jam bubbles.
  14. Let cool completely in the pan on a wire rack.
  15. For best results, chill pan in the refrigerator for several hours or overnight before cutting.

Cloudberries, also called aqpik in the Eskimo language of Inupiaq, are a sublimely sweet, berry that grow in the extreme north. Read more about them in these articles:

Cloudberry Country

Cloudberry Syrup

Cloudberry Cake

Cloudberry Sorbet

Coconut Aqpik Thumbprints

Chocolate Chip Yogurt Cookies – It’s All About the Penzeys Dutch Processed Cocoa

These dark, rich, chocolatey cookies disappeared within 24 hours of their creation. 

For this season in the Alaska bush, we ordered most of our spices and seasonings from Penzeys Spices. Whether we’re using their smoked chipotle chili peppers in a squash soup, the Italian seasoning blend we make from a combination of their herbs and spices, or a cup of hot cocoa, the quality of Penzeys’ products has been notable. In these cookies, its Penzeys’ Dutch-processed cocoa that takes them to a higher level.

By the way, yogurt is easy and economical to make in your own kitchen!

Chocolate Chip Yogurt Cookies

Ingredients

  • 1 cup all purpose flour
  • 1/2 tsp baking soda
  • 5 tbsp unsalted butter
  • 7 tbsp dutch processed cocoa
  • 2/3 cup granulated sugar
  • 1/3 cup brown sugar
  • 1/3 cup plain yogurt
  • 1 tsp vanilla extract

Directions

  1. Preheat oven to 350 degrees F.
  2. Measure flour and baking soda into a medium bowl. Set aside.
  3. Melt butter in a large pan over medium heat. Remove from heat.
  4. Stir in cocoa and sugars.
  5. Add yogurt and vanilla. Mix well.
  6. Add flour just until combined.
  7. Drop by tablespoon onto parchment-covered baking sheet, about 2 inches apart.
  8. Bake for 8 – 10 minutes. Cool on pan for a few minutes until firm. Finish cooling on wire racks.

Adapted from Myrecipes.com.

Coconut Butter Cookies – One Egg to Go

Chewy, sweet coconut butter cookies.

Some people count down by crossing off days. Up here in the village, the days are often counted in “sleeps.” This week, we’ve been counting in eggs. These cookies contain the second to last egg remaining in our refrigerator before we leave for the summer.

One egg, three days, two sleeps to go…

My mom cooked with fresh ingredients whenever she could, and so I have many memories of cracking coconuts and drinking the milk. Afterwards, we’d use fresh coconut shavings in various recipes.

Out here in bush Alaska, we’ve been using powdered coconut milk (obtained from our favorite Asian grocery store, New Sagaya, in Anchorage). Shredded coconut is also on our annual shopping list.

A few weeks ago, I made chocolate dipped macaroons. The coconut lovers around here gave them high marks. Others (those who couldn’t handle the coconut – you know who you are) diplomatically rated them “a-little-too-coconutty.” In an attempt to mellow out the coconut in this cookie, I mixed it into a tried and true butter cookie recipe. The coconut flavor and chewiness of these cookies goes perfectly with the butter-cookie sweetness. I was tempted to dip them in chocolate but resisted, thinking that might have made them too sweet. These cookies are already perfectly sweet!

Coconut Butter Cookies

Ingredients

  • 1 1/4 cups all-purpose flour
  • 1/2 tsp baking soda
  • dash salt
  • 1/2 cup unsalted butter
  • 3/4 cup granulated sugar
  • 1 egg
  • 1/2 tsp vanilla extract
  • 1 1/3 cups sweetened coconut

Directions

  1. Preheat oven to 350 degrees F.
  2. Mix together flour, baking soda and salt in a medium bowl. Set aside.
  3. In a separate mixing bowl, mix sugar and butter until smooth and pale colored.
  4. Mix egg into sugar mixture.
  5. Mix vanilla into sugar mixture.
  6. Blend in flour mixture to create a dough.
  7. Incorporate coconut into dough mixture.
  8. Drop dough by tablespoons onto parchment-lined baking sheets leaving 2 inches between cookies.
  9. Bake for 10 minutes or until cookies are toasted lightly on the top and golden brown on the bottom.
  10. Cool on wire racks.