Tomato Tarragon Halibut

I suppose that like many people, I grew up inculcated with the idea that dill and fennel are the quintessential herbs for fish and other seafood. Lately I’ve been circling back to rediscover the pleasant tang of dill, prompted by small bunches of the feathery stalks occasionally showing up in boxes of fresh produce sent to us from The Farm Lodge at Lake Clark. These days even when I don’t have fresh dill on hand, I’ve been making dry dill a regular part of certain salmon and shellfish recipes, particularly when I’m going for a bolder flavor than what might be supplied by, say, lemon grass.

Fennel is another matter. Neither of us have ever entirely warmed to the sharp anise taste and aroma it imparts. We like licorice, but not so much on salmon and subtly flavored seafood. When I discovered tarragon while searching for a fennel substitute some decades ago, it seemed I’d stumbled upon the perfect seafood herb. There’s an anise-like savor to it, but to our palate tarragon profiles as gentler and sweeter than fennel. It’s wonderful on steamed clams and mussels, makes an excellent a-little-something-extra in drawn butter dipping sauces, and beautifully complements virtually any white-meated fish from catfish to cod. In this recipe, tarragon brings together the flavors of garden-fresh tomatoes and halibut in a dish that is simple, beautiful and sumptuous. 

Try serving this dish with very thin slices of sourdough French bread or baguette pan-toasted in butter till crisp and seasoned with garlic.  

Tomato Tarragon Halibut

Ingredients

  • halibut fillets, patted dry to remove excess moisture. We prefer skin-on, but it’s up to the chef
  • extra virgin olive oil
  • onion, diced
  • garlic cloves sliced into fairly large pieces
  • sherry or other dry wine
  • tarragon, fresh or dried, to taste
  • fresh tomatoes, seeds removed, diced
  • Better than Bouillon clam base (optional) or use sea salt
  • soy sauce

Directions (You will need two frying pans.)

  1. Add olive oil to the first pan, apply medium heat and add the onions. You want the onions to caramelize, so don’t stir them too much. They’ll caramelize better if you mostly leave them alone.
  2. When onions begin to caramelize, add the garlic and stir. Cook for about 3 minutes – just until garlic begins to soften. Then add a little sherry and the tarragon. Stir and allow most of the wine to cook off. This only takes a minute or so.
  3. Add the tomatoes. Cover with a lid and reduce the heat so that the mixture simmers steadily. You want the mixture to cook down to a fairly thick consistency.
  4. As the tomato mixture is cooking, stir in either the clam base or salt. The clam base itself is quite salty. Don’t use too much. You want just a hint of the clam flavor. Alternatively, simply add a little sea salt. The mixture is very tasty either way.
  5. When the tomato mixture has cooked down, add olive oil to the other pan. Heat over medium until the oil is sizzling hot. Continue allowing the tomato mixture to simmer.
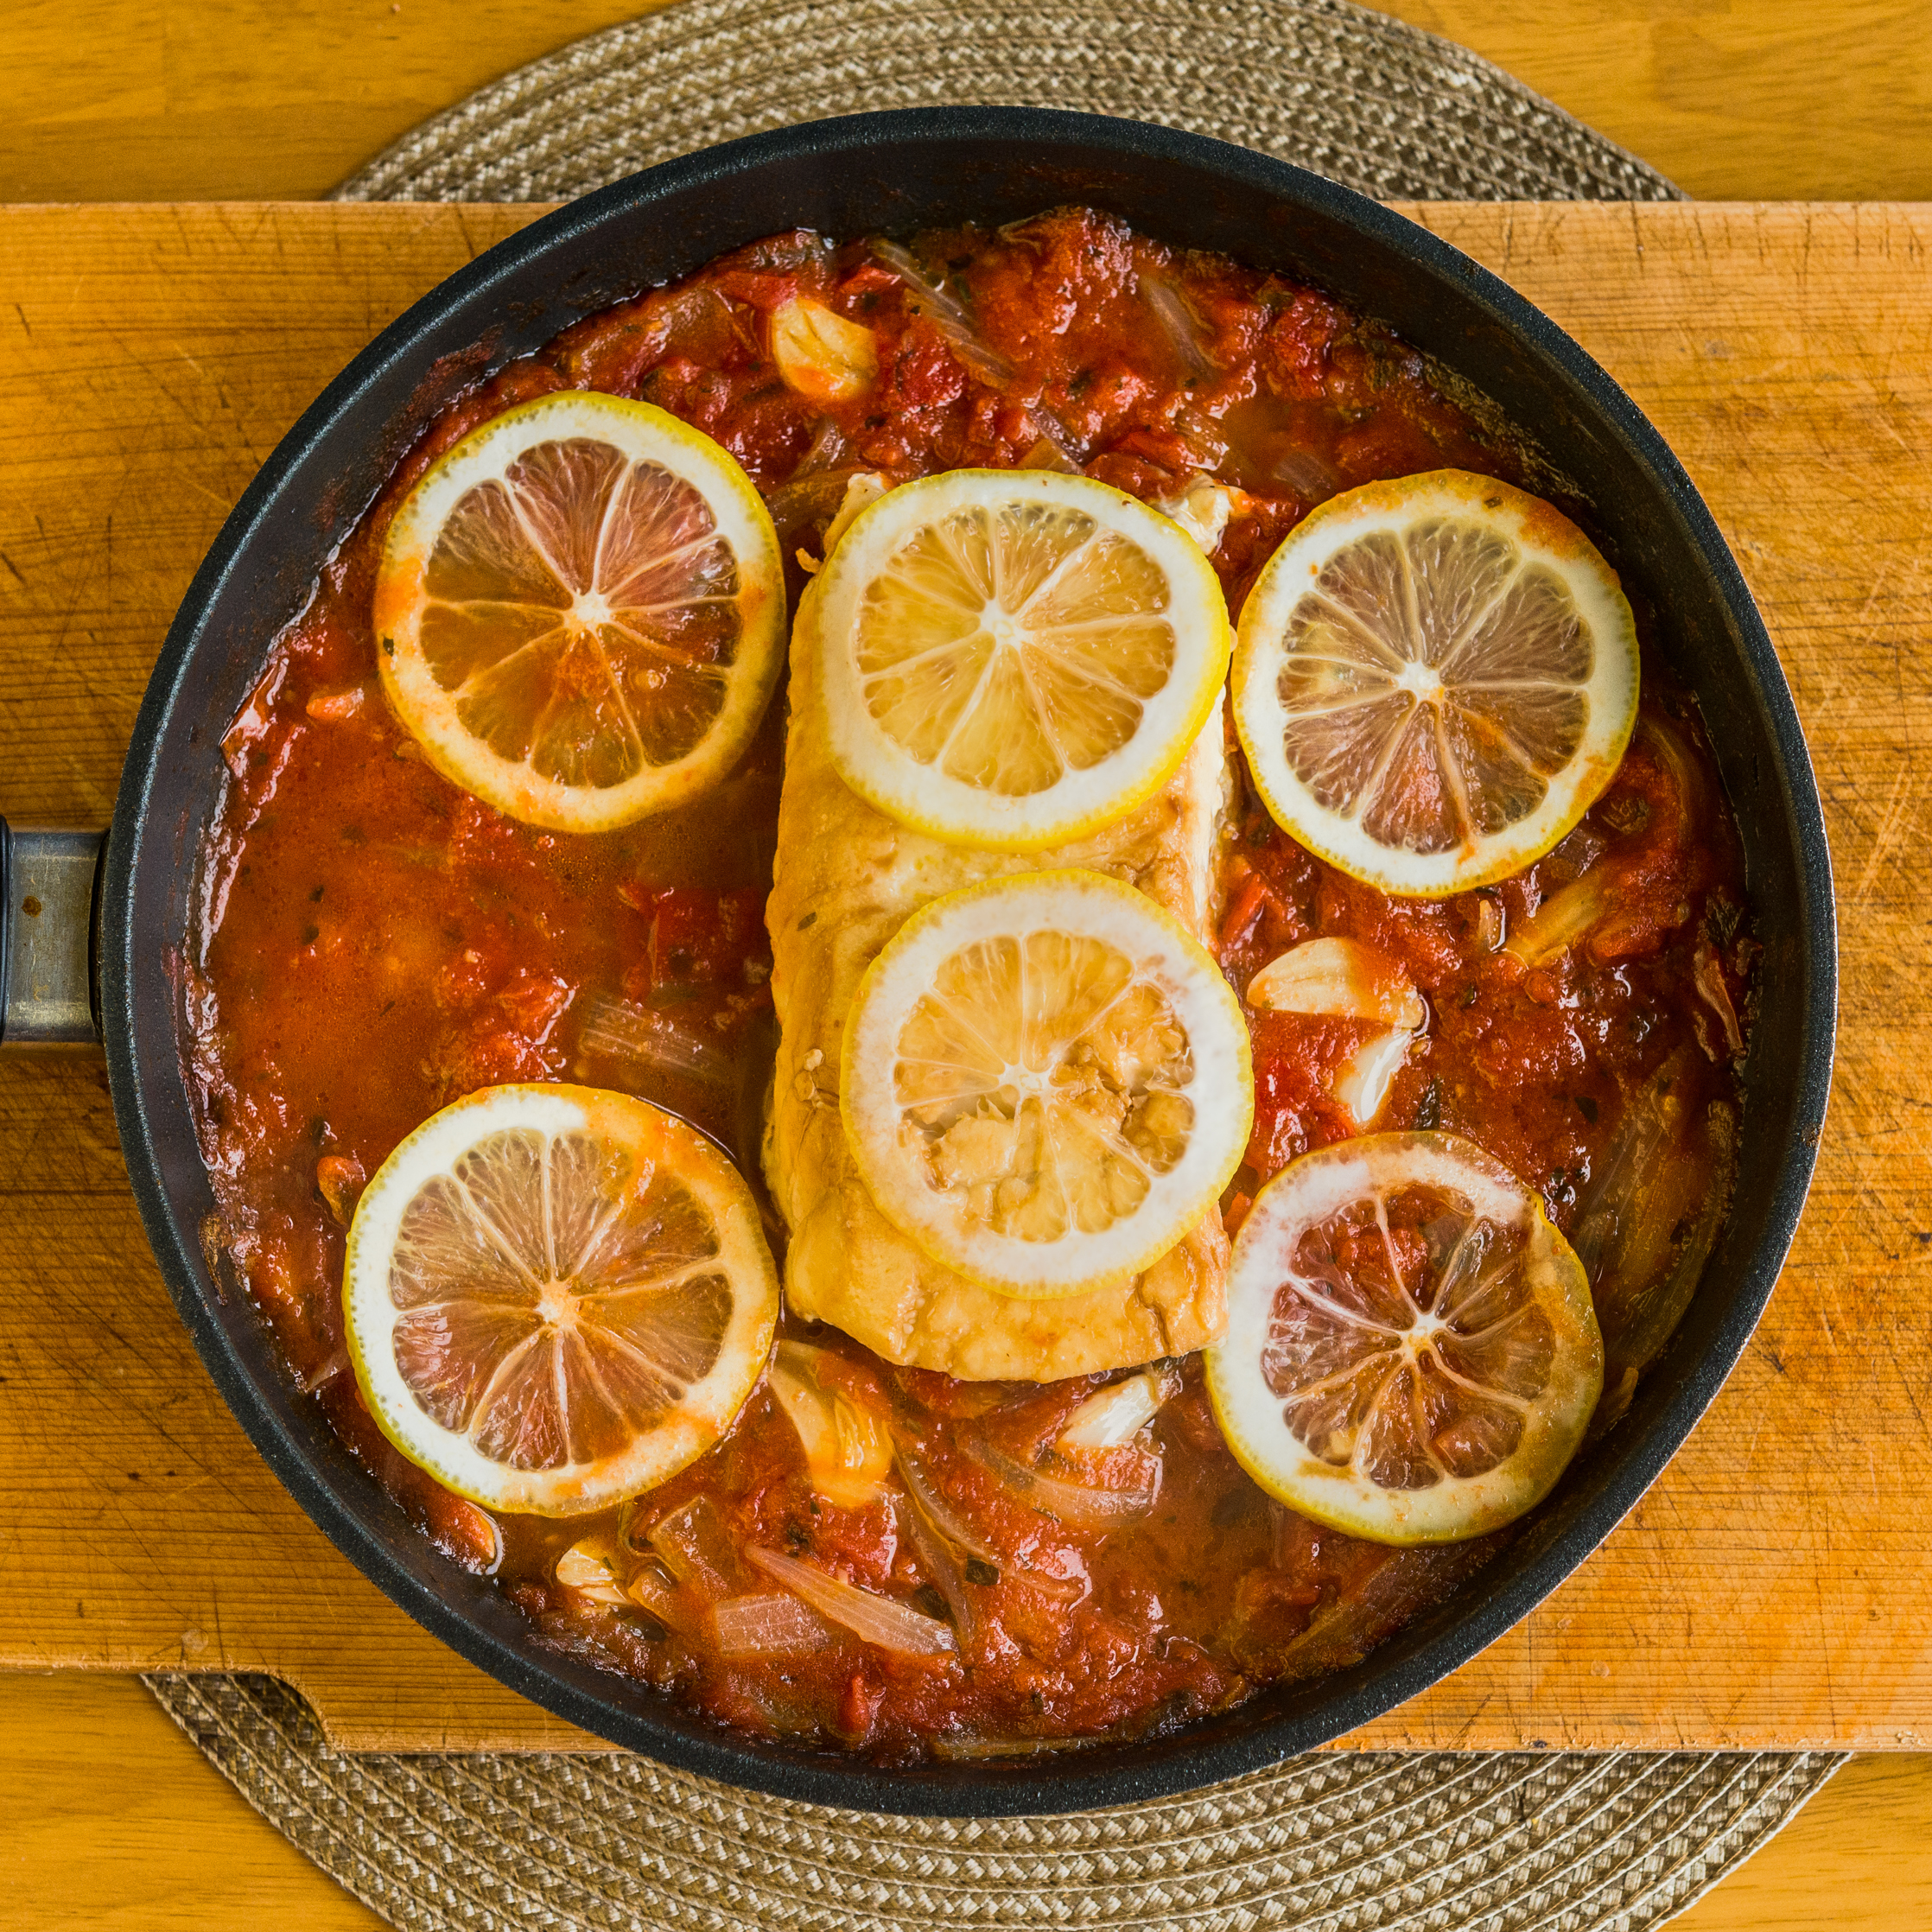
  6. Place the fillet(s) in  the hot oil presentation side up (skin side down if you’ve left the skin on.) The fillets should sizzle when they hit the pan. Pour a little soy sauce on the fillet. This will impart a pleasant umami flavor and will enhance the browning color when you flip the fillet.
  7. Cook uncovered for 3 minutes. Flip the fillets and cook the other side for 3 minutes.
  8. Place the fillets presentation side up in the tomato mixture. Cover with a lid and continue cooking for about four minutes. The general rule of thumb for fish is 10 minutes cooking time per inch of thickness. You can test the fillets for doneness by carefully inserting a knife and parting the meat. A perfectly cooked halibut fillet will be an opaque white all the way through and will flake cleanly. Don’t worry if you don’t get this perfectly right. If the fillets are a little overcooked, they will still be very good.
  9. Spoon out the tomato mixture on serving plates, add the fillet, and served piping hot with pan-fried toast. 

Any style of Chardonnay will pair well with this dish. Dry Riesling is another white option, but there’s enough oomph here to make a Pinot Noir a good choice as well. 

Alaska White Bean Soup With Salmon Sausage and Reindeer Sausage

bean-salmon-reindeer-sausage-soup-022017-n

This zesty, robust soup will take the chill off even the coldest weather. 

We’d been thinking about creating our own salmon sausage for quite some time, but it took the beautiful recipes in our recently acquired copy of The Tutka Bay Lodge Cookbook to get off the stick. Turns out, there’s nothing to it. Use a food processor (or a stick blender with a nut chopper) to grind up salmon (or just chop it up fine with a sharp knife), mix in your favorite seasonings, and bind with egg whites. Tightly roll up this mixture to the thickness desired in plastic wrap, put a twist in the middle to separate the sausages, twist and tie off the ends, boil for 10 minutes, and voila! Salmon Sausage. Although we used Coho Salmon fillets from one of our summer catches, this same method would work beautifully with canned salmon. And there’s no reason to confine yourself to salmon. Chopped clams, halibut, rockfish, crab, scallops or some of Alaska’s spectacular deep water prawns could go into this sausage as well. We can’t wait to try this recipe again with some of our smoked salmon.

As to the soup… We created a minestrone-type broth using canned tomatoes. To that we added white beans, oven-roasted carrots, salmon sausage, reindeer sausage and Swiss chard. We also added sweet onions, colorful Swiss chard stems and garlic that had been sautéed in olive oil. Seasonings included oregano, marjoram, a little thyme and a splash of white wine. We finished the soup with smoked sea salt. Served with toasted sourdough bread and a homemade hefeweizen, this is a bowl that takes the chill off!

Wild Salmon Sausages

Rain, rain and more rain here at The Lake – but any day that begins with a hot mug of joe, pumpkin waffles and tasty wild salmon sausages has gotta be great!

I first made these sausages when a wintery-cold weekend had us craving bean and sausage soup. With ample quantities of three types of beans in our larder, the bean part of the soup was no problem. But alas, the last of our store-bought meat sausages had long ago disappeared. Although I’d heard about salmon sausage, I wasn’t sure how to go about making them. Barbra came to the rescue. She recalled having come across a recipe while leafing through our copy of Kirsten and Mandy Dixon’s The Tutka Bay Lodge Cookbook.

The Dixons’ recipe is simple and lends itself to countless modifications. Any reasonably fatty fish works well, and scallops, shrimp, crab or other ingredients (think wild blueberries or lingonberries) can be feathered in to create unique and tasty variations. As for seasonings, we enjoy combinations of fennel or tarragon coupled with smokey chipotle pepper. Sautéing these sausages in soy sauce just prior to serving them or using them in other dishes adds a smack of umami.

Wild Salmon Sausages

Ingredients

  • 2 tbsp shallots, chopped fine
  • olive oil
  • 1 pound wild-caught salmon fillet, skin removed, or use canned salmon
  • 1 egg, beaten
  • 1 tsp ground fennel
  • 1 tsp oregano
  • 1 tbsp powdered chili mix – a mix that features chipotle, smoked paprika and mesquite works well. See here for a terrific DIY mix.
  • a pot of simmering water
  • soy sauce

Directions

  1. Heat a little olive oil in a skillet. Add shallots. Sauté briefly, just till shallots are cooked through. Place shallots in a large mixing bowl.
  2. Use a sharp knife to finely chop salmon fillet. Add to mixing bowl.
  3. Add egg, seasonings and spices to mixing bowl. Stir all ingredients together thoroughly.
  4. Arrange some of the salmon mixture lengthwise a couple of inches from the edge along a sheet of plastic wrap about 14 inches long. Leave a couple of inches of space at both ends of the plastic sheet. Roll/wrap the salmon mixture in the plastic, creating a sausage shape. At one third of the length of the sausage roll, gently twist the plastic wrap to separate the salmon into separate sausages. Repeat to create a total of three separate sausages.
  5. Twist the ends of the plastic to close. Rubber bands can be used to ensure the plastic stays closed.
  6. Repeat with additional plastic wrap sheets until all the salmon mixture has been formed into sausages.
  7. Place enough water in a large pot to cover the plastic-wrapped sausages and bring to a light boil. (A sauterne works perfectly for this.) Gently place the wrapped salmon sausages into the water and simmer for 10 minutes. Occasionally move the sausages to ensure that they don’t stick to the bottom of the pan.
  8. Remove sausages from water. Let cool and then unwrap them. (Left wrapped, they can be placed in a zipped plastic bag and stored in the freezer.)
  9. To serve: In a frying pan, heat olive oil over medium heat. Arrange sausages in the pan – they should sizzle. Drizzle each sausage with soy sauce. This will add an agreeable amount of salt and brown them up. Since they are already cooked, simply heat the sausages through.

Seafood Kebabs on Forbidden Rice

salmon kabab n

Seasoned cubes of wild Coho salmon, fat, succulent Kodiak scallops, sweet Alaska deep sea shrimp and artichoke hearts drenched in olive oil alternate on this broiled seafood kebab.

The early Persians were onto something. Skewered meats, seafoods and vegetables deftly seasoned and grilled or broiled to perfection are easy to whip up and always a hit. The variations on these Alaskan seafood kebabs are endless. We seasoned ours with a mixture of ginger, toasted sesame seeds, black sesame seeds, sea salt, sugar, garlic, pepper and a sprinkle of toasted coconut. Add a little soy sauce, too, and serve on a bed of nutrition-packed forbidden rice.

Seafood Kebobs

Ingredients

A dash or two each of

  • ginger (freshly grated or powdered)
  • toasted sesame seeds
  • black sesame seeds
  • sea salt
  • ground pepper
  • ground peppers such as chipotle or cayenne
  • garlic (fresh chopped fine or powdered)
  • toasted coconut
  • seafood such as chunks of salmon or other fish, whole scallops, prawns, etc.
  • vegetables such as cherry tomatoes, artichoke hearts, bell pepper, etc.
  • olive oil

Directions:

  1. Place broiler pan in oven and preheat on broil, or fire up grill.
  2. Combine ingredients in a mixing bowl and mix to thoroughly coat seafood and vegetables.
  3. Put food on skewers and place on preheated broiling pan or on hot grill. Cook for about 5 to 10 minutes, turning once or twice.
  4. Serve hot.

Smoked Salmon Avocado Dip: Tasty California-Alaska Fusion

smoked salmon avacado dip n
Served in avocado half-shells, this Alaskan twist on guacamole is as eye-catching as it is delicious! See the super quick and easy recipe below.

In our Arctic kitchen, homemade smoked salmon is an essential pantry staple for which there seems to be no end of uses. Mix a little in with the stuffing in deviled eggs to create salmon stuffed eggs, and you’ve never seen this standard party dish disappear so quickly. A smoked salmon and seafood frittata or smoked salmon crepes make a gourmet’s breakfast. Or stuff a Portabella cap with smoked salmon and a favorite cheese and fire up the grill for a dinner guests will savor.

Our most recent use for smoked salmon came about when Barbra returned from a trip to Anchorage with two large, perfectly ripe avocados. This turned out to be a “Why didn’t we think of this before?” dish that we pass along here.

Smoked Salmon Avocado Dip

  • Cut a soft, ripe avocado in half lengthwise. Use a spoon to gently scoop out the insides, taking care to not break the shell.
  • Place the avocado in a bowl and smash with a fork. Add approximately an equal amount of smoked salmon and some coarsely ground black or multi-colored pepper. Gently mix together. More avocado results in a creamier dip, more salmon makes for a chunkier dip.
  • Return mixture to avocado halves. Serve with crackers or tortilla chips and a favorite ale or lager.

Venison Broccoli Stir Fry with Brown Sugar & Soy Sauce

venison broccoli stir fry n

Tasty, quick, easy and attractive, beef (or wild game) and broccoli is a dish almost nobody doesn’t like. Here’s our twist on a classic favorite.

More than half-way through our year in the Arctic, our freezers remain abundantly stocked with Alaskan seafood and wild game. Featured in this dish is a lean, tender cut of Sitka black-tailed deer. Asian-style stir fry such as this is perfect for days when you want something quick but delicious.

Most recipes for this dish call for corn starch. For a cleaner taste and presentation while still achieving the thick broth desired for this dish, try substituting rice flour for the corn starch. A generous drizzle of sesame oil toward the end of cooking really brings this dish together. As we live far from a well-stocked grocer, we used powdered seasonings.

Venison Broccoli Stir Fry

Ingredients: (for two servings)

  • 1/2 pound lean, tender wild game or beef, cut into slender 2″ strips
  • 1 tbsp rice flour + 1/2 tbsp rice flour, separated (or use corn starch)
  • 1 tbsp water
  • 1/2 tbsp olive oil
  • a scant 1/2 tsp powdered garlic
  • 1/2 tsp powdered ginger
  • 1 tbsp brown sugar
  • 2 tbsp soy sauce
  • 3/4 cup onion, chopped very coarse
  • frying oil such as light olive oil
  • 2 cups broccoli florets
  • sesame oil
  • 1/2 tbsp sesame seeds

Directions:

  1. In a bowl, combine venison strips, 1 tbsp rice flour, water, olive oil, garlic and ginger. Mix thoroughly so that each meat strip is thoroughly coated with mixture. Set aside.
  2. In a small bowl, whisk together soy sauce and brown sugar. Set aside.
  3. In a wok or large skillet, heat olive oil over medium-high heat. When oil is hot, add venison, stirring continuously for about 2 – 3 minutes to sear and lightly cook through. Remove venison to a bowl and set aside.
  4. Add a little more oil to the pan and add the onions. Stirring frequently, cook until onions just begin turning translucent but are still fairly crunchy. Add broccoli and continue stir frying till broccoli begins to turn bright green, adding a little more oil if necessary.
  5. Add venison, sesame oil, sesame seeds and brown sugar and soy sauce mixture, stirring quickly to thoroughly mix ingredients together. Cook just long enough to reheat venison.
  6. Serve immediately on a bed of steaming rice.

Ginger Pear Cranberry Sauce: Delicious on Roasted Turkey or Duck

cranberry sauce ginger pear n

Top row: pear butter, smoked salmon, cloudberry jam. Second row: Arctic blueberry jam, cranberry sauce, cloudberry jam. Third row: Arctic blueberry jam, pear butter, smoked salmon.

Small batch canning has become a perfect way to preserve many foods in our Arctic home. We anticipate that this skill will transfer nicely to our galley kitchen aboard the sailing vessel Bandon.

We recently read an article about items that are supposedly “not worth the time to make in your own kitchen.” The three items that topped this rather specious list were yogurt, pasta and jam. Of course, we heartily disagree on each count. The hands-on time for our delicious homemade yogurt is about 15 minutes, and while it takes a little longer to turn out a few servings of pasta, the time invested results in noodles that trump any store-bought variety. And jam can be made between dinnertime and bedtime – including the processing time in the water bath. Knowing where your hand-picked berries and self-harvested salmon come from: priceless. As those in-the-know can attest, the rewards go beyond even that. Our meals are infused with memories of mornings in berry fields as we dip into our jam and of days on water and of the friends we shared fishing experiences with as we open jars of beautifully cured salmon.

Just in time for the holidays, we’ve added ginger pear cranberry sauce to our home-canned collection. We adapted the recipe from Full Circle Farms, which was thoughtfully tucked into a box containing our order of organic cranberries and D’Anjou pears. The spicy ginger and sweet stewed fruit was the perfect complement to roasted turkey.

Ginger Pear Cranberry Sauce

Ingredients

  • 7 tbsp brown sugar
  • 4 tbsp red wine vinegar
  • 1 ½ tsp powdered ginger
  • pinch salt
  • 3 firm D’Anjou pears, seeded and cut into ½-inch cubes
  • 6 tbsp granulated sugar
  • 2 tsp dried lemon zest
  • 2 tsp dried orange zest
  • 1/3 cup lemon juice
  • 1/3 cup orange juice
  • ¾ lb organic cranberries

Directions

  1. In a medium saucepan, combine brown sugar, vinegar, ginger, and salt.
  2. Bring to a boil over moderate heat.
  3. Add pears. Cover and cook until pears are crisp-tender, about 10 minutes.
  4. Remove pears with slotted spoon and set aside, leaving liquid in pan.
  5. Add granulated sugar, zests, juices and cranberries to pan.
  6. Simmer over medium heat, stirring often, until cranberries pop.
  7. Reduce heat and add pears back to mixture.
  8. Cook for at least 5 minutes to allow flavors to mix. Cook longer if a thicker sauce is desired.

Makes about 4 cups of sauce.

Pumpkin Risotto with Spicy Scallops

risotto w scallops n

Creamy risotto flavored with seasonal roasted pumpkin and topped with spicy scallops warm up an icy Arctic evening.

With our shared goal of making risotto this year, Arborio rice went on the annual shopping list, and recently when a tiny, 1.5 pound pumpkin arrived in our Full Circle Farms box, we decided to make it a featured ingredient in our first attempt at homemade risotto. The idea to pair spicy scallops with the risotto stemmed from the visual impact we thought they’d have: white scallops dusted with ground peppers, nutmeg and cinnamon atop a mellow-orange base. The visual was complimented by the blend of textures and flavors of this dish. Compared with more usual methods for preparing rice, the risotto was a bit labor intensive. But the results left us anticipating making this dish again soon, perhaps next time with Alaska sweet shrimp.

Pumpkin Risotto with Spicy Scallops
Serves 4

Ingredients: (We use our own blend of spices, but any good Thai-style blend such as Penzeys Spices Bangkok Blend works well.)

  • 1¼ cups pumpkin purée
  • 2 tbsp heavy cream
  • 1 tbsp spice blend, such as Penzeys Bangkok Blend
  • 6 tbsp unsalted butter, divided
  • 5 cups chicken broth (We use Better than Bouillon.)
  • 2 tbsp extra virgin olive oil
  • 1 medium onion, diced
  • 1 clove garlic, minced
  • 2 cups Arborio rice
  • 2 tbsp goat cheese, softened
  • ¼ cup parmesan cheese, grated
  • salt and pepper to taste
  • seared scallops (see below)
  • candied bacon (see below)

Directions

  1. Stir together pumpkin purée and cream in a small pot and bring to a simmer. If it seems too thick, stir in a few tbsp of chicken broth.
  2. Simmer for about 5 minutes. Remove mixture from heat. Season with spice blend, salt and pepper.
  3. Add ¼ cup of butter to the pumpkin mixture, 1 tbsp at a time. Stir until smooth.
  4. Pour the pumpkin mixture into a bowl and set aside.
  5. Pour the chicken broth into a medium pot and warm over low heat.
  6. Place a large pan such as a sautoir (a sauté pan with high, straight sides) or a pot over medium heat and melt the remaining 2 tbsp butter and olive oil.
  7. Add the onion and garlic and sauté for about 3 minutes.
  8. Add the rice and sauté for 3 to 5 minute or until each grain of rice is coated in oil and there is a white dot in the center of each grain.
  9. Begin adding the warm broth to the rice, one ladleful at a time, stirring frequently.
  10. Each time the liquid evaporates, add another ladle of broth and continue to stir.
  11. Continue to add liquid and stir until the rice is al dente, 20-25 minutes.
  12. Stir in the pumpkin mixture until completely combined.
  13. Stir in the goat cheese and parmesan until smooth. Season with salt and pepper.
  14. Place 3 seared scallops atop a portion of risotto.
  15. Finish dish with candied bacon just prior to serving.

Spicy Scallops

Ingredients

  • 12 large scallops, cleaned
  • 1 tbsp spicy seasoning mix, for example Penzeys Bangkok blend (Optional: add sesame seeds to the spice blend)
  • salt to taste

Directions

  1. Heat oil in a heavy skillet over medium-high heat.
  2. Lightly roll each scallop in spice mix and sprinkle with salt
  3. Using tongs or chopsticks to maneuver scallops, quickly sear each one on each side – a few seconds on each side. Do not overcook.
  4. Serve immediately.

Candied Bacon

Ingredients

  • 4 strips of thick cut bacon, chopped into micro pieces
  • 2 tbsp brown sugar

Directions

  1. Heat skillet over medium high heat
  2. Add the bacon to the pan and cook until the fat has rendered off and the bacon has just become crispy.
  3. Drain all but 2 tsp of grease from the pan and return to the stove, over medium heat.
  4. Sprinkle brown sugar over the bacon and stir vigorously until the sugar melts and coats the bacon.
  5. Spread the candied bacon onto a sheet pan lined with parchment and allow to cool and slightly harden.

Yam, Goat Cheese and Shallot Tart

yam goat cheese tart_n

The sweetness of yams and sautéed shallots, the creamy tartness of goat cheese, the zip of parmesan, and a sprinkle of thyme make this savory, aromatic tart perfect served as an appetizer, as a light meal, or as a side dish.

Our CSA (Full Circle Farm) sends a regular delivery of fruits and vegetables to our remote home in Arctic Alaska. In addition to the fresh, organic produce, they insert a recipe flyer into each box. Every recipe we’ve tried has been fantastic. And just in time for Thanksgiving, their test kitchen absolutely nailed a savory vegetable tart. Although we used yams, a number of substitutes came to mine as we were enjoying this tart with falling-off-the-bone tender pork ribs that Jack had slow cooked in the oven. Carrots, turnips, and especially parsnips would all work well. We love parsnips!

Yam, Goat Cheese and Shallot Tart

Ingredients

  • 3 tbsp olive oil
  • 1/4 cup shallots, finely chopped
  • 1 1/4 lb yams, peeled and thinly sliced
  • 1 tbsp thyme
  • 3/4 tsp salt
  • 1/2 cup parmesan cheese, freshly grated
  • 1 cup goat cheese, crumbled

Directions

  1. Preheat oven to 400 degrees F.
  2. In a medium pan, heat olive oil over medium-high heat. Add shallots and sauté until soft (about 2-3 minutes). Remove from heat and set aside.
  3. Grease a springform pan.
  4. Place yam slices in overlapping layers, starting at outer edge and spiraling inwards to make one layer.
  5. Sprinkle some of the thyme, shallots, cheeses, salt and pepper.
  6. Repeat process 3 times to create 3 layers.
  7. Cover top of tart with cheese.
  8. Bake until top is golden brown and tart is easily pierced with a fork, about 45 minutes.
  9. Let cool in pan for 10 minutes.
  10. Remove from pan and cut into wedges to serve.

Pumpkin Pasta with Pumpkin Chanterelle Sauce

pumpkin pasta_n

Do not adjust the color! This penne pasta gets its deep orange-yellow color from fresh pumpkin purée and was the perfect base for a tasty alfredo-style pumpkin and chanterelle mushroom sauce.

With a pumpkin arriving in our most recent box of produce from Full Circle Farms, I eagerly anticipated creating a dish of pumpkin and chanterelle lasagne. The idea was to layer slices of pumpkin and mushrooms between wheat lasagne noodles along with cheese and a cream-based sauce. When I pitched this menu to Jack, he wrinkled his nose and said something about taking the fall pumpkin spirit too far. So there I was with a beautifully ripe pumpkin, a couple of cups worth of aromatic chanterelles, and an unsatisfied craving for a pasta experiment.

So I decided to make a twist on my original idea by creating a pumpkin pasta and a sauce to accompany which would bring together the flavor of pumpkin and chanterelles. To avoid being vetoed again, I offered to give Jack a night off from cooking and create the dish as head chef. This way he could relax and I could satisfy my craving. He remained skeptical, but was willing to go along. Win-win, right?

pumpkin pasta w sauce_nA savory, satisfying meal of pumpkin penne served with a creamy pumpkin chanterelle sauce and slices of chicken apple sausage warmed up a truly blustery Arctic night. No flights in or out of Point Hope the past couple of days, and hurricane force gusts punctuated gale and storm force winds. Freshly grated parmesan cheese and a dash or two of Cholula sauce finish the dish. 

Throughout the whole meal, Jack kept mmmm-ing in approval and muttering about how different the combinations of flavors were and how beautifully they worked together. Although I added mildly spicy chicken sausage, this recipe would work equally well sans meat. When thickening a sauce such as this, we have found that rice flour is superior to other thickening agents.

Pumpkin Penne with Pumpkin Chanterelle Sauce

Ingredients

  • 1 lb pumpkin penne pasta (see below)
  • 2 tbsp olive oil
  • 3 shallots, finely sliced
  • 3 cloves garlic, finely chopped
  • 2 cups chanterelle mushrooms, chunked
  • 1 1/2 cups chicken stock (we use Better than Bouillon)
  • 1 2/3 cups pumpkin purée (fresh or canned)
  • 1/2 cup heavy whipping cream
  • 1 tsp Cholula sauce
  • freshly grated nutmeg, to taste
  • pinch cinnamon
  • salt and pepper
  • chicken apple sausage, sliced
  • 1 tsp sage
  • parmesan cheese
  • (optional) thickener, such as rice flour or wheat flour, as needed

Directions

  1. Heat water for pasta.
  2. Heat oil and sauté shallots, garlic and chanterelles for about 3 minutes.
  3. Stir in chicken stock, pumpkin purée, whipping cream, Cholula sauce, nutmeg, cinnamon, salt and pepper to taste.
  4. Add sliced sausage.
  5. Let sauce simmer and thicken. If it needs to be thickened, add a rice flour 1 tbsp at a time till desired consistency is achieved.
  6. Cook pasta al dente.
  7. Stir sage into drained pasta and toss with some olive oil.
  8. Place pasta on individual plates, add sauce, and finish it with grated parmesan cheese and a splashes of Cholula sauce.

Pumpkin Pasta Dough

Ingredients

  • 2 cups semolina flour
  • 2 eggs
  • 1/3 cup pumpkin purée
  • 2 tbsp olive oil
  • water as needed

Directions

  1. Whisk together eggs and pumpkin.
  2. Place semolina flour in a large bowl.
  3. Make a well in the middle of the semolina flour.
  4. Pour egg mixture and olive oil in well.
  5. Use a fork and scramble eggs into flour.
  6. Keeps scrambling until dough resembles large curds. Add small amounts of water if needed.
  7. When all the dough looks like large curds, knead dough several times in order to form a dough ball.
  8. Cover dough tightly with plastic wrap and let rest for 20 minutes.
  9. Follow pasta machine manufacturer’s directions to form noodle shape of choice.