Breakfast Panna Cotta – Turning Ordinary Into Extraordinary

A breakfast fit for a celebration – now where’s my champagne?

As it happens sometimes, we received a random box of ingredients, this time thanks to the Farmers to Families program. The box included a variety of items that someone defined as household staples. Included were roasted chicken quarters, hot dogs, potatoes, apples, milk, and yogurt. Jack quickly turned out a delicious soup with the chicken, potatoes, and other veggies we had in our fridge. My challenge was the yogurt. I usually make our own yogurt, so we already had more than enough for our regular menu. 

Living in a small village, we often gift extra food amongst our neighbors. For example, if someone gets an extra order of canned pumpkin or tahini (real examples), we share. When that happens, the resulting cooking challenge always strikes me as our own episode of Chopped. We don’t like to let anything go to waste. So the puzzle of the yogurt needed to be attended to right away.

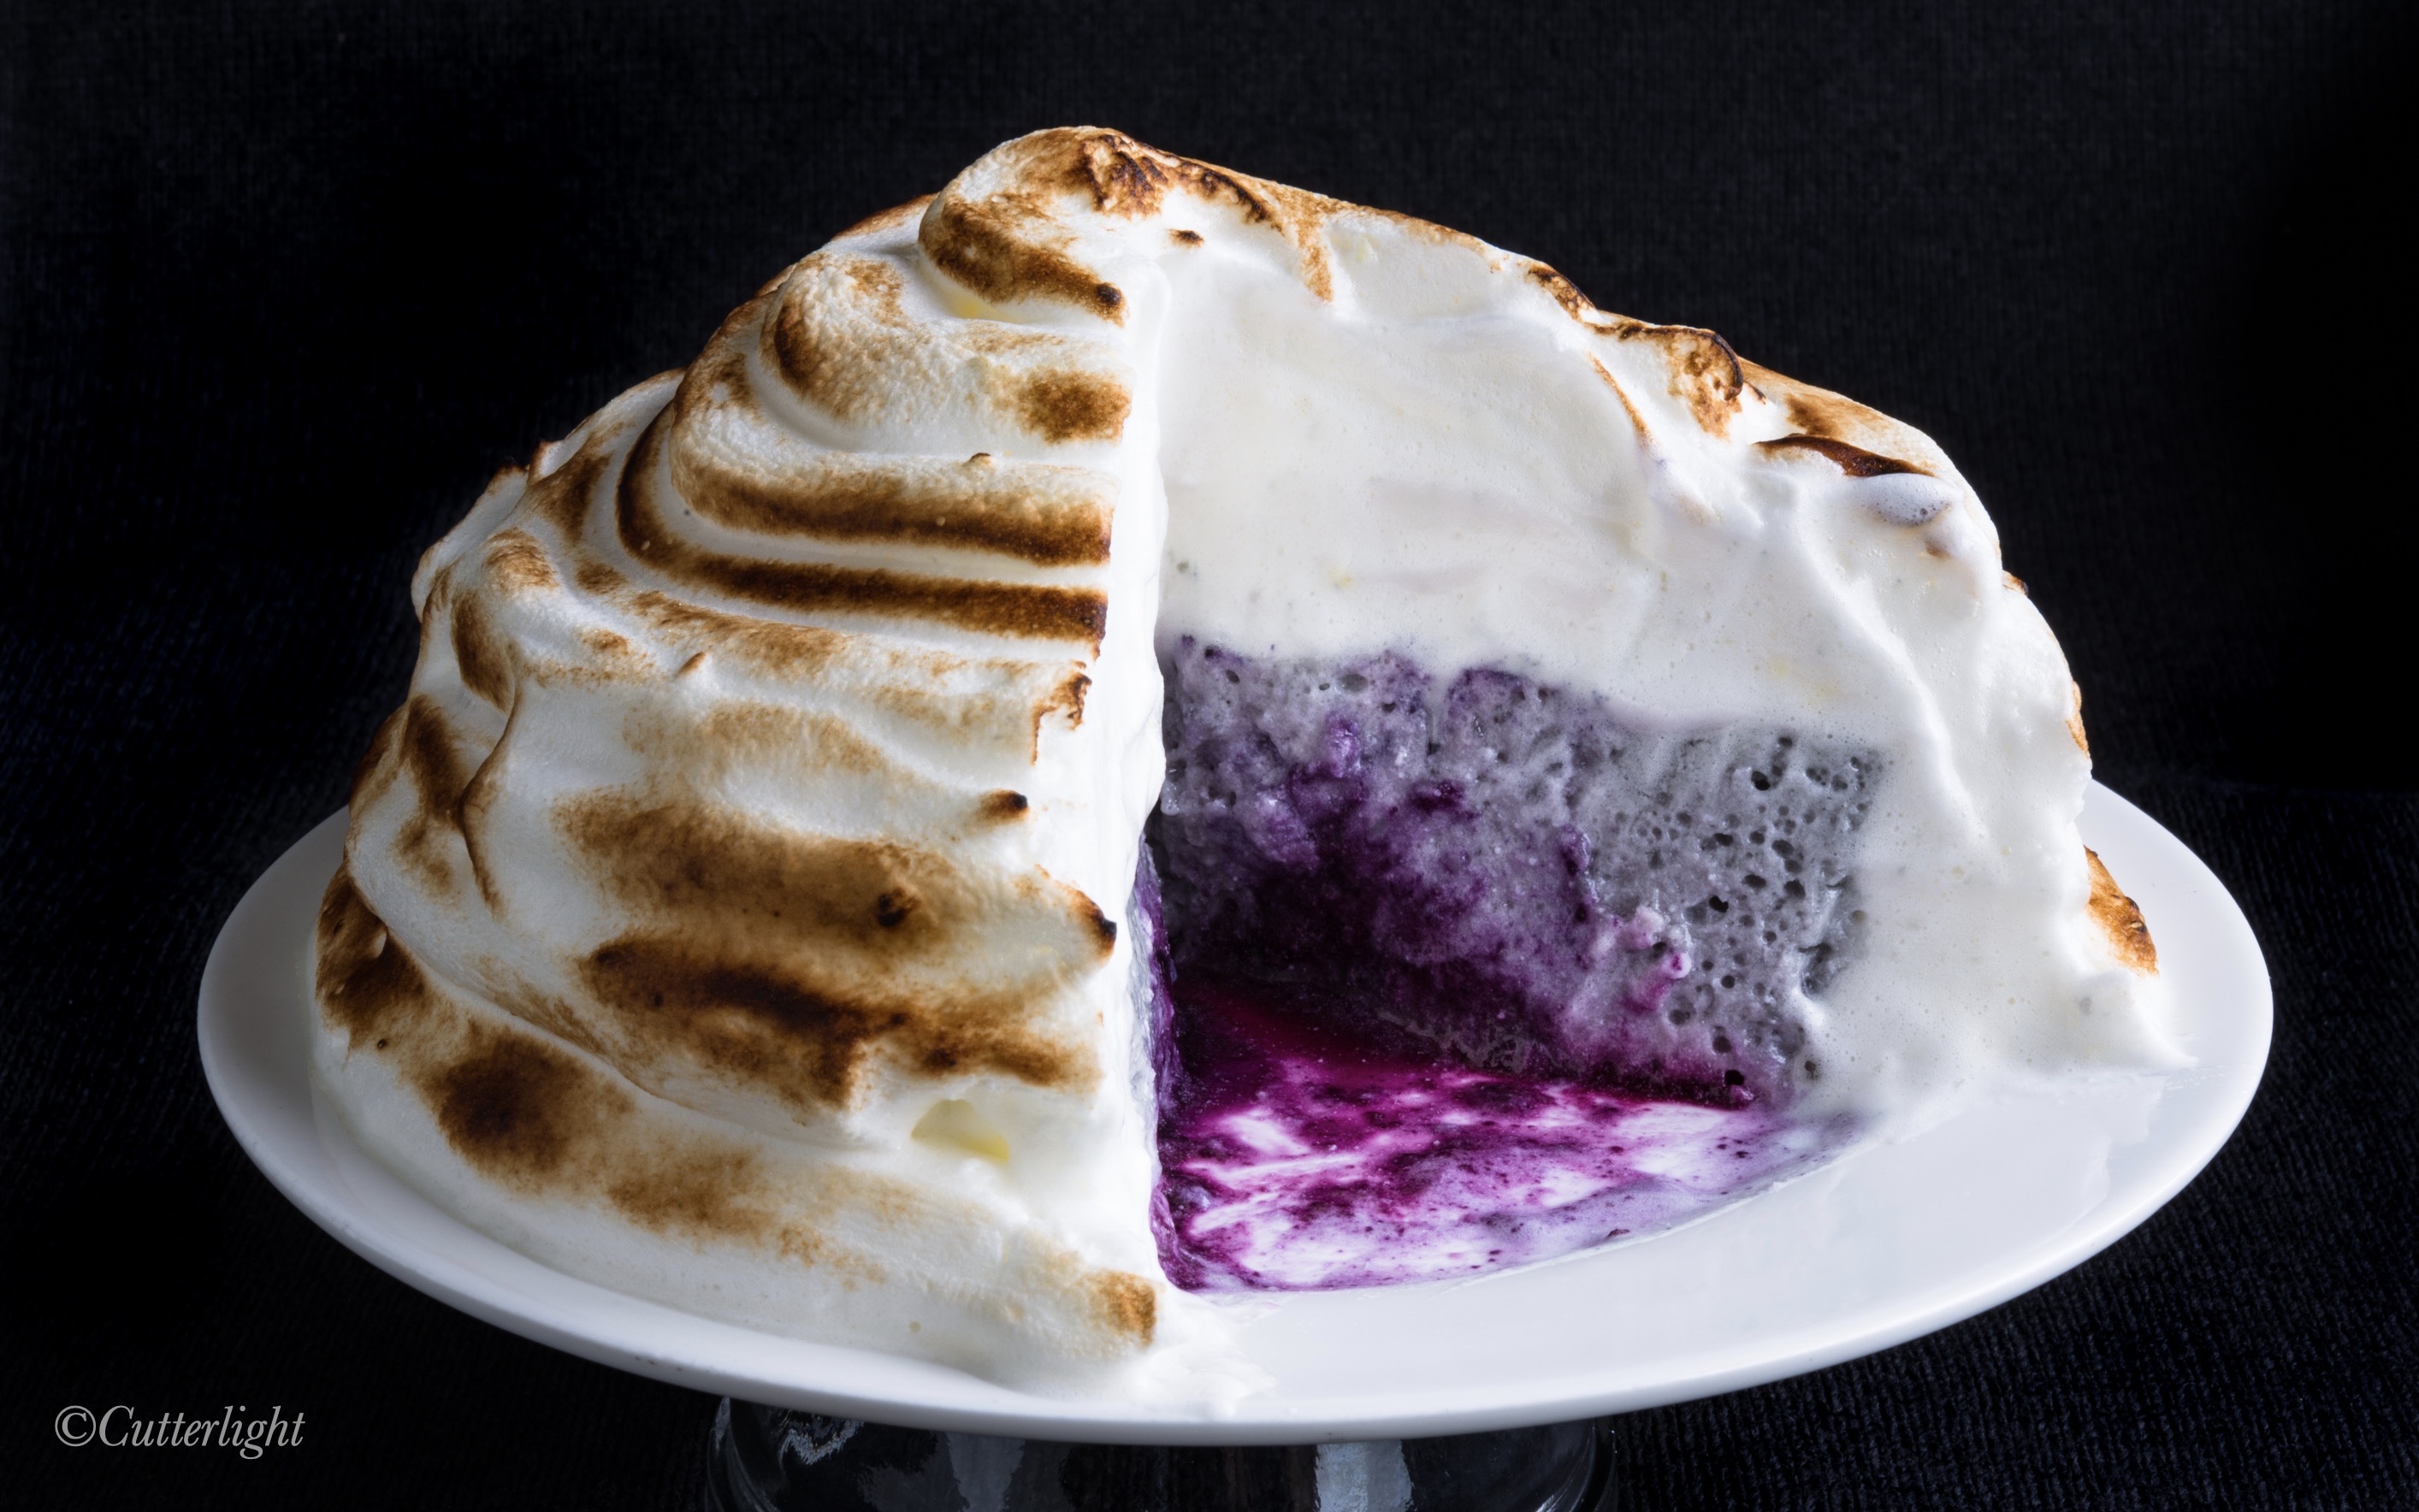
I had just finished re-reading The Tutka Bay Lodge Cookbook and was in the middle of another pastry chef cookbook when the box arrived. I already had Panna Cotta on the brain. I wondered if Panna Cotta could be made with yogurt instead of cream. Panna Cotta is a wonderful gelatinized dessert that can become a delicious canvas for a variety of fruit. The name is derived from Italian and means “cooked cream.” In my experiment, it would be cooked yogurt. So, yes, this is not a true Panna Cotta. My version has the same vanilla bean canvas and the same structure. That’s where the similarity ended.

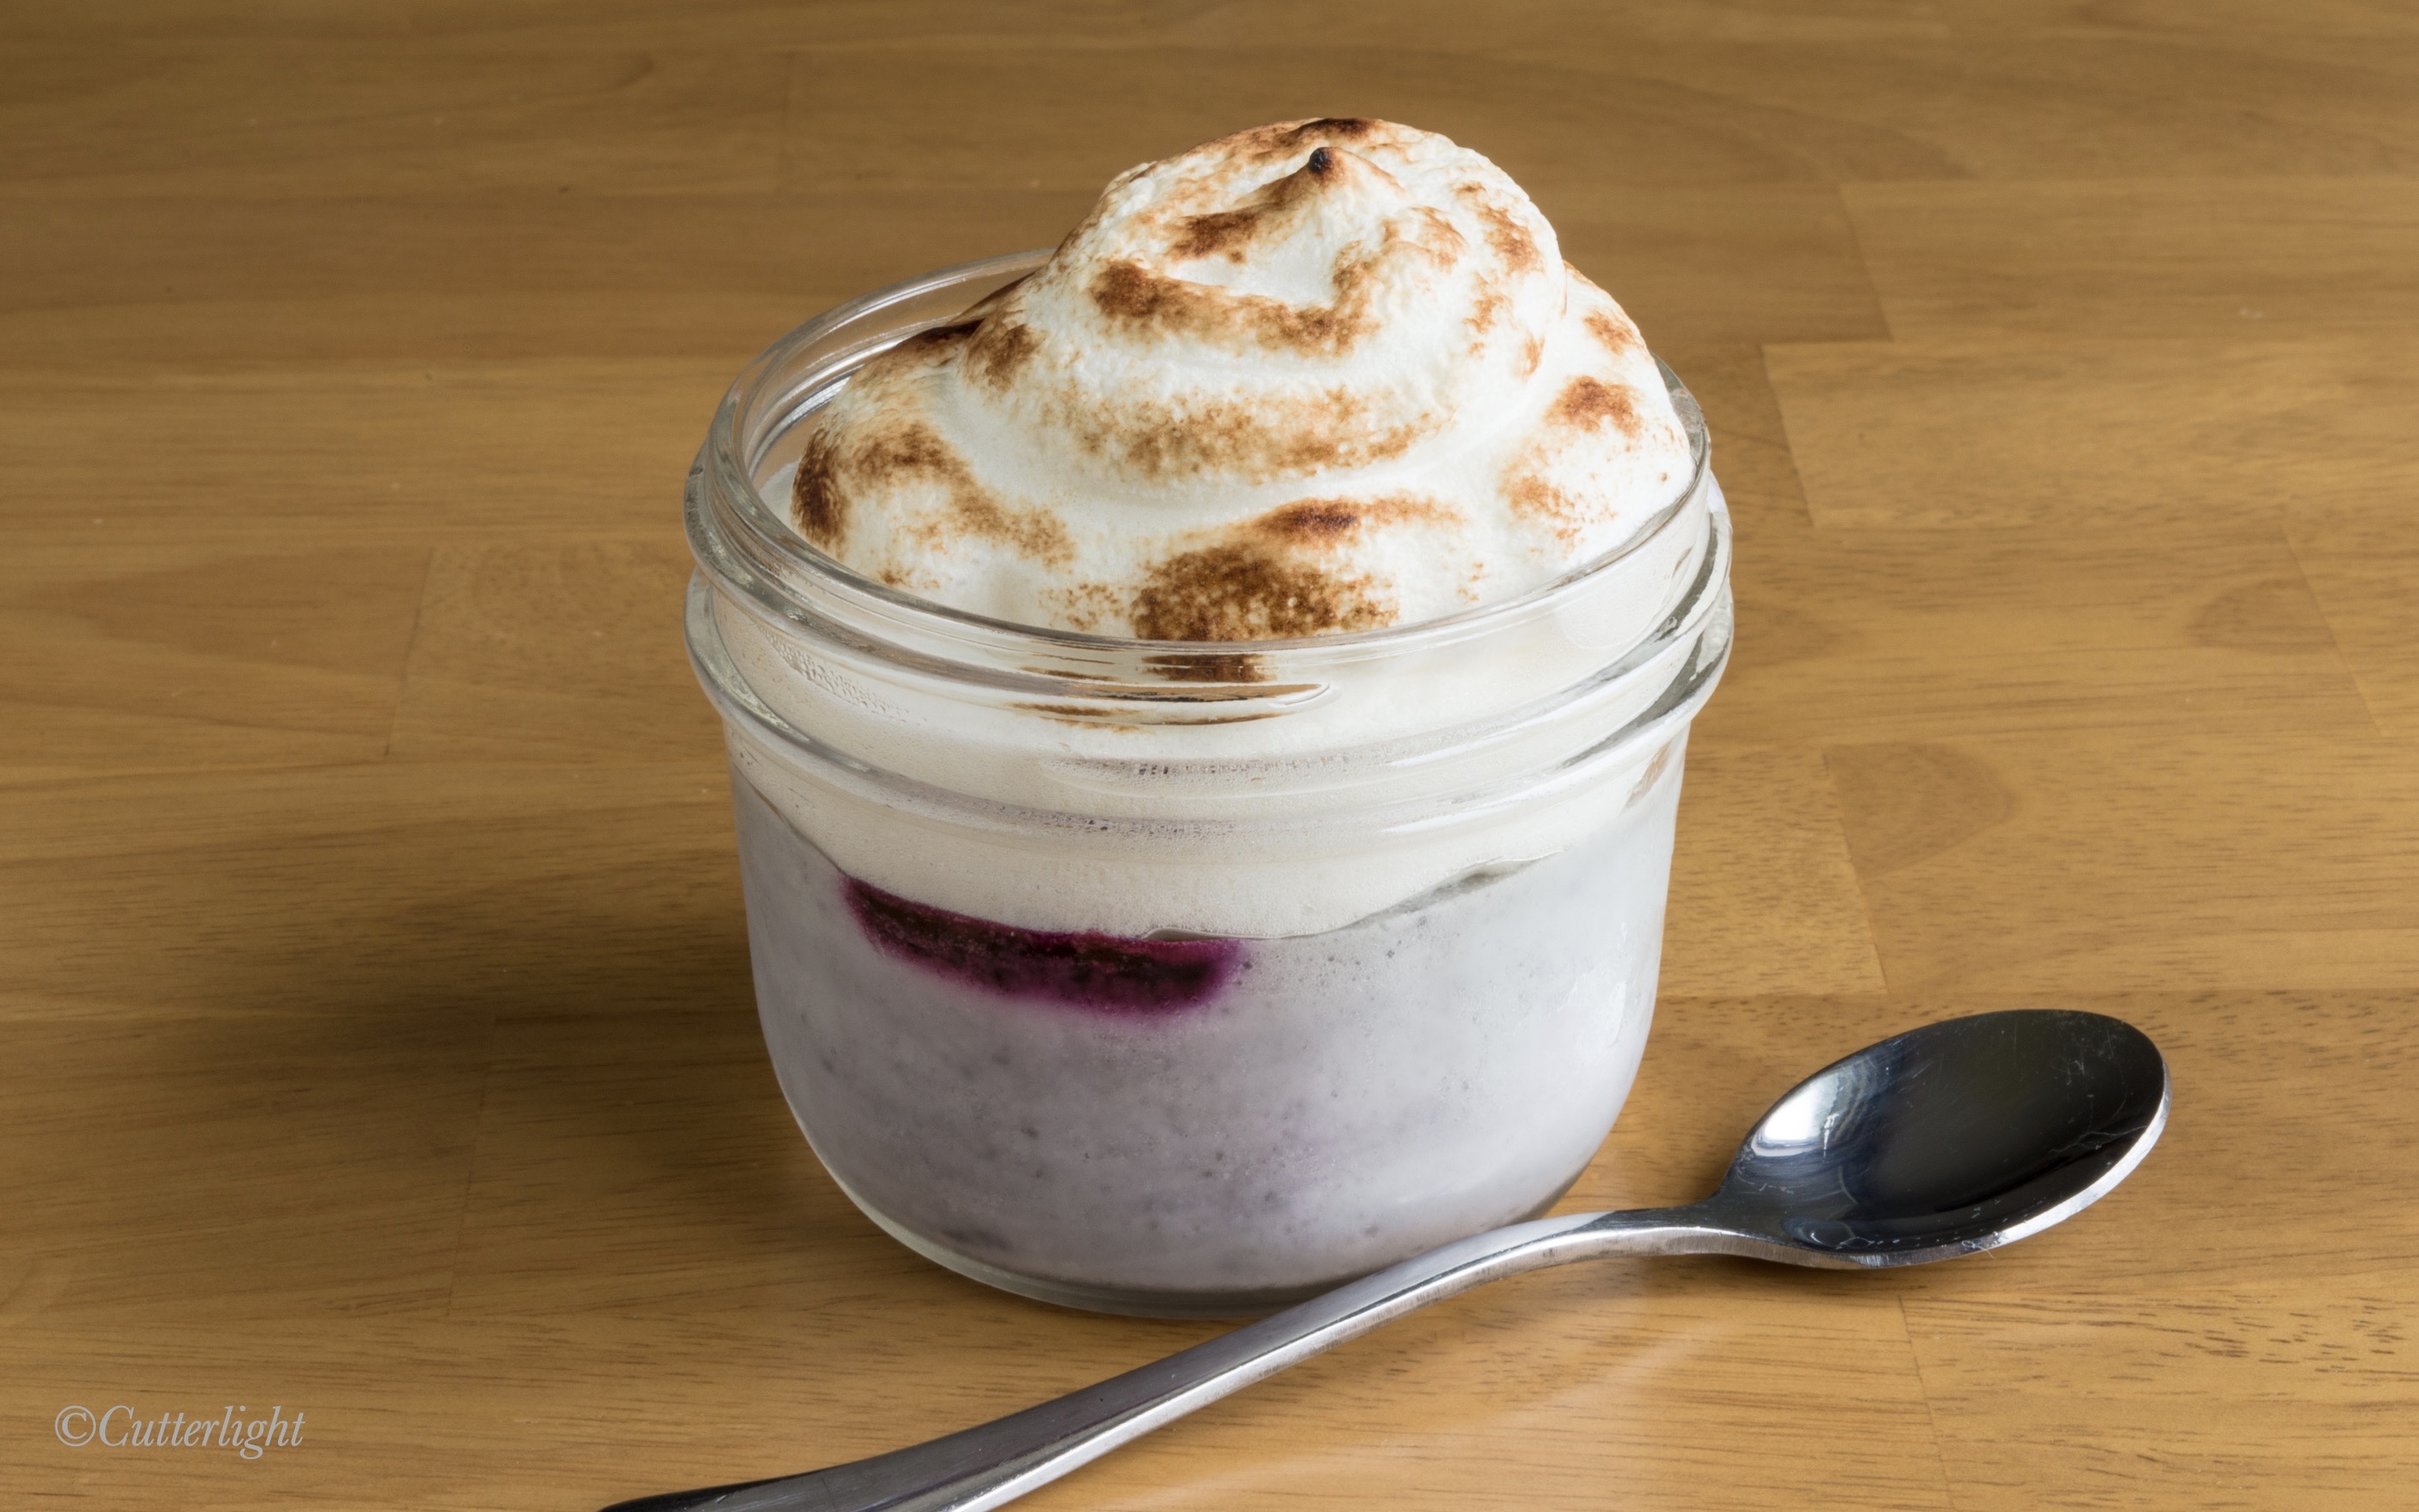
I tested different dishes and glasses for serving the Panna Cotta including wine glasses and ramekins. I think they all worked beautifully. My breakfast Panna Cotta definitely tasted like a rich vanilla yogurt. But it made for a gorgeous and delicious breakfast presentation – layers of crunchy granola, chewy dried fruit, zippy tart berries, and a drizzle of last summer’s wineberry syrup. The same visual layers can be accomplished in any clear glass if ramekins are not available. With just a bit of chilling time and not too much effort, you too can turn ordinary into extraordinary.

Breakfast Panna Cotta

Ingredients

  • 1 1/2 tsp powdered gelatin (1 package)
  • 3 cups plain yogurt
  • 1/2 cup milk
  • 1 tsp vanilla paste
  • 2/3 cup granulated sugar
  • granola
  • dried fruit
  • frozen or fresh berries
  • berry syrup

Directions

  1. Place gelatin in a small bowl. Pour a couple of tablespoons of the milk into the gelatin and mix. Let set for about 5 minutes.
  2. In a medium mixing bowl, whisk together the remainder of the milk, yogurt, vanilla and sugar.
  3. Place about 1/2 cup of the yogurt mixture into a small pot. Warm mixture while stirring constantly.
  4. Add gelatin mixture to pot.
  5. Whisk mixture until gelatin is dissolved. Let cool for 5 minutes.
  6. Pour gelatin mixture back into the original yogurt mixture in the medium bowl. Mix thoroughly.
  7. Divide the panna cotta into 6 ramekins or glasses. 
  8. Cover with plastic wrap and chill overnight in the refrigerator.
  9. To serve, layer on granola, dried fruit, berries and berry syrup of your choosing.
  10. Alternatively, run a knife around the edge of the ramekin, dip the ramekin in hot water and unmold onto a serving plate prepared with a bottom layer of granola. Top panna cotta decoratively with remaining ingredients.

Three Cheese Dungeness Crab Ravioli

Dungeness Crab Ravioli
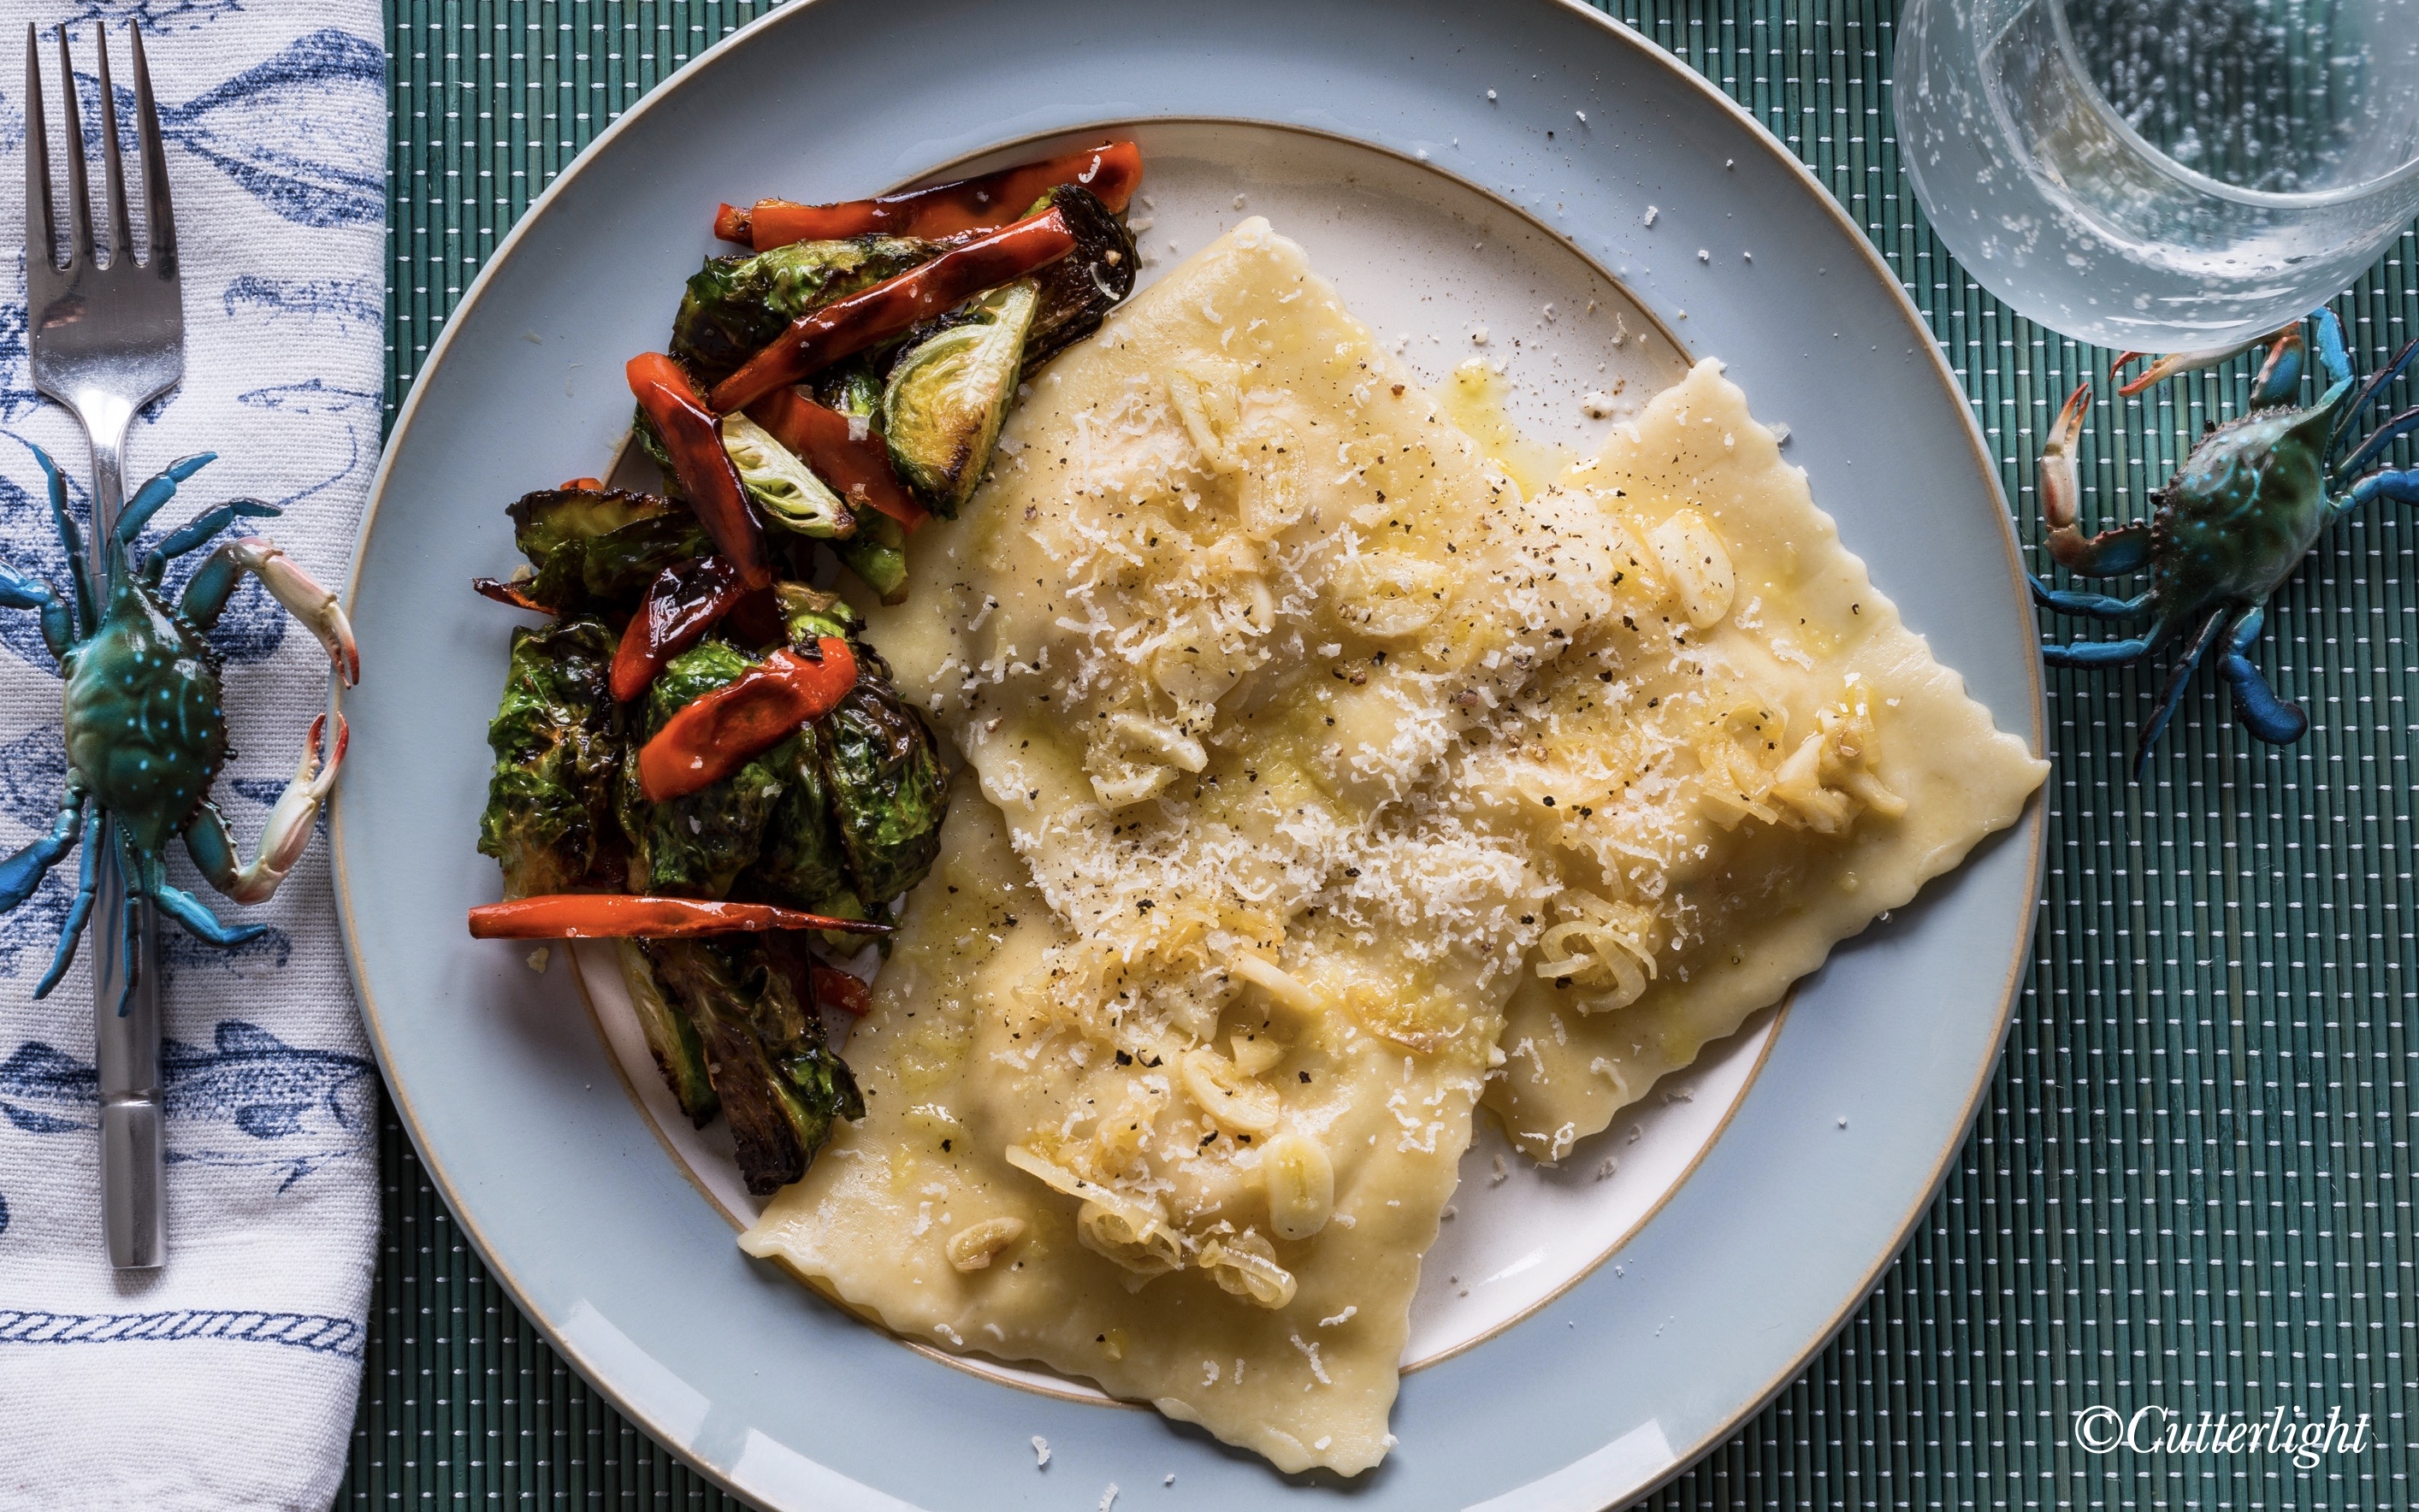
Giant ravioli stuffed with creamy cheese and sweet Dungeness Crab. Happy 2021 from The Lake!

“Jack?” It was Donny on the phone. “Come down to the beach and get some crab! Bring a tote. There’s lots!”

I’d been photographing kinglets in a copse of spruce trees a two-minute walk from my house when I got the call. Crab?! I didn’t waste any time retracing my steps. Back home I went straight to the living room window. Sure enough, there was Donny talking with a man and a woman I didn’t recognize who had nosed an unfamiliar skiff into the lakeshore. On the beach near Donny were three or four large tubs. I set my camera gear aside, grabbed a bright pink plastic tote, slipped my feet into boots and made my way down to the scene.

The skiff and its occupants were with the Alaska Department of Fish and Game. Apparently, they’d been sampling the Dungeness Crab population in the Chignik estuary and nearby waters and with a good haul of the tasty crustaceans had made the six-mile run up the river to share the bounty. I greeted Donny, introduced myself to the ADFG crew, and surveyed the tubs heaped with crab. There were indeed “lots.”

“Go ahead and fill that tote,” Donny advised. “And make sure you get some big ones.”

They were good-looking crabs. Legal males. Clean, shells filled out, two-pounds on average, still kickin’, sea-scented.

That night, quite literally everyone in the village of Chignik Lake feasted on fresh Dungeness Crab. All 50-something of us.

Barbra and I spent a good bit of that evening steaming Dungies three at a time in our big soup kettle. We picked two that night for dinner, complimented  with a bottle of Chard. The rest were frozen for later use. We did this by first freezing the crabs in regular zip-seal plastic bags. Similar to berries and other fragile items, once the crabs are frozen hard they can be vacuum-packed without being crushed. Frozen this way, the crabs are perfect and keep a long time. Which is a good thing; we ended up with a lot of crab.

The ravioli? Once you’ve got the pasta made, there’s really nothing to it.

I combined equal amounts of mozzarella, goat and feta cheeses along with a blend of Italian herbs. To this mixture, I added an equal amount of Dungeness Crab and hand-tossed the ingredients together.

Meanwhile, Barbra rolled out the pasta and cut it into nice, big three-and-a-half inch squares, filled them with the crab and cheese mixture and crimped them closed with a pastry roller. It is important to use a sharp tool for the crimping. It helps to ensure that the ravioli remains sealed.

To avoid crowding these large raviolis, I used two pots, each with a good amount of water. Once the water came to a boil, I added the ravioli. After three minutes, I gently flipped them to ensure even cooking of the pasta and the filling – a total of six minutes.

Meanwhile, in a small skillet on a back burner, I heated extra virgin olive oil over medium heat. When it was hot, I added shallots and garlic sliced as thin as I could manage along with a tablespoon of butter and a couple of healthy pinches of sea salt. This is a wonderfully simple accompaniment for delicately flavored pasta. I finished the dish with a grind of black pepper and a bit of grated Parmigiano-Reggiano.

By the way, these raviolis freeze well. Simply lay them out on a cookie sheet, freeze them solid, and then pack them in plastic bags. Cook them frozen, adding a minute to the overall boiling time.

With a surfeit of tasty Dungies in the freezer, expect more crab recipes in the coming weeks!

And for Dessert… a Blueberry Cloud

“I feel pretty – Oh, so pretty – That the city should give me its key – A committee – Should be organized to honor me – la la la la.”

What? You’ve never heard singing meringue?

I have a board in my kitchen where I post culinary ideas. Sometimes they’re inspired by an ingredient. Often the spark is drawn from a photo or even just the name of a recipe. Several weeks ago, I saw a “blueberry meringue pie.” Hmmm… I never thought of a blueberry version of a favorite pie. What a great idea! My ruminations took my mind through several possibilities – a pie for two, blueberry filling with a vanilla-flavored toasted top, an entirely blue pie, a crustless version…

Then I saw a photo online of a gorgeous, bright lime green soufflé encased in toasted meringue. That was the catalyst for what turned out to be essentially a scaled down crustless blueberry meringue pie.

So, how did it turn out?

As you can see, the toasted meringue provides for an eye-popping presentation. When sliced, layers of fluffy vanilla meringue and an airy purple-blue center are revealed. And the texture and flavor? Delicate yet creamy, sweet-tooth satisfying, with flavors of tropical coconut, toasted marshmallow and wonderfully intense wild Alaska blueberry. This dessert was as satisfying as a culinary achievement as it was to demolish – which we did in a gratifyingly indulgent blink of an eye.

You, too, can whip up (pun definitely intended) this five-star dessert. For the sake of making this scrumptious dish accessible to all levels of chefs, I’m writing up the directions for a mason jar version. If you are interested in the more difficult cloud-on-a-plate version, leave me a comment or message me and I’ll send that recipe to you.

The Blueberry Cloud (serves 6)

Ingredients for Blueberry Coconut Custard Base

  • 1 envelope unflavored powdered gelatin
  • 3/4 cup granulated sugar, divided
  • pinch salt
  • 4 eggs, yolks and whites separated
  • 1/2 cup cold water
  • 1/4 cup blueberry juice*
  • 1 cup coconut cream (the thick part from the top of the can)

Directions for Blueberry Coconut Custard Base

  1. In a double boiler, stir gelatin with 1/4 cup sugar and salt until well mixed.
  2. In a small bowl, using a wire whisk beat egg yolks with cold water and blueberry juice until mixed.
  3. Stir blueberry mixture into gelatin mixture.
  4. Cook over simmering water, stirring constantly until the mixture thickens and coats the back of a spoon.
  5. Remove from heat.
  6. Pour into a large bowl and cool to room temperature, stirring occasionally.
  7. Have six one-cup wide-mouth canning jars out and ready.
  8. In a small bowl with the mixer at high speed, beat egg whites until soft peaks form.
  9. Continue beating at high speed and gradually sprinkle in remaining 1/2 cup sugar.
  10. Beat until the sugar is completely dissolved. Whites should stand in stiff peaks.
  11. Fold the whites into the bowl with the blueberry mixture.
  12. In a separate small bowl with the mixer at medium speed, whip the coconut cream.
  13. Fold whipped cream into blueberry mixture.
  14. Divide into wide mouth jars.
  15. Chill the dessert in the refrigerator until firm, at least 3 hours.

Ingredients for Meringue Top

  • 6 egg whites
  • 1 cup granulated sugar
  • 1 teaspoon vanilla extract

Directions for Meringue Top and Assembly

  1. Place the egg whites in a large, very clean mixing bowl.
  2. Beat whites on high speed.
  3. When whites start to thicken, slowly add in the sugar a little at a time.
  4. Beat on high speed until stiff peaks form.
  5. Spread the meringue over the entire dessert. Toast the meringue using a chef’s torch.(People say, you can toast meringue under the broiler in the oven. If you don’t have a kitchen torch, this might be an alternative way of toasting. I have never tried this.)
  6. Serve immediately.

*You can make blueberry juice by taking about a cup of blueberries and an ounce of water and simmering for about ten minutes. Using a potato masher, smash the berries. Place mixture in a cheesecloth-lined wire-mesh strainer and let the juice drip through. To keep the juice clear, do not squeeze the cheesecloth.

Alaska Moose Wonton Soup

Hot, spicy, hearty – a perfect meal for this frigid Alaska weather.

Nothing beats hot soup on a cold day. What about after a hike on a cold day? Yup. Hot, hearty soup. Jack upped the ante on this soup by floating my homemade moose wontons in his hot and sour soup – beef broth, lots of hot spices paired with freshly squeezed lime juice and a dash of sesame oil. “Ooooh, Andy!” (Calm yourself Aunt Bee.) This spicy fusion warmed the heart, then the soul, and then traveled from the top of my head to the tips of my chilled toes.

A couple of weeks ago, I experimented with making my own wonton wrappers. The egg noodle recipe I used for my pasta worked extraordinarily well for the little dumplings. Instead of slicing the noodles into strands, I left them in three inch sheets which I cut into squares. Having already made the seasoned ground moose, I did nothing more than gather the dough around portions of meat and voila! – wontons. A big batch kept in the freezer allows us to throw a few into simmering soups. After a few minutes of cooking, wonton soup’s on!

Alaska Moose Wonton Soup

Ingredients

  • 2/3 lb ground moose (any ground meat will work)
  • 2 tsp soy sauce
  • 2 tsp chives, chopped small
  • 1 tsp rice wine vinegar
  • 1 tsp corn starch
  • 1 tsp dried ginger
  • 1 garlic clove, chopped fine
  • 1/2 tsp red pepper flakes or 1/2 tsp of your favorite spice mix like Jack’s
  • 1/2 tsp sesame oil
  • 1 package wonton wrappers or homemade pasta cut into 3” squares

Directions

  1. Quickly sauté ground meat, careful to just cook through
  2. Place meat in a bowl
  3. Mix next eight ingredients into cooked meat
  4. Place about a tablespoon of the meat mixture onto the center of a wonton wrapper
  5. Gather all the edges up to make a bag shape
  6. Gently squeeze together the closure or the neck of the wonton
  7. Place on a baking sheet if you are planning to freeze the wontons and place the baking sheet in the freezer until the wontons are frozen solid. Then store the frozen product in a zip top bag in the freezer until you want to use them.
  8. To cook, place wontons in simmering soup for 3 minutes. If frozen, cook for 4 minutes.

Two-Cheese Stuffed Artichokes Appetizers – (Shhh! It’s really a meal)

Days on end with temperatures stuck below zero, occasionally warming into the single digits or teens to snow. Winter is here, a time when comfort food is never more comforting.

For the first time in several days, we woke this morning to temperatures above 0° Fahrenheit. With the relative warmth, a fresh layer of snow is beginning to accumulate. Black-capped and Boreal Chickadees are nearly constant visitors to the feeders outside our living room window, and from our home’s southwest windows is a view of a river locked in ice.

Aside from summer-caught salmon fillets and wild blueberries, lingonberries and mushrooms gathered near our Newhalen home, most of our groceries come to us by small plane from Anchorage. Out of the asparagus we’d asked for, our shopper at Costco recently substituted artichokes. They’re beautiful, but other than steaming them and creating some sort of buttery dip, we don’t have much experience with this vegetable.

As it happens, we’ve been watching Italian Food Safari, a show created in Australia where Italian families have lived for generations preserving and expanding on the gustatory traditions they brought with them to their new country. It was in one of the show’s episodes that we were introduced to the wonderful idea of stuffing artichokes.

While this dish requires a certain amount of passive preparation time in the form of soaking and steaming the artichokes, the actual preparation is fairly simple. Create a mixture that will steam well and compliment the vegetable, chill a bottle of Pinot Gris or dry Riesling, prepare couscous, brown rice or something similar as a bed for the finished artichoke, and if you’ve never served an artichoke this way before, prepare yourself to be amazed.

Directions

  1. For each artichoke, cut the stem off so that the artichoke will sit upright in a steaming pot. Then cut off the top 1½ inches or so of the artichoke as these ends are mostly prickly and inedible. Next, use a melon baller or paring knife to remove the fine, thistle-like down (the choke) in the center of the artichoke. Taking a moment to do this will result in a more pleasant dining experience. Soak the artichokes in cold water for 30 minutes. You will want to use something to keep them fully submerged. This will ensure they steam nicely.
  2. There are probably all kinds of ingredients that would work well as the stuffing, but you’ll want to avoid items that will overwhelm the subtle flavor of the vegetable. We started by peeling the artichoke stems, chopping them fine and placing them in a bowl. To this, we added chopped garlic, crumbled feta cheese, grated Comté cheese, panko, Italian herbs, olive oil and fresh lemon juice. The cheeses were sufficiently salty that we didn’t add additional salt. Adding a splash of sherry or whatever wine you plan to serve works well. Although we didn’t add any type of meat or seafood to this mixture – and after serving the artichokes agreed that most meat and seafood wouldn’t work very well – we did think that Dungeness or Blue crab might do the trick. Italian-style breadcrumbs would work well as a substitution for the panko. Mix the ingredients together.
  3. Remove artichokes from the cold water where they’ve been soaking and push and pull the petals apart to create spaces into which the mixture can be stuffed. Fill as many of these spaces as you reasonably can.
  4. Arrange the stuffed artichokes stem-side down in a steaming pan – one you’ve prepared so that the artichokes can steam without being immersed in water. A canning rack, or even canning jar lids, works well for this. Steam for 45 minutes.
  5. Finish the artichokes with a drizzle of olive oil and a dusting of smoked paprika. Serve hot on a bed of rice, couscous, quinoa or something similar and celebrate the day with a glass of Oregon Pinot Gris. Don’t forget to provide a bowl for the discarded petals.


Salmon and Bleu Cheese Appetizers with Spicy Mayo

Served hot or cold, these appetizers will go fast at your next get together. Or reimagine them served in a toasted bun as a salmon meatball po’ boy!

Looking forward to a recent Friday night get-together (and football playoff snacks beyond that), I wanted to come up with something new in the salmon appetizer category – hopefully something even kids and non-fish-eaters would happily dig into.

This is it, and here’s how to make them. And by the way, we urge readers to always choose wild-caught salmon. By valuing wild salmon, you are helping to ensure that the ecosystems wild salmon depend on are also valued and will be protected for generations to come. This is vital not just for preserving the beauty of these landscapes, but for ensuring that everything that depends on wild salmon – orcas, bears, eagles, countless other animals and the salmon forests themselves – will continue to thrive. Choosing wild-caught salmon is quite likely the single most environmentally important food choice consumers can make. Read more at: Salmon Make a Landscape More Beautiful. 

Salmon and Blue Cheese Appetizers with Spicy Mayo

Ingredients for the Salmon Appetizers

  • 1 pound wild-caught salmon fillets, skinned, boned, rinsed and patted dry with paper towels
  • 1 large egg
  • soy sauce
  • smoked paprika
  • black pepper
  • mesquite seasoning (optional, but the smoky flavor of a mesquite seasoning such as the Kirkland brand available at Costco works very well with the soy sauce to add umami to this recipe)
  • 3/4 cup bleu cheese, crumbled fairly small
  • 1 or 2 strips thick-cut bacon, fried and cut into small pieces
  • 3/4 cup panko (or substitute crushed saltine crackers)
  • extra virgin olive oil – enough to generously cover the bottom of whatever pan you use to cook the appetizers

Directions

  1. Use a meat grinder, food processor or stick blender to mince the salmon. Place in a mixing bowl.
  2. Add egg, soy sauce, paprika, black pepper and mesquite seasoning. Use a spoon or spatula to thoroughly mix.
  3. Fold in bleu cheese, panko and bacon with your hands.
  4. Shape into bite-sized balls.
  5. While these could be cooked using a variety of methods, the combination of a sauteuse pan (a frying pan with high sides) with about 1/8 inch (3mm) of oil and a pair of tongs or chopsticks works especially well for cooking these appetizers as you’ll be able to ensure that all sides of the salmon are seared. As long as you make sure the oil doesn’t get too hot – just enough to make a gentle sizzle – extra virgin olive oil is a good choice for the additional flavor it will impart. Over medium to medium-low heat, bring the oil to a gentle sizzle. Arrange the appetizers so that there is a little space between them. After about 3 minutes, turn them over. You can use tongs or chopsticks to briefly position them to touch up sides that didn’t get seared. (This is mainly a cosmetic concern rather than something that will affect their taste.) Cook about 6 minutes total.
  6. Serve hot, chilled or in-between along with a dipping sauce and lemon wedges.

Directions for Spicy Mayo

While you can use store-bought mayonnaise, homemade is very flavorful. Here’s a quick, easy recipe: One Cup Mayo, and Hold the Preservatives! Stir in a favorite spicy seasoning blend. Here, too, there are all kinds of store-bought options, but if you’d like some inspiration for creating your own, see: Smoky & Spicy: Our Go-To Mix

Wonderfully Silky, Sumptuous Chanterelle Mushroom Soup

Forget everything you know about mushroom soup and slip a spoon into chanterelle magic.

This past fall when Costco (which we can now have delivered to our home in the Alaska bush) offered fresh, wild-picked chanterelle mushrooms, I couldn’t resist ordering a few pounds. I wasn’t sure what I wanted to do with them other than savor them with a little olive oil, garlic and mozzarella on one of Barbra’s homemade thin pizza crusts, or perhaps present them in an egg-white omelette, but I was confident I’d find something. An internet search brought up Escoffier’s Chanterelle Soup. Reading through the recipe, I began mentally picking out the bottle of Chardonnay I’d pull from the rack to serve with it.

While I stayed fairly true to Auguste Escoffier’s Veloute Agnes Sorel – based on the various English versions of the recipe I scanned through – I made a few adjustments, particularly the second time around. We don’t stock brandy, but we have bourbon on hand; that was an easy swap and it worked well. The chicken broth the original recipe calls for is fine… but we felt that lobster stock, made with Better than Bouillon’s Lobster Base, worked exceptionally well. And toward the end of cooking, a taste suggested that not only serving a Chard with this soup would make for an excellent pairing, but that a quarter cup or so to finish the soup might be warranted as well. In fact, we were amazed at the way in which a little Chardonnay brought this soup together, making the already subtle, silky transitions in the flavors of cream, butter, bourbon, saffron and chanterelles even smoother.

This is not a difficult recipe, but it does have distinct preparation steps. A velouté (vәl-ü-tā) must be created – a mixture of butter, flour and broth. And in the creation of a liaison of egg yolks and cream lies much of the secret of this soup’s silky feel.

Oh, and don’t skimp on the saffron.

Ingredients  (Serves 4+)

For the Velouté

  • 6 cups lobster stock (use Better than Bouillon Lobster Base)
  • 2 tbsp unsalted butter
  • 2 tbsp all purpose flour

For the Soup

  • 1 pound of chanterelle mushrooms, chopped fine
  • salt
  • 1/2 cup shallots, chopped fine
  • 1 tbsp unsalted butter
  • 3 egg yolks
  • 1/2 cup heavy whipping cream
  • 2 oz bourbon
  • saffron – approximately 2 full pinches
  • 1/4 cup or slightly more of Chardonnay
  • salt to taste/if necessary
  • a few especially nice chanterelles set aside as a garnish for each bowl

Directions

  1. Heat the stock, but try to keep the temperature just below simmering.
  2. Meanwhile, in a separate pot or pan (a large sauteuse pan works well for this) over medium-low heat, melt the butter until it begins to froth. Whisk in the flour. Continue whisking until mixture is cooked through and smooth, but do not allow to brown. This is called a roux.
  3. Whisk the broth into the roux and bring to a low simmer, stirring frequently. Cook this down by about a fourth or slightly more. Don’t let it boil. A very gentle simmer will reduce the velouté in about 30 minutes.
  4. Meanwhile, sweat the chopped mushrooms and shallots with a little salt over medium-low heat in a dry pan. Stir occasionally and cook till the shallots are translucent and the mushrooms have given up moisture and have browned. When they’re ready, add a tablespoon of butter and stir together.
  5. Crumble the saffron into the bourbon. This can be done earlier. The idea is to allow the saffron to begin releasing its flavor and color.
  6. Add the bourbon and saffron mixture to the mushroom mixture. Turn the heat up and stir until most of the bourbon has evaporated.
  7. Purée the mushroom mixture in a food processor or with a stick blender.
  8. When the velouté has cooked down by 1/4 or slightly less of its original volume, add the mushroom purée and stir well. Try to keep the temperature just below simmering or at a very low simmer. When the mushroom mixture is thoroughly incorporated, turn the heat to low to keep the soup hot without simmering.
  9. In a mixing bowl, whisk together the egg yolks and cream. This is a liaison. The intention here is to create a binding agent that will thicken the soup.
  10. Into the egg yolk and cream mixture, whisk in about 1/4 cup of soup at a time. By introducing the hot soup a little at a time while whisking, you will ensure that the liaison remains smooth and doesn’t break up. Once you’ve whisked in a total of about two cups of soup, you can now stir all of the liaison into the soup. Again, keep the soup hot, but at or below a very low simmer. Do not let it boil.
  11. Add 1/4 cup of Chardonnay. Give the soup a taste. Add a little more wine or salt, if necessary.
  12. To serve, garnish each bowl with a chanterelle and perhaps a drizzle of melted butter. Enjoy with a crusty piece of bread and a favorite Chardonnay.

Salmon (or any fish) in Saffron Broth with New Potatoes

Salmon worked wonderfully in this easy yet exotic meal, but halibut would also shine as would walleye, rockfish and most other fillets.

Saffron, the dried stigmas of crocus flowers, imbues food with a rich yellow-orange color and distinctive flavor that goes especially well with fish. Since it only takes a healthy pinch of the crumbled filaments, it’s not as expensive to use as you might think. We’ve been using Spanish coupe grade saffron from Penzeys Spices and have been very happy with it.

Crocus sativus, the saffron crocus – https://commons.wikimedia.org/wiki/File:Saffron8.jpg

This is our take on a recipe we found in a recent addition to our cookbook collection, The Complete Mediterranean Cookbook from America’s Test Kitchen. Their recipe calls for hake, chorizo and clam juice. Along with a few other minor changes, we substituted salmon fillets, thick-cut bacon and fish broth made from salmon and added a bit of powdered chipotle, cayenne and mesquite to emulate chorizo’s spicy smokiness. With most of the fat rended from the bacon, and the cooked bacon then pressed between paper towels, this is a healthful, satisfying one-bowl dinner. Add hunks of crusty rustic-style bread, and while you can seldom go wrong with salmon and Chardonnay, try pairing this dish with a Riesling that has a hint of sweetness to it.

Salmon in Saffron Broth with New Potatoes

Ingredients

  • extra virgin olive oil
  • sweet onion, chopped fine
  • thick-cut bacon, fried, pressed between paper towels and cut into small pieces
  • garlic cloves, minced
  • saffron
  • fish stock – clear, preferably homemade from fresh fish as we’ve found it difficult to obtain quality fish stock otherwise. Or use clam juice.
  • water
  • dry white wine
  • small red or yellow potatoes
  • seasonings: bay leaf, marjoram, soy sauce (or sea salt), chipotle powder, cayenne pepper,   and mesquite (for additional smokiness)
  • salmon fillets, skin removed and fillets patted dry (We felt that almost any type of fish   would work well in this dish.)
  • freshly ground black pepper
  • chervil or parsley
  • fresh lime juice

Directions

This works best in a sauteuse pan. You don’t need a lot of broth in this dish – perhaps a cup or so per serving. The potatoes and fish should rest in the broth, not be completely covered by it.

  1. Sauté the onions in olive oil. When they just begin to caramelize, add the minced garlic and crumble in the saffron. Cook for about 30 seconds, just till the garlic releases its aroma.
  2. Stir in fish stock and wine.
  3. Add potatoes and the seasonings – just a little of each as you can always add more if you need to. Give the broth a taste. If the flavor of the fish stock or clam juice is too strong, add a bit of water.
  4. Keep heat fairly low, at – or preferably just below – a low simmer. Cook until potatoes are tender – almost ready to serve. Taste broth and adjust seasonings as desired.
  5. Season the salmon fillets with freshly cracked pepper. Create space in the pan and position the salmon fillets skinned side down in the broth. Cook at or just below a low simmer for 7 to 12 minutes, depending on the thickness of the fillet. With salmon, you’ll see white albumin form on the fillet when it is cooked through. You can check with a thermometer – 140° F for fish.
  6. Remove pan from heat. Gently stir in a little lime juice and a sprinkle of chervil or parsley.
  7. Serve in shallow bowls, spooning some broth over the fillet.

Hot off the Grill: Two-Cheese Alaska Salmon Burgers

Wild Alaska Salmon on pan toasted homemade English muffins, wild Alaska blueberries and a big mug of coffee – a wild way to start the weekend.

This is easy. Take a wild salmon fillet, remove the skin, chop up the fillet and put it in a bowl. Add equal parts grated mozzarella and crumbled goat cheese. Sprinkle in a spicy seasoning – something with smoked chipotle is especially nice. No salt needed as the cheese should be salty enough. That’s it. Now shape the mixture into burgers and fry in olive oil, flipping once.

Served on English muffins that have been pan toasted in olive oil, these make for a terrific weekend brunch. Or put the burgers in traditional hamburger buns. Try them with a little Dijon mustard. Bon appétit!

Wild About Wild Mushrooms – Lentil and Wild Porcini Pâté

Wild Alaskan porcini mushrooms star in this pâté recipe – the perfect snack or appetizer served on rice crackers, summer squash or zucchini. 

Many years ago, Jack and I took a mushroom foraging class from a park ranger in Oregon. With the help of our instructor, we learned about local mushrooms and actually found one King Bolete mushroom. At the end of that experience, I had more fear of “false mushrooms” that could make me sick or even kill me than anything else. Since then, I’ve been on countless hikes and found countless mushrooms I wouldn’t dare eat – even though they look perfectly safe. When we moved to Newhalen and began fishing and foraging for berries, we began noticing mushrooms the color of browned bread. Big ones. As usual, Jack and I wondered if they were edible. After one quick wondering, we resigned ourselves to knowing our mushrooms would come from a store and went back to the task at hand.

We were delighted to learn that one of the locals here in Newhalen is an expert on mushrooms. She volunteered to take a few of us out a couple of weeks ago and teach us about Newhalen fungi. Turns out, all those big mushrooms we had been seeing are types of boletes (otherwise known as porcini) and are not just edible, but are delicious!

Many people dry these mushrooms. We also heard that they can be frozen. After a bit of experimenting, we decided to vacuum-pack them and freeze them for the winter. Of course, we’ve kept out a few for now. Many have already starred in our recent evening meals – sautéed with garlic in olive oil to serve over pasta and atop Swiss mushroom burgers. Mmmm. Both of us are alive and kicking and now armed with confidence to continue foraging for these delicious beauties on our local hikes.

I came up with this mushroom pâté recipe a couple of years ago with store-bought ingredients. It was created with an intent to mimic one of my favorite Jewish foods – chopped chicken liver. This recipe not only tastes surprisingly like the delicious spread from my memory, but it brings it into the category of good for you, not just tasty. Traditional chopped chicken liver recipes are loaded with flavorful, but not so healthy fats. The chicken liver itself is low in fat but is high in cholesterol. You can use store-bought crimini, button, or shiitake mushrooms. But if you have access to wild porcini or other wild mushrooms, they will up the flavor of this pâté. Also, don’t save this recipe for a special occasion. This scrumptious mushroom and lentil spread is packed with flavor, is low in fat and cholesterol and high in fiber and protein, which makes it a go-to for a pre-run snack or a mid-afternoon pick-me-up.

Nutrition Info Lentil Wild Porcini Pâté

Wild Porcini Mushroom and Lentil Pâté

Ingredients

  • 2 cups cooked lentils, any color
  • 2 cups chopped wild porcini mushrooms
  • 4 tbsp extra virgin olive oil
  • 1 small onion, diced
  • 4 cloves garlic, diced
  • 1 cup almond flour
  • 1 tbsp freshly squeezed lemon juice
  • 1 tbsp soy sauce
  • 1 tsp rosemary
  • 1 tsp thyme
  • 1 tsp honey
  • pinch cayenne pepper
  • salt to taste
  • extra olive oil, needed

Directions

  1. In a large sauté pan, heat 4 tbsp olive oil over medium heat.
  2. Add onions and sauté until translucent.
  3. Add garlic and sauté for 2 minutes.
  4. Add mushrooms and cook until they are soft and cooked through. Remove from heat and set aside.
  5.  In a large bowl, combine almond flour, lemon juice, soy sauce, rosemary, thyme, sage, honey, and cayenne.
  6. Stir in mushroom mixture.
  7. Using a stick blender (or food processor), purée the mixture.
  8. Add in cooked lentils.
  9. Purée the mixture until smooth.
  10. If the mixture feels too thick, thin it with additional olive oil.
  11. Salt to taste.