Three Cheese Dungeness Crab Ravioli

Dungeness Crab Ravioli
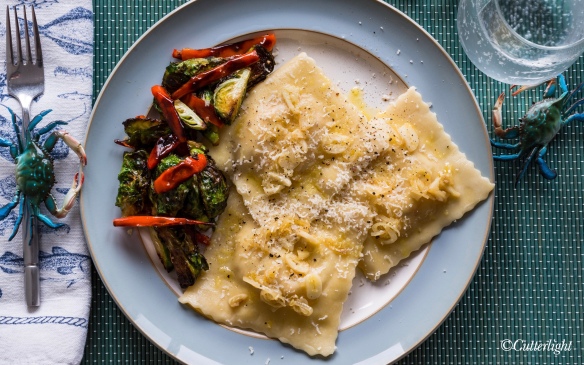
Giant ravioli stuffed with creamy cheese and sweet Dungeness Crab. Happy 2021 from The Lake!

“Jack?” It was Donny on the phone. “Come down to the beach and get some crab! Bring a tote. There’s lots!”

I’d been photographing kinglets in a copse of spruce trees a two-minute walk from my house when I got the call. Crab?! I didn’t waste any time retracing my steps. Back home I went straight to the living room window. Sure enough, there was Donny talking with a man and a woman I didn’t recognize who had nosed an unfamiliar skiff into the lakeshore. On the beach near Donny were three or four large tubs. I set my camera gear aside, grabbed a bright pink plastic tote, slipped my feet into boots and made my way down to the scene.

The skiff and its occupants were with the Alaska Department of Fish and Game. Apparently, they’d been sampling the Dungeness Crab population in the Chignik estuary and nearby waters and with a good haul of the tasty crustaceans had made the six-mile run up the river to share the bounty. I greeted Donny, introduced myself to the ADFG crew, and surveyed the tubs heaped with crab. There were indeed “lots.”

“Go ahead and fill that tote,” Donny advised. “And make sure you get some big ones.”

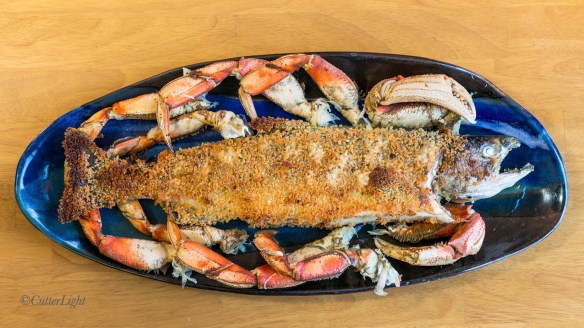
They were good-looking crabs. Legal males. Clean, shells filled out, two-pounds on average, still kickin’, sea-scented.

That night, quite literally everyone in the village of Chignik Lake feasted on fresh Dungeness Crab. All 50-something of us.

Barbra and I spent a good bit of that evening steaming Dungies three at a time in our big soup kettle. We picked two that night for dinner, complimented  with a bottle of Chard. The rest were frozen for later use. We did this by first freezing the crabs in regular zip-seal plastic bags. Similar to berries and other fragile items, once the crabs are frozen hard they can be vacuum-packed without being crushed. Frozen this way, the crabs are perfect and keep a long time. Which is a good thing; we ended up with a lot of crab.

The ravioli? Once you’ve got the pasta made, there’s really nothing to it.

I combined equal amounts of mozzarella, goat and feta cheeses along with a blend of Italian herbs. To this mixture, I added an equal amount of Dungeness Crab and hand-tossed the ingredients together.

Meanwhile, Barbra rolled out the pasta and cut it into nice, big three-and-a-half inch squares, filled them with the crab and cheese mixture and crimped them closed with a pastry roller. It is important to use a sharp tool for the crimping. It helps to ensure that the ravioli remains sealed.

To avoid crowding these large raviolis, I used two pots, each with a good amount of water. Once the water came to a boil, I added the ravioli. After three minutes, I gently flipped them to ensure even cooking of the pasta and the filling – a total of six minutes.

Meanwhile, in a small skillet on a back burner, I heated extra virgin olive oil over medium heat. When it was hot, I added shallots and garlic sliced as thin as I could manage along with a tablespoon of butter and a couple of healthy pinches of sea salt. This is a wonderfully simple accompaniment for delicately flavored pasta. I finished the dish with a grind of black pepper and a bit of grated Parmigiano-Reggiano.

By the way, these raviolis freeze well. Simply lay them out on a cookie sheet, freeze them solid, and then pack them in plastic bags. Cook them frozen, adding a minute to the overall boiling time.

With a surfeit of tasty Dungies in the freezer, expect more crab recipes in the coming weeks!

Salmon Cheddar Bisque with Morels

Salmon Cheddar Bisque with Morel Mushrooms

I’ve been making A. J. McClane’s Lobster Cheddar Bisque for quite a few years. The original recipe appears in my all-time favorite book on cooking fish, McClane’s North American Fish Cookery. Although by now I’ve strayed from the original recipe, spending time in the kitchen with an icon whose books and articles influenced me to seek the life I’m now living is invariably pleasant.

In addition to the connection with one of my personal culinary and angling heroes, I enjoy creating this bisque with ingredients that are in their own right touchstones. The Tillamook cheddar I use takes me back to the years I spent on the Oregon coast; the Coho salmon I used to catch in those days is replaced in this current iteration with Chignik River Sockeye. In Oregon, a friend’s gift of a large paper bag filled with freshly picked chanterelles inspired one version of this soup; the morels we recently came into from interior Alaska have inspired another.

The last time I published the recipe for this soup, I used lobster mushrooms. You can check out that recipe at: Salmon Cheddar Soup with Lobster Mushrooms

Here’s how I made it this time around.

Ingredients

  • 1/2 pound pan-fried Sockeye salmon, boned, skinned and flaked or cut into bite-sized pieces
  • *1¼ cups or so of morel mushrooms, cut so that a slice of morel and a chunk of salmon might both fit in a soup spoon
  • soy sauce
  • part of a red bell pepper, diced fairly fine. (I used a little over a tablespoon of Penzeys dried bell pepper.)
  • ¼ cup shallots, diced fine (I used Penzeys dried shallots.)
  • 2 tablespoons flower as a thickening agent. (White rice flower works best for this as it imparts very little flavor. But regular all purpose flower is fine.)
  • 1 tablespoon each olive oil and butter (for sautéing the mushrooms)
  • 3 cups milk
  • 1¾ cups shredded cheddar cheese
  • 1 or two tablespoons Better than Bouillon lobster base (optional). This is salty, so if you use it, be sure to taste as you go.
  • ⅛ teaspoon ground nutmeg
  • 1 teaspoon smokey mesquite seasoning
  • ½ teaspoon smoked paprika

*When sautéing the mushrooms, a splash of Sherry or Chardonnay and a dash of soy sauce can be nice. It’s up to you.

Directions

  1. Heat olive oil and butter in the pot or sauteuse pan you will use to make the bisque. Medium heat.
  2. When the butter mixture begins to bubble, add the sliced mushrooms and toss to coat. Sauté the mushrooms for about two minutes. Add the shallots, bell peppers, a splash of white wine and soy sauce to finish. Lower heat.
  3. Vigorously stir in flour. Add milk, seasonings and lobster base. Stir till mixture begins to thicken. Keep it hot, but don’t let it boil.
  4. Add salmon and cheddar cheese. Taste the soup and add additional seasonings as necessary.
  5. Garnish with a pinch of paprika. Serve piping hot with a favorite bread.

Provided the soup wasn’t allowed to boil, it refrigerates well.

The Chignik Jack: Panko Crusted Coho Jack Salmon Stuffed with Dungeness Crab

panko crusted salmon stuffed with Dungeness crab

The perfect marriage of River & Sea – Dungeness-stuffed whole jack salmon.

Each year we try to take a couple of char or salmon in the pound-and-a-half to three-pound range, the perfect size for presenting head and tail intact. When I lived in South Carolina, I sought Puppy Drum (small Red Drum), Speckled Sea Trout, Summer Flounder and keeper-sized Striped Bass for these dishes. If I lived in the American midwest, I’d target Walleye or bass from cold water. In Japan, small suzuki (Japanese Sea Bass), hirame (Olive Flounder) and kurodai (Black Porgy) fit the bill.

The salmon in the photo was about 17 or 18 inches in length and weighed just over a pound-and-a-half. Jack is the name given to precocial male salmon that mature early and return to the river after only a year at sea. Were I running a restaurant, I’d offer this dish as a special and call it The Chignik Jack, as in,

“What’ll it be, Mac?”
“I’ll have the Chignik Jack.”

The recipe here couldn’t be more straightforward. The stuffing is comprised of the back meat of a Dungeness Crab, steamed or boiled and lightly seasoned, perhaps a bit of fresh lemon juice added to the cleaned meat. Crab meat tends to be wet, so use paper towels to gently squeeze out excess moisture from the cooked meat. You might even heat the meat in a dry, non-stick skillet to remove additional moisture.

The fish is scaled, gilled, gutted and cleaned. Spritz the stomach cavity with lemon juice, rub in a little salt, add the crab meat and then roll the fish in panko that you’ve seasoned with salt and Italian-style herbs. This is a relatively light dish; you don’t need any batter, just the seasoned crumbs.

Meanwhile, set the oven to 400° F and put enough olive oil on a broiling sheet or pan to cover it and heat it on a center-positioned rack till the oil is hot. I use a heavy, rectangular, well-seasoned cast iron pan for this kind of cooking, but a thinner baking sheet will work. The fish should sizzle when you place it on the pan. After about 4 minutes, check the down side to make sure it’s not browning too quickly. Continue baking for a total of about 8 minutes, and then carefully turn the fish to the other side. It can help to have someone man an additional spatula to help with this.

Bake for another 8 minutes, again checking  halfway through to make sure the skin and panko are browning properly. In the above fish, I set the oven to broil for the final couple of minutes to further crisp the presentation side. The tail came out crunchy as a potato chip – a delicacy in its own right. And speaking of delicacies, don’t forget the cheek meat just in back of the jaw; the scallop-like morsel has a texture unlike any other part of the fish.

Paired with a buttery chardonnay, this is a lovely meal to enjoy with your best friend.

Tomato Tarragon Halibut

I suppose that like many people, I grew up inculcated with the idea that dill and fennel are the quintessential herbs for fish and other seafood. Lately I’ve been circling back to rediscover the pleasant tang of dill, prompted by small bunches of the feathery stalks occasionally showing up in boxes of fresh produce sent to us from The Farm Lodge at Lake Clark. These days even when I don’t have fresh dill on hand, I’ve been making dry dill a regular part of certain salmon and shellfish recipes, particularly when I’m going for a bolder flavor than what might be supplied by, say, lemon grass.

Fennel is another matter. Neither of us have ever entirely warmed to the sharp anise taste and aroma it imparts. We like licorice, but not so much on salmon and subtly flavored seafood. When I discovered tarragon while searching for a fennel substitute some decades ago, it seemed I’d stumbled upon the perfect seafood herb. There’s an anise-like savor to it, but to our palate tarragon profiles as gentler and sweeter than fennel. It’s wonderful on steamed clams and mussels, makes an excellent a-little-something-extra in drawn butter dipping sauces, and beautifully complements virtually any white-meated fish from catfish to cod. In this recipe, tarragon brings together the flavors of garden-fresh tomatoes and halibut in a dish that is simple, beautiful and sumptuous. 

Try serving this dish with very thin slices of sourdough French bread or baguette pan-toasted in butter till crisp and seasoned with garlic.  

Tomato Tarragon Halibut

Ingredients

  • halibut fillets, patted dry to remove excess moisture. We prefer skin-on, but it’s up to the chef
  • extra virgin olive oil
  • onion, diced
  • garlic cloves sliced into fairly large pieces
  • sherry or other dry wine
  • tarragon, fresh or dried, to taste
  • fresh tomatoes, seeds removed, diced
  • Better than Bouillon clam base (optional) or use sea salt
  • soy sauce

Directions (You will need two frying pans.)

  1. Add olive oil to the first pan, apply medium heat and add the onions. You want the onions to caramelize, so don’t stir them too much. They’ll caramelize better if you mostly leave them alone.
  2. When onions begin to caramelize, add the garlic and stir. Cook for about 3 minutes – just until garlic begins to soften. Then add a little sherry and the tarragon. Stir and allow most of the wine to cook off. This only takes a minute or so.
  3. Add the tomatoes. Cover with a lid and reduce the heat so that the mixture simmers steadily. You want the mixture to cook down to a fairly thick consistency.
  4. As the tomato mixture is cooking, stir in either the clam base or salt. The clam base itself is quite salty. Don’t use too much. You want just a hint of the clam flavor. Alternatively, simply add a little sea salt. The mixture is very tasty either way.
  5. When the tomato mixture has cooked down, add olive oil to the other pan. Heat over medium until the oil is sizzling hot. Continue allowing the tomato mixture to simmer.
  6. Place the fillet(s) in  the hot oil presentation side up (skin side down if you’ve left the skin on.) The fillets should sizzle when they hit the pan. Pour a little soy sauce on the fillet. This will impart a pleasant umami flavor and will enhance the browning color when you flip the fillet.
  7. Cook uncovered for 3 minutes. Flip the fillets and cook the other side for 3 minutes.
  8. Place the fillets presentation side up in the tomato mixture. Cover with a lid and continue cooking for about four minutes. The general rule of thumb for fish is 10 minutes cooking time per inch of thickness. You can test the fillets for doneness by carefully inserting a knife and parting the meat. A perfectly cooked halibut fillet will be an opaque white all the way through and will flake cleanly. Don’t worry if you don’t get this perfectly right. If the fillets are a little overcooked, they will still be very good.
  9. Spoon out the tomato mixture on serving plates, add the fillet, and served piping hot with pan-fried toast. 

Any style of Chardonnay will pair well with this dish. Dry Riesling is another white option, but there’s enough oomph here to make a Pinot Noir a good choice as well. 

Scrap Soup – Getting the Most from Those Precious Vegetables

Scrap Soup - Getting the Most out of Vegetables

Out in the Alaska bush, every scrap of vegetable is vital. …Come to think, of it, wherever you live, it makes sense to make the most out of vegetables – whether you grow them yourself, or purchase them at the market.

It’s been a week. Not good. Our boxes of produce from Fred Meyer in Anchorage shipped via U.S. mail on Monday. That’s Monday of last week. Usually these shipments arrive to us in about two days. Alas…

Even though we order hardy vegetables such as carrots, Brussels sprouts, onions and cabbage, there’s not likely to be much left of them by the time they arrive to our home in Chignik Lake, a village that defines “remote” out here on the Alaska Peninsula. Right smack in the middle of this Coronavirus epidemic… what a poor time for this president to “reorganize” the United States Postal Service. But, I digress. At Cutterlight we strive to keep things positive. (Interested readers can Google “mail delays.”)

The idea is not ours, but the moment we came across the concept of keeping an airtight container in the freezer in which to store the various cuttings, peelings and scraps from vegetable preparation, we knew we’d found a winner. Our container holds about 10 cups – perfect for turning out batches of vegetable broth on a regular basis. Onion ends, carrot peels, squash trimmings, one-use bay leaves, kale stems, cabbage cores and more – just about anything goes into the container.

When the container is full, the scraps go into a pot and are covered with water. I avoid outright boiling of soups. A very gentle simmer or near simmer for about 30 minutes is sufficient to bring out the flavors. I don’t salt or season the broth at this stage either. I’ll do that when I know what I’m going to use it for. When the 30 minutes are up, I pour the broth through a strainer to remove the vegetables. And that’s it. The result is an excellent base liquid for anything from chicken soup to vegetable soup. In a recent iteration, I added a variety of fresh, summertime vegetables and chunks of local halibut to the broth and served it on rice for a hearty Manhattan-style chowder. The broth is good stuff, and with no salt or seasoning added, it’s the perfect blank slate for your own creations.

Wild Delicious Refreshing Summer Parfait

Summer in the Chigniks, how do I love thee? Let me count the ways…

Berries beginning at the bottom:  watermelon berries, blueberries, salmonberries, and nangoon berries (aka wine berries). Simply put – the best way to start a glorious day in the Chigniks.

Fresh All Year Long: IQF – Individually Quick Frozen Berry Magic

Freshly Picked and Flash Frozen, these salmonberries will now be vacuum-packed and tucked away in the freezer for future use in pies, on breakfast cereal, and any other time we want high-quality berries.

Berry picking is a lot of fun. These days we’ve been cruising the shores of Chignik Lake and Chignik River, scanning likely looking spots on the hillsides for splashes of ripe orange-red among the light green leaves of salmonberry bushes. When we find a place that looks good, we beach the skiff and begin picking.

Not as resilient as blueberries, lingonberries, currants and crowberries, members of the Rubus family – raspberries, salmonberries and blackberries – benefit from a bit of TLC, especially when we want nice-looking fruit for finishing the top layer of pies or to be able to add individual berries to our breakfast cereal or to salads. So, for us it’s worth the little bit of extra effort to arrange the berries on a baking sheet lined with parchment paper and to quick freeze them. Once they’re frozen solid, the fruit remains separate and is firm enough to withstand vacuum-packing without clumping. The result is small bags of gourmet-quality individual berries, their flavor actually intensified by the freezing process.

Tis The Season For Rhubarb! Rhubarb Almond Cake

The delightful pinks and greens of rhubarb make this cake a beauty. The creaminess of almond flour and zippy tartness of rhubarb keep you coming back for more. We started this photo shoot with eight pieces. 😉

Happily, we are the recipients of the Farm Lodge produce boxes again. Every week we receive a mystery box packed with their latest ripened crops. The most recent box of vegetables we received was picked the same morning we received them! Most people probably would not find this remarkable, but we live very far away from sources of fresh fruits and veggies and so these Farm Lodge boxes serve as our Farmers’ Market. With the nearest grocery store hundreds of miles away, our fresh produce usually is limited to items which can withstand several days in a box while traveling through the U.S. Postal system to our home on the Alaska Peninsula. Thus, the veggie drawers of our fridge are usually stocked with carrots, Brussels sprouts, cabbage, onions, potatoes and the like. Being able to cook with freshly picked zucchini, tomatoes, cucumbers, and herbs is a summertime treat we relish.

One thing we’ve come to enjoy about the Farm Lodge produce is the surprise factor. The last box included a bright pink bunch of rhubarb stalks. Last summer, I really fell in love with this vegetable. Tartness is a flavor I adore. This ingredient has tartness in spades which compliments sweetness perfectly…it’s like a lemon’s brother from another mother. Our favorite rhubarb creation from last year was a sauce which we used to drizzle on top of warm brie and on grilled salmon fillets.

Wanting to do something different with this bunch, I looked back on recipe ideas I never got to try last year. On my list was a rhubarb custard pie. Jack loves custard and he loves pie, so I knew this one would be a winner. The problem was that one of the key ingredients I needed, heavy whipping cream, was not going to happen. Back to square one. I had seen a recipe of an almond cake made with almond flour. The almond paste-marzipan type flavor and dense texture sounded like a great pairing for the tart stems. With a bit of tinkering, I came up with a winner.

The finished cake was lighter than I had expected it would be. The almond and rhubarb flavors complemented each other very well. And the rhubarb kept its lovely pink hue, making for a stunning presentation. What did Jack think? He’s not usually a cake guy. This one got high marks. “Kind of like a custard pie,” he said between big bites of his second piece. Seeing how he is my main customer, I’ll put this one in the keeper section.

Rhubarb Almond Cake

Ingredients

  • 3/4 cup almond flour
  • 3/4 cup granulated sugar, divided
  • 1 cup all purpose flour
  • 1 1/4 tsp baking powder
  • pinch salt
  • 1/2 cut butter, melted
  • 3 large eggs
  • 1/2 tsp almond extract
  • 2 cups sliced or chopped rhubarb

Directions

  1. Preheat oven to 350°F.
  2. Grease a 9-inch springform pan. Set aside.
  3. In a large bowl, mix together almond flour and 1/4 cup sugar.
  4. Remove 1/4 cup of the mixture and set aside.
  5. Add flour, baking powder, and salt to the original large bowl.
  6. Mix butter, eggs, and almond extract into flour mixture.
  7. Pour batter into prepared springform pan.
  8. Sprinkle half of the reserved almond-sugar mixture over batter.
  9. Evenly place rhubarb atop batter.
  10. Sprinkle remainder of reserved almond-sugar mixture on rhubarb.
  11. Bake cake for 50 minutes. A wooden pick inserted to middle of the cake will come out clean when cake is done.
  12. Cool cake in pan on wire rack. Let cool to room temperature before serving.

Crispy, Crunchy, Homemade Rice Crackers

We’re at that clean-out-our-pantry time of year when we begin working through stores in earnest, cleaning out freezers and cupboards while we anticipate our annual summertime BST – Big Shopping Trip. This year? Plot Twists. First off, there’s the CoronaVirus. Here in Newhalen, if we’ve needed an additional ingredient, we’ve been able to drive over to our local general store – a small place that happens to have just about everything a person could ever need. We’re fond of saying, “If it’s not at the Iliamna Trading Company, you don’t need it.” Anchovies? They’ve got ‘em. Smoked oysters? They’ve got ‘em. Sanma, those delicious little tinned fish from Japan? No. Of course they don’t have those! I said it was a small store.

The other plot twist is an impending move. Wait. Did she just say “move?” Again? Didn’t she just move? And, like, for about the 80th time in the last 10 years?

Yep. Impeding move. We are heading back to the village where we left our hearts, back to Chignik Lake. Thankfully for everyone, enrollment appears to have stabilized at a number comfortably above the state-mandated minimum of 10. Of course, due to Shelter-in-Place orders and the wise decision among Alaska’s bush villages to prohibit people from flying in, we don’t know when the actual move will occur. It’s a good time to be staying close to home, cooking and baking through the larder.

The other day, I noticed that we still had a couple bags of dried chickpeas in our cupboard. I recalled that these bags had come with us last summer when we moved to Newhalen. “No way do these get on another plane,” I thought to myself. Fortunately, we had all the ingredients I needed to make a giant batch of hummus. Even lemons – which we hardly ever had at The Lake. Proof enough that Newhalen truly is the “Cush Bush.” (I’m smiling. It has been an easy and enjoyable year.) As soon as it the hummus was ready, we got out the last of our rice crackers and dug in.

But…

…thin, crispy, salty cracker by delectably thin, crispy, crunchy cracker…

Before I knew it, we were confronted with a problem. A big problem. I mean a Really Big Problem. All this fresh, delicious hummus and we had finished off the crackers! I sliced carrots thin and tried to substitute those. It was… well, if one must. We wanted crackers. Iliamna Trading would have them, but we’ve really been trying to honor the shelter-in-place edict.

Our dilemma got me to thinking about homemade crackers. This wouldn’t be my first rodeo in the world of crispy and crunchy. I’d made graham crackers, wheat thins, cheese-its, and more. But I’d never made rice crackers.

I found a base recipe and gave it a go. I’ll be honest, I worked and reworked this recipe before I met with success. I thought the last batch came out great. This was confirmed by Jack, “Forget about making dinner. Let’s just have crackers and hummus and watch old Suits episodes tonight!” he said as he reached for another cracker. Winner winner, hummus dinner!

They key turned out to be making the crackers really thin. After trying a rolling pin and then a pasta roller, I found the best way to make the dough thin enough was to flatten it using a tortilla press. By rolling the dough into marble-sized balls, I was able to press four crackers at a time. I know, that sounds like a lot of work for crackers. But, hey, I’m sheltering in. There’s time! And, man are they good!

Homemade Onion Rice Crackers

Ingredients

  • 1 cup rice flour
  • 1/3 cup water
  • 1 tbsp unsalted butter, melted
  • 1/2 tsp salt, non iodized will taste better
  • 1 tsp onion powder (or experiment with other spices and herbs)

Directions

  1. Preheat oven to 325°F.
  2. Line a baking sheet with parchment paper. Set aside.
  3. Cut the sides off of a ziplock bag to use to line the tortilla press later.
  4. Place all ingredients in a bowl.
  5. Stir with a fork until dough has crumbly chunks, like pie dough.
  6. Knead together. If it doesn’t come together, add water by teaspoons until it does.
  7. Using a teaspoon, scoop out some dough.
  8. Using your hand, roll it into a ball. The ball should be the shape and size of a marble.
  9. Place the ball between the cut ziplock sheets on a tortilla press.
  10. Press the ball with the tortilla press.
  11. Peel flattened ball off the plastic and place it on prepared baking sheet.
  12. Repeat with remainder of dough. You should be able to fit 4 dough marbles on your tortilla press once you get the hang of it.
  13. Bake crackers for 15-18 minutes. Keep an eye on them to make sure they don’t get overdone.
  14. Crackers will be slightly brown and crispy when they are done.
  15. Store cooled crackers in an airtight container.

Add a Little Zip to Your Morning – Ginger Crumbled Rhubarb Muffins

Spiked with a warm hit of ginger, rhubarb jam muffins quickly turn the feeling in our home from a dreary shelter in place to cozy and safely tucked-in.

A friend asked to trade some freshly laid eggs for some baked goods. With no dietary restrictions and no allergies I had a blank slate in front of me. I flipped through my mental recipe book of favorites. What a fun task! I visualized braided bread, focaccia, soft pretzels. Then I switched to sweets – mocha bars, monster cookies, blueberry pie. Last summer’s many warm and sunny harvesting days yielded gallons of berries and stalks upon stalks of rhubarb. I had made rhubarb sauce that went so well dolloped on warm brie cheese. I still have a few jars left of this concoction. With the snow falling outside, I thought the ideal baked good should conjure summer days. It was decided – rhubarb muffins. I thought a crumble crown would jazz up a potentially plain looking muffin. A bit of ginger and cinnamon added to the crumble finished out the flavor ensemble. The finished product came out moist and flavorful. A fresh cup of french roast, a rhubarb muffin and a fried egg – now that’s a warm and cozy breakfast!

Ginger Crumbled Rhubarb Muffins

Ingredients

For the crumble

  • 3 tbsp granulated sugar
  • 3 tbsp brown sugar
  • 1/4 tsp cinnamon
  • 1/8 tsp ground ginger
  • pinch salt
  • 4 tbsp unsalted butter, melted
  • 3/4 cup all purpose flour

For the muffins

  • 1 cup all purpose flour
  • 1/2 cup whole wheat pastry flour
  • 2 tsp baking powder
  • 1/2 tsp salt
  • 1 egg
  • 3/4 cup whole milk
  • 1/4 cup vegetable oil
  • 1/4 cup granulated sugar
  • 2 tbsp honey
  • 1 cup rhubarb sauce, or substitute your favorite jam

Directions

  1. Preheat oven to 375° F.
  2. Grease a 12-muffin pan. Set aside.
  3. Mix together all crumble ingredients.
  4. Break apart large chunks into pea-sized pieces. Set aside.
  5. For the muffins, in a large bowl, whisk together flours, baking powder, and salt.
  6. In a separate bowl, whisk together egg, milk, oil, sugar and honey.
  7. Stir egg mixture into flour mixture. Don’t overmix.
  8. Stir in rhubarb sauce.
  9. Evenly divide batter into muffin pan.
  10. Top each muffin with crumble mixture.
  11. Bake for 20-25 minutes. Muffins should be browned and an inserted wooden pick will come out clean when finished.
  12. Let cool on wire rack for about 10 minutes before removing from pan.