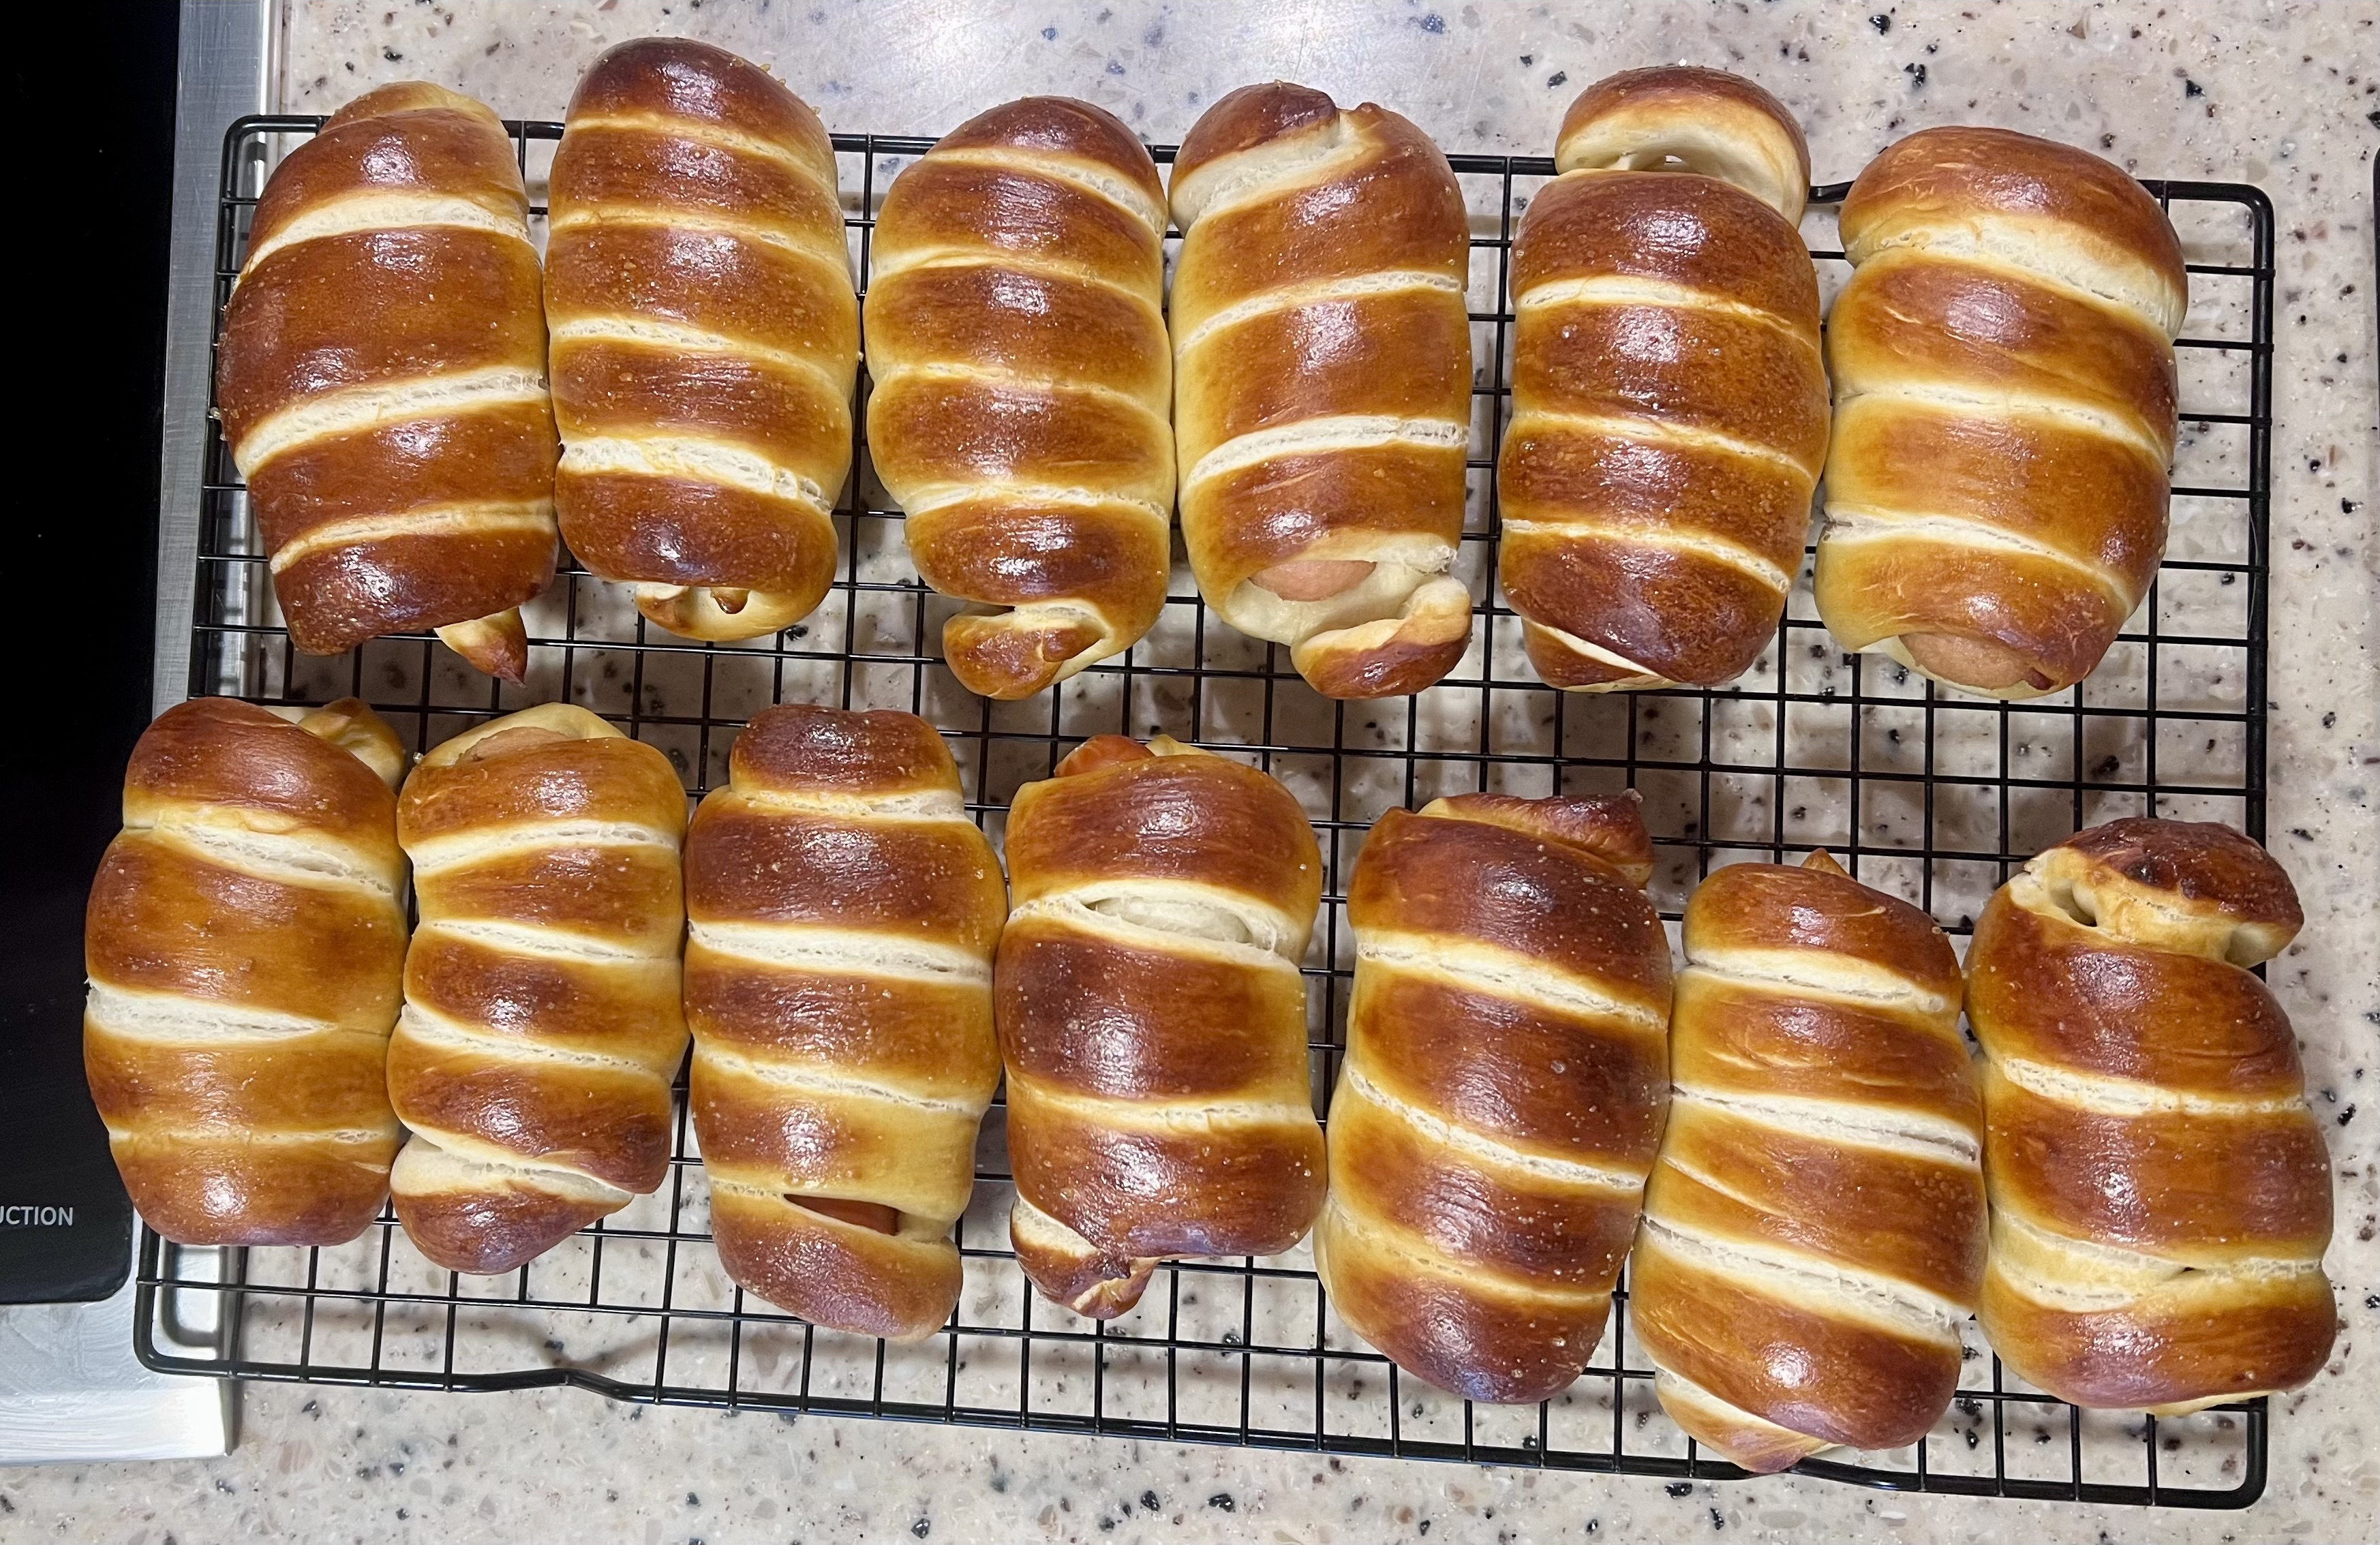
Don’t Discard the Discard Sourdough Crackers

Delightfully crispy and packed with flavor: cheese-like tang, garlic, onion, with a hit of salt. You’ll never discard your discard starter again.

One day, I noticed a friend had posted on a community webpage that she had extra sourdough starter if anyone wanted it. It made me wonder about extra starter – a problem I don’t seem to encounter. Due to a combination of where we live and our predisposition to avoid waste, we generally don’t have “extra.” Of course, shortly after coming to the conclusion that we’d never have extra starter, I had a week where I skipped making sourdough loaves and wound up with “extra starter.” One of my recipe books recommended discarding the extra. What?! I decided to taste it, to see if the flavor would inspire a recipe. Tasting raw starter was a bad idea. Yuck! 

After a bit of research, I decided to tinker with a cracker recipe I found on the King Arthur Flour website. My first batch came out wonderfully flavored, but too soft. The problem was the thickness. My rolling pin and I could not get the dough thin enough. The solution came to me after rolling lasagna noodles – the pasta machine! If you’ve only ever thought of your pasta machine as a noodle machine, think again. Besides wonderfully flavored and textured linguini and spaghetti, I’ve also cranked out perfect bowties, ravioli and even wonton wrappers. This seemingly single-purposed machine helps perfectly roll sourdough to make satisfyingly crunchy crackers.

If you don’t have a pasta machine, I highly recommend the Atlas model we have. It is a heavy beast, but it is a kitchen tool that’s made the cut every time we’ve had to pack up and move. If you don’t want to add another item to your cupboards, a rolling pin will still work with this recipe. Be patient and aim to roll a thickness of about 1/16”.

The finished crackers have a tangy cheese-like flavor from the sourdough starter. This in combination with a mixture of onion and garlic and a hit of grey sea salt make these crackers very addicting. Serve with the complementary topping of your choice. Or enjoy their flavor unadorned, as I usually do.

Don’t Discard the Discard Sourdough Crackers

Ingredients

  • 1 cup whole wheat flour
  • 1/2 tsp sea salt
  • 1 tsp granulated shallots (onion powder would work, too)
  • 1 tsp granulated garlic
  • 1 cup sourdough starter, unfed
  • 4 tbsp unsalted butter, melted
  • olive oil for brushing
  • coarse salt for sprinkling on top (I like grey sea salt)

Directions

  1. Mix first 6 ingredients to form a smooth dough.
  2. Tightly cover in plastic and refrigerate for at least 30 minutes. I often refrigerate for several days.
  3. Preheat oven to 350 degrees F.
  4. Cover a baking sheet with parchment paper or reusable liner.
  5. Cut off 1/4th of refrigerated dough and roll until it’s about 1/16” thick. I roll it like it is pasta on the pasta machine down to the 5th setting.
  6. Placed rolled dough on prepared baking sheet.
  7. Using a knife, or pastry roller, cut dough into cracker shapes. There is no need to move the crackers apart.
  8. Brush dough with olive oil.
  9. Sprinkle with coarse sea salt.
  10. Bake for 9 minutes.
  11. Crackers will be lightly browned when done.
  12. Let cool on wire rack. Store cooled crackers in an airtight container at room temperature.
  13. Repeat with remaining dough.

Crispy, Crunchy, Homemade Rice Crackers

We’re at that clean-out-our-pantry time of year when we begin working through stores in earnest, cleaning out freezers and cupboards while we anticipate our annual summertime BST – Big Shopping Trip. This year? Plot Twists. First off, there’s the CoronaVirus. Here in Newhalen, if we’ve needed an additional ingredient, we’ve been able to drive over to our local general store – a small place that happens to have just about everything a person could ever need. We’re fond of saying, “If it’s not at the Iliamna Trading Company, you don’t need it.” Anchovies? They’ve got ‘em. Smoked oysters? They’ve got ‘em. Sanma, those delicious little tinned fish from Japan? No. Of course they don’t have those! I said it was a small store.

The other plot twist is an impending move. Wait. Did she just say “move?” Again? Didn’t she just move? And, like, for about the 80th time in the last 10 years?

Yep. Impeding move. We are heading back to the village where we left our hearts, back to Chignik Lake. Thankfully for everyone, enrollment appears to have stabilized at a number comfortably above the state-mandated minimum of 10. Of course, due to Shelter-in-Place orders and the wise decision among Alaska’s bush villages to prohibit people from flying in, we don’t know when the actual move will occur. It’s a good time to be staying close to home, cooking and baking through the larder.

The other day, I noticed that we still had a couple bags of dried chickpeas in our cupboard. I recalled that these bags had come with us last summer when we moved to Newhalen. “No way do these get on another plane,” I thought to myself. Fortunately, we had all the ingredients I needed to make a giant batch of hummus. Even lemons – which we hardly ever had at The Lake. Proof enough that Newhalen truly is the “Cush Bush.” (I’m smiling. It has been an easy and enjoyable year.) As soon as it the hummus was ready, we got out the last of our rice crackers and dug in.

But…

…thin, crispy, salty cracker by delectably thin, crispy, crunchy cracker…

Before I knew it, we were confronted with a problem. A big problem. I mean a Really Big Problem. All this fresh, delicious hummus and we had finished off the crackers! I sliced carrots thin and tried to substitute those. It was… well, if one must. We wanted crackers. Iliamna Trading would have them, but we’ve really been trying to honor the shelter-in-place edict.

Our dilemma got me to thinking about homemade crackers. This wouldn’t be my first rodeo in the world of crispy and crunchy. I’d made graham crackers, wheat thins, cheese-its, and more. But I’d never made rice crackers.

I found a base recipe and gave it a go. I’ll be honest, I worked and reworked this recipe before I met with success. I thought the last batch came out great. This was confirmed by Jack, “Forget about making dinner. Let’s just have crackers and hummus and watch old Suits episodes tonight!” he said as he reached for another cracker. Winner winner, hummus dinner!

They key turned out to be making the crackers really thin. After trying a rolling pin and then a pasta roller, I found the best way to make the dough thin enough was to flatten it using a tortilla press. By rolling the dough into marble-sized balls, I was able to press four crackers at a time. I know, that sounds like a lot of work for crackers. But, hey, I’m sheltering in. There’s time! And, man are they good!

Homemade Onion Rice Crackers

Ingredients

  • 1 cup rice flour
  • 1/3 cup water
  • 1 tbsp unsalted butter, melted
  • 1/2 tsp salt, non iodized will taste better
  • 1 tsp onion powder (or experiment with other spices and herbs)

Directions

  1. Preheat oven to 325°F.
  2. Line a baking sheet with parchment paper. Set aside.
  3. Cut the sides off of a ziplock bag to use to line the tortilla press later.
  4. Place all ingredients in a bowl.
  5. Stir with a fork until dough has crumbly chunks, like pie dough.
  6. Knead together. If it doesn’t come together, add water by teaspoons until it does.
  7. Using a teaspoon, scoop out some dough.
  8. Using your hand, roll it into a ball. The ball should be the shape and size of a marble.
  9. Place the ball between the cut ziplock sheets on a tortilla press.
  10. Press the ball with the tortilla press.
  11. Peel flattened ball off the plastic and place it on prepared baking sheet.
  12. Repeat with remainder of dough. You should be able to fit 4 dough marbles on your tortilla press once you get the hang of it.
  13. Bake crackers for 15-18 minutes. Keep an eye on them to make sure they don’t get overdone.
  14. Crackers will be slightly brown and crispy when they are done.
  15. Store cooled crackers in an airtight container.

Sugar-free, Sweet and Satisfying Banana Custard

A brûlée crust does take this dish out of the sugar-free category. It tastes wonderful without the crust. It just doesn’t look very beautiful.

We are the consummate rescuers of nearly wasted bananas. Over this past year, we’ve collected aged very brown bananas from various places and have been enjoying them in a variety of recipes. Our favorite, as of late, is a custard made out of the overripe bananas.  It’s fantastically easy. It tastes wonderful. We’ve been regularly stocking our fridge with a batch and have guilt-free snacks for dessert on demand.

Since it’s made from overripe bananas, it has the not so lovely color of said fruit. The first batch we made, we served it with vanilla ice cream to mask the custard. On the next batch, I drizzled a chocolate ganache to pretty it up. Then I tried a brûlée top. If you are having a fancy dinner party, any of these options beautify the custard. But honestly, none of that is necessary. It tastes great just as it is. And, of course, it’s healthier au natural.

Banana Custard Au Natural

Ingredients

  • 4 overripe bananas
  • 3 eggs
  • 3 tbsp coconut milk powder
  • 1/2 tsp vanilla extract, optional

Directions

  1. Preheat oven to 350° F.
  2. Put all ingredients in a bowl.
  3. Use a stick blender to blend until smooth.
  4. Pour custard into 4 ramekins.
  5. Put ramekins in a glass baking dish.
  6. Fill baking dish with hot water. Water should surround ramekins as best you can (without spilling, of course)
  7. Bake for 45 minutes.
  8. Remove ramekins from water bath and allow to cool a bit before serving. Serve warm. Or store in refrigerator and eat chilled.

Add a Little Zip to Your Morning – Ginger Crumbled Rhubarb Muffins

Spiked with a warm hit of ginger, rhubarb jam muffins quickly turn the feeling in our home from a dreary shelter in place to cozy and safely tucked-in.

A friend asked to trade some freshly laid eggs for some baked goods. With no dietary restrictions and no allergies I had a blank slate in front of me. I flipped through my mental recipe book of favorites. What a fun task! I visualized braided bread, focaccia, soft pretzels. Then I switched to sweets – mocha bars, monster cookies, blueberry pie. Last summer’s many warm and sunny harvesting days yielded gallons of berries and stalks upon stalks of rhubarb. I had made rhubarb sauce that went so well dolloped on warm brie cheese. I still have a few jars left of this concoction. With the snow falling outside, I thought the ideal baked good should conjure summer days. It was decided – rhubarb muffins. I thought a crumble crown would jazz up a potentially plain looking muffin. A bit of ginger and cinnamon added to the crumble finished out the flavor ensemble. The finished product came out moist and flavorful. A fresh cup of french roast, a rhubarb muffin and a fried egg – now that’s a warm and cozy breakfast!

Ginger Crumbled Rhubarb Muffins

Ingredients

For the crumble

  • 3 tbsp granulated sugar
  • 3 tbsp brown sugar
  • 1/4 tsp cinnamon
  • 1/8 tsp ground ginger
  • pinch salt
  • 4 tbsp unsalted butter, melted
  • 3/4 cup all purpose flour

For the muffins

  • 1 cup all purpose flour
  • 1/2 cup whole wheat pastry flour
  • 2 tsp baking powder
  • 1/2 tsp salt
  • 1 egg
  • 3/4 cup whole milk
  • 1/4 cup vegetable oil
  • 1/4 cup granulated sugar
  • 2 tbsp honey
  • 1 cup rhubarb sauce, or substitute your favorite jam

Directions

  1. Preheat oven to 375° F.
  2. Grease a 12-muffin pan. Set aside.
  3. Mix together all crumble ingredients.
  4. Break apart large chunks into pea-sized pieces. Set aside.
  5. For the muffins, in a large bowl, whisk together flours, baking powder, and salt.
  6. In a separate bowl, whisk together egg, milk, oil, sugar and honey.
  7. Stir egg mixture into flour mixture. Don’t overmix.
  8. Stir in rhubarb sauce.
  9. Evenly divide batter into muffin pan.
  10. Top each muffin with crumble mixture.
  11. Bake for 20-25 minutes. Muffins should be browned and an inserted wooden pick will come out clean when finished.
  12. Let cool on wire rack for about 10 minutes before removing from pan.

Spending Time Baking Tiny Yummy Things – Mini Maple Pumpkin Donuts

Bite-sized foods are irresistible. These mini beauties are packed with flavor and powered with protein. Enjoy one (a couple) (a few) today!

In short order, our COVID-19 status in the small village of Newhalen went from “mindfully wash your hands” and “don’t touch your face” to a full-on “shelter in place.” We could take this mandate like pouty kids who are grounded. Or we can view it as a golden opportunity. Outside, it’s slick, icy, and chilly: -10° F (-23° C) this morning. So going out for runs or hikes isn’t very appealing. Lately, our preferred together activity has been spending time cuddling up with a bowl of popcorn and watching favorite movies and new documentaries. Moving on to independent activities, Jack has been mastering more tunes on his guitar, while my solo fun, as you might have guessed, has been getting creative in my personal home bakery.

Most recently, several containers of puréed pumpkin and a cute mini donut pan was my “shut in” entertainment. There is something appealing about making diminutive treats. It reminds me of tea parties and Easy Bake ovens in an imagined perfect childhood. Really, the ingredients are pretty healthy. If you’re like me, it’s hard to stop at one, so, eating four of these is not a terrible thing. So go ahead and eat a few – they are a great protein-packed snack to power up for a long run, to refuel after a hard run, or just to get up from the sofa and start a new movie.

How are you keeping yourself occupied these day? What are you baking? Stay healthy everyone!

Mini Maple Pumpkin Donuts

Ingredients

  • 1/2 cup all purpose flour, or whole wheat pastry flour
  • 1 tsp baking powder
  • pinch salt
  • 3/4 tsp ground cinnamon
  • pinch ground ginger
  • pinch nutmeg, or mace
  • 1 tbsp brown sugar
  • 1 tbsp granulated sugar
  • 1 egg
  • 3 tbsp pumpkin purée
  • splash vanilla extract
  • 1 tbsp canola oil
  • 2 tbsp pecans, chopped

Glaze

  • 1/4 cup powdered sugar
  • 1 tsp vanilla extract
  • 1 tbsp pure maple syrup
  • drizzle of water if glaze needs to be thinned

Directions

  1. Preheat oven to 375° F.
  2. In a mixing bowl, whisk together flour, baking powder, salt, cinnamon, ginger, and nutmeg.
  3. In a small bowl, whisk together sugars, egg, pumpkin, vanilla, and oil.
  4. Stir wet ingredients into dry.
  5. Fold in chopped pecans.
  6. Spoon mixture into donut pans. Fill them about 3/4 full.
  7. Bake 10 minutes. A wooden pick inserted into thickest part of donut should come out clean.
  8. Invert donuts onto a wire rack to cool.
  9. Mix glaze ingredients together.
  10. Drizzle glaze over cooled donuts.
  11. Serve immediately with a piping hot cup of French roast.

Whew! Just made it! Lite Double Chocolate Brownie Cookies

Chewy, chocolatey, small and delicious. What’s not to love?

This lifestyle of picking up shallow roots and moving every few years is not for everyone. It normally suits us. We love digging deep into an interesting place, enjoying what it has to offer, and then heading off to experience a new place. This particular move is the strangest one Jack and I have experienced in our life together. Previous moves have been predicated on well thought-out decisions backed by lots of research. A move toward a new adventure – Alaska – Mongolia – is always exciting to us. A move to a place with a new culture or new food, new fishing and new photography opportunities has always been welcome. Newhalen, where we soon will be living, has a lot to offer, but the cloud of having to leave Chignik Lake has put a giant damper on our excitement. We keep reminding ourselves that Newhalen is a terrific place, complete with salmon runs, hiking in nearly pristine landscapes and the many things we love about living in the Alaska Bush. In our new home, we will get to have our lovely little fishing boat, Gillie, with us. We’ve never lived somewhere where we can launch her and have miles and miles of rivers and lakes to explore right outside our door. That in and of itself should be very appealing, right?

Gillie is one salmon-catching boat. She sleeps the two of us comfortably in her cuddy cabin. There’s even a little dining table in the cabin. Equipped with a Coleman stove, she’ll be the perfect vessel for exploring the lakes and rivers of our new home.

But this time, there’s this whole leaving business that is really a drag. We’ve both loved living in Chignik Lake. It’s been a wonderful place to settle in to. We’ve loved only having to share the scenery, the wildlife and the fishing with the few people who call The Lake home. And I’ve enjoyed working in a building that’s well kept and working with a group of students that are second to none. The students and their families here made this the most fun and the easiest teaching job I’ve ever had. We hadn’t intended on leaving yet. So, the excitement of the move and the new destination has a bit of a pall over it.

Well, nonetheless, onward and upward.

One aspect of moving I get a strange pleasure from is the challenge of using up of all of our pantry items by the move date. This batch of cookies was especially satisfying as the recipe, to the tablespoon, helped me finish off several ingredients that I had just a bit of. The purpose of this recipe was to create cookies that could be used to make ice cream sandwiches with the bag of frozen bananas I still have in the freezer. They are perfect! They are small and have just the right texture for this frozen confection. We’ve found that dolloping the banana ice cream atop the open-faced cookies seems to work best. I also think these cookies taste fantastic straight out of the freezer. The idea to keep them in the freezer so they are out of sight didn’t quite work to keep them out of mind. They turned out too good! A taste of a few of these, and the “moving cloud” dissipates a little. 🙂

To keep them “lite” on calories, the ingredients were thought out, but so were the size. I made the cookies small – about two teaspoonfuls of dough. This way two cookies, with the banana ice cream, is a satisfying dessert. (According to an online calorie calculator, these weighed in at just 45 calories per cookie.) Feel free to adjust the size to your liking. I also thought adding a splash of peppermint extract would be delicious – a la “Thin Mint” Girl Scout cookies. (I loved those straight out of the freezer!) Alas, my pantry no longer has this ingredient.

Lite Double Chocolate Brownie Cookies

Ingredients

  • 1 cup whole wheat pastry flour
  • 1/2 cup Dutch processed cocoa powder
  • 1/2 cup granulated sugar
  • 3/4 tsp baking soda
  • 1/4 tsp baking powder
  • generous pinch salt
  • 6 tbsp vegetable oil, I used canola
  • 2 tbsp milk, I used nonfat
  • 1/4 cup low-fat plain yogurt
  • 1 1/2 tsp pure vanilla extract
  • 1/3 cups semi-sweet chocolate chips

Directions

  1. Preheat oven to 325 degrees F.
  2. Whisk together the first 6 ingredients in a large bowl.
  3. Stir in oil, milk, yogurt and vanilla.
  4. Fold in chocolate chips.
  5. Divide dough into 32 pieces. I formed a long skinny log and chopped it into pieces.
  6. Roll pieces into balls.
  7. Evenly space out 24 balls (4 x 6) on a parchment-covered cookie sheet. If your dough balls are bigger, bake fewer at a time to allow for expansion.
  8. Bake for 9 minutes. They will look slightly underdone.
  9. Allow to cool for 10 minutes before removing them from baking sheet.
  10. Repeat with remaining dough balls.
  11. Store cookies in the freezer in zip-top bags to ensure freshness. Enjoy straight out of the freezer.

The Real Breakfast of Champions


Creamy roasted butternut squash filling on a flakey, buttery crust – top it off with a lightly salted & peppered sunny-side up egg and serve a cup of French Roast on the side. Good morning, Chignik Lake.

Pumpkin pie for breakfast – it’s either just after Thanksgiving or Christmas, or we’re nearing the end of another year in the bush. In fact, we’re almost having to pinch ourselves to get our heads around the fact that there are just four days till the end of Barbra’s school year. With a very early summer vacation in sight, we’ve been in the process of clearing out our freezer. Several months ago we roasted and freezer-packed  a couple of butternut squashes. When we rediscovered them last weekend, they were still in excellent condition thanks to our manual defrost freezer.

Having never perfected crusts, I got out of the pie baking business when I married Barbra, but she still uses my pumpkin pie filling recipe – an adaptation from Craig Claiborne’s The New York Times Cookbook. She put a bush twist on the recipe this time, substituting Hoosier Hill Farm Premium Heavy Cream Powder for real heavy cream, which can be notoriously difficult to get out to the bush. The pie came out just fine.

And so this past week we’ve been starting our mornings right with one of our favorite breakfasts: Pumpkin Pie with a Fried Egg and a cup of joe. Our sparrows have begun returning, Cranes are starting to nest up on Black Lake, the bears are up and about and this morning I think I saw a salmon jump down at the bend. C’mon summer!

For our favorite pumpkin pie/squash pie recipe, see: A Cookbook for the Ages: Pumpkin and Pecan Pies from Craig Claiborne

Another $8 Cookie, Please

The best chocolate chip cookie on the planet? There’s one way to find out!

Break out all the best ingredients you’ve been hoarding and make yourself a batch of these…now!

A couple of years ago, I read about a cookie that really sells for $8. Could I create a cookie worth such a price? Oh boy, yes! The secret to this cookie is not gold flecks or a butler to serve it, but fine ingredients and an investment of some time. The recipe demands high quality chocolates, browned butter, toasted almonds, and vanilla paste. Serving them slightly cooled from the oven is a key to the experience. I make a batch of dough, cookie scoop out portions and freeze them. When we are in the mood for these decadent beauties, I pop a couple in the oven while we are eating dinner in order to serve them as a perfectly warm $8 dessert.

The $8 Cookie

Ingredients

  • 1 large egg
  • 1/3 cup dark brown sugar
  • 3 tbsp granulated sugar
  • 1/3 cup unsalted butter, browned
  • 2 tsp vanilla paste
  • 1/2 tsp almond extract
  • 3/4 cup plus 2 tbsp all-purpose flour
  • 1/2 tsp baking soda
  • pinch salt
  • 1/3 cup toasted almonds, chopped
  • 1/3 cup good quality milk chocolate chips
  • 1/3 cup good quality white chocolate, chopped

Directions

  1. Mix the sugars and the egg well.
  2. Add in the browned butter.
  3. Mix in vanilla paste and almond extract.
  4. Stir flour, baking soda and salt into the mixture.
  5. Fold in the almonds and chocolate pieces.
  6. Chill the dough for at least 1 hour.
  7. Line a baking sheet with parchment paper.
  8. Preheat oven to 325 degrees F (160 degrees C).
  9. Scoop tablespoon-sized balls using a small ice cream scoop onto the baking sheet. Bake for 8 – 10 minutes.
  10. Let the cookies set on the baking sheet for about 3 minutes before removing them to a wire cooling rack.
  11. Continue to cool for another two minutes on the wire rack.
  12. Serve cookies while still warm.

Makes 12 cookies.

Sunshine on a Snowy Day – Raspberry Lemon Curd Bars

Sunshine on a winter’s day… Lemon bars drenched in tangy-sweet raspberry jam

I love chocolate – in every form, flavor, and dish. I love dark, white, and milk chocolate. Except for a weird, avant-garde chocolate bar infused with pepper (??), I can’t think of a chocolate creation I haven’t enjoyed. Almost neck-in-neck with chocolate are desserts made with lemon. The difference with lemon is that it not only has a wonderfully tart flavor, but it also has a strong seasonal connection to summer. One bite or sip of lemon brings me back to sunshine splashed afternoons and evenings cooled by gentle breezes sitting in our little piece of paradise behind our home in California among Meyer lemon trees. When we moved to Alaska, I even made up a gallon’s worth of Meyer lemon simple syrup in order to ease the separation from those prolific trees.

As we hit the middle of March, our minds drift toward Spring! In our former life, I would be itching to get the planting pots and garden beds ready. In Chignik Lake, I’m ready to pull the Pack Rafts out and head down nearby rivers. Mother Nature has had three little words in response to these inclinations…”Not. So. Fast.” All the snow we didn’t see this past winter has been just now swirling around our windows and creating lovely white drifts. Our lake iced over, started to thaw, and is now covered in ice again.

As Jack tends to his culinary diversion, a slow-cooked moose roast, I decide on my own diversion…one that will bring a little sunshine into our home. I took a tried and true lemon curd bar recipe from my Williams and Sonoma Baking Book and adapted it with items from my bush pantry. All I can say is Wowee! After the initial mix of sweet and tart lemon, you are rewarded with a blanket of pure raspberry bliss. A definite blast of summer, in the best way possible.

Raspberry Lemon Curd Bars

Ingredients

Crust

  • 1 cup all-purpose flour
  • 1/3 cup granulated sugar
  • pinch salt
  • pinch cinnamon
  • ½ cup unsalted butter, melted

Filling

  • ¾ cup granulated sugar
  • 2 tbsp all-purpose flour
  • pinch salt
  • 3 large eggs (I used powdered eggs)
  • ½ cup lemon juice (I used good quality bottled lemon juice)
  • 3 tbsp heavy whipping cream

Topping

  • Raspberry jam (I used freezer jam which has a much brighter color and flavor)
  • Confectioners’ sugar

Directions

  1. Make crust.
  2. Preheat oven to 350° F (180° C).
  3. Grease an 8-inch square glass baking dish.
  4. Mix crust ingredients together.
  5. Press dough into bottom of baking dish.
  6. Bake for 20 minutes. Crust should be a pale golden color.
  7. Let the crust cool in the baking dish on a wire rack while you prepare filling.
  8. Reduce oven temperature to 325° F (165° C).
  9. Whisk together filling ingredients.
  10. Pour the mixture over the baked crust.
  11. Bake until filling is set, about 20 minutes. It may slightly jiggle when dish is shaken.
  12. Let lemon bars cool in the dish on a wire rack for at least 30 minutes.
  13. When ready to serve, run a knife around the edge of the pan. Cut into 12 or 16 rectangles.
  14. Remove from dish with a spatula and place pieces to be served on a serving dish.
  15. Spoon desired amount of jam on each piece.
  16. Dust each piece with confectioners’ sugar right before serving.

Bourbon Chocolate Chip Mini Skillet Cookie for Two

Warm and gooey, straight from the oven. Watch out – this cookie has been found to be highly addictive.

Several years ago, we were introduced to the cast iron skillet cookie. This giant chocolate chip cookie is best served nearly straight from the oven. No need for fancy serving dishes, we were handed spoons and in mere moments the 10-inch cast iron pan was emptied. 

This terribly addictive cookie came back into my thoughts during our last trip to Anchorage. Jack and I went to a restaurant where we were served a delicious skillet breakfast of country fried potatoes, a fried egg, and an Alaskan reindeer sausage all presented in a cute, single-serving cast iron pan. That presentation was as clever as it was practical. The mini-skillet was the perfect serving size for one and kept the breakfast piping hot. We could imagine all kinds of tasty creations that would work perfectly in these clever pans. When we got home, I ordered two, and was pleasantly surprised to find that they are relatively inexpensive.

When the pans arrived, the first order of the day was a skillet cookie… but not just any skillet cookie. We love the flavor of bourbon. It happens to perfectly complement the buttery, carmely, flavors of a chocolate chip cookie. (See our post about melty chocolate chip cookies.) So I decided to punch up the skillet cookie with a bit of bourbon. After a couple of different successful experiments, I came up with just the right balance of ingredients for my recipe.

The bad things about this cookie? It is ridiculously delicious. We found it impossible to eat part of it and save the other part for later. It is easy to make, which only contributes to the addiction problem. And if you happen to have some rich vanilla ice cream to scoop on the top? You may as well call your boss and tell him/her that you won’t be coming in this week.

With fair warning, I give you the –

Bourbon Chocolate Chip Skillet Cookie for Two

Ingredients

  • 1/4 cup unsalted butter, melted
  • 8 tsp granulated sugar
  • 1/4 cup brown sugar
  • 2 tbsp egg, whisked
  • 1 tsp vanilla extract
  • 2 tsp bourbon
  • 1/4 tsp baking soda
  • pinch salt
  • 1/2 cup all purpose flour
  • 1/3 cup semi-sweet chocolate chips

Directions

  1. Preheat oven to 350° F (180° C)
  2. Have a 6 1/2” cast iron skillet available
  3. Whisk melted butter with sugars
  4. Whisk in egg
  5. Whisk in vanilla and bourbon
  6. Stir in flour, baking solda and salt
  7. Fold in chocolate chips
  8. Pour batter into cast iron skillet
  9. Bake for 20 minutes. Cookie will be puffed up and will have pulled away from edge when finished.
  10. Let cool slightly. Serve while still warm plain or topped with creamy vanilla ice cream.