These little custards were baked in two-ounce canning jars and are awaiting the finishing touch of a caramelized top. They are the perfect size for a dessert bite at a potluck.
Tis the season for pumpkin pie. Ten years ago (wow, 10 years!!), we posted a recipe after making a fall pumpkin pie and found ourselves with leftover filling. You know the problem, not enough filling to make a whole second pie, but the idea of tossing the extra unthinkable. We decided to bain-marie the remainder. When the little custards came out of the hot water bath, they seemed to want a bit of crunch. Out came the kitchen torch and a little sugar for a satisfying brûlée finish. And so, a new recipe for our repertoire was born.
Leave a like and know that we appreciate comments! Join over 6,000 subscribers and thousands of regular readers from throughout the world as we continue to explore good food, adventures and Life Off The Beaten Path.
Our summer adventure of 2025 involved plants and rocks. We decided to redo what was already a good start of our modest terraced rock garden. Our inspiration for this redo was to celebrate culinary plants and also feature native plants. We moved hundreds of pounds of rock, we sifted dirt, and we removed overcrowding and non-native plants in order to create new planting beds.
Cordova isn’t as far flung as Chignik Lake. But it does take planning and effort to brings things here – especially live plants. So when our local Ace Hardware had a pop-up plant sale early in the summer, it made sense to go shop what was already in town. We had intended to find some flowers to plant in hanging baskets. As a happy surprise, we noticed the pop-up had apple trees. And not just any apple trees. They were grown in Fairbanks and hybridized to withstand extreme cold temperatures. Those little trees seemed like a perfect fit for a couple of our new planting beds.
At the time of planting, we noticed that both trees had fertilized flowers on them. We were advised to pluck most of the flowers off so that the trees could put their energies into root and tree growth. We were curious to see how the little apples would grow. So, we left a few blooms on each tree. By September, we had seven little apples.
Armed with some leftover puff pastry, I chopped the little apples and tossed them with a bit of sugar and cinnamon. This mixture was piled atop the puff pastry and baked for 20 minutes. Drizzled with caramel topping and they were ready for serving. What a lovely way to honor this first crop.
Here’s to you, my little Alaskan apple trees. May you have many years of bearing beautiful little red fruit.
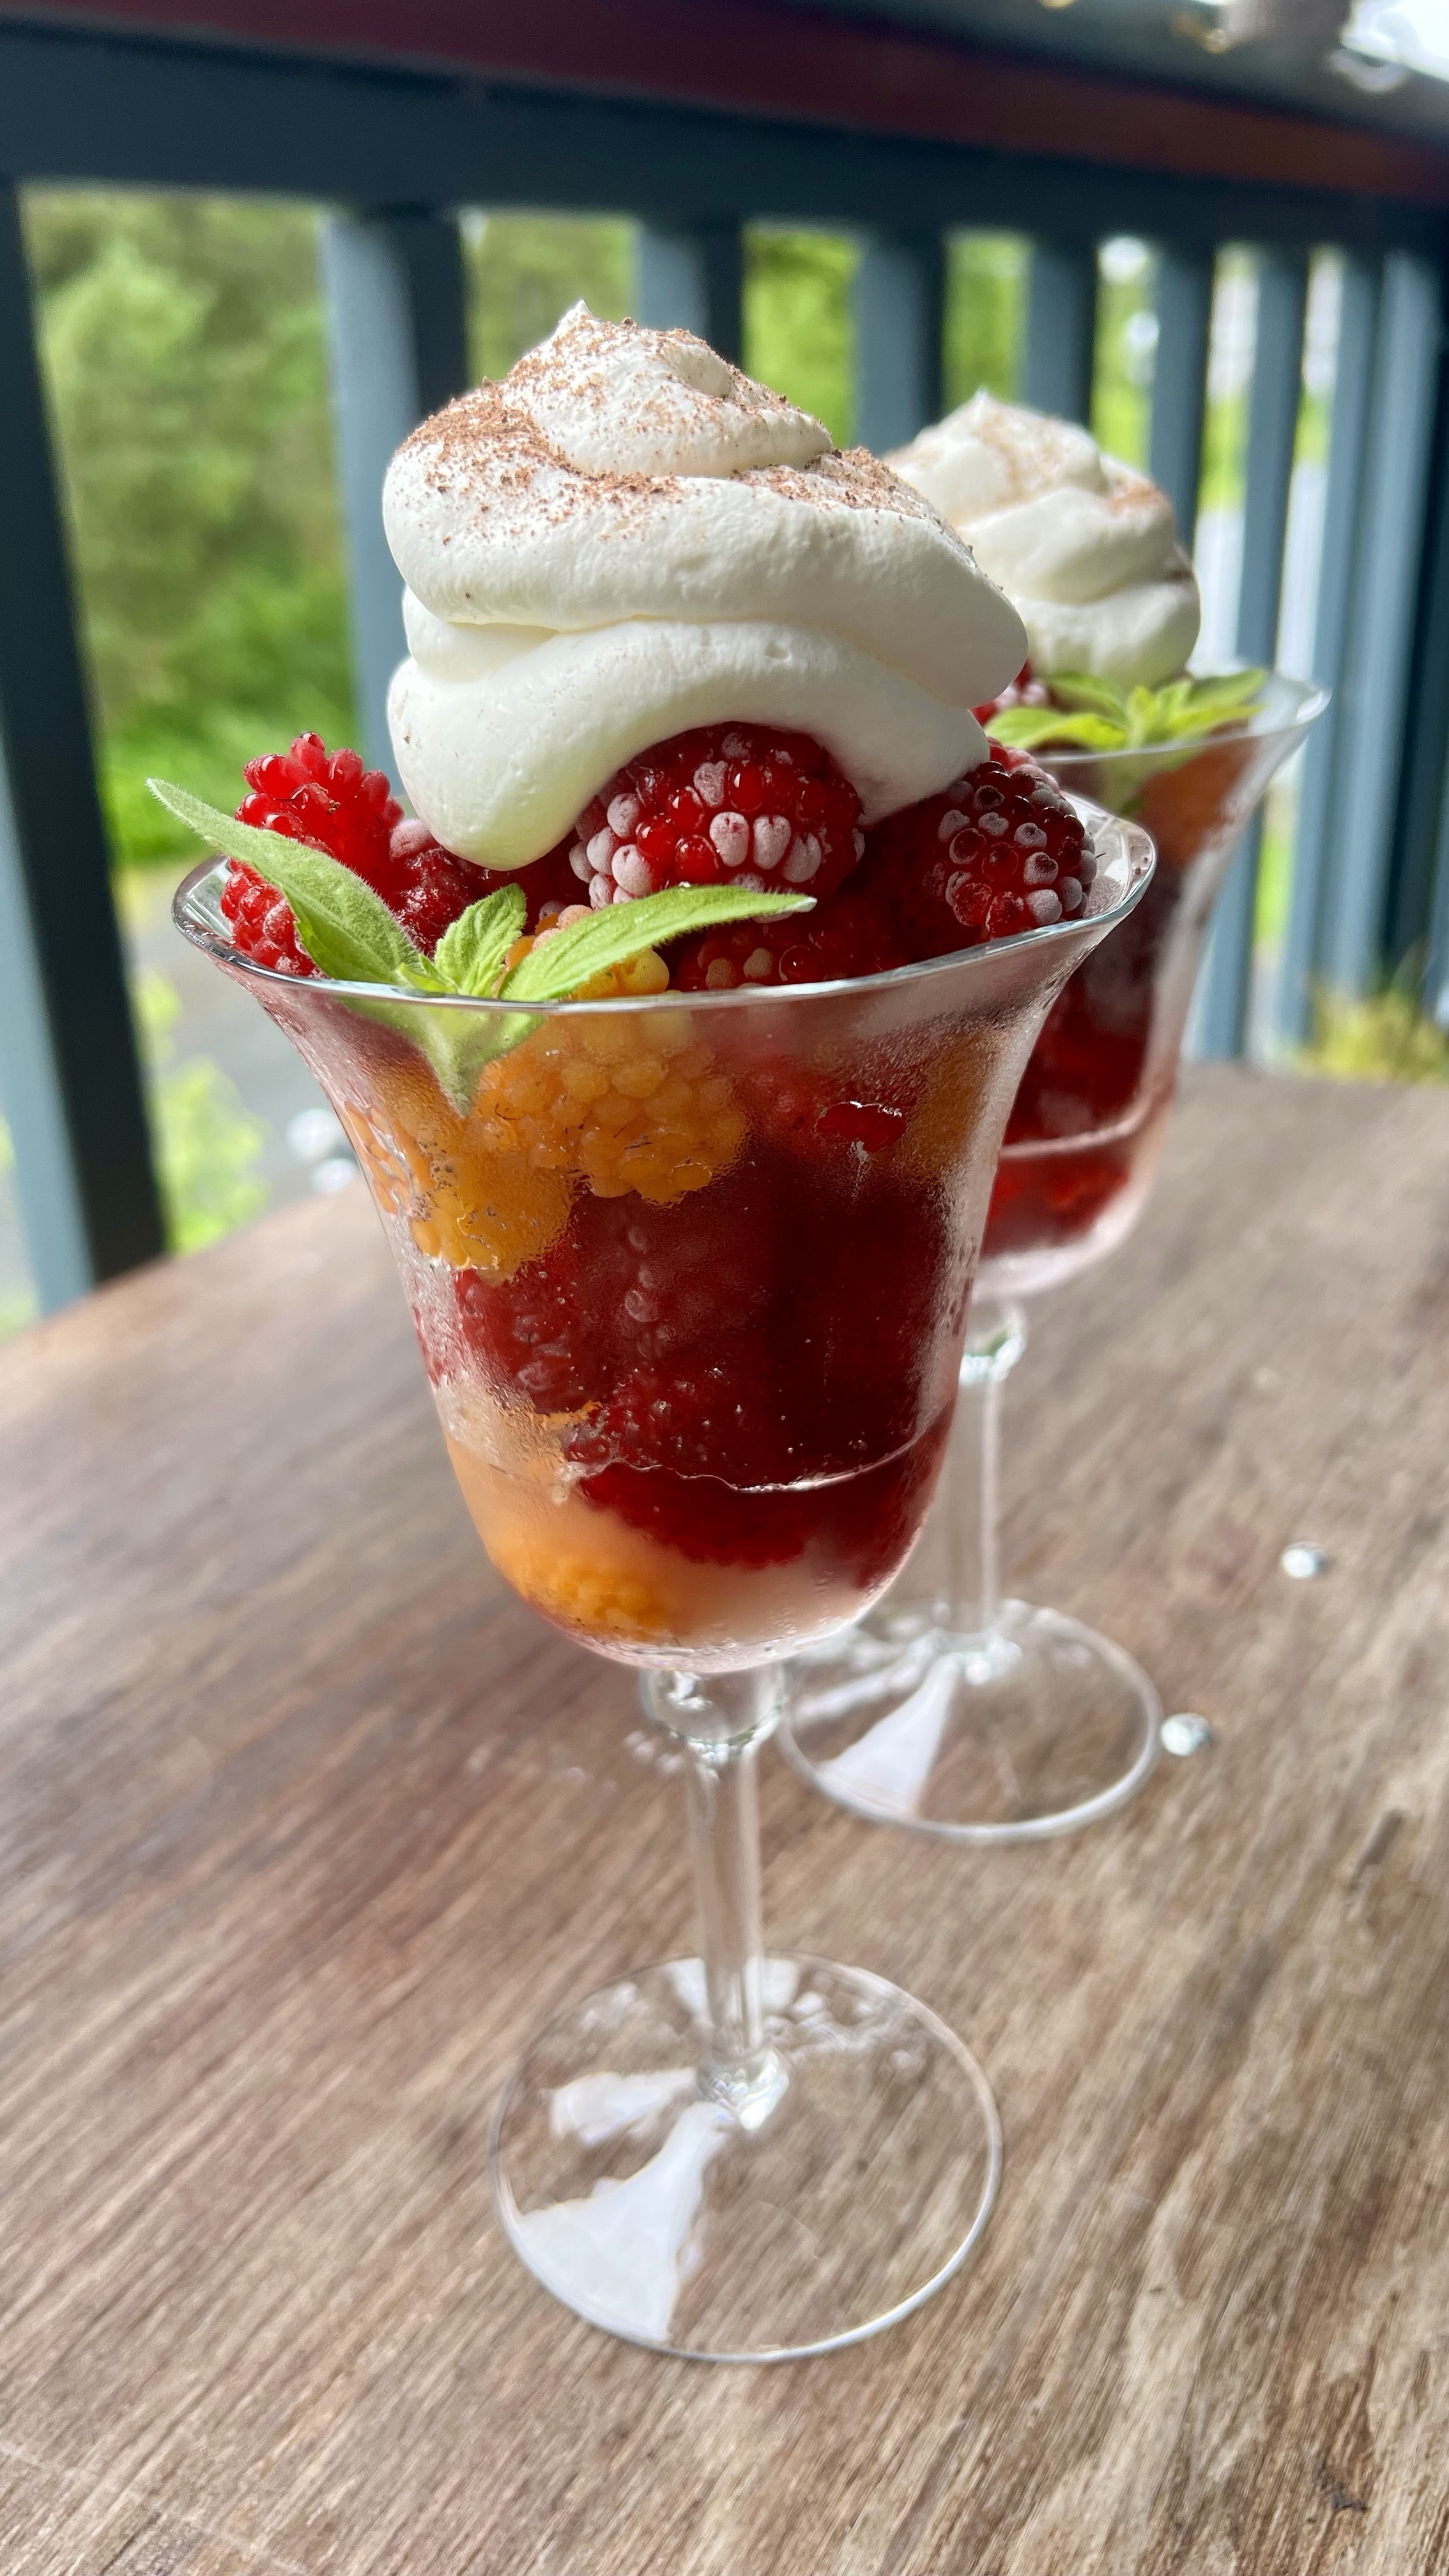
We are having quite a berry season. It was easy to gather premium wild blueberries and wild salmonberries for this tart. Look at the size of those golden berries! There’s a lot of things you could do with freshly picked berries…but nothing says “fresh berries” like fresh berries.
The flower petals have dropped. Tiny, hard berries are taunting me with their promise. It will be quite some time before they will be ripe and ready for picking. Normally, when I can’t stand the wait for this summer’s fruit, I usually have last year’s berries stashed in my freezer to bake with while I oh-so-patiently wait for this year’s fruit to mature. With the move this year, we gifted our stash to friends at the Lake. So, I wait.
We all know I’m not really going to wait to play in the kitchen. 😉 Now that I have not one, but two grocery stores nearby, I don’t have to keep a stocked pantry like we did at the Lake. But pantry items do drive inspiration. We mailed quite a bit of dry goods that we hadn’t used up. Boxes of pasta, pounds of rice and cans of pumpkin puree didn’t trigger any ideas. There was this bag of mini-marshmallows tucked away. I had purchased them for hot cocoa. What about hot cocoa cookies? Rocky road bars? Marshmallow thumbprints? None of these ideas appealed to me. Then I thought s’mores! I am a s’mores fan, but only in small quantities. I enjoy the summertime fireside treat in ones or twos. What if the essence of chocolate, graham crackers, and toasted marshmallows were featured in cookies instead of their original over-sweet form? The result? A chewy cookie with bursts of chocolate, crunches of graham cracker, and bites of gooey marshmallow.
The recipe was a successful distraction until the real show starts. (C’mon berries!) Between now and then, I will keep myself occupied with processing spruce tip syrup. And maybe figuring out a way to bake with pasta, rice, and pumpkin? Or not.
Double Chocolate S’more Cookies – small batch
Ingredients
1 cup all-purpose flour
3 tbsp dutch-processed cocoa powder
1/4 cup graham cracker crumbs
1 tsp baking soda
Pinch salt
1 stick unsalted butter, room temperature
1/2 cup packed brown sugar
1/4 cup granulated sugar
1 tsp pure vanilla extract
1 large egg
1/2 cup semi-sweet chocolate chips
1/2 cup mini marshmallows (and a few extra for finishing)
1 sheet graham cracker, roughly chopped
Directions
Preheat oven to 375°F.
Line a baking sheet with parchment paper.
In a bowl, whisk together flour, cocoa powder, graham cracker crumbs, baking soda, and salt. Set aside.
Using electric mixer, beat butter and sugars until light and fluffy.
Mix in vanilla.
Mix in egg.
Slowly add in flour mixture. Mix until incorporated.
Fold in chocolate chips, marshmallows and chopped graham cracker.
I used a 1 1/2 tbsp cookie scoop to spoon out 12 portions of dough to place on prepared cookie sheet.
Bake cookies for 10 minutes.
Quickly remove baking sheet from oven and add a few more marshmallows on each cookie. Place back in the oven for 2 additional minutes.
When done, cookies will be firm on the edges and soft in the middle. Allow to cool for about 5 minutes on sheet before removing to cool completely on a wire rack.
Light and creamy vanilla cheesecake drizzled flooded with wineberry syrup. Just building the anticipation for berry-picking season.
For most, I imagine spring flowers sow hope for warmer weather and start dreams of sunny summer adventures. The flowers of this particular spring were different for me.
For the last two summers, Jack and I have spent countless hours studying and identifying all the flowers we could find in the surrounding areas of Chignik Lake. It was a beautiful education. The flowering season began with chocolate lilies and ended with tiny white yarrow with lilac-colored geranium sustaining throughout. Along the growing months from May through October, a rainbow of blossoming gems ebbed and flowed. Although I loved seeing and identifying all the blooms, the flowers that gave me the most joy were the ones that I knew would transform into fruit. As we hiked through the months, I would monitor the progress of my miniature crops as they turned from tiny bud to flower to hard little fruit, and then to the final stage of delectable berry treasures that were ready to harvest.
Whenever Jack and I visit different places, we regularly look for flowers. It is interesting to us to see which flowers we have learned about at the Lake which also grow in other places. As it turns out, we are now in a new place. Yes, a surprising plot twist.
We would not have guessed we were going to make a move…even as late as this recent February. A principal job was opening at my school and I was just about finished with my credentialing coursework. We loved our community and our home. We have close friends and a deep connection to Chignik Lake. But life happens. Way leads to way. Turned out the way that opened was a door we had been keeping an eye on for a long time.
If you’ve been following our story for a long while (like thirteen years long), you’ll remember that our whole Alaska adventure began with a summer-long trip. It was one of those once-in-a-lifetime trips that people do. A hobby at that time had been running destination half marathons. Jack found an interesting destination that would align this hobby with a blend of other interests like road-tripping, camping, boating, and of course visiting Alaska. With just six days to make it up the Al-Can, launching our trusty C-Dory in Valdez, and boating over to the destination Salmon Jam Half Marathon in Cordova Alaska, we would start a journey that we had no idea would change our life. On the way home from that Epic Alaska Summer Adventure, we decided that Alaska would become home. In the way life sometimes circles and spirals, we find ourselves back in Cordova. This time, it is not a travel destination, but a new home.
A common thread in all of our our Alaskan homes has been the opportunity to forage for interesting edible plants. How fortunate are we to live in a big beautiful state that offers so many wild foods…among my all-time favorites – berries! We discovered many flowers on our initial hikes on the trails in the Chugach National Forest. I’m happy to report blueberry, low bush and high bush cranberry, salmonberry, currant, nagoonberry and lots of strawberry flowers. Now, in this new place, I get to follow my familiar summertime tradition of monitoring all of these flowers’ progress from bud to fruit. With any luck, we’ll find lots to harvest later this summer.
Jack suggested I share my process for making wineberry (aka nagoonberry) syrup. Most people find the process to be tedious. It’s pretty simple, actually. After picking the precious gems from your secret spot, take them home and xxxxxxx xxxxxxx xxxxxxxxxx xxxxxxx xxxxxxx xxxxx xxxxxxxx xxxxxx. For each cup of processed berries add 1/4 cup of water. Simmer the berries until soft. Smash the mixture with a potato masher. Separate the juice from the pulp by suspending a cheesecloth over a . Every time I try to publish this, it gets redacted. I guess the FBI doesn’t want it shared – (Fruit and Berry Interagency). 😉
For this creation, I used a no-bake cheesecake recipe adapted from a blog I follow, Sally’s Baking Addiction. I modified it to make a 4-inch version, which is perfect for two hungry writers, or can be served to four for a nice little sweet bite at the end of a meal. I like the no-bake version to complement fruit syrups because it is light and airy but still retains the tanginess of the flavor you’d expect from a cheesecake.
4-inch No Bake Cheesecake
Ingredients
Crust
1/2 cup graham cracker crumbs
1.5 tbsp brown sugar
3 tbsp unsalted butter, melted
Cheesecake
1/4 cup + 1 tbsp heavy whipping cream
6 oz. cream cheese, room temp
2 tbsp granulated sugar
1/2 tbsp powdered sugar
1 tbsp sour cream
1/2 tsp lemon juice
1/2 tsp pure vanilla extract
Directions
To make the crust, stir together crust ingredients. Pour into a 4-inch springform pan. Use the back of a spoon to pack the crust tightly against the bottom and sides of the pan. Place pan in freezer while the filling is being made.
Using an electric mixer fitted with a whisk attachment, whisk heavy cream until stiff peaks are formed. Scrape whipped cream into a separate bowl.
Using the original bowl you used for whipping cream, beat cream cheese and granulated sugar together until smooth.
Add powdered sugar, sour cream, lemon and vanilla. Beat again until mixture is smooth.
Gently fold whipped cream into cream cheese mixture.
Spread cheesecake filling into prepared crust.
Cover with plastic wrap and let cheesecake chill and set. I left it in the fridge for about 18 hours.
When ready to serve, loosen the chilled cheesecake by running a knife around the perimeter of the pan before springing it open. I prefer to serve the cheesecake without any syrup and let my guests adorn their own. It definitely adds to the anticipation and the wow factor.
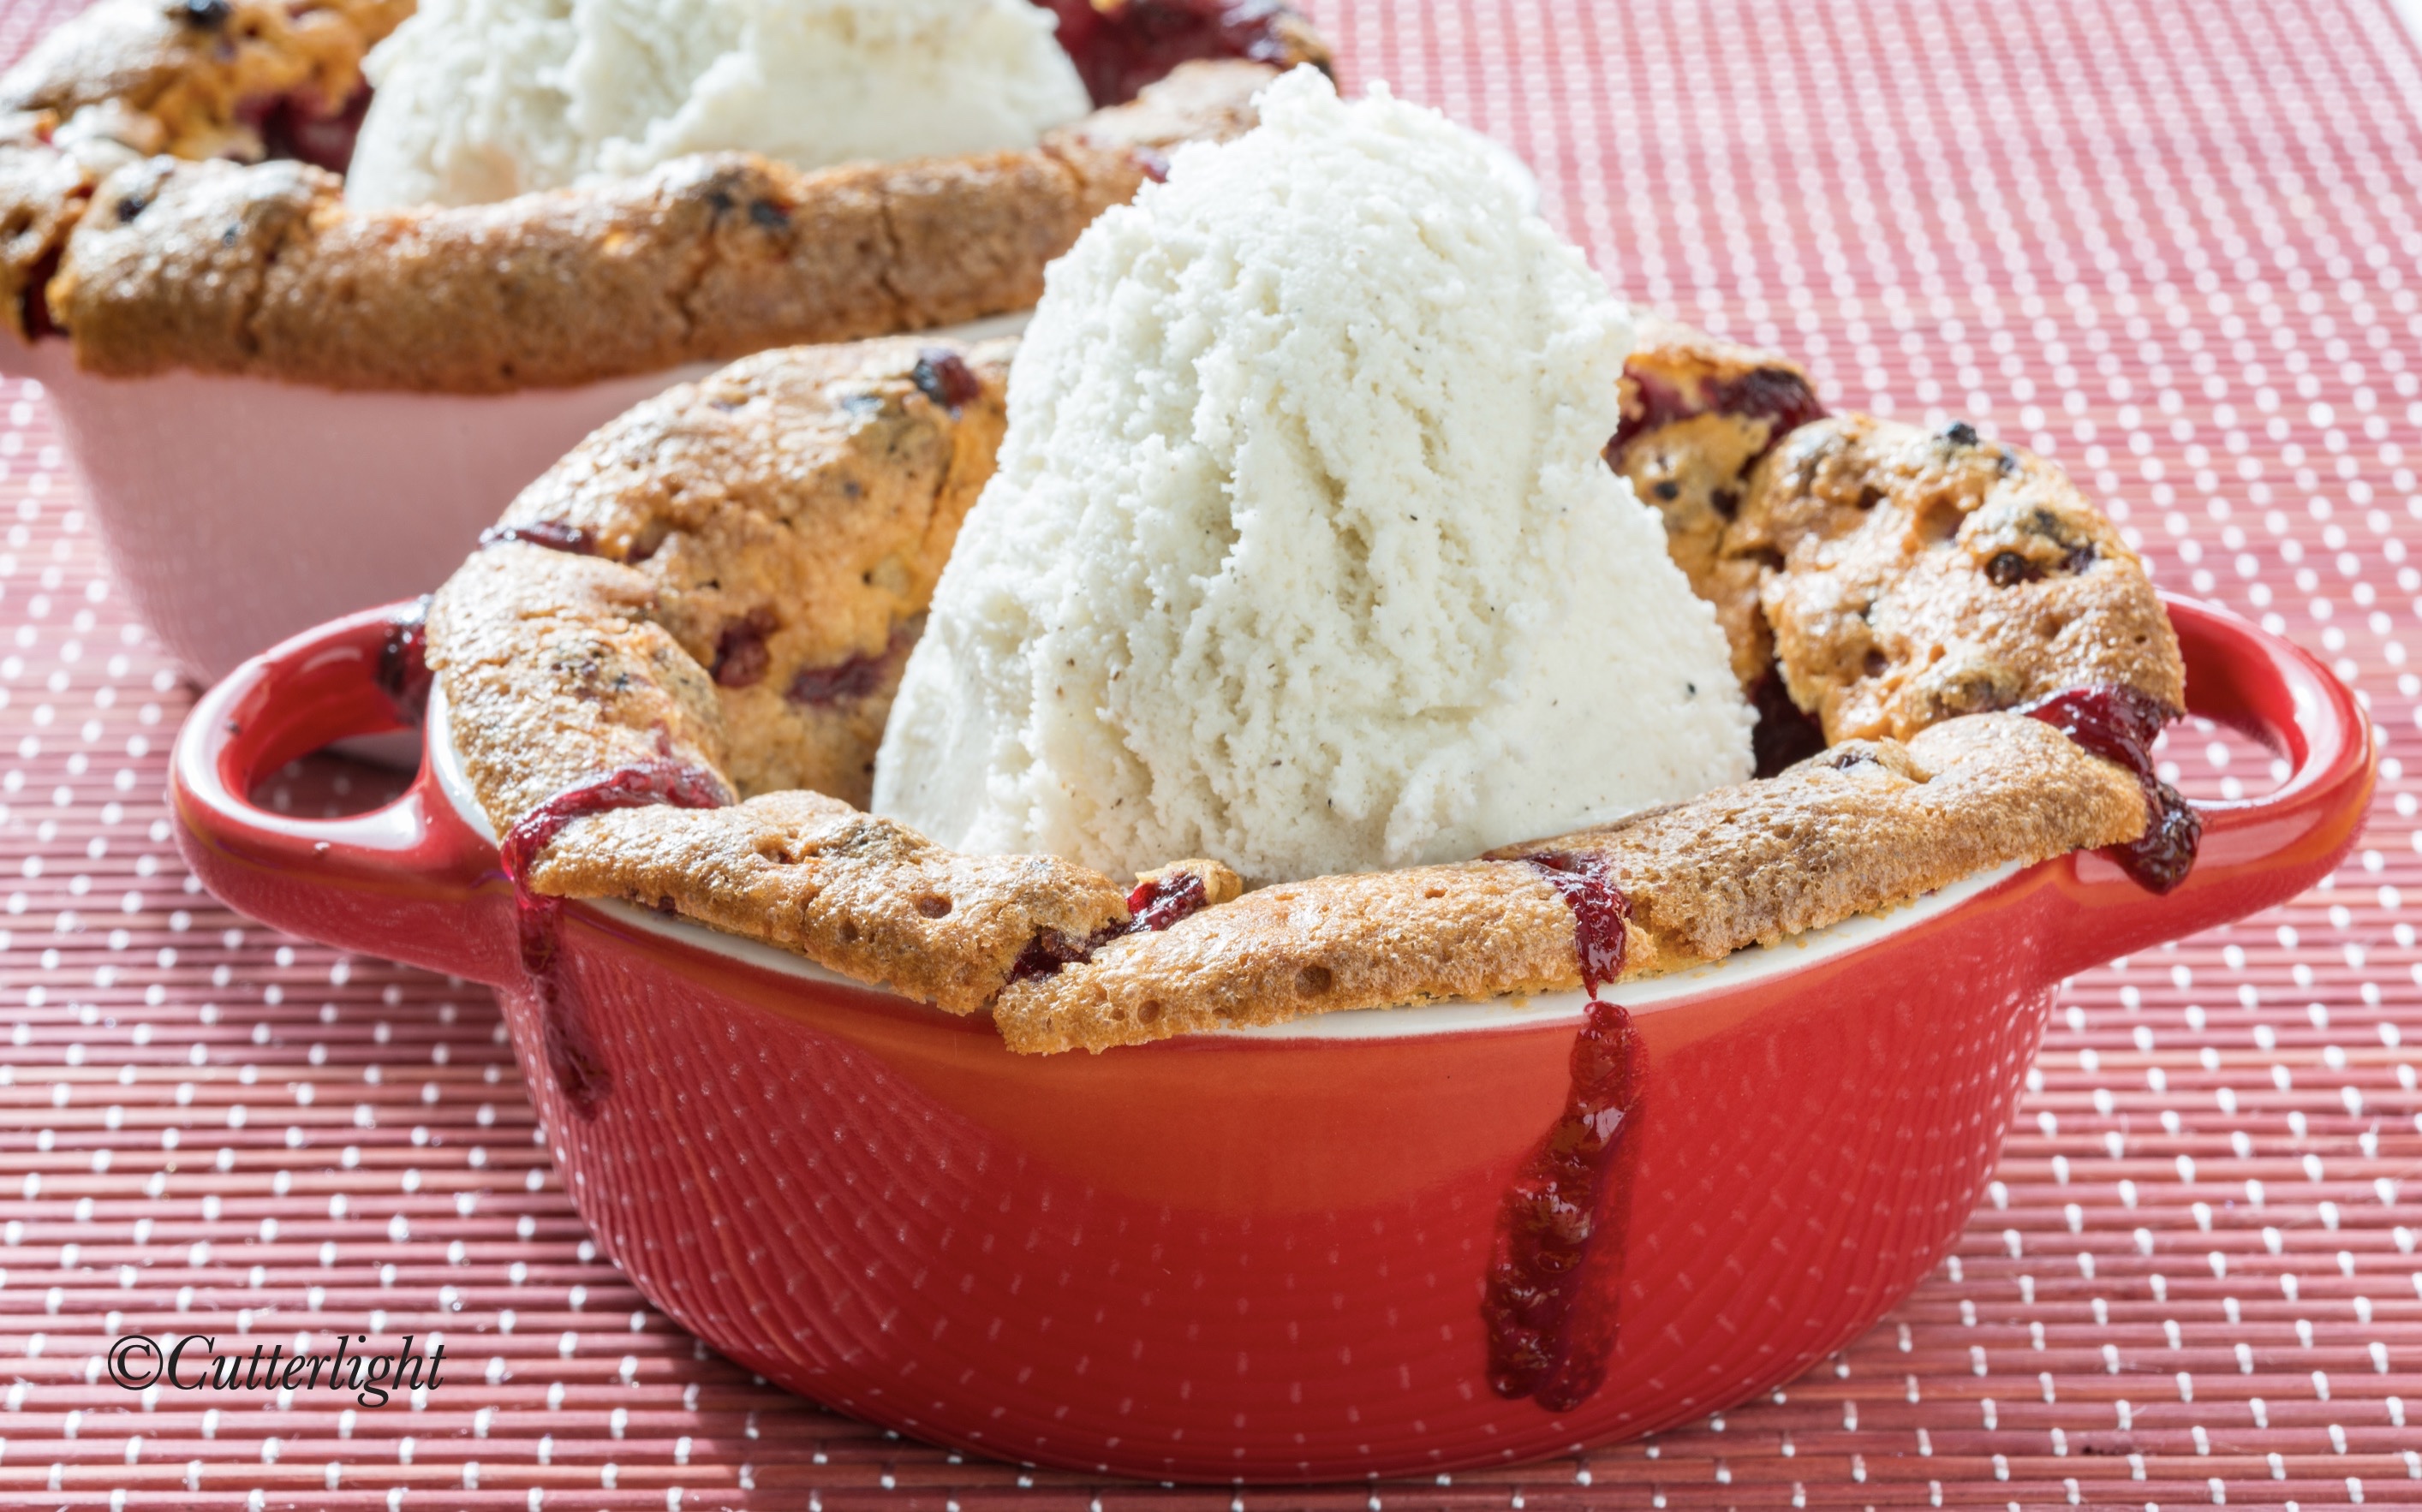
Flaugnarde is a lovely French name for a baked dessert which has fruit baked into a batter. The flaugnarde process creates a lightly crisped crust and a thick custard-like middle. Topped with ice cream, you’ll have a grand slam last course to any meal.
Lingonberries, known around here as low bush cranberries, are the last berry we forage for before we tuck in for winter. Collectors of these sour, flavorful gems are advised to wait until after the first frost for the best berries. We’ve learned that as long as the berries are fully red, the freezer also seems to do the same trick of enhancing their subtle sweetness.
Last year we found a killer spot for lingonberries across the lake. Looking back on the calendar where we kept noteworthy events, I noted that our several gallons of lingonberries in the freezer were collected in only two picking sessions. Now that’s a great spot!
Lingonberries can be used for cranberry recipes and vice versa. We’ve made lingonberry relish to go with roast turkey or moose, lingonberry breads to accompany poached egg breakfasts, and lingonberry juice for a hot spiced drink to warm up with on cold winter nights.
One of the tastiest recipes I’ve made with lingonberries is a version of Cranberry Chess Pie. It’s creamy filling packs a cranberry-orange, sweet-sour flavor punch inside a beautiful flaky pastry dough crust. This is the recipe I was channeling when I came up with a crustless version, which was supposed to be a little lighter on the calories. I can’t say I was successful with the calorie reduction. But I can say, it was incredibly delicious. I told Jack that I wished I could record his mmmming and ooohhing while he was eating this dessert. That would have been worth a thousand words.
Although this dessert is perfectly delicious on its own, I highly recommend serving it while it’s still warm with a scoop of vanilla bean ice cream. The dish will come out of the oven with a beautifully browned dome top. While it’s cooling, the flaugnarde will fall, creating a hollow perfectly shaped for a scoop of ice cream.
Lingonberry Flaugnarde
Ingredients
1/2 cup + 2 tbsp granulated sugar
1/4 cup unsalted butter, melted
Pinch salt
1 extra large egg or 2 small eggs
2 tbsp flour
1 1/2 tbsp Greek yogurt
1 tsp almond extract
1 1/2 cups lingonberries
Directions
Grease two 8 oz ramekins. Set aside.
Heat oven to 375 degrees F (190C).
In the bowl of a stand mixer, add sugar, butter, and salt. Mix together.
Mix in eggs.
Mix in flour.
Mix in yogurt and almond extract.
Mix well.
Stir in lingonberries.
Divide mixture into the prepared ramekins.
Bake until top is golden brown and filling is firm, about 50 minutes.
Cool ramekins on wire rack.
Top warm flaugnarde with scoops of vanilla bean ice cream. Devour immediately.
It was fun to share this elegant sponge cake featuring layers of creamy pumpkin mousse with my best friend and still be able to walk away (instead of stagger away for a post-food coma nap).
Hidden in the middle of my favorite baking book is a beautiful photo of a slice of golden layered cake. It draws my attention every time I peruse TheWilliams-Sonoma Baking Book. The recipe begins with “makes 10-12 servings.” As lovely as the image of that pumpkin mousse cake is, those words are where I stop reading and turn the page. But recently, I thought to myself that there has to be a way to scale this recipe down to create an intimate dessert for two. I thought my skills were up for the challenge.
The recipe lost nothing in pairing it down; the flavor is wonderful. My 6-inch springform helped turn out a decidedly cute cake, the perfect finale to our Thanksgiving meal for two. The mousse part of the recipe will make an extra cup, which we kept in two half-cup canning jars as a dessert for the next day.
Pumpkin Mousse Cake for Two
Ingredients for the Cake
1 egg
2 tbsp sugar
3 tbsp all-purpose flour
1 tbsp unsalted butter, melted
Directions for the Cake
Preheat an oven to 375°F. Line the bottom of a 6-inch round springform pan with parchment paper.
In the bowl of a stand mixer, whisk together the egg and sugar by hand until combined. Place the bowl over but not touching simmering water in a saucepan and gently whisk until the mixture registers 140°F on an instant-read thermometer, about 3 minutes. Put the bowl on the mixer fitted with the whisk attachment and beat on high speed until the mixture is pale and almost tripled in volume, 5 to 8 minutes.
Remove the bowl from the mixer. Sift 2 tablespoons of the flour over the egg mixture in two additions and carefully fold in with a large rubber spatula. Fold the third tablespoon of the flour into the melted butter, then fold back into the egg mixture.
Pour the batter into the prepared pan and smooth the top. Bake until the top is browned, about 20 minutes. Transfer the pan to a wire rack and let cool completely. Run a table knife around the edge of the pan and invert the cake onto a work surface. Turn the cake right side up.
Ingredients for Pumpkin Mousse
1 1/4 tsp. (1/2 envelope) unflavored gelatin
1 tbsp cold water
1 cup canned pumpkin purée
1/4 cup granulated sugar
tiny pinch salt
1/4 tsp ground cinnamon
1/4 tsp freshly grated nutmeg
1/2 tbsp good quality bourbon
1 cup heavy whipping cream
Directions for the Mousse and Assembling the Cake
Cut the cake into 2 equal layers.
In a small bowl, sprinkle the gelatin over the cold water, stir and let soften until opaque, about 3 minutes.
In a saucepan over medium heat, combine about 1/2 cup of the pumpkin purée, the granulated sugar and salt. Then heat, stirring, until the sugar dissolves.
Stir in the softened gelatin and let cool to room temperature.
In a bowl, stir the pumpkin mixture into the remaining pumpkin purée. Whisk in the cinnamon, nutmeg and bourbon.
Using a stand mixer, whip the whipping cream to soft peaks. Using a large rubber spatula, gently fold one-third of the whipped cream into the purée, then fold in the remaining whipped cream, making a mousse.
Peel off the parchment paper from the bottom cake layer.
Put the layer, cut side up, into the bottom of a 6-inch round springform pan.
Spread half of the mousse evenly over the cake. Trim 1/2 inch from the outside edge of the remaining layer. Center it, cut side down, on top of the mousse. Top with the additional mousse, pushing it between the cake and the pan and smoothing the top. Refrigerate until set, at least 4 hours or up to overnight.
Divide the remaining mousse into two containers and store, covered, in the refrigerator.
To remove, run a small knife around the inside of the pan. Open the springform and remove the pan sides.
Sixty-six days on a bike, 1,300 miles pedaled, more miles walked, hiked, climbed, and canoed. Before we knew it, we were back home with thousands of photos and a lifetime of stories to prepare for publication. What better way to transition back from the world of bicycle trekking to our home in Chignik Lake than baking? I can’t think of one.
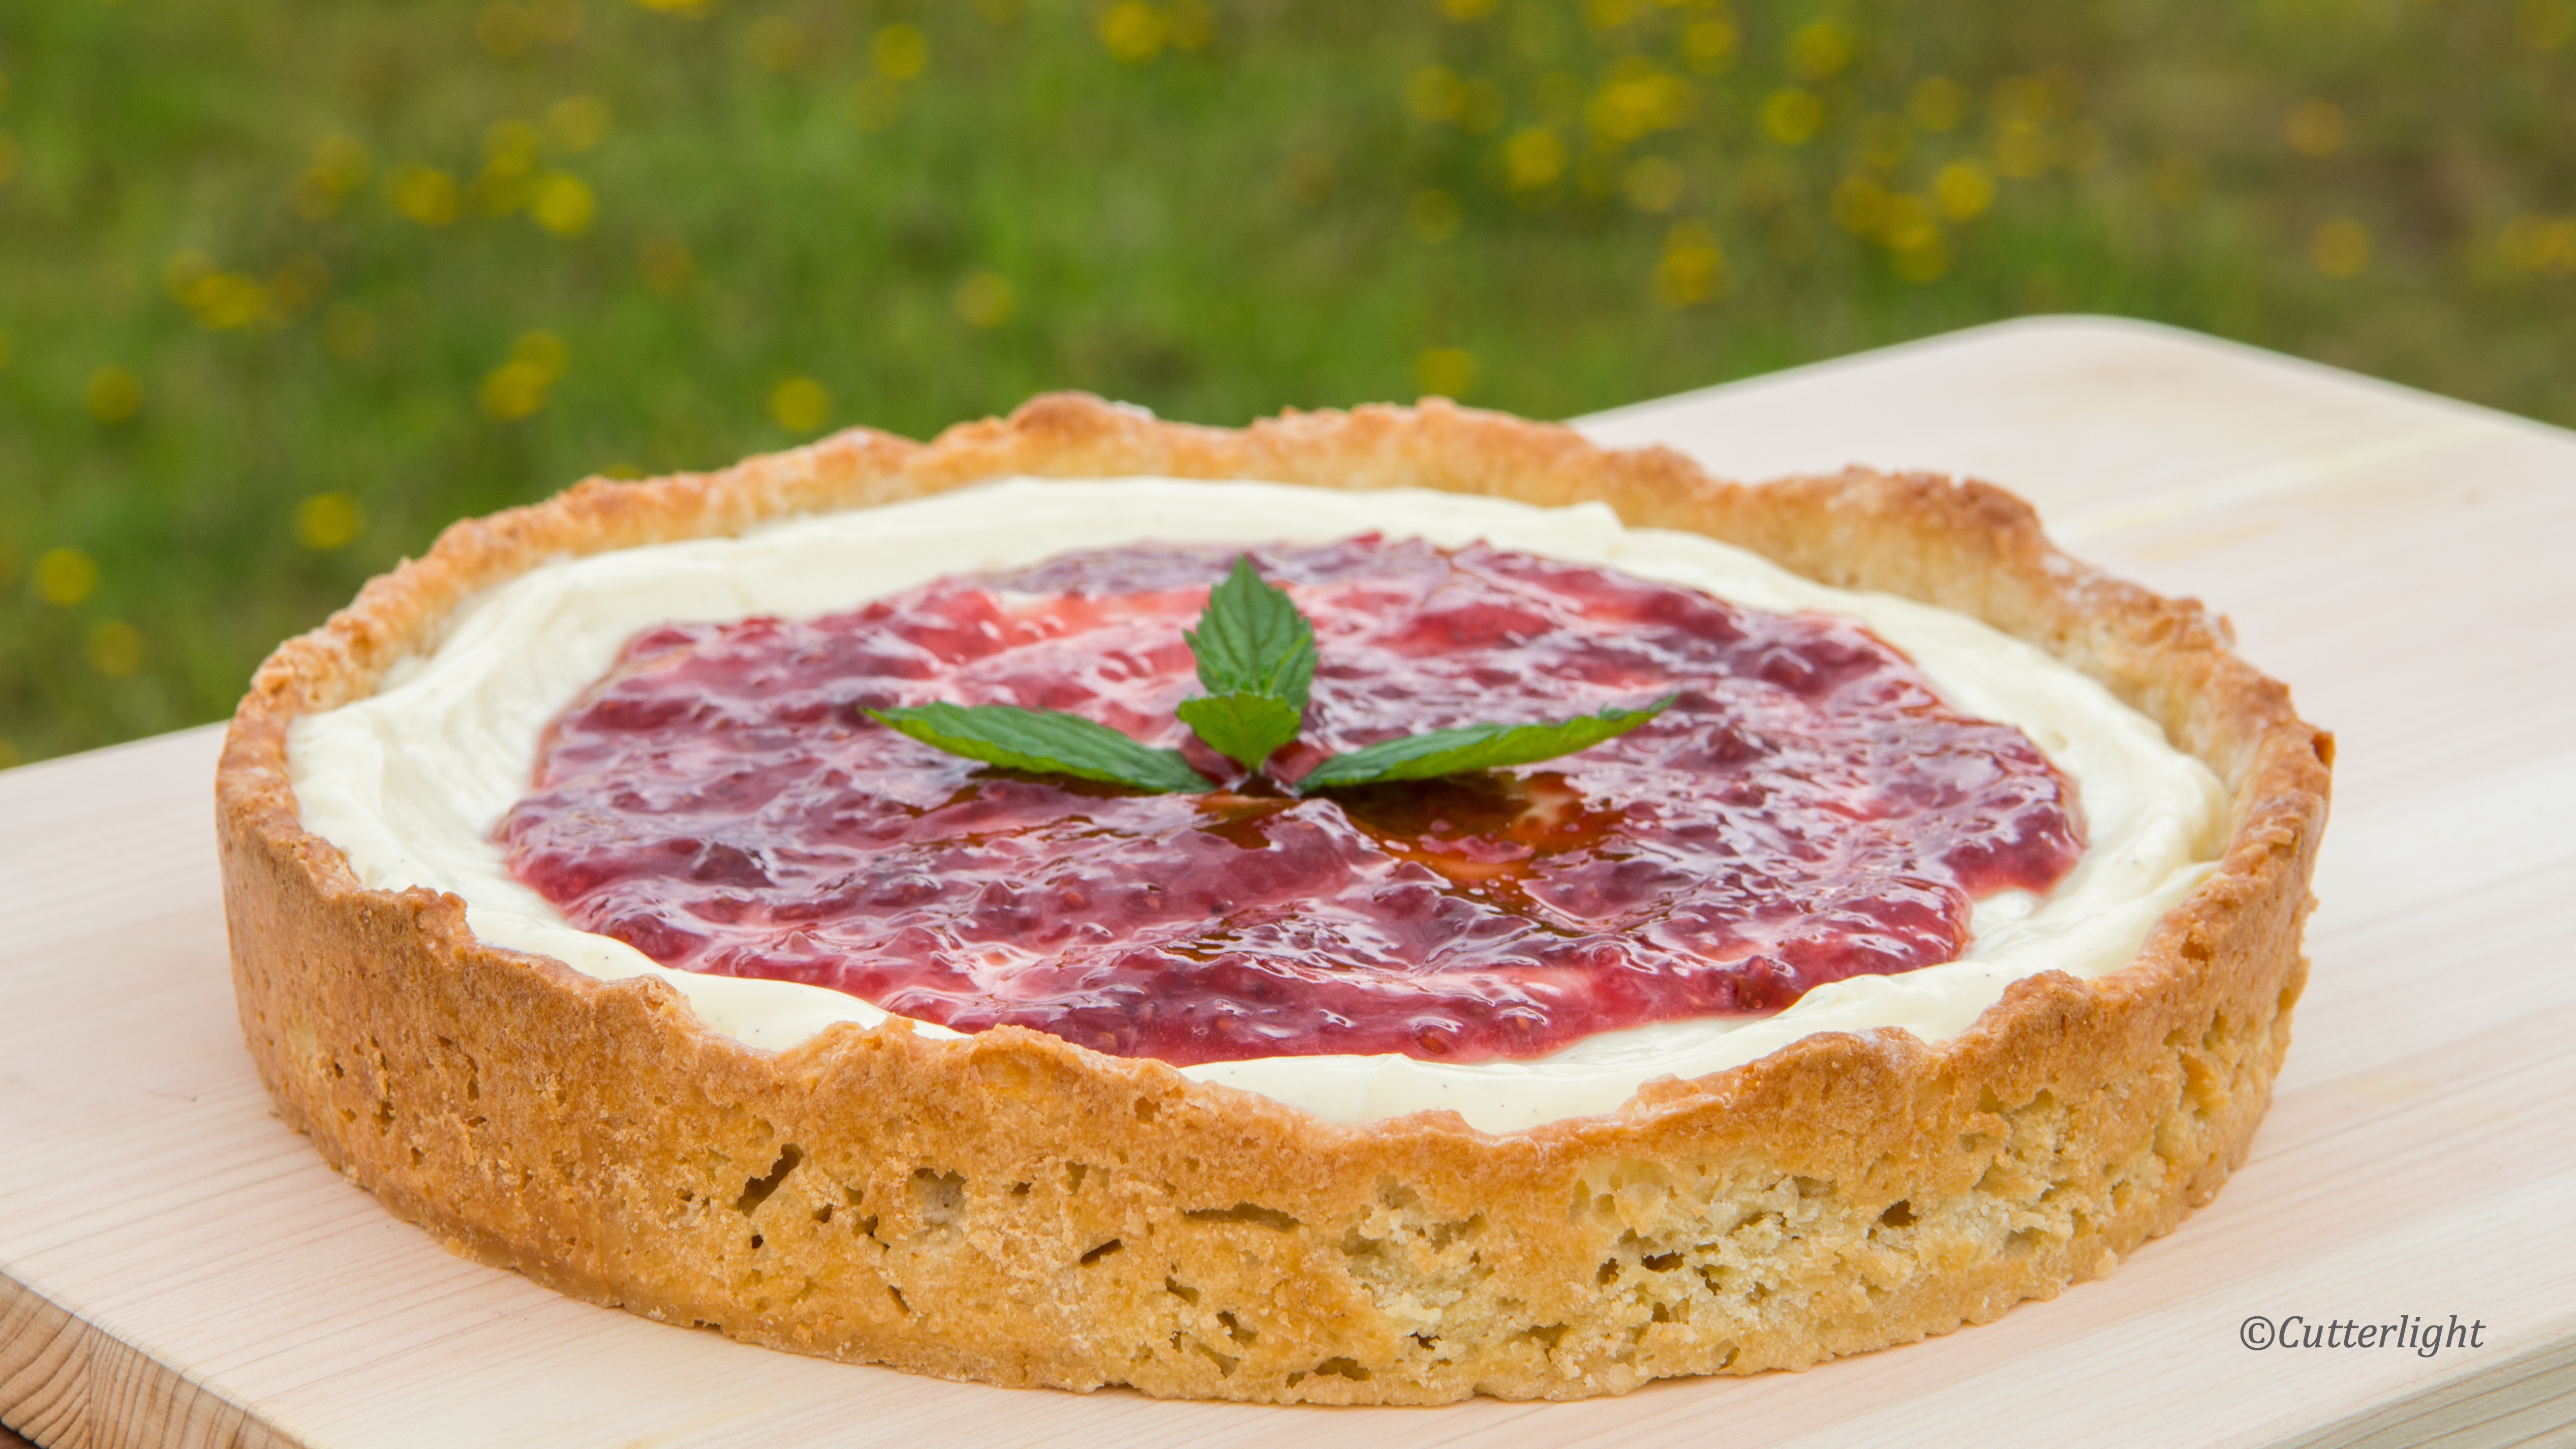
I arrived back home to my patiently waiting, full, lovely pantry. Translucent jars of raspberry jam caught my eye on from the shelf where they’d been stored. With this year’s fruit quickly ripening, it’s time to use up last year’s stores. What a great excuse to bake with one of my favorite flavors – raspberry. Jack “I-don’t-have-a-sweet-tooth” Donachy’s secret weakness is custard desserts. For no better reason than pure love (of custard and raspberry), this little baby was created. Wait… I’m not saying that little baby Jack was created just to eat custard. I’m saying that this dessert… never mind.
A crust infused with almonds. Then a creamy vanilla custard topped with a smooth, delicious layer of homemade jam – I prefer raspberry. I set it out to photograph, and it was gone in a flash.
For those of you following along, we will have plenty of photos and stories coming from our bicycle trek around Hokkaido. Jack is up to is elbows in the sorting and editing process as well as catching the last of Chignik Lake’s migratory birds before they head south. Stay tuned. For now, sit back and enjoy a slice, or two, of this delicious tart.
Raspberry Vanilla Custard Tart
Crust
Ingredients
1 cup all purpose flour
1/2 cup finely chopped almonds
3 tbsp granulated sugar
2 large egg yolks
1 tbsp cold water
generous pinch salt
1/4 cup cold unsalted butter
Directions
In a large bowl, whisk together flour, almonds, and sugar.
In a medium bowl, whisk egg yolks and water.
Grate butter into flour mixture. Toss butter so that it is fully coated. Use two sharp knives (I used steak knives) to chop the butter into smaller pea-sized pieces.
Pour egg mixture into flour mixture. Stir with fork until dough comes together. It should be shaggy looking. If it’s too dry add tiny amounts of cold water until it comes together.
Turn dough out into a 9-inch springform pan or tart pan with removable bottom.
Press dough into bottom of pan and up the sides of pan (about 1 inch) with fingertips.
Prick dough with fork. Freeze for 20 – 30 minutes.
Preheat oven to 350°F.
Bake crust for 35 minutes. It will be golden brown when finished.
Let cool completely. You can store the crust at room temperature if it’s tightly wrapped in plastic.
The best chocolate chip cookie on the planet? There’s one way to find out!
Break out all the best ingredients you’ve been hoarding and make yourself a batch of these…now!
A couple of years ago, I read about a cookie that really sells for $8. Could I create a cookie worth such a price? Oh boy, yes! The secret to this cookie is not gold flecks or a butler to serve it, but fine ingredients and an investment of some time. The recipe demands high quality chocolates, browned butter, toasted almonds, and vanilla paste. Serving them slightly cooled from the oven is a key to the experience. I make a batch of dough, cookie scoop out portions and freeze them. When we are in the mood for these decadent beauties, I pop a couple in the oven while we are eating dinner in order to serve them as a perfectly warm $8 dessert.
The $8 Cookie
Ingredients
1 large egg
1/3 cup dark brown sugar
3 tbsp granulated sugar
1/3 cup unsalted butter, browned
2 tsp vanilla paste
1/2 tsp almond extract
3/4 cup plus 2 tbsp all-purpose flour
1/2 tsp baking soda
pinch salt
1/3 cup toasted almonds, chopped
1/3 cup good quality milk chocolate chips
1/3 cup good quality white chocolate, chopped
Directions
Mix the sugars and the egg well.
Add in the browned butter.
Mix in vanilla paste and almond extract.
Stir flour, baking soda and salt into the mixture.
Fold in the almonds and chocolate pieces.
Chill the dough for at least 1 hour.
Line a baking sheet with parchment paper.
Preheat oven to 325 degrees F (160 degrees C).
Scoop tablespoon-sized balls using a small ice cream scoop onto the baking sheet. Bake for 8 – 10 minutes.
Let the cookies set on the baking sheet for about 3 minutes before removing them to a wire cooling rack.
Continue to cool for another two minutes on the wire rack.