Frosted Chocolate Orange Cupcakes

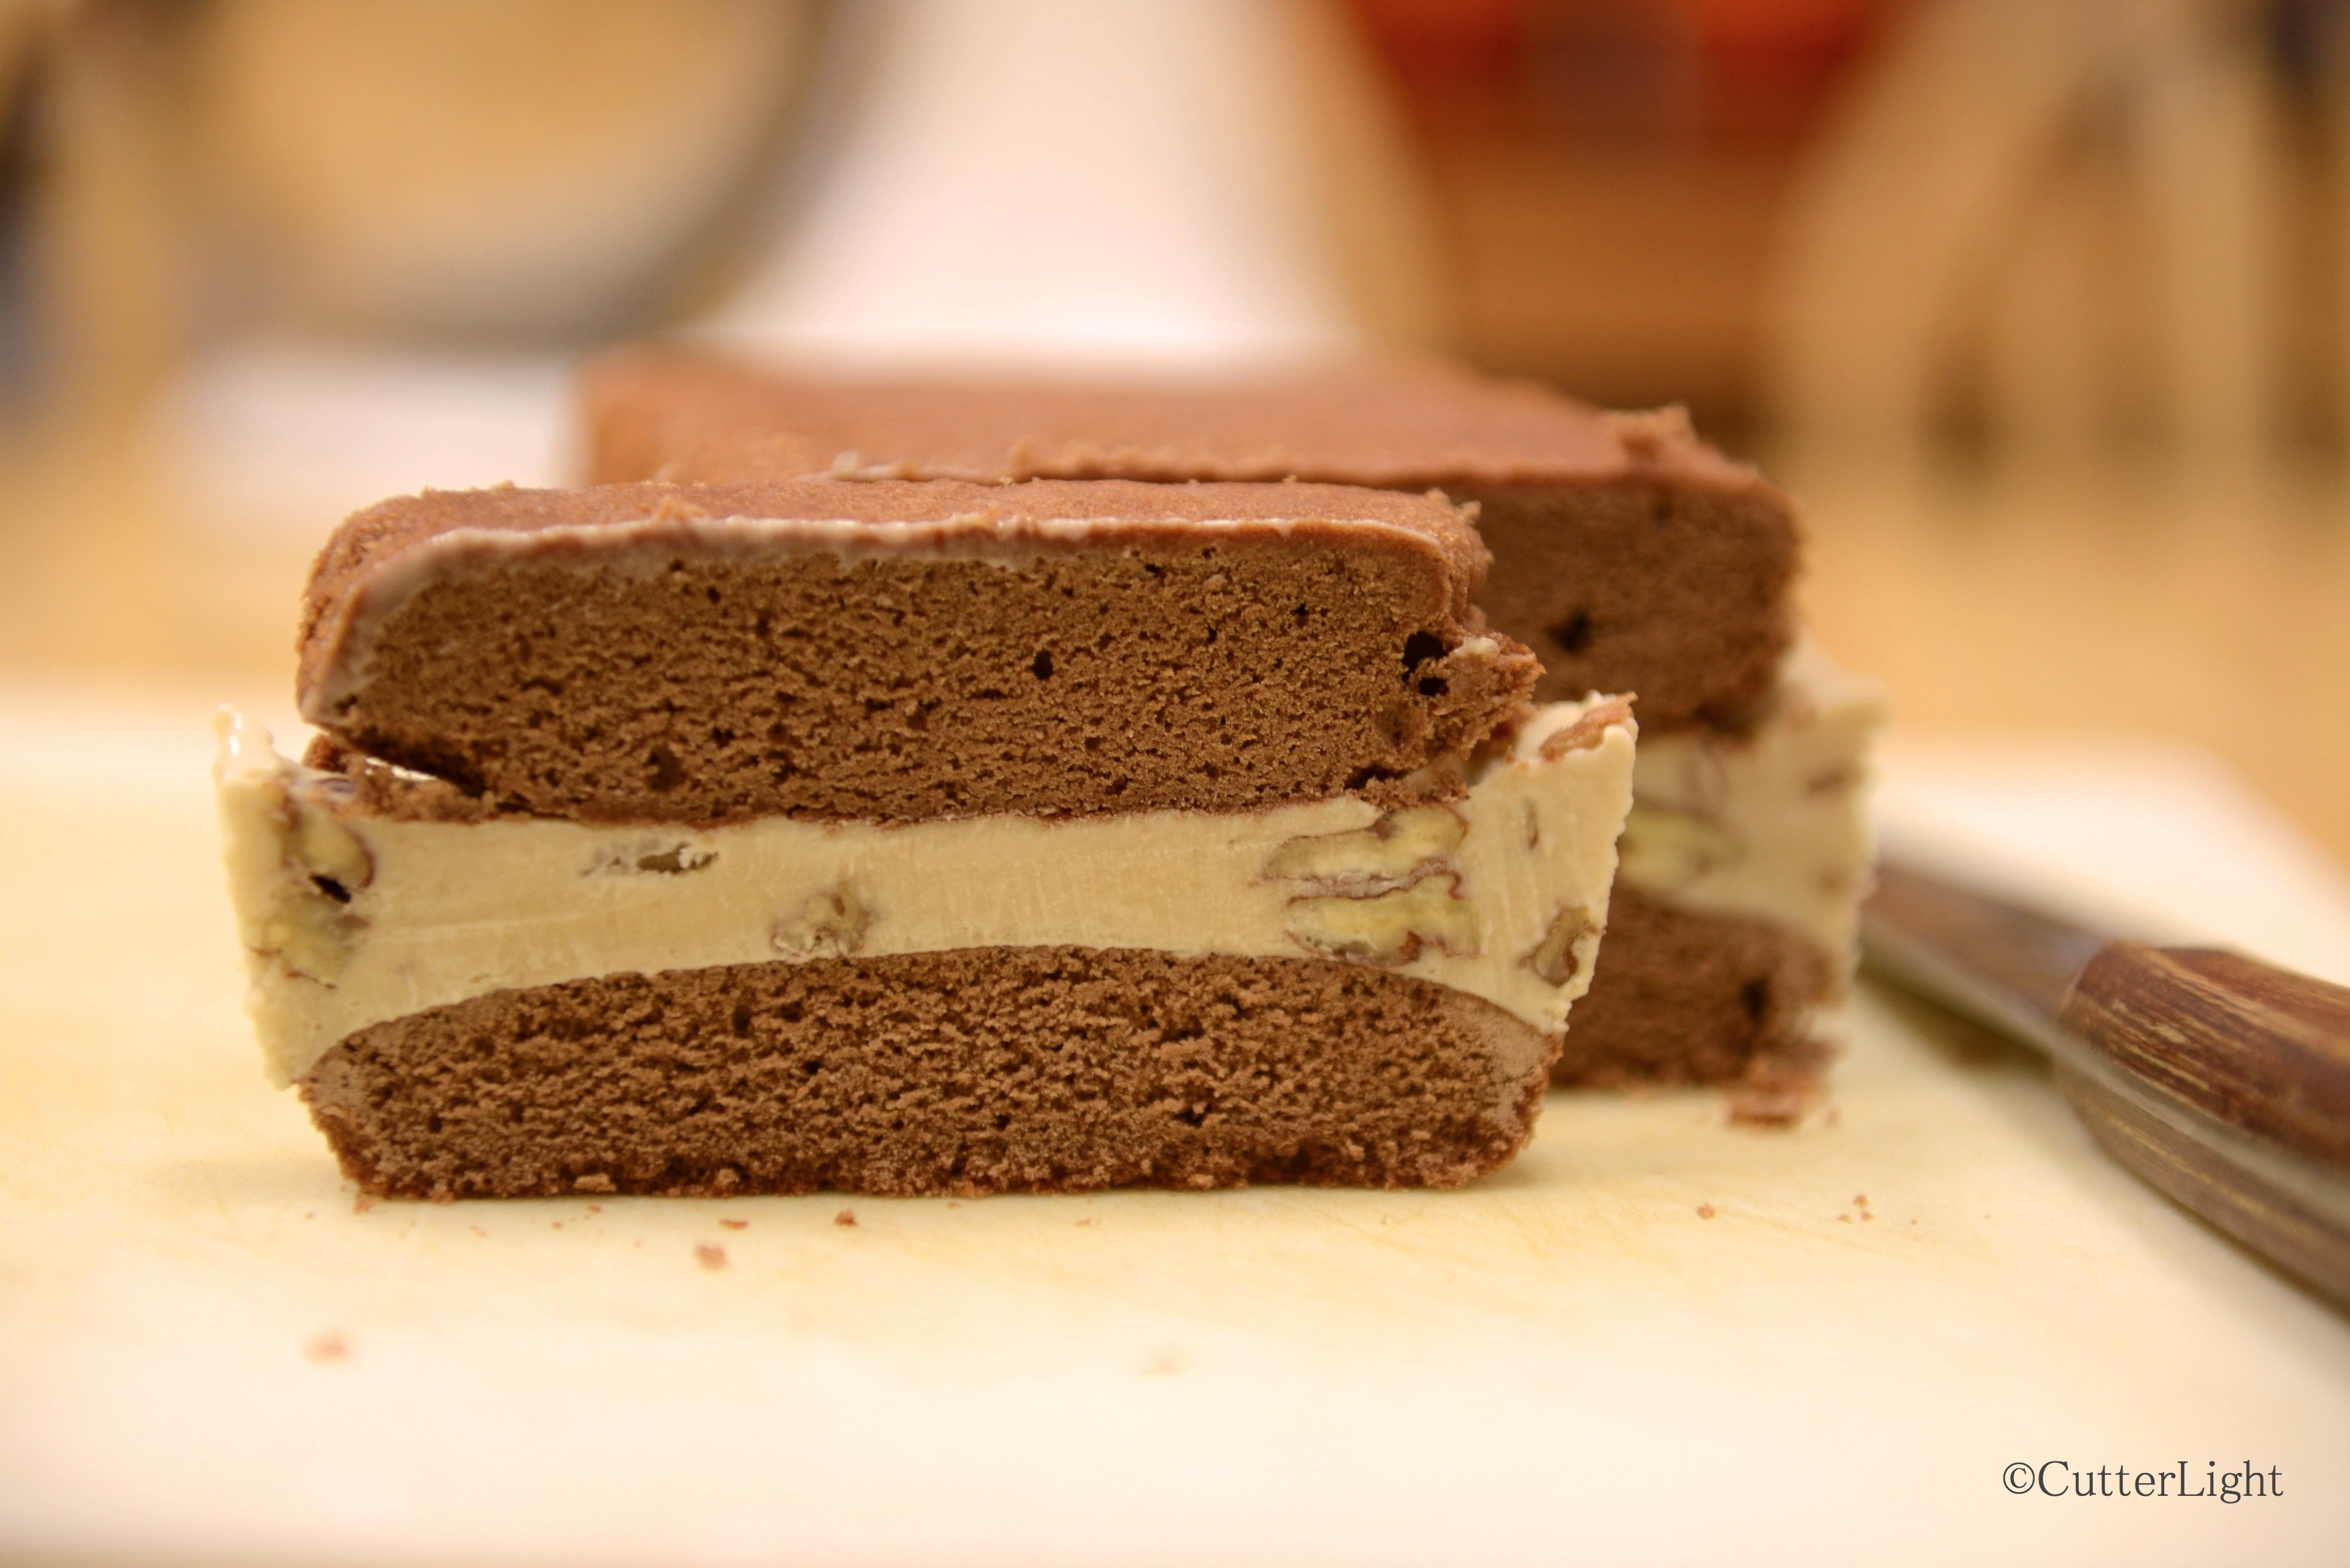
Moist chocolate cake infused with orange topped with super creamy rich chocolate buttercream frosting…. happy birthday to me!

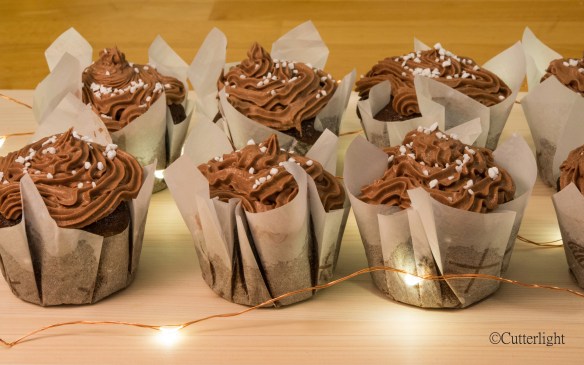
Another stellar recipe from my Williams-Sonoma Baking book. I can’t say enough good things about this cookbook. Every recipe is great. In addition to being great recipes, they are also great bases to build from or tinker with. For my birthday, I had narrowed down my celebratory dessert to three chocolate wonders from this cookbook. The combination of chocolate and orange is my all-time favorite, so the chocolate orange cupcakes won. The picture says it all – these delicious little cakes will start a party just by showing up.

Chocolate Orange Cupcakes

Ingredients

  • 3 tbsp Dutch processed cocoa powder
  • ¼ cup hot water
  • 1 ¼ cups all purpose flour
  • ½ tsp baking powder
  • ½ tsp baking soda
  • ¼ tsp salt
  • zest of 1 orange
  • 2 large eggs, at room temperature
  • ¾ cup granulated sugar
  • ½ cup buttermilk, at room temperature
  • ½ tsp pure vanilla extract
  • ¼ unsalted butter, melted, at room temperature

Frosting

  • 6 oz. semi-sweet chocolate chips
  • 1 cup unsalted butter, at room temperature
  • 2 cups confectioner’s sugar

Directions

  1. Preheat oven to 350° F.
  2. Line 12 standard muffin cups with paper liners.
  3. In a small bowl, stir cocoa with hot water until it is dissolved. Set aside.
  4. Whisk flour, baking powder, baking soda, and salt together in medium bowl.
  5. Mix orange zest into flour mixture. Set aside.
  6. In a large bowl, whisk eggs and granulated sugar together.
  7. Whisk in buttermilk and vanilla.
  8. Whisk in cocoa.
  9. Whisk in melted butter.
  10. Stir in flour mixture.
  11. Spoon batter into each muffin cup. Fill each cup about ½ full.
  12. Bake cupcakes until puffed and a cake tester inserted into the center of a cupcake comes out clean, about 15 – 20 minutes.
  13. Let cool completely on wire rack. Remove cupcakes when pan is cool.
  14. Make frosting. Put chocolate chips in top of double boiler. Melt chocolate over simmering water. Let cool to room temperature.
  15. Beat butter and confectioner’s sugar until creamy and smooth, about 3 minutes.
  16. Beat in melted chocolate until well-mixed.
  17. Fill a pastry bag fitted with a 12mm star tip (1/2 inch) with frosting.
  18. Pipe a spiral on top of each cupcake.
  19. Refrigerate the cupcakes until 30 minutes before serving to set the frosting.

Razzle Dazzle ‘Em with Raspberry Cream Pie

Looking to expand my cookie recipe collection, I bought a new baking recipe book a couple of weeks ago. I found a beautiful book which boasted over 150 interesting cookie ideas. After reading the book cover-to-cover, I decided to try a layered chocolate biscuit. It was a disaster. The biscuit dough completely and totally fell apart when I rolled it out and there seemed to be no way to salvage it. I really hate wasting anything, so I baked the crumbs of dough anyway figuring that if they tasted good, I’d find a way to put them to good use. Well, they did taste good, and so for several days they sat on the counter in an air-tight container awaiting inspiration.

This past weekend I reached for my tried and true Williams-Sonoma Baking Book. The book fell open to a beautiful picture of a pie with a deep brown cholatey crust and a creamy pink filling. Raspberry cream pie – of course! As luck would have it, we still have a good supply of frozen raspberries from last summer’s berry picking. Raspberries and chocolate are a perfect match, in my book.

What a delight! The look of this lovely pie certainly suggests Valentine’s Day, but any day would be a good day for this light, airy dessert. I think the best way to describe the flavor is to imagine a 50/50 bar, otherwise known as a Dreamcicle – creamy vanilla ice cream in the middle surrounded by a slightly tart, fruit exterior, usually orange. This pie filling has that same creaminess with a slight tang of sour from the fresh raspberries. The crunch of the chocolate crust provides the perfect textural counterbalance. Next time you want to tell someone you love them, make them a raspberry cream pie!

Raspberry Cream Pie

Ingredients

  • 1 1/4 cups chocolate cookie crumbs
  • 5 tbsp unsalted butter, melted
  • 3 tbsp granulated sugar
  • 1/4 cup cold water
  • 1 package (2 tsp) unflavored powdered gelatin
  • 2/3 cup natural raspberry juice or fresh raspberry purée
  • 2 large eggs
  • 1/2  cup granulated sugar
  • 3/4 cup heavy whipping cream

Directions

  1. Place oven rack in the middle of oven and preheat to 350° F (180° C).
  2. In a medium bowl, combine chocolate cookie crumbs, butter, and granulated sugar. Stir until all is evenly mixed.
  3. Press the cookie crumb mixture into bottom of 9-inch pie pan or springform pan.
  4. Bake until firm, about 5 minutes.
  5. Let crust cool on wire rack.
  6. Pour cold water into a saucepan. Sprinkle with gelatin and let sit until gelatin softens and swells (about 5 minutes).
  7. Heat gelatin over medium heat. Stir until it is clear and fluid.
  8. Stir gelatin mixture into raspberry juice. Set aside.
  9. In a medium bowl, whisk eggs, sugar, and salt until pale yellow. Set aside.
  10. In a large bowl, beat or whisk the cream until thick, soft peaks form.
  11. Add egg mixture to whipped cream. Whip until smooth.
  12. Add raspberry mixture to cream mixture. Whip until smooth.
  13. Pour filling into the crumb crust. Even out with a rubber spatula.
  14. Refrigerate until the filling is cold and firm (4-6 hours).
  15. Let the pie stand at room temperature for about 20 minutes before serving.
  16. Serve topped with sweetened whipped cream and fresh berries.

Gluten Free? Low Carb? Whatever! Just Eat These Fudgy Chocolate Meringues!

meringue fudgy chocolate n

Fudgy meringues with a crispy, melt in your mouth shell will have you attending “Meringues Anonymous” if you’re not careful!

How can four little ingredients be so good together? The combination of the crispy exterior and the moist chocolate middle sans flour resulted in an entire batch of fifteen cookies disappearing in just over 24 hours. I wish I could tell you we had guests…

Although airy and relatively low on calories compared to most confections, these meringues did not come about due to New Year’s self-promises centered around slimmer waistlines. The ignoble truth is that after creating crème brûlée, another custard dish and any number of ice creams, we had on hand countless extra egg whites and, according to Jack, “egg whites, fish and beer are three items that can be consumed without fear of weight gain.”

These meringues are quick and easy to make but do require an overnight stay in the oven to finish drying  in order to create that crispy exterior.

Fudgy Chocolate Meringues

Ingredients

  • 3 egg whites
  • 3/4 cup granulated sugar
  • 2 tbsp dutch processed cocoa
  • 1/2 cup smashed chocolate chips (Place chips in a Ziploc bag and smash with a meat tenderizer)

Directions

  1. Preheat oven to 350 degrees F. Line two baking sheets with parchment paper. Set aside.
  2. Place egg whites and sugar in the bowl of a stand mixer.
  3. Place bowl on top of pot of simmering water, for a double boiler effect.
  4. Whisk eggs and sugar for a couple of minutes until sugar is just dissolved.
  5. Place bowl back on stand mixer. Mix on high speed until eggs are thick and glossy and hold soft peaks.
  6. Sift cocoa onto egg mixture.
  7. Mix on high speed until cocoa is just incorporated.
  8. Fold smashed chocolate chips into egg whites.
  9. Use a cookie scoop to drop batter onto parchment-lined baking sheets.
  10. Bake cookies for 10 minutes. Cookies should puff up and may crack.
  11. Remove cookies and leave oven door open to cool down.
  12. Place cookies back in oven, close oven door and let cookies sit overnight.
  13. The next day, cookies will be cooled completely and can be easily removed from parchment paper. Store in airtight container.

Rustic Pear Gallette with Whole Wheat Blend Crust

gallette pear n

The sweet secret to this gallette is a generous layer of homemade cloudberry jam beneath the pears No cloudberries? Try raspberry, blackberry or apricot jam.

A gallette is a beautiful dessert that can whipped up on short notice – a perfect answer to a seasonal abundance of fresh fruit. During the summer, we made a delicious strawberry-port gallette with sliced almonds in the galley of our sailboat. Since it is wintertime, we decided to make the gallette a bit more full-bodied by adding wheat flour and some cornmeal to the crust. We happened to have pears on hand, but many other fruits readily lend themselves to this recipe. Enjoy a slice of pear gallette with a side salad, a favorite cheese and a freshly brewed cup of tea for a satisfying lunch in any season.

Rustic Pear Gallette

Ingredients

  • 1  cup all-purpose flour
  • 3/4 cup whole wheat flour
  • 1/3 cup granulated sugar
  • 1/4 cup coarse cornmeal
  • 1/4 tsp salt
  • 1/2 cup cold butter, cut into small pieces
  • 1/3 cup buttermilk (we made this from powdered)
  • 2 tablespoons cloudberry jam, or jam of your choice
  • 2 D’Anjou pears, thinly sliced
  • 1 egg, beaten
  • 2 tbsp granulated sugar mixed with a pinch of ground cinnamon

Directions

  1. Mix together flours, sugar, cornmeal and salt in a medium bowl.
  2. Using a pastry blender, mix in cold butter. Continue mixing until cold butter is the size of peas.
  3. Slowly mix in buttermilk. Stir with rubber spatula until dough forms into a ball.
  4. Wrap dough in plastic and chill for about 30-45 minutes in refrigerator.
  5. Preheat oven to 350 degrees F.
  6. Cut a piece of parchment paper to fit the size of a baking sheet.
  7. Place chilled dough on center of parchment paper.
  8. Roll dough to about a 15-inch circle. This is a rustic dessert, so no need to be a perfectionist here.
  9. Brush the entire rolled dough with jam.
  10. Arrange pear slices atop dough, leaving a 2-inch border.
  11. Fold border over pears, pressing down any folds of dough.
  12. Brush dough with egg.
  13. Sprinkle dough and pears with sugar and cinnamon mixture.
  14. Bake gallette 40 – 45 minutes, until dough is golden brown and pears are soft.
  15. Serve warm or at room temperature.

Rich, Custardy Eggnog Ice Cream: A Christmas Tradition

eggnog ice cream n

A big mug of freshly brewed coffee and a couple scoops of eggnog ice cream dressed up with shaved nutmeg: Bring it on, Winter!

This ice cream is divine.

Rich Eggnog Ice Cream

Ingredients

  • 2 cups heavy cream
  • 1 cup whole milk
  • 1 tsp ground cinnamon
  • 1/2 tsp freshly grated nutmeg
  • 1/2 tsp ground cloves
  • 8 egg yolks
  • 3/4 cup sugar

Directions

  1. Heat cream and milk in a medium saucepan over medium heat.
  2. Add cinnamon, nutmeg and cloves and heat until mixture almost boils, about 5 – 8 minutes.
  3. Reduce heat to low, using a heat diffuser if necessary.
  4. Meanwhile, beat yolks and sugar until the mixture is light yellow and smooth.
  5. Add 4 tbsp of hot cream mixture to egg mixture and stir until combined. This will temper the eggs.
  6. Slowly add warmed yolk mixture to warm cream. Stir continuously in order to not cook/curdle eggs.
  7. Cook entire mixture over low heat until slightly thickened and mixture coats the back of a spoon. Cool completely. I put the mixture in the refrigerator overnight before I use it.
  8. Pour into freezer bowl of ice cream machine. Turn machine on and mix until mixture thickens, about 20 minutes.
  9. Transfer to airtight container and place in freezer until firm, about 2 hours.

Now THIS is an Ice Cream Sandwich!

brownie butter pecan ice cream sandwich_n

Creamy, homemade butter pecan ice cream sandwiched between chewy, chocolatey, frozen brownies – a guaranteed cure for winter-darkness doldrums! 

Store-bought ice cream sandwiches have the right idea – it’s fun to eat ice cream with your hands. The problem is that the outside layers of the store-bought variety leave much to be desired. We wanted a delicious brownie that would be more than just an edible barrier between ice cream and hands. So we created a not-too-thick brownie that retains its chewiness when it’s frozen. For the ice cream filling, we chose butter pecan to add the texture and flavor of the nuts we like best in brownies. Turned out to be the best ice cream sandwiches we’ve ever had!

Brownie & Butter Pecan Ice Cream Sandwiches

Ingredients

  • 2 oz. semi-sweet chocolate chips
  • 1/2 stick unsalted butter
  • 3 eggs
  • pinch salt
  • 1 3/4 cups granulated sugar
  • 1/2 tsp vanilla extract
  • 1/2 cup all-purpose flour
  • butter pecan ice cream (see recipe below)

Directions

  1. Preheat oven to 350 degrees F. Line two 9″ x 5″ x 3″ loaf pans with foil. Butter the foil. Set pans aside.
  2. Melt chocolate and butter in a double boiler over simmering water. Mix completely. Let mixture cool slightly.
  3. Beat eggs and salt in a mixing bowl.
  4. Gradually beat in sugar and vanilla.
  5. Mix in cooled chocolate.
  6. Mix in flour.
  7. Pour half of the batter in each loaf pan.
  8. Bake for 25 minutes. Brownies are done when a toothpick inserted in the center comes out clean. Let cool for about 15 minutes.
  9. Gently lift brownies with foil out of loaf pans and place in freezer.
  10. Place one of the empty loaf pans in freezer.
  11. Scoop out several scoops of butter pecan ice cream* into a bowl. We used about six.
  12. Stir ice cream with a rubber spatula to soften a little. You want ice cream to be spreadable, but not soupy.
  13. Retrieve one brownie and frozen loaf pan from freezer.
  14. Place brownie back into loaf pan.
  15. Spread all the ice cream evenly on brownie.
  16. Retrieve second brownie from freezer. Remove foil.
  17. Press second brownie atop the ice cream layer. Place sandwich in freezer to set, about 30 minutes.
  18. Remove sandwich from pan and place on cutting board. Using a sharp knife, slice sandwich into slices of desired size.
  19. Let sit for about 5 minutes to slightly thaw before serving.

*If you want a top notch filling for this sandwich, try making your own butter pecan! Here’s how:

Butter Pecan Ice Cream

Ingredients

  • 1 stick unsalted butter
  • 1 cup pecan halves, chopped slightly
  • 1/2 tsp salt
  • 2 large eggs
  • 3/4 cup granulated sugar
  • 2 cups heavy whipping cream
  • 1 cup whole milk

Directions

  1. Melt butter in a heavy pan over low heat.
  2. Add pecans and salt and sauté, stirring constantly until pecans start to brown.
  3. Set pecans aside to cool. Leave melted butter in pan.
  4. Whisk eggs until light and fluffy.
  5. Whisk in sugar a little at a time until completely blended.
  6. Pour in cream and milk and whisk to blend.
  7. Add reserved melted butter from pan. Mix well.
  8. Complete by following the directions of your ice cream maker or method. Add buttered pecans near the end of the ice cream maker’s cycle, when the ice cream has thickened.

Roasted Salted Pistachio and Cherry Biscotti

pistachio cherry biscotti_n

This crisp cookie bursts with the flavors of salty, roasted pistachios and tart, sweet cherries. Its attractive green and red colors would make it a welcome addition to this season’s offerings.

We picked up a bag of roasted and salted shelled pistachios last summer at Costco. The large bag of nuts was quickly opened, but we know that a rapidly expanding waistline can be the price for eating too many pistachios in too short a time. So, we put the bag in a mailing tub to be shipped north only partly consumed and forgot about it till recently. To our surprise, the nuts have remained amazingly tasty. Before they fall from grace, we wanted to make good use of them. Enter a biscotti recipe that celebrates their unique flavor. The roasted and salted aspect adds a delicious juxtaposition to the sweet tanginess of the dried cherries. We think these biscotti should be eaten all year ’round, in spite of their seasonal colors.

Roasted Salted Pistachio and Dried Cherry Biscotti

Ingredients

  • 1 3/4 cups all-purpose flour
  • 1 cup granulated sugar
  • 1/2 cup old-fashioned oats
  • 1 tsp baking powder
  • 1/2 tsp baking soda
  • 1/2 tsp salt
  • 2 large eggs
  • 3 tbsp light olive oil
  • 1 tbsp dried orange zest
  • 2 tsp dried lemon zest
  • 1 1/2 tsp vanilla extract
  • 1/2 tsp almond extract
  • 1 cup dried cherries, coarsely chopped
  • 1 cup roasted and salted pistachios, coarsely chopped

Directions

  1. Preheat oven to 350 degrees F. Line a baking sheet with parchment paper. Set aside.
  2. Combine first 6 ingredients in bowl of stand mixer fitted with a paddle.
  3. Mix on low speed until ingredients are well combined.
  4. In a separate bowl whisk eggs with next 5 ingredients.
  5. Add egg mixture to flour mixture. Beat on low until combined.
  6. Fold in cherries and pistachios.
  7. Transfer dough to a lightly floured surface.
  8. Divide dough in half.
  9. Using floured hands, shape each dough half into a 16″ long log.
  10. Place logs on parchment covered baking sheet, about 5″ apart.
  11. Flatten logs to a strip about 2″ wide, so you have two logs that are 16″ x 2″.
  12. Bake cookies until browned and set, about 30 minutes.
  13. Let cookies cool in pan placed on wire rack for about 15 minutes.
  14. Reduce oven temperature to 250 degrees F.
  15. On a cutting board, using a serrated knife, cut logs into slices, about 2/3″ thick.
  16. Place slices back on the parchment-lined baking sheets, cut side down and close together.
  17. Bake for 20 minutes.
  18. Flip the cookies to the opposite side and bake again for 20 minutes.
  19. Let cool completely before serving. Store in an airtight container at room temperature.

Recipe adapted from BON APPÉTIT

Homemade Dreamy Creamy Orange Vanilla Ice Cream

dreamy creamy orange vanilla ice cream n

Our young hand-models enjoyed orange peel halves stuffed with dreamy creamy orange ice cream in exchange for their work. (Hey, modeling is hard work!)

Today is winter solstice. Two-hundred miles north of the Arctic Circle it is 1 degree F, but the frigid breeze makes it feel like -13. The sun set fifteen days ago and hasn’t peeked above the horizon since. The official beginning of winter is the perfect day to enjoy a taste summer. This ice cream was inspired by the orange covered vanilla popsicles we enjoyed as kids.

Dreamy Creamy Orange Ice Cream

Ingredients

  • 2 large eggs
  • 3/4 cup granulated sugar
  • 2 cups heavy whipping cream
  • 1 cup whole milk
  • ⅓ cup frozen orange juice concentrate, thawed
  • 2 tsp vanilla extract

Directions

  1. Whisk eggs until light and fluffy.
  2. Whisk in sugar a little at a time until completely blended.
  3. Pour in cream and milk and whisk to blend.
  4. Add juice concentrate and vanilla and blend well.
  5. Complete by following the directions of your ice cream maker or method.

Pumpkin Ice Cream – For Pie, Lattes or Shakes!

pumpkin ice cream n

Perfectly spiced pumpkin ice cream adds another layer of delicious pumpkin to a classic fall dessert.

Fall is always accompanied by the need to satisfy pumpkin urges: pumpkin bread, pumpkin lattes, pumpkin risotto and even pumpkin pasta. As we add to our collection of ice cream recipes, pumpkin seemed an appropriate seasonal choice for a dessert that never seems too cold, even if the outside Arctic temperatures are plunging below zero. For this recipe, I turned to Ben and Jerry for advise. If the gurus of ice cream recommend using canned pumpkin, who am I to argue? The only change we made to the master recipe was the use of organic pumpkin from a box instead of non-organic from a BPA-lined can.  After following their recipe to the T, we were really pleased with the creamy texture and spiced-just-right flavor. We enjoyed a scoop atop a piece of freshly baked pumpkin pie and can also imagine it in coffee or in a milkshake.

Pumpkin Ice Cream

Ingredients

  • 2 large eggs
  • 3/4 cup granulated sugar
  • 2 cups heavy whipping cream
  • 1 cup whole milk
  • 1 cup unsweetened organic pumpkin purée
  • 1 tsp freshly grated nutmeg
  • 1 tsp ground cinnamon

Directions

  1. Whisk eggs until light and fluffy.
  2. Whisk in sugar a little at a time until completely blended.
  3. Pour in cream and milk and whisk to blend.
  4. In a large bowl, mix purée, nutmeg and cinnamon. Stir to blend.
  5. Stir half of cream mixture into pumpkin mixture. Mix well.
  6. Pour in remainder of cream mixture and mix well.
  7. Complete by following the directions of your ice cream maker or method.

Arctic Amaretti

amaretti_nA perfect little cookie – crispy on the outside, chewy and sweet on the inside and accented with the wonderful flavor of almond.

I love to read blogs and look at food photos in order to hone my baking and photography  skills. Time and again, I find myself on David Lebovitz’s blog admiring  his well-staged photographs and interesting recipes. A few days ago, he posted a recipe for Italian almond cookies. I’ve never made these, but have fond memories of snacking on these delicious, crunchy treats straight out of the red tin from Cost Plus. The commercially sold cookies had a bit of a chewiness inside and a nice crunch on the outside and I  loved the almond flavor.

When I saw David’s post, I put it at the top of my “must bake” list, in spite of the fact I had neither the almond flour nor apricot jam his recipe called for. Nonetheless, the credit for the basic recipe goes to David. His idea of using jam to enhance the cookie’s chewiness and moisture is terrific.  But I did adapt the recipe to my pantry, which included swapping regular old apricot jam for fantastic Arctic cloudberry (aqpik) jam. Too good to keep for ourselves, we gave most of the batch to our  hard-working office staff who had them finished before lunch.

Arctic Amaretti

Ingredients

  • 2 cups sliced almonds, ground as fine as you can in a food processor (reserve a few slices to decorate cookies)
  • 2/3 cup granulated sugar
  • 2 egg whites
  • 2 tbsp cloudberry jam (any smooth jam would work)
  • pinch of salt
  • 1/2 tsp almond extract

Directions

  1. Preheat oven to 325 degrees F. Cover two baking sheets with parchment paper. Set aside.
  2. In a large bowl, mix together ground almonds and sugar. A whisk makes this job easy.
  3. In the bowl of a stand mixer, whisk egg whites and salt until they form soft peaks.
  4. Fold beaten eggs into almond mixture.
  5. Fold jam and almond extract into mixture. It’s OK if mixture loses volume.
  6. Mix dough until it forms a smooth ball. You may need to knead it a little with your hands.
  7. With a cookie scoop, scoop out dough balls and set them on parchment-lined baking sheets.
  8. Top cookies with reserved almond slices.
  9. Bake for 25 minutes. Cookies will be a light golden brown when done.
  10. Let cool in pans and transfer to wire racks to finish cooling.
  11. Store at room temperature.