Moist Macadamia Nut Coffee Cake

Macadamia Nut Coffee Cake n

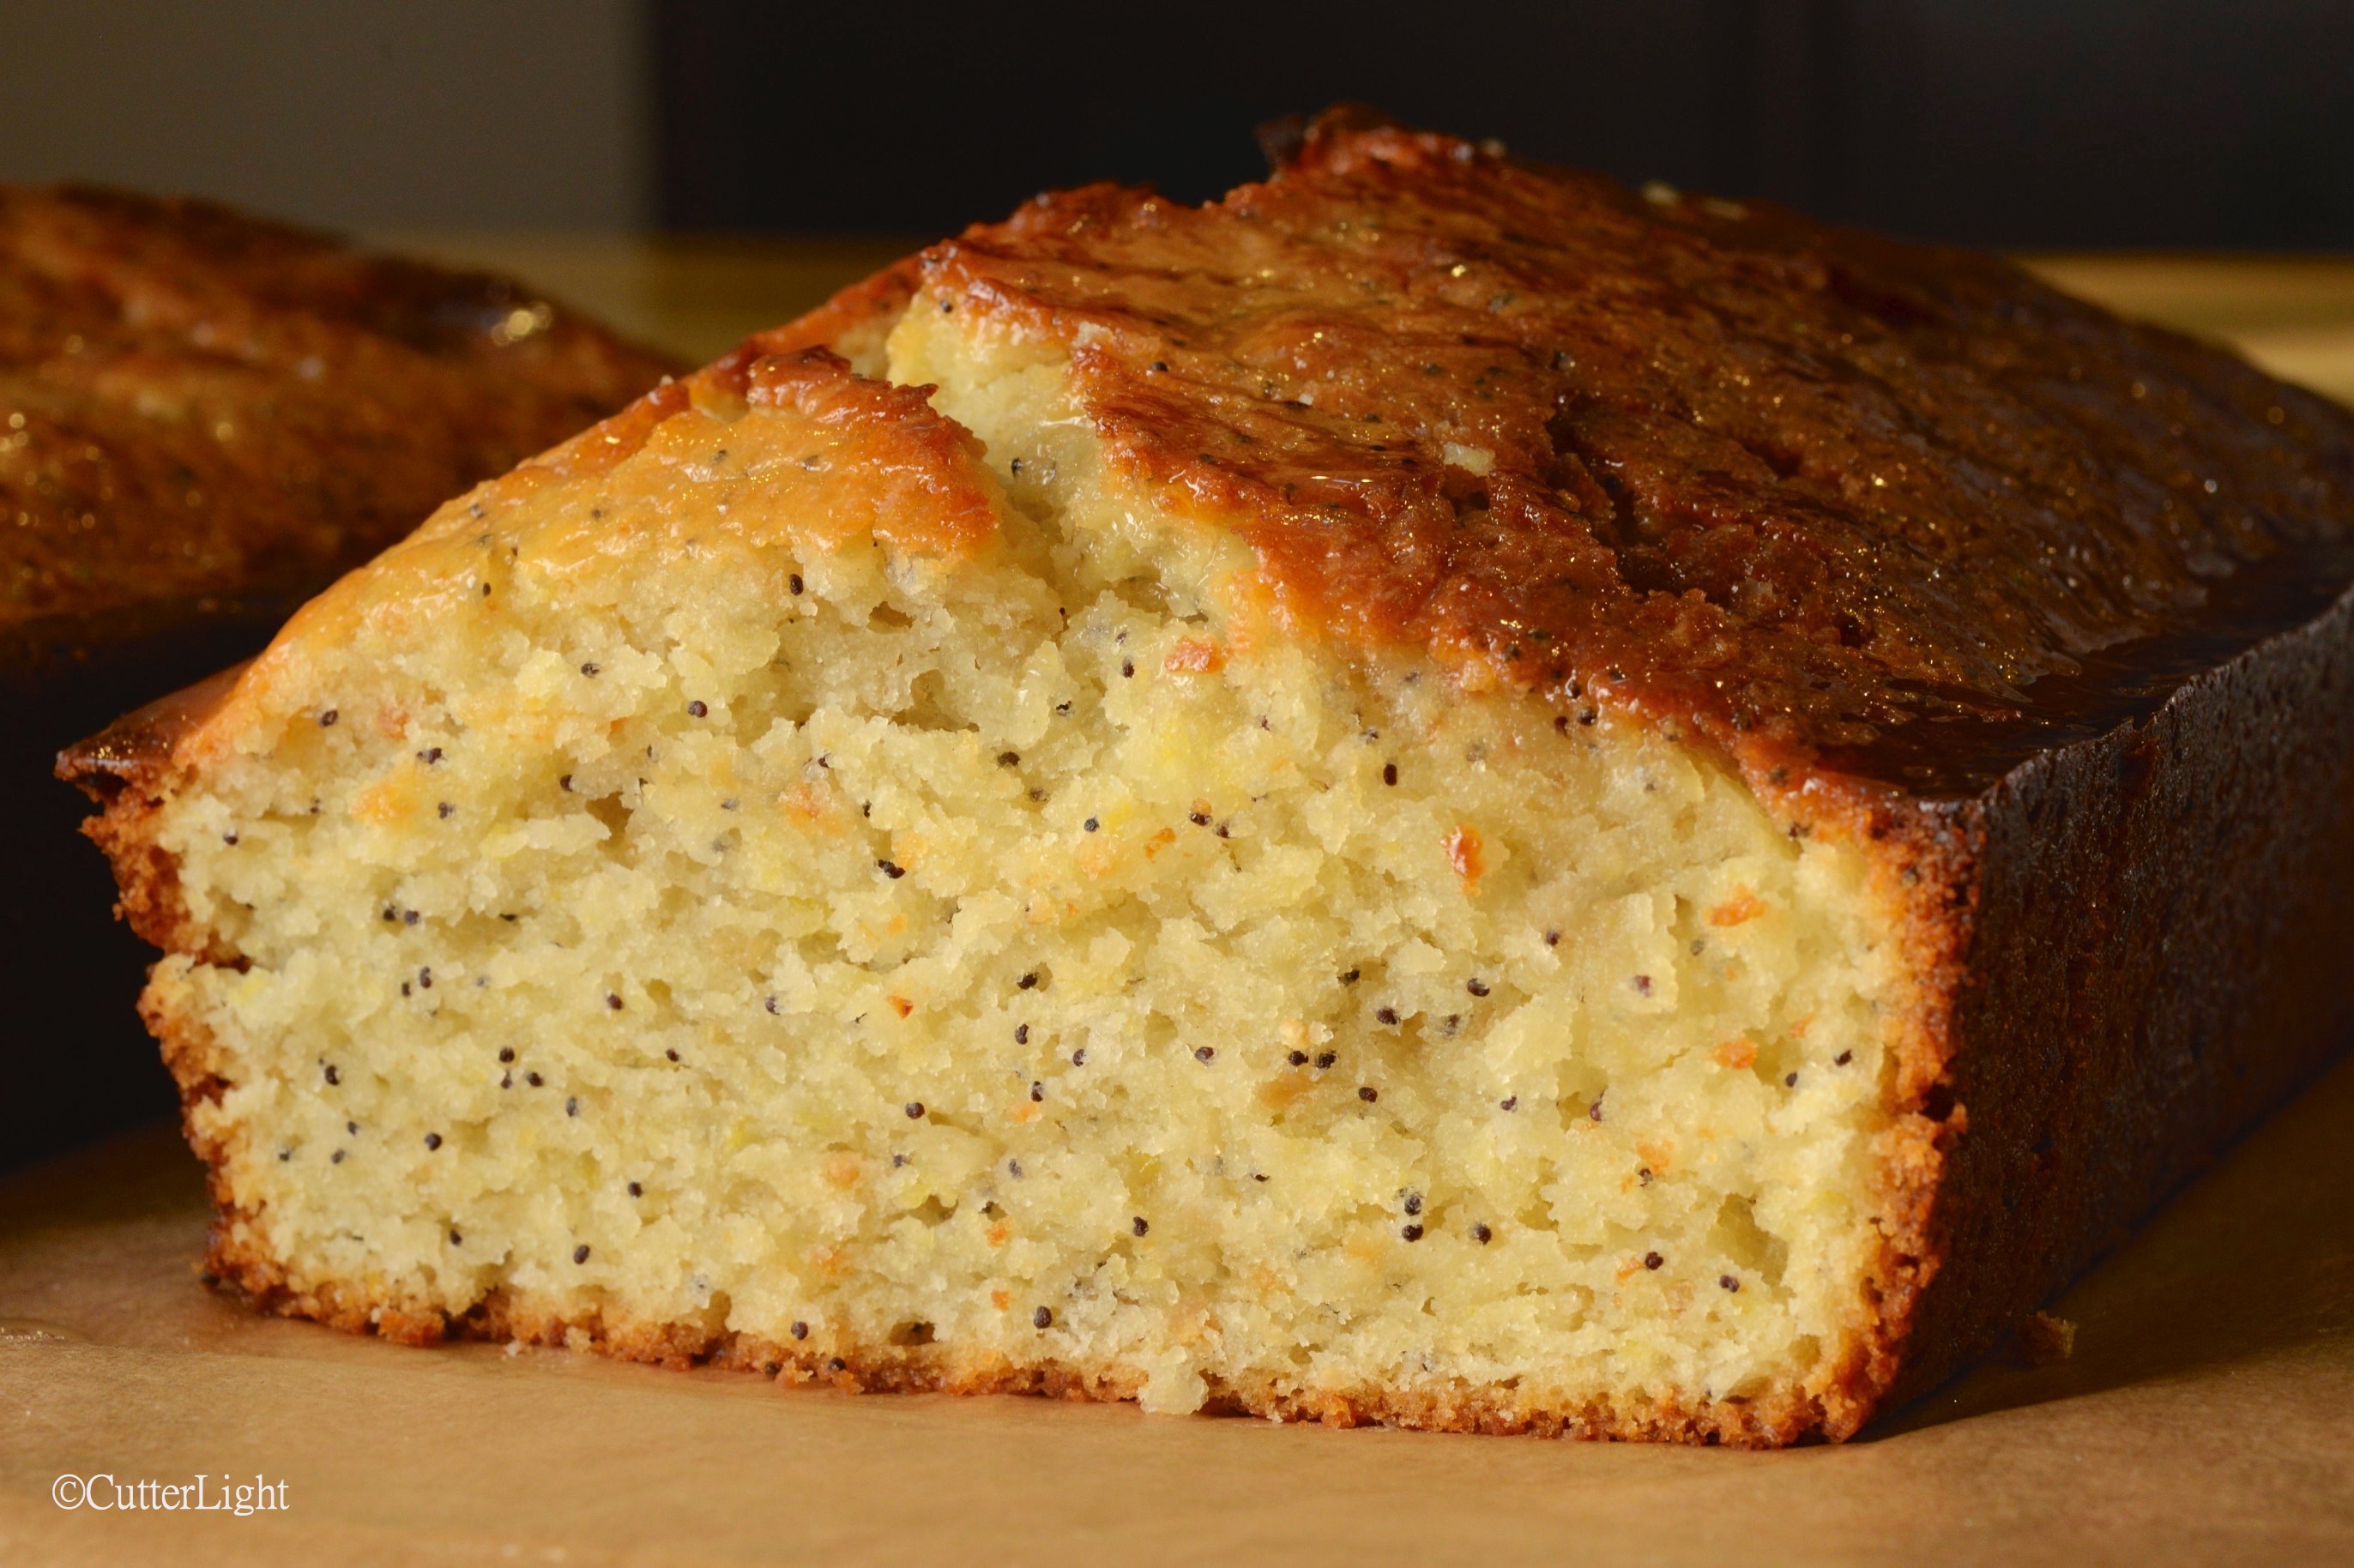
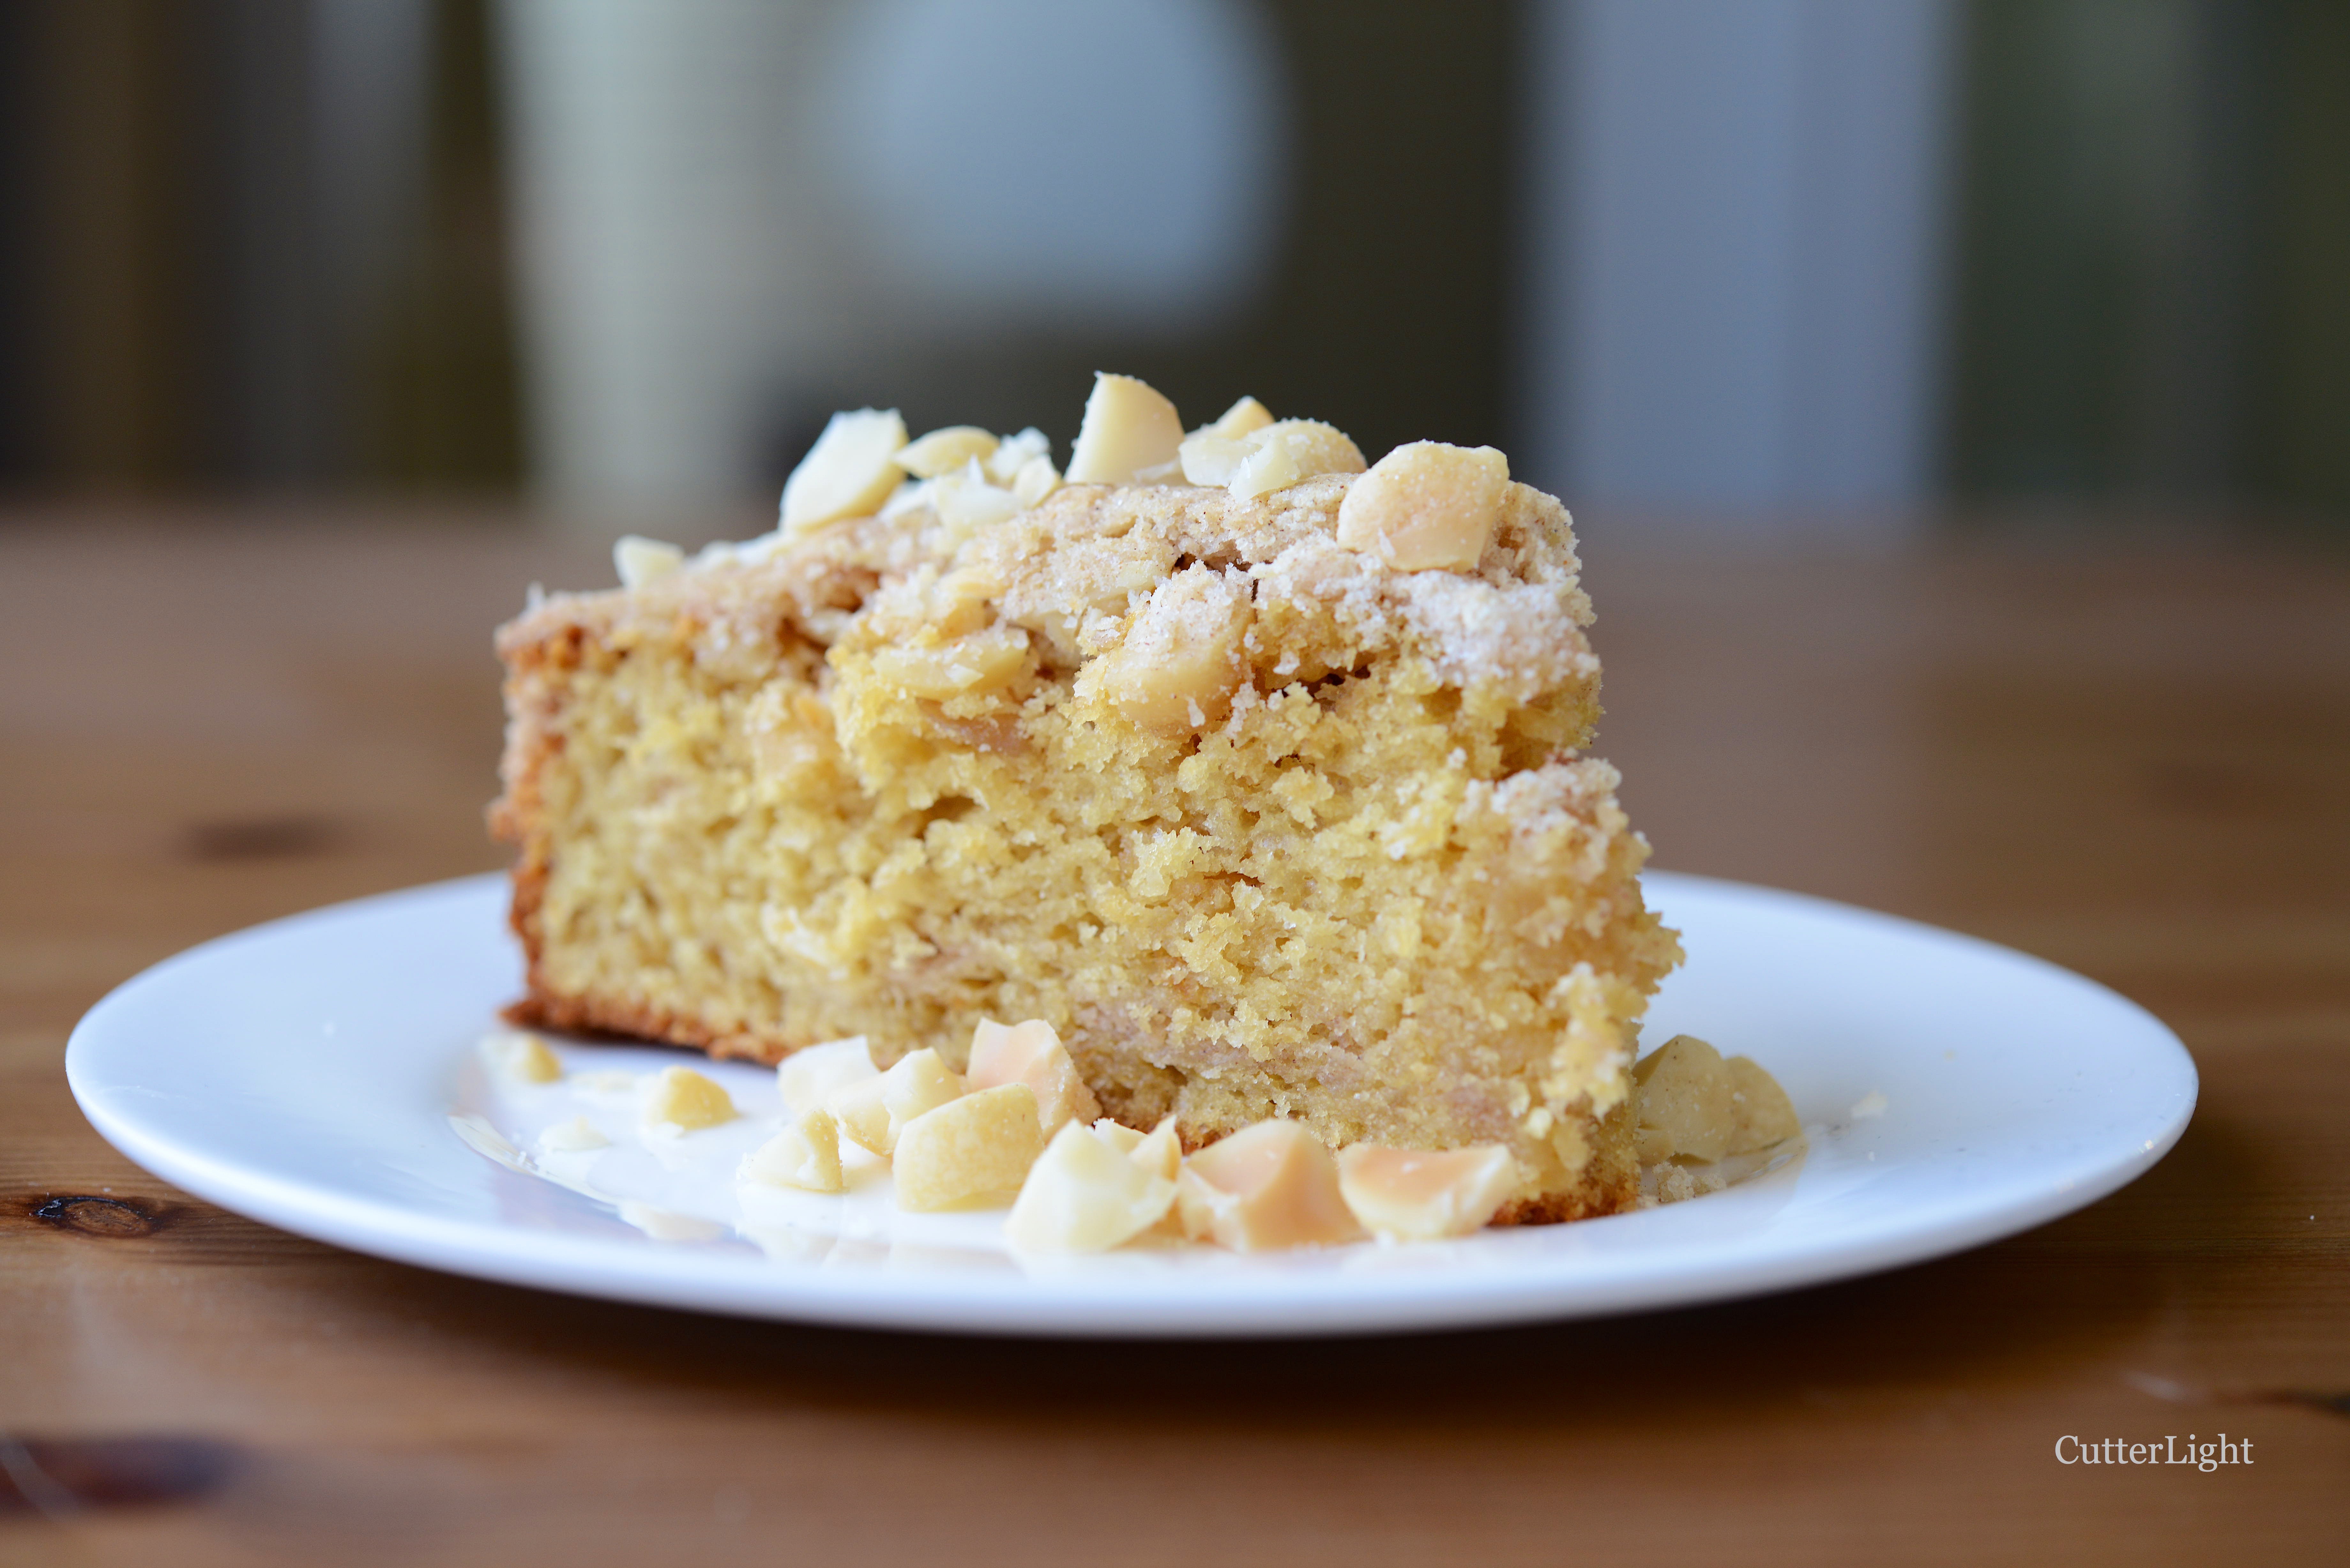
Crunchy, salted and toasted macadamia nuts knock this moist coffee cake recipe out of the park.

I’ve started on a project to collect excellent “base” recipes to which I can easily interchange ingredients. My initial collection includes baked goods such as braided bread, muffins and bagels. With this collection in mind, I opened one of my favorite baking recipe books, The Williams-Sonoma Baking Book, and flipped through it to my go-to focaccia recipe. On my way to that recipe, I was distracted by a delicious-looking macadamia nut coffee cake recipe.

Some of my best side trips have been when I have given in to distraction. This was definitely a worthy side trip! I did adapt the recipe slightly, but it turns out that it perfectly fit my definition of a “base” recipe. Macadamia nuts could be swapped out for other kinds of nuts. Dried fruit could be added or even a thin layer of homemade jam in the middle. Now there’s an idea!

Macadamia Nut Coffee Cake

Ingredients

Topping

  • 1 cup all purpose flour
  • 1/3 cup granulated sugar
  • 1 tsp ground cinnamon
  • 1 tsp galangal (or 1/2 tsp ground ginger)
  • 6 tbsp unsalted butter, cold and cut into small pieces

Cake

  • 1 1/2 cups all purpose flour
  • 1/2 cup granulated sugar
  • 1/2 cup packed brown sugar
  • 1 1/2 tsp baking powder
  • 1 tsp baking soda
  • pinch salt
  • 1 cup plain yogurt
  • 2 large eggs
  • 1/2 cup vegetable oil
  • 1 1/2 tsp vanilla extract
  • 1 cup roasted macadamia nuts, coarsely chopped

Directions

  1. Preheat oven to 350 degrees F (175 degrees C). Grease a 9 inch springform pan. Line bottom of pan with parchment paper. Set aside.
  2. Make topping. In a small bowl whisk together first four topping ingredients. Rub in butter with your fingers until coarse crumbs form. Set bowl aside.
  3. In a medium bowl, whisk together first six cake ingredients.
  4. In another medium bowl, mix together yogurt, eggs, oil, and vanilla.
  5. Pour wet ingredients into dry. Mix well.
  6. Pour half the batter into prepared springform pan.
  7. Sprinkle half of topping mixture evenly onto batter.
  8. Cover evenly with remaining batter.
  9. Sprinkle nuts evenly over top of batter. Press them into batter slightly.
  10. Cover with remaining topping.
  11. Bake for 40 – 45 minutes. Top should be golden brown and a wooden pick inserted into the center of the cake should come out clean.
  12. Cool pan on wire rack for 20 minutes.
  13. Remove sides of springform pan. Serve warm or at room temperature.

Good Morning, Ulaanbaatar! Carrot, Pineapple and More Muffins

carrot pineapple muffins n

Moist, delicious muffins filled with carrots, pineapple, pecans, and currants.

Sometimes, I wake up and want muffins for breakfast. The beauty of this muffin recipe is two-fold. It’s a quick recipe. Fifteen minutes after they were popped into the oven, they were ready to eat! And the recipe is a great base recipe. So many of the ingredients could be swapped for others to result in another version of a moist, tasty muffin. The carrots could be swapped with grated zucchini or summer squash. The pineapple could be replaced by chopped apple or smashed banana. The pecans and currants could be traded with any kind of nuts and dried fruits. The variations can be as wild as you can imagine.  Just check your pantry and make a batch!

Carrot, Pineapple and More Muffins

Ingredients

  • 2 eggs
  • 3/4 cup granulated sugar
  • 1/3 cup sour cream
  • 2 tbsp vegetable oil
  • 2 tsp vanilla extract
  • 1 1/3 cup all-purpose flour
  • 1 1/4 tsp baking powder
  • 1/4 tsp baking soda
  • pinch salt
  • 1 cup grated carrots
  • 1 cup chopped pineapple
  • 1/2 cup chopped pecans
  • 1/3 cup dried currants

Directions

  1. Grease 12-muffin tin. Set aside.
  2. Preheat oven to 375 degrees F (190 degrees C).
  3. In a medium bowl, whisk together first 5 ingredients.
  4. In a large bowl, combine flour, baking powder, baking soda, and salt.
  5. Stir carrots, pineapple, pecans and currants into flour mixture.
  6. Stir egg mixture into flour mixture until just combined.
  7. Divide batter evenly into prepared muffin tin.
  8. Bake for 15 – 20 minutes, until tops are golden brown and spring back to the touch.

Delicious Homemade Bagels – Without The Machine

bagels homemade n

Chewy homemade bagels smeared with cream cheese and an icy glass of cherry almond tea – a delicious lunch to enjoy while working from home. Next project? Making our own cheese spread for these tasty bagels.

We’ve discovered one place to purchase really good chewy bagels in Ulaanbaatar. We still prefer to make our own, even with the time it takes, instead of trekking out to the deli. Back in Alaska, I used a Zojirushi bread machine to create the dough for my bagels (see bagels three ways). We sold the machine when we left Alaska, and in our efforts to simplify our kitchen I did not replace it when we moved to Ulaanbaatar. That means taking my trusty bread machine bagel recipe and rewriting it to eliminate the machine. My adapted recipe’s results are just as tasty and chewy. You can still adorn the bagels with whatever your heart desires. Without the appliance, these bagels can be made in a galley or a tiny kitchen in a camper. Enjoy!

Homemade Chewy Bagels

Ingredients

  • 2 tsp active dry yeast
  • 1 1/2 tbsp granulated sugar
  • 1 1/2 cups warm water (105 degrees F/40 degrees C)
  • 3 1/2 cups all-purpose flour
  • 1 1/2 tsp salt
  • 3 qts water
  • 3 tbsp granulated sugar
  • 1 egg, beaten
  • toppings such as poppy seeds, toasted onions, sesame seeds, etc. (optional)

Directions

  1. In a large bowl, stir together yeast, 1 1/2 tbsp sugar and water. Let sit for about 5 minutes to make sure the yeast is good. (It will foam.)
  2. Stir in salt and the flour, 1/2 cup at a time. The last 1/2 cup, you will need to knead in by hand.
  3. Knead the dough until it is smooth and elastic.
  4. Coat the inside of a large bowl and place the dough inside.
  5. Cover bowl with plastic wrap and let dough rise until doubled, about an hour.
  6. Line baking sheet with parchment paper.
  7. Cut dough into 8 equal pieces.
  8. Roll pieces into balls.
  9. Flatten balls slightly.
  10. Poke your finger through center of ball and twirl dough around your finger to enlarge the hole.
  11. Place bagels on parchment-lined baking sheet to rest.
  12. Bring 3 qts water to boil in large pot. Stir in 3 tbsp sugar.
  13. Place 4 bagels in boiling water. Boil for 1 minute. Flip bagels and let boil for another minute.
  14. Place boiled bagels on clean, dry towel.
  15. Place remaining 4 bagels in boiling water. Repeat boiling process with these bagels.
  16. Take bagels from towel and place them on parchment-lined baking sheet.
  17. Preheat oven to 375 degrees F (190 degrees C).
  18. Brush bagels with beaten egg.
  19. Sprinkle desired toppings on bagels (poppy seeds, sesame seeds, charnushka, minced dried onion and minced dried garlic are some of our favorites).
  20. Bake in preheated oven for 20 – 25 minutes, until browned.


Individual Pizza Crusts: For Dinner, Breakfast, Camp and Galley

individual pizza crusts n

Tasty individual-sized pizza crusts ready to use for breakfast, lunch, dinner, or snacks. The size is perfect for the grill, for a galley, or the small oven we use here in Mongolia.

After trying many different recipes, I now have our go-to basic pizza crust recipe. The recipe can be easily modified by adding different spices or cheese into the crust. I’ve also substituted half of the all-purpose flour with wheat for a heartier crust that goes especially well with olive oil-based toppings. The best thing about the recipe is that it makes six crusts – two for now and four more for two more meals later. These crusts freeze well.

The crusts bake up best on a pizza stone, or, as I’ve recently learned, on an untreated clay tile from your local hardware store. The stone provides for even baking, giving the bottom a satisfying crispiness and leaving the top of the crust nice and chewy.

Our traditional dinner pizzas tend to be fully loaded, like our cheese and burger pizzas or smoked anchovy and salmon pizzas or our Alaska silver salmon pizzas. Pizza crusts can be loaded up for breakfast, too. How about a pepperonata and fried egg pizza? Or brush on some olive oil and grate some parmesan cheese on the crust, bake for 10 minutes and you have yourself a tasty appetizer. The possibilities are endless.

Individual-Sized Pizza Crusts

Ingredients

  • 1 1/4 cups water
  • 2 tbsp olive oil
  • 1 1/2 tsp active dry yeast
  • 1 1/2 tbsp granulated sugar
  • 3 3/4 cups all-purpose flour
  • 1 1/2 tsp salt

Directions

  1. Mix water, olive oil, yeast, and sugar together in a large bowl.
  2. Mix in salt and about half of the flour.
  3. Knead in more flour in increments of about 1/4 cup. (I actually knead the dough in the large bowl.)
  4. When all flour is incorporated, dough should no longer be sticky.
  5. Turn the dough out onto a lightly floured surface and clean the large bowl.
  6. Oil the bowl well and place the dough in the bowl. Cover with plastic wrap and let the dough rise until doubled, about an hour.
  7. Divide dough into six pieces. Stretch the dough into the shape of a plate. Let pizza-shaped crusts rest for 10 minutes while you preheat oven.
  8. Preheat oven to 400 degrees F (about 200 degrees C). Preheat with baking stone in oven. If you don’t have a baking stone, preheat baking sheet.
  9. Place two crusts on baking stone, pricking each generously with a fork.
  10. Bake for 10 minutes.
  11. Repeat with remaining crusts.
  12. Let cool completely before you keep in the freezer or refrigerator.
  13. When you are ready to use crusts, let them thaw slightly (if frozen) cover with desired toppings and bake at 400 degrees F (200 C) for about 10 minutes – cheese should be bubbly and slightly browned.

Need some tasty ideas to top these crusts?

Click here for silver salmon pizza.

Click here for smoked anchovy and salmon pizza.

Click here for pepperonata and fried egg pizza.

Almond Bread Pudding with Cognac Caramel

bread pudding n

You don’t need to share an individual serving of sweet nutty bread pudding drizzled with cognac caramel sauce!

Heavy whipping cream is not readily available in Ulaanbaatar. This surprised me. Since the Mongolian culture is heavily tied to herding and to dairy, I assumed that whipping cream would be much easier to get than in remote Point Hope, Alaska, where we had to fly in this precious commodity. The plight of whipping cream difficulties has followed me across the globe. Well, that’s a bit overdramatic. I did come across heavy whipping cream in the one store that carries many western groceries here in UB. But at about $28 a liter, I decided it wasn’t worth it. Plus it was UHT (ultra heat temperature processed) in order to keep it shelf stable. My experience with UHT whipping cream is that it turns to butter with the slightest amount of whipping.

The other day, I noticed a box of a new product in the dairy section of a grocery store we frequently shop. Everything was in Korean, except for the words “whipping cream.” Since the price was reasonable and since I could not find anything that looked like “UHT” written anywhere, I took a chance. Boy, am I glad I did! Not only does this cream whip up beautifully, it is the best tasting whipping cream I have ever had.

As is often the case in Ulaanbaatar, a product is here one day and gone the next. Alas, I can no longer find this whipping cream, so I am using it sparingly. I hope it will show up again.

One of our favorites is bread pudding. Using pantry staples such as homemade French bread, toasted almonds, and good cognac, I baked a small batch of individual bread puddings. It was the perfect amount for us to enjoy and share with guests. And it was a delicious way to use some of the precious heavy whipping cream.

Almond Bread Pudding with Cognac Caramel

Ingredients

  • 1/4 cup almonds, chopped and toasted
  • 2 tbsp unsalted butter, melted
  • 1/2 cup milk
  • 1/2 cup heavy cream
  • 1/4 cup granulated sugar
  • 1/2 tsp cinnamon
  • 1/4 tsp freshly grated nutmeg
  • 1 tsp almond extract
  • 2 eggs, beaten
  • 2 1/2 cups French bread, cubed small

Ingredients for cognac caramel

  • 1/4 cup brown sugar
  • 3 tbsp heavy cream
  • 2 tbsp good quality cognac

Directions

  1. Preheat oven to 325 degrees F (160 degrees C). Grease 6 cups in a muffin tin. Set aside.
  2. Whisk together melted butter, milk, cream, sugar, cinnamon, nutmeg, almond extract and eggs in a medium bowl.
  3. Stir in bread cubes. Let sit for a few minutes to allow the bread to soak up egg mixture.
  4. Divide mixture equally into prepared muffin tin.
  5. Bake for 20 minutes.
  6. Add almonds to the tops of bread puddings and bake for 10 more minutes.
  7. Let the bread puddings cool in the tin for 10 minutes. While they are cooling, make the cognac caramel.
  8. Bring brown sugar and cream to a boil in a small pan and continue to cook for 2 more minutes. Sauce should thicken.
  9. Remove from hit and stir in cognac.
  10. Loosen the bread puddings from tin by cutting around the edges with a knife. Transfer puddings to individual plates.
  11. Drizzle cognac caramel sauce on each bread pudding and serve warm.

Scratch Pancakes for Two

pancakes from scratch n

Fluffy homemade pancakes served with perfectly ripe bananas, toasted almonds, pure maple syrup and rich, whipped cream. Serves two. Fantastique!

I don’t know how many times we’ve heard that scratch pancakes won’t come out as good as pancakes from a mix. In fact, we’d heard it so many times that for years we fell into blindly relying on Krusteaz pancake mix. Good stuff, but not as good as this…

Everything from scratch tastes better. So we thought it was time to put the pancake myth to the test. Armed with seven pantry staples – things you probably already have in your kitchen, on your camper or in your galley – I went to work. The verdict? Everything from scratch tastes better!

Scratch Pancakes for Two

Ingredients

  • 3/4 cup all-purpose flour
  • 1 3/4 tsp baking powder
  • 1/2 tsp salt
  • 1 1/2 tsp granulated sugar
  • 1/2 tsp vanilla extract
  • 1/2 cup milk
  • 1 large egg
  • 2 tbsp unsalted butter, melted

Directions

  1. In a large bowl, whisk together flour, baking powder, salt and sugar.
  2. In a small bowl, whisk together vanilla, milk, egg, and butter.
  3. In the large bowl, make a well in the center of the flour.
  4. Pour milk mixture into the well.
  5. Whisk milk mixture into flour mixture until smooth, do not overmix.
  6. Heat a lightly oiled medium frying pan over medium-high heat.
  7. Scoop about 1/4 cup of mixture onto frying pan. Brown both sides of pancakes.
  8. Serve hot pancakes with toasted nuts, syrup, fruit and whipped cream.

Matcha Adzuki Bean Glazed Rolls

adzuki bean glazed role n

Sweet adzuki bean paste rolled into matcha-flavored dough with a dollop of buttery frosting… a confection you might expect to find in a trendy coffee shop in San Francisco’s Mission District.

My culinary love affair with matcha green tea is deepening. Cookie dough was an easy place to start with the distinctive flavor of this Japanese tea. In the midst of sampling my matcha butter cookies, my mind was already racing to the next possible recipes that could feature matcha… and then I remembered the bag of dried adzuki beans sitting on the shelf. What about sweet adzuki bean paste rolled into a matcha green tea dough – an Asian fusion cinnamon roll? Brilliant! All the fun of unrolling breakfast and enough tasty sweetness to satisfy without the gooey sugar overload of a traditional cinnamon roll.

Thinking ahead to life in a tiny home, I created a small batch version of these rolls that are made in a 6-muffin tin. I made the rolls the night before and placed them in a buttered muffin tin in the fridge overnight. They rose in the fridge and were ready for breakfast with minimal time and minimal oven energy. All good aspects for a tiny home recipe.

Matcha Adzuki Bean Glazed Rolls

Ingredients

  • 1/3 cup milk
  • 2 tbsp unsalted butter, softened
  • 2 tsp yeast
  • 2 tbsp granulated sugar
  • 1 egg, beaten
  • 1 1/2 cups all-purpose flour
  • 1 tsp green matcha tea powder
  • pinch salt
  • 1 cup adzuki bean paste*

Glaze

  • 1/4 cup confectioner’s sugar
  • 1 tbsp unsalted butter, softened
  • 1 tsp milk

Directions

  1.  Warm milk and butter in a small saucepan until it reaches about 110 degrees F (43 degrees C).
  2. Place yeast and granulated sugar into a large bowl. Pour warmed milk mixture into bowl. Whisk together.
  3. Whisk in egg and salt.
  4. Mix in matcha powder.
  5. Stir in flour, 1/2 cup at a time.
  6. When dough has pulled together, turn it out onto a lightly floured surface and knead until smooth, about 5 minutes.
  7. Let dough rest for about 10 minutes.
  8. Roll out dough to about a 6 x 9 inch rectangle.
  9. Spread adzuki bean paste evenly onto dough.
  10. Take the 6-inch side and roll dough, jelly roll style. Pinch seam to seal.
  11. Cut into 6 equal pieces.
  12. Place pieces into buttered 6-muffin tin. Cover with plastic wrap and refrigerate overnight.
  13. Bring rolls out 30 minutes before baking. Preheat oven to 375 degrees F (190C).
  14. Bake rolls for 15 minutes. Top will be golden brown. Remove rolls from muffin tin to cool slightly.
  15. While rolls are baking, whisk together glaze ingredients until smooth.
  16. Dollop glaze onto slightly cooled rolls and enjoy. Leftovers are a good snack served at room temperature.

*I made adzuki bean paste using just dried adzuki beans, water and sugar following the excellent directions from Japanese Cooking 101.

Raspberry Flaugnarde – Très Délicieux

raspberry clafoutis n

Traditionalists might argue that this is a dessert; we say a bakery item made fresh in the morning loaded with fruit and eggs works perfectly for breakfast.

This time of year, the warm, yellow sun may invite thoughts and flavors of Spring. But here in Mongolia, we were greeted this morning with fresh snowfall, prompting me to serve a warm baked breakfast with hot cups of tea. Of course, this baked creation served with French vanilla ice cream or a hot custard would satisfy any time of the day.

Raspberry Flaugnarde

Ingredients

  • 1 tbsp unsalted butter, room temperature
  • 1/2 cup plus 2 tbsp granulated sugar
  • 2 cups frozen or fresh raspberries
  • 2 large eggs
  • 3/4 cup whole milk
  • 1 tbsp cherry flavored brandy
  • 1 tsp vanilla extract
  • 1 tsp almond extract
  • 1 tsp Penzeys lemon peel powder (or fresh zest)
  • pinch salt
  • 1/2 cup all-purpose flour
  • 1/2 cup finely ground almonds
  • powdered sugar, for dusting

Directions

  1. Preheat oven to 350 degrees F (175 C).
  2. Grease an 8 x 8 inch (20 cum x 20 cm) glass baking dish with unsalted butter. Sprinkle bottom of baking dish with 2 tbsp of granulated sugar. Spread raspberries evenly in baking dish.
  3. Using a stick blender, or regular blender, mix 1/2 cup sugar, eggs, milk, brandy, vanilla and almond extracts, lemon powder and salt. Blend until smooth.
  4. Add flour and almonds to mixture. Blend until smooth.
  5. Pour mixture evenly over blackberries.
  6. Bake flaugnarde until edges are puffed and golden, and center is firm, about 25-30 minutes. When wooden pick inserted in center comes out clean, the flaugnarde is done.
  7. Let cool on wire rack for about 30 minutes.
  8. Dust with powdered sugar. Serve warm or at room temperature.

A Taste of Spring – Lemon Poppy Seed Drizzle Cake

Lemon Poppyseed Drizzle Cake n

Moist and not overly sweet, lemon poppy seed cake is a quick way to brighten up a cold winter day.

This afternoon, the sunshine poured through the living room window, filling our third floor apartment with warmth and the illusion that it wasn’t as cold as it actually is outside. But no mistake, we’re still deep in winter’s grip here in Ulaanbaatar. Today, the temperature soared to a chilly high of 17 degrees F – a bit warmer than it’s been the past several days. Snug inside our apartment, we fantasized about spring while we sat in the sunbeams enjoying warm pieces of moist lemon poppyseed cake with freshly brewed cups of tea.

Lemon Poppy Seed Drizzle Cake

Ingredients

  • 3 cups all-purpose flour
  • 1 tsp salt
  • 1 1/2 tsp baking powder
  • 2 tbsp poppy seeds
  • 2 1/4 cups granulated sugar
  • 1 tbsp lemon zest
  • 1 cup vegetable oil
  • 3 large eggs
  • 1 1/2 cups plain yogurt
  • 2 tsp almond extract
  • 1/2 cup lemon juice

Drizzle

  • 1/4 cup lemon juice
  • 3/4 cup powdered sugar

Directions

  1. Preheat oven to 350 degrees F (175 degrees C).
  2. Grease two regular-sized loaf pans.
  3. In a large mixing bowl, whisk together flour, salt, baking powder, poppy seeds, sugar, and lemon zest.
  4. Stir in oil, eggs, yogurt, almond extract, and lemon juice.
  5. Pour batter into prepared pans.
  6. Bake for 50 – 55 minutes, until a toothpick inserted into center of cake comes out clean.
  7. Mix together drizzle ingredients.
  8. Prick cake many times with tines of a fork while warm.
  9. Brush drizzle on top of cake allowing the drizzle to settle into the cake.

A German Apple Pancake – Morning Rituals and Victuals

German apple pancake n

An inspiring breakfast: topped with a dollop of sour cream, this apple-filled pancake is like a mile-high crepe, as delicious as it is beautiful .

Morning rituals. Jack and I start every day with a hearty breakfast. This important meal is usually accompanied with a big mug of coffee or tea and a selection of a few poems, which, lucky for me, are read to me by my favorite reader.  A day that starts with healthy fuel for the body and sustenance for the mind is likely to be positive and fruitful (wink).

Our breakfast menus traditionally include items like nourishing hot cereals, egg dishes, or something freshly baked. This morning’s menu came straight from the only baking recipe book I have with me here in Mongolia, The Williams-Sonoma Baking Book. If you are only going to have one recipe book, I highly recommend this one. It includes many foundational recipes for breads and desserts which can be easily modified or experimented with. I followed the German Apple Pancake recipe to the T. It came out perfectly. I am already dreaming of this mile-high pancake with farm fresh pears featuring galangal as the centerpiece spice.

German Apple Pancake

Ingredients

  • 5 large eggs
  • 2 tsp vanilla extract
  • 1/2 cup granulated sugar (plus 1 tsp)
  • 1/3 cup all purpose flour
  • 1 tsp baking powder
  • pinch salt
  • 1 1/2 tbsp unsalted butter
  • 2 large apples, cored and cut into wedges 1/4 inch thick (6 mm). I used Fuji apples.
  • 1 tsp ground cinnamon
  • 1 tsp confectioners’ sugar (optional)
  • 1/4 cup crème fraîche. I used 20% fat yogurt.

Instructions

  1. Using a blender, or a stick blender, mix eggs, vanilla, and 1/2 cup sugar for about 5 seconds.
  2. Add flour, baking powder and salt. Blend for an additional 10 seconds. Set mixture aside.
  3. Preheat oven to 375 degrees F (190 degrees C).
  4. Place a 10-inch (25 cm) ovenproof, nonstick frying pan over medium heat and add butter.
  5. When the butter is heated, add apples and sauté until softened, about 4-5 minutes.
  6. Sprinkle apples with cinnamon and remaining 1 tsp of sugar. Stir over heat until apples are evenly covered with cinnamon and sugar.
  7. Move the apples so that they are evenly spread in the pan.
  8. Pour batter over top of apples.
  9. Reduce heat to medium-low and cook until bottom is firm, about 8 minutes. You will notice the edges are set.
  10. Transfer pan to oven and bake until the top of the pancake is firm, about 10 minutes.
  11. Remove pan from oven. Invert a flat plate over frying pan and flip the pancake onto the plate.
  12. Cut the pancake into 4 wedges and transfer wedges to individual plates. Dust each portion with confectioners’ sugar. Place a dollop of crème fraîche on each wedge and serve immediately.
  13. This pancake may inspire someone to read you poetry after they are finished eating their breakfast!