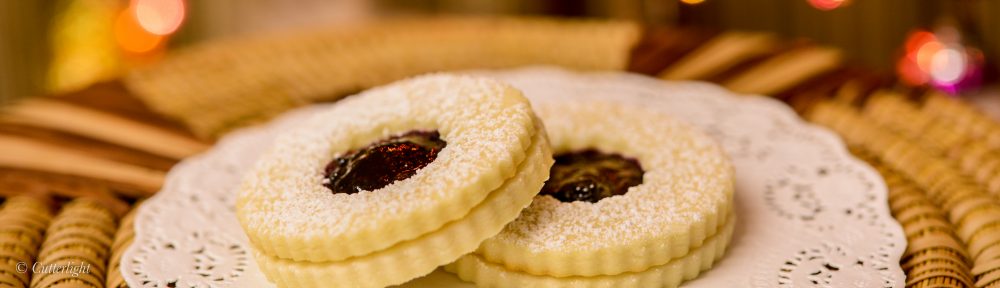
Scratch Pancakes for Two

pancakes from scratch n

Fluffy homemade pancakes served with perfectly ripe bananas, toasted almonds, pure maple syrup and rich, whipped cream. Serves two. Fantastique!

I don’t know how many times we’ve heard that scratch pancakes won’t come out as good as pancakes from a mix. In fact, we’d heard it so many times that for years we fell into blindly relying on Krusteaz pancake mix. Good stuff, but not as good as this…

Everything from scratch tastes better. So we thought it was time to put the pancake myth to the test. Armed with seven pantry staples – things you probably already have in your kitchen, on your camper or in your galley – I went to work. The verdict? Everything from scratch tastes better!

Scratch Pancakes for Two

Ingredients

  • 3/4 cup all-purpose flour
  • 1 3/4 tsp baking powder
  • 1/2 tsp salt
  • 1 1/2 tsp granulated sugar
  • 1/2 tsp vanilla extract
  • 1/2 cup milk
  • 1 large egg
  • 2 tbsp unsalted butter, melted

Directions

  1. In a large bowl, whisk together flour, baking powder, salt and sugar.
  2. In a small bowl, whisk together vanilla, milk, egg, and butter.
  3. In the large bowl, make a well in the center of the flour.
  4. Pour milk mixture into the well.
  5. Whisk milk mixture into flour mixture until smooth, do not overmix.
  6. Heat a lightly oiled medium frying pan over medium-high heat.
  7. Scoop about 1/4 cup of mixture onto frying pan. Brown both sides of pancakes.
  8. Serve hot pancakes with toasted nuts, syrup, fruit and whipped cream.

The Kindness of Strangers

OLYMPUS DIGITAL CAMERA

The America you miss is still there… if you look for it.

One of the best things about traveling is the great people we meet and the conversations we get into with them. At the end of a long day of driving, we eased our rig curbside in front of a beautifully landscaped cottage-style home on a quiet, tree-shaded street in Sultan, Washington. We were looking for a place to spend the night, and to our delight, the town was having a street fair complete with food booths, amusement rides, an auto show and live music. The challenge was finding a place to park our 50 foot combination of camper and C-Dory where we wouldn’t be in anyone’s way.

The owner of the house we were in front of was outside working in her garden. Jack and I understand that people can be irritated or suspicious to find a camper parked in front of their place. Whenever possible, we like to talk to homeowners so that they know our intent is to park overnight and not to move in. As is often the case, this homeowner, Toni, was happy to have us as temporary neighbors. After talking with her for a while and getting some tips on cool things to do in Sultan, we left her with a jar of our cloudberry jam. Then we got cleaned up and walked downtown to the fair which was reminiscent of the Autumn Leaf Festivals back in Jack’s hometown of Clarion, Pennsylvania and of thousands of similar fairs all across North America.

The next morning as we were preparing to depart Sultan, Toni presented us with a small cupful of deliciousness – beautifully ripe wild strawberries harvested from her garden. Time and again, these small, meaningful encounters with people add flavor and warmth to our travel. Whether it’s great service from a boatyard, restaurant or hardware store, conversations with business owners and chefs, or joys of the day and travel tips shared with the people we happen to have as temporary neighbors in a campground or at a local eatery, we continue to consistently discover that by turning off the endless cycle of negativity on news programs and going out and talking with people, the America we remember is still out there, waiting to be discovered.

OLYMPUS DIGITAL CAMERA

Summer street fair & auto show, Sultan, Washington, 2014.

Cowboy Soup – The Day After Wagon Wheel Ribs

cowboy sparerib soup n

The leftover stock from oven-cooked Wagon Wheel Baby Back Ribs is the base for one of the best soups we’ve ever enjoyed. 

This soup doesn’t really have much to do with cowboys, except that if we were cowboys, this would be what we’d want to eat around the campfire. A cold night, wolves howling in the darkness, shooting stars above, a roaring fire cracking and sparking, a properly chilled Riesling… (We’re the kinds of cowboys who pack stemware.)

Cowboy Soup

Ingredients

  • 2 cups leftover liquid from Wagon Wheel Ribs
  • 1 pound leftover baby back ribs, meat cut from bone and sliced into bite-sized chunks
  • leftover bones, cracked
  • leftover potatoes, beans and onions
  • fresh sweet corn from one or two cobs (1 – 2 cups)
  • 1 cup smoked gouda cheese, shredded
  • bay leaf
  • additional potatoes, cut into large chunks, salted and seasoned as desired
  • additional spices and seasonings such as chili powder, jerk rub, Cholula sauce, Mongolian fire oil, oregano, mesquite seasoning, salt and pepper, as desired
  • sour cream

Directions

  • Place leftover ingredients from Wagon Wheel Ribs (liquid, meat, bones, potatoes, beans, onions) and bay leaf in a medium-sized pot and heat over medium heat, stirring occasionally. Simmer.
  • Meanwhile, place olive oil in a skillet and heat over medium heat. Add chunks of additional potatoes, seasoned as desired with salt, pepper, Cholula sauce and jerk rub. Cook till tender.
  • Add potatoes to soup. Stir in sweet corn and gouda cheese. Add additional seasonings if desired.
  • Serve piping hot with a dollop of sour cream.

Wagon Wheel Baby Back Ribs

wagon wheel spare ribs

Look Ma, no grill! Seasoned just right and slow cooked in the oven in a large pan along with potatoes and onions, these baby back ribs come out sweet, spicy, tangy and falling off the bone. See recipe below.

Oftentimes camp cooking proves to be the mother of invention. On a rainy, windy evening in Seward, outdoor grilling was out of the picture. But our appetites were already set on baby back ribs…

This one-pan method for baby back ribs is sure to be a crowd pleaser and is as close to no-fuss cooking as you can get. Cleanup’s a breeze, too. We use a 12.5″ Swiss Diamond pan – our wagon wheel – for this kind of cooking. It’s heavy, oven-safe and non-stick. Mirin, a very sweet rice wine used liberally in Japanese cooking, gives this dish a pleasant sweetness complementing the heat.

Wagon Wheel Ribs

Ingredients

  • 1 set baby back ribs, cut into individual-sized servings of 2 to 4 ribs each
  • a few small potatoes, some cut into large chunks, others left whole
  • 1 large sweet onion, chopped coarse
  • 2 cups black beans, already cooked
  • 4 cloves garlic, chopped coarse
  • mirin (or substitute a little sherry and honey)
  • olive oil
  • Cholula sauce
  • Mongolian fire oil
  • mesquite seasoning (optional)
  • a chili-based dry rub with some heat such as Jamaican jerk rub or any rub featuring powdered chili, oregano, cinnamon and similar seasonings
  • sea salt
  • freshly cracked pepper

Directions

  1. Preheat oven to 300 degrees F. (The oven in our camper only goes down to 300 degrees. You can cook these ribs more slowly and at a lower temperature if you prefer.)
  2. Rub plenty of the dry chili-based rub into each set of ribs. Set aside.
  3. Place roughly equal portions of mirin, Cholula sauce and olive oil in a large, oven-safe frying pan (one that has a lid) and mix together over low heat. Stir in a little Mongolia fire oil or similarly spicy oil. Stir in mesquite seasoning, salt and pepper. There should be enough liquid to amply cover the bottom of the pan.
  4. Add the ribs to the pan, turning each piece so that they are coated with liquid. Place meat side down, cover the pan with a lid and place in the oven. Cook for 30 minutes.
  5. Remove the pan from the oven. Turn the ribs over so that they are bone side down. Add garlic, onions, potatoes and beans. Cover the pan and return to the oven. Cook for an additional hour.
  6.  Test the meat and potatoes with a fork for tenderness. Meat should easily come off the bone. (Save the liquid for delicious Cowboy Soup.)

A dry or semi-dry Riesling is an ideal wine to pair with spicy pork ribs.

Braised Elk Roast Camper Style: One Pan Cooking in The Wagon Wheel

elk roast n

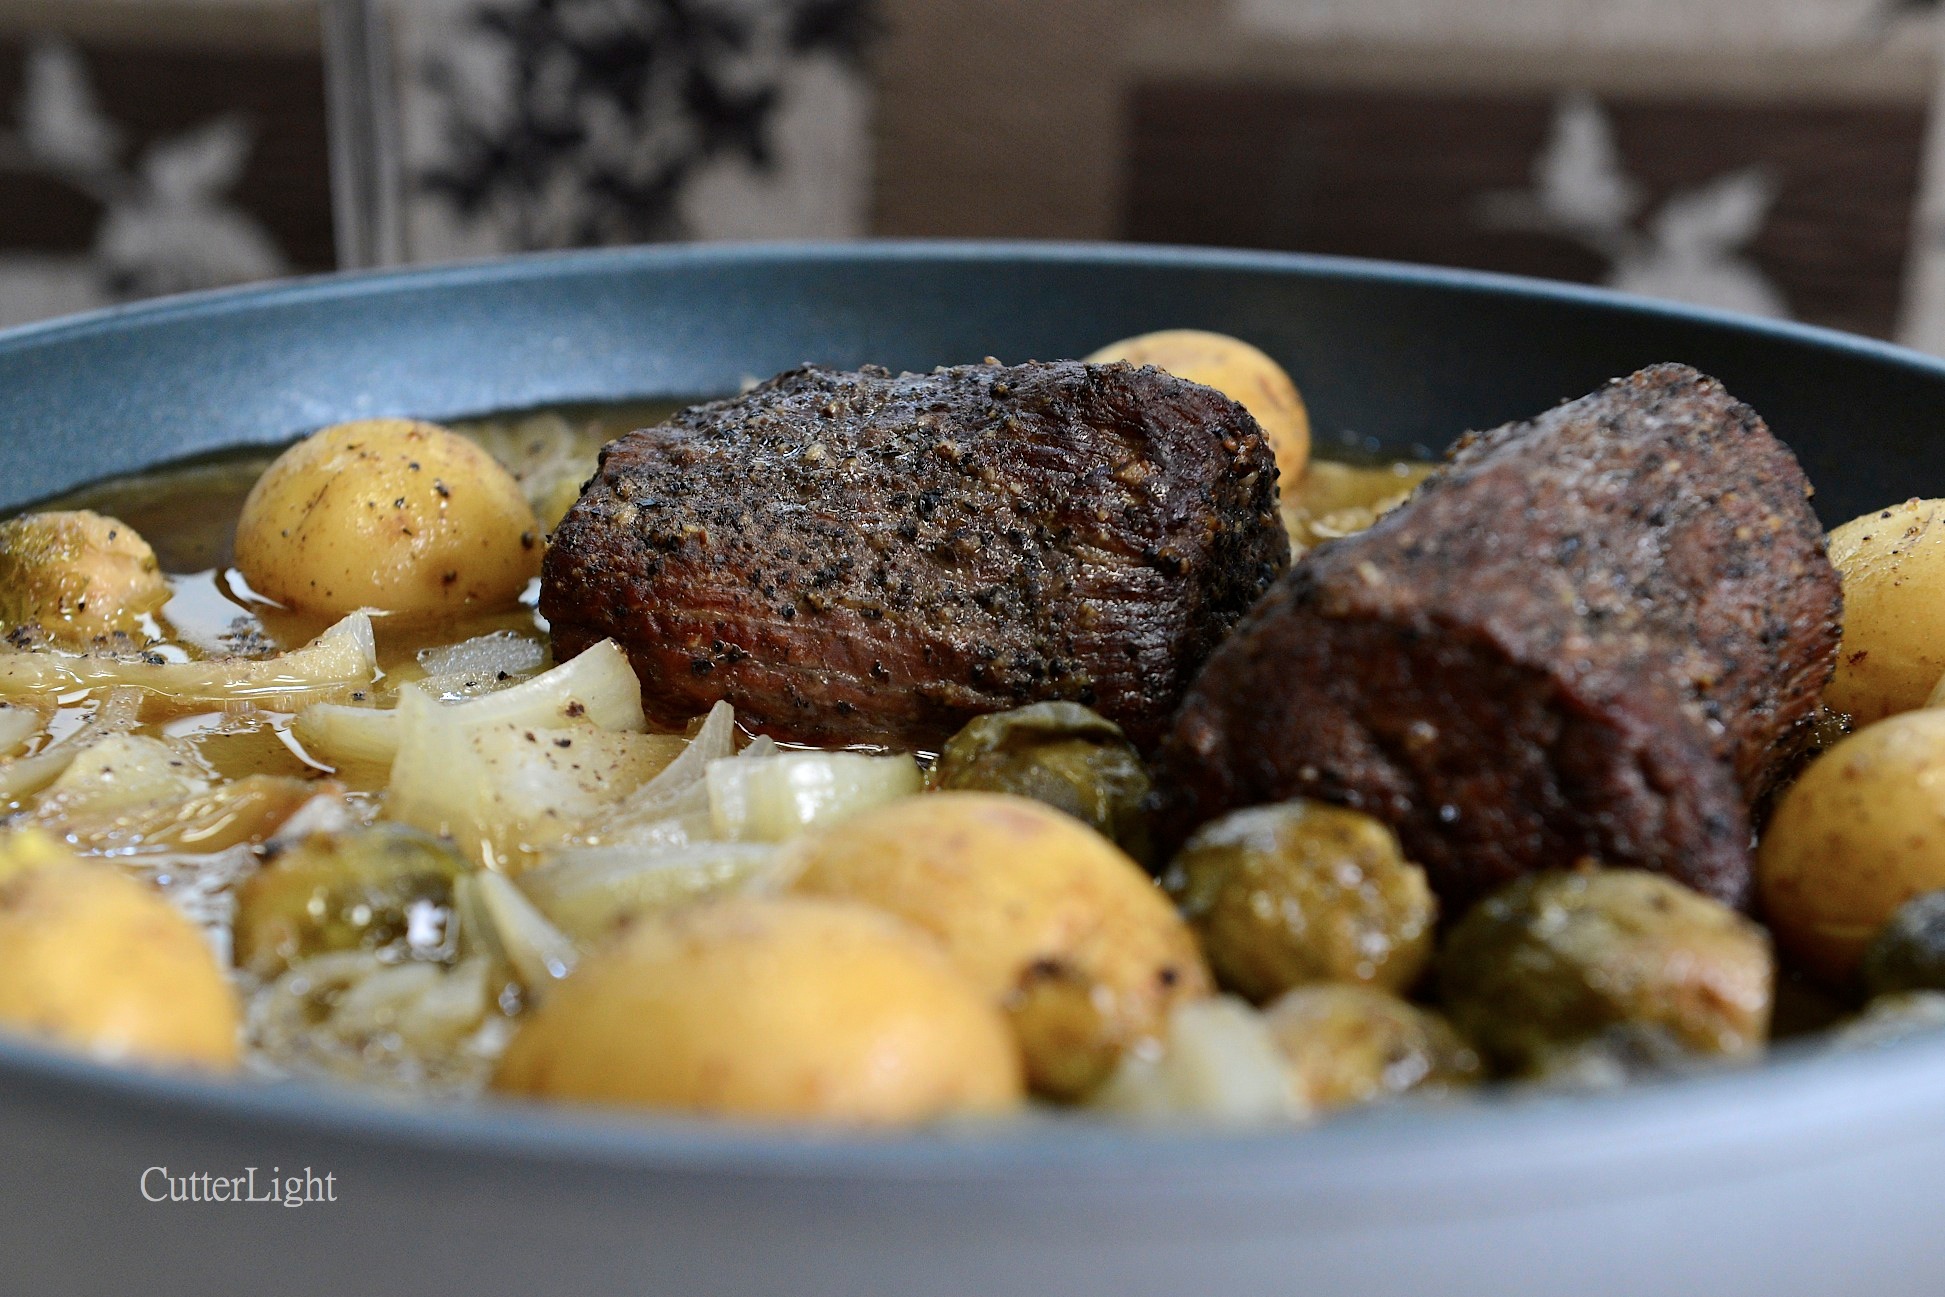
Elk roasts liberally rolled in freshly cracked pepper and slow cooked with sweet onions, baby Yukon Gold potatoes and the chef’s choice of additional vegetables is an appealing meal that can be prepared virtually anywhere. Recipe below.

Over the years we’ve become big fans of Swiss Diamond cookware. Covered eggs cooked over very low heat in their non-stick frying pans are a revelation. Nothing sticks, and as long as the manufacturer’s instructions regarding overly high heat are followed, the surface on this cookware remains in excellent condition through years of regular use.

My favorite Swiss Diamond pan is their big, 12.5  inch frying pan. We call it The Wagon Wheel and it’s perfect for everything from baking a pizza to frying fish to slow cooking a roast in in the oven. The challenge with a pan this large is fitting it into some ovens – such as the one on our Lance truck camper. In fact, even storing a pan of this size in a camper is no mean feat.

So I removed the handle. Permanently. It’s around somewhere, safely tucked away along with the hardware used to attach it. On the camper, we don’t need the handle. Oven mitts suffice.

The elk roasts were a gift from a friend. The recipe is uncomplicated. The finished meal is hearty and has great eye appeal – the perfect meal with a glass of old vine Zinfandel on a rainy evening in Seward, Alaska.

Braised Elk Roast

Ingredients

  • 1 pound elk rump roast or similar cut from wild game or beef
  • 1 large sweet onion, chopped coarse
  • whole small potatoes
  • other vegetables as desired: parsnips, carrots, brussels sprouts, garlic cloves, mushrooms and even chunks of pumpkin or squash are all good candidates
  • olive oil
  • freshly cracked pepper
  • sea salt
  • sherry or red wine
  • additional seasonings such as rosemary, sage or thyme, if desired

Directions

  1. Preheat oven to 250 degrees F. (Our camper oven only turns down to 300 degrees F – a little hotter than perfect, but still fine.)
  2. Heat light olive oil or similar frying oil over sufficiently high heat to create a sizzle when the meat hits the pan. Sear the meat on all sides. Use tongs to hold the meat if necessary. About 2 to 3 minutes per side. Remove meat and set aside.
  3. Lower heat on pan to medium low. Deglaze pan by adding sherry or wine and use a spatula to gently scrape the brown fond created during searing. Slightly reduce liquid over medium to medium-low heat.
  4. Meanwhile place seared roast in a bowl. Roll the roast in olive oil, salt and freshly cracked pepper to give the roast a coating.
  5. Add additional olive oil to the pan as necessary. Add onions and other vegetables along with salt and pepper, stirring briefly to thoroughly coat with oil. Add the meat, cover the pan with a lid, and place in oven.
  6. Cook covered for an hour for a small roast, longer for a larger roast. Add additional wine or a little water to maintain a broth on bottom of pan, if necessary.


Whole Sheefish (or any fish) Poached in Foil

sheefish whole poached in foil_n

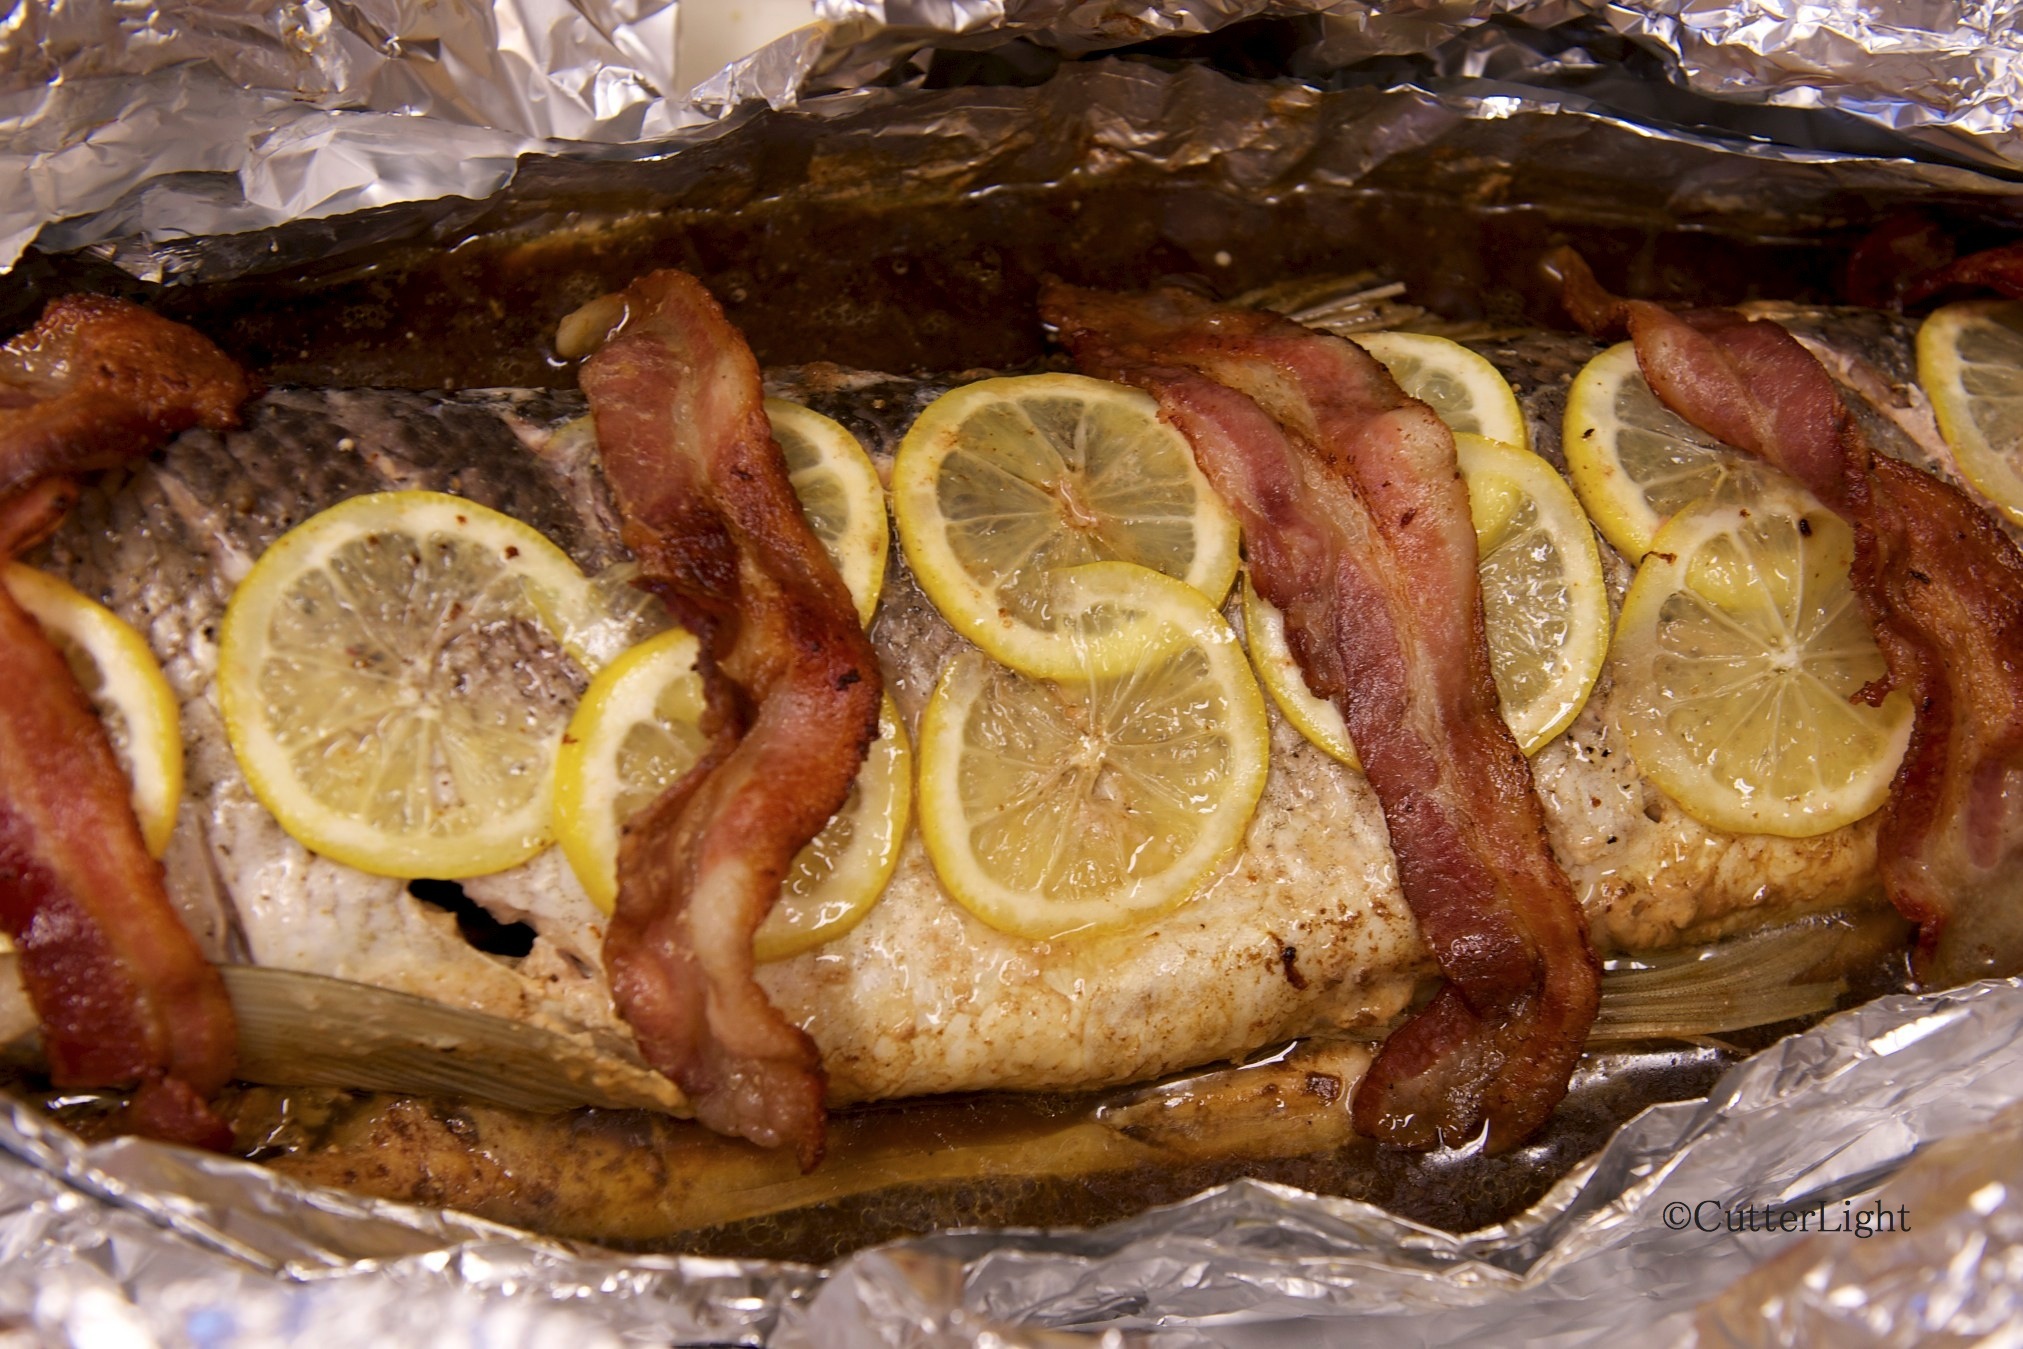
A large fish poached and served whole makes for a dramatic presentation and a first-class dining experience. You don’t need a fancy fish poacher to pull this off. Aluminum foil works beautifully in the galley, on the grill, over a campfire, or in the kitchen. Here are the basics. 

Sheefish whole poach_n

This past winter, we’ve been dining on sheefish (inconnu) in the six-to-eight-pound class. Measuring 25 – 30 inches, these fish of the far north are just small enough to fit into our oven and serve whole. Because sheefish is bony and not easily filleted, they are well-suited to this cooking method; when served, the meat comes easily off the bones. With firm white meat in large, sweet, flakey chunks, sheefish are comparable to striped bass, European seabass, Japanese seabass (suzuki) and similar fish. Here in Alaska, foil poaching works beautifully with salmon, rockfish, char and small halibut.

Poaching and steaming recipes need not be complicated. Although we generally start with a court bouillon or dashi and add Chardonnay when we have it, equal parts of water and Chardonnay alone make a perfectly acceptable basic poaching stock. No wine on hand? A little water – enough to keep the fish bathed in steam – is sufficient. Anything else is a matter of taste. We’ve found it difficult to improve on a combination of sea salt, freshly cracked pepper, lemon, butter and bacon. Olive oil makes a good substitution for butter and bacon.

One of the beautiful things about this recipe is that the ingredients can be prepared beforehand so that they’re ready for a shore lunch or camp dinner to celebrate a special catch.

Incidentally, wakame (dried kelp) and dried bonito flakes are an ideal base for fish stock for campers and sailors. These ingredients are light, easy to store, and last indefinitely. This dashi-style stock can be enhanced with salt, soy sauce, white wine, sherry or sake.sheefish

See more of Detlef Buettner’s beautiful art at: http://home.gci.net/~lifesize.fish/salmonids.htm

Poached fish is an excellent meal to serve with freshly baked French bread or sourdough bread. We and our guests enjoyed the above sheefish served on saffron rice cooked in a clam juice broth, spooning the poaching broth onto our rice and fish.

Ingredients:

  • 1 whole fish, scaled, gutted, gilled, rinsed off and patted dry.
  • aluminum foil sufficient to entirely wrap around the fish. We double wrap to prevent leaking.
  • poaching/steaming liquid – approximately 1/3 cup per pound of fish. (About 2 1/2 cups for an 8-pound fish.) See below for easy poaching liquid recipe.
  • 1 tbsp butter per pound of fish. (An 8-pound fish takes 1 stick of butter.)
  • very thin slices of lemon to cover one side of fish
  • strips of bacon to cover one side of fish. (about 5 strips for an 8-pound fish)
  • lemon juice to rinse stomach cavity – approximately 2 tbsp for an 8-pound fish
  • sea salt and freshly cracked pepper to rub into cavity and both sides of fish – approximately 2 – 3 tbsp sea salt for an 8-pound fish

Directions:

  1. Place large baking sheet in oven and preheat to 450 °F.
  2. Arrange aluminum foil on flat surface. Thoroughly coat foil with butter where fish will be placed.
  3. Rub lemon juice into fish’s stomach cavity. 
  4. Use a very sharp knife to make shallow diagonal slashes spaced about 1 inch apart from the head of the fish to the tail. Do this on both sides.
  5. Rub salt and pepper mixture onto both sides of fish and into cavity.
  6. Place fish onto buttered foil.
  7. Rub butter into fish’s cavity. Rub remaining butter on top side of fish.
  8. Arrange lemon slices on top side of fish.
  9. Arrange bacon slices atop fish.
  10. Pour poaching liquid along the sides of fish, taking care not to rinse the off the top of the fish.
  11. Close foil around fish and place on baking sheet (or on grill, etc.) Cook until a few dorsal fin rays can be easily pulled from fish. Total time will be approximately 5 – 6 minutes per pound. An 8-pound fish will cook for 40 minutes.
  12. Note: We like to remove the bacon when the fish is finished cooking, crisp it up in a pan, and return the bacon to the top of the fish prior to serving. The bacon drippings can be drizzled atop the fish as well.

Poaching Liquid Recipe:

Ingredients:

  • 3 cups water
  • 5 inch square of wakame (dried kelp – available in Asian grocers.)
  • 5 grams (0.17 ounces) dried bonito flakes
  • 1/4 teaspoon sea salt (or 1/2 teaspoon soy sauce)
  • 1 tbsp miso paste (optional)
  • Optional: replace 1/2 cup water with white wine or sake

Directions:

  1. Place water in pan and heat over high heat. Add wakame and salt, stir occasionally and continue heating but do not boil.
  2. When Wakame is soft, add bonito flakes. Cook briefly in steaming water and stir gently. Do not boil.
  3. Pour mixture through wire strainer into pan or bowl.
  4. If desired, return strained soup to low heat and stir in miso paste till dissolved.

Grilled S’mores? Who Knew? A Better (messier) Campfire Snack

This twist on a summertime favorite kicks the s’mores experience up a couple of notches. Graham crackers, thick chunks of dark chocolate, and marshmallows are as good as you remember them when you were a kid. Maybe better.

Guilty as charged: hardly a summer goes by when we don’t have s’mores at least once. They’re a great campfire dessert. But when a friend recently suggested we try grilling our s’mores instead of only toasting the marshmallows, we figured that maybe tried-and-true had been improved.

Hot off the grill, these s’mores don’t look dangerous. But looks, as everyone knows, can be deceiving. What you’re seeing here is molten goo ready to start pouring all over your hands, mouth, face, shirt and jeans at the slightest touch.

The chocolate looks like it’s set. It isn’t. As soon as it’s even slightly disturbed, it turns to liquid. The molecular science behind this is beyond our ken, but one thought came to mind: there’s a market for the s’mores equivalent of lobster bibs! The cracker is toasted crispy and warm, and the marshmallows are perfectly heated through – gooey and never burned.

Big, Fluffy Blueberry One-Pan Pancakes

The one pancake to a pan pancake: Half of one makes for a hearty breakfast. Perfectly crispy on the outside, light and fluffy and jammed full of fruit on the inside, served with a couple strips of thick bacon and maple syrup, who needs the other food groups? Well, coffee…

I’ve been messing around with pancakes for a long time. Here’s what I now think I know about making the perfect pancake.

First, while one can make them from scratch, there is no reason to. Krusteaz has come up with a mix that nails it. We buy Krusteaz mix in bulk at Costco and enjoy waffles or pancakes – or both – once or twice a week.

Second, put the butter in the pan, not on the pancake. Pancakes fry up crispier, turn a lovely golden brown, and taste more decadent when fried in roughly equal parts light olive oil and butter.

Third, the right pan makes a big difference. Barbra and I have become big fans of Swiss Diamond nonstick cookware. The pans are thick and heavy, so food scorch is avoided, and once they heat up, they cook with incredible evenness.

Fourth, do your best to get away with as little water and as little mixing as possible. The result is a fluffier pancake.

Fifth, forget medium heat. Low and long is the way to go. I start on medium-low, and then go a little lower than that, giving the cake time to rise without burning.

Sixth, one big pancake cooks up better – in every regard – than several small ones. Think 11 1/2″ pan and enough batter to cover most of it. Big pancakes can hold more fruit per volume and rise up higher and fluffier than smaller pancakes. (Get a big spatula, and be ready for a little splatter when you flip the cake.)

And finally… Fruit. Adding a generous amount of fruit to the batter lends more than just the added flavor and texture of the fruit itself to the cake; it also adds a creaminess that a fruitless pancake cannot match. Whole blueberries are great, and as this is Alaska, we use them frequently. Chopped bananas are superb. But our favorite? Strawberries. There is something about fresh strawberries, diced, that takes a pancake to another world.

Honey, jam, preserves or maple syrup – they all do a good pancake justice. Crispy around the edges, creamy in the middle, the maple syrup getting on the bacon, a hot cup of coffee to cut through the sweetness… It’s good morning food.

A big blueberry pancake, just about ready to be cut in half and served for breakfast. 

Stanley and the Lance

Our home on wheels the past three summers – a Lance camper perched on a 3/4 ton Chevy Silverado, here parked for lunch with a gorgeous view of Resurrection Bay near Seward, Alaska. Note the hitch for towing our C-Dory 22 Angler. This photo was taken on May 21, 2012.

Our first summer in Alaska, we lived aboard our C-Dory 22 Angler, GillieGillie’s pilot house and cuddy cabin made for a cozy nest, and the spirited little Toyota Tacoma that did the pulling over the 8,000 plus miles we drove that summer was, simply, the most enjoyable vehicle either one of us has ever driven. The 43 days we spent traveling in that rig made for a summer for the books. In fact, we talked for some time about traveling all across North America in this rig: exploring blue highways both on land and on water, envisioning jaunts down to the Florida Keys, out to Martha’s Vineyard, across the country to Catalina Island and everywhere in between. We even talked about launching the C-Dory at Pittsburgh, Pennsylvania and cruising all the way down the Ohio and the Mississippi to New Orleans.

But when we made the decision to move to Alaska, rent out our home in Sacramento, and spend our summers on the Kenai Peninsula…

A carved wooden hummingbird given to us by our daughter, Maia, on a trip that passed through a First Nations village in British Columbia greets us each time we open the door. Framed artwork and other personal touches make our camper a home.

After months of comparative shopping and researching campers and trucks, we still felt like we didn’t know as much as we would have liked. On the other hand, we knew enough to be comfortable making a decision. We’ve been very happy with both the Lance Camper and the Chevy Silverado 2500 it sits on.

The camper has a queen-size bed, lots of windows and skylights providing natural lighting, a three-burner propane stove with oven, an air conditioner and heater, a good shower and flush toilet, a TV and sound system, a great refrigerator/freezer, lots of storage space and enough room overhead to be comfortable for a person of my height (I’m 6′ 1″). We added a solar panel, which we highly recommend; even on cloudy days the battery charges. We also have a generator which, although rarely used, has been much appreciated the couple of times we’ve needed it.

A pair of Xtratuff boots – iconic of Alaska anglers and boaters – is ready at the entrance. 

Stanley is a name conferring strength and dependability – like Stanley tools. Fitted with airbags (extra shock absorbers), our three-quarter ton Silverado has performed superbly carrying the camper and towing our 4,500 pound boat. Given a steep mountain grade, Stanley shifts down as if to say, “All right.” Nothing more. No groaning and straining, no needless extra shifting, just a simple, straightforward, “All right” and up the mountain we go. And kicked into four-wheel drive, this truck has the grit to power through even loose beach sand with the camper – a test we didn’t intend to put the truck through and won’t be repeating.

We went back and forth regarding two options: gas or diesel, and dual rear wheels or single. We opted for a gas engine and single wheels, and after three summers of putting this rig to the test we can say without hesitation that with the right tires, single wheels are fine. And we’re happy we don’t have to deal with the noise of a diesel engine (or impose that noise on our neighbors). That being said, the fact is we don’t put a lot of miles on our rig. A diesel engine offers some real advantages to campers engaged in extensive traveling.

To anyone contemplating a rig like this, we have one firm recommendation: Start by choosing the camper you want, then match it to the right truck. 

This watercolor by Homer, Alaska artist Leslie Klaar depicts a boat much like our C-Dory heading off for a day of fishing in the great Northwest. It hangs near the door of of our camper.

Livin’ in a Van down by the River

Seward Harbor, May 21: This is the view from the back widows of our pickup truck camper, our summer home while we work to get Bandon ready to live on and to sail. Mornings start early up here, the first sunlight slanting into the camper a little after 5:00 AM – and getting earlier each day. Warblers and other songbirds are the first to wake. Too early for us. By the time we roll out of bed, gulls are calling and scolding and the high chirps of eagles have taken over. The fishing season hasn’t come into full swing yet, though a few engines can be heard making ready for a morning or a day on the water. Blueberry pancakes with maple syrup and strips of bacon on the side some days, fried eggs others, cold cereal when we’re really eager to get moving, but always with a ruby red grapefruit, a glass of orange juice and a big mug of coffee made from freshly ground beans. Then the walk to the end of the dock and a full day of work. In the photo above, as you look down the open water between the docks, Bandon is the last mast on the left.

We’ve submitted the paperwork to the coast guard in order to change the name of our Island Packet 350 from Tarsus to Bandon.

This is a sound vessel, and she surveyed well, but there is always work. The first of it has begun with giving every square inch of her interior – from her beautiful teak-wood sole to her overhead – a good cleaning. Meanwhile, there’s sorting through all the items previous owners left behind. From can openers to canvas, much of it is useful, and much of it is not. All of it requires a decision: toss out, donate to the  local thrift shop, or clean and restow.

Everything we touch, clean, move off or bring aboard makes this boat that much more ours. Bandon will be our home. In the near-term, that means about three months out of the year. And so we are outfitting it as such. This means furnishing it with good dinnerware (we went with Denby for our plates, bowls and pasta bowls), stemware (we found Schott Zweisel Tritan crystal wine glasses that look and feel luxurious but are exceptionally break resistant), and quality bourbon/Scotch glasses.

We anticipate that Bandon will be a full-on sailing vessel in every sense, but we recognize that even the most serious sailing vessels spend most of their days at anchor or in port. We want those days to be comfortable and inviting.