Now THIS is an Ice Cream Sandwich!

brownie butter pecan ice cream sandwich_n

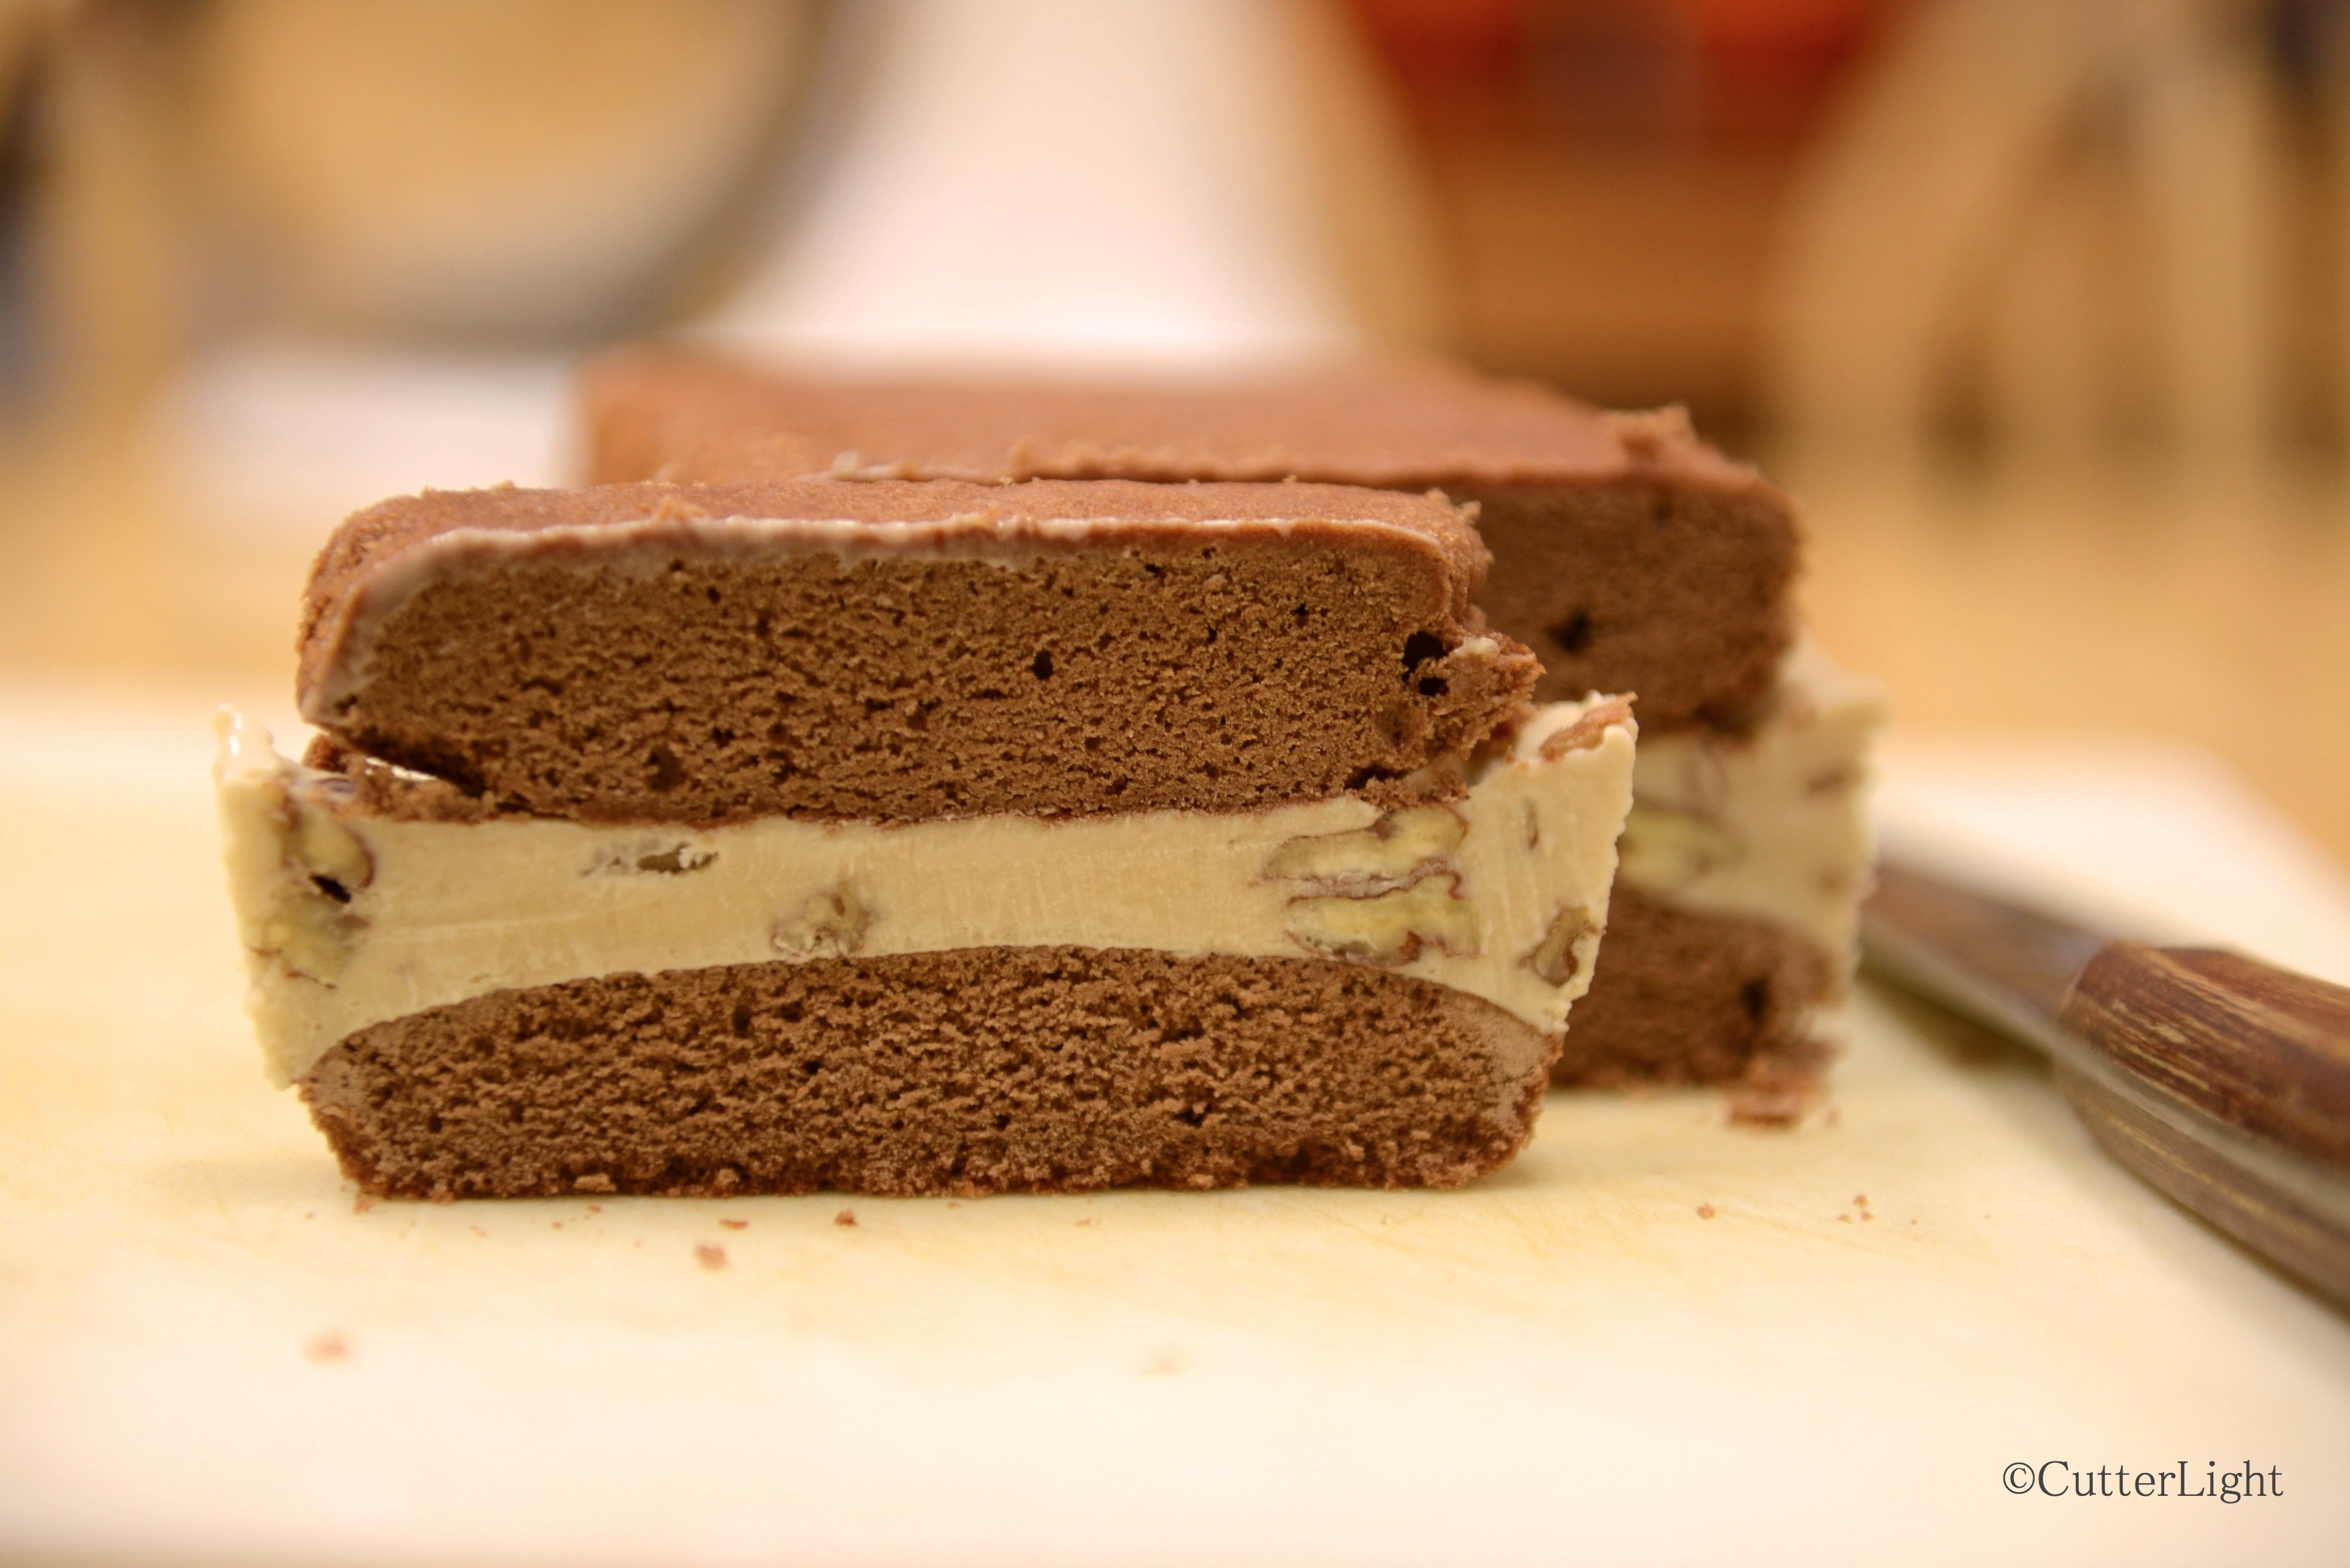
Creamy, homemade butter pecan ice cream sandwiched between chewy, chocolatey, frozen brownies – a guaranteed cure for winter-darkness doldrums! 

Store-bought ice cream sandwiches have the right idea – it’s fun to eat ice cream with your hands. The problem is that the outside layers of the store-bought variety leave much to be desired. We wanted a delicious brownie that would be more than just an edible barrier between ice cream and hands. So we created a not-too-thick brownie that retains its chewiness when it’s frozen. For the ice cream filling, we chose butter pecan to add the texture and flavor of the nuts we like best in brownies. Turned out to be the best ice cream sandwiches we’ve ever had!

Brownie & Butter Pecan Ice Cream Sandwiches

Ingredients

  • 2 oz. semi-sweet chocolate chips
  • 1/2 stick unsalted butter
  • 3 eggs
  • pinch salt
  • 1 3/4 cups granulated sugar
  • 1/2 tsp vanilla extract
  • 1/2 cup all-purpose flour
  • butter pecan ice cream (see recipe below)

Directions

  1. Preheat oven to 350 degrees F. Line two 9″ x 5″ x 3″ loaf pans with foil. Butter the foil. Set pans aside.
  2. Melt chocolate and butter in a double boiler over simmering water. Mix completely. Let mixture cool slightly.
  3. Beat eggs and salt in a mixing bowl.
  4. Gradually beat in sugar and vanilla.
  5. Mix in cooled chocolate.
  6. Mix in flour.
  7. Pour half of the batter in each loaf pan.
  8. Bake for 25 minutes. Brownies are done when a toothpick inserted in the center comes out clean. Let cool for about 15 minutes.
  9. Gently lift brownies with foil out of loaf pans and place in freezer.
  10. Place one of the empty loaf pans in freezer.
  11. Scoop out several scoops of butter pecan ice cream* into a bowl. We used about six.
  12. Stir ice cream with a rubber spatula to soften a little. You want ice cream to be spreadable, but not soupy.
  13. Retrieve one brownie and frozen loaf pan from freezer.
  14. Place brownie back into loaf pan.
  15. Spread all the ice cream evenly on brownie.
  16. Retrieve second brownie from freezer. Remove foil.
  17. Press second brownie atop the ice cream layer. Place sandwich in freezer to set, about 30 minutes.
  18. Remove sandwich from pan and place on cutting board. Using a sharp knife, slice sandwich into slices of desired size.
  19. Let sit for about 5 minutes to slightly thaw before serving.

*If you want a top notch filling for this sandwich, try making your own butter pecan! Here’s how:

Butter Pecan Ice Cream

Ingredients

  • 1 stick unsalted butter
  • 1 cup pecan halves, chopped slightly
  • 1/2 tsp salt
  • 2 large eggs
  • 3/4 cup granulated sugar
  • 2 cups heavy whipping cream
  • 1 cup whole milk

Directions

  1. Melt butter in a heavy pan over low heat.
  2. Add pecans and salt and sauté, stirring constantly until pecans start to brown.
  3. Set pecans aside to cool. Leave melted butter in pan.
  4. Whisk eggs until light and fluffy.
  5. Whisk in sugar a little at a time until completely blended.
  6. Pour in cream and milk and whisk to blend.
  7. Add reserved melted butter from pan. Mix well.
  8. Complete by following the directions of your ice cream maker or method. Add buttered pecans near the end of the ice cream maker’s cycle, when the ice cream has thickened.

Coffee Ice Cream

Patiently steeping coffee beans in a cream mixture base creates an ice cream infused with coffee flavor.

When I suggested coffee as an ice cream flavor to Jack, he shrugged his shoulders, obviously not impressed. But it’s one of my favorites, and since it seemed like I’d come up with the right egg ratio for the ice cream base, I ignored his indifference and went for it. I could already imagine my creamy cold dessert topped with homemade fudge. The process of steeping coffee beans in a custard base brought the coffee flavor to life. Jack’s response after a sample of the final product? “Wow!” That’s what a cook wants to hear.

Coffee Ice Cream

Ingredients

  • 1 cup whole milk
  • 3/4 cup granulated sugar
  • 1 1/2 cups whole coffee beans
  • 2 cups heavy cream
  • 5 egg yolks
  • 1 tsp vanilla extract

Directions

  1. Heat cream and milk in a medium saucepan over medium heat.
  2. Add coffee beans and sugar and heat until mixture almost boils, about 5 – 8 minutes.
  3. Remove from heat, cover and let steep for one hour.
  4. Beat yolks and vanilla until the mixture is light yellow and smooth.
  5. Strain coffee beans out of coffee mixture. Leave any remaining specks of coffee.
  6. Reheat coffee-cream mixture until it almost boils.
  7. Add 4 tbsp on hot cream mixture to egg mixture and stir until combined. This will temper the eggs.
  8. Slowly add warmed yolk mixture to warm cream back into saucepan. Stir continuously in order to not cook/curdle eggs.
  9. Cook entire mixture over low heat until slightly thickened and mixture coats the back of a spoon.
  10. Cool completely. I put the mixture in the refrigerator overnight before I use it.
  11. Pour into freezer bowl of ice cream machine. Turn machine on and mix until mixture thickens, about 20 minutes.
  12. Transfer to airtight container and place in freezer until firm, about 2 hours.

Matcha Green Tea Ice Cream

A Japanese ramekin heaped with a couple of scoops of matcha ice cream is the perfect dessert after a sushi dinner.

A few years ago after a lovely meal at a Japanese restaurant in San Francisco, I enjoyed a scoop of creamy green tea ice cream. Inspired by that memory and an abundance of matcha tea powder in our pantry, I attempted to recreate that delicious dessert. The intense flavor of the matcha powder gave this ice cream a rich, complex flavor. Keeping with Japanese preferences, this recipe calls for only about half the sugar American palettes might prefer, but is still satisfyingly sweet.

Matcha Green Tea Ice Cream

Ingredients

  • 3 cups heavy cream
  • 1 cup whole milk
  • 3 egg yolks
  • 1/4 cup sugar
  • 2 tbsp matcha green tea powder
  • 1 tsp vanilla bean paste

Directions

  1. Heat cream and milk in a medium saucepan over medium heat.
  2. Add vanilla paste and green tea powder and heat until mixture almost boils, about 5 – 8 minutes.
  3. Reduce heat to low.
  4. Meanwhile, beat yolks and sugar until the mixture is light yellow and smooth.
  5. Add 4 tbsp on hot cream mixture to egg mixture and stir until combined. This will temper the eggs.
  6. Slowly add warmed yolk mixture to warm cream. Stir continuously in order to not cook/curdle eggs.
  7. Cook entire mixture over low heat until slightly thickened and mixture coats the back of a spoon.
  8.  Cool completely. I put the mixture in the refrigerator overnight before I use it.
  9. Pour into freezer bowl of ice cream machine. Turn machine on and mix until mixture thickens, about 20 minutes.
  10. Transfer to airtight container and place in freezer until firm, about 2 hours.

If you liked this post, you might like to read about matcha green tea cookies.

Extra Rich Homemade Vanilla Ice Cream

Almost like gelato…

For the third year in a row, I’ve gone to the trouble of obtaining several quarts of heavy cream (whipping cream) out here in the Alaskan bush. It’s an item our Native Store doesn’t stock. The past two years, I’ve paid a tidy sum for a grocery store in Fairbanks ship out cream on a cargo plane. Another year I happened to be visiting a village where the Native Store did stock heavy cream; I hand carried several quarts of the precious liquid on the bush plane back to our village.

We love homemade ice cream, so it’s worth the trouble.

And we like variety. Last year, I experimented with eleven different flavors of ice cream and sorbet. We treated guests to rocky road, toasted almond, fireweed and honey, peanut butter chip, toffee crunch and more. This year, I stretched my ice cream making wings a bit further by experimenting with new flavors and by improving last year’s favorites. I’m happy to report that all of this year’s batches turned out terrific. One of the biggest hits has been this year’s vanilla.

I have a vanilla ice cream recipe that came with the Cuisinart ice cream maker Jack’s daughter Maia gave us a few years ago. It’s a good recipe as it stands, but I wondered what would happen if I were to leave out the milk and only only use heavy cream. The second modification I made was to use vanilla bean paste. A new addition to our kitchen, this paste packs an intense vanilla flavor. The result was a thick, creamy, gelato-like creation that has left guests exclaiming “Wow!”

Extra Rich Vanilla Ice Cream

Ingredients

  • 4 cups heavy cream
  • 2 tsp vanilla bean paste
  • 3 egg yolks
  • 1/2 cup sugar

Directions

  1. Heat cream in a medium saucepan over medium heat.
  2. Add vanilla paste and heat until mixture almost boils, about 5 – 8 minutes.
  3. Reduce heat to low.
  4. Meanwhile, beat yolks and sugar until the mixture is light yellow and smooth.
  5. Add 4 tbsp on hot cream mixture to egg mixture and stir until combined. This will temper the eggs.
  6. Slowly add warmed yolk mixture to warm cream. Stir continuously in order to not cook/curdle eggs.
  7. Cook entire mixture over low heat until slightly thickened and mixture coats the back of a spoon.
  8.  Cool completely. I put the mixture in the refrigerator overnight before I use it.
  9. Pour into freezer bowl of ice cream machine. Turn machine on and mix until mixture thickens, about 20 minutes.
  10. Transfer to airtight container and place in freezer until firm, about 2 hours.

Banana Split ala Alaska Bush

We spent the last couple of days finishing up projects and watching lots of football with friends. A perfect end to a great weekend? A bush-style banana split. Curious?

(Warning-the following blog entry may make you crazy with cravings for a banana split…read on with great care…)

Bananas rarely appear at the store. A beautiful golden bunch was waiting for us at just over a dollar a banana. They were perfectly ripe and unbruised. They tasted creamy and sweet. These bananas begged to be used in the perfect split.

Several months ago we happened across heavy cream at the store and bought them out…twelve cartons. We quickly realized that we had two weeks in which to do something with these or else they would spoil. We made four different kinds of ice cream: rocky road, chocolate chip, vanilla bean custard, and toasted almond. We also froze whipped cream topping and squash pie filling. Whew…used every carton.

A good banana split needs more than just ice cream and bananas. Toppings! We found a bottle of Smuckers caramel sauce at the store. Ok, that was good. How about hot fudge…homemade! Oh my…I made the best hot fudge I’ve ever had in my life. It was chocolately and smooth and oh, so tasty.

Nuts! Don’t forget the nuts. Jack toasted up some chopped pecans in butter. He sauteed them long enough for them to get hot and absorb the buttery goodness.

There it was…a creamy golden banana, halved.  Scoops of home-made rocky road, vanilla bean custard, and chocolate chip ice creams. A drizzle of caramel topping. An avalanche of home-made hot fudge –so hot it melts the ice cream –. Generous scoops of toasted pecans drenched in butter. All topped with a few dried cherries.

The dish was set in front of us and two minutes later it was a glorious memory.