Twisted Brunch: Twisted Loaf Cinnamon Bread

cinnamon braid_n

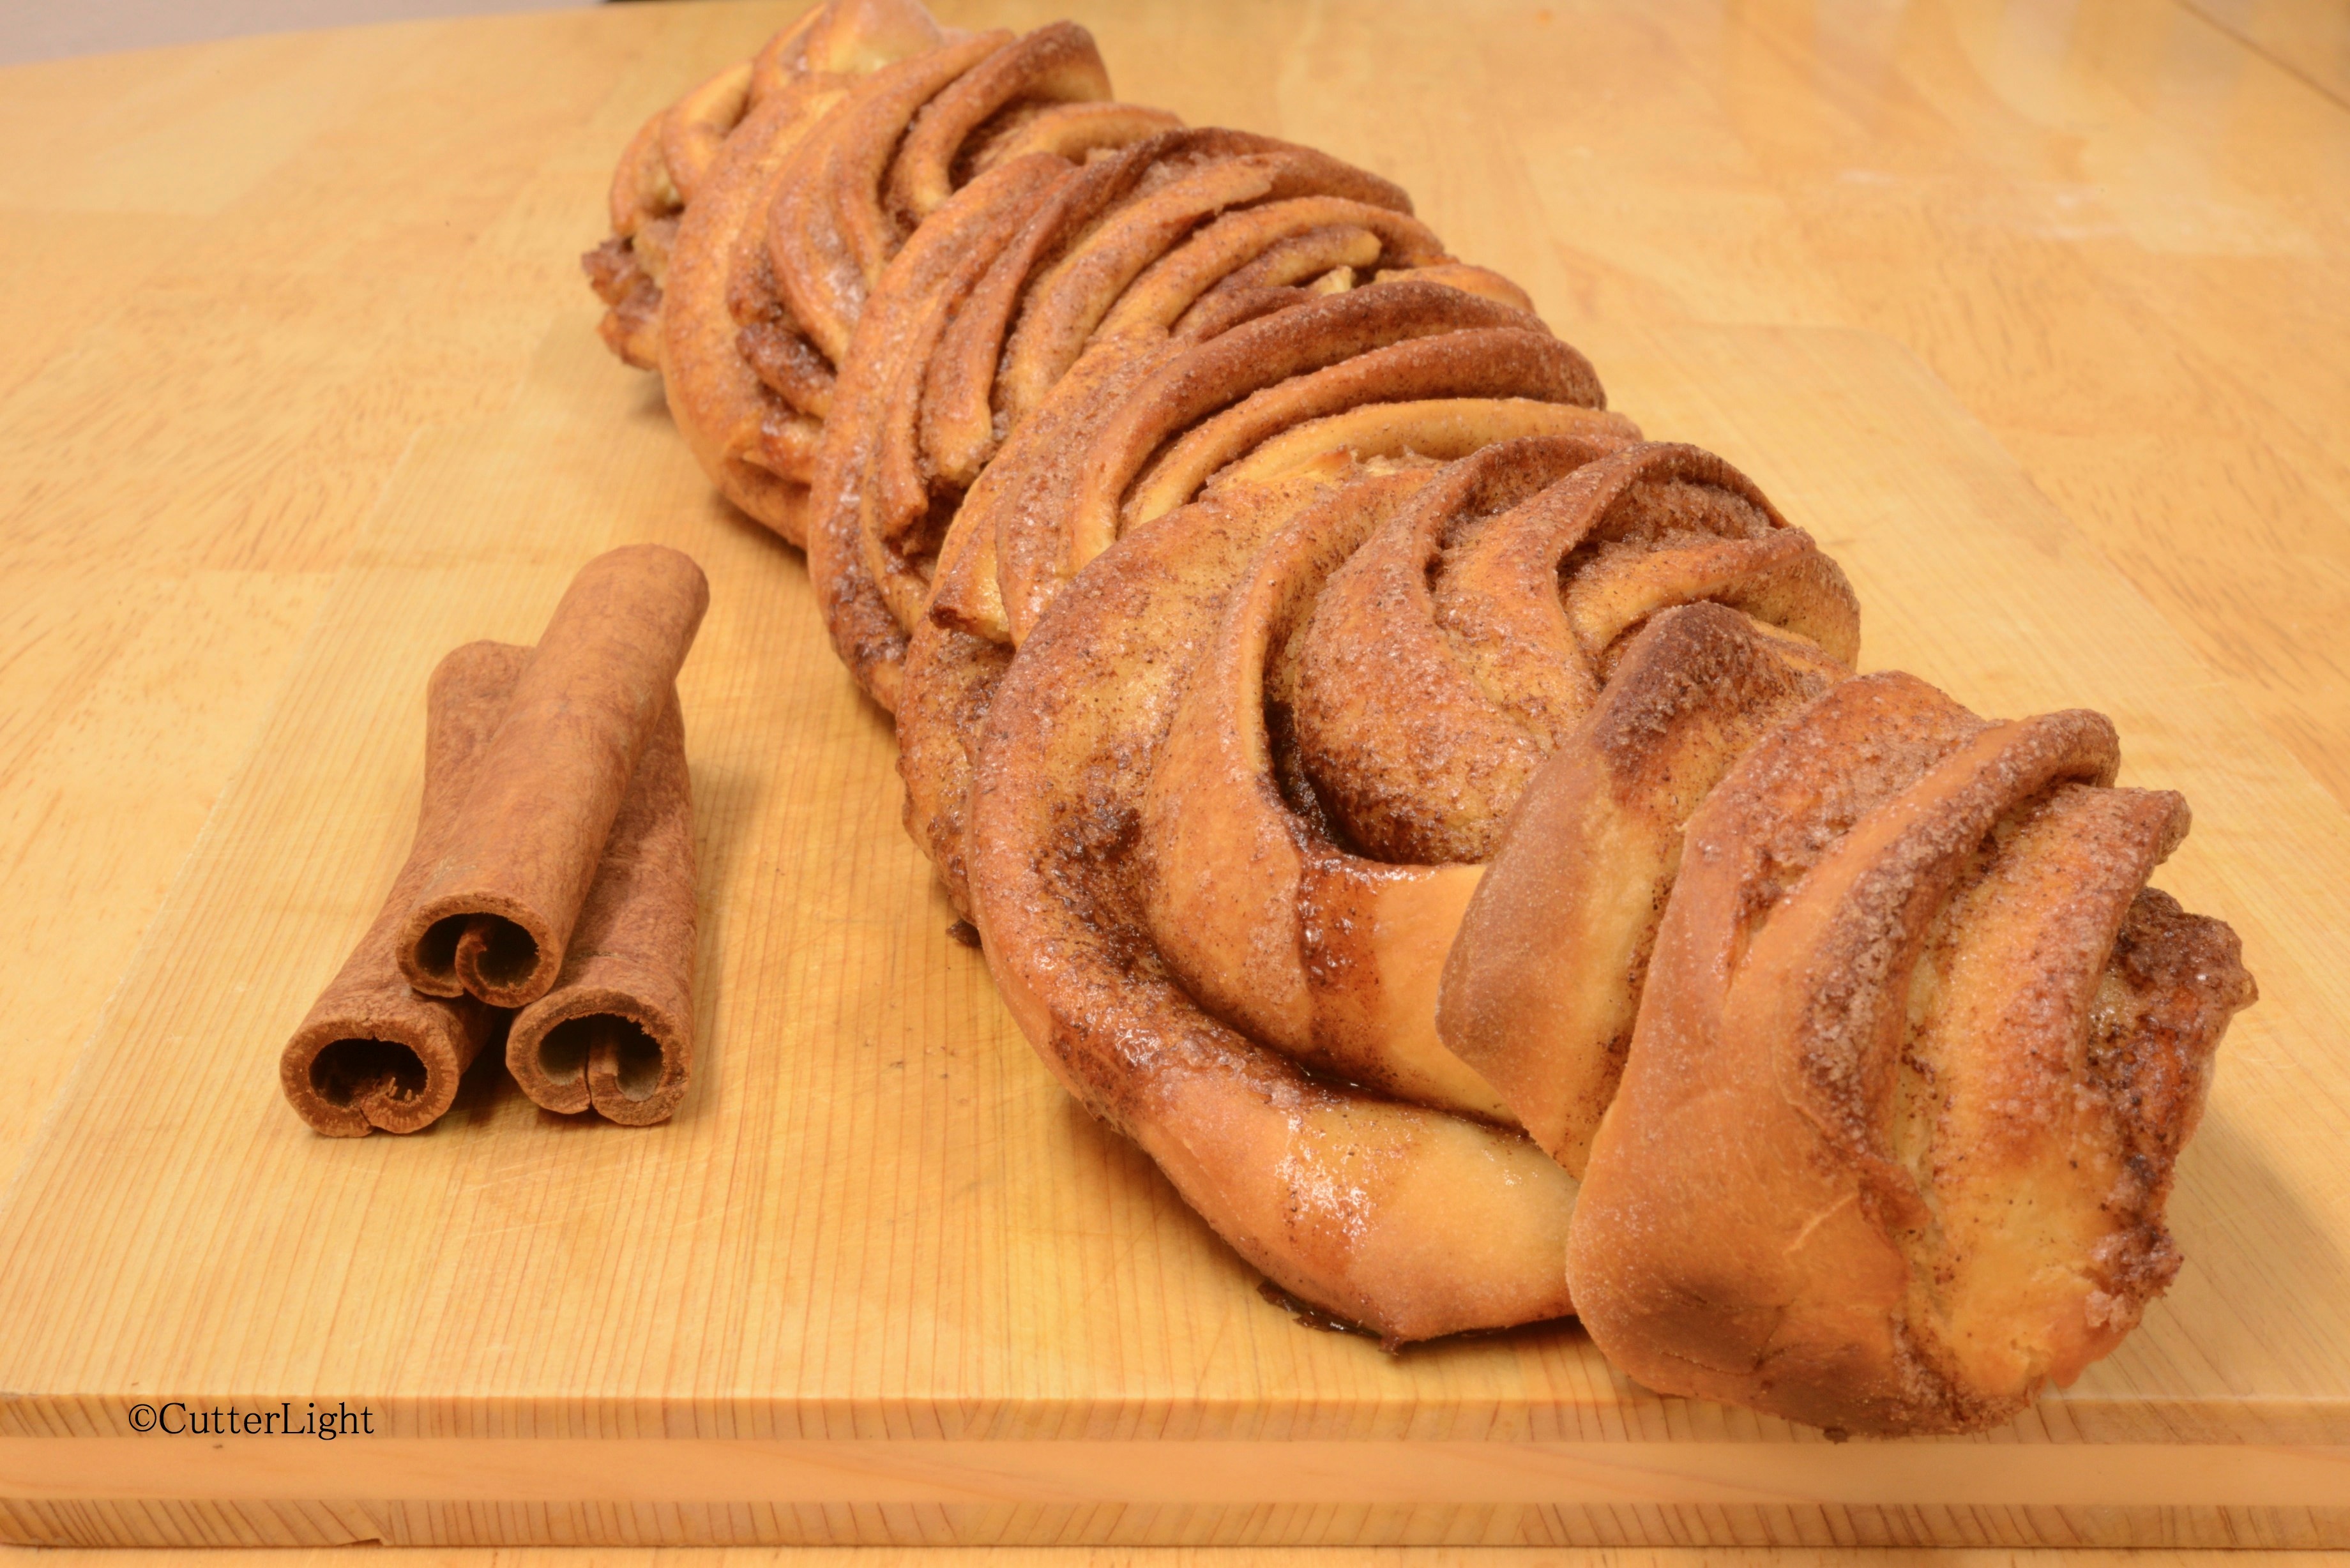
This sugary, buttery, cinnamon-laced, melt-in-your-mouth braided cinnamon loaf is centerpiece-worthy at the breakfast or bunch table.

In a quest for a visually unique loaf of bread, I came across a recipe for a Nutella twist which looked gorgeous. Reading through the instructions, I was surprised at how simple an intricate looking braid could be created. With plenty of cinnamon on hand, I decided to give this loaf a go sans Nutella. The result of my experiment is captured in the photo above and was a delicious compliment to plates of sunny-side-up friend eggs and mugs of French roast coffee.

However, upon further investigation, it turned out my “original” recipe idea had already been conceived and executed on the site Home Cooking Adventure. Nonetheless, here is my version of Estonian Kringle adapted for my dough machine.

Cinnamon Braid

Ingredients

Bread

  • 2 1/4 cups all purpose flour
  • 1/2 tsp salt
  • 3/4 cup lukewarm milk
  • 1 tbsp  granulated sugar
  • 2 1/4 tsp active dry yeast
  • 2 tbsp unsalted butter, melted
  • 1 large egg

Filling

  • 5 tbsp unsalted butter, softened
  • 5 tbsp granulated sugar
  • 3 tsp cinnamon

Directions

  1. Preheat oven to 400 degrees F.
  2. Place bread ingredients in bread machine in the order recommended by the manufacturer.
  3. Set cycle to “dough” and start machine.
  4. Make cinnamon filling while waiting for dough by combining filling ingredients in a medium bowl and mixing thoroughly.
  5. Roll dough out on a lightly floured surface to a rectangle, approximately 18″ x 12″.
  6. Spread cinnamon filling over dough evenly. Leave about 1/2″ border.
  7. Roll up dough jelly-roll style to form a long log.
  8. Cut log down the middle, the long way.
  9. Braid by wrapping the two cut pieces around each other, always leaving the cut sides up.
  10. Pinch ends of dough so that they will bake together.
  11. Bake for 20 – 25 minutes, until golden brown.

Roasted Onion Cheddar Knots: Savory Stuffed Rolls for a Cold Winter’s Day

Roasted onion cheese knots_n

Stuffed with cheddar cheese and warm out of the oven, these rolls are just the thing to go with a bowl of hot tomato soup on a chilly winter afternoon.

Cheddar knot rolls are fun to make, and just about everyone loves baked goods stuffed with tasty ingredients. Investing a little extra effort in roasting the onions for the top and cutting strips of cheese for the inside of the ropes results in a perfect accompaniment to soup as well as a savory take-along snack for a winter’s day walk or hike.

If you and your family and friends like these, try our Arctic Anpan 2 Ways for additional creative recipes for sweet and savory stuffed rolls.

Roasted Onion Cheddar Knots

Ingredients

  • 1 cup water
  • 5 tbsp powdered milk
  • 2 tsp active dry yeast
  • 3 tbsp granulated sugar
  • 2 tbsp olive oil
  • 3 cups flour
  • 1 1/2 tsp salt
  • 3 oz. cheddar cheese cut into matchstick strips
  • 3 thin slices (discs) of onion
  • olive oil, smoked sea salt, and freshly cracked pepper
  • 1 egg, beaten

Directions

  1. Place first 7 ingredients into the pan of your bread machine, in the order recommended by the manufacturer.
  2. Turn machine on, dough cycle.
  3. When cycle is finished, turn dough out onto lightly floured surface.
  4. Cut dough into 6 equal pieces.
  5. Roll and stretch each piece into ropes approximately 12 inches long.
  6. Flatten each rope. Place about four matchstick-shaped pieces of cheese down the middle of the flattened rope.
  7. Pinch dough closed around the cheese pieces so that you still have about a 12 inch rope with cheese enveloped in the center. Make sure you’ve really pinched these shut so they don’t pop open during baking.
  8. Tie the rope into a knot shape. Repeat with all the ropes.
  9. Let knots rest covered on a parchment-lined baking sheet for about 45 minutes in a warm place. Knots should almost double in size.
  10. Meanwhile, heat oven to 400 degrees F.
  11. Toss onions with olive oil, smoked salt, and freshly cracked pepper. Onion rings should be separated and all should be well coated.
  12. Roast onions on baking sheet for about 10 minutes. They should be translucent and just starting to brown.
  13. Remove onions from oven and set aside. Reduce oven temperature to 375 degrees F.
  14. Brush knots with beaten egg. Place roasted onions atop egg-washed knots.
  15. Bake for 15 – 20 minutes. Finished rolls should be golden brown.

Seafood Kebabs on Forbidden Rice

salmon kabab n

Seasoned cubes of wild Coho salmon, fat, succulent Kodiak scallops, sweet Alaska deep sea shrimp and artichoke hearts drenched in olive oil alternate on this broiled seafood kebab.

The early Persians were onto something. Skewered meats, seafoods and vegetables deftly seasoned and grilled or broiled to perfection are easy to whip up and always a hit. The variations on these Alaskan seafood kebabs are endless. We seasoned ours with a mixture of ginger, toasted sesame seeds, black sesame seeds, sea salt, sugar, garlic, pepper and a sprinkle of toasted coconut. Add a little soy sauce, too, and serve on a bed of nutrition-packed forbidden rice.

Seafood Kebobs

Ingredients

A dash or two each of

  • ginger (freshly grated or powdered)
  • toasted sesame seeds
  • black sesame seeds
  • sea salt
  • ground pepper
  • ground peppers such as chipotle or cayenne
  • garlic (fresh chopped fine or powdered)
  • toasted coconut
  • seafood such as chunks of salmon or other fish, whole scallops, prawns, etc.
  • vegetables such as cherry tomatoes, artichoke hearts, bell pepper, etc.
  • olive oil

Directions:

  1. Place broiler pan in oven and preheat on broil, or fire up grill.
  2. Combine ingredients in a mixing bowl and mix to thoroughly coat seafood and vegetables.
  3. Put food on skewers and place on preheated broiling pan or on hot grill. Cook for about 5 to 10 minutes, turning once or twice.
  4. Serve hot.

Smoked Salmon Avocado Dip: Tasty California-Alaska Fusion

smoked salmon avacado dip n
Served in avocado half-shells, this Alaskan twist on guacamole is as eye-catching as it is delicious! See the super quick and easy recipe below.

In our Arctic kitchen, homemade smoked salmon is an essential pantry staple for which there seems to be no end of uses. Mix a little in with the stuffing in deviled eggs to create salmon stuffed eggs, and you’ve never seen this standard party dish disappear so quickly. A smoked salmon and seafood frittata or smoked salmon crepes make a gourmet’s breakfast. Or stuff a Portabella cap with smoked salmon and a favorite cheese and fire up the grill for a dinner guests will savor.

Our most recent use for smoked salmon came about when Barbra returned from a trip to Anchorage with two large, perfectly ripe avocados. This turned out to be a “Why didn’t we think of this before?” dish that we pass along here.

Smoked Salmon Avocado Dip

  • Cut a soft, ripe avocado in half lengthwise. Use a spoon to gently scoop out the insides, taking care to not break the shell.
  • Place the avocado in a bowl and smash with a fork. Add approximately an equal amount of smoked salmon and some coarsely ground black or multi-colored pepper. Gently mix together. More avocado results in a creamier dip, more salmon makes for a chunkier dip.
  • Return mixture to avocado halves. Serve with crackers or tortilla chips and a favorite ale or lager.

“Bring Some Chocolate Home…”

Triple Chocolate_n

Three types of chocolate plus melted toffee bits on the top nestled in a chewy cookie will satisfy even the strongest chocolate craving. 

When traveling from the tiny bush village of Point Hope to the big city of Anchorage, it is customary to bring home produce or other items that are difficult to find in the village.

Standing in the produce section of our favorite Anchorage grocer surrounded by a bounty of colorful, crisp, juicy offerings such as asparagus, leeks, zucchini, avocados, and mangoes, I call Jack to see if there is anything special he wants me to bring back. “Bring Some Chocolate Home,” he requests (demands). Knowing I still have ten pounds of chocolate chips to use up in the next two-and-a-half months, I respond as my students do to me in their cute, slightly cheeky way: “Nope.” Poor guy was suffering not only from a lack of chocolate, but from a lack of freshly baked goods as well due to my absence of several days.

So, this delicious, chocolate-stuffed, brownie-like cookie is dedicated to Jack. When I asked him what he thought of this recipe, he merely pointed to his empty plate indicating a request for another. That’s my Jack.

Triple Chocolate Toffee Almond Cookies

Ingredients

  • 2 1/4 cups all purpose flour
  • 1 tsp baking soda
  • 1/2 cup dutch pressed cocoa
  • dash salt
  • 2 sticks unsalted butter, softened
  • 1 cup granulated sugar
  • 3/4 cup brown sugar
  • 3 eggs
  • 1/2 tbsp Penzeys double vanilla extract
  • 1 cup semi-sweet chocolate chips
  • 1/2 cup white chocolate chips
  • 1/2 cup crushed toffee bits
  • 1 cup chopped almonds

Directions

  1. Preheat oven to 375 degrees F. Line two cookie sheets with parchment paper. Set aside.
  2. In a medium mixing bowl, whisk together flour, salt, baking soda, and cocoa. Set aside.
  3. In bowl of stand mixer, blend together butter, sugars, and vanilla.
  4. Gradually stir in flour mixture into butter mixture.
  5. Stir in chocolate chips, toffee bits and almonds.
  6. Drop dough by tablespoons onto parchment-lined cookie sheets.
  7. Baked for 10 minutes.
  8. Cool on wire rack.
  9. Store in airtight container.

Venison Broccoli Stir Fry with Brown Sugar & Soy Sauce

venison broccoli stir fry n

Tasty, quick, easy and attractive, beef (or wild game) and broccoli is a dish almost nobody doesn’t like. Here’s our twist on a classic favorite.

More than half-way through our year in the Arctic, our freezers remain abundantly stocked with Alaskan seafood and wild game. Featured in this dish is a lean, tender cut of Sitka black-tailed deer. Asian-style stir fry such as this is perfect for days when you want something quick but delicious.

Most recipes for this dish call for corn starch. For a cleaner taste and presentation while still achieving the thick broth desired for this dish, try substituting rice flour for the corn starch. A generous drizzle of sesame oil toward the end of cooking really brings this dish together. As we live far from a well-stocked grocer, we used powdered seasonings.

Venison Broccoli Stir Fry

Ingredients: (for two servings)

  • 1/2 pound lean, tender wild game or beef, cut into slender 2″ strips
  • 1 tbsp rice flour + 1/2 tbsp rice flour, separated (or use corn starch)
  • 1 tbsp water
  • 1/2 tbsp olive oil
  • a scant 1/2 tsp powdered garlic
  • 1/2 tsp powdered ginger
  • 1 tbsp brown sugar
  • 2 tbsp soy sauce
  • 3/4 cup onion, chopped very coarse
  • frying oil such as light olive oil
  • 2 cups broccoli florets
  • sesame oil
  • 1/2 tbsp sesame seeds

Directions:

  1. In a bowl, combine venison strips, 1 tbsp rice flour, water, olive oil, garlic and ginger. Mix thoroughly so that each meat strip is thoroughly coated with mixture. Set aside.
  2. In a small bowl, whisk together soy sauce and brown sugar. Set aside.
  3. In a wok or large skillet, heat olive oil over medium-high heat. When oil is hot, add venison, stirring continuously for about 2 – 3 minutes to sear and lightly cook through. Remove venison to a bowl and set aside.
  4. Add a little more oil to the pan and add the onions. Stirring frequently, cook until onions just begin turning translucent but are still fairly crunchy. Add broccoli and continue stir frying till broccoli begins to turn bright green, adding a little more oil if necessary.
  5. Add venison, sesame oil, sesame seeds and brown sugar and soy sauce mixture, stirring quickly to thoroughly mix ingredients together. Cook just long enough to reheat venison.
  6. Serve immediately on a bed of steaming rice.

Gluten Free? Low Carb? Whatever! Just Eat These Fudgy Chocolate Meringues!

meringue fudgy chocolate n

Fudgy meringues with a crispy, melt in your mouth shell will have you attending “Meringues Anonymous” if you’re not careful!

How can four little ingredients be so good together? The combination of the crispy exterior and the moist chocolate middle sans flour resulted in an entire batch of fifteen cookies disappearing in just over 24 hours. I wish I could tell you we had guests…

Although airy and relatively low on calories compared to most confections, these meringues did not come about due to New Year’s self-promises centered around slimmer waistlines. The ignoble truth is that after creating crème brûlée, another custard dish and any number of ice creams, we had on hand countless extra egg whites and, according to Jack, “egg whites, fish and beer are three items that can be consumed without fear of weight gain.”

These meringues are quick and easy to make but do require an overnight stay in the oven to finish drying  in order to create that crispy exterior.

Fudgy Chocolate Meringues

Ingredients

  • 3 egg whites
  • 3/4 cup granulated sugar
  • 2 tbsp dutch processed cocoa
  • 1/2 cup smashed chocolate chips (Place chips in a Ziploc bag and smash with a meat tenderizer)

Directions

  1. Preheat oven to 350 degrees F. Line two baking sheets with parchment paper. Set aside.
  2. Place egg whites and sugar in the bowl of a stand mixer.
  3. Place bowl on top of pot of simmering water, for a double boiler effect.
  4. Whisk eggs and sugar for a couple of minutes until sugar is just dissolved.
  5. Place bowl back on stand mixer. Mix on high speed until eggs are thick and glossy and hold soft peaks.
  6. Sift cocoa onto egg mixture.
  7. Mix on high speed until cocoa is just incorporated.
  8. Fold smashed chocolate chips into egg whites.
  9. Use a cookie scoop to drop batter onto parchment-lined baking sheets.
  10. Bake cookies for 10 minutes. Cookies should puff up and may crack.
  11. Remove cookies and leave oven door open to cool down.
  12. Place cookies back in oven, close oven door and let cookies sit overnight.
  13. The next day, cookies will be cooled completely and can be easily removed from parchment paper. Store in airtight container.

Deep Fried Parsnips – World’s Best Bar Snack?

parsnips fried n

Crispy, salty, sweet, sprinkled with a little parmesan cheese and dusted with a couple of grinds of pepper, on a fry-crazy evening, we served these classic bar snacks along with deep-friend fish & chips. No one had to be scolded to eat their vegetables!

Bill Briwa, chef-instructor at the Culinary Institute of America at Greystone, calls deep fried parsnips “The World’s Best Bar Snack.” After frying up a batch, we think he’s got a good case!

We used a vegetable peeler to achieve the very thin ribbons of parsnips desired for this dish. In his instructional materials accompanying The Everyday Gourmet: Rediscovering the Lost Art of Cooking, (produced by The Great Courses) Chef Briwa employs a mandolin. A little care and a very sharp knife could achieve the same effect. The key is to cut the parsnips thin.

The other secret to ensuring that these snacks come out right every time is to make sure your oil isn’t too hot. It doesn’t matter whether you use canola, light olive oil, peanut oil or another oil suitable for deep frying, but don’t allow the temperature to climb above 300 degrees F. Parsnips have a lot of sugar; they’ll burn before they become tender at higher temperatures.

This makes them a logical appetizer to cook up with a meal of fish & chips. As the oil heats up to 300 degrees F, place the parsnips in. The temperature will drop a little at first, and that’s OK. It only takes a couple of minutes for them to become golden brown and crisp.

When they’re done, turn them out onto paper towels to drain off the oil and sprinkle a little salt over them. They’d be good served just like this, but to create a snack people can’t get enough of, add a little parmesan cheese. You can warm up a bowl in a countertop oven, place the drained, salted parsnip chips in the warm bowl, and gently toss them with grated parmesan, letting the warmth soften the cheese so it better adheres to the chips.

The final step is to turn the parsnips out onto serving plates in a nice, tall haystack. Hit it with a couple of grinds of pepper and serve. The cold beers should already be poured!

Pretzel Rolls for Sandwiches to Look Forward To

Pretzel Rolls_n

Chewy and deliciously salty, these pretzel rolls are ready for turkey sandwiches, complete with deli mustard and homemade ginger-pear cranberry sauce.

While most people roast a turkey for Thanksgiving or Christmas, Jack and I decided to make a turkey for going back to work after our winter break. We have plenty of recipes stockpiled for tasty meals featuring leftover roasted turkey. These pretzel rolls make lunchtime sandwiches something to look forward to.

Bread Machine Pretzel Rolls

Ingredients

  • 4 cups all purpose flour
  • 1 1/2 tsp salt
  • 2 tsp instant yeast
  • 1 3/4 cups milk
  • 2 tbsp olive oil
  • coarse sea salt
  • 2 tbsp salt
  • 1/2 cup baking soda
  • 16 cups water

Directions

  1. Place first 5 ingredients into baking pan in the order recommended by the manufacturer. Insert pan into the oven chamber. Select dough cycle.
  2. Turn out dough onto lightly floured surface.
  3. Divide dough into 8 pieces.
  4. Roll dough in to balls. Flatten slightly and let rest while you prepare pretzel bath.
  5. Preheat oven to 400 degrees F. Cover baking sheet with parchment paper.
  6. In a large pot, boil 16 cups water and salt.
  7. When water is boiling, stir in baking soda.
  8. Place 4 dough balls in boiling water for 30 seconds. Flip dough balls and continue to boil for 30 more seconds. Remove from water with slotted spoon and place on parchment-lined baking sheet.
  9. Repeat with remaining 4 dough balls.
  10. Sprinkle each roll with coarse salt.
  11. Slice two slashes into each roll with a very sharp knife.
  12. Bake rolls for 20 minutes. Pretzels are finished when they are a rich dark brown.
  13. Let cool for a couple of minutes on baking sheet. Finish cooling on wire rack.

Whaler’s Stew with Beef or Wild Game: A Hot, Filling Meal on a Cold Winter Day

whalers bowhead stew n

Ladle out a bowl, mug or thermos of hot, hearty stew to fuel up for wintertime activities or for just enjoying a movie by a cozy fire.

If you’ve never made a stew, or if you haven’t cooked one up in a while, the heart of winter is the perfect time. We’ve been using this basic recipe for years, varying the ingredients with what we have on hand. Different iterations have featured beef tri-tip, moose, elk, caribou, and even bowhead whale. Sweet potatoes, other potatoes, brussels sprouts, corn, tomatoes and other vegetables feature nicely. A favorite of ours is parsnips, which add a distinctive flavor that goes well with beef and wild game. While corn starch or all purpose flour are traditional thickeners in stews – and perfectly fine – we use rice flour. It dissolves easily, is virtually without flavor and thickens without becoming pasty.

Rather than provide specific amounts of ingredients for this delicious meal, we recommend taking a loose approach. A volume ratio of about three to one vegetables (combined) to meat works well, but there’s no need to measure or to be overly exact.

Whaler’s Stew

Ingredients (Each vegetable is optional and could be omitted while increasing the amount of other vegetables or substituted for something else.)

  • lean, boneless meat such as chuck steak, tri-tip, or a similar cut from wild game. Cut into cubes or chunks.
  • olive oil
  • onions, chopped coarse
  • garlic, minced or chopped fine
  • red wine or sherry (optional)
  • beef bouillon (or vegetable bouillon, or water) – enough to just cover all ingredients when combined. We use Better than Bouillon.
  • carrots, sliced into discs
  • russet or Yukon gold potatoes, cubed
  • pumpkin, squash, sweet potatoes or yams, cubed
  • parsnips, chopped coarse or sliced into discs
  • mushrooms, chunked
  • brussels sprouts, cut in halves or fourths, depending on size
  • tomatoes, diced
  • sweet corn
  • seasonings: sea salt or smoked salt, pepper, thyme, bay leaf, sage, cloves

Directions

  1. In a large bowl, add meat, olive oil, salt and pepper. Mix thoroughly.
  2. In a heavy skillet, heat oil over medium-high heat. When skillet is hot enough to make the meat sizzle, add it, stirring and turning to sear meat. Reduce temperature and continue cooking meat through, about 6 minutes.
  3. Add onion and additional oil, if necessary. Add a splash or two of sherry or red wine (optional). Stir until onions become barely translucent but are still crunchy.
  4. Stir in garlic and cook for about 30 seconds.
  5. Stir in seasonings and add bouillon mixture or water.
  6. Add potatoes and any other slow-cooking vegetables such as sweet potatoes, pumpkin, etc. Simmer for 20 minutes.
  7. Stir in rice flour – a little at a time to prevent clumping – to achieve desired thickness. Start by adding a total of 1 tbsp, wait a few minutes as broth thickens, and continue adding to desired thickness.
  8. Add additional vegetables, adding corn last as it doesn’t need much cooking time. Simmer till vegetables are tender, tasting and adjusting seasonings as necessary.

Alternatively: Place vegetables, (except corn) in individual bowls – each to its own bowl. Mix thoroughly with olive oil, salt and pepper. Keeping vegetables separate according to their kind, place them all on a heavy, oiled baking sheet and roast them at 400 degrees F, checking and removing each type of vegetable as it is done and setting them all aside in a large bowl. This ensures that all vegetables are cooked to the right consistency, and the roasting brings out sweetness. Cook meat as above, set aside with the oil it cooked in, and then add all ingredients to a large pot to finish cooking. Add the corn last. Vegetables can be grilled in this fashion too. It’s a little more effort, but it makes a difference.