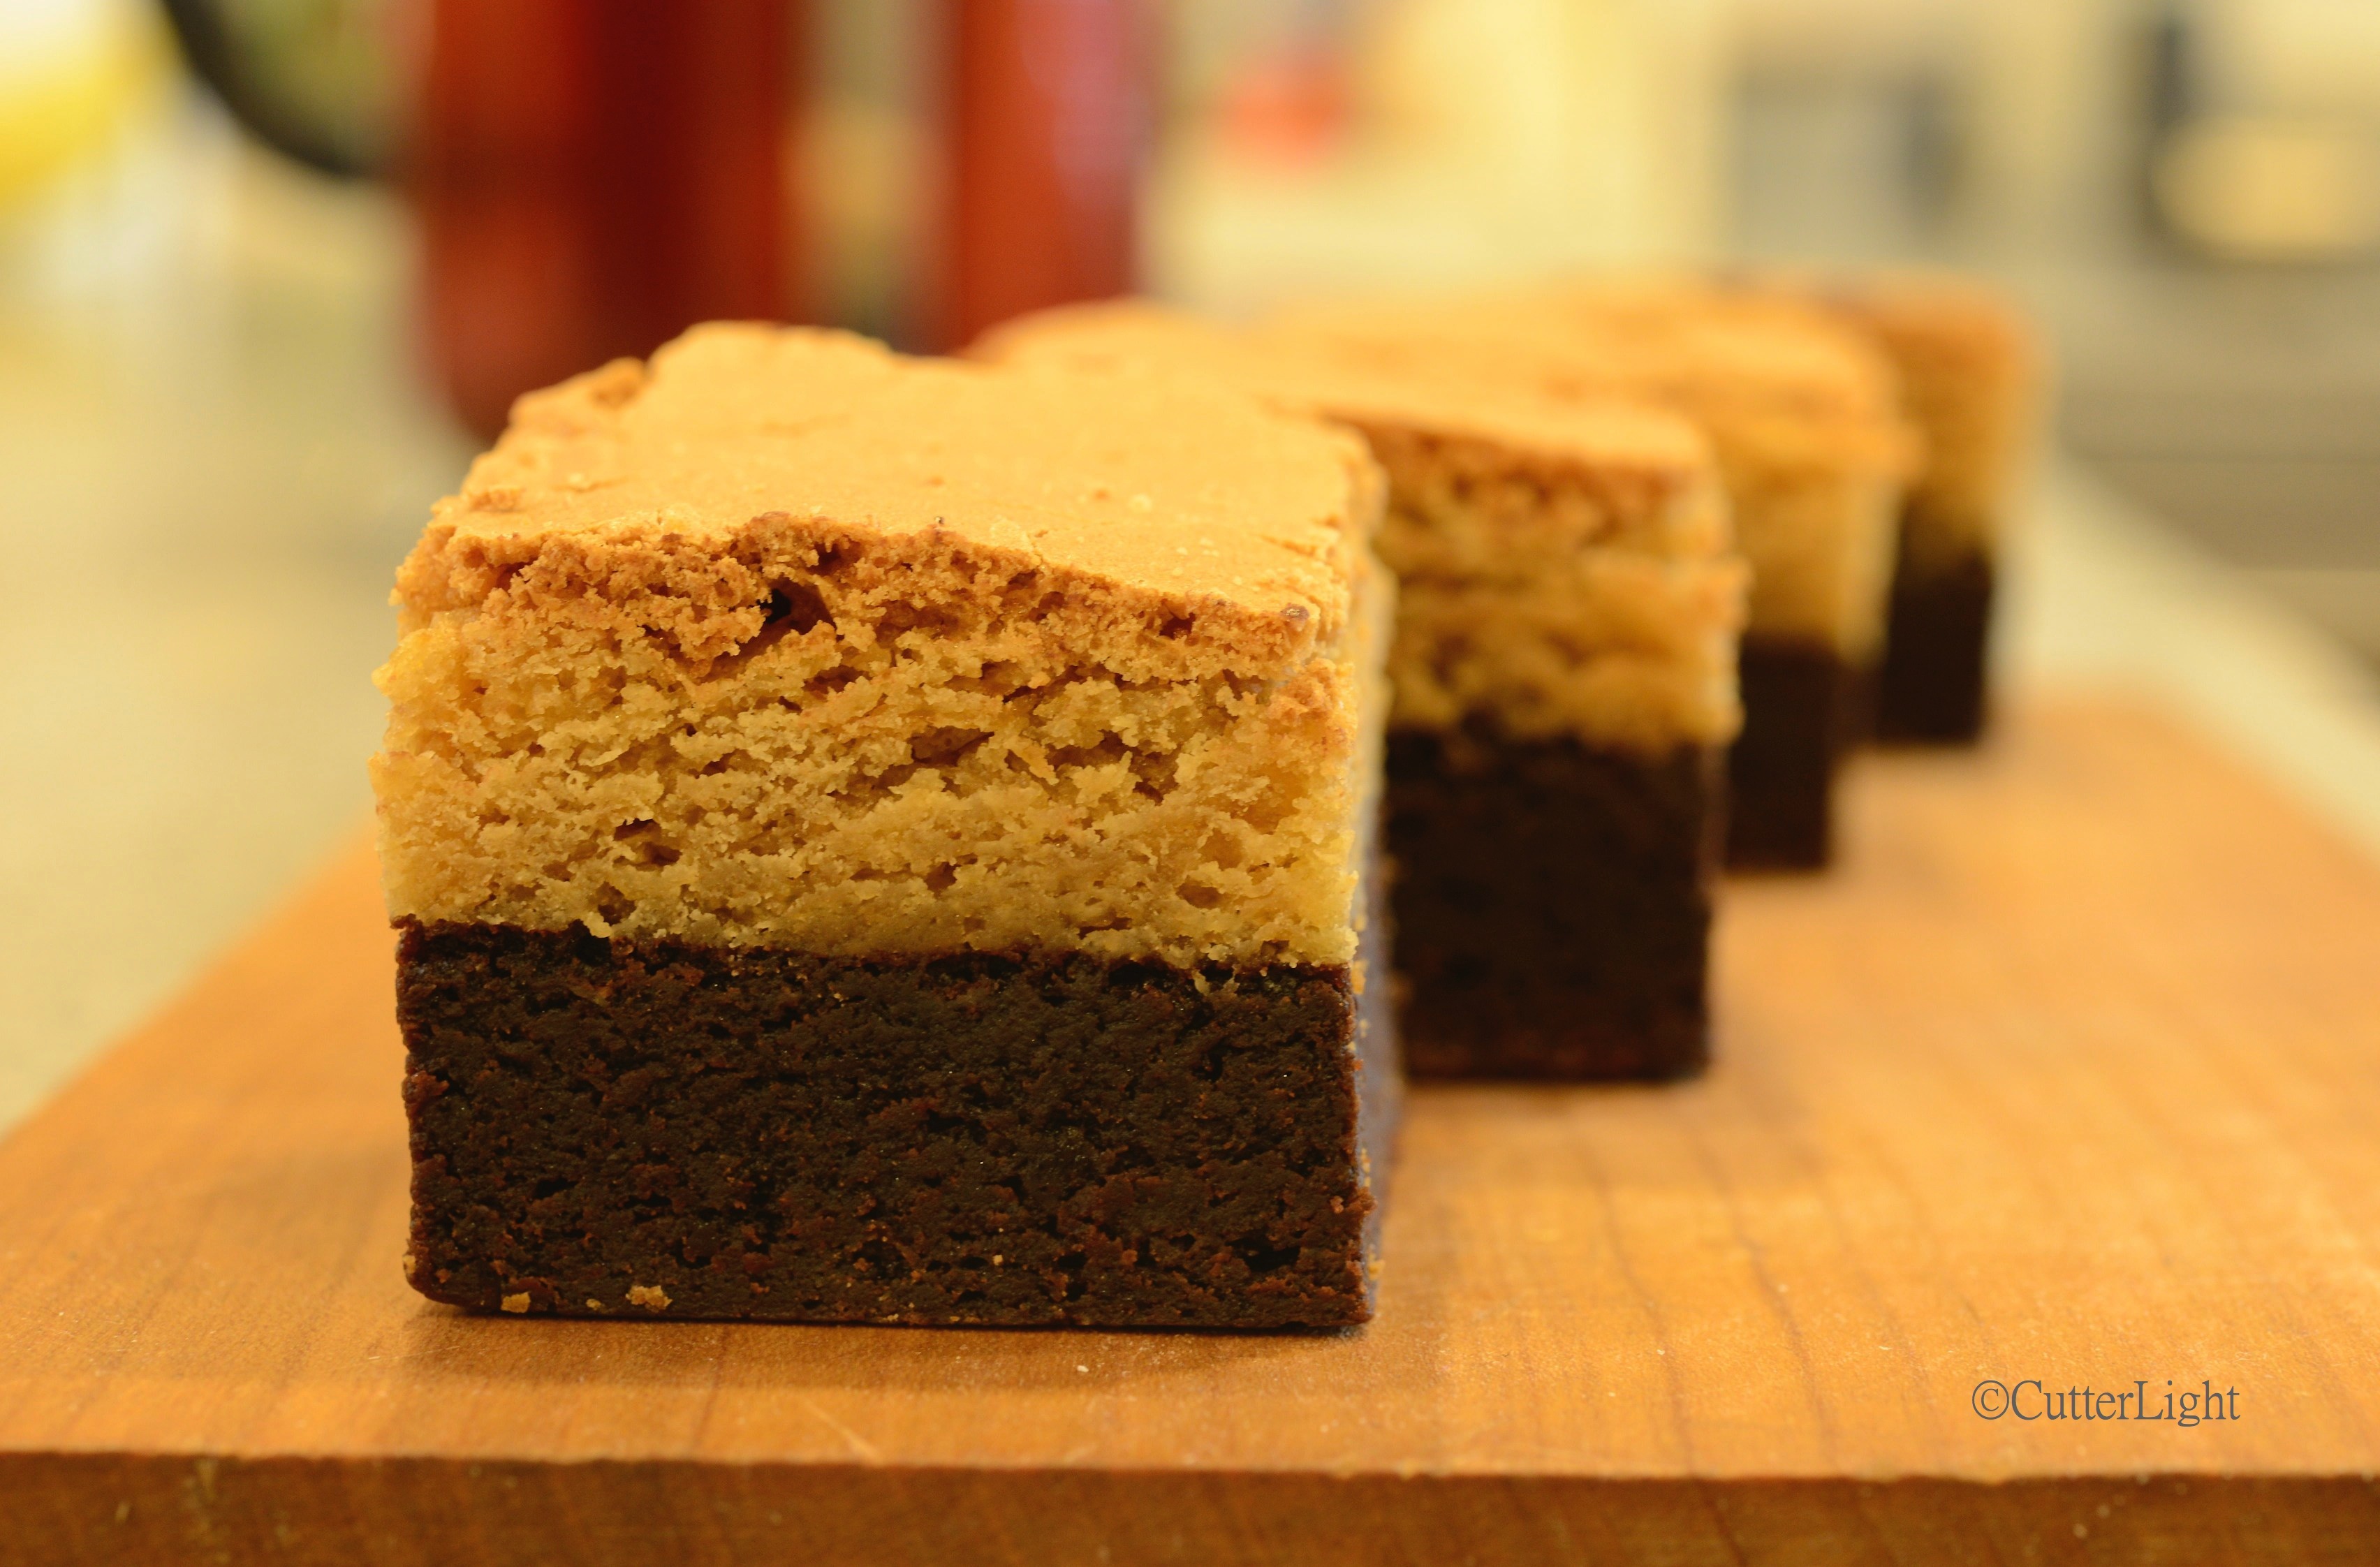
Brownie Blondies, Blond Brownies, Brownie Double Deckers… Hey, Brownies!

brownie blondies n

When faced with a difficult choice such as brownies or blondies, my answer is both! We love dense, chewy brownies, and lots of Dutch processed cocoa makes the brownie layer in this recipe super chocolatey. Slightly caramelizing the brown sugar gives the blondie layer a rich caramel flavor. There doesn’t seem to be a clever portmanteau to name these bits of deliciousness… How about Double Decker Blondie Brownies?

Every couple of weeks I have a bake sale in my classroom. Students save up tickets and can buy various privileges, or they can choose to spend their earnings on Barbra’s Bakery. Everyone wins, right? I get to bake and they get to enjoy freshly made items created just for them. The tasty products keep them earning tickets!

Last Friday, I asked my students for some ideas. They were smitten with the blondies I’d previously whipped up and suggested a double-decker version of blondies and brownies sandwiching a layer of chocolate frosting. I love sweets, but that sounded too sweet. However, the double-decker idea was intriguing. The key would be to somehow keep the layers separate for an appealing visual effect, like a black and tan beer.

The trick turned out to be first partially baking the brownie layer and then gently layering on the blondie dough before the final bake. The concoction was a big hit with the students and also with all the lucky adults who got to participate in the tasting.

Brownie Double Deckers

Ingredients

For the brownie

  • 1 1/4 cups dutch processed cocoa
  • 1 1/4 cups all purpose flour
  • 1 tsp salt
  • 1 1/2 cups unsalted butter, melted
  • 3 cups granulated sugar
  • 5 eggs
  • 2 tsp vanilla extract

For the blondie

  • 2/3 cup unsalted butter
  • 2 cups brown sugar
  • 2 eggs
  • 2 tsp vanilla extract
  • a little less than 2 cups all purpose flour
  • 1 tsp baking powder
  • 1 tsp salt

Directions

  1. Preheat oven to 375 degrees F (190 degrees C).
  2. Line a 9 x 13 inch baking dish with foil and generously butter. Set aside.
  3. Sift together dry brownie ingredients – flour, cocoa, and salt – in a large bowl.
  4. In a medium bowl, mix together melted butter and granulated sugar.
  5. Mix in one egg at a time until all 5 eggs are thoroughly mixed in.
  6. Stir in vanilla extract.
  7. Stir dry ingredients into wet.
  8. Pour brownie batter into baking dish and bake for 20 minutes. Brownie should be just starting to set.
  9. While brownie is baking, make blondie dough.
  10. Place butter and brown sugar in a medium pot. Stir over medium heat until mixture is just melted.
  11. Let mixture cool for a few minutes, then stir in eggs and vanilla.
  12. Stir in flour one cup at a time.
  13. Stir in baking powder and salt. Do not overmix.
  14. After the brownies have baked for 20 minutes, reduce oven temperature to 350 degrees F (175 degrees C).
  15. Carefully spoon blondie mixture on top of brownies. Gently spread blondie mixture to cover brownies. Don’t worry about making the dough perfectly even, it will spread during baking.
  16. Bake double-decker for an additional 30 minutes. A toothpick inserted in the center of the brownies will come out clean when it is done.
  17. As delicious as these smell straight out of the oven, they taste best when totally cool. We served ours with freshly brewed cups of chai tea.

Recipe adapted from Rachel Ray.

Mongolian Scones: An Airy, “No Cream” Version of a Breakfast Favorite

Mongolian Scones w egg n

“Mongolian” scones, a lighter and fluffier version of their English cousin, are quick to make and a delicious start to our day in the coldest capital in the world, Ulaanbaatar.

We are part of a foodie network in Ulaanbaatar (UB) where one of the most common questions is, “Can you get ______ ingredient here?” Although UB is a thriving city of over a million inhabitants, Mongolia is still a developing country where certain items can be difficult to come by. Heavy whipping cream is one example. When we finally tracked some down, the price tag was the equivalent of 28 US dollars for a one liter container. The cost and inconvenience associated with certain items has been fostering invention as we experiment with substitutions to our recipes.

Our “Mongolian” scones are our answer to the question, “What can I substitute for heavy cream in scones?” The answer is yogurt, which is inexpensive and readily available in Ulaanbaatar’s grocery stores. The result is a lighter, less crumbly scone.

For this version, we used a large cookie scoop, overfilled, to create mounded scones. It is typical to create scones in a disc shape and to then cut them into wedges. The mounded shape allowed a nice rise and more crunchy surface area in one perfectly portioned breakfast scone to accompany our Mongolian eggs and delicious, thick-sliced Mongolian bacon.

Mongolian scones stacked n

A large cookie scoop portioned this dough into sixteen scones. An ice cream scoop would work well for slightly larger scones.

Mongolian Scones with Cranberry and Pecans

Ingredients

  • 2 cups all-purpose flour
  • 1/4 packed brown sugar
  • 1 tbsp baking powder
  • 1/4 tsp ground nutmeg
  • 1/4 tsp salt
  • 1 tsp dried orange peel, or fresh orange zest
  • 1/4 cup unsalted butter, chilled and diced
  • 3/4 cup dried cranberries
  • 1/2 cup chopped pecans
  • 1 tbsp granulated sugar
  • 2 small eggs (Mongolian stores typically carry smaller eggs than are sold in America)
  • 3/4 cup plain yogurt

Direction

  1. Preheat oven to 375 degrees F (190 degrees C).
  2. Cover baking sheet with parchment paper and set aside.
  3. Stir flour, brown sugar, baking powder, nutmeg, salt and orange peel together in a large bowl.
  4. Stir cranberries and pecans into the flour mixture.
  5. In a small bowl, whisk granulated sugar and eggs together. Mix in yogurt.
  6. Pour wet ingredients into dry.
  7. Stir ingredients until fully incorporated with a rubber spatula. Dough will be very sticky.
  8. Scoop out generous cookie scoops (2 tbsp or more) of dough and drop mounds on baking sheet.
  9. Bake for 15 minutes, until scones are golden brown.
  10. Enjoy fresh out of the oven with a fried egg and a slice of bacon.

Chocolate Candy Bar Coffee Cake

chocolate coffee cake_n

Warm afternoon sunshine streamed in through the windows on a cool fall day, illuminating this rich, moist afternoon snack created from a favorite chocolate candy bar. Served with freshly brewed cups of hot tea it was just the thing before a walk into town.

Chocolate coffee cake is tempting straight out of the oven. But this cake tastes best the day after it is baked. The traditional streusel topping turns a good cake into an irresistible afternoon treat.

Chocolate Candy Bar Coffee Cake

Ingredients

Streusel top:

  • 2/3 cup all purpose flour
  • 1/2 cup firmly packed brown sugar
  • 1/2 tsp cinnamon
  • 6 tbsp cold unsalted butter, cut into small pieces
  • 1/2 quality chocolate candy bar, chopped fine

Cake:

  • 2 cups all purpose flour
  • 2/3 cup unsweetened Dutch-process cocoa powder
  • 1 tsp baking soda
  • 1 tsp baking powder
  • 1/2 tsp salt
  • 1/2 cup unsalted butter
  • 1 cup granulated sugar
  • 3 large eggs
  • 1  1/4 cups plain yoghurt
  • 1  1/2 tsp pure vanilla extract
  • 1 cup chopped pecans

Instructions

  1. Preheat oven to 350 degrees F.
  2. Grease a 9 x 13 inch glass baking dish.
  3. In a small bowl, mix together the following streusel ingredients: flour, sugar, and cinnamon.
  4. Rub in butter into streusel mixture, until coarse crumbs form.
  5. Fold in chopped chocolate pieces. Set aside.
  6. To make the cake, in a large bowl, whisk together flour, cocoa, baking powder, baking soda, and salt.
  7. In another bowl, cream together butter and sugar.
  8. Add eggs, one at a time, beating thoroughly.
  9. Mix in yoghurt and vanilla extract.
  10. Stir wet ingredients into dry. Mix thoroughly.
  11. Fold in chopped pecans.
  12. Pour batter into prepared pan.
  13. Sprinkle streusel mixture evenly over batter.
  14. Bake until topping is golden, about 40 minutes. Cake is done when toothpick inserted into center of cake comes out clean.
  15. Let pan cool on wire rack. Cut into squares to serve.

Stacking Up Shortbread Cookie Recipes: Espresso-Chocolate and Almond

shortbread cookies_new

A quintessential shortbread recipe revamped twice for two deliciously buttery versions of a classic cookie.

Shortbread cookies offer delectably crunchy bites that still maintain the sense of a soft cookie. Using powdered sugar as the sweetener gives these cookies their appealing melt-in-your-mouth texture. A blog I follow, Smitten Kitchen, posted a scrumptious coffee flavored version of these cookies featuring a deep, chocolately finish. Her recipe included a clever trick of rolling out the dough in a zip top plastic bag and then allowing it to chill in the bag, making for quick and easy cutting of the chilled dough. I made a batch of her espresso-chocolate flavored cookies and then experimented with my own almond flavored version. How did these two recipes stack up? Deliciously!

After successful experimentation substituting the coffee and chocolate with almonds, I can imagine a whole host of substitute flavors to continue playing with – lemon, caramel, anise…

Espresso Chocolate Shortbread Cookies

Ingredients

  • 1 tbsp coffee extract (or highly concentrated coffee)
  • 8 oz unsalted butter, room temperature
  • 2/3 cup powdered sugar
  • 1/2 tsp vanilla extract
  • 2 cups all-purpose flour
  • 4 oz of your favorite chocolate bar, chopped finely. I found one with toffee bits inside which worked fabulously.

Directions

  1. Thoroughly mix butter and powdered sugar in a medium bowl.
  2. Stir in coffee and vanilla.
  3. Mix in flour. Don’t overmix.
  4. Fold in chopped chocolate.
  5. Transfer dough to a gallon-sized zip top bag.
  6. Roll the dough out until it is about 1/4 inch thick. You should have a rectangle about 9 x 10 inches.
  7. Squeeze out the air and zip bag closed. Refrigerate dough for 2 hours. Refrigerated dough will keep for a couple of days.
  8. Preheat oven to 325 degrees F.
  9. Line a baking sheet with parchment paper.
  10. Cut the dough-filled plastic bag so you can remove top layer.
  11. Turn dough out onto a board.
  12. Cut dough into cookies – about 1 1/2 inch squares.
  13. Place cookies on parchment lined baking sheet.
  14. Bake for 10 minutes. Then rotate pan and bake for additional 10 minutes.
  15. Cool cookies on wire rack.
  16. Cookies will taste best when they are fully cooled.

Recipe courtesy of Smitten Kitchen.

Almond Shortbread Cookies

Ingredients

  • 1 tbsp almond extract
  • 8 oz unsalted butter, room temperature
  • 2/3 cup powdered sugar
  • 1/2 tsp vanilla extract
  • 2 cups all-purpose flour
  • 4 oz almonds, chopped fine.

Directions

  1. Thoroughly mix butter and powdered sugar in a medium bowl.
  2. Stir in almond and vanilla extracts.
  3. Mix in flour. Don’t overmix.
  4. Fold in chopped almonds.
  5. Transfer dough to a gallon-sized zip top bag.
  6. Roll the dough out until it is about 1/4 inch thick. You should have a rectangle about 9 x 10 inches.
  7. Squeeze out the air and zip bag closed. Refrigerate dough for 2 hours. Refrigerated dough will keep for a couple of days.
  8. Preheat oven to 325 degrees F.
  9. Line a baking sheet with parchment paper.
  10. Cut the dough-filled plastic bag so you can remove top layer.
  11. Turn dough out onto a board.
  12. Cut dough into cookies – about 1 1/2 inch squares.
  13. Place cookies on parchment lined baking sheet.
  14. Bake for 10 minutes. Then rotate pan and bake for additional 10 minutes.
  15. Cool cookies on wire rack.
  16. Cookies will taste best when they are fully cooled.

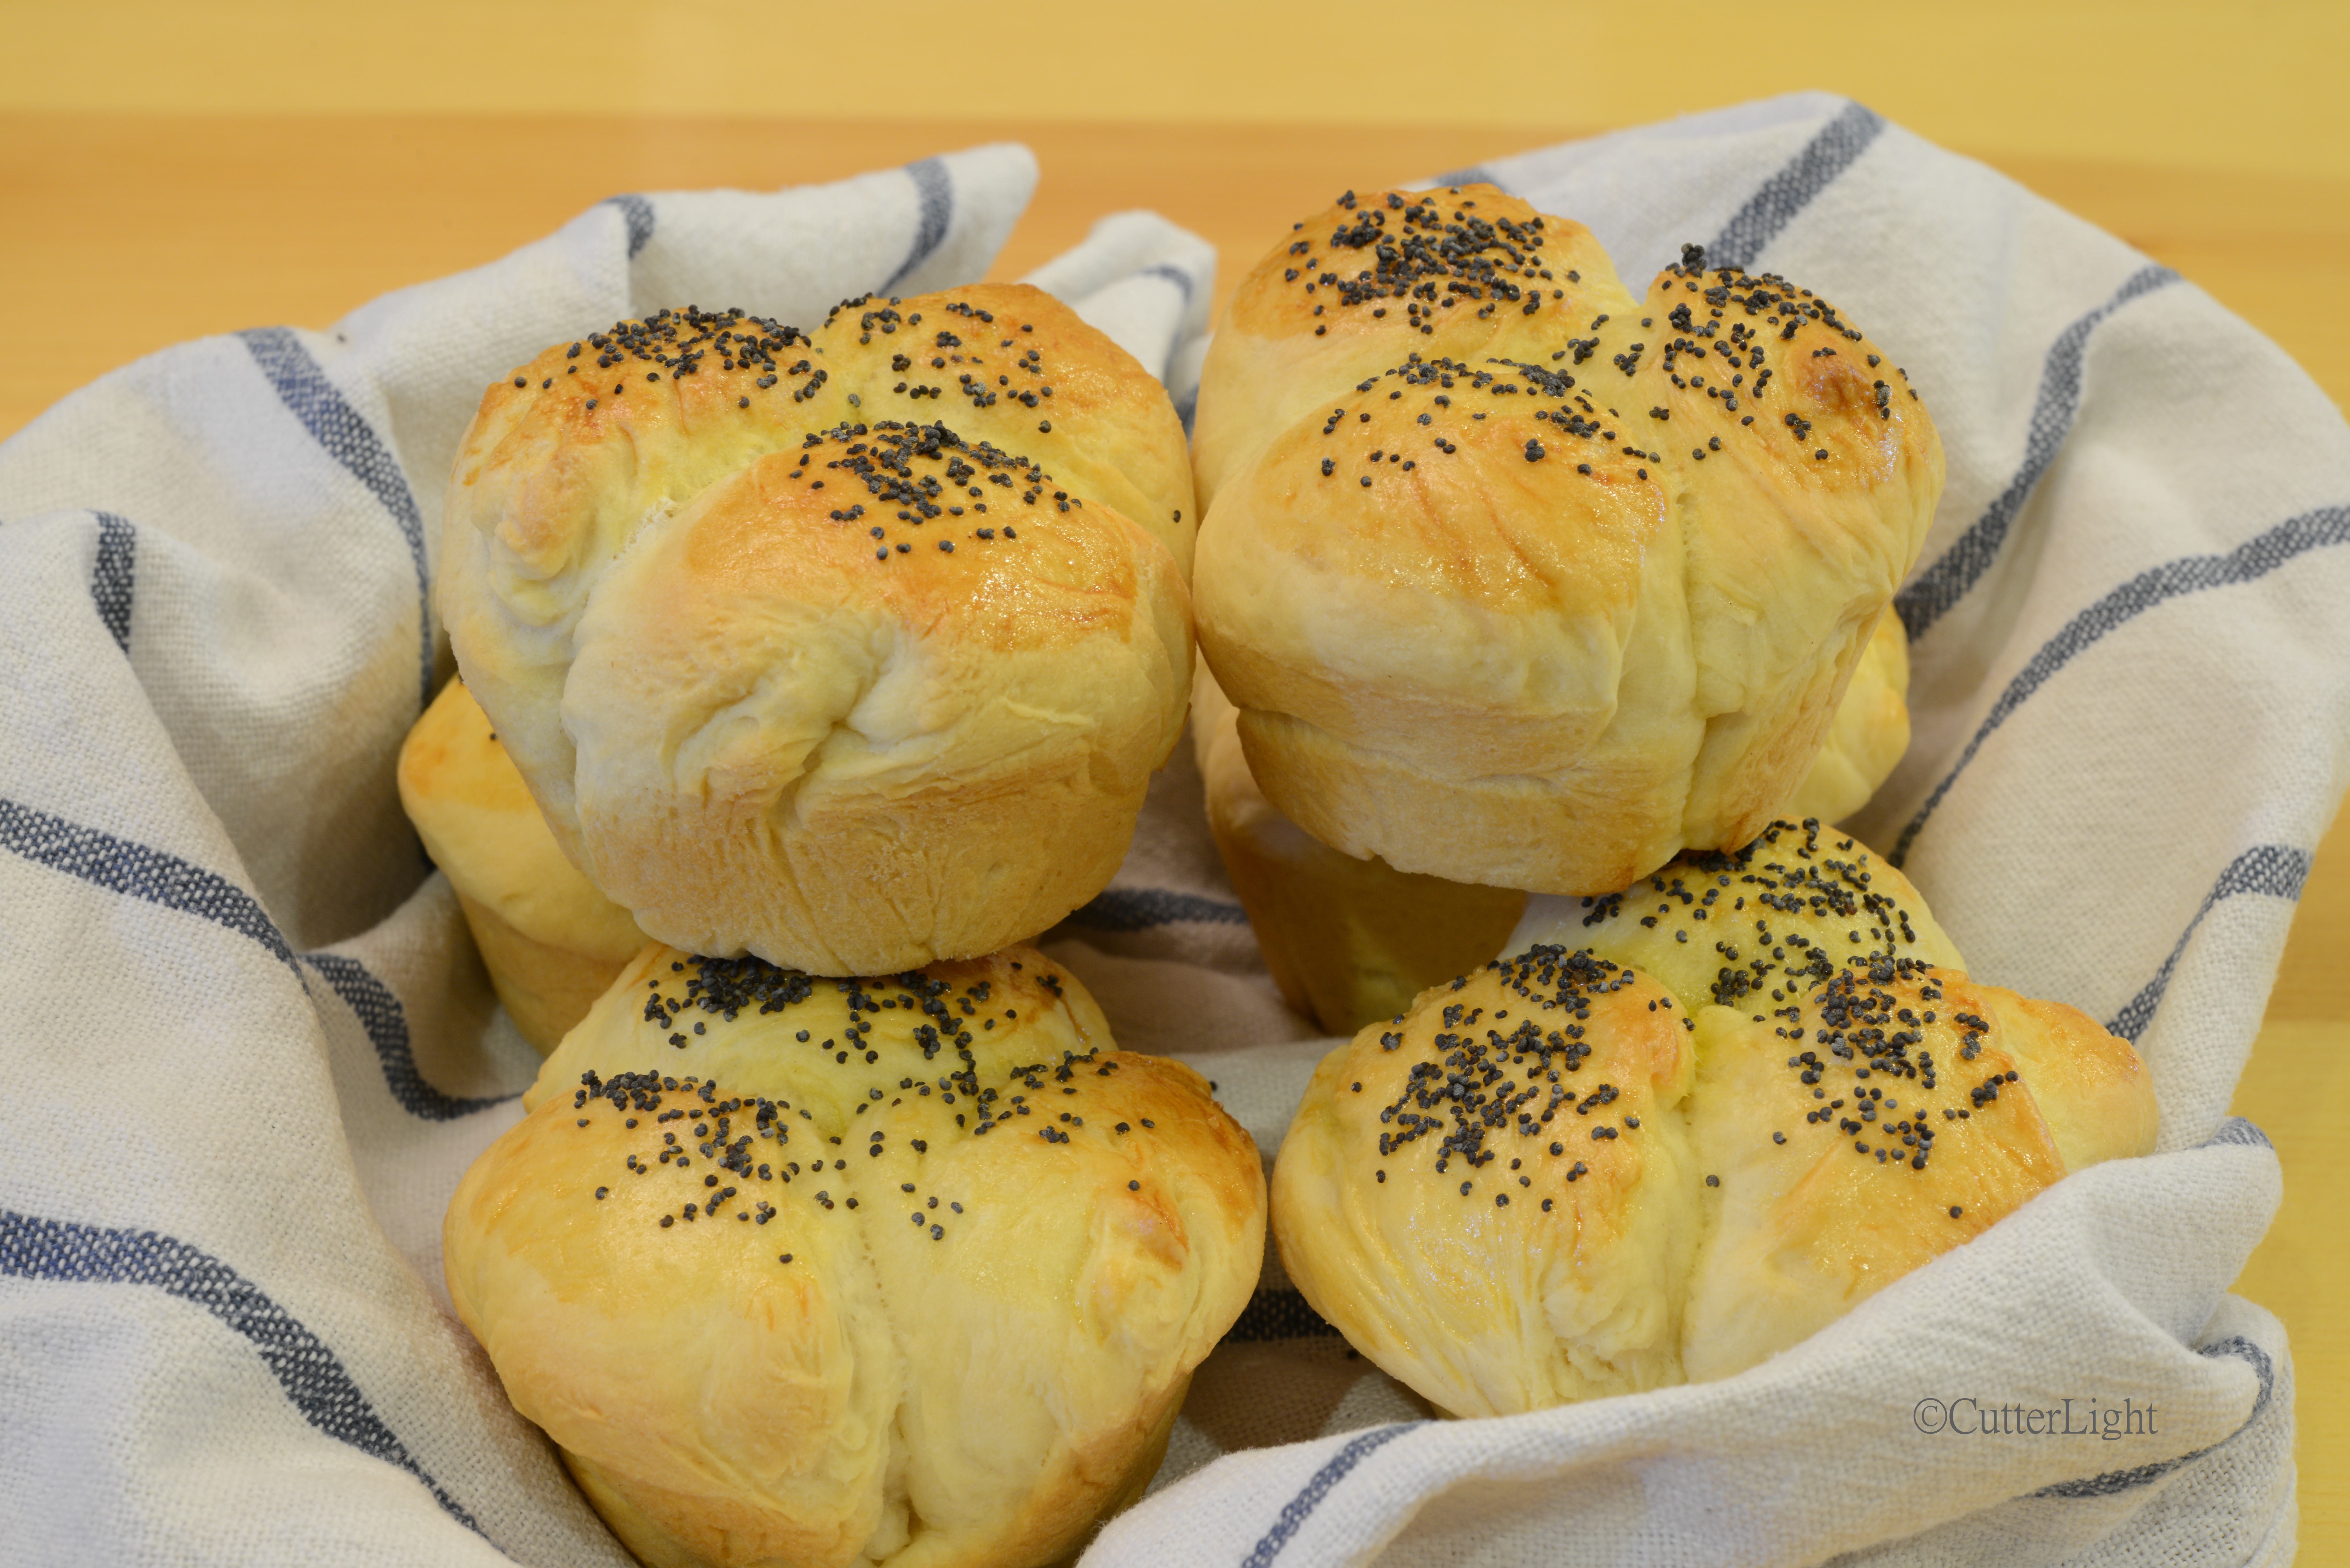
Poppy Seed Cloverleaf Rolls

poppy seed roll clover leaf n

In theory, this recipe will make twelve rolls. When I went to retrieve the rolls for my photo shoot, there were only six. Jack!?! They must have been really tasty!

The transition from Alaska to Ulaanbaatar, Mongolia has not been easy for the baker in me. Ulaanbaatar is known for being the coldest capital in the world. Since we have arrived, the weather has been really warm. Turns out highs in the 70’s and 80’s F is mighty warm for our Alaskan blood. Finally, a cloudy day with a high of 53 degrees F made for a comfortable baking weather.

After years of making dough in my Zojirushi bread machine, the move to a country with different electrical outlets encouraged me to relinquish my training wheels and bake on my own. I had always had trouble getting my doughs to rise properly in our home in Point Hope. With experience and a few tricks, I was ready to give it a go without any machinery.

I pulled my Williams-Sonoma Baking Book off the shelf and looked for a yeasted bread recipe which would be a delicious accompaniment to Jack’s tomato soup. Poppy seed cloverleaf rolls sounded tasty and look beautiful, too. The recipe was easy to follow and the dough rose beautifully. The final product proved to be irresistible.

Poppy Seed Cloverleaf Rolls

Ingredients

  • 1 cup whole milk
  • 2 tbsp unsalted butter, plus extra for greasing
  • 1 tbsp granulated sugar
  • 2  1/2 tsp active dry yeast
  • 3/4 tsp salt
  • 2 3/4 cups all purpose flour
  • 1 tbsp light oil
  • 1 egg, well beaten
  • 1  1/4 tsp poppy seeds

Directions

  1. In a small pan over low heat, mix milk, butter, and sugar.
  2. Stir until butter is melted.
  3. Pour milk mixture into a large bowl.
  4. Allow mixture to cool to 105 – 115 degrees F, then whisk in yeast.
  5. Let mixture stand until foamy, about 5 minutes.
  6. Whisk again and then stir in flour and salt, about 1/2 cup at a time. Dough should be soft and sticky.
  7. Turn dough out onto a lightly floured surface and knead until it is smooth and elastic, about 5 minutes.
  8. Coat a bowl with oil, then add dough to bowl. Turn dough so that it is covered with oil.
  9. Cover bowl with damp cloth and allow dough to rise until doubled, about 1  1/2 hours.
  10. Grease 12 standard muffin cups.
  11. Turn the dough out onto a lightly floured surface.
  12. Flatten dough to a rectangle.
  13. Cut rectangle into 12 equal portions.
  14. Take each portion and break into 3 pieces. Roll each piece into a ball and place three balls into each muffin cup.
  15. Cover pan with a kitchen towel and allow dough to rise until doubled, about an hour.
  16. Preheat oven to 375 degrees F.
  17. Brush tops of rolls with egg.
  18. Sprinkle each roll with some of the poppy seeds.
  19. Bake until puffed and golden, about 15 minutes.
  20. Remove from pan right away. Serve hot or warm.

Recipe courtesy of The Williams-Sonoma Baking Book.

Cowboy Soup – The Day After Wagon Wheel Ribs

cowboy sparerib soup n

The leftover stock from oven-cooked Wagon Wheel Baby Back Ribs is the base for one of the best soups we’ve ever enjoyed. 

This soup doesn’t really have much to do with cowboys, except that if we were cowboys, this would be what we’d want to eat around the campfire. A cold night, wolves howling in the darkness, shooting stars above, a roaring fire cracking and sparking, a properly chilled Riesling… (We’re the kinds of cowboys who pack stemware.)

Cowboy Soup

Ingredients

  • 2 cups leftover liquid from Wagon Wheel Ribs
  • 1 pound leftover baby back ribs, meat cut from bone and sliced into bite-sized chunks
  • leftover bones, cracked
  • leftover potatoes, beans and onions
  • fresh sweet corn from one or two cobs (1 – 2 cups)
  • 1 cup smoked gouda cheese, shredded
  • bay leaf
  • additional potatoes, cut into large chunks, salted and seasoned as desired
  • additional spices and seasonings such as chili powder, jerk rub, Cholula sauce, Mongolian fire oil, oregano, mesquite seasoning, salt and pepper, as desired
  • sour cream

Directions

  • Place leftover ingredients from Wagon Wheel Ribs (liquid, meat, bones, potatoes, beans, onions) and bay leaf in a medium-sized pot and heat over medium heat, stirring occasionally. Simmer.
  • Meanwhile, place olive oil in a skillet and heat over medium heat. Add chunks of additional potatoes, seasoned as desired with salt, pepper, Cholula sauce and jerk rub. Cook till tender.
  • Add potatoes to soup. Stir in sweet corn and gouda cheese. Add additional seasonings if desired.
  • Serve piping hot with a dollop of sour cream.

Wagon Wheel Baby Back Ribs

wagon wheel spare ribs

Look Ma, no grill! Seasoned just right and slow cooked in the oven in a large pan along with potatoes and onions, these baby back ribs come out sweet, spicy, tangy and falling off the bone. See recipe below.

Oftentimes camp cooking proves to be the mother of invention. On a rainy, windy evening in Seward, outdoor grilling was out of the picture. But our appetites were already set on baby back ribs…

This one-pan method for baby back ribs is sure to be a crowd pleaser and is as close to no-fuss cooking as you can get. Cleanup’s a breeze, too. We use a 12.5″ Swiss Diamond pan – our wagon wheel – for this kind of cooking. It’s heavy, oven-safe and non-stick. Mirin, a very sweet rice wine used liberally in Japanese cooking, gives this dish a pleasant sweetness complementing the heat.

Wagon Wheel Ribs

Ingredients

  • 1 set baby back ribs, cut into individual-sized servings of 2 to 4 ribs each
  • a few small potatoes, some cut into large chunks, others left whole
  • 1 large sweet onion, chopped coarse
  • 2 cups black beans, already cooked
  • 4 cloves garlic, chopped coarse
  • mirin (or substitute a little sherry and honey)
  • olive oil
  • Cholula sauce
  • Mongolian fire oil
  • mesquite seasoning (optional)
  • a chili-based dry rub with some heat such as Jamaican jerk rub or any rub featuring powdered chili, oregano, cinnamon and similar seasonings
  • sea salt
  • freshly cracked pepper

Directions

  1. Preheat oven to 300 degrees F. (The oven in our camper only goes down to 300 degrees. You can cook these ribs more slowly and at a lower temperature if you prefer.)
  2. Rub plenty of the dry chili-based rub into each set of ribs. Set aside.
  3. Place roughly equal portions of mirin, Cholula sauce and olive oil in a large, oven-safe frying pan (one that has a lid) and mix together over low heat. Stir in a little Mongolia fire oil or similarly spicy oil. Stir in mesquite seasoning, salt and pepper. There should be enough liquid to amply cover the bottom of the pan.
  4. Add the ribs to the pan, turning each piece so that they are coated with liquid. Place meat side down, cover the pan with a lid and place in the oven. Cook for 30 minutes.
  5. Remove the pan from the oven. Turn the ribs over so that they are bone side down. Add garlic, onions, potatoes and beans. Cover the pan and return to the oven. Cook for an additional hour.
  6.  Test the meat and potatoes with a fork for tenderness. Meat should easily come off the bone. (Save the liquid for delicious Cowboy Soup.)

A dry or semi-dry Riesling is an ideal wine to pair with spicy pork ribs.

Sweet and Sustainable: Alaska Prawns and Shrimp (and a Great Place to Find Them)

spot prawns on soba n

Zaru soba (Japanese buckwheat noodles) topped with Thai-seasoned Alaska spot prawns makes a perfect summertime meal. See recipe below.  

The windshield has a crack running through it, there’s a little rust and a dent or two on the body, and some of the paint is chipping off the hand-lettered sign affixed to the vehicle’s side, but we look for Patrick Johnson’s little black truck every summer when we’re cruising around Alaska’s Kenai Peninsula and we hit the brakes when we find it. If we don’t happen across his truck, we go find him at his Shrimp Guys Seafoods shop in Soldotna. Patrick sells sashimi-grade seafood smelling as fresh and briny as the seas it comes from.

Alaska shrimp & scallops sign n

Maybe it’s my East Coast upbringing, but experience has taught that fancy shops with glitzy signage are usually not the best places to look for quality seafood. The first time we saw the above sign, which is attached to Patrick’s older model black pickup truck, it took me back to days in the Carolinas where small-time operations were hands down the best places to pick up fresh blue crabs, white shrimp, oysters and maybe a flounder to enjoy with a bottle of something white and dry for the evening meal.  

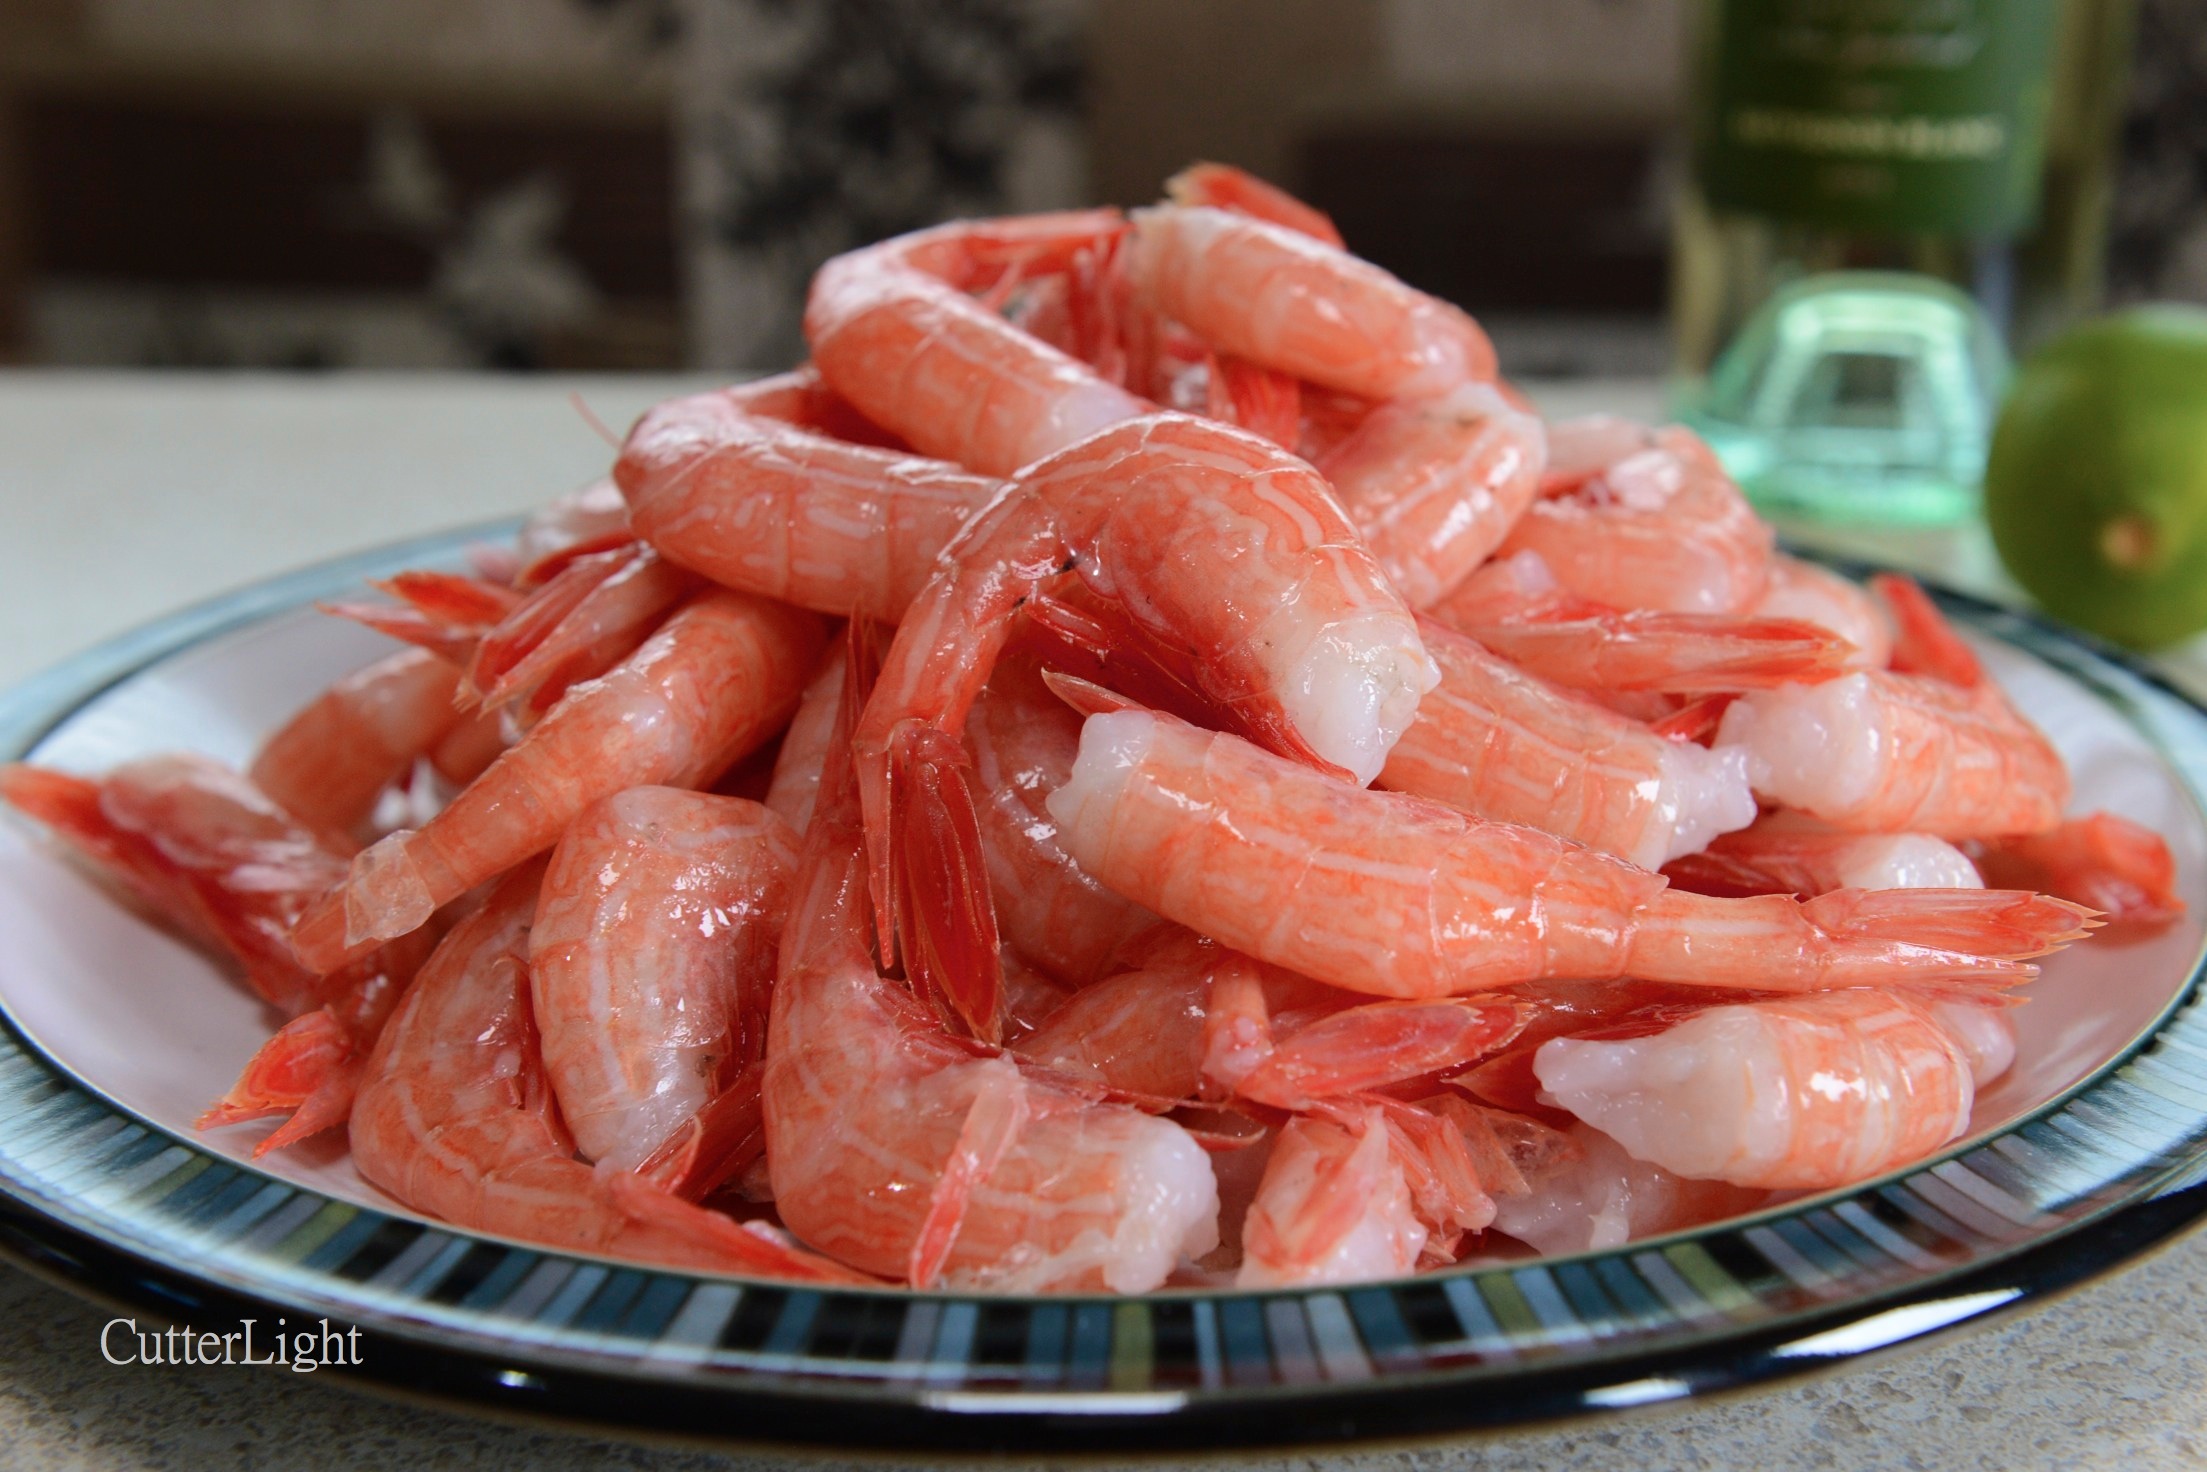
Alaska spot prawns fresh_n

Alaska’s prized spot prawns, ready to be peeled, seasoned and treated every so briefly and gently with heat.

There are two secrets to great seafood: cook it while it’s fresh, and don’t cook it long. If seafood smells bad, it is. That “bad” smell is not seafood; it’s bacteria growing on seafood. A quality seafood shop (or the seafood counter in a well-run grocery store) will smell pleasantly of the ocean – a little briny, vaguely sweet.

As to cooking shrimp or prawns, a former mentor in South Carolina gave me advice that applies to everything from broiled salmon to fried summer fluke. He was showing me how to prepare the white shrimp I’d caught in a cast net and iced earlier that day. (Read in a slow, South Carolina drawl.)  Jack, a little butter, a little lemon and a little garlic – that’s all they want. And a minute-and-a-half in the pan. Remember, they’ll keep cooking after you’ve removed them from heat, so a minute-and-a-half really means you’re cooking them for two minutes. But get them off the heat before two minutes, or you’ll ruin them. side stripe shrimp n

Smaller than spot prawns, these Alaska side stripe shrimp have the soft texture and signature sweetness of the ama-ebi served by sushi chefs. They are excellent served raw and dipped in soy sauce with a hint of wasabi. Any leftovers make a superb omelet or open-faced shrimp melt sandwich. 

Zaru Soba with Thai Seasoned Spot Prawns (serves two)

Ingredients (This recipe is a snap to make with pre-made seasoning and dipping sauce.)

  • soba (Japanese-style buckwheat noodles)
  • 6 spot prawns, peeled, vein removed and cut open butterfly style along their length. Give them a squirt of lime or lemon and set aside.
  • 2 tbsp coconut oil (or olive oil)
  • Spicy Thai-style seasoning mix, or mix your own from powdered chili peppers, powdered garlic, cinnamon, nutmeg and sesame seeds
  • green onions, sliced thin
  • English cucumber, cut julienne – about 1 1/2 inch of cucumber per serving
  • nori (dried seaweed) cut into thin strips
  • wasabi
  • mentsuyu – chilled dipping sauce – available at Asian grocers or in the Asian section of most regular grocery stores. Or make your own from soy sauce, mirin, sake and bonito flakes.

Directions

  1. Use a bowl to coat prawns in seasoning and let stand.
  2. Boil soba according to maker’s directions. Rinse thoroughly in cold water and drain.
  3. Mix mentsuyu with cold water, according to maker’s directions. Mix in wasabi to taste and add a few slices of green onions.
  4. Heat coconut oil in a frying pan over medium heat. Add seasoned prawns. Use tongs to turn so that both sides are cooked – about 90 seconds total. Place on a plate to stop cooking.
  5. Place cold, drained soba noodles on two plates. Add prawns. Garnish with cucumber, onions and nori. Serve with individual side bowls of cold mentsuyu dipping sauce.

Enjoy this dish with a chilled bottle of Bianchello – a beautiful white wine from Central Italy that seems to have been created for light seafood dishes.

For sashimi grade seafood, contact Patrick Johnson at 907-394-4201 or email him at akjohnson98@gmail.com. You can find his shop at 44526 Sterling Highway, Soldotna, Alaska


Braised Elk Roast Camper Style: One Pan Cooking in The Wagon Wheel

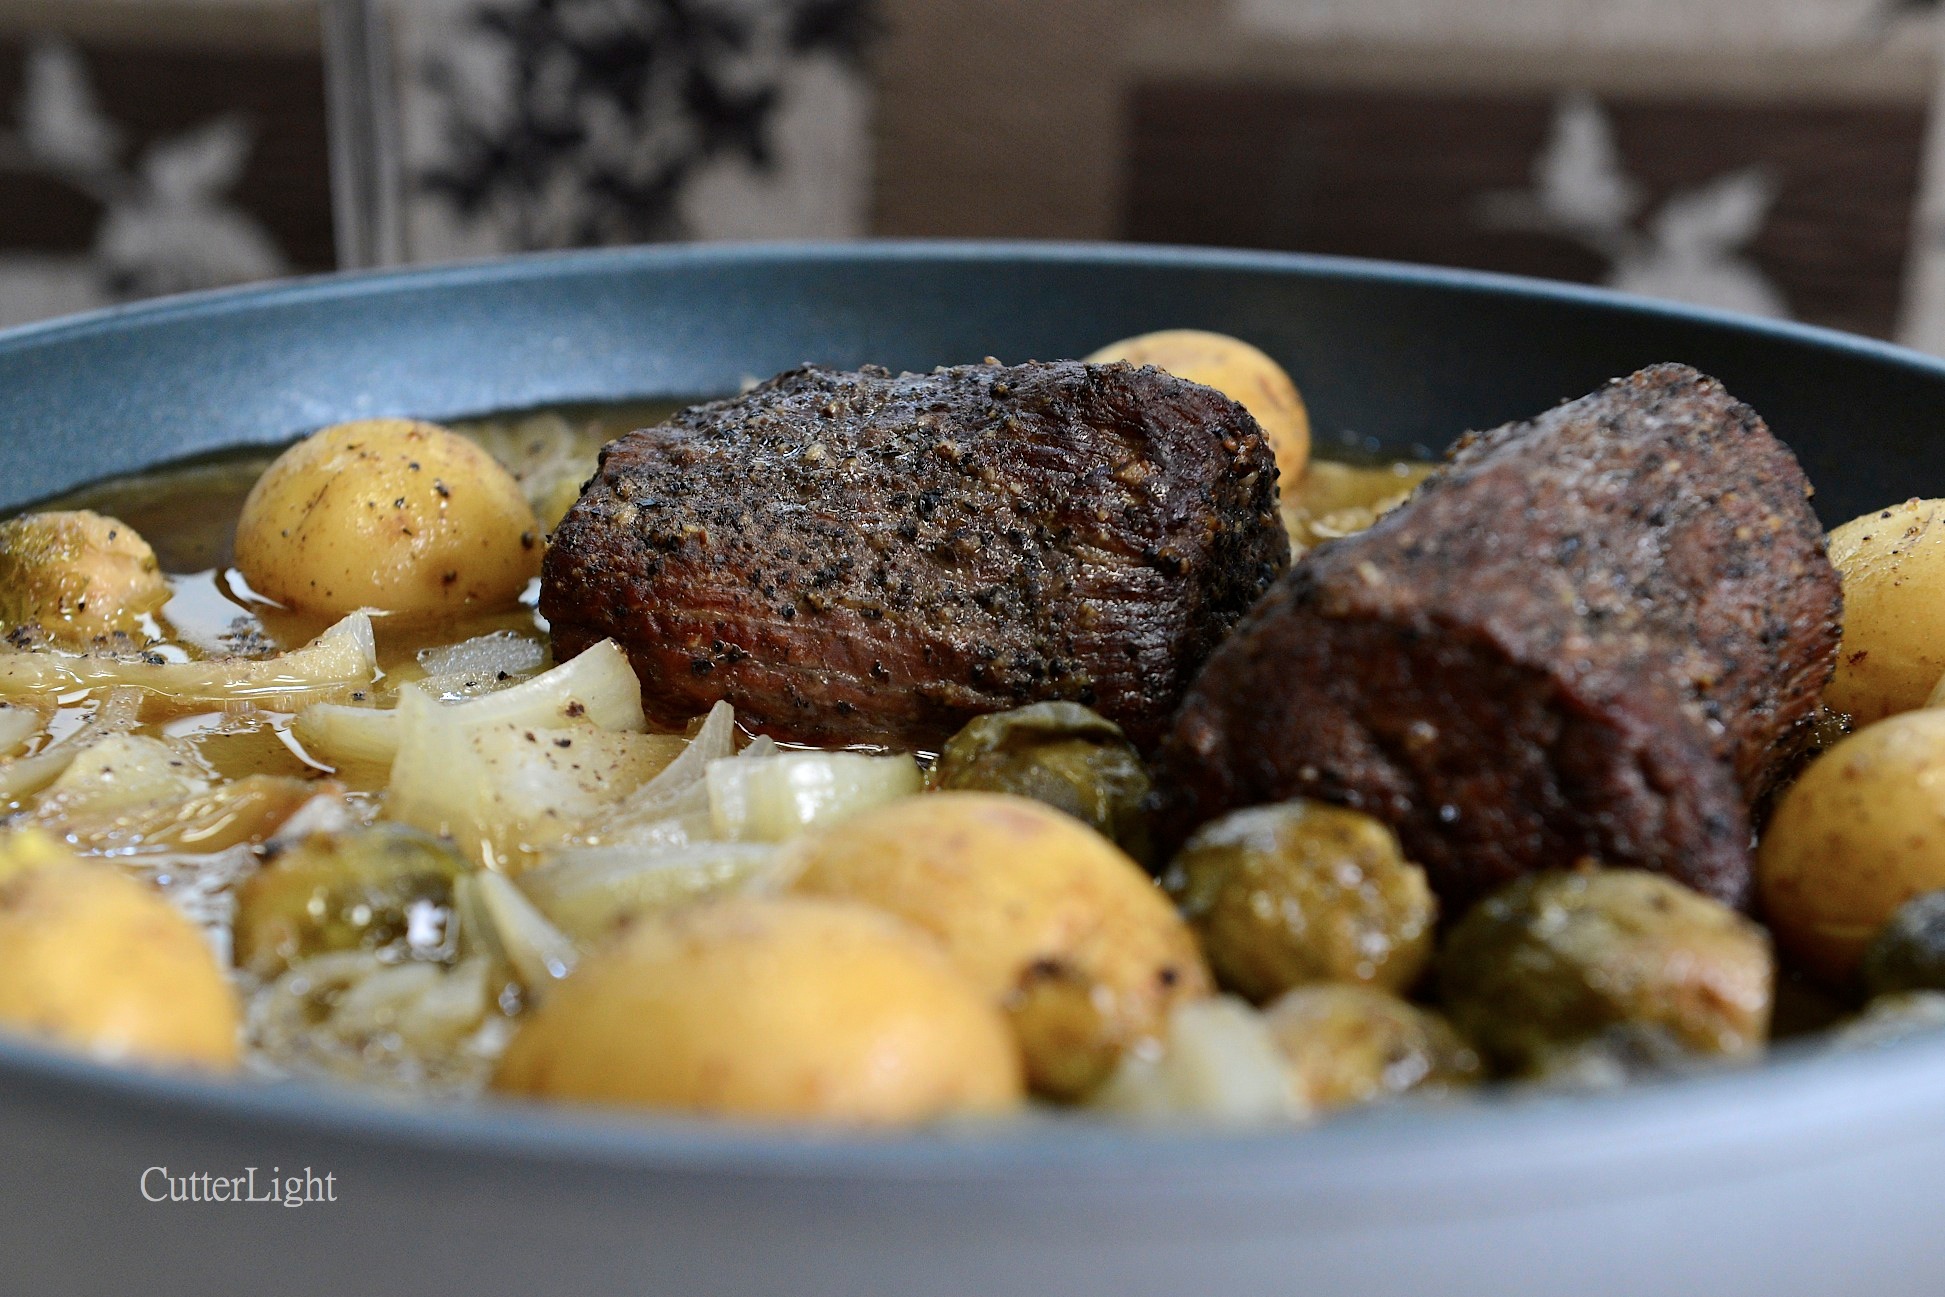
elk roast n

Elk roasts liberally rolled in freshly cracked pepper and slow cooked with sweet onions, baby Yukon Gold potatoes and the chef’s choice of additional vegetables is an appealing meal that can be prepared virtually anywhere. Recipe below.

Over the years we’ve become big fans of Swiss Diamond cookware. Covered eggs cooked over very low heat in their non-stick frying pans are a revelation. Nothing sticks, and as long as the manufacturer’s instructions regarding overly high heat are followed, the surface on this cookware remains in excellent condition through years of regular use.

My favorite Swiss Diamond pan is their big, 12.5  inch frying pan. We call it The Wagon Wheel and it’s perfect for everything from baking a pizza to frying fish to slow cooking a roast in in the oven. The challenge with a pan this large is fitting it into some ovens – such as the one on our Lance truck camper. In fact, even storing a pan of this size in a camper is no mean feat.

So I removed the handle. Permanently. It’s around somewhere, safely tucked away along with the hardware used to attach it. On the camper, we don’t need the handle. Oven mitts suffice.

The elk roasts were a gift from a friend. The recipe is uncomplicated. The finished meal is hearty and has great eye appeal – the perfect meal with a glass of old vine Zinfandel on a rainy evening in Seward, Alaska.

Braised Elk Roast

Ingredients

  • 1 pound elk rump roast or similar cut from wild game or beef
  • 1 large sweet onion, chopped coarse
  • whole small potatoes
  • other vegetables as desired: parsnips, carrots, brussels sprouts, garlic cloves, mushrooms and even chunks of pumpkin or squash are all good candidates
  • olive oil
  • freshly cracked pepper
  • sea salt
  • sherry or red wine
  • additional seasonings such as rosemary, sage or thyme, if desired

Directions

  1. Preheat oven to 250 degrees F. (Our camper oven only turns down to 300 degrees F – a little hotter than perfect, but still fine.)
  2. Heat light olive oil or similar frying oil over sufficiently high heat to create a sizzle when the meat hits the pan. Sear the meat on all sides. Use tongs to hold the meat if necessary. About 2 to 3 minutes per side. Remove meat and set aside.
  3. Lower heat on pan to medium low. Deglaze pan by adding sherry or wine and use a spatula to gently scrape the brown fond created during searing. Slightly reduce liquid over medium to medium-low heat.
  4. Meanwhile place seared roast in a bowl. Roll the roast in olive oil, salt and freshly cracked pepper to give the roast a coating.
  5. Add additional olive oil to the pan as necessary. Add onions and other vegetables along with salt and pepper, stirring briefly to thoroughly coat with oil. Add the meat, cover the pan with a lid, and place in oven.
  6. Cook covered for an hour for a small roast, longer for a larger roast. Add additional wine or a little water to maintain a broth on bottom of pan, if necessary.


Armed With Lemon, Cream Cheese and a Kitchen Torch

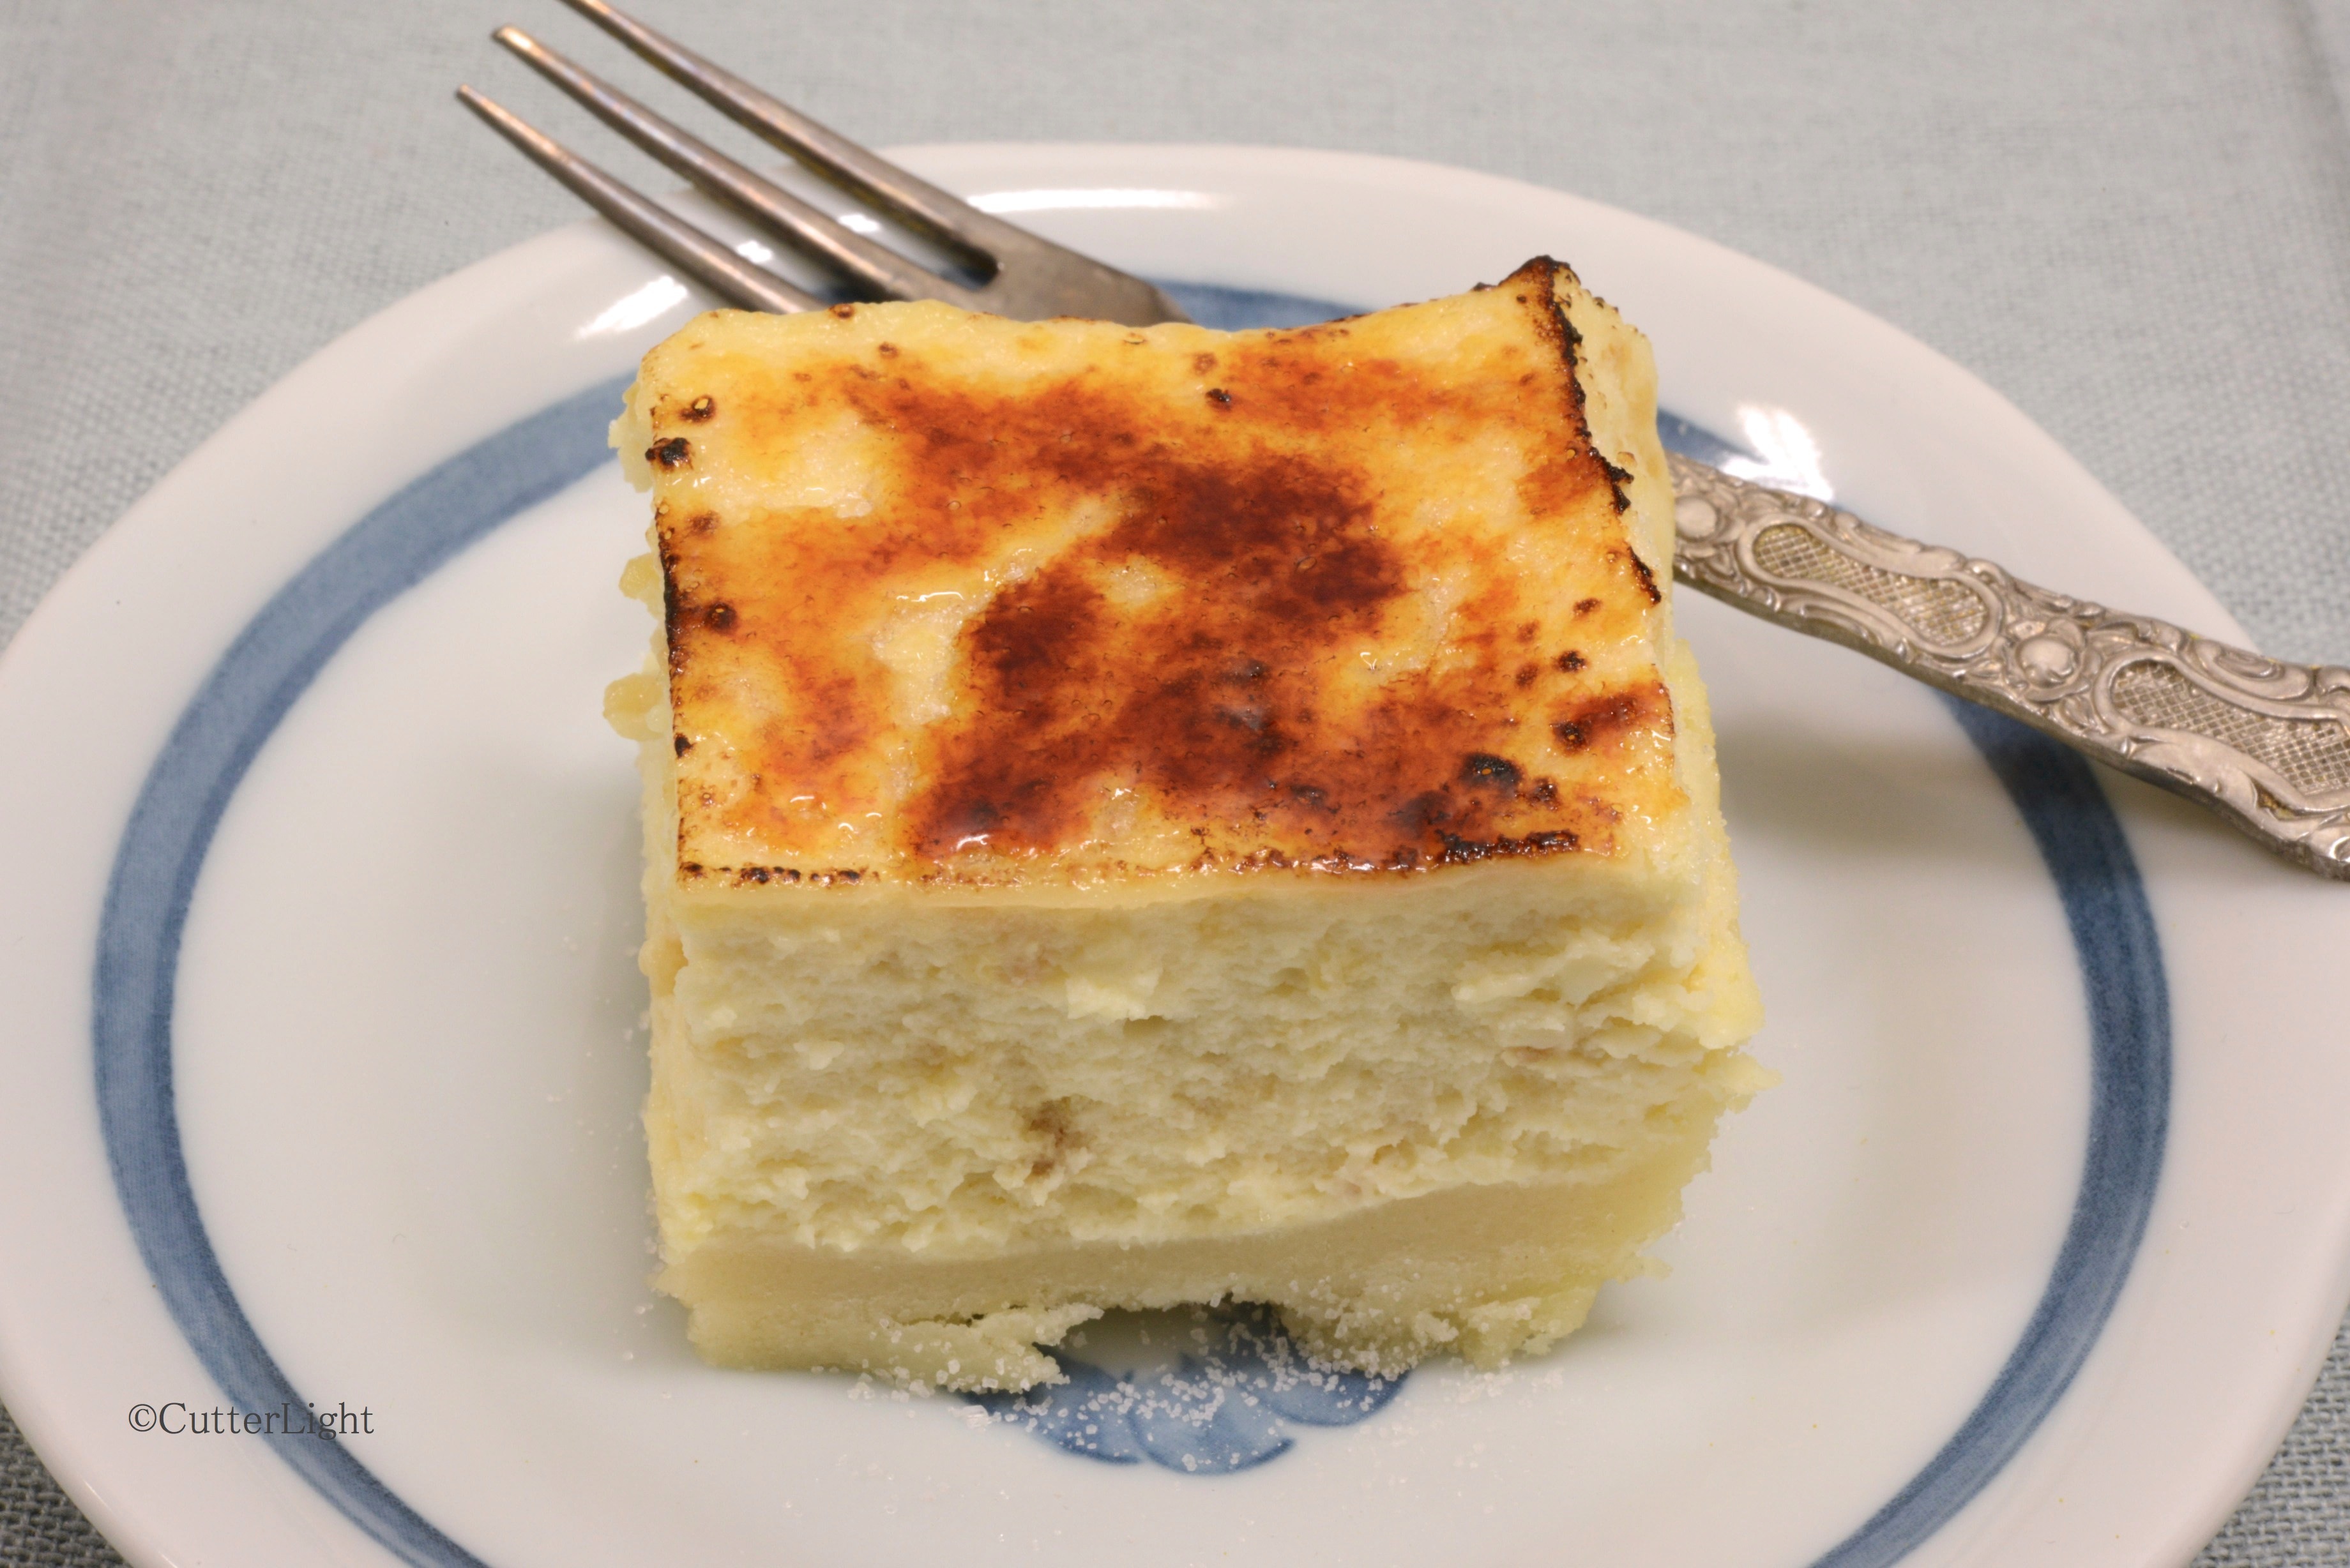
lemon cheesecake brulee_n

How to improve the creamy texture and flavor of lemon cheesecake bars baked atop a sugar cookie crust? Sprinkle with sugar and torch it to add a crunchy layer of caramel! 

After creating a delectable two-toned crème brûlée and a chai crème brûlée, we became hopelessly smitten with our kitchen torch and the multi-sensory delight it produces when applied to sugar crystals. We applied the technique to a different dessert with a creamy texture, cheesecake, and ended up with very satisfying results. We baked the cheesecakes in a rectangular pan so they could be cut into squares about two bites each, which is the perfect size – a miniature feast for the senses.

In recipes that call for sweetened condensed milk, we make our own. In addition to being less expensive and more natural, our homemade version has none of the tin-can aftertaste common to many canned products, and none of the harmful BPA manufacturers use to line cans. With the help of a stick blender, it’s easy to whip together 1 cup of powdered milk, 2/3 cup of sugar, 1/3 cup of boiling water, and 3 tablespoons of butter to create 14 ounces of sweetened condensed milk. This homemade version keeps well covered in the refrigerator.

Lemon Brûlée Cheesecake Bars

Ingredients

  • 5 tbsp unsalted butter, softened
  • 1/4 cup granulated sugar
  • 1/2 cup all purpose flour
  • 1/2 tsp vanilla extract
  • 4 oz. softened cream cheese
  • 7 oz. sweetened condensed milk
  • 1 egg
  • 1 tbsp lemon zest
  • 4 tbsp lemon juice
  • 3 tbsp fine granulated sugar for brulee-ing, approximately

Directions

  1. Preheat oven to 350 degrees. Line an 8.5″ x 4.5″ glass loaf pan with parchment paper and lightly spray with nonstick cooking spray. Set aside.
  2. In large bowl, combine butter, sugar, flour and vanilla until dough forms.
  3. Press evenly into the bottom of prepared dish. Set aside.
  4. In another bowl, whip cream cheese.
  5. Stir in sweetened condensed milk. Scrape sides and mix again.
  6. Pour in egg, lemon zest and juice.
  7. Mix until mixture starts to thicken, 20-30 seconds. Scrape sides and mix again briefly.
  8. Pour overtop cookie bottom and smooth the top.
  9. Bake 20 minutes or until cheesecake is completely set.
  10. Cool, then refrigerate.
  11. Cut into 16 squares and separate.
  12. Sprinkle the tops of each square with 1 teaspoon of sugar and spread around with finger to evenly distribute sugar. Torch the tops until the sugar melts and turns an amber color. (If you don’t have a torch, place under the broiler.)

Let the top cool for a few minutes, then serve immediately.