Alaskan Shrimp Harumaki with Lime-Infused Ponzu Dipping Sauce

Harumaki w shrimp 2_n

Harumaki (spring rolls) are a fun, tasty, easy-to-make appetizer or side dish. Both the wrappers and the filling can be modified to suit just about any taste. Recipes follow.

So named because they were a traditional part of Chinese New Year and a celebration of the coming spring, originally spring rolls were filled with vegetables and shaped like gold bars; thus they were a symbol of prosperity and good fortune. When Chinese immigrants brought this popular food to Japan, the name was directly translated to haru (spring) maki (roll). These days spring rolls are part of menus the world over, in part because they easily lend themselves to fusion cooking.

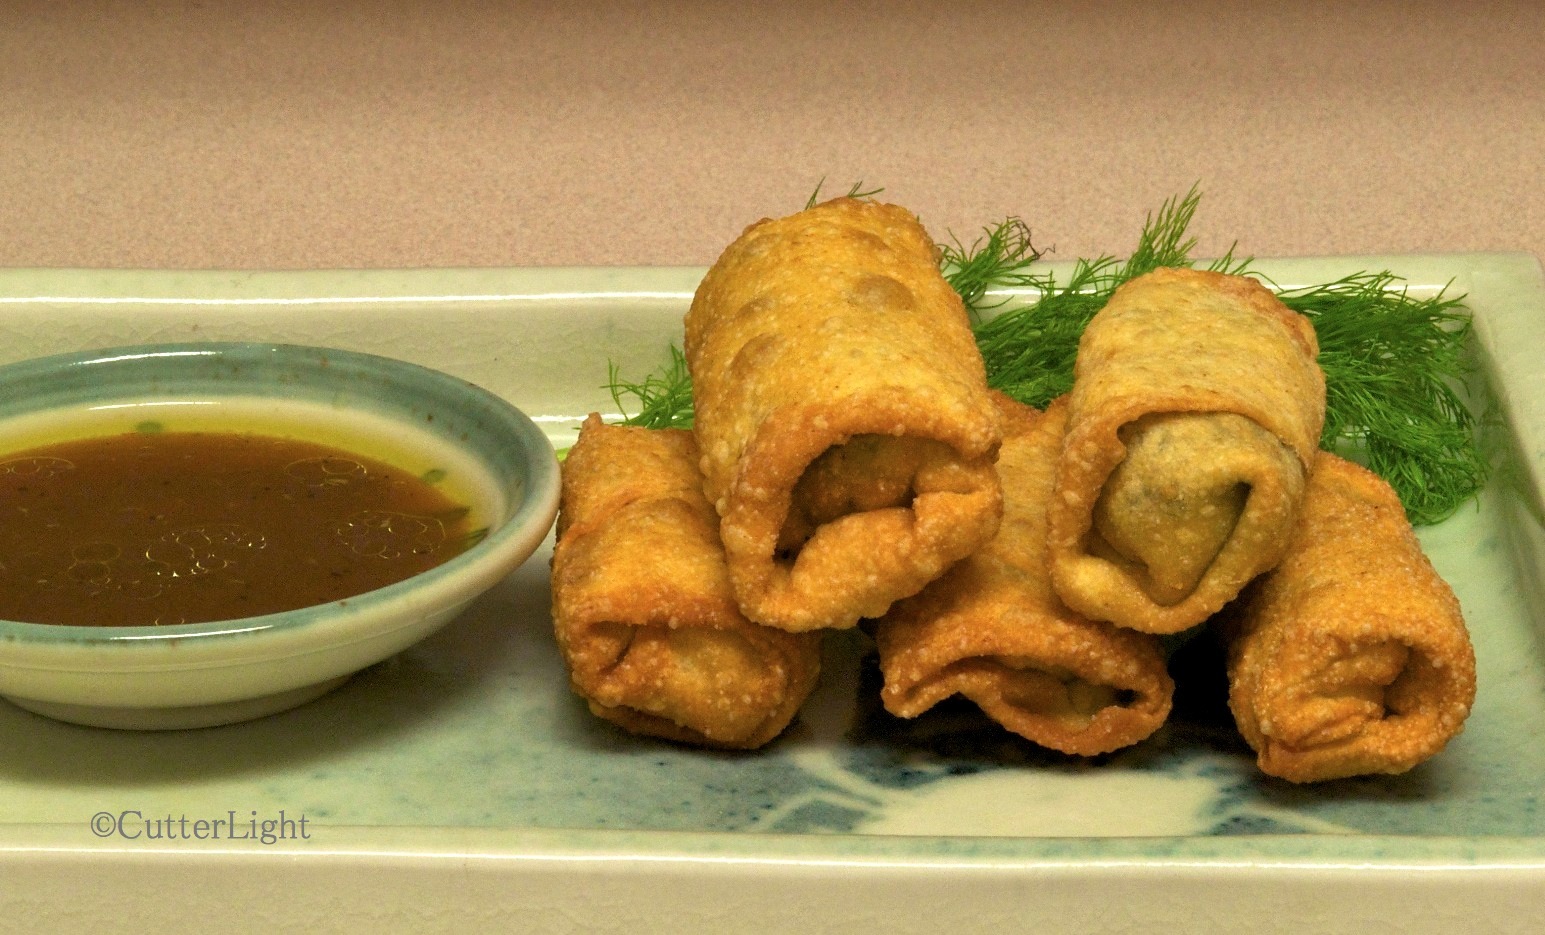
Our contribution to a recent dinner party was harumaki filled with sweet Alaskan shrimp, shitake mushrooms and fennel, which we’d recently been presented as a gift. These ingredients were arranged on a piece of nori (dried seaweed) and rolled up in thin squares of one of our favorite pasta doughs. Served hot from the deep fryer along with a lime-infused Ponzu dipping sauce, they were a big hit.

The Alaskan shrimp we use in our recipes are usually pink, coon stripe or side stripe shrimp – species often served in sushi restaurants as ama-ebi (sweet shrimp). The pinks and side stripes in particular have a distinctively sweet flavor.

Alaska Shrimp Harumaki (for eight, two-bite rolls)

Ingredients:

  • 2 to 4 shitake mushrooms
  • nori (dried seaweed) rectangles approximately 2 1/2″ x 3 “
  • 8 wrappers 3″ x 3″ (we used pasta dough). (Ready-made egg roll wrappers are available in most grocery stores.)
  • 8 ounces shrimp, shelled and veins removed
  • fresh fennel leaves – enough for each roll
  • 1 tbsp lime juice
  • sea salt
  • freshly ground pepper
  • olive oil
  • water (to help seal the wrappers)

Directions:

  1. Cut the mushrooms into 1/4 inch slices.
  2. If shrimp are small, use whole. Otherwise cut into 1 to 2 inch pieces
  3. In a bowl, toss together the mushrooms, shrimp, lime juice, ground pepper and sea salt.
  4. Place 1 tbsp olive oil in a frying pan and heat over medium heat till oil sizzles when a drop of water is added. Add the shrimp mixture, stirring frequently for about 90 seconds. Remove from heat and return mixture to bowl to avoid overcooking.
  5. Place one piece of nori in center of each wrapper. (Prevent nori from breaking by first dipping in water.) Place shrimp mixture and fennel in center of nori.
  6. To wrap: Position square so that one corner is toward you. Fold this corner over the filling. Next fold the right and left corners over the filling. Then roll wrapper toward top (remaining) corner as you would a burrito.
  7. Seal by slightly moistening the last corner and gentle pressing closed. Seal well to prevent oil from leaking in during deep frying.
  8. In a deep fryer or sufficiently large pot: Add enough frying oil (we use light olive oil or canola oil) so that rolls will be completely submersed. Bring oil to 350°F. Place rolls into oil and cook until wraps are golden brown. Do not overcrowd. Remove and drain on a plate covered with paper towel.
  9. Serve immediately with ponzu dipping sauce.

Harumaki w shrimp 1_n

Lime-Infused Ponzu Dipping Sauce

Ingredients:

  • 1/4 cup soy sauce
  • 1/2 cup rice vinegar
  • 1/4 cup lime juice
  • small square (about 3/4 inch) konbu (dried kelp)

Directions:

  1. Mix the ingredients together in a non-reactive container and let rest for 8 hours.
  2. Remove konbu.
  3. Combine the following dried ingredients to make 1 tbsp: onion, garlic, chili pepper, cilantro. Or use fresh ingredients.

Pasta Wrappers

Ingredients:

  • 1 cup semolina
  • 1 egg
  • 1 tbsp olive oil
  • water

Directions:

  1. In a bowl, combine the ingredients with a fork.
  2. Add 1 tbsp water. Continue combining. Consistency of dough should be as dry scrambled eggs. Add more water 1 tbsp at a time as necessary.
  3. Kneed dough by hand till it forms a ball. Wrap ball in plastic (or cover container tightly) and let rest for 20 minutes.
  4. Finish processing into squares using a manual pasta machine.

Exceptionally Delicious Whole-Grain Bread

Whole Wheat Bread_n

Moist, soft, flavorful and with a crunchy, hearty crust, this is easily the best 100% whole wheat bread recipe we’ve found – the quintessential “lightly toast and slather with butter” bread!

Far away from large grocery stores brimming with aisle upon aisle of reasonably-priced selections, we live a quasi-homesteading life here in Arctic Alaska. We stock most of our dry goods during our annual three-day shopping run in Anchorage in late summer. In late August, an order for spices goes out to Penzeys. Coolers jammed with salmon, halibut and rockfish fillets from the summer’s fishing come with us on the plane north – enough for us, and to reciprocate when we’re given caribou. Once we arrive in the village, we begin picking berries in earnest. We make our soups, chili, stews – and our ice cream – gallons at a time.

Our interest in self-sufficient living has led us to Mother Earth News magazine which we read cover-to-cover despite the fact that many of the articles don’t directly apply to our lives. Under the title Homemade Whole-Grain Bread: You Have to Try This Amazing Recipe, the December/January issue boasted a whole wheat “homemade bread you have to try.” We bake all of our own bread products and include mixed-whole-wheat-and-white-flour bread in our repertoire. But straight whole wheat? Past trials have come out dense and crumbly, so we were skeptical. However, our trust in Mother is high, and when they devoted five pages to the bread and included the science behind why this whole wheat loaf is different, our curiosity was piqued.

After finishing the article and discussing it, our conclusion was a shared, “That sounds like a lot of work for a loaf of bread!” Still, we’d sent up 25 pounds of Bob’s Red Mill whole wheat flour with every intention of feathering more whole wheat into our diet. So after procrastinating for a couple of weekends I decided to go for it.

As it turned out, the extra work is actually fun and quite satisfying. With two very successful loaves under my belt (in more ways than one), we both agree with Mother Earth News – this is an “exceptionally delicious whole-grain bread.”

I’ve simplified the directions for this post, but full credit for the following recipe goes to the staff of Mother Earth News. Their full-length article is highly recommended reading.

Exceptionally Delicious Whole-Grain Bread

Ingredients

Sponge:

  • 1 3/4 cups whole-wheat flour
  • 1/4 tsp instant yeast
  • 3/4 cup cool water

Soaker:

  • 1 cup whole-wheat flour
  • 1/2 tsp salt
  • 2/3 cup plain yogurt
  • 2 tbsp orange juice

Final Dough:

  • all of sponge recipe
  • all of soaker recipe
  • 2 1/4 tsp instant yeast
  • 1 tbsp unsalted butter, softened
  • 2 tbsp honey
  • extra whole-wheat flour and water for adjustments

Directions

The day before baking, make the sponge and the soaker:

  1. Mix the sponge ingredients together to form a ball of dough.
  2. Knead for about 2 minutes.
  3. Let dough rest for 10 minutes.
  4. Knead again for about a minute.
  5. Immediately cover and refrigerate for at least 6 hours.
  6. Mix the soaker ingredients together to form a loose, wet ball.
  7. Cover soaker dough and leave at room temperature for 6 to 24 hours.

The day of baking:

  1. An hour before making bread, remove the soaker from the refrigerator and let it come to room temperature.
  2. Tear sponge into about a dozen pieces.
  3. Roll each sponge piece with a piece of soaker. Place bowl of a stand mixer.
  4. Attach dough hook.
  5. Sprinkle in 2  1/4 tsp of yeast.
  6. Mix on first speed for 2 minutes. Increase to second speed and continue mixing for 2 more minutes.
  7. Add in honey and butter. Mix for another 2 minutes.
  8. Let dough rest in mixing bowl for 10 minutes.
  9. On a floured work surface, knead dough by hand for a few minutes, add extra flour or water if necessary to make a soft, slightly sticky dough.
  10. Form dough into a ball and transfer it to oiled bowl, turning ball to coat it.
  11. Let rise for 45 minutes. It should be 1 1/2 times its original size.
  12. Transfer dough to floured work surface and form it into a loaf to fit a 9″ x 5″ or 8.5″ x 4.5″ loaf pan.
  13. Grease loaf pan and place dough into pan.
  14. Cover and allow to rise for 45 minutes. Dough should be 1 1/2 times its original size.
  15. While loaf rises, preheat oven to 450 degrees F.
  16. For most consistent heat, place baking stone on bottom rack and a cast-iron pan on top rack while preheating.
  17. Brush top of loaf with water.
  18. Slash top of bread down the middle or with diagonal cuts.
  19. Place loaf on stone in center of oven.
  20. Immediately add 1/2 cup of hot water to heated cast-iron pan (be careful of steam burns!).
  21. Lower the temperature to 375 degrees F.
  22. Bake bread for 20 minutes.
  23. Rotate pan in oven and add another 1/2 cup of hot water to cast-iron pan.
  24. Bake for another 15 – 20 minutes.
  25. Bread is done when top is golden brown and bottom sounds hollow when thumped. Another method to check for doneness is the internal temperature of the bread is 195 degrees or more.
  26. Remove loaf from pan immediately and transfer it to a cooling rack.
  27. As tempting as the loaf will be, allow bread to cool at least an hour before slicing! 

Alaska Salmon Seafood Chowder with Fennel Sheefish Stock (and a Brief History of the Tomato)

Salmon & seafood tomato chowder_n

Pink salmon and sweet shrimp from the cold, clean seas of Alaska along with a terrific fish stock are key ingredients in this hearty, tomato-based seafood chowder. Made from a little of this, a little of that, and a lot of whatever the catch-of-the-day may have been, in many kitchens and galleys no two chowders are exactly the same. This one was especially tasty, and so we’ve provided the recipe, below.

Native to the Americas, tomatoes didn’t find their way to Europe until Spanish explorers took the fruit back in the late 1400’s or early 1500’s. Even after tomatoes found their way to Britain, leading horticulturalists there believed them to be poisonous. And so this versatile, luscious fruit was not generally consumed in Britain or her American colonies until the mid 1800’s.

It was in the 1800’s that Portuguese immigrants introduced tomato-based seafood chowders such as Manhattan clam chowder to New York and other American cities. Among the endless variations of this soup is the national dish of Bermuda: Bermuda fish chowder is built around a sumptuous combination of fish, tomato purée, onions, a healthy dollop of dark rum and sherry pepper sauce. 

See also: Manhattan-style Razor Clam Chowder

New England-style Alaska Clam Chowder

Alaska Salmon Seafood Chowder 

Ingredients: (makes about

  • 4 cups fish stock (see recipe below)
  • 1 1/2 pounds salmon, cut into 1/2″ or 3/4″ cubes (skin removed or not, chef’s choice)
  • 4 potatoes, diced into cubes smaller than the salmon cubes
  • 1 large onion, chopped semi-coarse
  • 1 cup carrots, chopped into discs
  • 3/4 cup celery, chopped coarse
  • 3/4 lb. shrimp, peeled and veins removed. Leave whole or cut to smaller pieces, depending on size of shrimp.
  • 3/4 lb. shellfish such as razor clams, other types of clams or oysters. Reserve juice to add to fish stock. (We used equal portions of clams and oysters)
  • 1 bay leaf
  • 1/2 tbsp oregano (dry)
  • ground pepper to taste
  • olive oil
  • smoked sea salt (to taste)
  • 1 lb. diced tomatoes (fresh or canned)
  • 6 oz tomato paste
  • 2 cups spinach leaves, chopped large (or use 1/2 cup frozen)
  • 5 cloves garlic, chopped into thin slivers
  • 1/4 cup good sherry or white wine (optional)

Directions:

  1. In a large kettle: Add fish stock, clam or oyster juice, bay leaf, oregano, ground pepper and tomato paste. Stir till paste is thoroughly mixed in.
  2. Add potatoes and tomatoes, ensuring that there is sufficient liquid to cover them. Add additional water, as necessary.
  3. Bring to a boil and then reduce heat to simmer. Continue cooking just until potatoes are tender.
  4. Meanwhile, in a large skillet: Add enough olive oil to cover skillet bottom. Add onions and cook for about 1 minute, stirring frequently. Add carrots and celery and continue stirring for about 3 minutes. Stir in garlic and continue cooking and stirring for 1 more minute – about 5 minutes total. Onions should be just turning translucent. Place in a bowl to prevent over-cooking and set aside.
  5. When the potatoes have just become tender, add sautéed onion mixture to soup. Add sherry or wine, if desired. Return soup to a simmer.
  6. Add salmon, shrimp and shellfish. At this point, we remove the pot from heat – the ambient temperature will cook the seafood sufficiently. (Seafood should be fresh or fresh-frozen.)
  7. Serve piping hot. This soup needs nothing, but a little freshly grated parmesan cheese, a few pieces of nori (dried seaweed), crackers or croutons make nice condiments.

Fennel Fish Stock

Ingredients:

  • 1 1/2 lbs. fish bones & head, cleaned, scaled, gills removed (preferably a white-meated fish such as striped bass, sea bass, snapper, porgy, rock fish, halibut, walleye, etc. We used sheefish.) It is important that the fish is fresh.
  • fennel – leaves and stalks from 2 stalks, chopped coarse (or use 1/2 tbsp fennel seeds or powdered fennel)
  • 1/2 tbsp thyme
  • 1 tsp rosemary
  • 1 bay leaf
  • 8 whole pepper corns
  • 1 tsp smoked sea salt
  • 1/2 cup coarsely chopped carrots
  • 1/2 cup coarsely celery
  • 1 sweet onion, coarsely chopped
  • 1/4 cup good sherry or white wine (optional)
  • water

Directions:

  1. Cut up fish bones and split fish head butterfly style so that everything can be lain as flat as possible in the bottom of a large kettle. 
  2. Place all other ingredients on top of the fish bones and head, arranging so that ingredients are fairly compact so that as little water as possible is needed to cover them.
  3. Cover ingredients with cold water. Bring to a boil over medium heat.
  4. As soon as pot is boiling, reduce heat to simmer. You may need to use a flame shield if stock is boiling too vigorously.
  5. Gently simmer for 20 minutes.
  6. Remove from heat and allow to stand an additional 15 minutes.
  7. Strain through a wire mesh colander and set stock aside.
  8. Stock can be placed into containers and frozen for later used, or used immediately.

Fresh Roasted Sweet Pecans

Roasted Sweet Pecans_n

Lightly candied and oven roasted, these pecans are perfect for snacking, as a dessert topping, or savored on a fresh garden salad.

Our kitchen is always well stocked with pecans and almonds. They’re great plain, but sometimes it’s fun to gussy ’em up a bit. This easy recipe results in snack that goes as well on morning oatmeal as it does as the finishing touch on a fresh salad.

Sweet Roasted Pecans

Ingredients

  • 2 egg whites
  • 1/2 tbsp water
  • 1/2 tbsp vanilla extract
  • 2  1/2 cups pecans
  • 1/4 cup granulated sugar
  • 1/4 cup brown sugar
  • 1  1/2 tsp ground cinnamon
  • 1 tsp coarse sea salt

Directions

  1. Preheat oven to 225 degrees F. Line a baking sheet with parchment paper. Set aside.
  2. Combine egg whites, water and vanilla in bowl of a stand mixer. Attach wire whip attachment.
  3. Whip egg mixture until really fluffy, about 2 minutes.
  4. Fold pecans into egg mixture.
  5. In a separate bowl, mix sugars and cinnamon.
  6. Fold in sugar mixture to pecan-egg mixture.
  7. Spread nuts evenly on parchment paper.
  8. Sprinkle sea salt over nuts.
  9. Bake in preheated oven for 60 – 75 minutes. Stir every 15 minutes. Nuts should be toasted and fragrant.
  10. Cool in pan. Stored cooled nuts in an airtight container.

Recipe adapted from allrecipes.com.

Caribou Stroganoff: A Classic Favorite Featuring Wild Game

Caribou Stroganoff on homemade fettuccine_n

From San Francisco to Sydney and from Tokyo to Toronto, Beef Stroganoff is a popular dinner item. Here’s a twist on a classic favorite.

Ever since its origination in 19th century Russia, Stroganoff has been served to rave reviews. Early iterations were created with beef cubes and and early written recipe for the sauce included mustard. Mushrooms and onions came later. These days, cubes have largely given way to thin strips of meat and mustard is considered optional by many cooks.

I’d not made Stroganoff till recently. Happy to fill requests, I put some caribou we’d recently been given to good use. The Stroganoff came out can’t-stop-eating-it good and we and our guests made short work of it. But even as I was simmering the sauce, I knew next time I’d add tarragon.

In our view, the addition of this herb really brought the dish alive. Other than that, be gentle with additional flavors, including garlic. This dish is about meat and mushrooms.

Caribou Stroganoff

Ingredients

  • 1 pound caribou cut into thin strips, about 1/4″ x 1″ (or use similar meat game such as elk, venison or lean beef)
  • 1/2 cup beef broth. (Excellent broth can be made using Better than Bouillon)
  • 3/4 tbsp Dijon mustard
  • 1/2 tsp Worcestershire sauce
  • 1/2 pound mushroom caps, sliced thin (Shitake mushrooms are a good choice. Here in bush Alaska, we use dried mushrooms.)
  • 1/2 large onion, sliced thin
  • 1 clove garlic, chopped fine
  • 1/2 tbsp soy sauce
  • 1 cup sour cream
  • 1/2 cup heavy cream
  • 2 tbsp flour, separated into equal portions
  • 1 tbsp butter
  • 2 tbsp olive oil separated into equal portions
  • salt
  • freshly ground pepper
  • 1/2 tsp dried tarragon
  • red wine – just a splash

Directions

  1. In a bowl, combine Dijon mustard, Worcestershire sauce, soy sauce, sour cream, heavy cream, a few grinds of pepper and tarragon. Set aside.
  2. Place caribou strips in a large bowl. Add 1 tbsp flour and a few grinds of fresh pepper and mix ingredients so that meat is coated.
  3. In a large pan over medium heat, heat 1 tbsp olive oil. When oil is hot enough to cause a drop of water or a pinch of flour to sizzle, add the meat. Stir and turn meat frequently to ensure all sides are seared. When meat is cooked through (about 5 minutes), place in a bowl and set aside.
  4. Pour pan juices into a bowl and set aside to cool.
  5. Deglaze the pan with a splash of red wine. Add 1 tbsp olive oil and butter, heat over medium heat, and add the onions. Stir frequently. After about two minutes, add the mushrooms and garlic and sprinkle the pan’s contents with flour, reducing heat if necessary. Continue to cook and stir just till onions begin to become translucent (about 5 minutest total).
  6. Return the meat to the pan. Thoroughly mix ingredients together and add the beef broth. Cover and simmer over low heat till broth is well reduced (cooked down) – about 15 to 30 minutes.
  7. Combine pan juices with sour cream mixture and stir into the pan. Heat to piping hot (but do not boil) and serve over fettucini, other pasta, or rice.

Serve with fall vegetables and a gin and tonic with a wedge of lime.

Alaska Salmon Lox or Gravlax

Lox on onion bagel_n

With a history dating back to the European Middle Ages, a number of methods for preparing lox and gravlax (or gravad lax) have evolved. We’ve settled on a dry-brining method that produces beautifully colored, deliciously flavored salmon fillets ready to be sliced translucently thin as on the above freshly made onion bagel.

Many cultures have a tradition of salting and burying fish, a technique that results in both preservation and fermentation. In fact, the origins of sushi can be traced back to fish prepared in this method. The grav of gravlax derives from the Scandinavian word for grave, and lax, salmon, has cognates in many old European languages. Thus gravlax literally means “buried salmon.”

Although preparing lox is somewhat labor intensive (the fillets are packed in salt under light pressure and liquid must be drained every 24 hours or so over a period of several days), since it isn’t smoked, anyone with a refrigerator can make it. Both sea salt and kosher salt produce good results, and we like to add a little brown sugar and black pepper. The dry brining method we prefer is known as “Scottish-style.” Other styles call for a wet brine. Dill, juniper berries and other seasonings are traditionally used in some recipes, but we prefer to add seasonings, if any, when the lox is being served.

In addition to traditional lox on a bagel with cream cheese, capers and a thin slice of onion, it’s also excellent on scrambled eggs, as a colorful finishing touch to deviled eggs, or as a wrap around any number of vegetables or other seafoods and served as an hors d’oeuvre.

Silver salmon head n

Always look for the freshest fish. Salmon should be bright with clear eyes and a pleasant smell reminiscent of the sea.

While historically lox was made with Atlantic salmon, these days, with Atlantic salmon populations in severe decline almost everywhere, the Atlantic salmon available in stores is farmed in places such as Norway, Scotland, British Columbia and Chile. For reasons rooted in flavor, sustainability and environmental impact, we prefer wild Pacific salmon. The salmon in the above photo is Coho (silver salmon), but any Pacific salmon species works well, as do large char. If you leave the skin on the fillets, it can later be used to create a crispy fried appetizer.

For the best presentation, lox should be sliced very thin. The best tool we’ve found for this job is a yanagiba – a Japanese sashimi knife. Our yanagiba has an extraordinarily sharp, nine-and-a-half inch blade. Both the sharpness and the length are important for slicing – not sawing – ultra thin pieces of salmon.

For a great recipe for smoked salmon, see:

Smoked Salmon with Soy Sauce and Brown Sugar Brine

For excellent homemade bagels, see: Bagels 3 Ways

———————————————————-

Homemade Lox

Ingredients

  • 1 lb. fresh salmon fillets, skin on. The fillets need not be scaled, but do take pains to ensure that all bones are removed.
  • ¼ cup coarse sea salt
  • ¼ cup brown sugar
  • 1 tbsp freshly ground black pepper

Directions

  1. Rinse fish and dry thoroughly.
  2. Remove any pin bones in fillet with tweezers or needle nose pliers.
  3. Mix together salt, sugar and pepper. (This recipe works well when multiplied. Our last batch was 5 pounds of fish.)
  4. Pack salt mixture around fish. You can do this skin side down.
  5. Sandwich two pieces of fish together, skin side out.
  6. Pack any leftover sugar mixture onto exposed fillet.
  7. Wrap sandwiched pieces tightly with plastic wrap. Leave sides slightly open so liquid can drain while the salmon cures.
  8. I use a poacher with a draining tray for the next step. Another method would be to place a steamer basket at the bottom of a plastic box. The idea is to create a raised place for the fish to set while being pressed from the top. This will allow the juice to drain away from the fish.
  9. Place sandwiched salmon in poacher.
  10. Place weight on top of all salmon pieces. I use large jars of jam or large containers of salt. I have seen pictures of people using bricks.
  11. Place poacher in refrigerator.
  12. For 7 days, every 24 hours pour off liquid from the bottom of the poacher and flip the fillet sandwiches.
  13. At the end of 7 days, take the salmon out of the plastic wrap and thoroughly rinse using really cold tap water.
  14. Thoroughly pat dry.
  15. Slice very thin and enjoy!
  16. Store leftovers in refrigerator or freeze in airtight containers.

Pre-Workout Almond, Craisin, Chocolate, Honey Granola Bars

Granola Almond Energy Bars_n

Soft and chewy granola bars packed with helpful protein and complex carbohydrates are a tasty, energy-packed pre-workout snack.

At this time of year, many people are re-tooling their workout program or starting a new one. Two hundred miles north of the Arctic Circle, that part of life is no different. We mostly confine ourselves to the weight room and gym at our school for workouts. With typical days featuring windchill below zero, running means treadmill workouts. Jack likes running workouts on the treadmill. I am slowly becoming accustomed to them. Running gives us a little cushion in terms of burning calories so we can enjoy all the sumptuous meals we cook, and it keep us in shape for our active lifestyle.

The most convenient time for our workouts is after school – a time of day when we often need an energy boost. I thought about making some kind of cookie that was filled with nuts and raisins, envisioning something soft and chewy. I also wanted to use up some of the staples in our pantry. What resulted was a chewy bar stuffed with craisins, coconut, nuts, peanut butter and honey. A homemade version of sweetened condensed milk is the binding agent. We snacked on them before our workout today and thought they came out great: tasty and energy boosting!

I imagine that any dried berries or nuts could be used in this recipe. I’m already planning on baking up a few batches to take with us on our summer adventures hiking, fishing and boating around the Kenai Peninsula.

Granola Bars

Ingredients

  • 3 cups rolled oats
  • 1 cup chopped almonds
  • 1 cup dried cranberries
  • 1/2 cup semi-sweet chocolate chips
  • 1/2 cup unsweetened coconut
  • 1/4 cup peanut butter
  • 1/2 cup boiling water
  • 1 cup powdered non-fat milk
  • 2/3 cup granulated sugar
  • 3 tbsp unsalted butter, softened
  • honey

Directions

  1. Preheat oven to 350 degrees F.
  2. Line a 13 x 9-inch glass baking dish with parchment paper. Paper should go all the way up the sides of the dish.
  3. In a large bowl, mix together oats, nuts, cranberries, chocolate chips and coconut. Set aside.
  4. Using a blender, (I prefer an immersion blender), blend sugar, boiling water, and non-fat milk powder.
  5. Add butter and peanut butter to milk mixture. Blend until fully mixed.
  6. Add enough honey to bring liquid mixture to 16 ounces. Blend until fully mixed.
  7. Pour milk mixture into oat mixture and thoroughly mix.
  8. Press dough into baking dish.
  9. Bake for 20 minutes.
  10. Allow bars to cool for 5 minutes in pan.
  11. Lift bars out of pan by holding parchment paper. Set on a wire rack to continue cooling.
  12. Allow the bars to cool completely on parchment paper on a wire rack before cutting.
  13. Store cut bars in an airtight container.

The Galangal Experiment: Orange Pecan Galangal Scones

Galangal, Pecan, Orange Scones

Scones are easy to make and always a favorite with a cup of coffee or tea.

Penzeys Spices is one of our grown up toy catalogues. Last spring, we pored over every page as we created a list of the spices and seasonings we thought we might want for the following year. During this perusal, a number of unfamiliar spices piqued our interest. One such item was galangal. Also known as blue ginger, galangal is indeed a member of the ginger family, but has a more intense, flowery taste not much at all like the ginger we’re familiar with. Perhaps cardamom is a closer comparison.

Recently, we came across a lemon-ginger scone recipe that seemed ripe for a makeover. In the following recipe, pecans and orange zest meld with the pleasantly flowery galangal to create a new classic. The yogurt gave the scone a moister texture that traditional recipes.

Orange Pecan Galangal Scones

Ingredients

Scone:

  • 2  1/4 cups all purpose flour
  • 1/4 cup granulated sugar
  • 1 tbsp baking powder
  • 2 tsp galangal
  • finely grated zest of one orange
  • healthy pinch of salt
  • 3/4 cup chopped pecans
  • 3/4 cup plain yogurt
  • 1/4 cup orange juice

Icing:

  • 1 cup powdered sugar
  • 1 tbsp orange juice

Directions

  1. Preheat oven to 375 degrees F.
  2. Line a baking sheet with parchment paper. Set aside.
  3. In a medium bowl, sift together flour, baking powder and galangal.
  4. Stir in sugar, salt and zest.
  5. Stir in pecans.
  6. Using wooden spoon or rubber spatula, stir in orange juice. Then stir in yogurt.
  7. On a lightly floured surface, gently knead dough until it comes together. Do not over-knead.
  8. Press dough into a circle, about one inch thick.
  9. Cut circle into 8 wedges.
  10. Arrange wedges on baking sheet so there is about 1 inch in between each one.
  11. Bake scones for 20 minutes. Scones will be lightly browned on the bottom and pale on the top.
  12. Let cool in pan for 5 minutes, then transfer to wire rack to continue cooling.
  13. Meanwhile, whisk powdered sugar and orange juice together to make drizzle icing. Consistency should be like honey.
  14. To drizzle icing, fill  a pastry bag with a small tip or a small Ziplock bag with a corner snipped, or simply use a spoon. Drizzle icing evenly over scones.
  15. Serve warm or room temperature.

Arctic Anpan 2 Ways: Azuki and Caribou Cha Sui (Sweetened Red Bean and Marinated Caribou)

Anpan with Sweet Azuki Paste_n

Delicious steamed buns filled with sweetened red bean paste were the finishing touch to an Asian-inspired meal. All that was lacking was a cold Sapporo Beer… The beer will have to wait until summer.*

Wintertime fishing, birding or just bike riding with my daughter Maia in Japan is indelibly linked with one of my happiest food memories: stopping by a local bakery and purchasing piping hot steamed buns filled with sweetened bean filling (anpan) or marinated pork (nikuman). The filling was so hot we’d have to be careful not to burn our tongues. Those steamed buns were the perfect on-the-go snack on chilly days.

Anpan ready for the steamer_n

Filled with bean paste or marinated meat and ready for the steamer…

Known as bao or baozi in China, steamed buns were on our list of items to try making this year. With Maia in Point Hope visiting over winter break from Berkeley, the anpan and nikuman Barbra created turned out just like the ones we’d enjoyed back in Japan. After devouring anpan with sweet red bean filling, we all could imagine the buns stuffed with a variety of other fillings: vegetable mixtures, curry, barbequed caribou, fruit, or even chocolate!

Anpan freshly steamed_n

Light, freshly steamed, piping hot and ready to be lifted out of our fish poacher, anpan definitely fit the category “comfort food.”  The ones we made were about the size of tangerines.

Because we rely on our Zojirushi bread machine to regulate the temperature for consistently rising dough, the following recipe has been created for the dough cycle of a bread machine. As an alternative to steaming, the dough can be given an egg wash and baked at 350 degrees F for 15 minutes. A recipe for Caribou Cha Sui follows the anpan recipe below. Click here to see a recipe for sweetened red bean filling.

Anpan

Ingredients

  • 1 cup water
  • 1 tbsp extra light olive oil
  • 1  3/4 cups all purpose flour
  • 1  1/2 tbsp granulated sugar
  • 1/4 tsp salt
  • 1 tbsp dry yeast
  • 1/2 tsp baking powder
  • 1 tbsp white vinegar

Directions

  1. Place first 6 ingredients into pan of bread machine in the order recommended by the manufacturer.
  2. Set machine to dough cycle. Start.
  3. After cycle is complete, punch down dough on a lightly floured surface.
  4. Sprinkle baking powder evenly over surface of dough.
  5. Knead dough for 5 minutes.
  6. Divide dough in half. Place half of dough in a covered bowl.
  7. Cut the remaining dough into 12 equal pieces.
  8. Roll dough pieces into balls and then flatten. Make sure that edges are thinner than the center.
  9. Fill dough with 1 teaspoon of desired filling. Bring edge of circle up to pinch closed so that none of the filling is showing.
  10. Place filled dough on a small piece of waxed or parchment paper. Continue with remaining dough balls.
  11. Repeat process with dough that has been covered in the bowl.
  12. Let all filled dough balls stand covered for another 30 minutes.
  13. Steaming process could be done in a steamer basket or a wok. I have a fish poacher with a raised grate and used this to steam the buns.
  14. Bring water and 1 tbsp vinegar to a boil in steamer.
  15. Place as many buns as will fit in steamer, allowing for about an inch between buns so that they don’t stick together as they cook.
  16. Cover with lid. Steam over boiling water for 15 minutes.

———————————————————————————————————————

Caribou Cha Sui (Works well with venison, moose, elk, lean beef or similar meat)

The first step is to create a marinade and let the tenderized caribou absorb the flavors overnight in the refrigerator. The next day, make a filling with the marinated caribou and stuff the anpan. The filling will make enough for 6 steamed buns (nikuman). This recipe is best started a day in advance to ensure the meat is properly marinated.

Ingredients (Makes 6 nikuman)

Filling:

Ingredients

  • 1/4 lb caribou, pounded/tenderized till 1/2 inch thick or thinner
  • cha sui marinade (see below)
  • 1/4 cup finely diced onions
  • 2 tbsp soy sauce
  • 1 tbsp honey
  • 1 tsp sesame oil
  • 1/4 cup beef stock (we use Better than Bouillon)
  • 1 tsp cornstarch
  • extra light olive oil

Directions:

  1. Place tenderized caribou in a glass bowl or container and completely cover with marinade.
  2. Cover glass container and place in refrigerator overnight.
  3. The following day…
    1. In a medium-sized frying pan, heat 1/2 tbsp oil over medium-high heat until a drop of water sizzles in pan.
    2. Sear caribou on each side to seal in the juices.
    3. Reduce heat to medium and cover pan. Continue cooking for 3 minutes on each side. Meat should be cooked to “medium.”
    4. Remove pan from heat and place cooked meat on a cutting board to rest a few minutes.
    5. Dice cooked caribou into 1/4 inch cubes and set aside.
    6. In a small bowl, mix cornstarch and beef stock and set aside
    7. Wipe out the pan used to cook the caribou. Heat 1/2 tbsp oil over medium heat.
    8. Add diced caribou and onion to pan. Cook for about 1 minute, stirring occasionally.
    9. Add soy sauce, honey and sesame oil to pan. Stir fry for another minute.
    10. Add cornstarch and stock mixture to pan and continue cooking until sauce thickens, about 2 minutes.
    11. Place caribou in bowl to cool prior to filling anpan rolls.
    12. See above directions for anpan to complete recipe.

Cha Sui Marinade:

Combine the following ingredients in a glass bowl:

  • 4 large cloves garlic, minced or chopped fine
  • 1/2 tsp dried ginger
  • 1 tbsp honey
  • 2 tbsp soy sauce
  • 1/4 tsp white pepper
  • 1/4 tsp dry fennel
  • 1/4 tsp ground cinnamon
  • 1/2 tsp sesame oil
  • pinch salt

*Point Hope, like many bush villages in Alaska, is dry. Every now and again a certain meal calls for a special adult beverage. At these times we miss being able to enjoy an alcoholic beverage. Most of the time we are content to wait until summer, which we spend in the “wet” town of Seward, Alaska or traveling.

Sweet, Smooth, Delicious Azuki Bean Paste

Azuki paste and azuki beans_n

Popular in Japan, sweetened azuki beans are a key ingredient in sumptuous desserts and baked goods. (The above photo marks the debut of our new Nikon D800.)

Many years ago, I lived in San Francisco. Walking along shopping streets lined with boutiques, a waft of warm vanilla  drew me into a tiny shop with just two tables. Behind the counter was very large crepe pan and a chalkboard menu filled with tempting daily specials. I was drawn to the vanilla crepe stuffed with red bean paste and topped with green tea ice cream. The textures, sweetness and interplay of flavors made for a satisfying dessert for a die-hard sweet tooth.

Many years later, 200 miles north of the Arctic Circle, supplied with dried azuki beans from a speciality shop in Anchorage, I was ready to try my hand at homemade azuki bean paste. It came out perfect and was featured in anpan (Japanese-style steamed rolls) to rave reviews. We can’t wait to try this paste in our own crepes.

Azuki Bean Paste

Ingredients

  • 1 cup dried adzuki beans
  • 5 cups water
  • 1  1/2 cups granulated sugar
  • pinch salt

Directions

  1. Soak dried beans overnight. Make sure beans are generously covered in several inches of water, as the water will be absorbed.
  2. The following morning, pour beans into a colander and rinse thoroughly with cold water.
  3. Place beans in a large pot along with 5 cups of water.
  4. Bring water to a boil over high heat.
  5. Reduce heat to low, cover and simmer for 1  1/2 hours. Beans should be soft.
  6. Put a wire strainer over a bowl.
  7. Pour beans and liquid into strainer. Strainer should be low enough that beans are partially immersed in water.
  8. Using a wooden spoon, smash beans through strainer into water. Skins should remain in the strainer.
  9. Line a bowl with cheesecloth and pour strained beans and liquid into cheesecloth.
  10. Draw up edges of cheesecloth and squeeze out excess liquid.
  11. Put squeezed out bean paste back into pot.
  12. Add sugar and salt to the beans and stir mixture over low heat. Continue stirring until mixture is glossy and has the consistency of mashed potatoes.
  13. Store in refrigerator.

See also: Arctic Anpan 2 Ways: Sweet Azuki Paste and Caribou Cha Sui