Zaru Soba: Chilled Buckwheat Noodles with Seared Scallops and Ikura

Buckwheat soba w seared scallops & ikura_n

Chilled buckwheat noodles topped with whatever imagination and taste comes up with and served with tsuyu dipping sauce combines the terms “gourmet” with “healthful.” Recipes follow.

A favorite food memory from the days I spent in Japan is the combination of sultry summer afternoons and lunches of refreshingly chilled buckwheat noodles. The first time I was served zaru soba in a Japanese restaurant, I knew I’d begun a life-long love affair.

Soba refers to thin noodles made from buckwheat, which in Japan is mainly grown in Hokkaido. Zaru refers to a seive-like bambo tray the soba is often served on, although these days it is popular to drain the soba in a colander and to then place the noodles on a tray or dish. Often served plain or with thin strips of nori and perhaps toasted sesame seeds, the noodles are almost always served with tsuyu, dashi, mirin and sweetened soy sauce mixture. The mixture is typically refrigerated or chilled with ice, and just prior to serving wasabi and scallions can be mixed in. Chopsticks are used to gather up a portion of soba which is then dipped into the tsuyu and, at least in Japan, the noodles are eaten with loud, appreciative slurps.

Buckwheat soba w seared scallops & ikura close_n

In addition to being tasty and very simple to make, soba is an especially healthful food. Easy to digest and packed with energy, soba contains all eight essential amino acids as well as antioxidants and important nutrients such as thiamine.

Soba and tsuyu are available at Asian grocers and in the Asian sections of many grocery stores. Tsuyu can be fairly easily made from scratch, provided you have on hand the necessary kombu, katsuo (bonito) flakes, mirin and soy sauce. Cooking up a serving or two of zaru soba – or several – for lunch or a light dinner is a breeze.

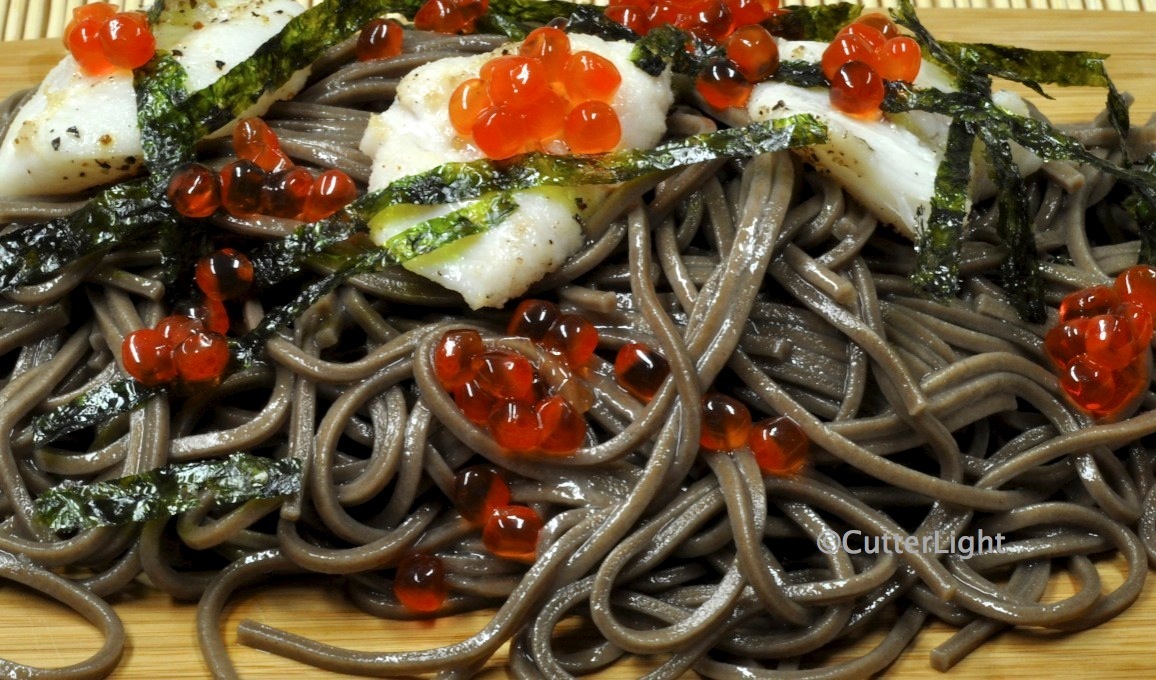
Zaru Soba with Seared Scallops and Ikura (for 2 servings)

Soba Ingredients:

  1. Two serving’s worth of soba (It generally comes packages with ribbons used to tie off serving-sized bundles.)
  2. Water to boil the soba
  3. Salt

Prepare according to package instructions much as you would pasta. Drain cooked soba in a colander and rinse thoroughly with cold water, using your hand or tongs to toss. Place rinsed, drained soba on plates, top with seared scallops, ikura and strips of nori and serve.

Seared Scallop Medallions

Directions:

  1. Select 4 large sea scallops. Cut them into medallions (approximately 1/8 inch (o.3 cm) thick.
  2. Dust medallions with seasonings of your choice. (We like a mixture of sesame seeds, chili pepper, powdered garlic, cinnamon and nutmeg. Commercially prepared Thai seasoning blends work very well.)
  3. In a frying pan, heat a tablespoon or two of olive oil over medium heat till a drop of water placed in the pan sizzles. Sear medallions on each side for just a few seconds. Use tongs or chopsticks to flip.
  4. Immediately remove medallions to a cool plate. Cover and refrigerate if they are to be used later.

ikura cured salmon eggs_nTo create sushi grade ikura in your own kitchen, see our article Ikura: Curing Salmon Eggs

Readers might also be interested in:

Alaskan Shrimp Harumaki with Lime-Infused Ponzu Dipping Sauce

Arctic Anpan Two Ways: Sweet Azuki and Caribou Cha Sui

Exceptionally Delicious Whole-Grain Bread

Whole Wheat Bread_n

Moist, soft, flavorful and with a crunchy, hearty crust, this is easily the best 100% whole wheat bread recipe we’ve found – the quintessential “lightly toast and slather with butter” bread!

Far away from large grocery stores brimming with aisle upon aisle of reasonably-priced selections, we live a quasi-homesteading life here in Arctic Alaska. We stock most of our dry goods during our annual three-day shopping run in Anchorage in late summer. In late August, an order for spices goes out to Penzeys. Coolers jammed with salmon, halibut and rockfish fillets from the summer’s fishing come with us on the plane north – enough for us, and to reciprocate when we’re given caribou. Once we arrive in the village, we begin picking berries in earnest. We make our soups, chili, stews – and our ice cream – gallons at a time.

Our interest in self-sufficient living has led us to Mother Earth News magazine which we read cover-to-cover despite the fact that many of the articles don’t directly apply to our lives. Under the title Homemade Whole-Grain Bread: You Have to Try This Amazing Recipe, the December/January issue boasted a whole wheat “homemade bread you have to try.” We bake all of our own bread products and include mixed-whole-wheat-and-white-flour bread in our repertoire. But straight whole wheat? Past trials have come out dense and crumbly, so we were skeptical. However, our trust in Mother is high, and when they devoted five pages to the bread and included the science behind why this whole wheat loaf is different, our curiosity was piqued.

After finishing the article and discussing it, our conclusion was a shared, “That sounds like a lot of work for a loaf of bread!” Still, we’d sent up 25 pounds of Bob’s Red Mill whole wheat flour with every intention of feathering more whole wheat into our diet. So after procrastinating for a couple of weekends I decided to go for it.

As it turned out, the extra work is actually fun and quite satisfying. With two very successful loaves under my belt (in more ways than one), we both agree with Mother Earth News – this is an “exceptionally delicious whole-grain bread.”

I’ve simplified the directions for this post, but full credit for the following recipe goes to the staff of Mother Earth News. Their full-length article is highly recommended reading.

Exceptionally Delicious Whole-Grain Bread

Ingredients

Sponge:

  • 1 3/4 cups whole-wheat flour
  • 1/4 tsp instant yeast
  • 3/4 cup cool water

Soaker:

  • 1 cup whole-wheat flour
  • 1/2 tsp salt
  • 2/3 cup plain yogurt
  • 2 tbsp orange juice

Final Dough:

  • all of sponge recipe
  • all of soaker recipe
  • 2 1/4 tsp instant yeast
  • 1 tbsp unsalted butter, softened
  • 2 tbsp honey
  • extra whole-wheat flour and water for adjustments

Directions

The day before baking, make the sponge and the soaker:

  1. Mix the sponge ingredients together to form a ball of dough.
  2. Knead for about 2 minutes.
  3. Let dough rest for 10 minutes.
  4. Knead again for about a minute.
  5. Immediately cover and refrigerate for at least 6 hours.
  6. Mix the soaker ingredients together to form a loose, wet ball.
  7. Cover soaker dough and leave at room temperature for 6 to 24 hours.

The day of baking:

  1. An hour before making bread, remove the soaker from the refrigerator and let it come to room temperature.
  2. Tear sponge into about a dozen pieces.
  3. Roll each sponge piece with a piece of soaker. Place bowl of a stand mixer.
  4. Attach dough hook.
  5. Sprinkle in 2  1/4 tsp of yeast.
  6. Mix on first speed for 2 minutes. Increase to second speed and continue mixing for 2 more minutes.
  7. Add in honey and butter. Mix for another 2 minutes.
  8. Let dough rest in mixing bowl for 10 minutes.
  9. On a floured work surface, knead dough by hand for a few minutes, add extra flour or water if necessary to make a soft, slightly sticky dough.
  10. Form dough into a ball and transfer it to oiled bowl, turning ball to coat it.
  11. Let rise for 45 minutes. It should be 1 1/2 times its original size.
  12. Transfer dough to floured work surface and form it into a loaf to fit a 9″ x 5″ or 8.5″ x 4.5″ loaf pan.
  13. Grease loaf pan and place dough into pan.
  14. Cover and allow to rise for 45 minutes. Dough should be 1 1/2 times its original size.
  15. While loaf rises, preheat oven to 450 degrees F.
  16. For most consistent heat, place baking stone on bottom rack and a cast-iron pan on top rack while preheating.
  17. Brush top of loaf with water.
  18. Slash top of bread down the middle or with diagonal cuts.
  19. Place loaf on stone in center of oven.
  20. Immediately add 1/2 cup of hot water to heated cast-iron pan (be careful of steam burns!).
  21. Lower the temperature to 375 degrees F.
  22. Bake bread for 20 minutes.
  23. Rotate pan in oven and add another 1/2 cup of hot water to cast-iron pan.
  24. Bake for another 15 – 20 minutes.
  25. Bread is done when top is golden brown and bottom sounds hollow when thumped. Another method to check for doneness is the internal temperature of the bread is 195 degrees or more.
  26. Remove loaf from pan immediately and transfer it to a cooling rack.
  27. As tempting as the loaf will be, allow bread to cool at least an hour before slicing! 

Pumpkin Pancakes: A Tasty, Healthy Way to Start the Day

Pumpkin Pancakes

Give your pancakes a tasty nutritional boost by stirring in some pumpkin purée left over from baking pies. Hot off the grill, these especially light pancakes are served with chopped pecans and a slice of smoked Alaskan salmon.

Pumpkin pie is practically a staple at our Thanksgiving and Christmas meals. Easy to make and inexpensive (pumpkins can generally be had for pennies per pound), pumpkin is also one of the more healthful pies. In fact, we sometimes have a slice sans whipped cream along with an egg for breakfast. But what to do with the leftover pumpkin purée, particularly if all you have is a cup or so? One of our favorite solutions is pumpkin pancakes. Use the same spices you would with pumpkin pie, hold the sugar, and you’ve got a great start to your day!

Pumpkin Pancakes 

Ingredients (4 medium-sized pancakes):

  • 1/2 cup pumpkin purée (or use butternut squash)
  • 1 cup your favorite pancake mix (we use Krusteaz buttermilk mix, which we buy in bulk at Costco)
  • approximately 3/4 cup cold water
  • 2 tbsp light olive oil
  • 1 – 2 tbsp butter
  • a healthy dash of nutmeg
  • a healthy dash of ginger
  • 1/4 tsp cinnamon

Directions:

  1. Place purée and pancake mix in a small bowl or large measuring cup. Add cold water and stir. Mixture should be thick but pourable. Do not overstir. Batter should have lumps. This ensures for better rising pancakes.
  2. Meanwhile, heat a griddle or large frying pan over medium heat. Place the olive oil and butter onto the griddle. When oil is hot enough to sizzle when a small drop of batter is added, it’s ready. Pour batter onto the griddle in 4 separate portions and reduce heat to medium-low.
  3. When the surface of the pancakes have formed bubbles and the bottoms are golden brown, turn them over with a spatula.
  4. Reduce heat further, if necessary, and continue cooking pancakes till golden brown.

Once the griddle or pan is hot and the batter has been poured, reducing the heat will allow the pancakes to rise better. A fairly thick, heavy griddle or pan works best.

See also:

Big, Fluffy Blueberry One-Pan Pancakes

Smoked Salmon with Soy Sauce and Brown Sugar Brine

Maple Pecan Pumpkin Pie

Pumpkin and Pecan Pies