Heart Healthier Tangerine Dark Chocolate Scones

chocolate tangerine scones n

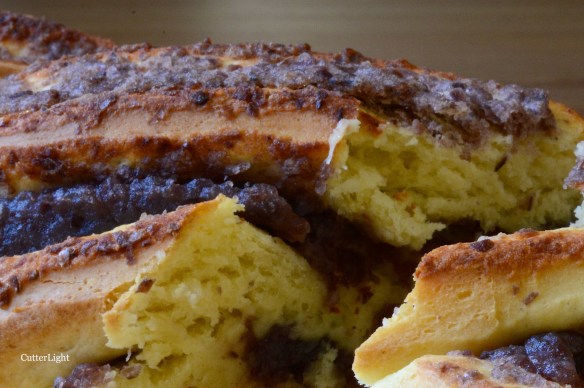
Slightly sweet and packed with chocolately flavor. Our “bakery” turned out delicious, satisfying scones to start our day.

Scones are delicious. We like their slightly crunchy exterior and dense buttery interior. I’ve made them without cream, with local berries, and have even stuffed them with chocolate chips.  On my current quest to amp up the health factor, I swapped out some of the usual ingredients with others that are more heart healthy. This recipe used only one egg white as a binder. The cocoa powder boasts healthful antioxidants. Part of the white flour has been substituted with whole wheat to add more fiber. How did the recipe come out? Delicious! These scones are just sweet enough and are full of flavor. If you wanted more sweetness, you could sprinkle another tablespoon of sugar on top or even fold in some dark chocolate chips, but I really don’t think it’s necessary.  This turned out to be a good base recipe which could be tweaked by adding dried fruit and other spices. Definitely a keeper.

Tangerine Dark Chocolate Scones

Ingredients

  • 1 1/4 cups all purpose flour
  • 1 cup whole wheat pastry flour
  • 1/4 cup cocoa powder
  • 1 tsp baking powder
  • 1/2 tsp baking soda
  • pinch salt
  • 5 tbsp unsalted butter, frozen
  • 1 egg white
  • 1/3 cup brown sugar
  • 1/3 cup tangerine juice
  • 1/2 cup lowfat plain yogurt
  • 1 tsp vanilla extract
  • zest from one tangerine
  • 1 tbsp granulated sugar and chopped nuts for topping

Directions

  1. Preheat oven to 375 degrees F (190 degrees C). Line a baking sheet with parchment paper.
  2. In a large bowl, sift together flours, cocoa powder, baking powder, baking soda and salt.
  3. Using a cheese grater, grate frozen butter into flour mixture. Gently mix with your hands making sure butter is coated in flour mixture. Set aside.
  4. In a small bowl, whisk together egg white, tangerine juice, yogurt, vanilla and tangerine zest.
  5. Pour wet ingredients into dry and mix with rubber spatula.
  6. Gather dough into a ball and pat into a 10″ circle on the prepared baking sheet. Cut dough into 8 wedges, but do not separate.
  7. Sprinkle top of scones with granulated sugar and chopped nuts.
  8. Bake for 25 minutes. Let scones cool for 10 minutes on baking sheet atop a wire rack before cutting.

Honey Apple Cider Vinaigrette on a New Leaf

apple cider vinegret n

This tangy and sweet salad dressing will encourage you to eat lots of healthy veggies. It’s working in our home.

‘Tis the season to begin replacing the overload of holiday sweets with heathful fruits and vegetables. I can’t say all the sweets are gone, but Jack and I are certainly shifting the balance away from the cookies and pastries. Ok, we admit it. Our diet was entirely too rich. It was only a matter of time before the decadent butter, hedonistic heavy cream, fabulously fatty fried chicken thighs and all the rest of it were going to get us. We’ve been pretty good about not going crazy with portions over the years, but we realize it’s time for a more realistic and healthful change.

I’ve been researching recipes and recipe books which earn the description “healthy.” I’m not too excited about what I’m finding thus far. I was looking for gourmet recipes which meet my standards and also will pass our would-you-be-happy-if-you-got-this-in-a-restaurant test. So, it looks like I have a new quest – the showcasing and creation of healthful gourmet recipes. Sounds like fun to me!

We love salads – especially those big, fill-a-dinner-plate mixes crowded with a variety of color and lots of tasty ingredients. This salad dressing recipe is not fat free, salt free or taste free. It was borne out the desire to use apple cider vinegar as opposed to my favorite, balsamic vinegar. Quality balsamic is expensive and elusive in Ulaanbaatar. Apple cider vinegar is abundant. I mixed onion, freshly cracked pepper and a pinch of salt into the standard oil and vinegar dressing ratio. I then added Dijon mustard to emulsify the dressing and mixed in honey to balance the acid in the vinegar. Voila, a delicious dressing. Tonight it is going on a layered salad stacked with romaine lettuce, carrots, tomatoes, English cucumbers, and spring squash. It’s topped with Jack’s roasted skinless chicken thighs, pine nuts, sun dried tomatoes and a few flavorful shaves of parmesan cheese. Served with a mellow glass of wine and a slice of French bread, and we have ourselves a heart-healthy meal that passes the would-you-be-happy-if-you-got-this-in-a-restaurant test.

Honey Apple Cider Vinaigrette

Ingredients

  • 1/3 cup extra virgin olive oil
  • 1/4 cup apple cider vinegar
  • 2 tsp Dijon mustard
  • 2 tbsp honey
  • 1/4 tsp freshly ground pepper
  • 1 tbsp dried onions
  • pinch salt

Directions

  1. Put all ingredients in a jar with a tight fitting lid. Shake vigorously.
  2. Store unused dressing in a glass container with a tight fitting lid in the refrigerator.

Buckwheat – It’s What’s for Breakfast

buckwheat pancakes n

Buckwheat maple pancakes stacked ten high. Hey, where’s the tenth one?

It’s new year’s eve in Ulaanbaatar, Mongolia. Why wait for the new year to start adding some more healthful items to our menus? Today’s breakfast featured buckwheat, which boasts 12 grams of fiber in it’s nutritional makeup. Not only were they more healthful than our usual favorite, scratch pancakes for two, but they were quite tasty with their infusion of maple syrup. We wish all of our readers a happy and healthy 2016!

Buckwheat Maple Pancakes

Ingredients

  • 1 cup buckwheat flour
  • 1/2 cup all purpose flour
  • 1 tsp baking powder
  • pinch salt
  • 1 large egg
  • 1/4 cup maple syrup
  • 1 cup soy milk

Directions

  1. Whisk together flours, baking powder and salt in a large bowl.
  2. In a small bowl, whisk together egg, maple syrup and soy milk.
  3. Whisk in egg mixture to flour mixture until smooth. Consistency should be thick and not runny.
  4. Heat oiled pan over medium heat.
  5. Use 1/4 cup measure to scoop out batter and drop onto hot pan. Once you see bubbles forming on the top and the edges look a bit dry, it’s time to flip your pancakes. Cook for another 2 minutes.
  6. Keep pancakes warm in a low temperature oven while making the rest of the batch.
  7. Enjoy while hot with toasted nuts, fresh fruit, and real maple syrup.

Sweet Adzuki Bean Twist Bread

Adzuki bean twist bread n

Soft, slightly sweet dough layered with sweet adzuki bean paste. Yum!

This turned out to be a ridiculous recipe mash-up. I had some adzuki bean paste in my freezer – it’s always a good idea to make a big batch of adzuki bean paste because of the time and effort it takes. (Click here for directions.) We’re always happy to have some on hand. It’s delicious in anpan, adzuki rolls, and in other delectable pastries like sweet adzuki bean rolls. It’s smooth and sweet. An added benefit is the high fiber and good source of B vitamins. I searched cutterlight.com for adzuki and was surprised to see how many of our recipes feature this yummy paste. This is definitely a pantry staple for us.

I took the dough recipe from my twisted loaf cinnamon bread and swapped out the cinnamon spread with adzuki bean paste. This bread creation was a meal in itself – a delicious breakfast with a side of freshly brewed joe. It was packed with the delicious flavor of the beans which perfectly complemented the dough. And the presentation was pretty cool, too.

Adzuki Bean Twist Bread

Ingredients

  • 2 1/4 cups all purpose flour
  • 1/2 tsp salt
  • 3/4 cup lukewarm milk
  • 1 tbsp  granulated sugar
  • 2 1/4 tsp active dry yeast
  • 2 tbsp unsalted butter, melted
  • 1 large egg
  • 3/4 cup adzuki bean paste (recipe here)

Directions

  1. Mix milk, sugar and yeast together in a large bowl. Let stand until creamy, about 10 minutes.
  2. Add the egg, butter, 1 cup of bread flour and salt. Stir well to combine.
  3. Stir in the remaining flour, 1/2 cup at a time, mixing well after each addition.
  4. When the dough has pulled together, turn it out onto a lightly floured surface and knead until smooth and elastic, about 8 minutes.
  5. Roll dough out on a lightly floured surface to a rectangle, approximately 18″ x 12″.
  6. Spread adzuki bean paste over dough evenly. Leave about 1/2″ border.
  7. Roll up dough jelly-roll style to form a long log.
  8. Cut log down the middle, the long way.
  9. “Braid” by wrapping the two cut pieces around each other, always leaving the cut sides up.
  10. Pinch ends of dough so that they will bake together.
  11. Bake for 20 – 25 minutes, until golden brown.


Internationally Acclaimed Isabel’s Turkish Bean Stoup

Isabellas Stewp n

Deliciously tangy and easy to make, you can serve this soup as a vegetarian dish – or add spicy sausage to satisfy your inner carnivore.

When I first met Jack, we were living in two different states. As our relationship grew, we spent more and more time together in each of our locations. After months of dating, it was going to be Jack’s birthday. Being the clever girl that I am, I hid his birthday present behind his refrigerator as I wasn’t planning to be in town for his big day. My genius idea was to call him on his birthday and surprise him from afar. Only a few days later, I get a call from Jack. You see, he had found his birthday present. The man I would eventually marry, I learned, had a penchant for cleaning – really cleaning. He had pulled out the fridge and was cleaning behind it when he came across my hidden surprise.

Fast forward to the present time… earlier this school year, we had a lovely houseguest named Isabel. She eagerly went on Mongolian adventures with us and shared our joy in sharing food. Isabel made a creation for us that we dubbed “Isabel’s Turkish Stoup.” She explained that it has Turkish seasonings and could be served as a stew or could be a soup. Her recipe was vegetarian, which of course, could be altered to satisfy our carnivorous tendencies. But we decided to taste Isabel’s recipe as she created it before making adjustments. We really enjoyed this recipe. The lemon juice adds a delightful tartness that brings all the elements together. We couldn’t get enough. We asked Isabel for the recipe, but as end-of-visits are usually busy, she left our home forgetting to give us the recipe.

Or so we thought…

Isabel is a clever girl, too. After hearing the story of Jack’s penchant for cleaning, she hid the recipe with a letter at the back of the top of the refrigerator. Who looks there, right? Sure enough, Jack decided to clean the kitchen and found Isabel’s recipe as well as a lovely thank you letter from her stay with us.

I was happy to have found the recipe. I whipped up a version of Isabel’s stoup. It was just as delicious as her version. Now, I will share with you, the internationally acclaimed (Isabel is German, we are American, the dish was made in Mongolia) Isabel’s Turkish Stoup. Thank you for sharing, Isabel!

Isabel’s Turkish Stoup

Ingredients

  • 2 cups chopped onions
  • 2 cups chopped carrots
  • 1 tbsp chopped garlic
  • olive oil for sauté
  • 1 cube bouillon
  • 2 tbsp tomato paste
  • 1 cup water
  • 4 cups white beans
  • 4 14-oz cans of tomatoes (about 56 oz total)
  • 2 tsp smoked paprika
  • 3 tsp cumin
  • 2 tsp marjoram
  • 4 tbsp lemon juice

Directions

  1. Sauté onions in a few tablespoons of olive oil in a large pot. Cook until onions are slightly translucent.
  2. Add carrots. Continue to cook until the carrots begin to soften.
  3. Add garlic and cook for 2-3 more minutes.
  4. Mix bouillon and tomato paste with water. Add to pot.
  5. Add white beans and tomatoes. Mix well.
  6. Add paprika, cumin, marjoram and lemon juice. Mix well.
  7. Allow mixture to simmer for about 15 minutes.
  8. Serve hot with delicious bread, like pesto mozzarella muffins.

Pesto Mozzarella Muffins

Pesto cheese muffins n

Savory pesto and that delicious strip of baked parmesan cheese make an irresistible muffin. Soup’s up!

Toward the end of last summer, we began ordering vegetables from a local farmer here in Mongolia. The growing season is short, so we jumped at the chance for local produce. One week, I ordered a kilogram (over two pounds) of basil. Although I thought I had a general idea of what a kilo of basil would look like, my jaw dropped when my order arrived. It was a large grocery bag full of aromatic leaves and flowers. Every spare minute of the next three after-school afternoons were spent processing the basil – destemming, deflowering, and cleaning. After processing what seemed to be a mountain of basil, we made a purée of the leaves with olive oil and froze the end product in ice cube trays which we then packed into plastic zip-top freezer bags for winter use.

The work was worth it. The flavor of my first-ever batch of homemade pesto was phenomenally fresh and bright. It proved to be the perfect ingredient to infuse into a savory muffin to serve alongside a hot bowl of homemade bean soup.

Pesto Mozzarella Muffins

Ingredients

  • 3 cups all purpose flour
  • 1 tbsp baking powder
  • 1 tsp salt
  • 3 large eggs, beaten
  • 2/3 cup extra virgin olive oil
  • 1 cup whole milk
  • 1/2 cup pesto
  • 1 cup shredded mozzarella cheese

Directions

  1. Preheat oven to 375 degrees F (190 degrees C).
  2. Grease 12 standard muffin cups
  3. In a small bowl, whisk together flour, baking powder and salt. Set aside.
  4. In a large bowl, whisk together eggs, olive oil and milk.
  5. Stir flour mixture into egg mixture.
  6. Fold pesto and mozzarella into batter until it is evenly incorporated. Do not overmix.
  7. Divide batter evenly into muffin cups.
  8. Bake muffins until are golden and they spring back to the touch, about 20 – 25 minutes. A wooden pick inserted into the center of a muffin should come out clean.
  9. Serve warm or at room temperature.

Almond Matcha Snowball Cookies – A Green Tea Twist on a Classic

almond match snowball cookies n

The light texture with the rich, complex flavors of matcha and almond put this cookie into the “favorites” category of my recipe file.

The tin of matcha green tea powder in my pantry continually inspires ideas. The powder is easy to use and has a distinctive flavor. I’ve made mini matcha cheesecakes, matcha butter cookies, and even matcha flavored ice cream. At this time of year, Jack always requests Russian tea cakes. He has fond memories of these delightful cookies tied to both Christmas and his grandmother. I thought I would create a recipe combining the texture and look of the traditional Russian snowballs with the inspiring flavor of matcha. This recipe is not shy on flavor. The small cookies give two bites with the pow of almond and the zip of matcha.

Almond Matcha Snowball Cookies

Ingredients

  • 1 cup unsalted butter, melted
  • 3 tsp water
  • 1 tsp vanilla extract
  • 3 tsp almond extract
  • 1 egg, beaten
  • 1 tbsp matcha tea powder
  • 1 1/2 cups powdered sugar
  • 2 cups all purpose flour
  • 1 cup sliced almonds
  • 1/2 cup powdered sugar, for rolling

Directions

  1. Mix butter, water, egg and extracts together in a small bowl.
  2. Sift together matcha tea powder, powdered sugar and flour in large bowl.
  3. Stir almonds into flour mixture.
  4. Stir butter mixture into flour mixture. Mix until dough forms. Add additional water if mixture is dry.
  5. Let dough chill for 30 minutes in refrigerator.
  6. Line baking sheet with parchment paper. Preheat oven to 325 degrees F (160 degrees C).
  7. Using a cookie scoop or a tablespoon, scoop out dough and shape into balls.
  8. Bake on baking sheet for 20 minutes. Cookies should be lightly browned on the edges when done.
  9. Cool completely on a wire rack.
  10. Roll cooled cookies in powdered sugar.
  11. Store at room temperature in an air tight container.

Makes 48 cookies.

Noodle Kugel – Entirely from Scratch or Not a Kosher Kitchen Kugel

noodle kugel n

A rich and creamy dish topped with crunchy noodles and speckled with cinnamon and currants. It’s especially delicious on a cold, snowy Sunday morning.

“Soul food” for us are the foods that stir strong memories and pleasant associations. If you’ve been following this blog, you already know that our soul food doesn’t harken from one location, one culture, or even one group of people. We have an eclectic past – one might say checkered – where food and food associations are always the common denominator.

That brings us to the present where I am in my kitchen in Ulaanbaatar, Mongolia, with a craving for warm noodle kugel inspired by my Jewish roots. I don’t know who gave me my first taste of this rich, satisfying and sweet dish. Maybe it was one of my Jewish grandmas, who still metaphorically lurk in my kitchen. Noodle kugel is a relatively easy dish with normally available ingredients. This version of noodle kugel has been adapted to my Mongolian pantry, which means I started with egg pasta I made from scratch. I substituted the traditional cottage cheese with homemade ricotta because I can’t find cottage cheese here. The ricotta turned out to be a delicious substitution. And I used currants instead of raisins – just because they are tasty and pack a big bang of flavor into a cute little package. The end result was as satisfying as I remember. I’d like to think mine tasted better than my memory serves if only because of the fresh pasta.

Scratch Noodle Kugel

Ingredients

  • 4 tbsp unsalted butter, melted
  • 3 large eggs
  • 1 cup homemade ricotta cheese
  • 1 cup sour cream
  • 4 tbsp granulated sugar
  • 1 tsp ground cinnamon
  • 3 cups wide egg noodles, cooked al dente
  • 1/4 cup dried currants

Directions

  1. Grease an 8 x 8 inch glass baking dish (20 x 20 cm).
  2. Preheat oven to 350 degrees F (175 degrees C).
  3. In a large bowl, thoroughly mix together first 6 ingredients.
  4. Gently mix noodles into egg mixture.
  5. Fold in currants.
  6. Pour noodle mixture into prepared baking dish.
  7. Bake for 30 minutes. Custard should be set and top of kugel should be lightly browned.

The Secret to Super Moist, Sweet Cornbread

cornbread super moist n

Moist cake-like cornbread, a perfect accompaniment to a spicy chili or a spicy stew.

We. love. cornbread. From muffin-shaped to loaf-shaped cornbread, from cornbread made with coarse cut cornmeal to smooth cornbread made with fine meal, we love them all. After years of making and enjoying different versions, I think we now have a favorite. The secret is plain yogurt. This sweet, moist version has a lovely flavor and a smooth texture that has put this recipe at the front of our recipe box.

Moist Sweet Cornbread

Ingredients

  • 1/2 cup unsalted butter
  • 2/3 cup granulated sugar
  • 2 eggs
  • 1 cup plain yogurt
  • 1/2 tsp baking soda
  • 1 cup cornmeal, fine ground
  • 1 cup all-purpose flour
  • 1/2 tsp salt

Directions

  1. Grease an 8 x 8 inch baking dish, or a 9-inch springform pan. Preheat oven to 375 degrees F (175 degrees C).
  2. In a medium pan, melt butter over medium heat. Remove pan from heat.
  3. Stir in sugar.
  4. Mix in eggs and yogurt.
  5. In a medium bowl, whisk together baking soda, cornmeal, flour, and salt.
  6. Pour flour mixture into butter mixture. Mix well.
  7. Pour batter into baking dish.
  8. Bake for 30 to 40 minutes. Cornbread will be lightly brown and a wooden toothpick inserted into the center of the cake should come out clean.

Maple Pumpkin Pie Brûlée or What to do with leftover pie filling?

Pumpking Brulee n

Dark maple syrup and good bourbon put this pumpkin pie filling over the top. We invariably have extra – perfect for an American-style crème brûlée

We are right around the corner from the pumpkin pie holiday of the year – my birthday. 😉 Last weekend, Jack made his delicious maple pumpkin pie from a fresh pumpkin we found in one of our local markets here in Ulaanbaatar. As is often the case, we ended up with extra filling, so…

Armed with granulated sugar and a kitchen torch, I put it to delicious use. This brûlée deserves a recipe of it’s own and could easily take the place of my traditional birthday pie or Thanksgiving dessert. Follow the original recipe here to make a traditional pie. Or use this recipe to make eight individual servings of a new twist on a holiday favorite.

Maple Pumpkin Pie Brûlée

Ingredients

  • 3 large eggs
  • 2 cups pumpkin purée, either canned or made from fresh roasted pumpkin or squash
  • 1 cup heavy whipping cream
  • 1/4 cup maple syrup
  • 2 tsp vanilla extract
  • 1/4 cup granulated sugar
  • 1 tsp ground cinnamon
  • 1/2 tsp ground ginger
  • 1/2 tsp mace or nutmeg
  • 2 tbsp bourbon
  • extra granulated sugar for the top

Directions

  1. Preheat oven to 350 degrees F (175 degrees C).
  2. Beat eggs in a large mixing bowl.
  3. Mix next nine ingredients into eggs. Mixture should be smooth.
  4. Evenly divide mixture into 8 half cup ramekins.
  5. Place ramekins in a large baking dish.
  6. Pour enough water into baking dish so that water comes at least halfway up the sides of the ramekins.
  7. Bake until the filling is set, about 40 minutes.
  8. Remove ramekins from water and chill in the refrigerator for 2 hours. (Covered, they will keep nicely for a couple of days.)
  9. Half an hour before serving, set the ramekins on counter to come to room temperature.
  10. Sprinkle a generous 1/2 tsp of granulated sugar on top of each ramekin.
  11. Using a kitchen torch, melt the sugar to create a crisp, caramelized top.
  12. Allow the pumpkin brûlée to sit for 5 minutes before serving.

Makes 8 half cup ramekins.

You might also like our other favorite pumpkin pie recipe by Craig Claiborne.