Gluten Free? Low Carb? Whatever! Just Eat These Fudgy Chocolate Meringues!

meringue fudgy chocolate n

Fudgy meringues with a crispy, melt in your mouth shell will have you attending “Meringues Anonymous” if you’re not careful!

How can four little ingredients be so good together? The combination of the crispy exterior and the moist chocolate middle sans flour resulted in an entire batch of fifteen cookies disappearing in just over 24 hours. I wish I could tell you we had guests…

Although airy and relatively low on calories compared to most confections, these meringues did not come about due to New Year’s self-promises centered around slimmer waistlines. The ignoble truth is that after creating crème brûlée, another custard dish and any number of ice creams, we had on hand countless extra egg whites and, according to Jack, “egg whites, fish and beer are three items that can be consumed without fear of weight gain.”

These meringues are quick and easy to make but do require an overnight stay in the oven to finish drying  in order to create that crispy exterior.

Fudgy Chocolate Meringues

Ingredients

  • 3 egg whites
  • 3/4 cup granulated sugar
  • 2 tbsp dutch processed cocoa
  • 1/2 cup smashed chocolate chips (Place chips in a Ziploc bag and smash with a meat tenderizer)

Directions

  1. Preheat oven to 350 degrees F. Line two baking sheets with parchment paper. Set aside.
  2. Place egg whites and sugar in the bowl of a stand mixer.
  3. Place bowl on top of pot of simmering water, for a double boiler effect.
  4. Whisk eggs and sugar for a couple of minutes until sugar is just dissolved.
  5. Place bowl back on stand mixer. Mix on high speed until eggs are thick and glossy and hold soft peaks.
  6. Sift cocoa onto egg mixture.
  7. Mix on high speed until cocoa is just incorporated.
  8. Fold smashed chocolate chips into egg whites.
  9. Use a cookie scoop to drop batter onto parchment-lined baking sheets.
  10. Bake cookies for 10 minutes. Cookies should puff up and may crack.
  11. Remove cookies and leave oven door open to cool down.
  12. Place cookies back in oven, close oven door and let cookies sit overnight.
  13. The next day, cookies will be cooled completely and can be easily removed from parchment paper. Store in airtight container.

Pretzel Rolls for Sandwiches to Look Forward To

Pretzel Rolls_n

Chewy and deliciously salty, these pretzel rolls are ready for turkey sandwiches, complete with deli mustard and homemade ginger-pear cranberry sauce.

While most people roast a turkey for Thanksgiving or Christmas, Jack and I decided to make a turkey for going back to work after our winter break. We have plenty of recipes stockpiled for tasty meals featuring leftover roasted turkey. These pretzel rolls make lunchtime sandwiches something to look forward to.

Bread Machine Pretzel Rolls

Ingredients

  • 4 cups all purpose flour
  • 1 1/2 tsp salt
  • 2 tsp instant yeast
  • 1 3/4 cups milk
  • 2 tbsp olive oil
  • coarse sea salt
  • 2 tbsp salt
  • 1/2 cup baking soda
  • 16 cups water

Directions

  1. Place first 5 ingredients into baking pan in the order recommended by the manufacturer. Insert pan into the oven chamber. Select dough cycle.
  2. Turn out dough onto lightly floured surface.
  3. Divide dough into 8 pieces.
  4. Roll dough in to balls. Flatten slightly and let rest while you prepare pretzel bath.
  5. Preheat oven to 400 degrees F. Cover baking sheet with parchment paper.
  6. In a large pot, boil 16 cups water and salt.
  7. When water is boiling, stir in baking soda.
  8. Place 4 dough balls in boiling water for 30 seconds. Flip dough balls and continue to boil for 30 more seconds. Remove from water with slotted spoon and place on parchment-lined baking sheet.
  9. Repeat with remaining 4 dough balls.
  10. Sprinkle each roll with coarse salt.
  11. Slice two slashes into each roll with a very sharp knife.
  12. Bake rolls for 20 minutes. Pretzels are finished when they are a rich dark brown.
  13. Let cool for a couple of minutes on baking sheet. Finish cooling on wire rack.

Individual-Sized Beef Wellingtons for Two

beef wellington sliced n

This classic presentation serves well as the entrée for any special meal. And where did the name originate?

There are two classic ways to serve Beef Wellington. Created from a cut of filet mignon weighed in pounds, it makes for a centerpiece as impressive as whole salmon, striped bass, loupe de mer, or a whole roasted turkey. There is a definite Wow factor with food done large. These are the kinds of presentations that prompt guests to spontaneously break into shared applause – gratifying to any chef.

beet goat cheese stacked salad n

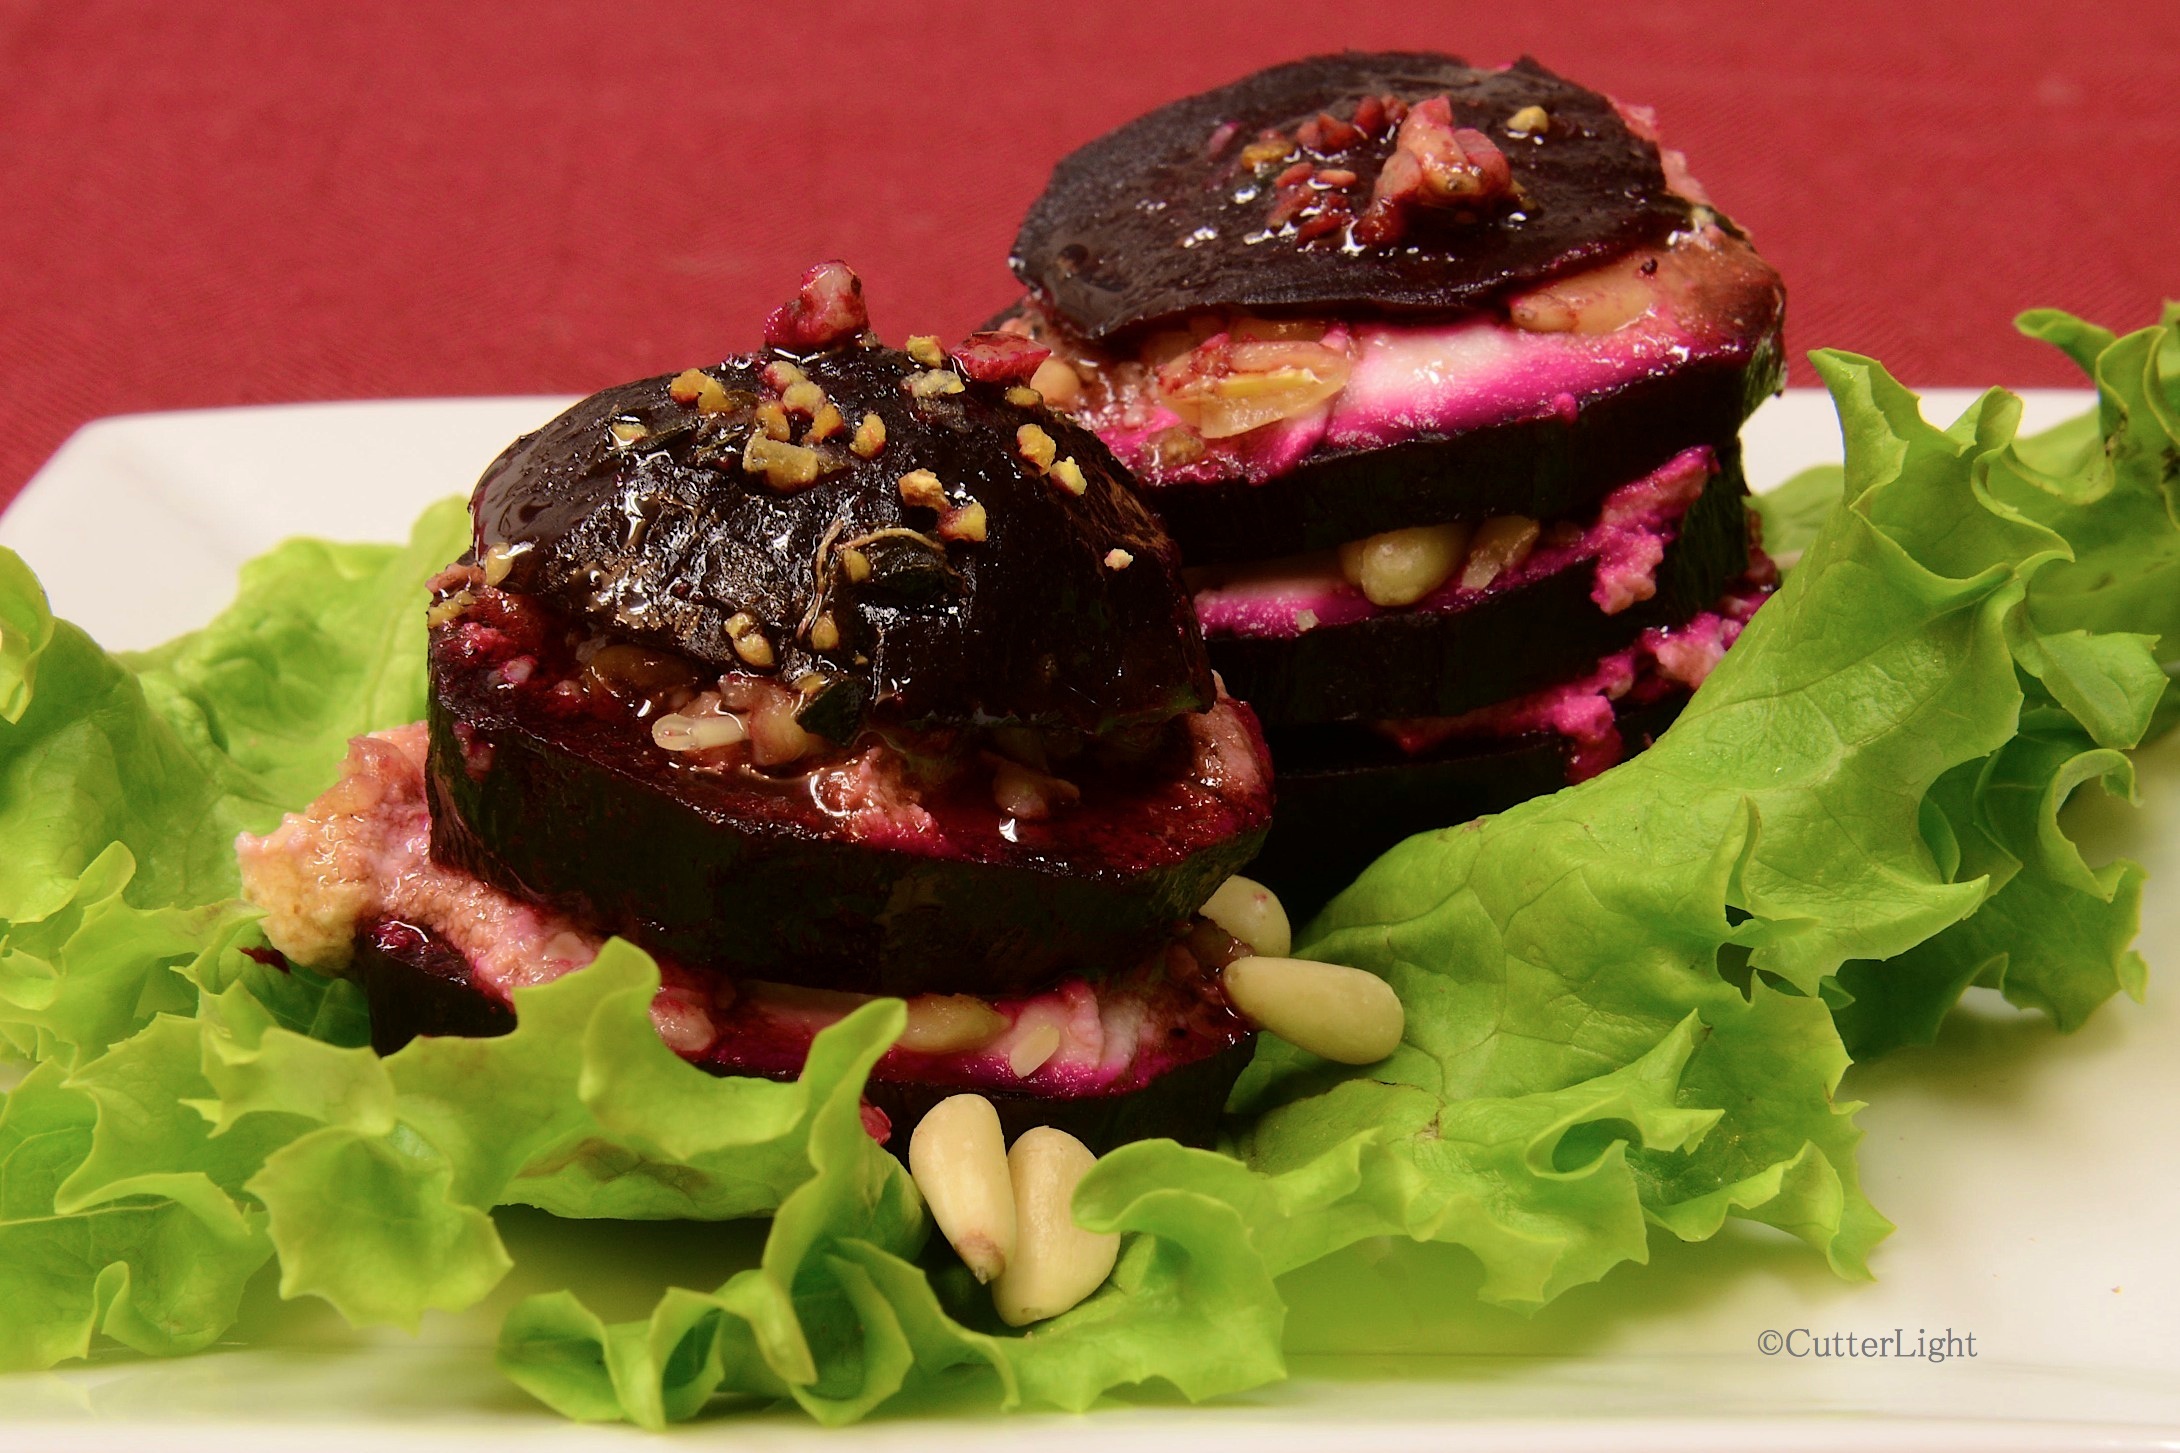
This stacked beet salad, made from roasted beets and homemade goat cheese, goes nicely with beef. 

But equally appreciative responses can be elicited with individual-sized presentations. Just as a handsomely baked 15-pound salmon, perhaps stuffed with shrimp and garnished with sliced lemons and fresh fennel draws the focus to the center of the table, a perfectly poached 12 ounce trout adorned with fiddle heads and a side of freshly cut asparagus inspires individual applause and equally broad smiles. There is something wonderfully intimate about being served with an individually prepared whole fish, a cornish hen or small game bird, or a perfectly done melt-in-your mouth individual Beef Wellington.

beef wellington whole

Living in a “dry” (no alcohol permitted) village in Arctic Alaska is a considerable hardship at times. A Malbec, a Malbec, our kingdom for a Malbec! We made do with wild cherry sparklers from our SodaStream.

And the origins of this dish? Arthur Wellesley, First Duke of Wellington, was reputedly a big fan of beef, mushrooms and pâté cooked in pastry. Another claim is that the dish was named in honor of Wellington, New Zealand. To us, the theory that this dish was named for the Duke of Wellington seems the more plausible. Arthur Wellesley was a field marshall whose troops defeated the army of Napoleon Bonaparte resulting in the collapse of Napoleon’s empire and his exile. Wellesley’s status as a conquering hero earned him royalty status as the First Duke of Wellington. Chefs sometimes name their creations after people they admire, and there was a similar French dish at the time that British chefs may have felt merited appropriate modification and renaming.

Beef Wellington for Two

Ingredients

  • 2 cuts of filet mignon, about 3/4 lb. each, brought to room temperature. The better the grade of beef, the better this dish will be.
  • duxelles – (a mushroom paste: see recipe below)
  • enough puff pastry to wrap each filet
  • enough prosciutto to completely wrap each filet
  • flour
  • whole grain Dijon mustard
  • 1 egg, lightly beaten
  • 2 sheets of plastic wrap large enough to wrap each Beef Wellington
  • parchment paper

Preparing the Filet MIgnon

  1. Place filets in a bowl one at a time. Drizzle with olive oil and turn to completely coat filet while adding pinches of salt and pepper so that all sides are seasoned. Set filets on cutting board.
  2. Add light olive oil to a heavy pan over medium-high heat. Use tongs to sear all sides of filets. This takes about 20 – 30 seconds per side – a total of about 2 – 3 minutes. Do not overcook, but make sure all surface areas are seared.
  3. Save the remaining oil to sauté the duxelles.
  4. Let filets cool.

Duxelles

Ingredients

  • 1/2 lb. shitake mushrooms chopped fine (or any firm mushroom). We use dried shitakes which reconstitute nicely, store forever, and retain lots of flavor.
  • 1 shallot, chopped fine (Penzeys dried shallots work well)
  • 2 cloves garlic, chopped fine (Penzeys dried garlic is excellent)
  • 1 tbsp whole grain Dijon mustard
  • 1 tsp dried thyme
  • 2 tsp dried sage
  • 1 tbsp butter and 1 tbsp olive oil (Or sear the filet first and use the remaining oil to sauté the duxelles in the same pan)
  • salt & pepper to taste

Directions

  1. Place mushrooms, shallot, garlic, thyme and sage in a food processor and pulse till finely chopped.
  2. Place butter and olive oil in a pan over medium heat till butter is melted or add butter to oil remaining from searing beef and use that. Add mushroom mixture, reduce heat and sauté for approximately 8 minutes, until most of the liquid is evaporated and mixture is the consistency of a damp paste. Mix in salt and pepper and set aside to cool.

Prepare the Beef Wellington

  1. On cutting boards or table, lay out two sheets of plastic wrap sufficiently large to wrap each Beef Wellington.
  2. Arrange prosciutto on plastic wrap making sure there is plenty of extra plastic wrap all around. Overlap prosciutto as necessary to ensure that it will completely cover the filets.
  3. Use a spatula to cover prosciutto with duxelles.
  4. Cover each rested filet with a 1/2 – 1 tablespoon of whole grain mustard – a sparse coating.
  5. Place filets atop prosciutto. Using plastic wrap to keep things tight, wrap beef in prosciutto, making sure everything is tight and sealed.
  6. Place prosciutto-wrapped filets in refrigerator for at least 30 minutes. This will help the prosciutto to stay in place when the plastic is removed.
  7. After 30 minutes, remove filets from refrigerator.
  8. Preheat over to 400 degrees F.
  9. Lightly dust cutting boards with flour and arrange puff pastry sheets sufficient to wrap each filet.
  10. Remove plastic from filets. (This may be easiest done with scissors.) Place filets on puff pastry and fold or roll up pastry so that filet is completely encased. Brush egg wash onto pastry edges to help get a good seal.
  11. Place parchment paper on baking sheet. Turn encased Beef Wellingtons seam side down and place on baking sheet. Make 2 slashes on top of pastry to allow steam to escape.
  12. Brush egg wash on pastry and place in pre-heated oven.
  13. Bake for approximately 40 minutes, checking toward the end to make sure pastry does no overcook. Beef should have an internal temperature of 125 degrees F.
  14. Remove from oven and allow to rest for a few minutes before serving.

Enjoy with a fine Malbec, Zinfandel or Cabernet!

Sweet Nosh – Homemade Lemon Curd and Almond Scones

scone lemon curd and almond n

Creamy, sweet lemon curd is the perfect partner to a freshly baked almond scone for a light breakfast or an afternoon nosh. See lemon curd and scone recipes below.

Any excuse to make lemon curd is a good excuse. I’ve been playing around with a lemon lava cake recipe and decided the ingredient it needed is lemon curd. With the lava cake in mind, I whipped up four cups of this zesty conserve, which happened to be more than my recipe required. What to do? Enjoy the tangy, sweet, creamy curd with a freshly baked batch of almond scones.

I’ve made many iterations of scones in my kitchen, but lemon curd seemed to fit with savory almond flavor as opposed to blends of fruits or other sweet ingredients.

The curd is a cinch to make. The Meyer lemons that grow in our backyard in Sacramento would have been the choice ingredient, but even without our favorite Meyers on hand in our Arctic kitchen, we can make a darn good curd with Nellie & Joe’s brand lemon juice and Penzeys dried lemon peel. The small scones, too, are a snap to make. The time it took from gathering pantry ingredients to pulling freshly baked scones from the oven was only about half an hour – about as long as it takes to have a first cup of Joe and get fully awake on a leisurely weekend or holiday morning.

Pantry Lemon Curd

Ingredients

  • 1 1/2 tbsp Penzeys dried lemon peel
  • 1 1/2 cups granulated sugar
  • 5 eggs
  • 1/2 cup lemon juice
  • pinch salt
  • 1/4 lb unsalted butter, room temperature

Directions

  1. In a medium bowl, mix together lemon peel and sugar.
  2. Whisk eggs into sugar mixture, one at a time.
  3. Whisk in lemon juice and salt.
  4. Pour mixture into a medium pot. Add butter in pieces.
  5. Cook over low heat until thickened, about 10 minutes.
  6. Remove from heat and let cool before serving with fresh-baked almond scones hot from the oven.
  7. Store any leftovers in a covered container in the refrigerator.

Snack-Sized Almond Scones

Ingredients

  • 2 cups all-purpose flour
  • 2 tsp baking powder
  • 1/2 tsp baking soda
  • healthy pinch salt
  • 1/3 cup granulated sugar
  • 2 tbsp frozen butter
  • 1/3 cup whole milk
  • 1/3 cup buttermilk
  • 1 egg
  • 1 tsp almond extract
  • 1/2 cup sliced almonds

Directions

  1. Preheat oven to 350 degrees F. Line a baking sheet with parchment paper.
  2. In a medium mixing bowl, mix flour, baking powder, baking soda, salt, and sugar.
  3. Using a cheese grater, grate butter into flour mixture. Stir until butter is well dispersed in flour.
  4. In a second bowl, whisk together whole milk, buttermilk, egg, and extract.
  5. Pour wet ingredients into dry. Stir together.
  6. Stir in almonds. Dough will be sticky.
  7. Coat your hands with flour and divide dough into thirds.
  8. Flatten each third into a disc about 1-inch tall. Place 3 discs apart on parchment-covered baking sheet. Cut each disc into fourths, but do not separate. This will allow the scones to be broken easily when they are finished baking.
  9. Bake for about 15 minutes. Scones will be very lightly browned when done.
  10. Serve with hot tea and homemade lemon curd.

Rustic Pear Gallette with Whole Wheat Blend Crust

gallette pear n

The sweet secret to this gallette is a generous layer of homemade cloudberry jam beneath the pears No cloudberries? Try raspberry, blackberry or apricot jam.

A gallette is a beautiful dessert that can whipped up on short notice – a perfect answer to a seasonal abundance of fresh fruit. During the summer, we made a delicious strawberry-port gallette with sliced almonds in the galley of our sailboat. Since it is wintertime, we decided to make the gallette a bit more full-bodied by adding wheat flour and some cornmeal to the crust. We happened to have pears on hand, but many other fruits readily lend themselves to this recipe. Enjoy a slice of pear gallette with a side salad, a favorite cheese and a freshly brewed cup of tea for a satisfying lunch in any season.

Rustic Pear Gallette

Ingredients

  • 1  cup all-purpose flour
  • 3/4 cup whole wheat flour
  • 1/3 cup granulated sugar
  • 1/4 cup coarse cornmeal
  • 1/4 tsp salt
  • 1/2 cup cold butter, cut into small pieces
  • 1/3 cup buttermilk (we made this from powdered)
  • 2 tablespoons cloudberry jam, or jam of your choice
  • 2 D’Anjou pears, thinly sliced
  • 1 egg, beaten
  • 2 tbsp granulated sugar mixed with a pinch of ground cinnamon

Directions

  1. Mix together flours, sugar, cornmeal and salt in a medium bowl.
  2. Using a pastry blender, mix in cold butter. Continue mixing until cold butter is the size of peas.
  3. Slowly mix in buttermilk. Stir with rubber spatula until dough forms into a ball.
  4. Wrap dough in plastic and chill for about 30-45 minutes in refrigerator.
  5. Preheat oven to 350 degrees F.
  6. Cut a piece of parchment paper to fit the size of a baking sheet.
  7. Place chilled dough on center of parchment paper.
  8. Roll dough to about a 15-inch circle. This is a rustic dessert, so no need to be a perfectionist here.
  9. Brush the entire rolled dough with jam.
  10. Arrange pear slices atop dough, leaving a 2-inch border.
  11. Fold border over pears, pressing down any folds of dough.
  12. Brush dough with egg.
  13. Sprinkle dough and pears with sugar and cinnamon mixture.
  14. Bake gallette 40 – 45 minutes, until dough is golden brown and pears are soft.
  15. Serve warm or at room temperature.

Homemade Chocolate Brownie Ice Cream in Chocolate Orange Wafer

brownie chocolate ice cream n

To create this ice cream, we use the same brownie as in our ice cream sandwiches. These brownies work well because they retain their chewy, firm, moist texture when frozen. The edible serving cups are created from a modified fortune cookie recipe infused with orange flavor. See recipes below.

Dig in!

Chocolate Brownie Ice Cream

Ingredients

  • 2 oz. semi-sweet chocolate chips
  • 1/3 cup unsweetened cocoa powder
  • 1 1/2 cups whole milk
  • 2 eggs
  • 1 cup granulated sugar
  • 1 cup heavy whipping cream
  • 1 tsp vanilla extract
  • 1 cup chopped brownies, cut into 1/2 inch cubes (see recipe below)

Directions

  1. Melt chocolate chips in top of double boiler.
  2. Whisk cocoa powder into melted chips until smooth.
  3. Whisk in milk a little at a time until completely blended.
  4. Remove from heat and let cool.
  5. Beat eggs in bowl of a stand mixer until light and fluffy.
  6. Mix in sugar a little at a time until completely blended.
  7. Mix in cream and vanilla. Thoroughly combine.
  8. Pour chocolate mixture into cream mixture and whisk to blend.
  9. Cool completely. I put the mixture in the refrigerator overnight before I use it.
  10. Pour into freezer bowl of ice cream machine. Turn machine on and mix until mixture thickens, about 20 minutes. 5 minutes before ice cream is complete, add chopped brownies to freezer bowl.
  11. Transfer to airtight container and place in freezer until firm, about 2 hours.

Brownies for Ice Cream

Ingredients

  • 2 oz. semi-sweet chocolate chips
  • 1/2 stick unsalted butter
  • 3 eggs
  • pinch salt
  • 1 3/4 cups granulated sugar
  • 1/2 tsp vanilla extract
  • 1/2 cup all-purpose flour

Directions

  1. Preheat oven to 350 degrees F. Grease a 9″ x 9″ baking dish. Set aside.
  2. Melt chocolate and butter in a double boiler over simmering water. Mix completely. Let mixture cool slightly.
  3. Beat eggs and salt in a mixing bowl.
  4. Gradually beat in sugar and vanilla.
  5. Mix in cooled chocolate.
  6. Mix in flour.
  7. Pour batter in baking dish.
  8. Bake for 30 minutes. Brownies are done when a toothpick inserted in the center comes out clean. Let cool completely before using for ice cream recipe.

Edible Chocolate Orange Ice Cream Bowls (makes 4 wafers)

Ingredients

  • 1 egg white
  • pinch salt
  • 1/2 tsp orange zest
  • 1/2 tsp orange extract
  • 1/4 cup granulated sugar
  • 1/4 cup all-purpose flour
  • 1 tbsp orange juice

Directions

  1. Preheat oven to 400 degrees F. Line two baking sheets with parchment paper. Set aside. Have two small teacups or ramekins ready.
  2. Whisk egg white in a medium bowl until foamy, not stiff.
  3. Add salt and whisk to incorporate.
  4. Whisk in orange zest and orange extract.
  5. Whisk in sugar.
  6. Whisk in flour.
  7. Whisk in orange juice.
  8. Drop a teaspoon of batter onto parchment-lined baking sheet.
  9. Spread the batter around in a circular motion with the back of teaspoon until you have about a 4 inch circle. Repeat to make second wafer.
  10. Bake for 6 minutes.
  11. Immediately remove wafers with an offset spatula and place on an upside-down teacup to cool and dry in the shape of a cup.
  12. Repeat with batter for second 2 wafers.
  13. If desired, dip edges of wafers in chocolate.
  14. Let cool completely before using.

Now THIS is an Ice Cream Sandwich!

brownie butter pecan ice cream sandwich_n

Creamy, homemade butter pecan ice cream sandwiched between chewy, chocolatey, frozen brownies – a guaranteed cure for winter-darkness doldrums! 

Store-bought ice cream sandwiches have the right idea – it’s fun to eat ice cream with your hands. The problem is that the outside layers of the store-bought variety leave much to be desired. We wanted a delicious brownie that would be more than just an edible barrier between ice cream and hands. So we created a not-too-thick brownie that retains its chewiness when it’s frozen. For the ice cream filling, we chose butter pecan to add the texture and flavor of the nuts we like best in brownies. Turned out to be the best ice cream sandwiches we’ve ever had!

Brownie & Butter Pecan Ice Cream Sandwiches

Ingredients

  • 2 oz. semi-sweet chocolate chips
  • 1/2 stick unsalted butter
  • 3 eggs
  • pinch salt
  • 1 3/4 cups granulated sugar
  • 1/2 tsp vanilla extract
  • 1/2 cup all-purpose flour
  • butter pecan ice cream (see recipe below)

Directions

  1. Preheat oven to 350 degrees F. Line two 9″ x 5″ x 3″ loaf pans with foil. Butter the foil. Set pans aside.
  2. Melt chocolate and butter in a double boiler over simmering water. Mix completely. Let mixture cool slightly.
  3. Beat eggs and salt in a mixing bowl.
  4. Gradually beat in sugar and vanilla.
  5. Mix in cooled chocolate.
  6. Mix in flour.
  7. Pour half of the batter in each loaf pan.
  8. Bake for 25 minutes. Brownies are done when a toothpick inserted in the center comes out clean. Let cool for about 15 minutes.
  9. Gently lift brownies with foil out of loaf pans and place in freezer.
  10. Place one of the empty loaf pans in freezer.
  11. Scoop out several scoops of butter pecan ice cream* into a bowl. We used about six.
  12. Stir ice cream with a rubber spatula to soften a little. You want ice cream to be spreadable, but not soupy.
  13. Retrieve one brownie and frozen loaf pan from freezer.
  14. Place brownie back into loaf pan.
  15. Spread all the ice cream evenly on brownie.
  16. Retrieve second brownie from freezer. Remove foil.
  17. Press second brownie atop the ice cream layer. Place sandwich in freezer to set, about 30 minutes.
  18. Remove sandwich from pan and place on cutting board. Using a sharp knife, slice sandwich into slices of desired size.
  19. Let sit for about 5 minutes to slightly thaw before serving.

*If you want a top notch filling for this sandwich, try making your own butter pecan! Here’s how:

Butter Pecan Ice Cream

Ingredients

  • 1 stick unsalted butter
  • 1 cup pecan halves, chopped slightly
  • 1/2 tsp salt
  • 2 large eggs
  • 3/4 cup granulated sugar
  • 2 cups heavy whipping cream
  • 1 cup whole milk

Directions

  1. Melt butter in a heavy pan over low heat.
  2. Add pecans and salt and sauté, stirring constantly until pecans start to brown.
  3. Set pecans aside to cool. Leave melted butter in pan.
  4. Whisk eggs until light and fluffy.
  5. Whisk in sugar a little at a time until completely blended.
  6. Pour in cream and milk and whisk to blend.
  7. Add reserved melted butter from pan. Mix well.
  8. Complete by following the directions of your ice cream maker or method. Add buttered pecans near the end of the ice cream maker’s cycle, when the ice cream has thickened.

Roasted Salted Pistachio and Cherry Biscotti

pistachio cherry biscotti_n

This crisp cookie bursts with the flavors of salty, roasted pistachios and tart, sweet cherries. Its attractive green and red colors would make it a welcome addition to this season’s offerings.

We picked up a bag of roasted and salted shelled pistachios last summer at Costco. The large bag of nuts was quickly opened, but we know that a rapidly expanding waistline can be the price for eating too many pistachios in too short a time. So, we put the bag in a mailing tub to be shipped north only partly consumed and forgot about it till recently. To our surprise, the nuts have remained amazingly tasty. Before they fall from grace, we wanted to make good use of them. Enter a biscotti recipe that celebrates their unique flavor. The roasted and salted aspect adds a delicious juxtaposition to the sweet tanginess of the dried cherries. We think these biscotti should be eaten all year ’round, in spite of their seasonal colors.

Roasted Salted Pistachio and Dried Cherry Biscotti

Ingredients

  • 1 3/4 cups all-purpose flour
  • 1 cup granulated sugar
  • 1/2 cup old-fashioned oats
  • 1 tsp baking powder
  • 1/2 tsp baking soda
  • 1/2 tsp salt
  • 2 large eggs
  • 3 tbsp light olive oil
  • 1 tbsp dried orange zest
  • 2 tsp dried lemon zest
  • 1 1/2 tsp vanilla extract
  • 1/2 tsp almond extract
  • 1 cup dried cherries, coarsely chopped
  • 1 cup roasted and salted pistachios, coarsely chopped

Directions

  1. Preheat oven to 350 degrees F. Line a baking sheet with parchment paper. Set aside.
  2. Combine first 6 ingredients in bowl of stand mixer fitted with a paddle.
  3. Mix on low speed until ingredients are well combined.
  4. In a separate bowl whisk eggs with next 5 ingredients.
  5. Add egg mixture to flour mixture. Beat on low until combined.
  6. Fold in cherries and pistachios.
  7. Transfer dough to a lightly floured surface.
  8. Divide dough in half.
  9. Using floured hands, shape each dough half into a 16″ long log.
  10. Place logs on parchment covered baking sheet, about 5″ apart.
  11. Flatten logs to a strip about 2″ wide, so you have two logs that are 16″ x 2″.
  12. Bake cookies until browned and set, about 30 minutes.
  13. Let cookies cool in pan placed on wire rack for about 15 minutes.
  14. Reduce oven temperature to 250 degrees F.
  15. On a cutting board, using a serrated knife, cut logs into slices, about 2/3″ thick.
  16. Place slices back on the parchment-lined baking sheets, cut side down and close together.
  17. Bake for 20 minutes.
  18. Flip the cookies to the opposite side and bake again for 20 minutes.
  19. Let cool completely before serving. Store in an airtight container at room temperature.

Recipe adapted from BON APPÉTIT

Chocolate Mousse Cake – Chocolate, Chocolate, Chocolate!

chocolate mousse cake n

Alternate layers of moist, airy devil’s food cake and rich chocolate mousse are topped with chocolate ganache. This is the kind of cake that makes you want to skip straight to dessert!

The culminating task for The Great Courses baking classes, taught by Chef Stephen Durfee of the Culinary Institute of America, was a chocolate mousse cake. This “final exam” would test my cake, mousse and ganache making skills. After careful scrutiny and tasting, Jack gave this cake an A+. Being a bit of an overachiever, that’s the lowest grade I would accept. The recipes below did make extra mousse and ganache. Extra mousse keeps well in the refrigerator to be enjoyed later. We used the extra ganache on sundaes served in almond lace bowls.

One of the benefits to living in the Arctic is our Arctic entry. This tiny room is like a decompression chamber when coming in from icy weather outside. There are two heavy metal doors, one leading outside and one leading inside, which keeps the icy weather at bay. This time of year the temperature in the Arctic entry is warmer than outside and cooler than the house – effectively making it a refrigerator. So, it is a perfect place to chill dough, store vegetables, and cool a chocolate mousse cake before serving to dinner guests.

chocolate mousse cake w torch n

Chef Durfee instructed his class to give the outside of the pan a burst of torch heat in order to loosen the mousse without melting it. Good thing I have a handy kitchen torch.

Chocolate Mouse Cake

Devil’s Food Cake

Ingredients

  • 2.5 oz. cocoa powder
  • 14 oz granulated sugar
  • 14 oz boiling water
  • 5 oz canola oil
  • 3 eggs
  • 1 tsp vanilla extract
  • 10 oz all-purpose flour
  • 1.5 tsp baking soda
  • pinch salt

Directions

  1. Preheat oven to 350 degrees F.
  2. Sift cocoa powder into a bowl.
  3. Add some of the boiling water to cocoa powder and whisk it together. Continue adding boiling water and whisking until mixture is smooth.
  4. Let cocoa mixture cool to body temperature before adding eggs.
  5. Blend sugar, salt, and baking soda in medium bowl.
  6. Sift flour into dry ingredients. Mix well.
  7. To the cooled cocoa mixture add oil, vanilla and eggs. Mix well.
  8. Stir wet mixture into dry and blend well.
  9. Divide batter into two pans and place in preheated oven.
  10. Cake is done when it has a glossy sheen on surface, about 30 minutes.
  11. Allow cake to cool completely.

Chocolate Mousse

Ingredients

  • 16 oz heavy whipping cream
  • 8 oz half and half
  • 1 oz sugar
  • 3 egg yolks
  • 12 oz chocolate, chopped
  • 1 oz espresso or liqueur (optional)

Directions

  1. Heat half and half and sugar in a pan over medium heat until it is steaming, not boiling.
  2. Place egg yolks in a medium mixing bowl. Whisk yolks.
  3. Slowly pour hot half and half mixture into yolks, whisking the whole time. This will temper the eggs.
  4. Pour the egg mixture back in the pan over medium heat until custard thickens enough to coat the back of a spoon.
  5. Place chocolate in a large mixing bowl. Pour hot egg mixture over chocolate. Allow to rest for a few minutes so chocolate will begin to melt.
  6. Whisk mixture until smooth.
  7. Stir in optional espresso or liqueur.
  8. Beat heavy whipping cream with mixer to soft peaks. The cream should still be pourable.
  9. Fold whipped cream into chocolate mixture. Keep blending until it’s thoroughly mixed.

Chocolate Ganache

Ingredients

  • 5 oz heavy cream
  • 1 oz corn syrup
  • 8 ox finely chopped chocolate

Directions

  1. Bring heavy cream and corn syrup to a boil.
  2. Pour cream mixture over chopped chocolate in a bowl.
  3. Allow mixture to rest for about 30 seconds.
  4. Whisk mixture in the center of the bowl. Once the center is mixed, whisk in larger circles to incorporate more of the mixture.
  5. Ganache should be shiny and thick when it is finished.

Assembling the chocolate mousse cake

If you have a cake ring, retrieve it from your cupboards. If, like me, you don’t, then use a springform pan for a cake mold.

  1. Place one devil’s food cake at the bottom of your mold.
  2. Pour some of the chocolate mousse on top of the cake layer.
  3. Fit the next cake on top of the mousse layer.
  4. Pour the rest of the mousse on top of the cake, or as much as you can.
  5. Place the mousse cake into your Arctic entry (or your refrigerator) to set up.
  6. After the cake has set up, pour the ganache on the cake. Smooth with an offset spatula.
  7. Continue to chill cake until right before serving.
  8. It is helpful to give the mold short bursts of heat from a propane torch to unmold it. Otherwise, run a knife around the circumference of the cake to loosen mousse and cake from ring. Remove ring and enjoy!

Almond Lace Ice Cream Cups

almond lace ice cream cups n

Extra rich vanilla ice cream is a delicious accompaniment for these elegant, lacy almond ice cream cups.

Every fall we enjoy making homemade ice cream in a variety of interesting and delicious flavors. And thinking as photographers, we wanted to show off one of this year’s star creations with something less ordinary than a store-bought cone. So, continuing with the almond theme we seem to be on recently, we created a sweet, candy-like bowl featuring the flavor and crunchy texture of this very versatile nut.

The finished ice cream cups came out a beautiful golden brown, supremely crunchy and sturdy enough to handle multiple scoops of ice cream or mounds of fresh fruit and whipped cream. We already have plans to heap them with three flavors of ice cream, sliced bananas and toppings for tomorrow’s dinner – banana splits!

almond lace ice cream cup b n

This almond lace cup is in the final stages of cooling on an upside-down ramekin. 

Almond Lace Ice Cream Cups

Ingredients

  • 4 tbsp unsalted butter
  • ¼ cup light corn syrup
  • ¼ cup packed brown sugar
  • a few drops of almond extract
  • ½ cup sliced almonds
  • 6 tbsp all purpose flour

Directions

  1. Preheat the oven to 350 degrees F. Line a baking sheet with parchment paper. Have 6 teacups or small ramekins ready.
  2. Melt butter in a medium pan over low heat.
  3. Mix in corn syrup and brown sugar. Mix well.
  4. Turn heat off and stir in almond extract, sliced almonds, and flour.
  5. Pour batter onto a parchment-lined baking sheet. Spread evenly.
  6. Bake for 10-12 minutes. The finished product should be golden brown.
  7. Remove from oven and let sit on baking sheet for about 45 seconds.
  8. Cut the large cookie into 6 even rectangles (one slice lengthwise down the middle to create two long pieces. Cut the long pieces into thirds.
  9. Lift each cookie off with an offset spatula (or other long, thin spatula) and drape the cookie on an overturned ramekin or teacup to cool and set in the shape of a bowl.
  10. If the cookies are too firm to shape, you can return the cookies to the oven briefly while they are on the overturned cups in order to let them melt to the right shape. Make sure you watch them, because they will begin to melt quickly.