Almond Matcha Snowball Cookies – A Green Tea Twist on a Classic

almond match snowball cookies n

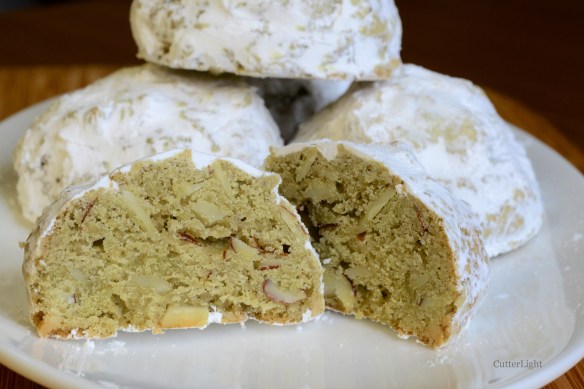
The light texture with the rich, complex flavors of matcha and almond put this cookie into the “favorites” category of my recipe file.

The tin of matcha green tea powder in my pantry continually inspires ideas. The powder is easy to use and has a distinctive flavor. I’ve made mini matcha cheesecakes, matcha butter cookies, and even matcha flavored ice cream. At this time of year, Jack always requests Russian tea cakes. He has fond memories of these delightful cookies tied to both Christmas and his grandmother. I thought I would create a recipe combining the texture and look of the traditional Russian snowballs with the inspiring flavor of matcha. This recipe is not shy on flavor. The small cookies give two bites with the pow of almond and the zip of matcha.

Almond Matcha Snowball Cookies

Ingredients

  • 1 cup unsalted butter, melted
  • 3 tsp water
  • 1 tsp vanilla extract
  • 3 tsp almond extract
  • 1 egg, beaten
  • 1 tbsp matcha tea powder
  • 1 1/2 cups powdered sugar
  • 2 cups all purpose flour
  • 1 cup sliced almonds
  • 1/2 cup powdered sugar, for rolling

Directions

  1. Mix butter, water, egg and extracts together in a small bowl.
  2. Sift together matcha tea powder, powdered sugar and flour in large bowl.
  3. Stir almonds into flour mixture.
  4. Stir butter mixture into flour mixture. Mix until dough forms. Add additional water if mixture is dry.
  5. Let dough chill for 30 minutes in refrigerator.
  6. Line baking sheet with parchment paper. Preheat oven to 325 degrees F (160 degrees C).
  7. Using a cookie scoop or a tablespoon, scoop out dough and shape into balls.
  8. Bake on baking sheet for 20 minutes. Cookies should be lightly browned on the edges when done.
  9. Cool completely on a wire rack.
  10. Roll cooled cookies in powdered sugar.
  11. Store at room temperature in an air tight container.

Makes 48 cookies.

Noodle Kugel – Entirely from Scratch or Not a Kosher Kitchen Kugel

noodle kugel n

A rich and creamy dish topped with crunchy noodles and speckled with cinnamon and currants. It’s especially delicious on a cold, snowy Sunday morning.

“Soul food” for us are the foods that stir strong memories and pleasant associations. If you’ve been following this blog, you already know that our soul food doesn’t harken from one location, one culture, or even one group of people. We have an eclectic past – one might say checkered – where food and food associations are always the common denominator.

That brings us to the present where I am in my kitchen in Ulaanbaatar, Mongolia, with a craving for warm noodle kugel inspired by my Jewish roots. I don’t know who gave me my first taste of this rich, satisfying and sweet dish. Maybe it was one of my Jewish grandmas, who still metaphorically lurk in my kitchen. Noodle kugel is a relatively easy dish with normally available ingredients. This version of noodle kugel has been adapted to my Mongolian pantry, which means I started with egg pasta I made from scratch. I substituted the traditional cottage cheese with homemade ricotta because I can’t find cottage cheese here. The ricotta turned out to be a delicious substitution. And I used currants instead of raisins – just because they are tasty and pack a big bang of flavor into a cute little package. The end result was as satisfying as I remember. I’d like to think mine tasted better than my memory serves if only because of the fresh pasta.

Scratch Noodle Kugel

Ingredients

  • 4 tbsp unsalted butter, melted
  • 3 large eggs
  • 1 cup homemade ricotta cheese
  • 1 cup sour cream
  • 4 tbsp granulated sugar
  • 1 tsp ground cinnamon
  • 3 cups wide egg noodles, cooked al dente
  • 1/4 cup dried currants

Directions

  1. Grease an 8 x 8 inch glass baking dish (20 x 20 cm).
  2. Preheat oven to 350 degrees F (175 degrees C).
  3. In a large bowl, thoroughly mix together first 6 ingredients.
  4. Gently mix noodles into egg mixture.
  5. Fold in currants.
  6. Pour noodle mixture into prepared baking dish.
  7. Bake for 30 minutes. Custard should be set and top of kugel should be lightly browned.

The Secret to Super Moist, Sweet Cornbread

cornbread super moist n

Moist cake-like cornbread, a perfect accompaniment to a spicy chili or a spicy stew.

We. love. cornbread. From muffin-shaped to loaf-shaped cornbread, from cornbread made with coarse cut cornmeal to smooth cornbread made with fine meal, we love them all. After years of making and enjoying different versions, I think we now have a favorite. The secret is plain yogurt. This sweet, moist version has a lovely flavor and a smooth texture that has put this recipe at the front of our recipe box.

Moist Sweet Cornbread

Ingredients

  • 1/2 cup unsalted butter
  • 2/3 cup granulated sugar
  • 2 eggs
  • 1 cup plain yogurt
  • 1/2 tsp baking soda
  • 1 cup cornmeal, fine ground
  • 1 cup all-purpose flour
  • 1/2 tsp salt

Directions

  1. Grease an 8 x 8 inch baking dish, or a 9-inch springform pan. Preheat oven to 375 degrees F (175 degrees C).
  2. In a medium pan, melt butter over medium heat. Remove pan from heat.
  3. Stir in sugar.
  4. Mix in eggs and yogurt.
  5. In a medium bowl, whisk together baking soda, cornmeal, flour, and salt.
  6. Pour flour mixture into butter mixture. Mix well.
  7. Pour batter into baking dish.
  8. Bake for 30 to 40 minutes. Cornbread will be lightly brown and a wooden toothpick inserted into the center of the cake should come out clean.

Maple Pumpkin Pie Brûlée or What to do with leftover pie filling?

Pumpking Brulee n

Dark maple syrup and good bourbon put this pumpkin pie filling over the top. We invariably have extra – perfect for an American-style crème brûlée

We are right around the corner from the pumpkin pie holiday of the year – my birthday. 😉 Last weekend, Jack made his delicious maple pumpkin pie from a fresh pumpkin we found in one of our local markets here in Ulaanbaatar. As is often the case, we ended up with extra filling, so…

Armed with granulated sugar and a kitchen torch, I put it to delicious use. This brûlée deserves a recipe of it’s own and could easily take the place of my traditional birthday pie or Thanksgiving dessert. Follow the original recipe here to make a traditional pie. Or use this recipe to make eight individual servings of a new twist on a holiday favorite.

Maple Pumpkin Pie Brûlée

Ingredients

  • 3 large eggs
  • 2 cups pumpkin purée, either canned or made from fresh roasted pumpkin or squash
  • 1 cup heavy whipping cream
  • 1/4 cup maple syrup
  • 2 tsp vanilla extract
  • 1/4 cup granulated sugar
  • 1 tsp ground cinnamon
  • 1/2 tsp ground ginger
  • 1/2 tsp mace or nutmeg
  • 2 tbsp bourbon
  • extra granulated sugar for the top

Directions

  1. Preheat oven to 350 degrees F (175 degrees C).
  2. Beat eggs in a large mixing bowl.
  3. Mix next nine ingredients into eggs. Mixture should be smooth.
  4. Evenly divide mixture into 8 half cup ramekins.
  5. Place ramekins in a large baking dish.
  6. Pour enough water into baking dish so that water comes at least halfway up the sides of the ramekins.
  7. Bake until the filling is set, about 40 minutes.
  8. Remove ramekins from water and chill in the refrigerator for 2 hours. (Covered, they will keep nicely for a couple of days.)
  9. Half an hour before serving, set the ramekins on counter to come to room temperature.
  10. Sprinkle a generous 1/2 tsp of granulated sugar on top of each ramekin.
  11. Using a kitchen torch, melt the sugar to create a crisp, caramelized top.
  12. Allow the pumpkin brûlée to sit for 5 minutes before serving.

Makes 8 half cup ramekins.

You might also like our other favorite pumpkin pie recipe by Craig Claiborne.

Onion Focaccia

Focaccia Onion n

Ready for sandwiches or to accompany soups or salads, this flavorful and versatile belongs in your repertoire!

The base recipe for this scrumptious allows you to add different herbs and seasonings such as rosemary or even saffron. In this recipe, I used dried onions. But onions could be substituted with olives, sun-dried tomatoes, parmesan cheese, or any number of savory add-ins. With a little imagination, focaccia could be turned from savory to sweet by using dried fruit and coconut. Today’s version features the traditional flavor and richness of olive oil with minced onions. I love onion flavor!

Onion Focaccia

Ingredients

  • 1 tbsp active dry yeast
  • 1 tbsp granulated sugar
  • 1 1/2 cups warm water (105 degrees F/40 degrees C)
  • 1/2 cup extra virgin olive oil
  • 1 1/2 tsp salt
  • 4 cups all purpose flour
  • 1/2 cup dried onions
  • Coarse sea salt for sprinkling

Directions

  1. In a large bowl, stir together yeast, sugar, and water.
  2. Stir in 1/4 cup of the extra virgin olive oil.
  3. Stir in 1 cup of the flour and the salt.
  4. Stir in another cup of the flour and the dried onions.
  5. Add in another cup of flour and mix.
  6. Knead in the last cup of flour 1/4 cup at a time. Dough should be soft, smooth and slightly sticky.
  7. Cover loosely with plastic wrap and let rest for 20 minutes.
  8. Line a baking sheet with parchment paper.
  9. Turn dough out onto the parchment paper. Press the dough to flatten to about 1 inch thickness.
  10. Cover loosely with oiled plastic wrap and let rise at room temperature for about an hour.
  11. Make deep indentations with your your fingertips all over the surface of the dough.
  12. Drizzle remaining olive oil over top of dough. Let stand while you preheat oven.
  13. Set oven temperature to 425 degrees F (220 degrees C).
  14. Sprinkle dough lightly with coarse sea salt.
  15. Bake bread for 20 – 25 minutes. Bread is done when bottom is lightly browned.
  16. Serve warm or at room temperature.

Moist Macadamia Nut Coffee Cake

Macadamia Nut Coffee Cake n

Crunchy, salted and toasted macadamia nuts knock this moist coffee cake recipe out of the park.

I’ve started on a project to collect excellent “base” recipes to which I can easily interchange ingredients. My initial collection includes baked goods such as braided bread, muffins and bagels. With this collection in mind, I opened one of my favorite baking recipe books, The Williams-Sonoma Baking Book, and flipped through it to my go-to focaccia recipe. On my way to that recipe, I was distracted by a delicious-looking macadamia nut coffee cake recipe.

Some of my best side trips have been when I have given in to distraction. This was definitely a worthy side trip! I did adapt the recipe slightly, but it turns out that it perfectly fit my definition of a “base” recipe. Macadamia nuts could be swapped out for other kinds of nuts. Dried fruit could be added or even a thin layer of homemade jam in the middle. Now there’s an idea!

Macadamia Nut Coffee Cake

Ingredients

Topping

  • 1 cup all purpose flour
  • 1/3 cup granulated sugar
  • 1 tsp ground cinnamon
  • 1 tsp galangal (or 1/2 tsp ground ginger)
  • 6 tbsp unsalted butter, cold and cut into small pieces

Cake

  • 1 1/2 cups all purpose flour
  • 1/2 cup granulated sugar
  • 1/2 cup packed brown sugar
  • 1 1/2 tsp baking powder
  • 1 tsp baking soda
  • pinch salt
  • 1 cup plain yogurt
  • 2 large eggs
  • 1/2 cup vegetable oil
  • 1 1/2 tsp vanilla extract
  • 1 cup roasted macadamia nuts, coarsely chopped

Directions

  1. Preheat oven to 350 degrees F (175 degrees C). Grease a 9 inch springform pan. Line bottom of pan with parchment paper. Set aside.
  2. Make topping. In a small bowl whisk together first four topping ingredients. Rub in butter with your fingers until coarse crumbs form. Set bowl aside.
  3. In a medium bowl, whisk together first six cake ingredients.
  4. In another medium bowl, mix together yogurt, eggs, oil, and vanilla.
  5. Pour wet ingredients into dry. Mix well.
  6. Pour half the batter into prepared springform pan.
  7. Sprinkle half of topping mixture evenly onto batter.
  8. Cover evenly with remaining batter.
  9. Sprinkle nuts evenly over top of batter. Press them into batter slightly.
  10. Cover with remaining topping.
  11. Bake for 40 – 45 minutes. Top should be golden brown and a wooden pick inserted into the center of the cake should come out clean.
  12. Cool pan on wire rack for 20 minutes.
  13. Remove sides of springform pan. Serve warm or at room temperature.

Chewy Melty Double Chocolate Oatmeal Cookies

Double chocolate oatmeal cookies n

Some people enjoy warm chocolatey cookies with cold glasses of milk. We prefer ours with a splash of bourbon. 

This recipe adds to the already deliciously chewy texture of oatmeal cookies by including cocoa powder for another layer of flavor. A zip of cinnamon adds still another layer. We couldn’t wait for these to cool. We were rewarded with a scrumptious cookie with a rich melty center, thanks to the chocolate chips. Perfect on a day when a rare fog crept into Ulaanbaatar “on little cat feet” and froze to bare tree branches.

Double Chocolate Oatmeal Cookies

Ingredients

  • 1 cup all purpose flour
  • 3 tbsp dutch processed cocoa powder
  • 1 tsp baking powder
  • 1/2 tsp baking soda
  • generous pinch salt
  • 1/2 tsp ground cinnamon
  • 1/2 cup butter, unsalted
  • 1 cup granulated sugar
  • 2 tbsp honey
  • 1 large egg
  • 1 tsp vanilla extract
  • 1 cup rolled oats
  • generous 1/2 cup semi sweet chocolate chips

Directions

  1. Preheat oven to 350 degrees F (175 degrees C).
  2. Line baking sheet with parchment paper. Set aside.
  3. Whisk together the following dry ingredients:  flour, cocoa, baking powder, baking soda, salt and cinnamon in a medium bowl. Set aside.
  4. In a medium pot over medium heat, melt butter. When butter is melted, remove pot from heat.
  5. Mix sugar and honey into melted butter.
  6. Mix egg and vanilla into sugar mixture.
  7. Stir dry ingredients into sugar mixture. Mix well.
  8. Fold oats into dough.
  9. Fold chocolate chips into dough.
  10. Place tablespoon-sized scoops of dough onto prepared baking sheets. Press dough down to flatten slightly.
  11. Bake for 8 – 10 minutes. Cool on cookie sheet for about 5 minutes before removing to wire rack to finish cooling. Enjoy while still warm and melty.


The Yin and Yang of Chocolate Chip Cookies

Yin Yang Chocolate chip cookies n

Which side is more delicious? The chocolate with white chocolate chips? Or the traditional chocolate chip side? 

Life is too short for just one kind of cookie. Combine two cookie doughs that take about the same amount of time to bake and you have a recipe for a cookie which will disappear in the blink of an eye! These cookies were as fun to make as they were to eat… play dough for a baker!

Yin Yang Chocolate Chip Cookies

Ingredients

Chocolate Chip Dough

  • 3/4 cup unsalted butter, melted
  • 3/4 cup brown sugar
  • 1/4 cup granulated sugar
  • 1 large egg
  • 2 tsp vanilla extract
  • 2 cups all purpose flour
  • 1 tsp baking soda
  • pinch salt
  • 1 cup semi-sweet chocolate chips

White Chocolate Chip Chocolate Dough

  • 1/2 cup unsalted butter, melted
  • 1/2 cup granulated sugar
  • 1/2 cup brown sugar
  • 1 large egg
  • 1 tsp vanilla extract
  • 1 cup all-purpose flour
  • 10 tbsp dutch processed cocoa
  • 1 tsp baking soda
  • pinch salt
  • 1 cup white chocolate chips

Directions

  1. Make the chocolate chip dough.
  2. In a large bowl, mix together butter, sugars, egg and vanilla.
  3. In a medium bowl, whisk together flour, baking soda and salt.
  4. Thoroughly mix the flour mixture into the butter mixture.
  5. Fold chocolate chips into dough.
  6. Turn dough out onto piece of plastic wrap. Cover tightly and refrigerate for at least 2 hours.
  7. Make the white chocolate chip chocolate dough.
  8. In a large bowl, mix together butter, sugars, egg and vanilla.
  9. In a medium bowl, whisk together flour, cocoa, baking soda and salt.
  10. Thoroughly mix the flour mixture into the butter mixture.
  11. Fold white chocolate chips into dough.
  12. Turn dough out onto piece of plastic wrap. Cover tightly and refrigerate for at least 2 hours.
  13. Preheat oven to 350 degrees F (175 degrees C). Line baking sheet with parchment paper.
  14. Take a tablespoon of the light dough and roll into a ball.
  15. Take a tablespoon of the chocolate dough and roll into a ball.
  16. Cut each ball in half and press the opposite doughs together, so you have a ball of half chocolate chip dough and half white chocolate chip dough.
  17. Press the balls slightly and place on prepared baking sheet. Repeat process until the baking sheet is filled. I fit 20 cookies on a sheet.
  18. Bake cookies for about 10 minutes. I like mine soft, so they will appear slightly underdone at 10 minutes. Bake a couple of minutes longer for a crunchier cookie.
  19. Enjoy warm or at room temperature.

Makes about 60 cookies.

The Suffering Bastard – a Toast to the End of Summer and the Beginning of Fall

Suffering Bastard n

The end of summer, the beginning of autumn – and a little of both in this lovely drink that combines citrus, bourbon, gin and ginger ale.

Sometime during the late 40’s in Cairo, Egypt, a bartender by the name of Joe Scialom thought to combine gin and brandy to remedy his hangover. A bit of lime cordial gave the drink a citrusy zip and a few ounces of ginger ale added fizz. In 1950, Time Magazine reported that it was “Egypt’s favorite drink.” At any rate, the concoction was popular at the original Shepard’s Hotel were Scialom was employed until the hotel burned down in 1952.

These days, Suffering Bastard’s are more commonly made with bourbon than brandy, and although the original called for bitters, we’ve omitted it here. Pick a glass, add ice, pour in the ingredients and give it a stir.

Suffering Bastard

Ingredients

  • 1 ounce bourbon
  • 1 ounce gin
  • 1 ounce lime juice
  • 4 ounces cold ginger ale

Directions

  1. Fill an old fashioned glass with cubed ice.
  2. Pour bourbon, gin, lime juice, and ginger ale over ice.
  3. Give it a quick stir and garnish with a slice of lime.


Good Morning, Ulaanbaatar! Carrot, Pineapple and More Muffins

carrot pineapple muffins n

Moist, delicious muffins filled with carrots, pineapple, pecans, and currants.

Sometimes, I wake up and want muffins for breakfast. The beauty of this muffin recipe is two-fold. It’s a quick recipe. Fifteen minutes after they were popped into the oven, they were ready to eat! And the recipe is a great base recipe. So many of the ingredients could be swapped for others to result in another version of a moist, tasty muffin. The carrots could be swapped with grated zucchini or summer squash. The pineapple could be replaced by chopped apple or smashed banana. The pecans and currants could be traded with any kind of nuts and dried fruits. The variations can be as wild as you can imagine.  Just check your pantry and make a batch!

Carrot, Pineapple and More Muffins

Ingredients

  • 2 eggs
  • 3/4 cup granulated sugar
  • 1/3 cup sour cream
  • 2 tbsp vegetable oil
  • 2 tsp vanilla extract
  • 1 1/3 cup all-purpose flour
  • 1 1/4 tsp baking powder
  • 1/4 tsp baking soda
  • pinch salt
  • 1 cup grated carrots
  • 1 cup chopped pineapple
  • 1/2 cup chopped pecans
  • 1/3 cup dried currants

Directions

  1. Grease 12-muffin tin. Set aside.
  2. Preheat oven to 375 degrees F (190 degrees C).
  3. In a medium bowl, whisk together first 5 ingredients.
  4. In a large bowl, combine flour, baking powder, baking soda, and salt.
  5. Stir carrots, pineapple, pecans and currants into flour mixture.
  6. Stir egg mixture into flour mixture until just combined.
  7. Divide batter evenly into prepared muffin tin.
  8. Bake for 15 – 20 minutes, until tops are golden brown and spring back to the touch.