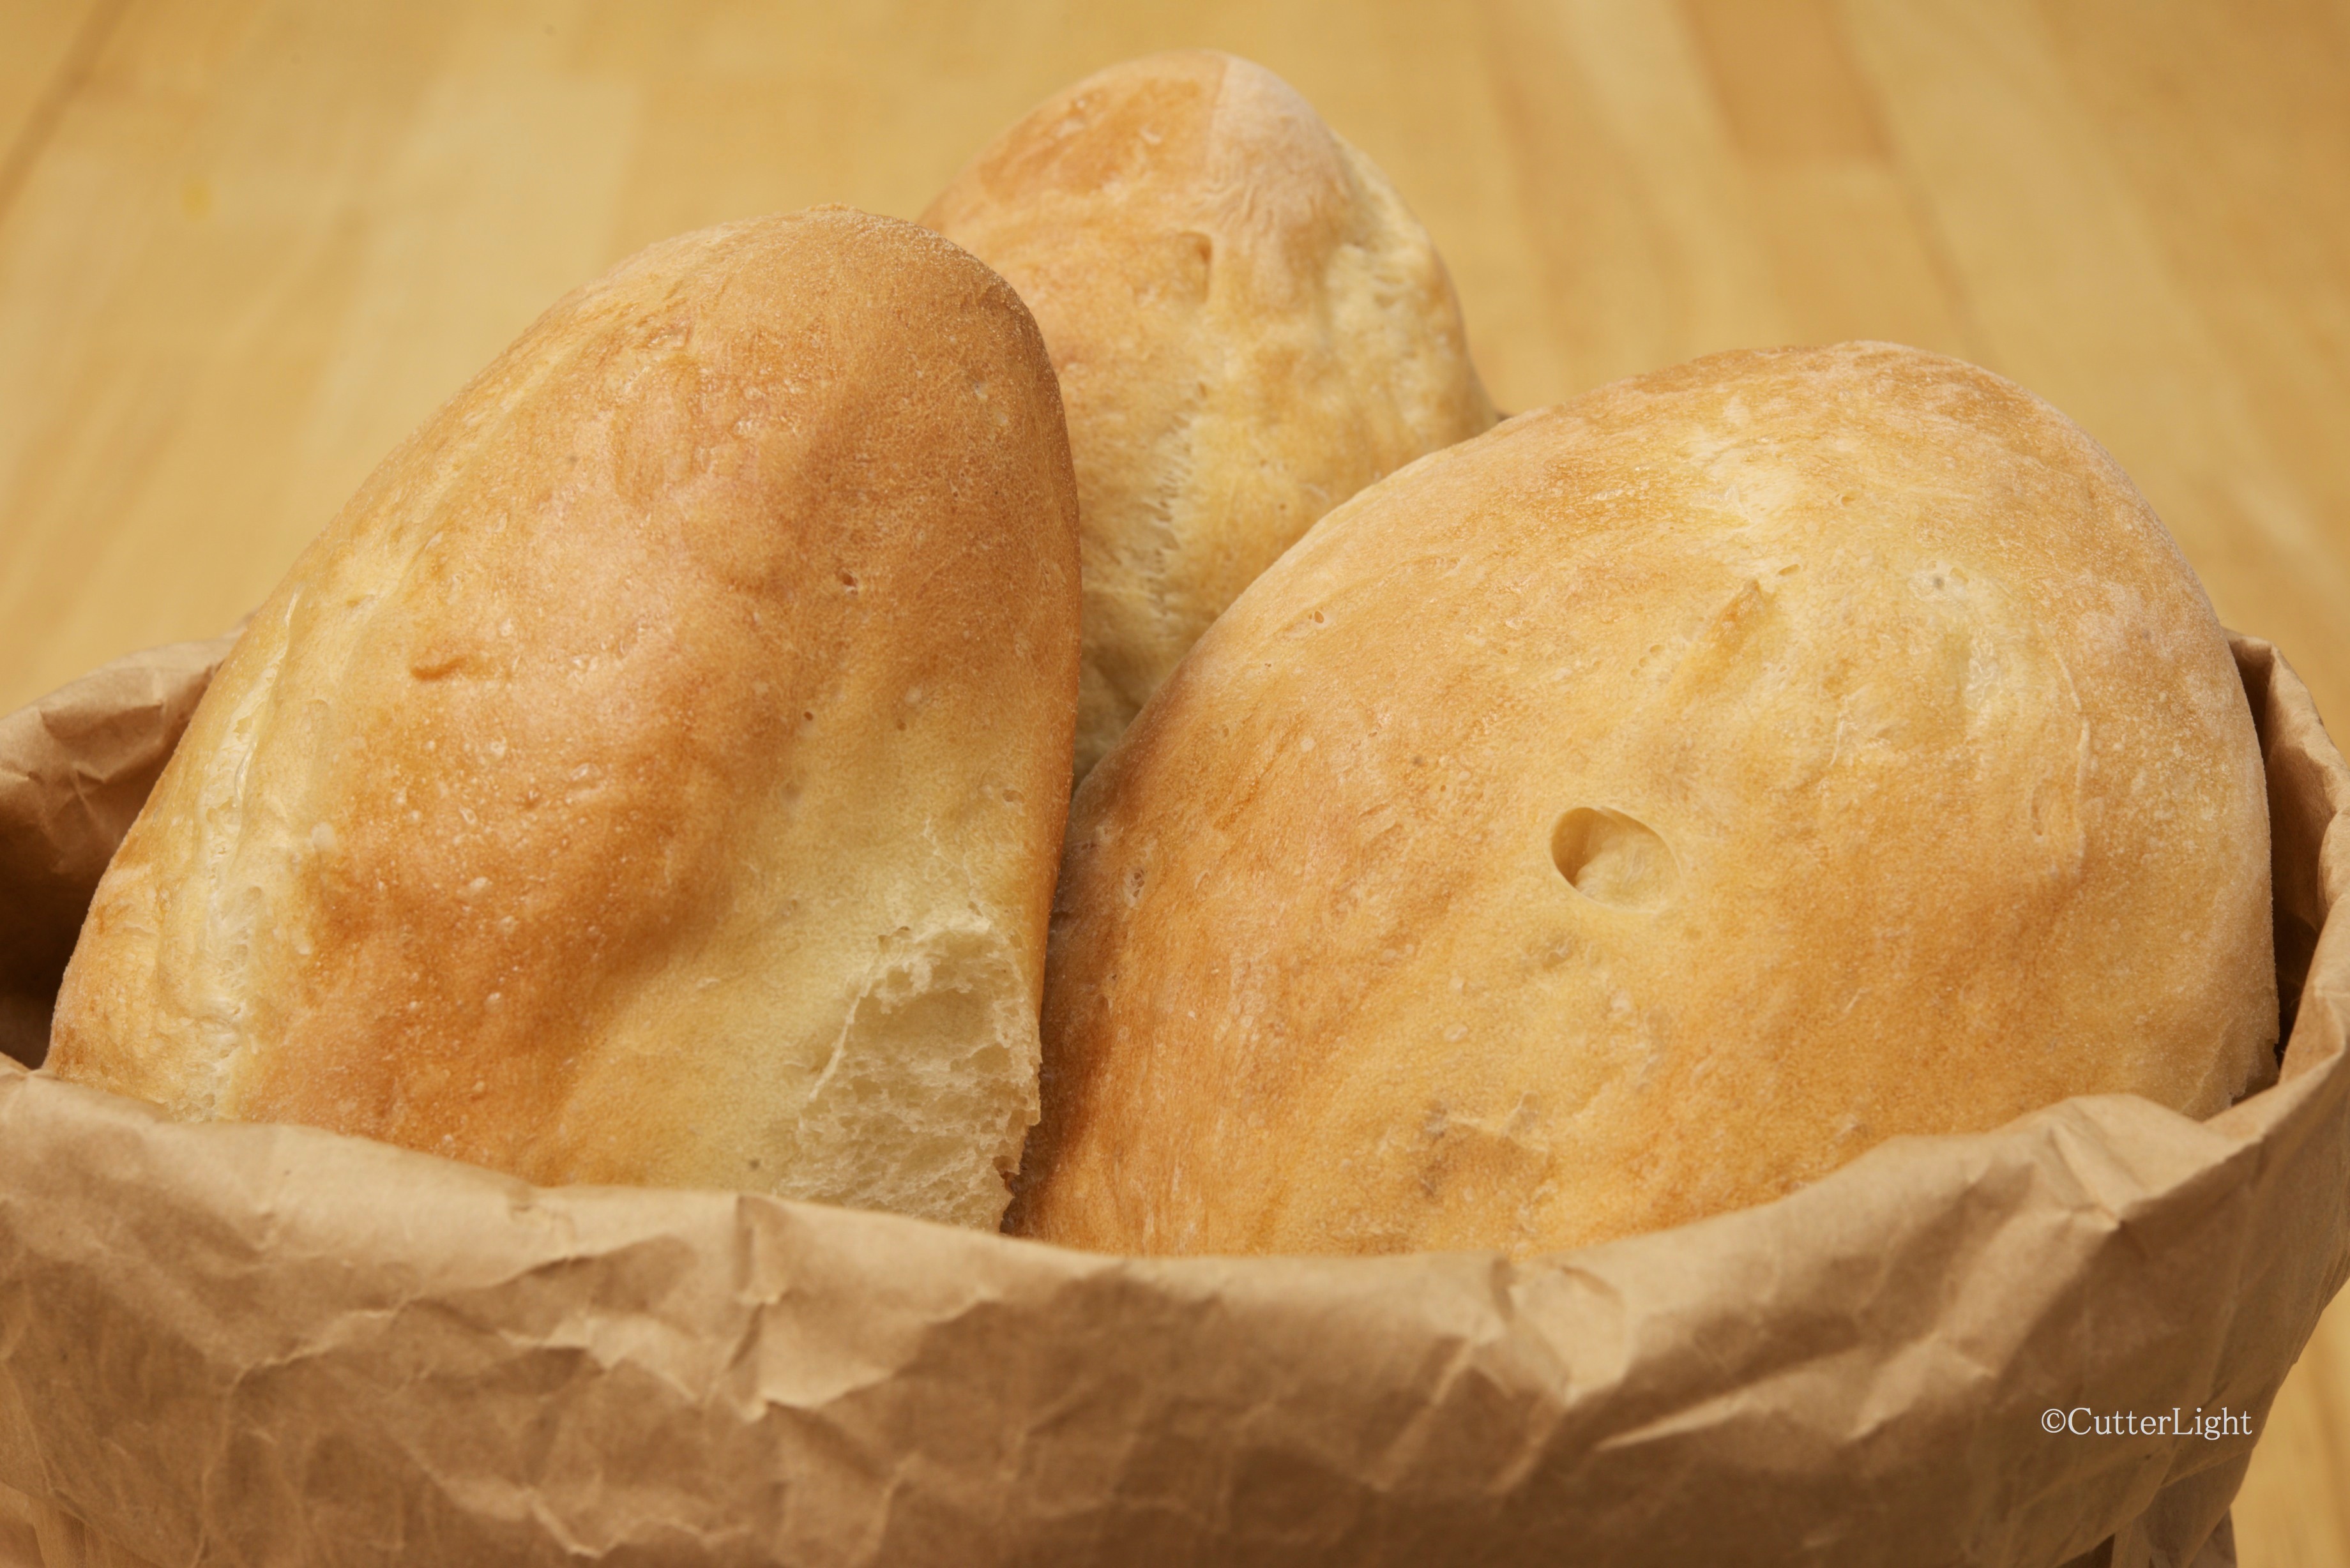
Coconut Modest Lace Cookies

modest lace cookies n

Chocolate drizzle sets up on a fresh batch of ultra thin, chewy, crispy, modest lace cookies.

Traditionally, lace cookie dough spreads thin and bubbles while it bakes resulting in a delicate confection marked with lacy holes. I was intrigued with a coconut lace cookie recipe I found posted by Giada De Laurentiis. The cookies in the photo on her post looked simultaneously chewy and crispy and I could easily imagine the coconut flavor layered with the semi-sweet chocolate drizzle. Unfortunately, the reviews on her recipe were terrible (too greasy, too sugary, gloppy, lacking distinct flavor), so I contemplated how I could create a similar cookie while avoiding the pitfalls.

After making adjustments to amp up the flavor and improve the texture, the cookies came out of the oven a tasty winner. Although these very thin cookies crisped up around the edges nicely while remaining chewy, they aren’t very “lacy,” so I’ve dubbed them “modest lace.” The coconut shines through deliciously.

Modest Coconut Lace Cookies

Ingredients

  • 3/4 cup packed brown sugar
  • 1/2 cup unsweetened coconut flakes
  • 1/4 cup all purpose flour
  • 1/4 cup unsalted butter, melted
  • 1 tbsp unrefined coconut oil, melted
  • 1 egg, beaten
  • 1/2 tsp vanilla extract
  • pinch salt
  • 1/2 semi-sweet chocolate chips

Directions

  1. Preheat oven to 375 degrees F.
  2. Line two baking sheets with parchment paper. Set aside.
  3. In a large bowl, thoroughly mix together sugar, coconut and flour.
  4. Mix in butter, coconut oil, egg and vanilla to coconut flake mixture.
  5. Drop batter by teaspoonful on baking sheets. These cookies spread, so give them a couple of inches to do so.
  6. Bake cookies for 8 minutes. They should be golden brown in the center and darker brown on the edges.
  7. Slide parchment paper with cookies on it onto wire racks to fully cool.
  8. When cookies are cool, melt chocolate chips in a double boiler. Use a fork to drizzle chocolate onto cooled cookies.
  9. Let chocolate set before serving. Pop the cookies in the freezer to set the chocolate faster.

Makes two dozen cookies.

A Great Brine and Smoke – Soy Sauce, Brown Sugar and Seasonings for Salmon, Trout and other Fish

smoked salmon in rows_n

For the past couple of years, our brining and smoking method for salmon, trout, sturgeon and other fish has been the most popular article on our blog. Here it is again, with updated notes and photos.

If you’ve ever looked at those electric smokers sold in sporting goods stores and wondered if they did the job, the short answer is, “They do.” Our favorites are the Big Chief, Little Chief and Mini Chief models made by Smokehouse in Hood River Valley Oregon. Inexpensive, easy to use, easy to store and efficient, these smokers come with complete directions and a useful booklet that details the how-to of smoking and provides a number of recipes for fish, shellfish, poultry, meat, cheese, and even noodles, soup and breads.  My own most recent experiment with smoking was sea salt. It came out… smokey!

smoked salmon fillet_nTo obtain the best smoked fish, start with high-quality fish. Fresh fillets from bright fish make for a far better product than poorly cared for fillets from a badly handled fish. Also – and this is important -the method we use is not designed to kill parasites. It is recommended that fish be frozen at the lowest freezer setting possible for at least seven days before smoking them in order to ensure that they are parasite-free. You can read NOAA’s full recommendations here.

Below: A double batch of sockeye salmon in side-by-side Big Chief smokers.

smoking salmon double batch_n

For salmon, trout, sturgeon and similar fish with fairly firm meat, we marinate fillets in a wet brine for roughly six to 10 hours depending on the size and thickness of the fish or fillets. The fish can be brined in non-reactive glass, plastic or stainless steel (not aluminum) pans in the refrigerator or in a bucket or cooler with a couple of sealed Ziplock bags of ice thrown in to keep the mixture cool. Following are the step-by-step instructions we use for whole small trout and the fillets of salmon and other fish. The recipe can easily be modified to add other flavors or to finish the smoked fish with a sesame seed glaze.

Brine

Ingredients: For eight pounds of salmon, trout, sturgeon or other fish

  • 8 to 10 pounds fillets, skin on, rinsed, patted dry, cut into small pieces. A good size is about 3″ x 6″, but smaller or slightly larger is fine. Small trout can be cleaned and smoked whole.
  • 8 cups water
  • 2 cups soy sauce (Kikkoman is our favorite)
  • 1 1/2 cups brown sugar
  • 1/2 cup sea salt or kosher salt (Do not use iodized salt. It will impart an unpleasant flavor.)
  • 1 1/2 tbsp granulated garlic
  • 1 tbsp ginger

Directions:

  1. Mix brining ingredients together in a large bowl.
  2. Pour mixture over fillets, making sure they are covered, or until they float.
  3. Cover containers and marinate for about 8 hours (or overnight) in the refrigerator.
  4. Remove fillets from brine, pat dry with paper towels, and arrange on racks to dry for about an hour – until a glaze forms on the surface of the fish.
  5. Smoke fish according to your smoker’s directions with alder wood, mesquite, fruit tree or hickory chips. Check occasionally, keeping in mind that air temperature will influence smoking time. Typical smoking times range from 6 to 12 hours. A slightly wet product is best suited for many of the recipes we enjoy and for canning. For straight snacking, a drier product may be preferred.

Sockeye Salmon off the Beaten Path: Dipnetting on Alaska’s Copper River

barbra dipnetting sockeye b and w_n

A two-mile hike into the canyon, a scramble down a steep bank, a piece of river with no one else in sight, and a run of red salmon hugging the shoreline, pushing upstream, heading home… 

Chalky-brown with glacial silt and bank erosion, the broad river sweeps by below, swift, powerful, wild. If we’ve timed it right, the piece of water we’ve chosen to fish will be full of sockeyes. Fireweed has just begun to bloom, and the forest trail above the river is lined with bluebells and pink wild roses.

barbra dipnetting sockeye_n

Barbra fishes an eddie where the fish swim close to the bank on their journey to spawning grounds further upstream.

This is not the fishing of hackle and thread carefully presented on graceful, arcing casts, nor even of Pixie spoons heaved out and fluttered through clear riffles. The net our friend Nathaniel Wilder has loaned us measures roughly three feet across and four feet long and is attached to a 12-foot handle. The rig is cumbersome, made more so by the surging tug of the current and we take turns bracing the handle against a slate rock outcropping to keep it steady in the river’s flow. When a fish hits, the net comes to life.

barbra dipnetting sockeye b_n

With a salmon in the net, the scramble for solid footing begins. 

sockeye in net_nLeft: On average the hens are smaller, but the roe is a delicacy. 

They come one, two and even three at a time and average six pounds apiece. The limit is 30, and it’s quickly apparent it won’t take long to put that many on the bank. A small, ice-cold stream cascading down the canyon wall provides the perfect place to clean the catch. We’re happy to have packed in a scrap of wood to serve as a filleting table.

The two-mile hike back to our camper, our backpacks loaded with 90 pounds of fish between the two of us is work, but a good kind of work. Back home, we’ll smoke and can the bright red fillets. The roe we’ve kept will be cured and made into ikura.

sockeye fillets_nBrilliant red-orange and marbled with fat, these sockeye fillets are ready to be brined and smoked, seasoned and broiled, grilled on a cedar plank, or sliced thin and served as sashimi. As per standard practice in Japanese sushi shops, we freeze salmon (and other fish) for at least 24 hours prior to preparing raw.

eagle in high water_n

Warm weather in Alaska has meant quickly melting ice and high water. 

wild roses_n

blue bells and trestle ruins_n

Above left: Bluebells, horsetail ferns and salmonberries take over the ruins of an old train trestle. Right: Dense patches of wild rose perfume the air along the trail. Below: We hiked out of the canyon at midnight, just as the Alaskan sun was setting.

copper river midnight sunset_n

For an excellent recipe for brining and smoking salmon, see: Smoked Salmon with Soy Sauce and Brown Sugar Brine

For an easy ikura curing method, see: Ikura: Curing Salmon Eggs

Eat Wild! Sautéed Fireweed Shoots and Fiddleheads with Freshly Caught Fish

fireweed and fiddleheads w rockfish_n

Lightly sautéed in olive oil with a pinch of salt, these tender fireweed shoots and fiddlehead ferns compliment fresh rockfish on a bed of pasta. 

With the beautiful warm weather we’ve been enjoying this summer in Seward, spring flew by before we knew it. So we had to do some climbing to harvest the purple-colored fireweed shoots and young fiddleheads we wanted for the rockfish dinner we had planned.

fireweed shoots_nEleven hundred feet up Mount Marathon, near the last patches of snow at the edge of the timberline where the cold had extended spring we found what we were looking for. We filled our stainless steel water bottle with a couple handful’s worth of these delicacies, added clear, icy water from a rivulet to keep the shoots cool and hiked back down the mountain.                                                             The perfect time to pick fireweed is when the young shoots are still purple. 

Mount Marathon mid June _n

                                                                              Right: The town of Seward is a nearly vertical drop below the timberline of Mount Marathon. The day was sunny and shorts-and-t-shirt warm and even with a bit of haze in the air the view of mountain-rimmed Resurrection Bay was spectacular.

Below: This well concealed nest added to the sense that we had turned back the clock a few weeks to earlier in spring.

fox sparrow nest mt marathon_nBack aboard Bandon that evening, we poured out a little bourbon into a couple of tumblers, seasoned a fillet from a rockfish we’d caught the day before, and panfried it along with the fiddleheads and fireweed.

There is something incredibly satisfying about harvesting one’s own dining fare – whether from sea or river, garden or mountainside. If you are lucky enough to live where you can gather wild plants, we hope you will. Keep your best spots secret, leave plenty to sustain regeneration and a healthy population, and maybe pick up a little bit of the litter less considerate people have left behind on your way out. Bon appétit!

yelloweye rockfish_n

Bourbon and Vodka Vanilla Extract from Scratch: Do Not Open till Christmas!

vanilla w bourbon_n

Quality Madagascar vanilla beans, bourbon in one bottle and vodka in the other, and the experiment begins. If all goes well, in six months we’ll have two excellent bottles of double-strength vanilla extract for our Christmas pies and confections.

Even when perfectly good store-bought products are available, we are fascinated by how various foods are actually made. For excellent vanilla extract, we know of no better than Penzeys Spices double strength. But we wanted to give making our own a go.

vanilla beans bourbon and vodka_n

We purchased our Madagascar vanilla beans from Penzeys. For the bourbon and vodka, we went with two well-known makers – a bourbon we enjoy sipping and a vodka that’s fine in our bloody Mary’s.

vodka pouring into bottle_n

There’s really nothing to creating your own vanilla extract. We had 15 long beans which we cut in half, split down the middle, and placed in old-fashioned bottles with tight seals.

Whether the subject is sherry for cooking or bourbon for vanilla extract, an oft-repeated axiom is “Don’t use anything you wouldn’t drink.” That’s good advice, on par with adding seasonings “to taste” in recipes. On one hand, this isn’t the place to use the finest bourbon one might drink; on the other hand, in our own experience we noticed a marked improvement in our sauces and sautés when we moved away from lower end sherries and upgraded to more drinkable varieties.

.

bourbon pouring into bottle_new

Once the vanilla beans and alcohol have been combined and sealed tight, it’s helpful to give the bottle a gentle shake from time to time to ensure mixing and full extraction. For the richest, most flavorful extract, allow six months to go by before opening.

For this batch, that means we’ll be able to break the seal for Christmastime chocolate orange meringue pie, pecan pralines and extra rich vanilla ice cream.

Lemon Vanilla Biscotti (with Ports, Sherries, Muscat and Roasted Grouse)

fortified wine_n

Light, crunchy and mildly sweet, Lemon Vanilla Biscotti (see recipe below) was the perfect accompaniment to an evening of sampling Port Wines, Sherries, Madeira and Muscat.

Lesson 8 in the wine appreciation course we’ve been taking this summer focused on fortified wines – ruby Port, tawny Port, fino Sherry, Amontillado, Madeira and Muscat. We wanted something sweet but not overly so to finish an evening that began with roasted wild grouse, squash risotto, Brussels sprouts and the sweet wines.

biscotti_n

Baked three times, biscotti has a satisfying crunch. This lemon vanilla version could be drizzled with icing, but we enjoyed ours unadorned. 

Although served on a warm Alaskan June evening, the meal took us to visions of late fall evenings and Autumn-colored forests where wild grouse thrive. The grouse and the squash risotto (one of the best we’ve ever enjoyed) were courtesy of our friends Bix and Krystin at Alaskagraphy.

Lemon Vanilla Biscotti

Ingredients

  • 2 cups all purpose flour
  • 1 cup granulated sugar
  • 1 tsp baking powder
  • 3 large eggs
  • 1 tsp vanilla extract
  • 1  1/2 tsp lemon zest

Directions

  1. Preheat oven to 300 degrees F.
  2. Line a baking sheet with parchment paper. Set aside.
  3. Combine flour, sugar and baking powder in medium bowl. Set aside.
  4. Whisk eggs, vanilla and zest in a medium bowl.
  5. Add flour mixture to wet mixture and stir until combined.
  6. Scrape dough onto parchment-lined baking sheet.
  7. With floured hands, shape dough into a flat rectangle (about 10 in. x 5 in.).
  8. Bake for 50 minutes.
  9. Remove from oven and let cool for 10 minutes.
  10. Slice into 1/2 inch long pieces with a serrated knife.
  11. Lay the slices on their side and bake again for 15 minutes.
  12. Remove from oven and flip the biscotti to the opposite side and bake for 15 more minutes.
  13. Cookies should be lightly golden and crunchy on each side.

Smelt Smoked or Fried (Eulachon, Hooligan or Candlefish)

hooligans in cooler_n

Eulachon are packed with oil when they begin their spawning run – roughly 15% of their body weight. Dried, they can be lit and will burn like a candle, which is why early explorers in North American called them candlefish. The term eulachon is derived from the Chinook language. 

When the hooligan are making their spring-time run in the Pacific Northwest, dip-netters from Oregon to Alaska gather along the banks of their natal streams and rivers to scoop up a few pounds for the pan and the smoker. An anadromous species, these members of Osmeridae (the smelt family) spend most of their lives in the ocean and ascend the rivers of their birth to spawn and die. At this time, they don’t feed, so dip-netting is the best way to harvest them.

hooligan krystin b_n

Our friend Krystin scoops up a netful of hooligan from a small stream near Seward. 

Fiddlehead ferns, fireweed shoots or asparagus lightly sautéed in olive oil and finished with a squirt of lemon make a fitting accompaniment for a meal of freshly caught smelt. One of our favorite cooking methods for the fish themselves is to roll them in cornmeal, wrap them in bacon, fry them whole and serve them wrapped in a crisp leaf of Romain lettuce – a lettuce-smelt taco. (See Bacon-Wrapped Smelts for more on this recipe.)

hooligan by hand_n

Right: When the fish are in, it can be possible to catch them by hand. It took Krystin a few minutes to grab these fish one at a time.

Another great way to enjoy hooligans is to smoke them, and that’s the way our friends Bixler and Krystin recently prepared them. They use a commercially prepared dry rub, but making your own is easy enough. Typical dry rubs feature about one cup of non-iodized salt to four cups of brown sugar. Garlic, ginger, cloves, nutmeg and allspice are among seasonings commonly added to give brines more flavor. Simply pack the fish in the brine in a glass baking dish, place in the fridge for a day or so, rinse the fish, pat the fish dry with paper towels and smoke for about eight hours. (See Alaska Fast Food: Smoked Hooligans at Alaskagraphy.)

The bones of cooked or smoked smelt are soft, and many people (including us) eat them whole from head to tail. Gravid females (those with ripe roe) are our favorites.

hooligan zaru soba_n

Zaru soba – cold buckwheat noodles – is a perfect dish for the hot weather we’ve been having lately. Topped with a smoked smelt from the refrigerator, this dish can be garnished with salmon roe, nori or served as is. You can used a store-bought noodle dipping sauce or make your own with a little rice vinegar, a little soy sauce, a little brown sugar, ice-cold water and a sprinkling of sesame seeds.

Galley and Kitchen: What’s on our Spice Racks

Penzeys Spices_n

So that we’re ready to hit the ground running (or to hit the kitchen cooking) when we return to Point Hope in August, we place our Penzeys Spices order in April. 

Onboard our summer home, the sailing vessel Bandon, galley space is limited and so the question If you had to choose just a few herbs and spices… is answered out of necessity. Sea salt, Tellicherry pepper, powdered garlic, powdered wasabi, an Italian seasoning blend, herbs de provence and a couple of spicy chili-pepper-based blends or rubs are essentials in our kitchen. We also keep on hand soy sauce, Cholula sauce, olive oil (both light olive oil for frying and extra virgin for other uses), and when we can, sherry. Our meals tend to center around fresh seafood, and these minerals, herbs, spices and condiments go well with fresh fish.

Up in Point Hope where our kitchen is much larger, our herb and  spice collection is far more extensive and includes a variety of extracts as well. We’ve discovered that even something as basic as salt can vary greatly from one type to another. For example, smoked sea salt can be the “secret ingredient” that makes a stew, soup or chili stand out. And if you haven’t tried grey sea salt on fish, you’re in for a pleasant surprise when you do. It’s usually packaged coarse or slightly coarse, but it’s  damp, so don’t be tempted to put it in a grinding mill. Use it in its coarse form. Also called Celtic sea salt or sel gris, this mineral-rich salt from the Brittany region of France  is especially nice on broiled salmon. Like many others in this food-appreciating time we live in, we’ve come a long way from the days when Morton’s Iodized  was the only salt in our kitchen.

Another change we’ve been making is a gradual shift away from prepared spice and herb blends toward our own hand-crafted blends. We keep our old bottles of blends like Northwoods Fire, Southwest Seasoning, Italian Seasoning, Curry Seasoning and so forth, but these days those bottles are filled with similar-but-unique creations. The modifications we make to the original recipes have resulted in blends we are really pleased with, and it’s satisfying to grind and mix our own chili-pepper-based rubs. Carefully considering the ingredients that go into these blends has led us to a fuller understanding of herbs and spices.

This past year our “great discovery” was Penzeys Spices’ whole smoked chipotle chili peppers. Ground with our immersion blender as we need them, these peppers add a rich, smokey heat to chili, squash soups, cloudberry or raspberry chipotle sauce, and chicken noodle soup. Blended into a rub, smoked chipotle’s add another dimension to broiled halibut, salmon, moose or pork. 

The spice we’re most anticipating using in the coming year is high-grade Kashmir Mogra saffron. We’ve been using Spanish Coupé  which is very nice, but we’ve been wondering if the higher quality Kashmir Mogra is worth it. We’ll let you know what we conclude this fall.

Less than two weeks till we’re back aboard Bandon in Seward!

Cloudberry Cheesecake Cookie Bars

oat wheat aqpik bars_n

Make these! Really, we couldn’t believe how good these jam-and-cream-cheese bars came out. You’ll have to patiently wait while they chill in the refrigerator to get the most flavor. 

The end of our school year provides us with an education on amounts over or under-ordered in our annual shopping. We ended up a little short on all-purpose flour and a little heavy on whole wheat. The challenge with 100% whole wheat is the heaviness and denseness it lends to baked goods. Mixing finely chopped nuts into the whole wheat crust and layering lighter flavors on top solved the problem in a delicious way.

This recipe would work with any jam. Of course, we love cloudberries and as long as we’re in the Arctic these delicious, rare berries will be our fruit of choice.

Cloudberry Cheesecake Cookie Bars

Crust

  • 1/4 cup pecans, finely chopped
  • 2/3 cup whole wheat flour
  • 3 tbsp granulated sugar
  • 4 tbsp unsalted butter, melted

Cheesecake layer

  • 8 oz. cream cheese, softened
  • 1/4 cup granulated sugar
  • 1 egg
  • 1 tsp vanilla extract

Top layers

  • 1/4 cup granulated sugar
  • 1/4 cup whole wheat flour
  • 1/2 cup rolled oats
  • 1/4 cup pecans, finely chopped
  • 4 tbsp unsalted butter, melted
  • 2 cups cloudberry jam

Directions

  1. Preheat oven to 350 degrees F.
  2. Butter 8 x 8 inch glass baking dish. Set aside.
  3. Mix crust ingredients until coarse meal forms.
  4. Press crust mixture into bottom of glass baking dish.
  5. Bake for 15 minutes, or until edges are lightly browned.
  6. Prepare cheesecake layer while crust is baking.
  7. Beat cream cheese, sugar, egg and vanilla until smooth.
  8. Pour cream cheese mixture evenly over baked crust.
  9. Return baking dish to oven and bake for an additional 25 minutes, until layer sets.
  10. Mix the remaining ingredients for top layer (except jam) until crumbly.
  11. Evenly and gently spread jam over cream cheese layer taking care not to disturb the cheese layer.
  12. Sprinkle crumble on top of jam.
  13. Return to oven and bake for another 20 minutes, or until top begins to turn golden brown and jam bubbles.
  14. Let cool completely in the pan on a wire rack.
  15. For best results, chill pan in the refrigerator for several hours or overnight before cutting.

Cloudberries, also called aqpik in the Eskimo language of Inupiaq, are a sublimely sweet, berry that grow in the extreme north. Read more about them in these articles:

Cloudberry Country

Cloudberry Syrup

Cloudberry Cake

Cloudberry Sorbet

Coconut Aqpik Thumbprints

The Year-End Pantry: Applesauce Caramel Cookies

Applesauce carmel cookies_n

Wrapping up another year in the Arctic before we go to our summer home in Seward, these caramel-topped applesauce cookies were a terrific way to work through the last of our supply of applesauce. 

A few lonely jars, bottles and boxes remain atop the cabinetry that lines the walls off our kitchen. Over five meters (sixteen-and-a-half feet) of uninterrupted shelf space that in August was packed tight to the ceiling with everything from chocolate to olives to nuts to jarred jalapenos is now mostly space. The remaining jars of salsa, soy sauce, sun dried tomatoes, Cholula and assorted other items stand like lonely sentinels overlooking our kitchen. It is the same throughout our house as freezers and pantries that had once been packed and piled with nine months worth of food are now nearly empty. And while our spice racks look full, it’s a deception. Many of the bottles are empty or nearly so. Our bulk order for next year went in to Penzeys Spices last week.

Applesauce is a healthful moistening agent in a number of baking recipes. It’s also terrific in oatmeal, as a blintz topping and in pancake batter, and makes for a light snack on its own. When we lived within driving distance of Northern California’s Apple Hill and the numerous orchards there, we made our own applesauce. Up here, we annually purchase a couple of cases of Tree Top Organic from Costco. The cookies in this recipe feature the fall flavor of applesauce in a light, soft cookie. The crunchy carmel-flavored topping adds another layer of sweetness and texture.

Applesauce Caramel Cookies

Ingredients

  • 2  1/2 cups all purpose flour
  • 1 tsp baking soda
  • 1 tsp baking powder
  • 1 tsp cinnamon
  • 1/4 tsp ground mace
  • 1 cup granulated sugar
  • 1/2 cup unsalted butter, room temperature
  • 2 eggs
  • 1 cup applesauce
  • caramel topping (see below)

Directions

  1. Preheat oven to 375 F.
  2. In a large bowl, sift together flour, baking soda, baking powder, cinnamon, and mace.  Set aside.
  3. Cream sugar and butter together.
  4. Add eggs and applesauce and mix well.
  5. Add in dry ingredients and mix until well incorporated.
  6. Drop tablespoons of batter onto parchment-lined baking sheets, 1 – 2 inches apart.
  7. Bake for 8 – 10 minutes, until edges of cookies begin to become golden brown.
  8. While cookies are cooling, prepare topping.

Caramel Topping

Ingredients

  • 3 tbsp unsalted butter
  • 1/4 cup heavy cream
  • 1/2 cup packed brown sugar
  • 3/4 cup granulated sugar
  • 1 tsp vanilla extract

Directions

  1. In a medium saucepan over medium heat, combine butter, heavy cream, brown sugar and granulated sugar.
  2. Cook, stirring occasionally until mixture just begins to boil and the sugars are melted.
  3. Remove from heat.
  4. Stir in vanilla.
  5. Scoop caramel mixture from pan with a teaspoon and drip onto cookies.
  6. Let caramel topped cookies fully cool before enjoying them.

Makes 3 dozen cookies.

Recipe adapted from Chef In Training