The Real Breakfast of Champions


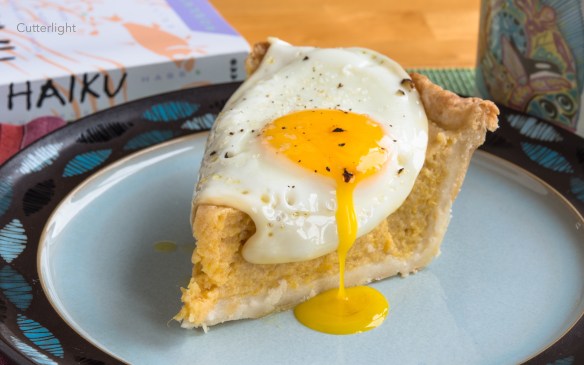
Creamy roasted butternut squash filling on a flakey, buttery crust – top it off with a lightly salted & peppered sunny-side up egg and serve a cup of French Roast on the side. Good morning, Chignik Lake.

Pumpkin pie for breakfast – it’s either just after Thanksgiving or Christmas, or we’re nearing the end of another year in the bush. In fact, we’re almost having to pinch ourselves to get our heads around the fact that there are just four days till the end of Barbra’s school year. With a very early summer vacation in sight, we’ve been in the process of clearing out our freezer. Several months ago we roasted and freezer-packed  a couple of butternut squashes. When we rediscovered them last weekend, they were still in excellent condition thanks to our manual defrost freezer.

Having never perfected crusts, I got out of the pie baking business when I married Barbra, but she still uses my pumpkin pie filling recipe – an adaptation from Craig Claiborne’s The New York Times Cookbook. She put a bush twist on the recipe this time, substituting Hoosier Hill Farm Premium Heavy Cream Powder for real heavy cream, which can be notoriously difficult to get out to the bush. The pie came out just fine.

And so this past week we’ve been starting our mornings right with one of our favorite breakfasts: Pumpkin Pie with a Fried Egg and a cup of joe. Our sparrows have begun returning, Cranes are starting to nest up on Black Lake, the bears are up and about and this morning I think I saw a salmon jump down at the bend. C’mon summer!

For our favorite pumpkin pie/squash pie recipe, see: A Cookbook for the Ages: Pumpkin and Pecan Pies from Craig Claiborne

3 Easy Steps & 16 Minutes to Perfection: Pork Chops Cooked “Just Right” Every Time

Consistency is a key to turning out a perfectly cooked cut of meat. We’ve been following this straightforward recipe to turn out “just right” pork chops on stovetops, grills and even countertop toaster-ovens for years

Time tested and true, there are three keys to this recipe:

1. Start with a thick pork chop. Costco offers an excellent value on a package of exactly the kind of boneless pork loin chops this recipe calls for. If Costco quantities are too much, visit your local butcher. You want a two-inch thick (5 cm) chop, preferably one with a bit of fat.

2. Pick a great rub. Our favorites feature a balance of powdered chilis such as ancho, cayenne, Aleppo and chipotle as well as other seasonings such as mesquite, black pepper and paprika. Penzeys Southwest Seasoning or their Northwest Fire are good examples.

3. Use a sufficiently thick frying pan (one with a lid) to ensure even heating and to avoid burning the meat. Nonstick Swiss Diamond and Scanpan cookware handle heat well and make clean-up a breeze. Good stainless steel or well-seasoned cast iron pans are also good choices.

Once you’ve got the pork chop, the rub and the pan ready, the rest is a breeze. We find that one Costco-sized chop served with rice is plenty for two diners. In fact, we often have enough left over for a killer omelet the following morning.

I should add a note here: Stoves and pans vary. You may have to fine tune the heat, but once you’ve got it, you’ve got it. The same approach works for perfecting your favorite cut of steak, chicken breasts or thighs, or fish fillets.

Click here for an easy raspberry chipotle sauce.

16-minute Perfect Pork Chop

Ingredients

1 pork chop, 2 inches thick, rinsed and patted dry

chili based rub such as Penzeys Southwest Seasoning

soy sauce (or substitute sea salt)

1 or 2 tablespoons olive oil

Directions

Gently rub in a generous amount of seasoning on all sides

Meanwhile, in a frying pan, heat olive oil at a little higher than medium heat till it’s sizzling hot. Don’t allow it to smoke.

Set timer to 16 minutes and place chop in pan. Cover and cook for 1 minute to sear. Use tongs to turn the cutlet to the other side, lower temperature to medium-low, cover and allow to cook for 8 minutes.

Turn chop back to the side you first seared, drizzle with soy sauce, cover and cook for the remaining 7 minutes.

Remove chop and place on a wooden cutting board. Cover with a bowl or tent loosely with aluminum foil and allow to rest for 5 minutes.

Cut into two pieces. Top with raspberry chipotle sauce and serve with rice, couscous or potatoes.

Move Over Bacon – Smoked Wild Salmon Fried Rice

A dollop of homemade ikura adds a tasty finishing touch to a bowl of Alaskan soul.

You know it’s a good day when a recipe for bacon fried rice shows up in your inbox. That’s just what happened a few days ago when our blog friend Chef Mimi posted a recipe for this very dish. Who doesn’t love fried rice? The slightly nutty flavor of sautéed day-old rice tossed with scrambled eggs and onions is a regular on menus from Kodiak to Kyoto. Add bacon, and a favorite truism comes into play: anything is better with bacon. Right?

Well, we actually didn’t ship out any bacon in our annual shopping this past year. Don’t worry, we’re hardly turning vegan. 😉 We just decided that as much as we love the flavor, the texture, the – well, everything – about bacon, it really isn’t good for our health. We’ve discovered that we can substitute smoked salmon in most recipes that call for bacon and be very satisfied.

Enter Chef Mimi’s recipe for bacon fried rice. A quick check of our pantry revealed that we had on hand most of the ingredients she uses and delicious substitutions for those we didn’t. A swap of smoked salmon for bacon, a switch of snow peas for petite peas, a few extra splashes of flavors we have around and, voila, we came up with an Alaska twist which came out beautiful and delicious. We give you Smoked Wild Salmon Fried Rice.

Smoked Wild Salmon Fried Rice

Ingredients

  • 4 cups cooked rice, leftover rice works great
  • 1 tbsp fish sauce
  • 1 tbsp soy sauce
  • 1 tbsp lime juice
  • 1 tbsp mirin
  • 2 tbsp extra virgin olive oil
  • 1 1/2 cups diced sweet onion such as Walla Walla
  • 1/4 cup chopped garlic
  • 1/2 cup diced carrots
  • 1 cup chopped snow peas
  • 3/4 cup canned corn
  • 2 large eggs, lightly beaten
  • 8 oz. smoked salmon

Directions

  1. Set out cooked rice to bring to room temperature.
  2. In a small bowl, mix together fish sauce, lime juice, soy sauce, and mirin. Set aside.
  3. In a large pan, heat oil over medium-high heat.
  4. Sauté onions for about 2 minutes.
  5. Add garlic and continue to cook for about 2 additional minutes.
  6. Add carrots and sauté for another 2 minutes.
  7. Mix in snow peas and corn. Cook for an additional minute.
  8. Gently stir in rice. Let mixture heat thoroughly.
  9. Make a well in center of pan.
  10. Add eggs and scramble them in the well.
  11. When eggs are just cooked through, add in salmon.
  12. Stir entire mixture so that all ingredients are evenly distributed.
  13. Toss the rice mixture with fish sauce mixture.
  14. Optionally, garnish with green onions, or salmon roe.
  15. Serve immediately.


Leftovers? Or Canned Salmon’s all You’ve Got? No Worries. Salmon Avocado Sandwich

Whip up this restaurant-worthy salmon sandwich in no time with a can of salmon, an avocado, and a couple of ingredients you probably already have on hand. Serve it with something creative from your Soda Stream (that’s a Currant Fizz in the photo) or a glass of sparkling water with a slice of lemon.

Canned salmon is cost-effective, convenient and delicious. In fact, a lot of us who catch all the salmon we need to get us through the year can our own. It’s great in salmon burgers, salmon dip, salmon sausage, as a pasta topping or in any number of other recipes. When we lived in Mongolia, canned Alaskan salmon was the only salmon readily available. We always have this versatile, tasty ingredient in our pantry. Of course, you can easily make this sandwich with grilled or broiled salmon – or leftovers. We’ve made this sandwich with all of that, and have found king, red, silver and pink salmon all to work nicely. For environmental reasons, we don’t use Atlantic salmon.

Ingredients & Directions for Salmon Spread (makes 2 sandwiches)

In a bowl, combine.

Taste for salt and seasoning and set aside.

Ingredients & Directions for Avocado Spread

In a bowl, combine:

  • 1 avocado
  • 1 tsp lime juice
  • 1/2 tsp chipotle based spice mix
  • a little Cholula Chili Lime or similar hot sauce

Spread the two spreads on a toasted bun. Serve with tangy beverage such as sparkling water with a slice of lemon or a crisp ale.

Rise and Roast! Sunday Morning Stout Slow Cooked Moose

Aromas of mushrooms, tarragon, Italian herbs and root vegetables pulled together with a sweet, rich coffee stout make the temptation to steal a taste of this moist, nearly falling apart roast irresistible.

With winter hurling itself at us one more time last weekend and with a two-and-a-half pound cut of moose in the fridge, I decided it would be the perfect day to try something new – a slow-cooked roast. While I had in my imagination something beef brisket like, moist and practically falling apart, having never cooked anything like that, I wasn’t really sure how to go about the task. The cut of moose I had was very lean. Meanwhile, Barbra’s home-brewed Sunday Morning Stout, a rich, sweet, dark beer with a hint of coffee had just finished bottle-aging. How about a slow-cooked Sunday Morning Moose Roast?

I’m happy to report that after six hours in the oven, the roast came out moist, flavorful and pulling apart with ease. That evening, we served this dish on rice with a wonderful bottle of Malbec while snow fell outside our dining room window. Over the following days, the moose was featured in omelets, pulled moose barbecue sandwiches (yum!), on lumaca rigata pasta (the hollow shape captured the broth perfectly), and, once the moose meat was gone, as a hearty vegetable soup.

This dish was surprisingly easy. Although I prepared it in a sauteuse in the oven, I’m sure this recipe would work well in a slow cooker. Canned soup soup or broth could be substituted for the from-scratch broth described below, but don’t skimp on the stout. Use a generous amount of a good one. Beef or lamb would no doubt be delicious in this recipe as well. Add a few chunks of rutabaga or parsnips for additional flavor.

Sunday Morning Moose Roast

You will need an oven-safe sauteuse with a lid or a lidded pot large enough to hold the meat and vegetables. Alternatively, a slow-cooker can be used.

Ingredients

  • 2 to 3 pound cut of meat suitable for roasting. I used moose shoulder.
  • 4 cups dehydrated mushrooms* (or use 1 pound fresh mushrooms and beef or mushroom broth)
  • 1 cup cream
  • 16 ounces of a favorite stout beer (I used a coffee stout)
  • small whole potatoes
  • (optional) rutabaga, parsnips or other root vegetables, cut into chunks
  • 3 shallots, sliced (or substitute 1 sweet onion)
  • 1 bulb garlic, cloves peeled and slightly crushed, but left whole
  • carrots cut into chunks (or use baby carrots)
  • 2 or 3 stocks of celery, cut into 1 1/2 inch pieces
  • Worcestershire Sauce
  • freshly cracked black pepper
  • sea salt
  • tarragon
  • Italian herb blend
  • extra virgin olive oil

Directions

  1. Place oven rack on next to lowest level. Preheat oven to 220° F.
  2. Season meat liberally on all sides with cracked pepper and sea salt. Set aside.
  3. Place dehydrated mushrooms in a sauteuse or other sufficiently large pan and add water to hydrate – about 6 to 8 cups. Bring to a boil, then cover and reduce heat to simmer till mushrooms are tender.
  4. Remove mushrooms and set aside but keep the mushroom broth.
  5. Stir cream into the mushroom broth, add tarragon, Worcestershire sauce and sea salt to taste. Continue cooking at a high simmer until broth is slightly reduced.
  6. Stir in stout and add Italian herb blend. Continue simmering over low heat.
  7. Meanwhile, in a separate frying pan, heat olive oil over medium heat. Add shallots and garlic and sauté until just soft. Add shallots and garlic to mushroom broth.
  8. Remove pan from heat. Place seasoned meat into broth.
  9. Add mushrooms and all the vegetables except for the celery, arranging them in the liquid around the meat. There should be sufficient liquid to cover just over half the roast.
  10. Cover the pan and place into oven.
  11. After 4 hours, add the celery. Cover and continue cooking for two more hours.
  12. After 6 hours, remove pan from oven. Taste broth to determine if additional salt or seasonings are needed.
  13. Serve over rice, on pasta or as is. Accompany with the same stout used in cooking, or with a full-bodied red wine such as a Zinfandel, Cabernet or Malbec.

*The Dried Gourmet Mushroom Mix from the Wild Mushroom company works particularly well in this dish.

Not yet done with Winter: White Bean & Butternut Salmon Sausage Soup

A great read,* a hot bowl of soup, memories of last fall and dreams of summer…

A cold snap has fallen on Chignik Lake. Middle March, and once again our our world in this remote corner of Alaska is blanketed in snow. This morning we woke to find our lake glassed off with ice, the flocks of Goldeneyes and Scaup that had gathered in the view out our window gone to find open water. Now and then our resident family of otters appears on the ice to take advantage of new fishing opportunities in mid-lake openings, happy to bask in the late morning sunshine. The silver bright salmon of last autumn have long since spawned and died.

As recently as January there were still a few late-run salmon clinging to life in feeder streams. Even those fish are gone by now, returned to gravel stream beds, becoming nutrients in the web of life their offspring will soon depend upon. Even the char have disappeared, huddled together somewhere in deep water, waiting for spring.

March is a month for tying flies and sorting through gear, a month for evening games of Scrabble and tucking into a good book. March is a month when the next generation of salmon are stirring in their redds and you imagine those tiny fish and even though the water is covered with fresh ice,  you think to yourself, “Spring is coming.”

March is a good time to make big pots of soups and big plans for summer. This soup is one of our favorites. I prepared the salmon sausage without using eggs and I added chorizo to give it some zip. I seasoned the sausage with an Italian herb blend and added additional ground fennel, which came through nicely. It’s soup, so experiment with ingredients to make it your own.

White Bean & Butternut Salmon Sausage Soup

Ingredients

  • 6 cups white beans (3 16oz cans)
  • 1 butternut squash, roasted or steamed until tender, rind removed, cut into cubes (or used canned pumpkin or squash)
  • 6 cloves of garlic, sliced thin
  • 1 shallot, sliced thin (or substitute a small sweet onion)
  • 3 cups chicken broth (enough broth to thin the bean & squash mixture)
  • 1 or 2 lbs salmon sausage (see recipe here). Or substitute any sausage.
  • sea salt
  • 1 tablespoon of a favorite spicy mix featuring powdered chipotle (See “Jack’s”)
  • olive oil

Directions

  1. Add a tablespoon or 2 of olive oil to a frying pan and heat over medium heat. Add the shallots and garlic and sauté until soft. Remove from heat and set aside.
  2. Using a stick blender, food processor or conventional blender, purée the beans, squash, garlic and shallots, adding chicken broth as you do this to create a thick soup.
  3. Add the purée to a large pot. Add additional chicken broth to achieve desired consistency. Stir in seasonings, bring to a simmer and cook for a few minutes. Taste to determine how much salt is needed and if additional seasoning is required.
  4. Add the salmon sausage and gently stir in. Allow to simmer for a few more minutes.
  5. Ladle into serving bowls, drizzle with a favorite olive oil, and serve piping hot.

*A River Never Sleeps, Roderick Haig-Brown, 1946

Roasted Stacked Beet Salad

Roasted Beets & Goat Cheese

Almost ten years ago, I went on a fabulous California North Coast honeymoon with my honey. As I’m sure you can imagine, that get-away was filled with culinary delights. We ate and drank at wonderful restaurants and Jack grilled us fabulous meals on the balcony outside our honeymoon suite. One of our favorite memories is of a dinner at the River’s End restaurant in Jenner, California. The chef included locally sourced food, some of which came from a garden right on the grounds outside the restaurant.

We’d just completed a fantastic run along a trail on a bluff looking out over the Pacific Ocean, and we were famished. We began our meal with oysters on the half shell and a crisp amber ale. Next, Jack and I ordered two entrées to share along with what proved to be a wonderful bottle of old vine Zinfandel from a California winery. Jack opted for roasted elk while I went for duck prepared three ways. While we were waiting for our entrées, we tucked into a pair of beautifully presented stacked beet salads. What a revelation! Growing up, I’d always been served canned, pickled beets. I developed a disdain for those beets. But roasted, fresh beets? Wow, who knew? River’s End’s creation featured three colors of perfectly roasted beet discs atop garden-fresh greens. In between each of the discs were crumbles of creamy goat cheese. A garnish of chiffonade basil and a drizzle of balsamic vinaigrette completed the presentation. The combination of flavors and textures were perfection.

Earlier this fall, beets showed up in our Farm Lodge vegetable box. With a lovely memory of our honeymoon meal, I set out to recreate this delicious salad. My version came out just as good as my memory. The combination of the earthiness of a roasted beet, a curl of basil, creamy goat cheese and tangy  vinaigrette can’t be beat.

Roasted Stacked Beet Salad

Ingredients

  • two portions of salad greens
  • two medium-sized beets
  • extra virgin olive oil
  • a few sprigs of basil
  • 2 tbsp goat cheese

Vinaigrette

  • 3 tablespoons balsamic vinegar
  • 1 tablespoon Dijon mustard
  • 1 garlic clove, minced
  • 1/2 cup olive oil
  • Salt and freshly ground pepper to taste

Directions

  1. Preheat oven to 425° F.
  2. Coat beet roots in olive oil.
  3. Wrap beets in aluminum foil.
  4. Roast for about an hour.
  5. Beets are done when easily pierced with a knife.
  6. Let them cool enough to handle. Using a paring knife, skin the beets.
  7. Slice the beets while warm. Set aside.
  8. Prepare the vinaigrette by mixing vinaigrette ingredients well.
  9. Place greens on plates. Top greens with one slice of roasted beet. Sprinkle beet slice with goat cheese. Continue with remaining beet slices and cheese. Repeat this process on another plate with the second beet.
  10. Roll up basil leaves and slice into thin strips. Sprinkle strips atop each salad plate.
  11. Drizzle each salad with vinaigrette dressing.
  12. Serve with freshly baked bread to sop up every crumb and delicious drop left on the plate.

Light and Airy Raspberry Mousse

Airy and light, but packing a powerful raspberry punch, this raspberry mousse is a delightful dessert after a rich meal.

Two of my favorite culinary pastimes are making jams and ice creams. We love to pick local berries. The usual varieties around Chignik Lake are blueberries, cranberries, crowberries, currants, and raspberries. Unfortunately, this year was a terrible year for berries. Our usual spots are yielding small amounts or no berries at all. Except for the raspberries. Years ago, someone planted a garden of raspberries and currants. The raspberries, as raspberries do, have spread out from their original patch to a nearby hill. Last year, this hill was crazy with berries. This year, it was the only place we could find a decent amount of berries of any kind. So this winter portends many creations featuring the delicious raspberry.

Today’s recipe stemmed from my other joy – ice cream. Many of our favorite ice creams are the custard type, requiring several egg yolks. This tends to leave us with quite a bit of leftover egg whites at times. What to do? Omelets are good, up to a point. I’ve made batches of meringues, too. But this time, I wanted to do something different. What about whipping the egg whites into a foamy mousse?

This is a simple recipe that can be made in minutes and is best whipped up right before it’s eaten. The first time I made it, I whipped up heavy cream to top it off. That was good, but a little too heavy for this airy-light dessert. Today’s version is topped with a whipped topping made from nonfat powdered milk and ice water. It, too, must be made just before serving. Drizzled with a little raspberry jam, this mousse makes for a light and delicious dessert fit to end a beautiful feast.

Light and Airy Raspberry Mousse

Ingredients

  • 1/2 cup egg whites (or whites from 4 eggs)
  • 4 tsp granulated sugar
  • 4 tbsp raspberry jam
  • whipped topping

Directions

  1. Whip egg whites until stiff peaks are formed.
  2. Add sugar to whites and continue to whip until well mixed.
  3. Fold in raspberry jam.
  4. Divide egg white mixture into two parfait glasses.
  5. Top with whipped topping.

Oyster Po’ Boy with Zesty Rémoulade and a Side of The World’s Best Bar Snack


oster-po-boy-w-fried-parsnips-n

The Carolinas meet California in a Po’ Boy that combines a favorite from each coast. Served up with our home-brewed hefeweizen. 

True, po’ boys originated in Louisiana, but the fried oyster sandwiches of my youth were served up in family-run seafood shacks on North Carolina’s Outer Banks. You had to remember to ask for unsweetened iced tea in those Southern establishments, shoes were optional – even the waitresses often went barefooted -, and a proudly displayed Department of Health rating of “C” was a guarantee that the seafood would be fresh, authentic and delicious.

A warm, soft bun slathered with tartar sauce or rémoulade, a wedge of lemon, and sides of fries and ‘slaw are traditional and tough to improve on. Some folks add lettuce, tomatoes, or pickles (or even the ‘slaw) for a little crunch, but when we chomp down on an oyster po’ boy, all we want is soft bun and even softer, deep-fried, juicy oysters. The crispy coating on the oysters is crunch enough. But how about a few slices of creamy avocado?

Oh, The World’s Best Bar Snack? That’s what Bill Briwa, Chef-Instructor at the Culinary Institute of America, calls deep-friend parsnips. These are a cinch to make, and, yeah, they just might be the World’s Best Bar Snack. Get the recipe here.

Rémoulade

Ingredients

Directions

  1. Mix the above ingredients together.
  2. Allow to sit for a few minutes so flavors come together.

Deep Fried Oysters

Ingredients

  • a dedicated deep-frying pot or a good stainless steel pot. For safety, the pot should be large enough so that the oil (see below) does not fill it more than half full.
  • cooking thermometer that attaches to the pot so you can monitor oil temperature
  • a slotted steel spoon or wire mesh (spider) for removing the oysters from the oil
  • cutting board or platter on which to rest oysters after they’ve been rolled in crackers
  • tongs
  • platter with paper towel to rest and drain fried oysters
  • a gallon-sized sealable plastic bag
  • 1 pint fresh oysters (The only way we can have fresh oysters in Bush Alaska is to freeze them. Happily, they freeze well.)
  • approximately 50 ounces cooking oil that withstands high heat Canola or peanut oil are good choices.
  • 3 eggs, well beaten in a bowl with fairly steep sides
  • 1/2 tbsp soy sauce
  • 1/2 tbsp Cholula or similar hot sauce
  • 1/2 cup all-purpose flour
  • 1/2 tbsp chili powder mixture, preferably one with chipotle, divided into two equal portions
  • 1/4 tsp salt
  • cracked pepper
  • 2 cups crushed saltine crackers (we use salted saltines)

Directions

  1. Drain oysters and set aside. You might want to gently roll them in paper towels to remove excess moisture.
  2. Add canola oil to a large pot and heat over high heat to 360° F (180° C). Keep an eye on the temperature, lowering burner heat as necessary. You can test the oil’s readiness for cooking by dropping in a pinch of crushed saltines. They should immediately sizzle.
  3. Meanwhile, add soy sauce, Cholula, and half of the powdered chili mix to the beaten eggs and whisk together.
  4. Add the flour, half the powdered chili mix, salt and pepper to the gallon-sized plastic bag, seal and shake well to mix. Pour the mixture into a shallow bowl or onto a plate.
  5. Place the crushed saltines in a shallow bowl or on a plate. A good way to crush them is to put them in a gallon-sized sealable plastic bag. Seal the bag, but leave a small opening so air can escape. Use a rolling pin to crush the crackers in the bag.
  6. Arrange items on your counter in the following order, leading toward the frying pot: oysters, flour mixture, egg mixture, crushed crackers, board/platter for resting oysters.
  7. Using tongs: Place an oyster into the flour mixture and thoroughly coat but give it a shake to let excess flour fall off. Then place the oyster in the egg mixture, thoroughly coat it, but hold it above the bowl for a moment to let excess egg drip off. Next, roll it in the crushed crackers, making sure it’s completely covered. Finally, set it on the board/platter to rest. Repeat till all oysters are ready to be fried.
  8. Hopefully you or your sous chef have been keeping an eye on the temperature of the cooking oil. 360° F is about right. Use tongs to carefully add oysters one at a time – no splattering. Keep adding oysters, but don’t overcrowd the pot. Try to keep them from touching each other – better too few oysters at a time than too many. Using tongs, gently turn the oysters to ensure that all side are evenly cooked to a golden brown. This will take 1 to 3 minutes. Don’t overcook them.
  9. Use a steel slotted spoon or a spider to remove fried oysters. Place on platter with paper towel to drain. You can keep them warm and crisp on the center rack of a warm oven, or loosely cover them with a towel.

The Po’ Boy

  1. It can be nice to toast the sandwich roll.
  2. Spread both sides with rémoulade. Arrange the fried oysters and give them a squirt of lemon juice from a lemon wedge. Top with slices of avocado. Drop the lemon wedge into your hefeweizen and dig in.

Broiled Salmon Udon – It’s all about the Noodle Bowls

broiled-salmon-udon-02-08-2017-n

For lunch or dinner, on a cold winter’s day nothing beats a bowl of agreeably slippery udon noodles served in piping hot miso soup. The trick is finding the right bowl.

Ramen, soba, udon – we are big fans of Asian noodles. In Mongolia our apartment came ready with two perfectly-sized bowls for serving up this kind of fare. Back in America, finding the right bowls proved to be much more of a challenge than we anticipated. The average soup/cereal/pasta bowl isn’t big enough, and the average serving bowl is too big.

With a bit of persistence we found just what we were looking for. Mrs. Lin’s Kitchen carries beautiful karakusa swirl noodle bowls in classic white and classic black. These bowls are made in Japan and reminiscent of higher-end noodle shops there. Karakusa is a traditional arabesque design of repeating swirls popular in Japanese ceramics. The bowls are simultaneously elegant and sturdy. Best of all they’re large enough to fill up with a true noodle soup meal.

And the people at Mrs. Lin’s know how to pack fragile items. Here in Chignik Lake, our post office is just a two-minute walk from our house – but it can be a treacherous walk, especially on days such as yesterday when the road and footpaths were covered in hard ice. On the return trip, my feet went up and I came down – hard – as did the box containing our brand new noodle bowls. I was fine, but I dreaded what I might find when I opened the box. We needn’t have worried. In fact, we don’t think we’ve ever seen anything packed quite so well.