Unknown's avatar

About Jack & Barbra Donachy

Writers, photographers, food lovers, anglers, travelers and students of poetry

Four Days of Quiet Solitude (Except for the Hurricane-force Winds): The Cabin on Black Lake

Fire Mountain: Barbra got this beautiful photo of sunset rimming a mountain – possibly 8,200 foot Veniaminof Volcano, its top missing. That’s me left of center, shooting a closer perspective. During our stay at a nearby cabin, the forecast had been for temperatures in the mid 30’s (low single digits Celsius) and the usual 10 to 20 knot breezes. The subfreezing temperatures, heavy sleet and snowfall, and hurricane-force winds we experienced seemed to come out of nowhere.

Every night before we go to bed and every morning upon waking, I slide the dining room/living room window open and scan the lakeshore with a small, powerful spotlight. You never know what you’ll see. Though not necessarily at night, from these very windows we’ve seen brown bears, moose, foxes, owls, weasels, otters, eagles, falcons, beavers, a wolverine and a wolf, not to mention an array of waterfowl including cranes, swans, loons and ducks.

“You oughta take that spotlight and stay in my cabin up on Black,” Fred texted one morning. “You’d like it up there.” Fred’s Chignik Lake home sits atop a high bluff, big picture windows overlooking a good bit of Chignik Lake and the beginning of Chignik River. He spends a fair amount of time doing the same thing we do – scanning for wildlife.

Snow Bunting, Black Lake, Alaska. We’re told that in years past, Snow Buntings were common winter visitors to Chignik Lake. Recently, they’ve been scarce. Although the flock of three birds we came upon only gave me a chance for a couple of quick shots, I was happy to get this record for a project I’m working on to document area birds. (Stay tuned for more on this.) In addition to waterfowl, Black-capped Chickadees, Common Redpolls, magpies, eagles and a Northern Shrike rounded out the avian life we encountered. 

Fred’s text came on the last day of December, a few days before Barbra’s winter break was over. The two of us were antsy from days-on-end rain we’d been enduring through most of autumn and early winter. Fred’s offer wouldn’t change the weather, but it would change the scenery. We were in.

That evening we packed up our gear: down sleeping bags, rain gear, extra rain gear for when the first rain gear was soaked, cameras and binoculars, pens and journals, cookware, four days worth of dehydrated backpacking food, four sweet onions and four Fuji apples…

…and awoke the next morning to find that the weather had taken a nasty turn. Rain we can work with, but when winds started blowing spray off the whitecaps on the lake, there was no way Fred would be launching his skiff. “We’ll try again tomorrow,” we agreed. In retrospect, this squall which hadn’t been forecast should have tipped us off that our local weather patterns were unstable.

The following morning we rose early, hoping for the best. During winter, the sun doesn’t break over the mountains rimming our valley till sometime after 10:00 AM, but a flashlight cutting into the pitch black indicated that Fred and his friend Nick were already down at the beach getting the skiff ready. The wind had settled and a mist was falling under a lightless sky that swallowed the lake in inky darkness.

By nine o’clock the first crepuscular twilight silhouetted the mountains to the south. With breakfast behind us and a hint of light on the water, we loaded up the skiff and began the 18-mile run north up the valley. Pockets of near-freezing drizzle appeared and disappeared, prompting us to pull our hoods tight. The forecast – which up here is usually spot on – was for similar weather over the coming days with a few sun breaks mixed in. Ahh, sun breaks. This year, we’ve been living for sun breaks.

As we cut across the lake and proceeded up Black River, a loon and a few mallards and pintails lifted from resting places in coves and a pair of eagles were startled from their riverside perches. Most of the bears are denned up by this time of year, though here and there a few late-run salmon still cling to life in feeder streams. There’s always a chance of seeing a wolf.

Fins, January 2, 2018: The Chignik System is known to receive the latest salmon runs in North America. Still, we were amazed to find a few Coho in a nearby feeder stream near the cabin. More remarkable still, some of these fish appeared to spawning.

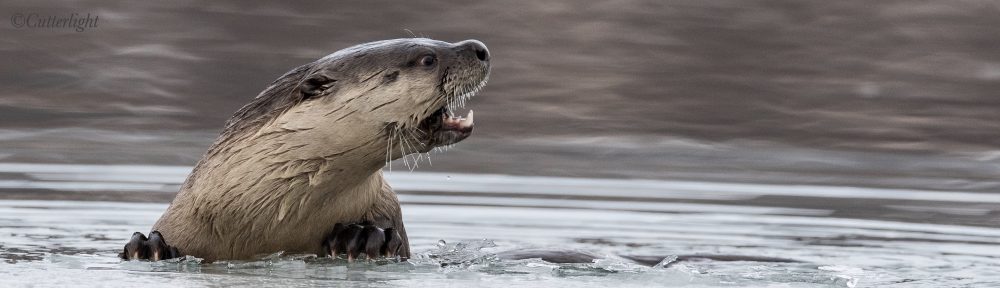
 A rim of shore ice at the mouth of the stream provided a dining table for otters, who left plenty of salmon scraps for ravens. Although we didn’t see the otters, evidence of their presence was everywhere. We also found signs of moose, foxes, weasels, hares and wolves. In fact, we have reason to suspect that at one point a wolf was just around the bend from us.

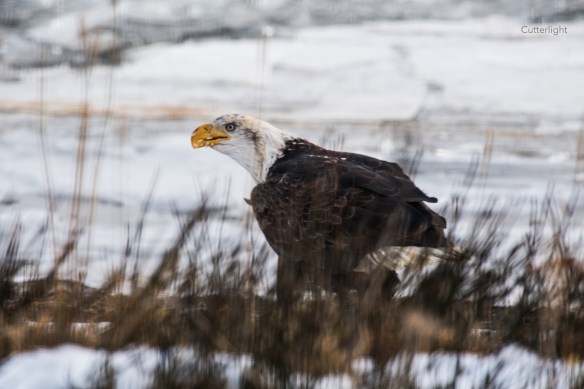
After the storm, a fully intact salmon carcass managed to find its way to the shore in front of our cabin – quite possibly plucked from a patch of open water and dropped by this very eagle. I grabbed this shot through a double-paned window – not ideal for a photograph, but what a handsome bird. The moment I opened the cabin door, she took off.

If you come across a single antler from a member of the deer family, it’s been shed, part of an annual process in which male deer, elk and moose grow antlers for the mating season and then lose them. If you come across an entire rack joined by skull bone, it’s the result of a kill. Some years ago, when Fred was scouting out the location for a cabin from his skiff, he came upon five wolves on a downed bull moose right on the beach where he hoped to one day build. Years later, someone found this rack in a nearby alder thicket – undoubtedly that same moose having been dragged there by the predators. 

Fred described the cabin he and a couple of friends had built as “sturdy, snug and cozy,” a spot-on description. Insulated from floor to roof and appointed with double-paned windows, the cabin’s 10 x 15 interior is just big enough to comfortably house a diesel heater, three-burner propane stove, hand-made wooden bed frames, small pantry, a table and three hand-made wooden stools. Snug and cozy. The lines looked square and sturdy, points that would soon be tested.

Once Nick got the heater going, the cabin was toasty warm in no time. Fred introduced us to the vagaries of the propane stove, pointed out the water catchment system (a bucket hanging near a roof gutter), and assured us once again that we were welcome to dip into any of the food in the pantry.

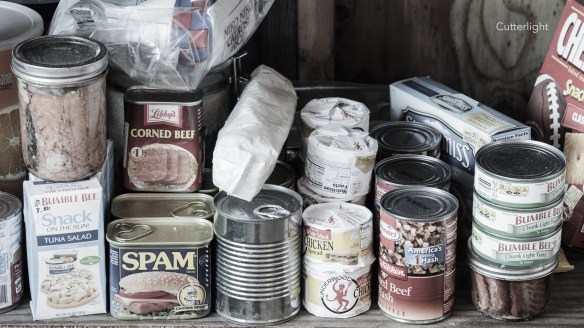
I muted the color in this pantry photo. The cabin’s door is never locked and the assortment of canned fish, deviled meat, rice and crackers could be a lifesaver for anyone caught in a sudden storm or out of luck with a dead engine. Although we brought plenty of our own food, I have to confess that the temptation of a skillet of fried Spam was more than I could resist, not having had this treat since childhood. It was, to my mild surprise, every bit as good as I remembered.

With winds pushing 100 miles per hour and sub-freezing temperatures, our water catchment system failed. Fortunately, the wind blew beautifully clear sheets of ice onto our shore.

Following two days of snow and sleet pushed by fierce, cabin-rattling winds, the sun rose serenely over a frozen lake Black Lake. Black River, which leads to Chignik Lake, begins in the gap between the mountains where the light is breaking through. If things didn’t warm up and melt the ice, there was doubt that Fred would be able to make across the lake in his skiff. Fortunately, by the next day the ice had thinned and lay in broken patches. We learned later that two of our neighbors in the village out on a different adventure had to be emergency rescued when the storm came up.

The view from the cabin shoreline after the storm passed: Although we didn’t get the waterfowl and wildlife encounters we’d hope for – and the weather certainly had our full attention for awhile – our four days on Black Lake were wonderfully memorable. And left us with this thought: Why aren’t we doing more landscape photography? New adventures lead to new thoughts, new studies, new goals. 

“Hope you guys get lucky and see some wildlife,” Fred said as he and Nick headed to the skiff. Motioning across the bay toward the far shore from where a racket of honking and quacking was issuing, he added, “Of course, those swans and ducks never stop chattering. They’ll keep it up all night.” I helped shove off the skiff, and as the last echoing hum of the boat was enveloped in the valley we’d just come up, we found ourselves wonderfully and utterly alone. Over the next four days, the only human-generated sound we would hear was the drone of a couple of bush planes flying into the village 18 miles to the south.

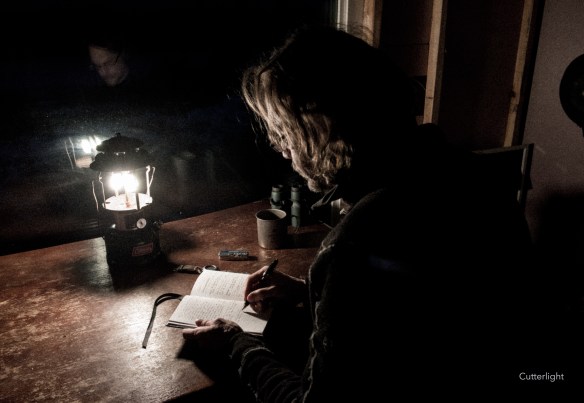
Sketching a novel outline at the cabin on Black Lake: Thirty-some years ago, aboard USS Blue Ridge, a friend and I made elaborate post-enlistment plans to go up into the Colorado Rockies, find a cabin, and live there for a year. We talked about the staples we’d need to lay in: flour, rice, coffee and so forth, the rifles and shotguns we’d take to hunt with, canning equipment, and the desirability of locating ourselves not overly far from a small town where we could reprovision as necessary. We would write. Fundamental to that objective would be pens and journals and a small, carefully selected library of literature. My friend got out a few months before I did… and disappeared. When I called the number he’d given me, his mother picked up the phone. She sounded distraught, with no idea where her son was. No one knew. I’m still not sure if we were kidding ourselves or if we’d really intended to go through with the plan, but either way I couldn’t see going it alone. When an acceptance packet came from the University of Colorado at Boulder, I took the door that was open. But I never completely let go of that idea… someplace quiet, off the grid, armed with books to read and journals to fill.

January 26, Chignik Lake, Alaska


Alaska White Bean Soup With Salmon Sausage and Reindeer Sausage

bean-salmon-reindeer-sausage-soup-022017-n

This zesty, robust soup will take the chill off even the coldest weather. 

We’d been thinking about creating our own salmon sausage for quite some time, but it took the beautiful recipes in our recently acquired copy of The Tutka Bay Lodge Cookbook to get off the stick. Turns out, there’s nothing to it. Use a food processor (or a stick blender with a nut chopper) to grind up salmon (or just chop it up fine with a sharp knife), mix in your favorite seasonings, and bind with egg whites. Tightly roll up this mixture to the thickness desired in plastic wrap, put a twist in the middle to separate the sausages, twist and tie off the ends, boil for 10 minutes, and voila! Salmon Sausage. Although we used Coho Salmon fillets from one of our summer catches, this same method would work beautifully with canned salmon. And there’s no reason to confine yourself to salmon. Chopped clams, halibut, rockfish, crab, scallops or some of Alaska’s spectacular deep water prawns could go into this sausage as well. We can’t wait to try this recipe again with some of our smoked salmon.

As to the soup… We created a minestrone-type broth using canned tomatoes. To that we added white beans, oven-roasted carrots, salmon sausage, reindeer sausage and Swiss chard. We also added sweet onions, colorful Swiss chard stems and garlic that had been sautéed in olive oil. Seasonings included oregano, marjoram, a little thyme and a splash of white wine. We finished the soup with smoked sea salt. Served with toasted sourdough bread and a homemade hefeweizen, this is a bowl that takes the chill off!

Where did it go? Bourbon Pecan Mini Skillet Brownie

This delicious little dessert was supposed to be for two. Fudgy, chocolatey, with a nutty crunch and a hint of caramely bourbon. Maybe it wasn’t enough!

We had just finished dinner – bowls brimming with homemade clam chowder served with a hunk of toasted garlic sourdough on the side. The forecast was for snow, but instead Chignik’s famously howling winds were slamming our house with torrents of icy rain blown sideways. Soup alone was not enough in the face of such weather.

We had a stash of chocolate squares to nibble for dessert, but even those didn’t sound satisfying. Something quick and freshly baked might do the trick, I thought. Armed with a six-inch cast iron skillet, a few tablespoons of this and a dollop that, 25 minutes later all that was left was the two bites you see above. Well, that’s not true. We paused for a photographic intermission and then devoured the last two bites. Now that was satisfying!

Bourbon Pecan Mini Skillet Brownie for Two

Ingredients

  • 5 tbsp all purpose flour
  • 6 ½ tbsp granulated sugar
  • 2 ½ tbsp Dutch processed cocoa powder
  • pinch salt
  • 3 tbsp vegetable oil, we use canola
  • 1 egg
  • 1 tbsp bourbon
  • 1/3 cup semi-sweet chocolate chips
  • 1/3 cup pecans, chopped coarse

Directions

  1. Heat oven to 350° F. Lightly grease 6” cast iron skillet.
  2. In a medium bowl, whisk together flour, sugar, cocoa powder and salt.
  3. Add in oil, egg, and bourbon.
  4. Stir until well mixed.
  5. Fold in chocolate chips.
  6. Fold in pecans.
  7. Spoon batter into prepared pan.
  8. Bake for 20 minutes. Center should look done. Cook a little longer for a more well-done brownie. We like ours nice and fudgy, so 20 minutes was perfect.
  9. Let cool for 10 minutes and then dig in!


Wild Salmon Sausages

Rain, rain and more rain here at The Lake – but any day that begins with a hot mug of joe, pumpkin waffles and tasty wild salmon sausages has gotta be great!

I first made these sausages when a wintery-cold weekend had us craving bean and sausage soup. With ample quantities of three types of beans in our larder, the bean part of the soup was no problem. But alas, the last of our store-bought meat sausages had long ago disappeared. Although I’d heard about salmon sausage, I wasn’t sure how to go about making them. Barbra came to the rescue. She recalled having come across a recipe while leafing through our copy of Kirsten and Mandy Dixon’s The Tutka Bay Lodge Cookbook.

The Dixons’ recipe is simple and lends itself to countless modifications. Any reasonably fatty fish works well, and scallops, shrimp, crab or other ingredients (think wild blueberries or lingonberries) can be feathered in to create unique and tasty variations. As for seasonings, we enjoy combinations of fennel or tarragon coupled with smokey chipotle pepper. Sautéing these sausages in soy sauce just prior to serving them or using them in other dishes adds a smack of umami.

Wild Salmon Sausages

Ingredients

  • 2 tbsp shallots, chopped fine
  • olive oil
  • 1 pound wild-caught salmon fillet, skin removed, or use canned salmon
  • 1 egg, beaten
  • 1 tsp ground fennel
  • 1 tsp oregano
  • 1 tbsp powdered chili mix – a mix that features chipotle, smoked paprika and mesquite works well. See here for a terrific DIY mix.
  • a pot of simmering water
  • soy sauce

Directions

  1. Heat a little olive oil in a skillet. Add shallots. Sauté briefly, just till shallots are cooked through. Place shallots in a large mixing bowl.
  2. Use a sharp knife to finely chop salmon fillet. Add to mixing bowl.
  3. Add egg, seasonings and spices to mixing bowl. Stir all ingredients together thoroughly.
  4. Arrange some of the salmon mixture lengthwise a couple of inches from the edge along a sheet of plastic wrap about 14 inches long. Leave a couple of inches of space at both ends of the plastic sheet. Roll/wrap the salmon mixture in the plastic, creating a sausage shape. At one third of the length of the sausage roll, gently twist the plastic wrap to separate the salmon into separate sausages. Repeat to create a total of three separate sausages.
  5. Twist the ends of the plastic to close. Rubber bands can be used to ensure the plastic stays closed.
  6. Repeat with additional plastic wrap sheets until all the salmon mixture has been formed into sausages.
  7. Place enough water in a large pot to cover the plastic-wrapped sausages and bring to a light boil. (A sauterne works perfectly for this.) Gently place the wrapped salmon sausages into the water and simmer for 10 minutes. Occasionally move the sausages to ensure that they don’t stick to the bottom of the pan.
  8. Remove sausages from water. Let cool and then unwrap them. (Left wrapped, they can be placed in a zipped plastic bag and stored in the freezer.)
  9. To serve: In a frying pan, heat olive oil over medium heat. Arrange sausages in the pan – they should sizzle. Drizzle each sausage with soy sauce. This will add an agreeable amount of salt and brown them up. Since they are already cooked, simply heat the sausages through.

Pumpkin Caramel Ice Cream Sandwiches – They are It!

The crème de la crème of frozen desserts – creamy spiced pumpkin ice cream on a layer of caramel sandwiched between the chewy perfection of oatmeal cookies. The whole creation is dipped in a rich, crunchy chocolate coating.

December may not be the time that most people think of ice cream. But in our home, this is the time of the year when camping and fishing gear are stowed away and the stormy weather outdoors has us working on projects inside. One of my favorite winter hobbies is creating with baked goods.

I’m not sure what caused me to think of It’s Its, but somehow they overtook my thoughts last weekend. It’s Its are a San Francisco frozen creation that I was introduced to during a visit to the great city while in high school. It is really a simple dessert – vanilla ice cream sandwiched between two oatmeal cookies and dipped in chocolate that instantly hardens. Simple but a perfect balance of flavors and textures – the ingredients have so much flavor and the cookies have the best texture. The sandwich is messy enough that you have to pay attention to the potential loss of ice cream, chocolate bits and cookie, but it manages to stay together long enough so you never lose one little bit.

This time of the year, I’m drawn to pumpkin-flavored creations. This being the case, I have a quart of homemade spiced pumpkin ice cream tucked away in our freezer. I also had a jar of caramel topping in the fridge. An It’s It-type dessert made with this ice cream and topping seemed like a winning combination. All I needed was a chewy oatmeal cookie and a chocolate dip that hardens and then cracks just right to turn this memory into a reality with a pumpkin-caramel twist.

Let the experiment begin!

Would the caramel be too hard? Would the frozen cookies remain chewy? Would the coating have that wonderful crunch? The answer, as you’ve probably guessed, is a resounding Yes! They are a bit time consuming to make because of having to wait in between steps for freezing. It’s totally worth it. After all the time put in to making these at home, we have eight delicious ice cream sandwiches to enjoy and to share with friends.

Pumpkin Caramel Ice Cream Sandwiches

Ingredients

  • 8 scoops pumpkin ice cream (click here for recipe)
  • 16 oatmeal cookies (see below)
  • caramel ice cream topping
  • chocolate dipping sauce (see below)

Directions

  1. Line baking sheet with parchment paper.
  2. Pair up oatmeal cookies so that cookies are of equal sizes.
  3. Spread caramel topping on one side one of the pair of oatmeal cookies.
  4. Place one scoop of ice cream atop caramel topping.
  5. Sandwich second cookie atop ice cream.
  6. Place sandwiches on prepared baking sheet and freeze for 30 minutes.
  7. While sandwiches are freezing, prepare chocolate dipping sauce.
  8. Use a pair of forks to maneuver sandwiches. Place one sandwich at a time into dipping sauce. Flip sandwich. Remove from dipping sauce and place back on parchment-lined baking sheet.
  9. Repeat with all sandwiches.
  10. Freeze for one hour.
  11. Enjoy right away or wrap tightly in plastic wrap and keep in the freezer until you are ready to eat.

Chewy Oatmeal Cookies

Ingredients

  • ½ cup unsalted butter, melted
  • ½ cup brown sugar
  • ½ cup granulated sugar
  • ½ tsp vanilla
  • 1 egg
  • 1 cup all purpose flour
  • ½ tsp salt
  • ½ tsp baking soda
  • ¾ tsp cinnamon
  • 1 ½ cup rolled oats (instant or regular)

Directions

  1. Combine butter and sugars. Mix well.
  2. Add vanilla. Mix well.
  3. Add egg. Mix well.
  4. In a separate bowl, whisk together flour, salt, baking soda, and cinnamon.
  5. Mix flour mixture into butter mixture.
  6. Stir in oats.
  7. Refrigerate dough for at least 30 minutes.
  8. Heat oven to 375° F. Line baking sheet with parchment paper.
  9. Scoop out dough and roll it into 1-inch balls. Place balls on prepared baking sheet.
  10. Flatten cookies with fingers, or base of a flat glass. Use a small amount of water on your fingers or on the bottom of the glass to prevent sticking.
  11. Bake cookies for 8 minutes.
  12. Allow to cool in pan for a couple of minutes. Finish cooling on a wire rack.

Chocolate Coating

Ingredients

  • 8 oz semi-sweet chocolate chips
  • 1 ½ tbsp coconut oil

Directions

  1. Place chips and coconut oil in top of double boiler.
  2. Melt mixture over simmering water.
  3. Stir thoroughly.
  4. Use coating immediately in above recipe.

Frosted Chocolate Orange Cupcakes

Moist chocolate cake infused with orange topped with super creamy rich chocolate buttercream frosting…. happy birthday to me!

Another stellar recipe from my Williams-Sonoma Baking book. I can’t say enough good things about this cookbook. Every recipe is great. In addition to being great recipes, they are also great bases to build from or tinker with. For my birthday, I had narrowed down my celebratory dessert to three chocolate wonders from this cookbook. The combination of chocolate and orange is my all-time favorite, so the chocolate orange cupcakes won. The picture says it all – these delicious little cakes will start a party just by showing up.

Chocolate Orange Cupcakes

Ingredients

  • 3 tbsp Dutch processed cocoa powder
  • ¼ cup hot water
  • 1 ¼ cups all purpose flour
  • ½ tsp baking powder
  • ½ tsp baking soda
  • ¼ tsp salt
  • zest of 1 orange
  • 2 large eggs, at room temperature
  • ¾ cup granulated sugar
  • ½ cup buttermilk, at room temperature
  • ½ tsp pure vanilla extract
  • ¼ unsalted butter, melted, at room temperature

Frosting

  • 6 oz. semi-sweet chocolate chips
  • 1 cup unsalted butter, at room temperature
  • 2 cups confectioner’s sugar

Directions

  1. Preheat oven to 350° F.
  2. Line 12 standard muffin cups with paper liners.
  3. In a small bowl, stir cocoa with hot water until it is dissolved. Set aside.
  4. Whisk flour, baking powder, baking soda, and salt together in medium bowl.
  5. Mix orange zest into flour mixture. Set aside.
  6. In a large bowl, whisk eggs and granulated sugar together.
  7. Whisk in buttermilk and vanilla.
  8. Whisk in cocoa.
  9. Whisk in melted butter.
  10. Stir in flour mixture.
  11. Spoon batter into each muffin cup. Fill each cup about ½ full.
  12. Bake cupcakes until puffed and a cake tester inserted into the center of a cupcake comes out clean, about 15 – 20 minutes.
  13. Let cool completely on wire rack. Remove cupcakes when pan is cool.
  14. Make frosting. Put chocolate chips in top of double boiler. Melt chocolate over simmering water. Let cool to room temperature.
  15. Beat butter and confectioner’s sugar until creamy and smooth, about 3 minutes.
  16. Beat in melted chocolate until well-mixed.
  17. Fill a pastry bag fitted with a 12mm star tip (1/2 inch) with frosting.
  18. Pipe a spiral on top of each cupcake.
  19. Refrigerate the cupcakes until 30 minutes before serving to set the frosting.

Definitely Thankful for This – Almond Raspberry Tart

Tis the season for decadent desserts! Imagine a bite of smooth, sweet almond swathed in fresh raspberry jam atop flaky layers of buttery piecrust. Oh yeah!

Sure, our Thanksgiving always ends with Jack’s pumpkin pie. It’s a delicious tradition we don’t skip. When we plan the big feast, one dessert never seems to be enough. Some years, the second dessert has been a caramel apple pie, a lemon meringue pie or even a chocolate layer cake. This year, I really wanted to use almond paste that I sent out in our annual shopping. It’s an ingredient I rarely use, but love so much. Many years ago, when I first discovered bakeries and baked goods, I would always go for almond croissants. The combination of the sweet, smooth almond paste and the buttery, flakey croissant were irresistible. This tart has the same elements along with an added bonus – homemade raspberry jam. Some of the jam I made this year was a freezer jam. In other words, it wasn’t cooked. The fresh berries are stirred with some sugar and pectin and put straight into the freezer. This method of making jam preserves the fresh bright flavor of the raspberries straight from the vine.

The tart starts with a buttery, flaky piecrust that is partially blind baked to keep it light and airy. The crust is brushed with jam and then covered with an almond paste mixture, which is the main event. The whole tart is sprinkled with almond slices which provide the finishing touch. What a delicious combination! We all enjoyed the beautiful and delicious addition to this year’s table. Sadly, it is now just a fond memory.

Raspberry Almond Tart

Ingredients

  • pie dough for one crust
  • 1/2 cup unsalted butter, at room temperature
  • 8 oz. almond paste, cut into small cubes
  • 1/4 cup granulated sugar
  • 2 large eggs
  • 1/3 cup all purpose flour
  • 1/3 cup good quality raspberry jam
  • 1/3 cup sliced almonds

Directions

  1. Roll out dough to a 12-inch disk. Cover a 9 ½ inch tart pan or a 9 inch springform pan.
  2. Trim off excess if using a tart pan. If using a springform pan, trim off dough 1 ½ inches up the side of the pan. The dough will shrink when baked, so make sure to extend the dough higher than you want your end product.
  3. Freeze the shell for 30 minutes or until firm.
  4. Place oven rack in lower third of oven. Preheat to 375° F.
  5. Partially blind bake shell for 20 minutes. Shell will be done when it is pale gold and dry looking.
  6. Remove pan from oven and cool on a wire rack.
  7. Reduce oven temperature to 350° F.
  8. In a large bowl, beat butter until smooth.
  9. Add almond paste, a couple pieces at a time. Continue beating until smooth. Add more pieces and repeat beating. Continue with remaining almond paste pieces.
  10. Add sugar to almond paste mixture and beat until smooth.
  11. Add eggs, one at a time, beating after each addition.
  12. Stir in flour.
  13. Spread jam evenly on base of tart shell.
  14. Spoon almond mixture atop jam. Smooth the top.
  15. Sprinkle almond slices evenly over tart.
  16. Bake until filling is golden and the middle is firm, 35-45 minutes.
  17. Cool on wire rack.

Serve at room temperature.

Recipe adapted from The Williams-Sonoma Baking Book


Homemade Crispy Thin Wheat Crackers in a Snap

Warm from the oven or cooled and ready for a party, these crispy little wafers with a hint of sweet, a hint of wheat and a touch of salt are sure to please.

A Thanksgiving gathering at our house prompted me to come up with an appetizer that I could conjure out of our bush kitchen. In other words, I couldn’t pop over to the nearest grocery store to pick up phyllo dough or other fun ingredients that I might have available back when I lived in a city.

A great ingredient we do always have on hand is salmon – in this case I had in mind a jar of smoked salmon. We also happened to have a block of cream cheese in our freezer. Mix those two and you have a show-stopping spread. Yummy appetizers with smoked salmon spread can be served on many tasty items – mini bagels, crepes, crostini, and of course, crackers.

I love making homemade crackers. They have a satisfying crunch and flavors of their store-bought siblings. But the homemade versions lack the stabilizers and other mystical, less than healthful ingredients. These thin wheat crackers are no different.

You can simply roll out the dough with a rolling pin, but in this case I ran the dough through my pasta roller. The pasta roller not only produces thinner dough than I can achieve with a rolling pin, it also creates more uniformly even dough resulting in more evenly baked crackers.

By the time Jack’s perfectly roasted chickens came out of the oven, three dozen crackers and a bowl of smoked salmon spread were gone!

Homemade Thin Wheat Crackers

Ingredients

  • 1 1/4 cups whole wheat pastry flour
  • 1 1/2 tbsp granulated sugar
  • 1/2 tsp salt
  • 1/4 tsp smoked paprika
  • 4 tbsp unsalted butter, frozen
  • 1/4  cup ice cold water

Directions

  1. Whisk together flour, sugar, salt, and paprika in a medium bowl.
  2. Grate frozen butter into flour mixture using a cheese grater.
  3. Cut butter into flour mixture using two knives to form smaller bits of butter. Mixture is ready when butter bits are the size of small peas and the mixture looks like coarse cornmeal.
  4. Add water, stir with fork until dough comes together. If dough seems too dry, add additional cold water by tablespoons until dough comes together. Knead once or twice. Don’t over knead.
  5. Preheat oven to 350 degrees F. Line baking sheet with parchment paper.
  6. Divide dough in half. Lightly flour work area. Roll out dough into a very thin rectangle.
  7. Cut dough into cracker shapes. I used a pastry wheel to cut one batch and a knife to cut the other. Both worked well.
  8. Use a fork to prick crackers several times.
  9. Place crackers on prepared baking sheet. They can be close together as they won’t spread.
  10. Optional: I sprinkled the crackers with more salt before I baked them to add to the look and to provide additional flavor.
  11. Bake crackers until crisp, about 7 minutes. Flip crackers and bake an additional 7 minutes. If your crackers are thicker, you may need to bake a bit longer.
  12. Cool on wire racks. Repeat process with second half of dough.
  13. Enjoy crackers right away. Store extras in an airtight container to keep them crisp.


Better Bagels (it’s the sourdough)

The addition of sourdough gives these bagels texture and flavor.

I’m been really happy with my sourdough starter. I’ve used it for pancakes, waffles, and English muffins. Every week, I use this delicious starter to turn out two beautiful loaves of sourdough bread to accompany many of our meals. Recently, I finished a batch of homemade lox. I wondered what would happen if I included some of my trusty starter in my bagel recipe.

Wow. What an improvement. The resulting bagels have a subtle sourdough flavor. But the flavor wasn’t the main improvement – it was the texture. These bagels have a perfectly soft interior and a perfectly chewy exterior. We couldn’t believe the difference from an already tried and true recipe. I’ve made the recipe twice now with the same happy results. It’s a keeper!

Sourdough Chewy Bagels

Ingredients

  • 2 tsp active dry yeast
  • 1 1/2 tbsp granulated sugar
  • 1 1/2 cups warm water (105° F/40° C)
  • ½ cup sourdough starter
  • 3 cups all-purpose flour
  • 1 1/2 tsp salt
  • 3 qts water
  • 3 tbsp granulated sugar
  • 1 egg, beaten
  • toppings such as poppy seeds, toasted onions, sesame seeds, etc. (optional)

Directions

  1. In a large bowl, stir together yeast, 1 1/2 tbsp sugar and water. Let sit for about 5 minutes to make sure the yeast is good. (It will foam.)
  2. Stir in sourdough starter
  3. Stir in salt and the flour, 1/2 cup at a time. The last 1/2 cup, you will need to knead in by hand.
  4. Knead the dough until it is smooth and elastic.
  5. Coat the inside of a large bowl with oil and place the dough inside.
  6. Cover bowl with plastic wrap and let dough rise until doubled, about an hour.
  7. Line baking sheet with parchment paper.
  8. Cut dough into 8 equal pieces.
  9. Roll pieces into balls.
  10. Flatten balls slightly.
  11. Poke your finger through center of each ball and twirl dough around your finger to enlarge the hole.
  12. Place bagels on parchment-lined baking sheet to rest.
  13. Bring 3 qts water to boil in large pot. Stir in 3 tbsp sugar.
  14. Place 4 bagels in boiling water. Boil for 1 minute. Flip bagels and let boil for another minute.
  15. Place boiled bagels on clean, dry towel.
  16. Place remaining 4 bagels in boiling water. Repeat boiling process with these bagels.
  17. Take bagels from towel and place them on parchment-lined baking sheet.
  18. Preheat oven to 375° F (190° C).
  19. Brush bagels with beaten egg.
  20. Sprinkle desired toppings on bagels (poppy seeds, sesame seeds, charnushka, minced dried onion and minced dried garlic are some of our favorites).
  21. Bake in preheated oven for 20 – 25 minutes, until browned.

Roasted Stacked Beet Salad

Roasted Beets & Goat Cheese

Almost ten years ago, I went on a fabulous California North Coast honeymoon with my honey. As I’m sure you can imagine, that get-away was filled with culinary delights. We ate and drank at wonderful restaurants and Jack grilled us fabulous meals on the balcony outside our honeymoon suite. One of our favorite memories is of a dinner at the River’s End restaurant in Jenner, California. The chef included locally sourced food, some of which came from a garden right on the grounds outside the restaurant.

We’d just completed a fantastic run along a trail on a bluff looking out over the Pacific Ocean, and we were famished. We began our meal with oysters on the half shell and a crisp amber ale. Next, Jack and I ordered two entrées to share along with what proved to be a wonderful bottle of old vine Zinfandel from a California winery. Jack opted for roasted elk while I went for duck prepared three ways. While we were waiting for our entrées, we tucked into a pair of beautifully presented stacked beet salads. What a revelation! Growing up, I’d always been served canned, pickled beets. I developed a disdain for those beets. But roasted, fresh beets? Wow, who knew? River’s End’s creation featured three colors of perfectly roasted beet discs atop garden-fresh greens. In between each of the discs were crumbles of creamy goat cheese. A garnish of chiffonade basil and a drizzle of balsamic vinaigrette completed the presentation. The combination of flavors and textures were perfection.

Earlier this fall, beets showed up in our Farm Lodge vegetable box. With a lovely memory of our honeymoon meal, I set out to recreate this delicious salad. My version came out just as good as my memory. The combination of the earthiness of a roasted beet, a curl of basil, creamy goat cheese and tangy  vinaigrette can’t be beat.

Roasted Stacked Beet Salad

Ingredients

  • two portions of salad greens
  • two medium-sized beets
  • extra virgin olive oil
  • a few sprigs of basil
  • 2 tbsp goat cheese

Vinaigrette

  • 3 tablespoons balsamic vinegar
  • 1 tablespoon Dijon mustard
  • 1 garlic clove, minced
  • 1/2 cup olive oil
  • Salt and freshly ground pepper to taste

Directions

  1. Preheat oven to 425° F.
  2. Coat beet roots in olive oil.
  3. Wrap beets in aluminum foil.
  4. Roast for about an hour.
  5. Beets are done when easily pierced with a knife.
  6. Let them cool enough to handle. Using a paring knife, skin the beets.
  7. Slice the beets while warm. Set aside.
  8. Prepare the vinaigrette by mixing vinaigrette ingredients well.
  9. Place greens on plates. Top greens with one slice of roasted beet. Sprinkle beet slice with goat cheese. Continue with remaining beet slices and cheese. Repeat this process on another plate with the second beet.
  10. Roll up basil leaves and slice into thin strips. Sprinkle strips atop each salad plate.
  11. Drizzle each salad with vinaigrette dressing.
  12. Serve with freshly baked bread to sop up every crumb and delicious drop left on the plate.