Rise and Roast! Sunday Morning Stout Slow Cooked Moose

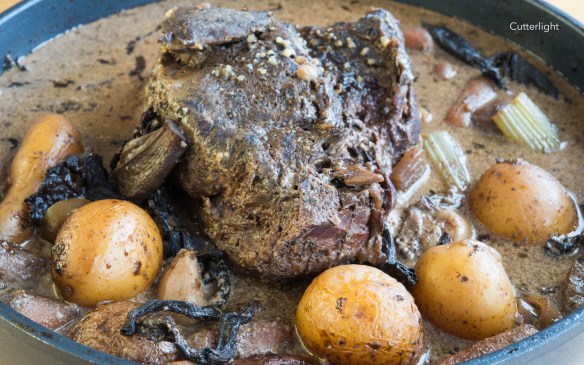
Aromas of mushrooms, tarragon, Italian herbs and root vegetables pulled together with a sweet, rich coffee stout make the temptation to steal a taste of this moist, nearly falling apart roast irresistible.

With winter hurling itself at us one more time last weekend and with a two-and-a-half pound cut of moose in the fridge, I decided it would be the perfect day to try something new – a slow-cooked roast. While I had in my imagination something beef brisket like, moist and practically falling apart, having never cooked anything like that, I wasn’t really sure how to go about the task. The cut of moose I had was very lean. Meanwhile, Barbra’s home-brewed Sunday Morning Stout, a rich, sweet, dark beer with a hint of coffee had just finished bottle-aging. How about a slow-cooked Sunday Morning Moose Roast?

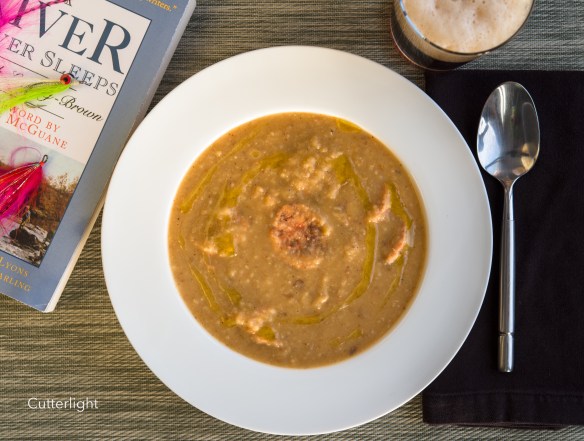
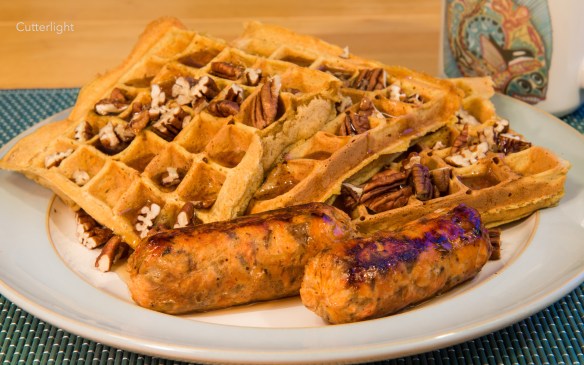
I’m happy to report that after six hours in the oven, the roast came out moist, flavorful and pulling apart with ease. That evening, we served this dish on rice with a wonderful bottle of Malbec while snow fell outside our dining room window. Over the following days, the moose was featured in omelets, pulled moose barbecue sandwiches (yum!), on lumaca rigata pasta (the hollow shape captured the broth perfectly), and, once the moose meat was gone, as a hearty vegetable soup.

This dish was surprisingly easy. Although I prepared it in a sauteuse in the oven, I’m sure this recipe would work well in a slow cooker. Canned soup soup or broth could be substituted for the from-scratch broth described below, but don’t skimp on the stout. Use a generous amount of a good one. Beef or lamb would no doubt be delicious in this recipe as well. Add a few chunks of rutabaga or parsnips for additional flavor.

Sunday Morning Moose Roast

You will need an oven-safe sauteuse with a lid or a lidded pot large enough to hold the meat and vegetables. Alternatively, a slow-cooker can be used.

Ingredients

  • 2 to 3 pound cut of meat suitable for roasting. I used moose shoulder.
  • 4 cups dehydrated mushrooms* (or use 1 pound fresh mushrooms and beef or mushroom broth)
  • 1 cup cream
  • 16 ounces of a favorite stout beer (I used a coffee stout)
  • small whole potatoes
  • (optional) rutabaga, parsnips or other root vegetables, cut into chunks
  • 3 shallots, sliced (or substitute 1 sweet onion)
  • 1 bulb garlic, cloves peeled and slightly crushed, but left whole
  • carrots cut into chunks (or use baby carrots)
  • 2 or 3 stocks of celery, cut into 1 1/2 inch pieces
  • Worcestershire Sauce
  • freshly cracked black pepper
  • sea salt
  • tarragon
  • Italian herb blend
  • extra virgin olive oil

Directions

  1. Place oven rack on next to lowest level. Preheat oven to 220° F.
  2. Season meat liberally on all sides with cracked pepper and sea salt. Set aside.
  3. Place dehydrated mushrooms in a sauteuse or other sufficiently large pan and add water to hydrate – about 6 to 8 cups. Bring to a boil, then cover and reduce heat to simmer till mushrooms are tender.
  4. Remove mushrooms and set aside but keep the mushroom broth.
  5. Stir cream into the mushroom broth, add tarragon, Worcestershire sauce and sea salt to taste. Continue cooking at a high simmer until broth is slightly reduced.
  6. Stir in stout and add Italian herb blend. Continue simmering over low heat.
  7. Meanwhile, in a separate frying pan, heat olive oil over medium heat. Add shallots and garlic and sauté until just soft. Add shallots and garlic to mushroom broth.
  8. Remove pan from heat. Place seasoned meat into broth.
  9. Add mushrooms and all the vegetables except for the celery, arranging them in the liquid around the meat. There should be sufficient liquid to cover just over half the roast.
  10. Cover the pan and place into oven.
  11. After 4 hours, add the celery. Cover and continue cooking for two more hours.
  12. After 6 hours, remove pan from oven. Taste broth to determine if additional salt or seasonings are needed.
  13. Serve over rice, on pasta or as is. Accompany with the same stout used in cooking, or with a full-bodied red wine such as a Zinfandel, Cabernet or Malbec.

*The Dried Gourmet Mushroom Mix from the Wild Mushroom company works particularly well in this dish.

Sunshine on a Snowy Day – Raspberry Lemon Curd Bars

Sunshine on a winter’s day… Lemon bars drenched in tangy-sweet raspberry jam

I love chocolate – in every form, flavor, and dish. I love dark, white, and milk chocolate. Except for a weird, avant-garde chocolate bar infused with pepper (??), I can’t think of a chocolate creation I haven’t enjoyed. Almost neck-in-neck with chocolate are desserts made with lemon. The difference with lemon is that it not only has a wonderfully tart flavor, but it also has a strong seasonal connection to summer. One bite or sip of lemon brings me back to sunshine splashed afternoons and evenings cooled by gentle breezes sitting in our little piece of paradise behind our home in California among Meyer lemon trees. When we moved to Alaska, I even made up a gallon’s worth of Meyer lemon simple syrup in order to ease the separation from those prolific trees.

As we hit the middle of March, our minds drift toward Spring! In our former life, I would be itching to get the planting pots and garden beds ready. In Chignik Lake, I’m ready to pull the Pack Rafts out and head down nearby rivers. Mother Nature has had three little words in response to these inclinations…”Not. So. Fast.” All the snow we didn’t see this past winter has been just now swirling around our windows and creating lovely white drifts. Our lake iced over, started to thaw, and is now covered in ice again.

As Jack tends to his culinary diversion, a slow-cooked moose roast, I decide on my own diversion…one that will bring a little sunshine into our home. I took a tried and true lemon curd bar recipe from my Williams and Sonoma Baking Book and adapted it with items from my bush pantry. All I can say is Wowee! After the initial mix of sweet and tart lemon, you are rewarded with a blanket of pure raspberry bliss. A definite blast of summer, in the best way possible.

Raspberry Lemon Curd Bars

Ingredients

Crust

  • 1 cup all-purpose flour
  • 1/3 cup granulated sugar
  • pinch salt
  • pinch cinnamon
  • ½ cup unsalted butter, melted

Filling

  • ¾ cup granulated sugar
  • 2 tbsp all-purpose flour
  • pinch salt
  • 3 large eggs (I used powdered eggs)
  • ½ cup lemon juice (I used good quality bottled lemon juice)
  • 3 tbsp heavy whipping cream

Topping

  • Raspberry jam (I used freezer jam which has a much brighter color and flavor)
  • Confectioners’ sugar

Directions

  1. Make crust.
  2. Preheat oven to 350° F (180° C).
  3. Grease an 8-inch square glass baking dish.
  4. Mix crust ingredients together.
  5. Press dough into bottom of baking dish.
  6. Bake for 20 minutes. Crust should be a pale golden color.
  7. Let the crust cool in the baking dish on a wire rack while you prepare filling.
  8. Reduce oven temperature to 325° F (165° C).
  9. Whisk together filling ingredients.
  10. Pour the mixture over the baked crust.
  11. Bake until filling is set, about 20 minutes. It may slightly jiggle when dish is shaken.
  12. Let lemon bars cool in the dish on a wire rack for at least 30 minutes.
  13. When ready to serve, run a knife around the edge of the pan. Cut into 12 or 16 rectangles.
  14. Remove from dish with a spatula and place pieces to be served on a serving dish.
  15. Spoon desired amount of jam on each piece.
  16. Dust each piece with confectioners’ sugar right before serving.

Not yet done with Winter: White Bean & Butternut Salmon Sausage Soup

A great read,* a hot bowl of soup, memories of last fall and dreams of summer…

A cold snap has fallen on Chignik Lake. Middle March, and once again our our world in this remote corner of Alaska is blanketed in snow. This morning we woke to find our lake glassed off with ice, the flocks of Goldeneyes and Scaup that had gathered in the view out our window gone to find open water. Now and then our resident family of otters appears on the ice to take advantage of new fishing opportunities in mid-lake openings, happy to bask in the late morning sunshine. The silver bright salmon of last autumn have long since spawned and died.

As recently as January there were still a few late-run salmon clinging to life in feeder streams. Even those fish are gone by now, returned to gravel stream beds, becoming nutrients in the web of life their offspring will soon depend upon. Even the char have disappeared, huddled together somewhere in deep water, waiting for spring.

March is a month for tying flies and sorting through gear, a month for evening games of Scrabble and tucking into a good book. March is a month when the next generation of salmon are stirring in their redds and you imagine those tiny fish and even though the water is covered with fresh ice,  you think to yourself, “Spring is coming.”

March is a good time to make big pots of soups and big plans for summer. This soup is one of our favorites. I prepared the salmon sausage without using eggs and I added chorizo to give it some zip. I seasoned the sausage with an Italian herb blend and added additional ground fennel, which came through nicely. It’s soup, so experiment with ingredients to make it your own.

White Bean & Butternut Salmon Sausage Soup

Ingredients

  • 6 cups white beans (3 16oz cans)
  • 1 butternut squash, roasted or steamed until tender, rind removed, cut into cubes (or used canned pumpkin or squash)
  • 6 cloves of garlic, sliced thin
  • 1 shallot, sliced thin (or substitute a small sweet onion)
  • 3 cups chicken broth (enough broth to thin the bean & squash mixture)
  • 1 or 2 lbs salmon sausage (see recipe here). Or substitute any sausage.
  • sea salt
  • 1 tablespoon of a favorite spicy mix featuring powdered chipotle (See “Jack’s”)
  • olive oil

Directions

  1. Add a tablespoon or 2 of olive oil to a frying pan and heat over medium heat. Add the shallots and garlic and sauté until soft. Remove from heat and set aside.
  2. Using a stick blender, food processor or conventional blender, purée the beans, squash, garlic and shallots, adding chicken broth as you do this to create a thick soup.
  3. Add the purée to a large pot. Add additional chicken broth to achieve desired consistency. Stir in seasonings, bring to a simmer and cook for a few minutes. Taste to determine how much salt is needed and if additional seasoning is required.
  4. Add the salmon sausage and gently stir in. Allow to simmer for a few more minutes.
  5. Ladle into serving bowls, drizzle with a favorite olive oil, and serve piping hot.

*A River Never Sleeps, Roderick Haig-Brown, 1946

Alaska White Bean Soup With Salmon Sausage and Reindeer Sausage

bean-salmon-reindeer-sausage-soup-022017-n

This zesty, robust soup will take the chill off even the coldest weather. 

We’d been thinking about creating our own salmon sausage for quite some time, but it took the beautiful recipes in our recently acquired copy of The Tutka Bay Lodge Cookbook to get off the stick. Turns out, there’s nothing to it. Use a food processor (or a stick blender with a nut chopper) to grind up salmon (or just chop it up fine with a sharp knife), mix in your favorite seasonings, and bind with egg whites. Tightly roll up this mixture to the thickness desired in plastic wrap, put a twist in the middle to separate the sausages, twist and tie off the ends, boil for 10 minutes, and voila! Salmon Sausage. Although we used Coho Salmon fillets from one of our summer catches, this same method would work beautifully with canned salmon. And there’s no reason to confine yourself to salmon. Chopped clams, halibut, rockfish, crab, scallops or some of Alaska’s spectacular deep water prawns could go into this sausage as well. We can’t wait to try this recipe again with some of our smoked salmon.

As to the soup… We created a minestrone-type broth using canned tomatoes. To that we added white beans, oven-roasted carrots, salmon sausage, reindeer sausage and Swiss chard. We also added sweet onions, colorful Swiss chard stems and garlic that had been sautéed in olive oil. Seasonings included oregano, marjoram, a little thyme and a splash of white wine. We finished the soup with smoked sea salt. Served with toasted sourdough bread and a homemade hefeweizen, this is a bowl that takes the chill off!

Wild Salmon Sausages

Rain, rain and more rain here at The Lake – but any day that begins with a hot mug of joe, pumpkin waffles and tasty wild salmon sausages has gotta be great!

I first made these sausages when a wintery-cold weekend had us craving bean and sausage soup. With ample quantities of three types of beans in our larder, the bean part of the soup was no problem. But alas, the last of our store-bought meat sausages had long ago disappeared. Although I’d heard about salmon sausage, I wasn’t sure how to go about making them. Barbra came to the rescue. She recalled having come across a recipe while leafing through our copy of Kirsten and Mandy Dixon’s The Tutka Bay Lodge Cookbook.

The Dixons’ recipe is simple and lends itself to countless modifications. Any reasonably fatty fish works well, and scallops, shrimp, crab or other ingredients (think wild blueberries or lingonberries) can be feathered in to create unique and tasty variations. As for seasonings, we enjoy combinations of fennel or tarragon coupled with smokey chipotle pepper. Sautéing these sausages in soy sauce just prior to serving them or using them in other dishes adds a smack of umami.

Wild Salmon Sausages

Ingredients

  • 2 tbsp shallots, chopped fine
  • olive oil
  • 1 pound wild-caught salmon fillet, skin removed, or use canned salmon
  • 1 egg, beaten
  • 1 tsp ground fennel
  • 1 tsp oregano
  • 1 tbsp powdered chili mix – a mix that features chipotle, smoked paprika and mesquite works well. See here for a terrific DIY mix.
  • a pot of simmering water
  • soy sauce

Directions

  1. Heat a little olive oil in a skillet. Add shallots. Sauté briefly, just till shallots are cooked through. Place shallots in a large mixing bowl.
  2. Use a sharp knife to finely chop salmon fillet. Add to mixing bowl.
  3. Add egg, seasonings and spices to mixing bowl. Stir all ingredients together thoroughly.
  4. Arrange some of the salmon mixture lengthwise a couple of inches from the edge along a sheet of plastic wrap about 14 inches long. Leave a couple of inches of space at both ends of the plastic sheet. Roll/wrap the salmon mixture in the plastic, creating a sausage shape. At one third of the length of the sausage roll, gently twist the plastic wrap to separate the salmon into separate sausages. Repeat to create a total of three separate sausages.
  5. Twist the ends of the plastic to close. Rubber bands can be used to ensure the plastic stays closed.
  6. Repeat with additional plastic wrap sheets until all the salmon mixture has been formed into sausages.
  7. Place enough water in a large pot to cover the plastic-wrapped sausages and bring to a light boil. (A sauterne works perfectly for this.) Gently place the wrapped salmon sausages into the water and simmer for 10 minutes. Occasionally move the sausages to ensure that they don’t stick to the bottom of the pan.
  8. Remove sausages from water. Let cool and then unwrap them. (Left wrapped, they can be placed in a zipped plastic bag and stored in the freezer.)
  9. To serve: In a frying pan, heat olive oil over medium heat. Arrange sausages in the pan – they should sizzle. Drizzle each sausage with soy sauce. This will add an agreeable amount of salt and brown them up. Since they are already cooked, simply heat the sausages through.

Pumpkin Caramel Ice Cream Sandwiches – They are It!

The crème de la crème of frozen desserts – creamy spiced pumpkin ice cream on a layer of caramel sandwiched between the chewy perfection of oatmeal cookies. The whole creation is dipped in a rich, crunchy chocolate coating.

December may not be the time that most people think of ice cream. But in our home, this is the time of the year when camping and fishing gear are stowed away and the stormy weather outdoors has us working on projects inside. One of my favorite winter hobbies is creating with baked goods.

I’m not sure what caused me to think of It’s Its, but somehow they overtook my thoughts last weekend. It’s Its are a San Francisco frozen creation that I was introduced to during a visit to the great city while in high school. It is really a simple dessert – vanilla ice cream sandwiched between two oatmeal cookies and dipped in chocolate that instantly hardens. Simple but a perfect balance of flavors and textures – the ingredients have so much flavor and the cookies have the best texture. The sandwich is messy enough that you have to pay attention to the potential loss of ice cream, chocolate bits and cookie, but it manages to stay together long enough so you never lose one little bit.

This time of the year, I’m drawn to pumpkin-flavored creations. This being the case, I have a quart of homemade spiced pumpkin ice cream tucked away in our freezer. I also had a jar of caramel topping in the fridge. An It’s It-type dessert made with this ice cream and topping seemed like a winning combination. All I needed was a chewy oatmeal cookie and a chocolate dip that hardens and then cracks just right to turn this memory into a reality with a pumpkin-caramel twist.

Let the experiment begin!

Would the caramel be too hard? Would the frozen cookies remain chewy? Would the coating have that wonderful crunch? The answer, as you’ve probably guessed, is a resounding Yes! They are a bit time consuming to make because of having to wait in between steps for freezing. It’s totally worth it. After all the time put in to making these at home, we have eight delicious ice cream sandwiches to enjoy and to share with friends.

Pumpkin Caramel Ice Cream Sandwiches

Ingredients

  • 8 scoops pumpkin ice cream (click here for recipe)
  • 16 oatmeal cookies (see below)
  • caramel ice cream topping
  • chocolate dipping sauce (see below)

Directions

  1. Line baking sheet with parchment paper.
  2. Pair up oatmeal cookies so that cookies are of equal sizes.
  3. Spread caramel topping on one side one of the pair of oatmeal cookies.
  4. Place one scoop of ice cream atop caramel topping.
  5. Sandwich second cookie atop ice cream.
  6. Place sandwiches on prepared baking sheet and freeze for 30 minutes.
  7. While sandwiches are freezing, prepare chocolate dipping sauce.
  8. Use a pair of forks to maneuver sandwiches. Place one sandwich at a time into dipping sauce. Flip sandwich. Remove from dipping sauce and place back on parchment-lined baking sheet.
  9. Repeat with all sandwiches.
  10. Freeze for one hour.
  11. Enjoy right away or wrap tightly in plastic wrap and keep in the freezer until you are ready to eat.

Chewy Oatmeal Cookies

Ingredients

  • ½ cup unsalted butter, melted
  • ½ cup brown sugar
  • ½ cup granulated sugar
  • ½ tsp vanilla
  • 1 egg
  • 1 cup all purpose flour
  • ½ tsp salt
  • ½ tsp baking soda
  • ¾ tsp cinnamon
  • 1 ½ cup rolled oats (instant or regular)

Directions

  1. Combine butter and sugars. Mix well.
  2. Add vanilla. Mix well.
  3. Add egg. Mix well.
  4. In a separate bowl, whisk together flour, salt, baking soda, and cinnamon.
  5. Mix flour mixture into butter mixture.
  6. Stir in oats.
  7. Refrigerate dough for at least 30 minutes.
  8. Heat oven to 375° F. Line baking sheet with parchment paper.
  9. Scoop out dough and roll it into 1-inch balls. Place balls on prepared baking sheet.
  10. Flatten cookies with fingers, or base of a flat glass. Use a small amount of water on your fingers or on the bottom of the glass to prevent sticking.
  11. Bake cookies for 8 minutes.
  12. Allow to cool in pan for a couple of minutes. Finish cooling on a wire rack.

Chocolate Coating

Ingredients

  • 8 oz semi-sweet chocolate chips
  • 1 ½ tbsp coconut oil

Directions

  1. Place chips and coconut oil in top of double boiler.
  2. Melt mixture over simmering water.
  3. Stir thoroughly.
  4. Use coating immediately in above recipe.

Frosted Chocolate Orange Cupcakes

Moist chocolate cake infused with orange topped with super creamy rich chocolate buttercream frosting…. happy birthday to me!

Another stellar recipe from my Williams-Sonoma Baking book. I can’t say enough good things about this cookbook. Every recipe is great. In addition to being great recipes, they are also great bases to build from or tinker with. For my birthday, I had narrowed down my celebratory dessert to three chocolate wonders from this cookbook. The combination of chocolate and orange is my all-time favorite, so the chocolate orange cupcakes won. The picture says it all – these delicious little cakes will start a party just by showing up.

Chocolate Orange Cupcakes

Ingredients

  • 3 tbsp Dutch processed cocoa powder
  • ¼ cup hot water
  • 1 ¼ cups all purpose flour
  • ½ tsp baking powder
  • ½ tsp baking soda
  • ¼ tsp salt
  • zest of 1 orange
  • 2 large eggs, at room temperature
  • ¾ cup granulated sugar
  • ½ cup buttermilk, at room temperature
  • ½ tsp pure vanilla extract
  • ¼ unsalted butter, melted, at room temperature

Frosting

  • 6 oz. semi-sweet chocolate chips
  • 1 cup unsalted butter, at room temperature
  • 2 cups confectioner’s sugar

Directions

  1. Preheat oven to 350° F.
  2. Line 12 standard muffin cups with paper liners.
  3. In a small bowl, stir cocoa with hot water until it is dissolved. Set aside.
  4. Whisk flour, baking powder, baking soda, and salt together in medium bowl.
  5. Mix orange zest into flour mixture. Set aside.
  6. In a large bowl, whisk eggs and granulated sugar together.
  7. Whisk in buttermilk and vanilla.
  8. Whisk in cocoa.
  9. Whisk in melted butter.
  10. Stir in flour mixture.
  11. Spoon batter into each muffin cup. Fill each cup about ½ full.
  12. Bake cupcakes until puffed and a cake tester inserted into the center of a cupcake comes out clean, about 15 – 20 minutes.
  13. Let cool completely on wire rack. Remove cupcakes when pan is cool.
  14. Make frosting. Put chocolate chips in top of double boiler. Melt chocolate over simmering water. Let cool to room temperature.
  15. Beat butter and confectioner’s sugar until creamy and smooth, about 3 minutes.
  16. Beat in melted chocolate until well-mixed.
  17. Fill a pastry bag fitted with a 12mm star tip (1/2 inch) with frosting.
  18. Pipe a spiral on top of each cupcake.
  19. Refrigerate the cupcakes until 30 minutes before serving to set the frosting.

Definitely Thankful for This – Almond Raspberry Tart

Tis the season for decadent desserts! Imagine a bite of smooth, sweet almond swathed in fresh raspberry jam atop flaky layers of buttery piecrust. Oh yeah!

Sure, our Thanksgiving always ends with Jack’s pumpkin pie. It’s a delicious tradition we don’t skip. When we plan the big feast, one dessert never seems to be enough. Some years, the second dessert has been a caramel apple pie, a lemon meringue pie or even a chocolate layer cake. This year, I really wanted to use almond paste that I sent out in our annual shopping. It’s an ingredient I rarely use, but love so much. Many years ago, when I first discovered bakeries and baked goods, I would always go for almond croissants. The combination of the sweet, smooth almond paste and the buttery, flakey croissant were irresistible. This tart has the same elements along with an added bonus – homemade raspberry jam. Some of the jam I made this year was a freezer jam. In other words, it wasn’t cooked. The fresh berries are stirred with some sugar and pectin and put straight into the freezer. This method of making jam preserves the fresh bright flavor of the raspberries straight from the vine.

The tart starts with a buttery, flaky piecrust that is partially blind baked to keep it light and airy. The crust is brushed with jam and then covered with an almond paste mixture, which is the main event. The whole tart is sprinkled with almond slices which provide the finishing touch. What a delicious combination! We all enjoyed the beautiful and delicious addition to this year’s table. Sadly, it is now just a fond memory.

Raspberry Almond Tart

Ingredients

  • pie dough for one crust
  • 1/2 cup unsalted butter, at room temperature
  • 8 oz. almond paste, cut into small cubes
  • 1/4 cup granulated sugar
  • 2 large eggs
  • 1/3 cup all purpose flour
  • 1/3 cup good quality raspberry jam
  • 1/3 cup sliced almonds

Directions

  1. Roll out dough to a 12-inch disk. Cover a 9 ½ inch tart pan or a 9 inch springform pan.
  2. Trim off excess if using a tart pan. If using a springform pan, trim off dough 1 ½ inches up the side of the pan. The dough will shrink when baked, so make sure to extend the dough higher than you want your end product.
  3. Freeze the shell for 30 minutes or until firm.
  4. Place oven rack in lower third of oven. Preheat to 375° F.
  5. Partially blind bake shell for 20 minutes. Shell will be done when it is pale gold and dry looking.
  6. Remove pan from oven and cool on a wire rack.
  7. Reduce oven temperature to 350° F.
  8. In a large bowl, beat butter until smooth.
  9. Add almond paste, a couple pieces at a time. Continue beating until smooth. Add more pieces and repeat beating. Continue with remaining almond paste pieces.
  10. Add sugar to almond paste mixture and beat until smooth.
  11. Add eggs, one at a time, beating after each addition.
  12. Stir in flour.
  13. Spread jam evenly on base of tart shell.
  14. Spoon almond mixture atop jam. Smooth the top.
  15. Sprinkle almond slices evenly over tart.
  16. Bake until filling is golden and the middle is firm, 35-45 minutes.
  17. Cool on wire rack.

Serve at room temperature.

Recipe adapted from The Williams-Sonoma Baking Book


Homemade Crispy Thin Wheat Crackers in a Snap

Warm from the oven or cooled and ready for a party, these crispy little wafers with a hint of sweet, a hint of wheat and a touch of salt are sure to please.

A Thanksgiving gathering at our house prompted me to come up with an appetizer that I could conjure out of our bush kitchen. In other words, I couldn’t pop over to the nearest grocery store to pick up phyllo dough or other fun ingredients that I might have available back when I lived in a city.

A great ingredient we do always have on hand is salmon – in this case I had in mind a jar of smoked salmon. We also happened to have a block of cream cheese in our freezer. Mix those two and you have a show-stopping spread. Yummy appetizers with smoked salmon spread can be served on many tasty items – mini bagels, crepes, crostini, and of course, crackers.

I love making homemade crackers. They have a satisfying crunch and flavors of their store-bought siblings. But the homemade versions lack the stabilizers and other mystical, less than healthful ingredients. These thin wheat crackers are no different.

You can simply roll out the dough with a rolling pin, but in this case I ran the dough through my pasta roller. The pasta roller not only produces thinner dough than I can achieve with a rolling pin, it also creates more uniformly even dough resulting in more evenly baked crackers.

By the time Jack’s perfectly roasted chickens came out of the oven, three dozen crackers and a bowl of smoked salmon spread were gone!

Homemade Thin Wheat Crackers

Ingredients

  • 1 1/4 cups whole wheat pastry flour
  • 1 1/2 tbsp granulated sugar
  • 1/2 tsp salt
  • 1/4 tsp smoked paprika
  • 4 tbsp unsalted butter, frozen
  • 1/4  cup ice cold water

Directions

  1. Whisk together flour, sugar, salt, and paprika in a medium bowl.
  2. Grate frozen butter into flour mixture using a cheese grater.
  3. Cut butter into flour mixture using two knives to form smaller bits of butter. Mixture is ready when butter bits are the size of small peas and the mixture looks like coarse cornmeal.
  4. Add water, stir with fork until dough comes together. If dough seems too dry, add additional cold water by tablespoons until dough comes together. Knead once or twice. Don’t over knead.
  5. Preheat oven to 350 degrees F. Line baking sheet with parchment paper.
  6. Divide dough in half. Lightly flour work area. Roll out dough into a very thin rectangle.
  7. Cut dough into cracker shapes. I used a pastry wheel to cut one batch and a knife to cut the other. Both worked well.
  8. Use a fork to prick crackers several times.
  9. Place crackers on prepared baking sheet. They can be close together as they won’t spread.
  10. Optional: I sprinkled the crackers with more salt before I baked them to add to the look and to provide additional flavor.
  11. Bake crackers until crisp, about 7 minutes. Flip crackers and bake an additional 7 minutes. If your crackers are thicker, you may need to bake a bit longer.
  12. Cool on wire racks. Repeat process with second half of dough.
  13. Enjoy crackers right away. Store extras in an airtight container to keep them crisp.


Better Bagels (it’s the sourdough)

The addition of sourdough gives these bagels texture and flavor.

I’m been really happy with my sourdough starter. I’ve used it for pancakes, waffles, and English muffins. Every week, I use this delicious starter to turn out two beautiful loaves of sourdough bread to accompany many of our meals. Recently, I finished a batch of homemade lox. I wondered what would happen if I included some of my trusty starter in my bagel recipe.

Wow. What an improvement. The resulting bagels have a subtle sourdough flavor. But the flavor wasn’t the main improvement – it was the texture. These bagels have a perfectly soft interior and a perfectly chewy exterior. We couldn’t believe the difference from an already tried and true recipe. I’ve made the recipe twice now with the same happy results. It’s a keeper!

Sourdough Chewy Bagels

Ingredients

  • 2 tsp active dry yeast
  • 1 1/2 tbsp granulated sugar
  • 1 1/2 cups warm water (105° F/40° C)
  • ½ cup sourdough starter
  • 3 cups all-purpose flour
  • 1 1/2 tsp salt
  • 3 qts water
  • 3 tbsp granulated sugar
  • 1 egg, beaten
  • toppings such as poppy seeds, toasted onions, sesame seeds, etc. (optional)

Directions

  1. In a large bowl, stir together yeast, 1 1/2 tbsp sugar and water. Let sit for about 5 minutes to make sure the yeast is good. (It will foam.)
  2. Stir in sourdough starter
  3. Stir in salt and the flour, 1/2 cup at a time. The last 1/2 cup, you will need to knead in by hand.
  4. Knead the dough until it is smooth and elastic.
  5. Coat the inside of a large bowl with oil and place the dough inside.
  6. Cover bowl with plastic wrap and let dough rise until doubled, about an hour.
  7. Line baking sheet with parchment paper.
  8. Cut dough into 8 equal pieces.
  9. Roll pieces into balls.
  10. Flatten balls slightly.
  11. Poke your finger through center of each ball and twirl dough around your finger to enlarge the hole.
  12. Place bagels on parchment-lined baking sheet to rest.
  13. Bring 3 qts water to boil in large pot. Stir in 3 tbsp sugar.
  14. Place 4 bagels in boiling water. Boil for 1 minute. Flip bagels and let boil for another minute.
  15. Place boiled bagels on clean, dry towel.
  16. Place remaining 4 bagels in boiling water. Repeat boiling process with these bagels.
  17. Take bagels from towel and place them on parchment-lined baking sheet.
  18. Preheat oven to 375° F (190° C).
  19. Brush bagels with beaten egg.
  20. Sprinkle desired toppings on bagels (poppy seeds, sesame seeds, charnushka, minced dried onion and minced dried garlic are some of our favorites).
  21. Bake in preheated oven for 20 – 25 minutes, until browned.