Linzertorte with Raspberry Freezer Jam – A Bright Idea!

linzertorte-n

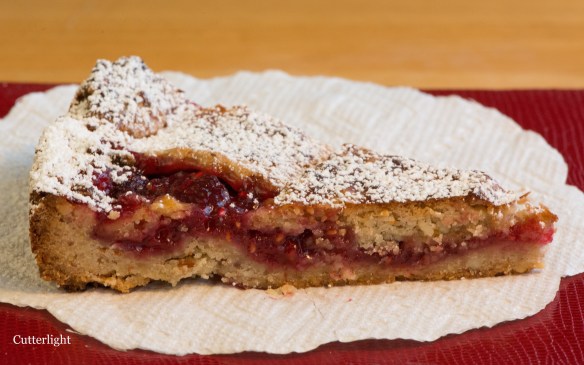
Lovely rich texture of ground almonds brightened by fresh, tart raspberry jam. Yes, sir, I’ll have another!

Linzertorte is not a new creation. I read that the first published recipes for this lovely dessert appeared in the early 1700’s. Sidestepping a culinary history lesson, I can happily report that you we love this torte. What makes ours a bit different is freezer jam – which is a magical concoction made from a mix of fresh berries, pectin and sugar without using heat. The result is a fresh, bright flavor, featuring the sweet, tart Pow of right-off-the-bushes raspberry taste. Click here to read more about freezer jam.

Freezer Jam Linzertorte

Ingredients

  • 1 1/2 cups all purpose flour
  • 1/2 tsp ground cinnamon
  • 1/8 tsp ground cloves
  • pinch salt
  • 1 cup whole almonds
  • 1 cup confectioners’ sugar
  • 3/4 cup unsalted butter, melted
  • 2 large egg yolks
  • 1 1/2 cups raspberry freezer jam

Directions

  1. Whisk together flour, cinnamon, cloves and salt in a bowl. Set aside.
  2. In a food processor, process almonds with confectioner’s sugar. Almonds should be finely ground.
  3. Pour butter into almond mixture and mix well.
  4. Add in egg yolks. Mix well.
  5. Add flour mixture to almond mixture and mix well.
  6. Separate about 1/3 of the dough. Flatten it into a disc. Wrap in plastic and refrigerate.
  7. Take remaining dough and press it into a greased, fluted tart pan. I used a springform pan and that worked well, too.
  8. Spread dough with jam. Place this part of torte into refrigerator.
  9. Take chilled dough and roll out into a circle about 1/4 inch thick.
  10. Using a fluted roller, cut the rolled dough into 6 strips.
  11. Criss-cross strips on top of torte.
  12. Press edges together to seal.
  13. Place torte in refrigerator while preheating oven.
  14. Preheat oven to 350 degrees F (180 degrees C).
  15. Bake torte until crust is browned and jam is bubbling, about 45 minutes.
  16. Let cool on wire rack until torte is just warm. Remove torte from pan and move it to a serving plate.
  17. Dust top of Linzertorte with confectioners’ sugar to serve.

Home Brewed Amber and our Razor Clam Fritter Recipe: Dinner in the Alaska Bush

amber-beer-n-clam-fritters-n

A wonderful marriage – home brewed dark amber beer by brewmeister Barbra and razor clam fritters by chef Jack. See the fritter recipe below.

Jack has been making razor clam fritters for years. He has culinary ties to the delicious shellfish from his life on the Oregon Coast. When we first visited Alaska, we dug the biggest razor clams either one of us had ever seen and promptly turned them into soups, pasta sauces, sashimi and fried dishes. These delicious beauties are something we try to stock in our pantry every year… we dig them ourselves or pick them up at our Anchorage Costco. The following recipe is tried and true. It’s been with us for years. We may change the seasoning up a bit, otherwise, we stick to the original, which has proved hard to improve upon.

To accompany our delicious fritters, we opted for our amber home-brew. It was only a matter of time before my yeastly attentions turned from bread to brew. Now that we live in a “damp” community, we are free to experiment with adult libations. Thanks to a company called Mr. Beer, I’ve been able to experiment with beer-making with great success. In addition to the amber beer (pictured above), we also are enjoying a slightly more complicated kit which yielded a robust, slightly-citrusy hefeweizen. We currently have a nut brown ale and a Mexican style lager fermenting. The beer we’re turning out would stand up nicely against any of the favorites we typically order in restaurants or buy at the package store. Brewing beer seems a natural addition to our kitchen. It certainly has been a tasty and satisfying compliment to our cuisine!

Clam Fritters: serves 4

Ingredients

  • 1 cup chopped clams
  • 1 egg, lightly beaten
  • 1 tsp lemon juice
  • 1 tbsp chopped tarragon (or substitute dry tarragon or marjoram)
  • 1 tsp baking soda
  • 1 cup flour
  • 1/4 cup clam juice
  • 1/4 cup milk
  • 1 1/2 tbsp melted butter
  • couple dashes cayenne pepper (to taste)
  • freshly ground black pepper to taste
  • oil for frying

Directions

  1. Chop clams on a cutting board. Not too fine. Place them in a mixing bowl.
  2. Add the egg, lemon juice, tarragon, cayenne, black pepper, baking soda and flour and lightly stir together.
  3. Blend the clam juice and milk. Add gradually to the clam mixture along with the butter, continuing to stir. Do not make the batter too runny and do not over-stir.
  4. Heat about 1/8 inch of oil in a frying pan.
  5. Drop batter in the hot oil – about 2 tablespoons per fritter. (They’ll cook better if they’re fairly small.)
  6. Turn when the bottom is browned, as you would for pancakes.
  7. Finish cooking till golden-brown. Serve with a side of slaw and a favorite ale or lager.

Improved Gingerbread Cookies – Hold the Molasses

gingerbread-cookies-n

The look and smell of December – warm, spicy gingerbread cookies straight from the oven, or let them cool and frost them for a more traditional treat.

‘Tis the season for hot toddies and gingerbread cookies. Out in the Alaskan bush, we have to plan ahead for any special ingredients. Ginger, yes. Cloves, yes. Molasses? When stocking up our pantry, I was on the fence when it came to molasses. I really don’t like molasses. It’s not a flavor I would normally add to any of my creations. But it is very traditional in a couple of bread and cookie recipes. In Point Hope, we kept it as a pantry item and only used it once over three years. So, I opted against stocking it again here at “the Lake.”

Here it is December, and I have a hankering for gingerbread cookies, but I have no molasses… Throwing molasses to the wind, I altered a gingerbread cookie recipe by upping the ginger and using a combination of honey and pure maple syrup instead of the traditional molasses. The result? A flavorful, spicy cookie with enough “brownness” to satisfy the eye and a flavor to satisfy my December craving. After frosting these little babies and bringing them to my students, I was met with many compliments and requests for more. Who says elementary student palates don’t know what’s good? The adults who sampled the cookies concurred with my young tasters. I patted myself on the back for improving a long-standing recipe and also for avoiding an expedited shipment of molasses from the nearest grocery store – nearly 500 air miles away!

Improved Gingerbread Cookies

Ingredients

  • 1/2 cut unsalted butter, melted
  • 1/4 cup brown sugar
  • 1/4 cup granulated sugar
  • 1/4 cup honey
  • 1/4 cup pure maple syrup
  • 1 egg, beaten
  • 2 1/2 cups all purpose flour
  • 1 tsp baking soda
  • 1/2 tbsp ground ginger
  • 1/2 tsp ground cinnamon
  • 1/4 tsp ground cloves
  • pinch salt
  • Royal icing (optional)

Directions

  1. Mix butter and sugars.
  2. Mix in honey and maple syrup.
  3. Mix in egg.
  4. Sift together flour, baking soda, spices and salt in a large bowl.
  5. Stir butter mixture into flour mixture.
  6. Turn dough out onto a floured work surface and form into two large disks.
  7. Wrap each disk in plastic wrap and refrigerate for at least two hours.
  8. Preheat oven to 400 degrees F (200 degrees C).
  9. Cover baking sheet with parchment paper.
  10. Roll out dough of one disk between two sheets of waxed paper. Dough should be about 1/4 inch thick.
  11. Using cookie cutters, cut out figures. Use an offset spatula to move cookies to prepared baking sheet.
  12. Repeat with remaining dough.
  13. Gather up scraps and roll out and cut as with original dough.
  14. Bake cookies until lightly browned, about 6 minutes.
  15. Let the cookies cool on sheet for about 5 minutes before transferring to wire rack to finish cooling.
  16. Decorate cookies with Royal icing, if desired.

I’ve Become a Baking Nerd – Cranberry Pecan Rugelach

rugelach-cranberry-n

These sweet little cookies are common at Hanukkah, but filled with pecans and cranberries they will be welcomed at any Thanksgiving, Christmas or fall festivities table.

If you’ve been following our life off the beaten path, you know Jack and I love to read. The chilly, rainy days that encourage us to be inside only fuel our fires for reading. We read together almost every morning and most nights as well. We are in the midst of a tome of poetry for our morning sessions. The Top 500 Poems edited by William Harmon has been taking us on a poetic journey through the ages from Chaucer and Shakespeare to Ginsberg and Plath. In the evening, we are currently enjoying Truman Capote’s timeless classic Breakfast at Tiffany’s. In addition to our joint reading adventures, each of us is immersed in yet another read. My current book is excruciatingly nerdy  – The Professional Pastry Chef by Bo Friberg. It contains details and procedures for doing things only a baking nerd would love to do – like making marzipan from scratch, for example. And, yes, that is on my goal list now.

‘Tis the season for making pies, so I’ve delved into the section on infallible pie crusts. The author didn’t claim infallibility, but I am certainly trying to find one that never fails. I would like to be known as “The Pope of Pie Crusts.” The author did say that “a mastery of dough making is critical to the success of a professional pastry kitchen.” My kitchen is not professional, but I would like my crusts to have the taste and texture like those of the professionals. One pie crust which caught my eye includes cream cheese as part of the primary fat.

However, before I take on the intimidating world of pie crust perfection, I thought I would inch toward it with a cookie called rugelach that uses a similar cream cheese dough. The cookie dough spirals around a tasty filling. They are lovely to look at and even lovelier to eat!

Bo uses apricots and walnuts as her filling. I adapted her published recipe to make the directions simpler, and I also swapped her choice of fruit and nuts for what I had in my Alaska pantry. The resulting cookie recipe makes it easy to substitute any dried fruit and nut for the cranberries and pecans I used.

Pecan Cranberry Rugelach

Ingredients

Dough

  • 2 sticks unsalted butter (1 cup), room temperature
  • 8 oz. cream cheese, room temperature
  • 2 cups all purpose flour

Filling

  • 1/2 cup Craisins
  • 1 cup pecans, chopped coarse
  • 1 cup brown sugar
  • 1 tsp cinnamon
  • 3 tbsp unsalted butter, melted
  • 1 egg, beaten

Directions

  1. Beat 2 sticks butter and cream cheese together with mixer.
  2. Add in flour by 1/2 cups.
  3. Divide dough into thirds. Form 3 discs. Wrap each disc with plastic wrap and refrigerate for at least 2 hours.
  4. Rehydrate Craisins. Place Craisins in pan with enough water to cover. Bring water to boil, then remove pan from heat and let Craisins cool.
  5. Drain Craisins.
  6. Combine pecans, sugar, and cinnamon in a bowl.
  7. Preheat oven to 350 degrees F (180 degrees C). Line a baking sheet with parchment paper.
  8. Roll dough into 10-inch circles.
  9. Paint circles with melted butter.
  10. Sprinkle dough with pecan mixture.
  11. Evenly sprinkle with Craisins.
  12. With a pizza wheel, cut each circle into 12 even wedges.
  13. Roll the wedges from edge to center. Place cookies on prepared baking sheet.
  14. Paint all the cookies with beaten egg.
  15. Bake for 15 minutes. Finished rugelach will be golden when finished.

Alaska Gourmet: Pan-Fried Salmon with Herbed Butter on Butternut Squash Ravioli

salmon-on-pumpkin-ravioli-n

Fall food themes continue with this pièce de résistance fit for a king. Chinook salmon holds center stage drizzled with herbed butter and served on butternut squash ravioli. Food stylist extraordinaire Barbra came up with the idea of rolling shaved parmesan into tubes. 

With plenty of sockeye salmon harvested, cleaned and packaged in our freezers, it nonetheless wasn’t a case of “coals to Newcastle” when a friend offered up a couple fat fillets of Chinook. Reds, pinks, chums and silvers – they’re all welcome at our dinner table any time. But kings… with their higher percentage of healthful fat and their decadent melt-in-your-mouth texture… kings are special.  With a batch of butternut and ricotta ravioli in the freezer courtesy of Barbra, I knew just what I wanted to do with one of the fillets. This was as fine a meal as we’ve ever enjoyed. (Barbra promises the pumpkin/squash ravioli recipe will be posted soon!)

This dish goes particularly well with Brussels sprouts, a vegetable we especially appreciate out here in the Alaska bush because they ship well and have a long shelf-life in the refrigerator. Our favorite cooking method is to cut the Brussels sprouts in half lengthwise, toss them in a bowl with olive oil, sea salt and cracked pepper, and then place them cut-side down in sizzling olive oil in a frying pan. Turn the heat down (but make sure they’re still sizzling) and cover the pan. Check, and when the cut side has browned, flip the sprouts to the leafy side. Turn up the heat a little to get things really sizzling again, then turn it back down to a little below medium and cover the pan. The leaves will brown up and caramelize and a few will blacken. They’re ready to be served.

Pan-Fried Salmon with Herbed Butter on Butternut Squash Ravioli

Ingredients (serves 2)

  • 1-pound fillet of any wild-caught Pacific salmon, skin on
  • sea salt
  • black pepper
  • (Optional) mirin or white wine – just a little
  • 2 tbsp butter
  • 1 or 2 shallots, sliced fine
  • 1/2 tbsp tarragon (dried) or 1 tbsp fresh
  • 2 servings worth of ravioli stuffed with pumpkin, squash, mushrooms or light cheeses
  • parmesan cheese, grated or sliced, to garnish
  • Extra virgin olive oil

Directions

  1. Prepare ravioli per directions, timed so that it’s ready when the salmon is ready.
  2. Rinse fillet, pat dry with paper towels and cut into two portions. Inspect for pin bones, which can easily be pulled out with a pair of kitchen pliers. Sprinkle with sea salt and a little black pepper.
  3. Add a tablespoon or 2 of olive oil to a frying pan and turn to a little hotter than medium heat. When oil is ready to sizzle, carefully place fillets in the pan skin side up. Add just a splash of mirin. Cover and cook for 2 minutes, till meat is seared.
  4. Turn salmon over so that it is skin side down. Add another splash of mirin. Turn heat down to just below medium, cover. A general rule of thumb for fish is to cook for about 8 to 10 minutes per inch of thickness. When white substance appears on fillet, it is cooked through. Avoid overcooking.
  5. Meanwhile, over medium-low heat, melt butter in a small pan. Add shallots and tarragon and sauté just long enough to soften the shallots and release the tarragon’s aroma.
  6. Serve ravioli and arrange salmon on top. Spoon on herbed butter.
  7. Serve hot with a couple of fingers of your favorite bourbon.


Perfect Sourdough English Muffins: Easier than You Think!

english-muffins-n

Perfectly round. Perfectly chewy. Perfect little breakfast breads. Why did I quit on you so quickly. my Darlings?

With success under my belt making sourdough bread, I found myself contemplating what other types of delicious baked goods I could make with my sourdough starter. A friend in the village lent me an old Alaskan recipe book with a huge collection of recipes that are truly Alaskan. Did you ever wonder how to cook up beaver meat? Or fireweed stalks? These are just a couple of the interesting recipes found in this volume. Of course, there was a substantial section on sourdough. I don’t know if many people realize this, but sourdough is a very Alaskan thing.  In fact, you can find starters that date back to the Klondike gold rush! It was an easy thing for people of that time to keep fresh starter going. They only had to regularly feed it. Delicious pancakes and breads could then be whipped up in a snap.

Now that I have a healthy starter going (I actually have two, thanks to another friend), I started playing around with recipe ideas that would showcase this unique ingredient. In short order, an idea came to me from a recipe that I’d failed at several years ago…

I got into serious baking when we first came out to the Alaska bush. At that time, we decided to make as much of our food as we could from scratch, knowing that our local store would have limited supplies. We shipped out ingredients in bulk, like 50-pound bags of flour and sugar and 25-pound bags of rice and beans. It was lovely to have a year’s worth of ingredients in our pantry. Lately, I’ve been contemplating how my baking skills and confidence have grown since the days of bread machine loaves and basic chocolate chip cookies to what I turn out in our kitchen now: lattice-topped pies with homemade crusts and my own “Twix” bars in which every layer of the candy is crafted from scratch.

I can’t remember what about my first English muffins was so bad, but I do remember being quite frustrated and promptly turning my back on these little breads. Until now. I’m glad I came around. These round beauties came out better than store bought. They had that lovely sour tang to them, the chewiness that is the hallmark of good English muffins with the expected crunch of cornmeal on the outside. Of course, we split them with forks before serving them toasted with butter and homemade jam. We also use these muffins for tasty breakfast sandwiches of fried egg, salmon, and melting cheddar cheese. As it turns out, these tasty baked breads are actually pretty easy to make. Who knows what wrong I did to this recipe so many years ago.

Sourdough English Muffins

Ingredients

  • 2 tbsp granulated sugar
  • 2 cups warm water (about 110 degrees F)
  • 1 tbsp active dry yeast
  • 7 cups all-purpose flour
  • 1 cup sourdough starter
  • ½ cup nonfat dried milk
  • ¼ unsalted butter
  • 1 tbsp salt
  • cornmeal, for coating

Directions

  1. Combine all of the dough ingredients (except cornmeal) in a large bowl.
  2. Mix and knead. Dough should be elastic and not too sticky.
  3. Place dough in a lightly greased bowl. Cover with plastic and let rise for about 1 hour.
  4. Turn dough out on a lightly flour surface.
  5. Divide dough in half.
  6. Roll dough to about ½ inch thick. Cut into 3” rounds with cookie cutter. Or just cut dough into squares, using a knife.
  7. Re-roll and cut any remaining scraps.
  8. Repeat with remaining half of dough.
  9. Place rounds onto cornmeal-sprinkled baking sheets. Sprinkle with additional cornmeal.
  10. Cover with plastic wrap and let them rise for another hour.
  11. Preheat a large griddle over medium-low heat.
  12. Place as many muffins as you can (without crowding) on griddle.
  13. Cook muffins for 10 minutes on each side.
  14. Remove muffins from griddle and cool on a wire rack. Store tightly wrapped at room temperature for about 5 days. Freeze for longer storage.

Recipe adapted from King Arthur Flour.

Happy Holidays! Lowbush Cranberry (Lingonberry) Upside-Down Cake

lingonberry-upside-down-cake_n

Bursting with the flavors and colors of the holidays, this lowbush cranberry cake makes a beautiful centerpiece for a fall table and, if there is any left, the breakfast table the next day!

Oh, these little red gems, these sour little beauties. They go straight from the freezer into a delicious batter and bake up into a cake you’ll want to share with friends.

Lowbush cranberries (as they are known here in Alaska) are our superstar fruit of fall and winter. Known as lingonberries elsewhere, these tart, tiny red berries grow close to the ground in cold, boggy habitat of northern climes. They taste similar to the cranberries we used to buy in the store, but they are so much better. As with many small, wild fruits, they are packed with more flavor than their mass-produced counterparts. And according to the University of Alaska, our lowbush cranberries contain more antioxidants due to clean air and long summertime sunlight hours. The berries are easy to pick and easy to clean and are widely available in our neck of the woods just around the time of the first frost. So far, we’ve made them into hot juice drinks and cranberry sauce. Now they are starring in this sumptuous upside down cake.

Lingonberry aka Lowbush Cranberry Upside Down Cake

Ingredients

Bottom Layer

  • 4 tbsp unsalted butter
  • ¾ cup dark brown sugar
  • 3 cups lowbush cranberries (or substitute store-bought cranberries)

Batter

  • 1 ¼ cup all purpose flour
  • ¼ cup corn meal
  • 1 ½ tsp baking powder
  • ¼ tsp salt
  • ½ cup unsalted butter, melted or browned
  • ¾ cup granulated sugar
  • 1 tsp Penzeys powdered lemon zest (or zest of 1 lemon)
  • 2 large eggs, beaten
  • 1 tsp vanilla extract
  • ½ cup whole milk

Directions

  1. In a small saucepan, heat 4 tbsp unsalted butter and brown sugar.
  2. Stir constantly until butter and sugar are melted together and bubbling.
  3. Pour mixture into bottom of 9 inch cake pan. Set aside.
  4. Preheat oven to 350 degrees F (180 degrees C).
  5. Whisk together flour, corn meal, baking powder and salt in a large bowl.
  6. In a small bowl, whisk together melted butter, sugar, lemon zest, eggs, vanilla and milk.
  7. Pour wet ingredients into dry and whisk together until mixed.
  8. Pour cranberries evenly on top of butter mixture in the 9-inch pan.
  9. Pour batter evenly over cranberries.
  10. Bake cake in preheated oven for 50 minutes. Wooden pick inserted into center will be clean when cake is done.
  11. Let cake cool in pan on wire rack for 10 minutes.
  12. Run a knife around the circumference of cake. Invert on cake platter to serve.
  13. Serve warm.

Recipe adapted from David Lebovitz.

Diminutive Raspberry Cheesecakes with a Sweet Raspberry Jam

diminutive-cheesecakes_n

Cheesecakes for one – creamy vanilla with the tang of cream cheese. Top it with some favorite jam and Wow, this makes for a delicious, elegant dessert.

Out in the Alaska bush, I don’t usually stock cream cheese in my pantry. But during a recent visit to a neighboring village I happened across a two-pound block at the store. It doesn’t freeze very well, which makes for a perfect excuse to immediately create lots of baked items with this delicious ingredient. I’ve made these lovely little cheesecakes before using matcha green tea as the flavoring. This recipe is a perfect base in which to add in a variety of flavors. For this batch, I wanted to showcase my raspberry freezer jam, so I created a complementary vanilla-flavored cake.

Diminutive Vanilla Cheesecakes

Ingredients

Crust

  • 1 1/2 cups all purpose flour
  • 1/3 cup granulated sugar
  • 1 egg, beaten
  • 1/2 cup butter, melted

Filling

  • 1 package of cream cheese, 250 grams, softened to room temperature
  • 1/2 cup granulated sugar
  • 1 large egg, beaten
  • 1 tsp vanilla extract

Directions

  1. Preheat oven to 300 degrees F (150 degrees C). Line 8 standard-sized muffin tin cups with paper liners.
  2. In a medium bowl, mix together crust ingredients.
  3. Evenly divide crust mixture into lined muffin tin cups. Press down to form bottom of cheesecakes.
  4. Bake crusts for 5 minutes. Let cool.
  5. In a large bowl, whisk together filling ingredients. There should be no lumps and all ingredients should be mixed well.
  6. Divide filling evenly into paper lined cups.
  7. Bake cheesecakes until set, about 16 – 18 minutes. Centers should not jiggle.
  8. Refrigerate cheesecakes for 3 hours before serving.

The Damp Times: The News on Home Brewing in Chignik Lake

beer-first-n

With no place to pick up a case of beer for our Octoberfest sausage (grilling in the background), we decided to have a go at brewing our own. The results? A pilsner as light and crisp as the autumn weather we enjoyed today here in Chignik Lake.

Nothing compliments fried oyster po’ boys, grilled sausages with caramelized onions, deep fried rockfish or the end of a good run like a crisp, cold lager or ale. Living in a “damp” village where alcohol is permitted but not sold, we added “learn to make beer” to our list of culinary goals for this year.

For us, a kit was the way to go. The one we ordered came with a can of wort – the thick, molasses-like mixture that is the base of beer -, bottles, and everything else we needed. Total brewing time was about six weeks.

beer-first-w-grill-n

And the results… Well, take a look! We’ve already got our next brew going. Looks like it’s time to purchase proper beer glasses!

Roasted Squash Pecan Bread

squash-pecan-bread-n

Imbued with traditional fall flavors, we have a feeling this bread could become a new Thanksgiving tradition!

During our annual shopping in July, we picked up several acorn and butternut squashes – favorite centerpieces in many of our recipes. There is also a practical side to squashes when living in the bush… they ship well and last a long time in a cool, dry location. Up in Point Hope, we used to keep squash and potatoes for months in our mudroom. Here in Chignik Lake, a much more damp location, the fridge serves as our long-term storage area.

Recently, after oven-roasting a butternut squash in olive oil and garlic, I decided to try something new. I have a time-tested base recipe for fruit bread, but instead of the usual pears or other fruit, I used the roasted squash. Even the raw dough was quite tasty! (I know, I know, I’m not supposed to eat raw dough…but I always do). The squash helps to make the bread moist and satisfying and pumpkin pie spices give it a sense of holiday seasons. Pecans add a layer of flavor and a hearty crunch. This would be a perfect Thanksgiving bread!

Roasted Butternut Squash Pecan Bread

Ingredients

  • 2 cups mashed roasted butternut squash (any roasted squash will work)
  • ½ cup vegetable oil
  • ½ cup unsalted butter, melted
  • 4 large eggs, beaten
  • 2 tsp vanilla extract
  • 1 ½ cups granulated sugar
  • 1 tsp galangal (or ground ginger)
  • ½ tsp ground nutmeg
  • 1 tsp ground cinnamon
  • 3 ½ cups all purpose flour
  • 1 tsp baking powder
  • ½ tsp salt
  • 1 cup chopped pecans

Directions

  1. Grease two 8 in. x 4 in. x 2 in. loaf pans. Set aside.
  2. Preheat oven to 350 degrees F (175 degrees C).
  3. In a large bowl mix together squash, oil, butter.
  4. Mix in eggs and vanilla.
  5. Mix in sugar.
  6. Sift in spices, flour, baking powder and salt.
  7. Mix well, but do not over mix.
  8. Fold in pecans.
  9. Pour batter into two prepared pans.
  10. Bake for 60 minutes or until a wooden pick inserted into center of loaf comes out clean.
  11. Top should be lightly browned.
  12. Cool for a few minutes in pans. Remove loaves and finish cooling on wire racks.