Sometimes it’s the Little Things: Farm Fresh Vegetables in Bush Alaska

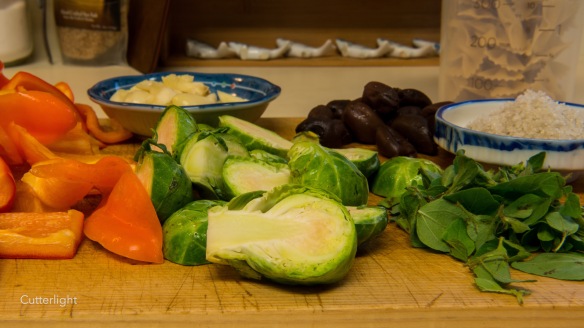
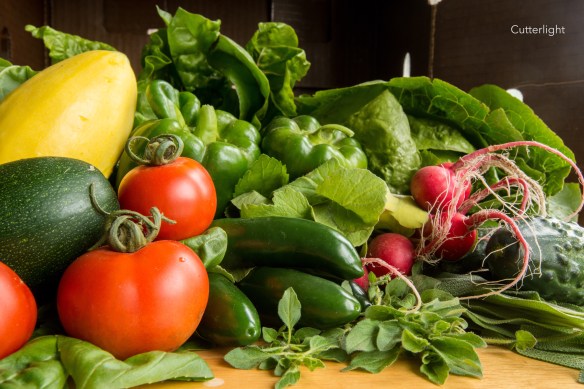
Courtesy of The Farm in Port Alsworth, a newly-arrived box of fresh vegetables fit to inspire any food-lover.

Once a week flown in a little bush airplane, a box shows up packed with freshly picked vegetables. It’s like having a birthday each week!

We’ve written a number articles about how we get food out to the tiny, remote Alaskan bush villages where we live. There’s a story about carefully packing a year’s worth of food from Costco into durable Rubbermaid tubs. More recently, we’ve been ordering much of our food from the Fred Meyer grocery store on Debarr Road in Anchorage. The people there take great care getting our groceries out to us, sending us impeccably wrapped and packed goods usually within about four days of the request. Amazon’s grocery store is another great way to get groceries, although sometimes that involves a wait of several weeks. When we lived in Point Hope we discovered a company in Washington called Full Circle, which mails farm fresh gourmet vegetables to select communities in Alaska. We would get multi-colored carrots and Swiss chard, yellow beets, and pink haricots verts. These premium veggies came at a premium price, but I will admit that after eating frozen vegetables our first year in the bush, we threw our budget to the wind in the name of fresher, tastier fare. Besides, it was fun to experiment in our cooking with colorful and interesting ingredients.

When we moved to Chignik Lake, we heard about “The Farm” in Port Alsworth. It was almost spoken as a whisper – a secret to be kept tight within an inner circle. The scoop was that they would sync orders with local flights and ship boxes filled with vegetables picked that very morning. Freshly picked veggies? Right to our door? The same day they’re picked? Our response – “What’s the phone number?” In the same secretive way we’d first heard about this magical place, we were handed a phone number. Imagine a folded slip of paper passed from one to another during a knowing handshake. When I looked up The Farm in Port Alsworth on the internet, I was surprised to discover that there was no evidence of such a place. I took out the note with the scrawled number and called.

“Hello?” an informal voice came through the receiver. Oh, dear. I must have a wrong number, I remember thinking. They should have answered the phone with a jaunty, “The Farm!” Right?

Tentatively I asked, “Is this The Farm?”

“Yes!” came the cheerful reply. Sometimes things in Alaska don’t come about the way one might imagine.

“The Farm” is actually “The Farm Lodge.” Located in Port Alsworth on beautiful Lake Clark, the lodge is operated by the same company that runs Lake Clark Air, which we regularly fly with. The lodge features a picturesque greenhouse, inviting grounds and accommodations for guests who travel to Port Alsworth for nature viewing, hunting and fishing expeditions. In addition to world class salmon fishing and wildlife photo opportunities, the lodge boasts excellent home cooked meals featuring, of course, their garden fresh vegetables. Since Chignik Lake is a regular stop for Lake Clark Air, we benefit from the surfeit of fresh produce grown in their greenhouse.

They may not have multi-colored beets or artisan green beans, but they nonetheless offer wonderful produce. We’ve received many of the crisp favorites one might find in a typical garden – cucumbers, green-leaf lettuce, tomatoes, chard, beets, radishes, bell peppers and sugar snap peas. With long hours of summertime daylight, Alaska is famous for the truly humongous size certain vegetables attain up here. The cabbage that came in our box last week was as big as a large mixing bowl – and yet it turned out to be only half the original head!

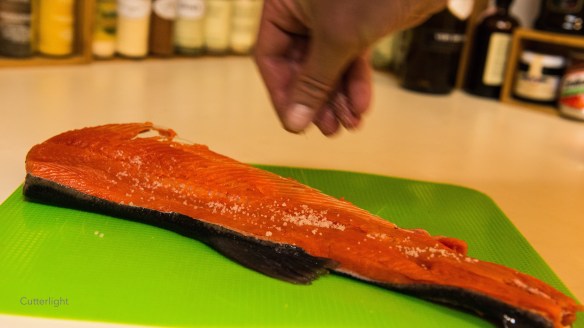
The only downside to The Farm’s service is that the growing season ends in October. But until then, we have all the fresh vegetables we can eat to go with meals of the equally fresh salmon we catch in the river in front of our house!

If you are in our area and would like to participate in The Farm Lodge’s special deliveries, here is the secret phone number (907) 310-7630.

Broiled Salmon Spine with Roasted Vegetables on Farfalle: Getting The Most out of Every Fish

Close to the bone, salmon meat near the skeleton is lean and tasty. Salmon spines (salmon carcasses with some meat still attached) are perfect candidates for the broiler. Add some vegetables to the broiling pan and you’ve got a gourmet meal for two.

No sooner did we return back home in Chignik Lake than we began turning our attention to filling our freezer and smoker with salmon. Wild salmon are precious, and every last bit of salmon meat is delicious. I don’t always get the fillets off the bones as cleanly as I’d like. That’s where this dish comes in. While the photos depict a Sockeye salmon, other species work well, too, and of course a fillet works as well as a spine in this recipe.

1. Position your oven rack to the second level below the broiler. Place a broiling pan on the rack and turn on the broiler to preheat the pan and the oven.

2. Chop up some of your favorite vegetables. Pick ones that are hardy enough to withstand a few minutes under the broiler. Whole garlic cloves roast up soft, slightly charred and delicious in this recipe. Fruit such as pitted olives work well, too.

3. To serve two, measure out about two cups of Farfalle pasta. Other types of pasta are fine.

Mise en place: whole garlic cloves, bell peppers, Brussels sprouts, fresh oregano, sea salt, pasta and Kalamata olives. You’ll also need a good extra virgin olive oil, a broiling pan, and, of course, the salmon spine or fillet. 

4. Toss the vegetables together in a bowl along with sea salt and olive oil. Fresh or dried thyme or oregano are good herb choices.

Sprinkle salt into the vegetables to taste, add a couple of tablespoons of olive oil, then mix together. As an additional option, a tablespoon or so of mirin – a light, sweet cooking wine – adds a hint of sweetness and helps the vegetables brown and char.

5. Next, rinse the salmon in cold water and dry and clean it with paper towels. There may be some dark matter running along the spine inside the skeletal cavity. That’s the kidney. If there’s a lot of this, you can use a knife or even a spoon to scrape it out. It can be further cleaned up with a stiff brush. A toothbrush works well for this.

6. Place the salmon spine on a cutting board and give it a fairly generous sprinkling of salt.

A good sea salt (we like gray sea salt) really brings out the flavor of salmon.

7. Take the preheated broiling pan out of the oven. Use a brush or spatula to coat the surface with olive oil. Arrange the salmon and the vegetables on the pan.  It should be sizzling hot. Place the pan back into the oven and broil for about 8 or 9 minutes.

8. While the salmon is broiling, prepare the pasta according to the maker’s directions.

Colored bell peppers and Brussels sprouts char and caramelize beautifully under a broiler.

9. After about 8 or 9 minutes, remove the broiling pan from the oven. Transfer the salmon to a cutting board and use a fork to pull the meat off the bones. You want chunks of a good size to go on a fork along with a bite of vegetable and a bit of pasta.

10. Finally, plate up the pasta. Add the salmon and vegetables. Finish with freshly grated Parmesan cheese and a couple of grinds of freshly cracked pepper. Serve hot with a bright Willamette Valley Pinot Gris.


Bourbon Chocolate Chip Mini Skillet Cookie for Two

Warm and gooey, straight from the oven. Watch out – this cookie has been found to be highly addictive.

Several years ago, we were introduced to the cast iron skillet cookie. This giant chocolate chip cookie is best served nearly straight from the oven. No need for fancy serving dishes, we were handed spoons and in mere moments the 10-inch cast iron pan was emptied. 

This terribly addictive cookie came back into my thoughts during our last trip to Anchorage. Jack and I went to a restaurant where we were served a delicious skillet breakfast of country fried potatoes, a fried egg, and an Alaskan reindeer sausage all presented in a cute, single-serving cast iron pan. That presentation was as clever as it was practical. The mini-skillet was the perfect serving size for one and kept the breakfast piping hot. We could imagine all kinds of tasty creations that would work perfectly in these clever pans. When we got home, I ordered two, and was pleasantly surprised to find that they are relatively inexpensive.

When the pans arrived, the first order of the day was a skillet cookie… but not just any skillet cookie. We love the flavor of bourbon. It happens to perfectly complement the buttery, carmely, flavors of a chocolate chip cookie. (See our post about melty chocolate chip cookies.) So I decided to punch up the skillet cookie with a bit of bourbon. After a couple of different successful experiments, I came up with just the right balance of ingredients for my recipe.

The bad things about this cookie? It is ridiculously delicious. We found it impossible to eat part of it and save the other part for later. It is easy to make, which only contributes to the addiction problem. And if you happen to have some rich vanilla ice cream to scoop on the top? You may as well call your boss and tell him/her that you won’t be coming in this week.

With fair warning, I give you the –

Bourbon Chocolate Chip Skillet Cookie for Two

Ingredients

  • 1/4 cup unsalted butter, melted
  • 8 tsp granulated sugar
  • 1/4 cup brown sugar
  • 2 tbsp egg, whisked
  • 1 tsp vanilla extract
  • 2 tsp bourbon
  • 1/4 tsp baking soda
  • pinch salt
  • 1/2 cup all purpose flour
  • 1/3 cup semi-sweet chocolate chips

Directions

  1. Preheat oven to 350° F (180° C)
  2. Have a 6 1/2” cast iron skillet available
  3. Whisk melted butter with sugars
  4. Whisk in egg
  5. Whisk in vanilla and bourbon
  6. Stir in flour, baking solda and salt
  7. Fold in chocolate chips
  8. Pour batter into cast iron skillet
  9. Bake for 20 minutes. Cookie will be puffed up and will have pulled away from edge when finished.
  10. Let cool slightly. Serve while still warm plain or topped with creamy vanilla ice cream.

Bourbon Raspberry Beret

The perfect drink for when you’re “doing something close to nothing.” We went down to the beach and gathered a little snow for the staging.

Drinks for Two:

Have two 8-ounce glasses with two or three ice cubes in each ready, and then to a cocktail shaker add:

  • 3  jiggers raspberry syrup*
  • 2 jiggers simple syrup
  • 1/2 jigger lemon juice
  • 2 jiggers bourbon
  • 3 cubes ice

Shake well and serve.

*This is easy to make by adding simple syrup to raspberry juice, to taste.

The Blueberry Bourbon Bomb – It’s Friday… Bombs Away!

This one’s easy to make and even easier to drink. Happy Friday!

Blueberry Bourbon Bomb

  1. Place two or three ice cubes in an 8-ounce glass
  2. In a cocktail shaker, place:
    • 3/4 ounce blueberry syrup (or blueberry juice with simple syrup)
    • 1 tsp lime juice
    • 1.5 ounces bourbon
    • 3 ice cubes
  3. Shake vigorously.
  4. Pour into glasses, top off with carbonated water and gently stir.

It’s five o’clock somewhere! Bombs away!

Razzle Dazzle ‘Em with Raspberry Cream Pie

Looking to expand my cookie recipe collection, I bought a new baking recipe book a couple of weeks ago. I found a beautiful book which boasted over 150 interesting cookie ideas. After reading the book cover-to-cover, I decided to try a layered chocolate biscuit. It was a disaster. The biscuit dough completely and totally fell apart when I rolled it out and there seemed to be no way to salvage it. I really hate wasting anything, so I baked the crumbs of dough anyway figuring that if they tasted good, I’d find a way to put them to good use. Well, they did taste good, and so for several days they sat on the counter in an air-tight container awaiting inspiration.

This past weekend I reached for my tried and true Williams-Sonoma Baking Book. The book fell open to a beautiful picture of a pie with a deep brown cholatey crust and a creamy pink filling. Raspberry cream pie – of course! As luck would have it, we still have a good supply of frozen raspberries from last summer’s berry picking. Raspberries and chocolate are a perfect match, in my book.

What a delight! The look of this lovely pie certainly suggests Valentine’s Day, but any day would be a good day for this light, airy dessert. I think the best way to describe the flavor is to imagine a 50/50 bar, otherwise known as a Dreamcicle – creamy vanilla ice cream in the middle surrounded by a slightly tart, fruit exterior, usually orange. This pie filling has that same creaminess with a slight tang of sour from the fresh raspberries. The crunch of the chocolate crust provides the perfect textural counterbalance. Next time you want to tell someone you love them, make them a raspberry cream pie!

Raspberry Cream Pie

Ingredients

  • 1 1/4 cups chocolate cookie crumbs
  • 5 tbsp unsalted butter, melted
  • 3 tbsp granulated sugar
  • 1/4 cup cold water
  • 1 package (2 tsp) unflavored powdered gelatin
  • 2/3 cup natural raspberry juice or fresh raspberry purée
  • 2 large eggs
  • 1/2  cup granulated sugar
  • 3/4 cup heavy whipping cream

Directions

  1. Place oven rack in the middle of oven and preheat to 350° F (180° C).
  2. In a medium bowl, combine chocolate cookie crumbs, butter, and granulated sugar. Stir until all is evenly mixed.
  3. Press the cookie crumb mixture into bottom of 9-inch pie pan or springform pan.
  4. Bake until firm, about 5 minutes.
  5. Let crust cool on wire rack.
  6. Pour cold water into a saucepan. Sprinkle with gelatin and let sit until gelatin softens and swells (about 5 minutes).
  7. Heat gelatin over medium heat. Stir until it is clear and fluid.
  8. Stir gelatin mixture into raspberry juice. Set aside.
  9. In a medium bowl, whisk eggs, sugar, and salt until pale yellow. Set aside.
  10. In a large bowl, beat or whisk the cream until thick, soft peaks form.
  11. Add egg mixture to whipped cream. Whip until smooth.
  12. Add raspberry mixture to cream mixture. Whip until smooth.
  13. Pour filling into the crumb crust. Even out with a rubber spatula.
  14. Refrigerate until the filling is cold and firm (4-6 hours).
  15. Let the pie stand at room temperature for about 20 minutes before serving.
  16. Serve topped with sweetened whipped cream and fresh berries.

Waiter! Another oven fresh Soft Pretzel with a Deep Red Ale, please

A couple of weeks ago, Jack and I took our biannual trip to the big city – Anchorage. Since we’ve been brewing our own beer this year, we felt it was our moral and professional obligation to sample different types of beers in order to best serve our customers. All right, morals and professions have nothing to do with this tasting quest. And we happen to be our own best customers, but whatever. Tasting beer is fun and actually educational! We met up with a guy at the 49th State Brewing Company who told us he is studying to be a Cicerone (think beer sommelier). He will become a trained and certified beer professional! After talking through the beer menu with him, we diligently read descriptions and critically tasted several beers in order to get a handle on what we really liked and what food pairings we could imagine with 49th State’s brews. By the way, they have a diverse selection with beers featuring imaginative and complex flavors. We highly recommend making 49th State Brewing a stop on your tour of Anchorage. We came back home with a new appreciation of the levels of complexity we are producing in our little home brewery.

When we returned to Chignik Lake, one of our batches of new beer was ready to try. This beer recipe was produced by a company called Brew Demon. The brew, Deep Red Ale, came out nicely. It had a deep red-brown color with a slight nutty flavor, mildly hoppy, with a touch of malt and a beautiful head. Jack says, “When I drink this beer, I imagine enjoying it with fried or grilled by the campfire.” 

One night in Anchorage, we decided to enjoy a Giant pretzel along with our beer tasting. The bakers at 49th State Brewing nailed this pretzel. It was delightfully chewy with that expected glossy exterior speckled with high quality salt. And it was Huge. It was a perfect accompaniment to a delicious beer – and a perfect idea to recreate in my home bakery. To go with our deep red ale, this time I stuck to my time-tested regular-sized pretzel recipe. The giant pretzel is on the baking goal list. Stay tuned for that recipe.

Soft Pretzels

Ingredients

  • 4 tsp active dry yeast
  • 1 tsp granulated sugar
  • 1 1/4 cups warm water (110° F/45° C)
  • 4 cups all purpose flour
  • 2 tbsp granulated sugar
  • 1 1/2 tsp salt
  • 1 tbsp extra virgin olive oil
  • 1/4 cup baking soda
  • 4 cups hot water
  • kosher salt for topping

Directions

  1. In a large bowl, dissolve yeast and 1 tsp sugar in warm water. Let stand about 10 minutes.
  2. Mix one cup of flour and 2 tbsp sugar into the yeast mixture.
  3. Mix an additional cup of flour and salt into the dough mixture.
  4. Continue adding flour by half cups.
  5. Add additional flour if dough is too wet.
  6. Knead dough until smooth (about 7 minutes).
  7. Oil a large bowl. Place dough in bowl and turn until coated.
  8. Cover bowl with plastic wrap and let dough list un a warm place for an hour. Dough should double in size.
  9. Preheat oven to 450° F (230° C). Line a baking sheet with parchment paper.
  10. In a large pot, dissolve baking soda in hot water.
  11. Divide dough into 12 equal pieces.
  12. Roll each piece into a rope and twist into a pretzel shape.
  13. Once the dough pieces are shaped, dip them into the hot baking soda solution.
  14. Placed dipped pretzels onto prepared baking sheets. Sprinkle with kosher salt.Bake in preheated oven for 8 minutes. Finished pretzels will be golden brown.
  15. Let pretzels cool slightly and enjoy them with your favorite mustard and a delicious red ale.

More Vegetables, Please! Spiced Carrot Cake with Rich Vanilla Cream Cheese Frosting

Packed with raisins, pecans and puréed carrots, this is a tasty way to enjoy a serving (or two) of carrots!

Living out in bush Alaska, there are certain ingredients that are a luxury in our pantry – like cream cheese. With recent outdoor temperatures agreeably mimicking a nicely chilled fridge, it was time to mail order dairy items requiring colder temperatures. Our here in Chignik Lake, Alaska, we’ve been relying heavily on the wonderful services of the mail order department at the Anchorage Fred Meyer (Debarr store). About every two weeks, we email a grocery list to the store and within four to five days, we receive  our items carefully wrapped or zip-top bagged for a nominal packing fee. A few weeks ago, we received heavy whipping cream, cream cheese and sour cream all nicely chilled in the belly of a little bush plane. Culinary feats take a bit of planning ahead, but with the cooperating weather, we can get most of what we need out here in tiptop condition. I can’t speak highly enough of our mail order friends in the Debarr Fred Meyer store!

If you’ve been following along, you’ll know that I periodically bake for my students. This has now become a time-honored tradition that has followed me through several schools. Last week, one of my students requested a cake for our “bake sale” (students can spend tickets they earn in class on a variety of rewards, including my baked creations). After my students polished off a bag of trail mix packed with raisins and nuts last week, I was confident that a carrot cake stuffed with nuts and raisins would be healthful and would be well-received by my young customers. Ok, and I like carrot cake, too, so I picked up my trusty Williams-Sonoma Baking Book to see what they had to say on the subject. Every recipe I’ve tried in this book has come out fantastically. The carrot cake recipe looked delicious. The one difference I noticed is that it called for puréed instead of shredded carrots. Pumpkin purée is a favorite, so why not a purée of carrots? Turns out the purée adds more moisture and the carrot flavor is slightly sweeter. I modified the recipe a bit and was highly pleased with the result. The cake was moist and smooth. The texture was only improved by the chopped nuts and raisins. What did the students say? They loved it! They especially liked the spice and the frosting, of course. If you won’t believe the kids, all the adults I shared the cake with agreed it was delicious!

Spiced Carrot Cake with Rich Vanilla Cream Cheese Frosting

Ingredients

  • 3/4 lb carrots, peeled and cut into 1/2 inch slices
  • 1 1/4 cups all purpose flour
  • 2 tsp baking powder
  • 1/2 tsp baking soda
  • generous pinch salt
  • 1 tsp ground cinnamon
  • 1/2 tsp mace (or substitute nutmeg)
  • 2 large eggs
  • 1 1/3 firmly packed light brown sugar
  • 1/2 cup whole milk
  • 1/2 cup unsalted butter, melted
  • 3/4 cup pecans, chopped coarse
  • 1/2 cup golden raisins
  • cream cheese frosting (see recipe below)

Directions

  1. Boil carrots until tender, about 10 minutes. Drain and let cool.
  2. Purée the carrots with a blender, stick blender or food processor. Set aside.
  3. Preheat oven to 350 degrees F (180° C). Line the bottom of an 8-inch square baking pan with parchment paper. Set aside.
  4. In a small bowl, whisk together flour, baking powder, baking soda, salt, cinnamon and mace.
  5. In a large bowl, whisk together eggs, brown sugar, milk and butter.
  6. Whisk the flour mixture into the egg mixture.
  7. Whisk in the carrot purée.
  8. Fold in the pecans and raisins.
  9. Pour batter into square baking pan.
  10. Bake 45 – 50 minutes in preheated oven. Cake will be lightly browned and wooden pick inserted into middle of cake will come out clean when cake is done.
  11. Let cake cool on a wire rack.
  12. Run a knife around edge of pan. Invert cake onto serving plate. Peel off parchment paper.
  13. Frost cake and serve right away.

Rich Vanilla Cream Cheese Frosting

Ingredients

  • 4 oz. cream cheese
  • 2 tbsp unsalted butter, melted
  • 3/4 cup powdered sugar
  • 3/4 tsp pure vanilla extract

Directions

  1. Using a mixer, beat all the frosting ingredients on medium speed until mixture is totally smooth and well-mixed.
  2. Alternatively, hand-mix all the frosting ingredients until smooth and totally mixed using a rubber spatula.

Ink and Light: “The meanest flower that blows…”

x-feather-fan-n

Feather Fan: Junco

To me the meanest flower that blows can give
Thoughts that do often lie too deep for tears.
William Wordsworth – Intimations of Immortality, 1807

Along with Samuel Coleridge, Wordsworth (1770-1850) is credited with founding English Literature’s Romantic Age. He was the country’s Poet Laureate from 1843 until his death.

Oyster Po’ Boy with Zesty Rémoulade and a Side of The World’s Best Bar Snack


oster-po-boy-w-fried-parsnips-n

The Carolinas meet California in a Po’ Boy that combines a favorite from each coast. Served up with our home-brewed hefeweizen. 

True, po’ boys originated in Louisiana, but the fried oyster sandwiches of my youth were served up in family-run seafood shacks on North Carolina’s Outer Banks. You had to remember to ask for unsweetened iced tea in those Southern establishments, shoes were optional – even the waitresses often went barefooted -, and a proudly displayed Department of Health rating of “C” was a guarantee that the seafood would be fresh, authentic and delicious.

A warm, soft bun slathered with tartar sauce or rémoulade, a wedge of lemon, and sides of fries and ‘slaw are traditional and tough to improve on. Some folks add lettuce, tomatoes, or pickles (or even the ‘slaw) for a little crunch, but when we chomp down on an oyster po’ boy, all we want is soft bun and even softer, deep-fried, juicy oysters. The crispy coating on the oysters is crunch enough. But how about a few slices of creamy avocado?

Oh, The World’s Best Bar Snack? That’s what Bill Briwa, Chef-Instructor at the Culinary Institute of America, calls deep-friend parsnips. These are a cinch to make, and, yeah, they just might be the World’s Best Bar Snack. Get the recipe here.

Rémoulade

Ingredients

Directions

  1. Mix the above ingredients together.
  2. Allow to sit for a few minutes so flavors come together.

Deep Fried Oysters

Ingredients

  • a dedicated deep-frying pot or a good stainless steel pot. For safety, the pot should be large enough so that the oil (see below) does not fill it more than half full.
  • cooking thermometer that attaches to the pot so you can monitor oil temperature
  • a slotted steel spoon or wire mesh (spider) for removing the oysters from the oil
  • cutting board or platter on which to rest oysters after they’ve been rolled in crackers
  • tongs
  • platter with paper towel to rest and drain fried oysters
  • a gallon-sized sealable plastic bag
  • 1 pint fresh oysters (The only way we can have fresh oysters in Bush Alaska is to freeze them. Happily, they freeze well.)
  • approximately 50 ounces cooking oil that withstands high heat Canola or peanut oil are good choices.
  • 3 eggs, well beaten in a bowl with fairly steep sides
  • 1/2 tbsp soy sauce
  • 1/2 tbsp Cholula or similar hot sauce
  • 1/2 cup all-purpose flour
  • 1/2 tbsp chili powder mixture, preferably one with chipotle, divided into two equal portions
  • 1/4 tsp salt
  • cracked pepper
  • 2 cups crushed saltine crackers (we use salted saltines)

Directions

  1. Drain oysters and set aside. You might want to gently roll them in paper towels to remove excess moisture.
  2. Add canola oil to a large pot and heat over high heat to 360° F (180° C). Keep an eye on the temperature, lowering burner heat as necessary. You can test the oil’s readiness for cooking by dropping in a pinch of crushed saltines. They should immediately sizzle.
  3. Meanwhile, add soy sauce, Cholula, and half of the powdered chili mix to the beaten eggs and whisk together.
  4. Add the flour, half the powdered chili mix, salt and pepper to the gallon-sized plastic bag, seal and shake well to mix. Pour the mixture into a shallow bowl or onto a plate.
  5. Place the crushed saltines in a shallow bowl or on a plate. A good way to crush them is to put them in a gallon-sized sealable plastic bag. Seal the bag, but leave a small opening so air can escape. Use a rolling pin to crush the crackers in the bag.
  6. Arrange items on your counter in the following order, leading toward the frying pot: oysters, flour mixture, egg mixture, crushed crackers, board/platter for resting oysters.
  7. Using tongs: Place an oyster into the flour mixture and thoroughly coat but give it a shake to let excess flour fall off. Then place the oyster in the egg mixture, thoroughly coat it, but hold it above the bowl for a moment to let excess egg drip off. Next, roll it in the crushed crackers, making sure it’s completely covered. Finally, set it on the board/platter to rest. Repeat till all oysters are ready to be fried.
  8. Hopefully you or your sous chef have been keeping an eye on the temperature of the cooking oil. 360° F is about right. Use tongs to carefully add oysters one at a time – no splattering. Keep adding oysters, but don’t overcrowd the pot. Try to keep them from touching each other – better too few oysters at a time than too many. Using tongs, gently turn the oysters to ensure that all side are evenly cooked to a golden brown. This will take 1 to 3 minutes. Don’t overcook them.
  9. Use a steel slotted spoon or a spider to remove fried oysters. Place on platter with paper towel to drain. You can keep them warm and crisp on the center rack of a warm oven, or loosely cover them with a towel.

The Po’ Boy

  1. It can be nice to toast the sandwich roll.
  2. Spread both sides with rémoulade. Arrange the fried oysters and give them a squirt of lemon juice from a lemon wedge. Top with slices of avocado. Drop the lemon wedge into your hefeweizen and dig in.