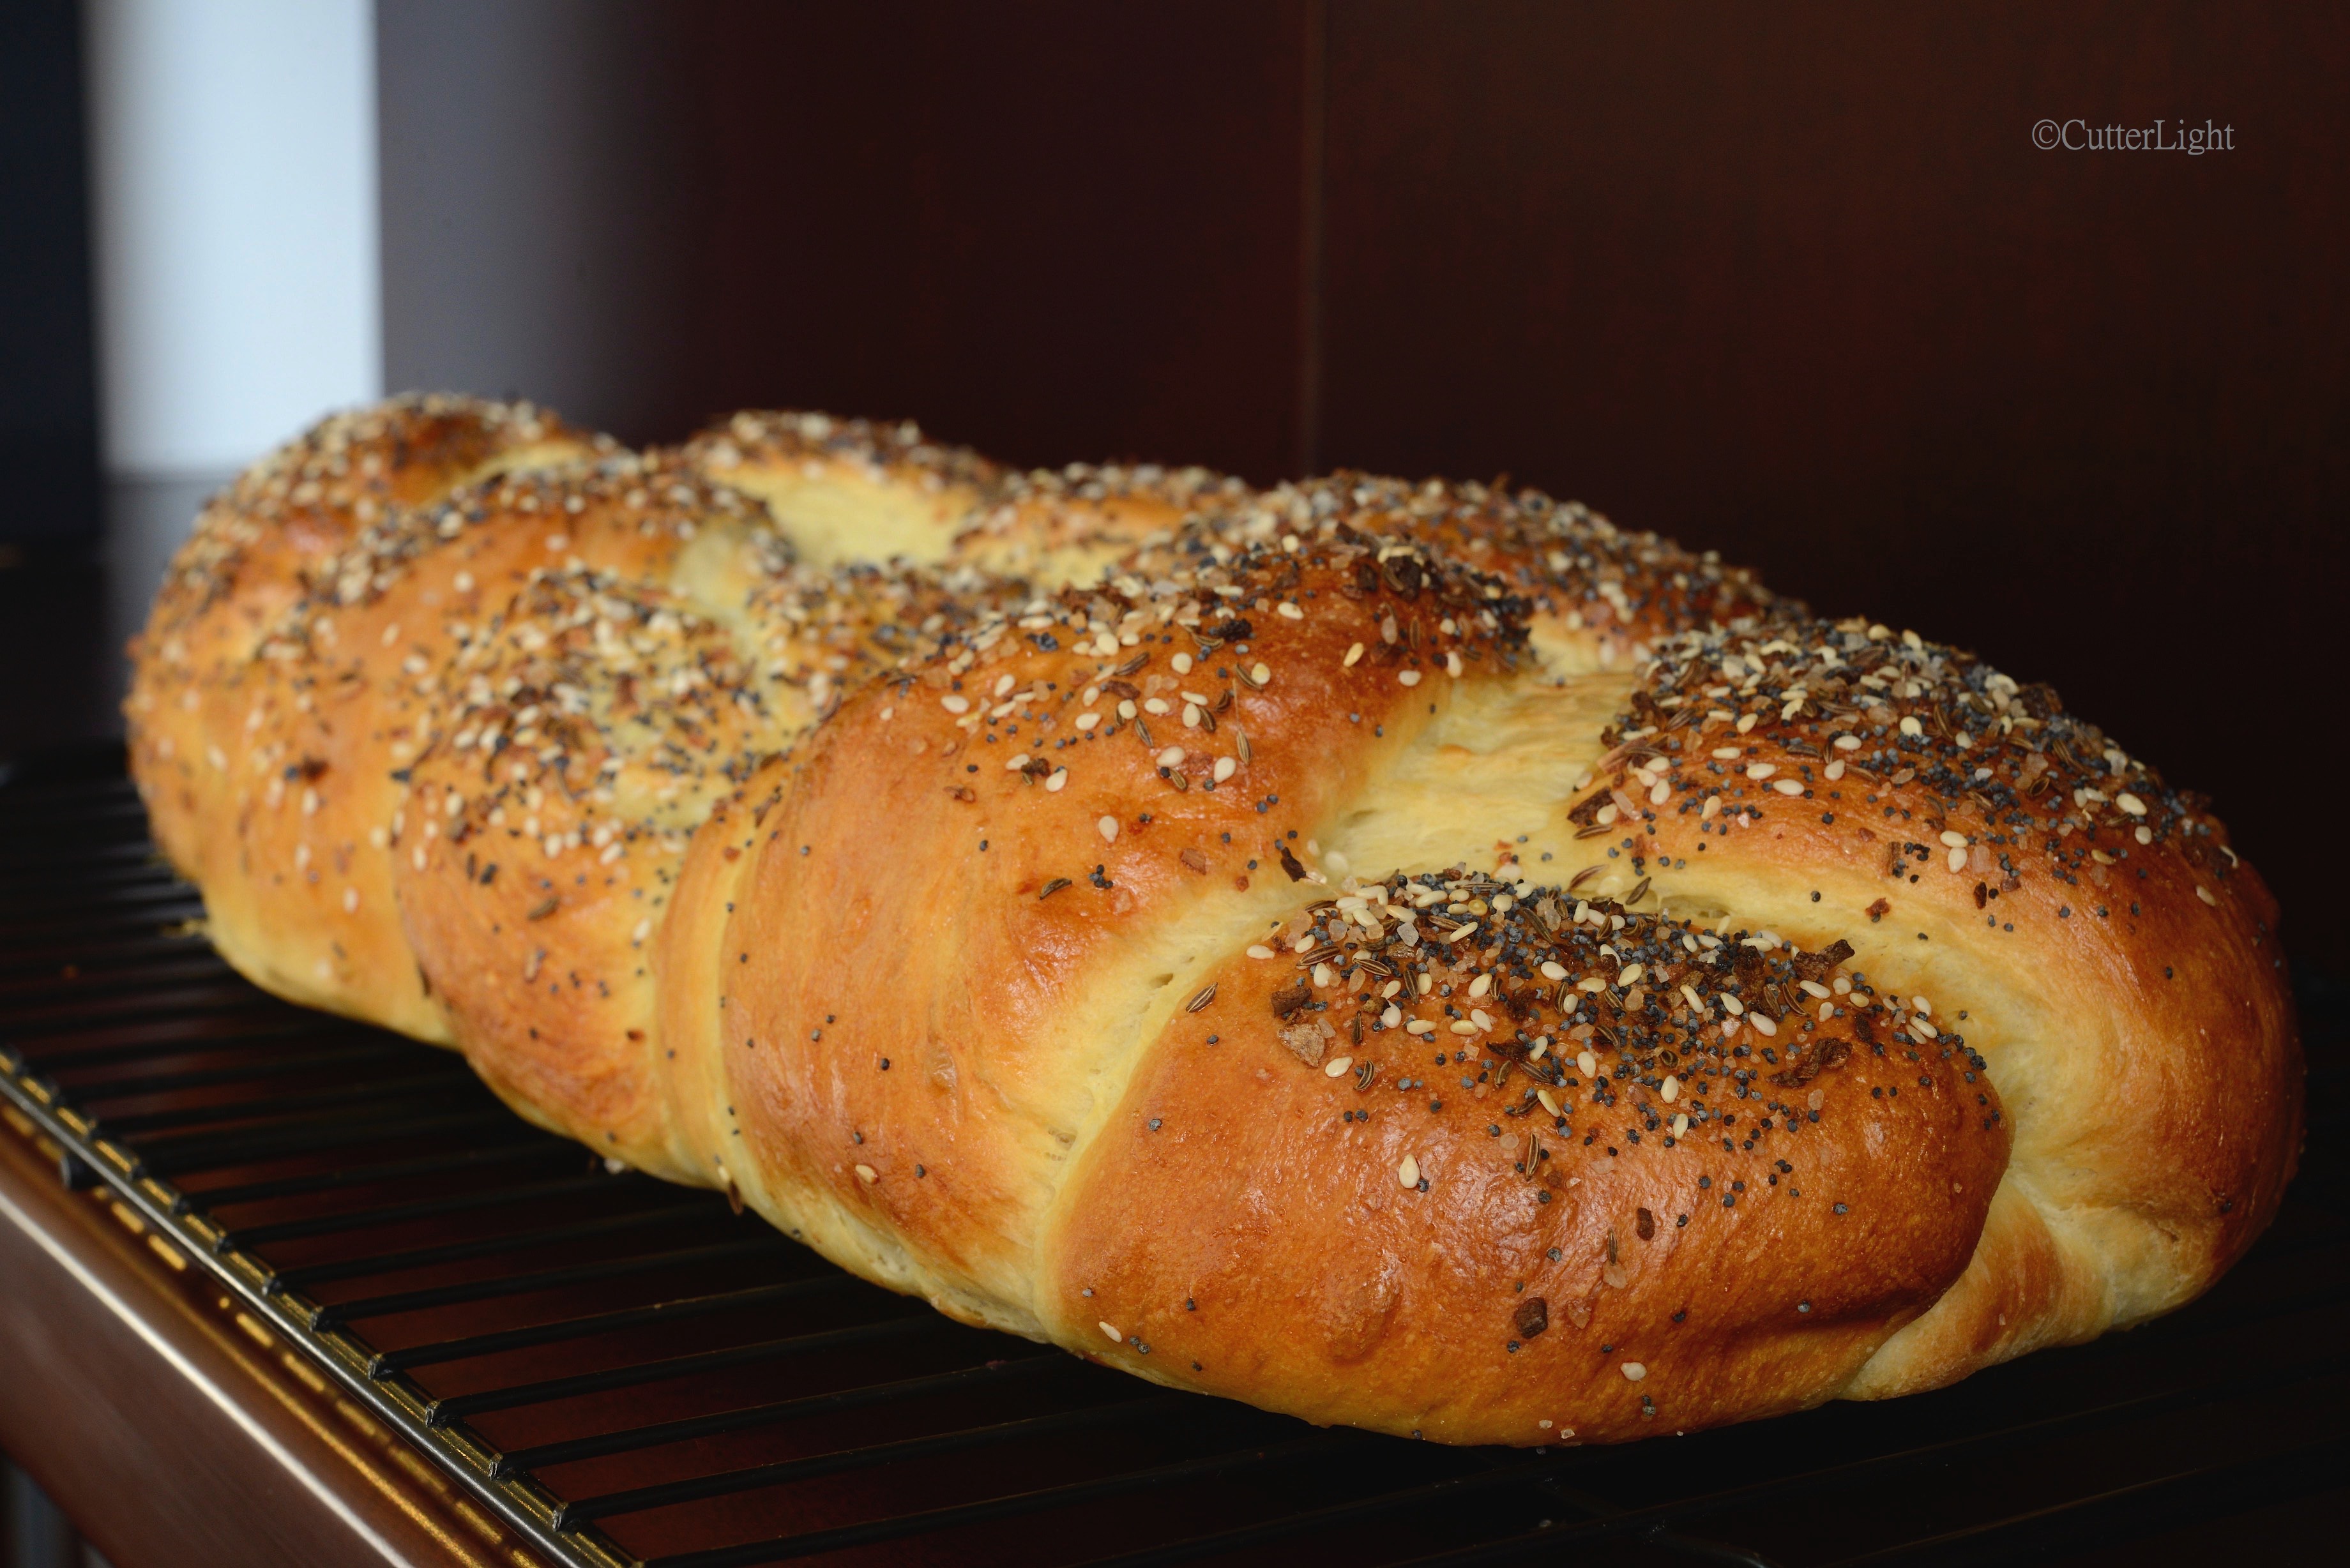
White Chocolate Orange Bites

white chocolate orange bites n

Soft bite-sized cookies spiked with orange essence and loaded with white chocolate chunks… irresistible!

No matter the weather outside or the latitude where we reside, as soon as the calendar rolls over to March, I think Spring! The thermometer right now is a wicked reminder that it is not time to get the day pack out for hiking just yet. While I patiently wait for the mercury to rise, I decided to bring some spring flavors into the house. The sunny smiles in the room after eating all of these cookies warmed up our day.

Orange White Chocolate Bites: Makes about 40 cookies

Ingredients

  • 3 cups all-purpose flour
  • generous pinch salt
  • 1 tbsp baking powder
  • 1 1/4 cups unsalted butter, melted
  • 1 cup granulated sugar
  • 1 tbsp orange extract
  • 1 large egg
  • 2 tbsp whole milk
  • 2 tbsp Penzeys dried orange peel
  • 1/2 cup good quality white chocolate chips

Directions

  1. Preheat oven to 350 degrees F (175 C). Line a baking sheet with parchment paper. Set aside.
  2. Sift together flour, baking powder, and salt in a medium bowl. Set aside.
  3. In a large bowl mix together sugar, orange extract, egg, milk, and dried orange peel.
  4. Stir half of flour into sugar mixture. Mix well.
  5. Mix in other half of flour into cookie dough.
  6. Mix in chocolate chips.
  7. Drop tablespoons of dough about an inch apart onto prepared baking sheet. Flatten cookies slightly.
  8. Bake cookies for 10 minutes. They should be beginning to brown. Let baked cookies cool completely on wire rack before serving.

Double Cinnamon Biscotti

biscotti double cinnamon n

Cinnamon is magical. It should be included in your diet because of all its health benefits, right? Some say cinnamon may cut your risk of heart disease. Other research will tempt you with cinnamon’s high quantity of antioxidants. I say just enjoy the flavor of this spice and the way it adds a layer of sweetness without adding sugar. For me, cinnamon conjures sweet and savory memories, from warm Indian dishes created in our cozy kitchens around the world to sweet baked creations with hot cups of tea on cold days.

The latter memory inspired today’s cookie creation – double cinnamon biscotti. I generally lean toward soft cookies. Biscotti are the crunchy exception. Paired with a hot beverage, the speckles of cinnamon in the cookie and the sweet stripes of cinnamon icing atop the biscotti make for a winning combination.

Double Cinnamon Biscotti

Ingredients

  • 2 cups all purpose flour
  • 2 1/2 tsp ground cinnamon
  • 1 tsp baking powder
  • pinch salt
  • 2/3 cup granulated sugar
  • 3/4 cup unsalted butter, melted
  • 2 eggs
  • 1 tsp vanilla extract

Drizzle

  • 1/2 cup confectioners’ sugar
  • 1 tsp ground cinnamon
  • 1 tbsp whole milk

Directions

  1. Preheat oven to 325 degrees F (165 degrees C). Line a baking sheet with parchment paper. Set aside.
  2. Sift together flour, cinnamon, baking powder and salt in medium bowl.
  3. In a large bowl, stir together butter and sugar.
  4. Stir in eggs, one at a time.
  5. Mix in vanilla extract.
  6. Thoroughly mix in flour mixture into egg mixture, half at a time.
  7. Divide dough in half.
  8. Shape 1/2 of dough into a long log on baking sheet, about 1 1/2 inches wide and about 9 inches long.
  9. Repeat with other 1/2 of dough. Give logs space in between because dough will spread during baking.
  10. Bake biscotti for about 15 minutes.
  11. Remove from oven and cool for about 15 minutes.
  12. Cut logs into 1/2 slices with a serrated knife.
  13. Place sliced cookies back on baking sheet and bake for 15 additional minutes.
  14. Flip cookies to opposite side and bake for 15 additional minutes.
  15. Cool on wire racks.
  16. Make drizzle by mixing confectioners’ sugar, cinnamon and milk.
  17. Place drizzle in a zip top bag and snip off a tiny piece of bottom corner.
  18. Squeeze drizzle over cooled biscotti. Let drizzle set before serving.
  19. Store leftover cookies in airtight container.

A Taste of Spring – Lemon Poppy Seed Drizzle Cake

Lemon Poppyseed Drizzle Cake n

Moist and not overly sweet, lemon poppy seed cake is a quick way to brighten up a cold winter day.

This afternoon, the sunshine poured through the living room window, filling our third floor apartment with warmth and the illusion that it wasn’t as cold as it actually is outside. But no mistake, we’re still deep in winter’s grip here in Ulaanbaatar. Today, the temperature soared to a chilly high of 17 degrees F – a bit warmer than it’s been the past several days. Snug inside our apartment, we fantasized about spring while we sat in the sunbeams enjoying warm pieces of moist lemon poppyseed cake with freshly brewed cups of tea.

Lemon Poppy Seed Drizzle Cake

Ingredients

  • 3 cups all-purpose flour
  • 1 tsp salt
  • 1 1/2 tsp baking powder
  • 2 tbsp poppy seeds
  • 2 1/4 cups granulated sugar
  • 1 tbsp lemon zest
  • 1 cup vegetable oil
  • 3 large eggs
  • 1 1/2 cups plain yogurt
  • 2 tsp almond extract
  • 1/2 cup lemon juice

Drizzle

  • 1/4 cup lemon juice
  • 3/4 cup powdered sugar

Directions

  1. Preheat oven to 350 degrees F (175 degrees C).
  2. Grease two regular-sized loaf pans.
  3. In a large mixing bowl, whisk together flour, salt, baking powder, poppy seeds, sugar, and lemon zest.
  4. Stir in oil, eggs, yogurt, almond extract, and lemon juice.
  5. Pour batter into prepared pans.
  6. Bake for 50 – 55 minutes, until a toothpick inserted into center of cake comes out clean.
  7. Mix together drizzle ingredients.
  8. Prick cake many times with tines of a fork while warm.
  9. Brush drizzle on top of cake allowing the drizzle to settle into the cake.

Individual Apple Pies (You Don’t Have to Share)

individual apple pies n

All the pleasures of indulging in a whole pie without the downside of consuming a regular-sized pie – these individual apple pies feature sautéed Fuji apples in a brown-sugar-speckled crust topped with gooey caramel dulce de leche sauce.

We love desserts that could, in theory, be shared but are best enjoyed on your own. Click the links to see these delicious ways we’ve end meals with individual serving desserts: pecan persimmon upside down cake, anniversary crème brûlée, fall harvest cakes and, of course, molten lava chocolate cake.  Individual miniature desserts are especially enjoyable because you can savor the textures and flavors of the entire pie.

Individual Apple Pies

Ingredients

Crust

  • 2 1/2 cups all purpose flour
  • 1 tsp salt
  • 2 tbsp dark brown sugar
  • 1 cup frozen, unsalted butter
  • 14 tbsp ice cold water

Filling

  • 5 large Fuji apples, peeled, cored and chopped into 1/4 inch cubes (6mm)
  • 2 tbsp unsalted butter
  • 1 tsp ground cinnamon
  • 3 tbsp dark brown sugar

Directions

  1. Liberally grease a 12-muffin tin with butter. Set aside.
  2. Make dough. Whisk together flour, salt and dark brown sugar in a medium bowl.
  3. Using a cheese grater, grate frozen butter into flour mixture. Stir so that butter is evenly distributed in flour mixture.
  4. 1 tbsp at a time, mix ice water into flour mixture until dough comes together. Knead a few times on a floured surface. Form dough into a flattened disc. Wrap in plastic wrap and chill for at least 30 minutes.
  5. While dough is chilling, make apple filling.
  6. Melt butter over medium heat. Add apples, cinnamon and dark brown sugar.
  7. Sauté apple mixture for about 8 minutes. Apples should be firm but soft enough to pierce with a fork. Set aside to cool slightly.
  8. Place chilled dough on a lightly floured surface and roll it out to about 1/4 inch (6mm) thick.
  9. Cut circles of dough to fit muffin tin cups.
  10. Fill pies to the brim with apple mixture.
  11. Bake for 30 minutes in a 350 degree F (175 C) oven. Crusts should be golden brown when finished.
  12. Let pies cool for 10 minutes before removing them from the tin.
  13. Drizzle dulce de leche on top of pies just before serving.

Dulce de Leche Topping

Ingredients

  • 1 can sweetened condensed milk

Directions

  1. Pour 1 can sweetened condensed milk into top of double-boiler pan; cover. Place over boiling water.

  2. Cook over low heat, stirring occasionally, for 40 to 50 minutes, or until thick and light caramel-colored. Remove from heat. Beat until smooth.


A German Apple Pancake – Morning Rituals and Victuals

German apple pancake n

An inspiring breakfast: topped with a dollop of sour cream, this apple-filled pancake is like a mile-high crepe, as delicious as it is beautiful .

Morning rituals. Jack and I start every day with a hearty breakfast. This important meal is usually accompanied with a big mug of coffee or tea and a selection of a few poems, which, lucky for me, are read to me by my favorite reader.  A day that starts with healthy fuel for the body and sustenance for the mind is likely to be positive and fruitful (wink).

Our breakfast menus traditionally include items like nourishing hot cereals, egg dishes, or something freshly baked. This morning’s menu came straight from the only baking recipe book I have with me here in Mongolia, The Williams-Sonoma Baking Book. If you are only going to have one recipe book, I highly recommend this one. It includes many foundational recipes for breads and desserts which can be easily modified or experimented with. I followed the German Apple Pancake recipe to the T. It came out perfectly. I am already dreaming of this mile-high pancake with farm fresh pears featuring galangal as the centerpiece spice.

German Apple Pancake

Ingredients

  • 5 large eggs
  • 2 tsp vanilla extract
  • 1/2 cup granulated sugar (plus 1 tsp)
  • 1/3 cup all purpose flour
  • 1 tsp baking powder
  • pinch salt
  • 1 1/2 tbsp unsalted butter
  • 2 large apples, cored and cut into wedges 1/4 inch thick (6 mm). I used Fuji apples.
  • 1 tsp ground cinnamon
  • 1 tsp confectioners’ sugar (optional)
  • 1/4 cup crème fraîche. I used 20% fat yogurt.

Instructions

  1. Using a blender, or a stick blender, mix eggs, vanilla, and 1/2 cup sugar for about 5 seconds.
  2. Add flour, baking powder and salt. Blend for an additional 10 seconds. Set mixture aside.
  3. Preheat oven to 375 degrees F (190 degrees C).
  4. Place a 10-inch (25 cm) ovenproof, nonstick frying pan over medium heat and add butter.
  5. When the butter is heated, add apples and sauté until softened, about 4-5 minutes.
  6. Sprinkle apples with cinnamon and remaining 1 tsp of sugar. Stir over heat until apples are evenly covered with cinnamon and sugar.
  7. Move the apples so that they are evenly spread in the pan.
  8. Pour batter over top of apples.
  9. Reduce heat to medium-low and cook until bottom is firm, about 8 minutes. You will notice the edges are set.
  10. Transfer pan to oven and bake until the top of the pancake is firm, about 10 minutes.
  11. Remove pan from oven. Invert a flat plate over frying pan and flip the pancake onto the plate.
  12. Cut the pancake into 4 wedges and transfer wedges to individual plates. Dust each portion with confectioners’ sugar. Place a dollop of crème fraîche on each wedge and serve immediately.
  13. This pancake may inspire someone to read you poetry after they are finished eating their breakfast!

Secrets for Fluffier Country Butter Biscuits

buttery biscuits n

Hot from the oven, these beautiful country-style biscuits have a down-home balance of crunchy peaks and crannies and buttery fluffiness. They’ll disappear faster than you can say “Breakfast is served!”

There are two tricks to fluffy biscuits. The first is use frozen butter. I use a cheese grater to add it to the dough while it’s still frozen. The grated butter pieces are just the right size to stir into the flour for even distribution. As the biscuits bake, buttery pockets are created and the steam released causes the dough to rise and become flaky.

The other trick is to tear the dough into biscuits instead of cutting it. Alternatively, you can use a cookie scoop to create the biscuits. Both methods produce fluffier biscuits than laying out the dough and cutting it. A traditional method of making biscuits is to use a water glass to cut them. Don’t. The glass seals the dough edges which inhibits the dough’s ability to rise. Tearing the dough is quick and allows for minimal handling. The edges of the ripped biscuits bake up into satisfyingly crunchy peaks and crannies.

Rustic Fluffy Butter Biscuits

Ingredients

  • 2 cups all purpose flour
  • 1 tbsp baking powder
  • 1 tsp salt
  • 1 tbsp granulated sugar
  • 1/3 cup unsalted butter, frozen
  • 1 cup whole milk

Directions

  1. Preheat oven to 425 degrees F (220 degrees C). Cover baking sheet with parchment paper and set aside.
  2. In a large bowl, whisk together the flour, baking powder, salt, and sugar.
  3. Grate frozen butter into flour mixture using a cheese grater with large holes.
  4. Stir butter into flour mixture until it is evenly mixed.
  5. Gradually stir in milk until dough just pulls away from the side of the bowl. Do not overstir.
  6. Turn dough out onto a floured surface and knead until dough sticks together. It will be craggy looking.
  7. Pull off pieces sized to your liking and gently flatten them to about 1 inch thick.
  8. Place pieces on baking sheet.
  9. Bake for 11 – 13 minutes. Edges will be golden brown when done.
  10. Let cool slightly before serving. Serve warm or room temperature.

As buttery as these are, Jack still slathers them with butter and adds honey. I like them “as is” unless we have a favorite homemade jam on hand.

Mongolian Scones: An Airy, “No Cream” Version of a Breakfast Favorite

Mongolian Scones w egg n

“Mongolian” scones, a lighter and fluffier version of their English cousin, are quick to make and a delicious start to our day in the coldest capital in the world, Ulaanbaatar.

We are part of a foodie network in Ulaanbaatar (UB) where one of the most common questions is, “Can you get ______ ingredient here?” Although UB is a thriving city of over a million inhabitants, Mongolia is still a developing country where certain items can be difficult to come by. Heavy whipping cream is one example. When we finally tracked some down, the price tag was the equivalent of 28 US dollars for a one liter container. The cost and inconvenience associated with certain items has been fostering invention as we experiment with substitutions to our recipes.

Our “Mongolian” scones are our answer to the question, “What can I substitute for heavy cream in scones?” The answer is yogurt, which is inexpensive and readily available in Ulaanbaatar’s grocery stores. The result is a lighter, less crumbly scone.

For this version, we used a large cookie scoop, overfilled, to create mounded scones. It is typical to create scones in a disc shape and to then cut them into wedges. The mounded shape allowed a nice rise and more crunchy surface area in one perfectly portioned breakfast scone to accompany our Mongolian eggs and delicious, thick-sliced Mongolian bacon.

Mongolian scones stacked n

A large cookie scoop portioned this dough into sixteen scones. An ice cream scoop would work well for slightly larger scones.

Mongolian Scones with Cranberry and Pecans

Ingredients

  • 2 cups all-purpose flour
  • 1/4 packed brown sugar
  • 1 tbsp baking powder
  • 1/4 tsp ground nutmeg
  • 1/4 tsp salt
  • 1 tsp dried orange peel, or fresh orange zest
  • 1/4 cup unsalted butter, chilled and diced
  • 3/4 cup dried cranberries
  • 1/2 cup chopped pecans
  • 1 tbsp granulated sugar
  • 2 small eggs (Mongolian stores typically carry smaller eggs than are sold in America)
  • 3/4 cup plain yogurt

Direction

  1. Preheat oven to 375 degrees F (190 degrees C).
  2. Cover baking sheet with parchment paper and set aside.
  3. Stir flour, brown sugar, baking powder, nutmeg, salt and orange peel together in a large bowl.
  4. Stir cranberries and pecans into the flour mixture.
  5. In a small bowl, whisk granulated sugar and eggs together. Mix in yogurt.
  6. Pour wet ingredients into dry.
  7. Stir ingredients until fully incorporated with a rubber spatula. Dough will be very sticky.
  8. Scoop out generous cookie scoops (2 tbsp or more) of dough and drop mounds on baking sheet.
  9. Bake for 15 minutes, until scones are golden brown.
  10. Enjoy fresh out of the oven with a fried egg and a slice of bacon.

Stacking Up Shortbread Cookie Recipes: Espresso-Chocolate and Almond

shortbread cookies_new

A quintessential shortbread recipe revamped twice for two deliciously buttery versions of a classic cookie.

Shortbread cookies offer delectably crunchy bites that still maintain the sense of a soft cookie. Using powdered sugar as the sweetener gives these cookies their appealing melt-in-your-mouth texture. A blog I follow, Smitten Kitchen, posted a scrumptious coffee flavored version of these cookies featuring a deep, chocolately finish. Her recipe included a clever trick of rolling out the dough in a zip top plastic bag and then allowing it to chill in the bag, making for quick and easy cutting of the chilled dough. I made a batch of her espresso-chocolate flavored cookies and then experimented with my own almond flavored version. How did these two recipes stack up? Deliciously!

After successful experimentation substituting the coffee and chocolate with almonds, I can imagine a whole host of substitute flavors to continue playing with – lemon, caramel, anise…

Espresso Chocolate Shortbread Cookies

Ingredients

  • 1 tbsp coffee extract (or highly concentrated coffee)
  • 8 oz unsalted butter, room temperature
  • 2/3 cup powdered sugar
  • 1/2 tsp vanilla extract
  • 2 cups all-purpose flour
  • 4 oz of your favorite chocolate bar, chopped finely. I found one with toffee bits inside which worked fabulously.

Directions

  1. Thoroughly mix butter and powdered sugar in a medium bowl.
  2. Stir in coffee and vanilla.
  3. Mix in flour. Don’t overmix.
  4. Fold in chopped chocolate.
  5. Transfer dough to a gallon-sized zip top bag.
  6. Roll the dough out until it is about 1/4 inch thick. You should have a rectangle about 9 x 10 inches.
  7. Squeeze out the air and zip bag closed. Refrigerate dough for 2 hours. Refrigerated dough will keep for a couple of days.
  8. Preheat oven to 325 degrees F.
  9. Line a baking sheet with parchment paper.
  10. Cut the dough-filled plastic bag so you can remove top layer.
  11. Turn dough out onto a board.
  12. Cut dough into cookies – about 1 1/2 inch squares.
  13. Place cookies on parchment lined baking sheet.
  14. Bake for 10 minutes. Then rotate pan and bake for additional 10 minutes.
  15. Cool cookies on wire rack.
  16. Cookies will taste best when they are fully cooled.

Recipe courtesy of Smitten Kitchen.

Almond Shortbread Cookies

Ingredients

  • 1 tbsp almond extract
  • 8 oz unsalted butter, room temperature
  • 2/3 cup powdered sugar
  • 1/2 tsp vanilla extract
  • 2 cups all-purpose flour
  • 4 oz almonds, chopped fine.

Directions

  1. Thoroughly mix butter and powdered sugar in a medium bowl.
  2. Stir in almond and vanilla extracts.
  3. Mix in flour. Don’t overmix.
  4. Fold in chopped almonds.
  5. Transfer dough to a gallon-sized zip top bag.
  6. Roll the dough out until it is about 1/4 inch thick. You should have a rectangle about 9 x 10 inches.
  7. Squeeze out the air and zip bag closed. Refrigerate dough for 2 hours. Refrigerated dough will keep for a couple of days.
  8. Preheat oven to 325 degrees F.
  9. Line a baking sheet with parchment paper.
  10. Cut the dough-filled plastic bag so you can remove top layer.
  11. Turn dough out onto a board.
  12. Cut dough into cookies – about 1 1/2 inch squares.
  13. Place cookies on parchment lined baking sheet.
  14. Bake for 10 minutes. Then rotate pan and bake for additional 10 minutes.
  15. Cool cookies on wire rack.
  16. Cookies will taste best when they are fully cooled.

Poppy Seed Cloverleaf Rolls

poppy seed roll clover leaf n

In theory, this recipe will make twelve rolls. When I went to retrieve the rolls for my photo shoot, there were only six. Jack!?! They must have been really tasty!

The transition from Alaska to Ulaanbaatar, Mongolia has not been easy for the baker in me. Ulaanbaatar is known for being the coldest capital in the world. Since we have arrived, the weather has been really warm. Turns out highs in the 70’s and 80’s F is mighty warm for our Alaskan blood. Finally, a cloudy day with a high of 53 degrees F made for a comfortable baking weather.

After years of making dough in my Zojirushi bread machine, the move to a country with different electrical outlets encouraged me to relinquish my training wheels and bake on my own. I had always had trouble getting my doughs to rise properly in our home in Point Hope. With experience and a few tricks, I was ready to give it a go without any machinery.

I pulled my Williams-Sonoma Baking Book off the shelf and looked for a yeasted bread recipe which would be a delicious accompaniment to Jack’s tomato soup. Poppy seed cloverleaf rolls sounded tasty and look beautiful, too. The recipe was easy to follow and the dough rose beautifully. The final product proved to be irresistible.

Poppy Seed Cloverleaf Rolls

Ingredients

  • 1 cup whole milk
  • 2 tbsp unsalted butter, plus extra for greasing
  • 1 tbsp granulated sugar
  • 2  1/2 tsp active dry yeast
  • 3/4 tsp salt
  • 2 3/4 cups all purpose flour
  • 1 tbsp light oil
  • 1 egg, well beaten
  • 1  1/4 tsp poppy seeds

Directions

  1. In a small pan over low heat, mix milk, butter, and sugar.
  2. Stir until butter is melted.
  3. Pour milk mixture into a large bowl.
  4. Allow mixture to cool to 105 – 115 degrees F, then whisk in yeast.
  5. Let mixture stand until foamy, about 5 minutes.
  6. Whisk again and then stir in flour and salt, about 1/2 cup at a time. Dough should be soft and sticky.
  7. Turn dough out onto a lightly floured surface and knead until it is smooth and elastic, about 5 minutes.
  8. Coat a bowl with oil, then add dough to bowl. Turn dough so that it is covered with oil.
  9. Cover bowl with damp cloth and allow dough to rise until doubled, about 1  1/2 hours.
  10. Grease 12 standard muffin cups.
  11. Turn the dough out onto a lightly floured surface.
  12. Flatten dough to a rectangle.
  13. Cut rectangle into 12 equal portions.
  14. Take each portion and break into 3 pieces. Roll each piece into a ball and place three balls into each muffin cup.
  15. Cover pan with a kitchen towel and allow dough to rise until doubled, about an hour.
  16. Preheat oven to 375 degrees F.
  17. Brush tops of rolls with egg.
  18. Sprinkle each roll with some of the poppy seeds.
  19. Bake until puffed and golden, about 15 minutes.
  20. Remove from pan right away. Serve hot or warm.

Recipe courtesy of The Williams-Sonoma Baking Book.

Armed With Lemon, Cream Cheese and a Kitchen Torch

lemon cheesecake brulee_n

How to improve the creamy texture and flavor of lemon cheesecake bars baked atop a sugar cookie crust? Sprinkle with sugar and torch it to add a crunchy layer of caramel! 

After creating a delectable two-toned crème brûlée and a chai crème brûlée, we became hopelessly smitten with our kitchen torch and the multi-sensory delight it produces when applied to sugar crystals. We applied the technique to a different dessert with a creamy texture, cheesecake, and ended up with very satisfying results. We baked the cheesecakes in a rectangular pan so they could be cut into squares about two bites each, which is the perfect size – a miniature feast for the senses.

In recipes that call for sweetened condensed milk, we make our own. In addition to being less expensive and more natural, our homemade version has none of the tin-can aftertaste common to many canned products, and none of the harmful BPA manufacturers use to line cans. With the help of a stick blender, it’s easy to whip together 1 cup of powdered milk, 2/3 cup of sugar, 1/3 cup of boiling water, and 3 tablespoons of butter to create 14 ounces of sweetened condensed milk. This homemade version keeps well covered in the refrigerator.

Lemon Brûlée Cheesecake Bars

Ingredients

  • 5 tbsp unsalted butter, softened
  • 1/4 cup granulated sugar
  • 1/2 cup all purpose flour
  • 1/2 tsp vanilla extract
  • 4 oz. softened cream cheese
  • 7 oz. sweetened condensed milk
  • 1 egg
  • 1 tbsp lemon zest
  • 4 tbsp lemon juice
  • 3 tbsp fine granulated sugar for brulee-ing, approximately

Directions

  1. Preheat oven to 350 degrees. Line an 8.5″ x 4.5″ glass loaf pan with parchment paper and lightly spray with nonstick cooking spray. Set aside.
  2. In large bowl, combine butter, sugar, flour and vanilla until dough forms.
  3. Press evenly into the bottom of prepared dish. Set aside.
  4. In another bowl, whip cream cheese.
  5. Stir in sweetened condensed milk. Scrape sides and mix again.
  6. Pour in egg, lemon zest and juice.
  7. Mix until mixture starts to thicken, 20-30 seconds. Scrape sides and mix again briefly.
  8. Pour overtop cookie bottom and smooth the top.
  9. Bake 20 minutes or until cheesecake is completely set.
  10. Cool, then refrigerate.
  11. Cut into 16 squares and separate.
  12. Sprinkle the tops of each square with 1 teaspoon of sugar and spread around with finger to evenly distribute sugar. Torch the tops until the sugar melts and turns an amber color. (If you don’t have a torch, place under the broiler.)

Let the top cool for a few minutes, then serve immediately.