Waiter! There’s a Whale in my Soup! Beluga Chowder

beluga chowder spoonful_n

Not your everyday ingredient, beluga whale has a firm, slightly crunchy texture and delicious flavor making it a perfect ingredient in traditional seafood chowders. 

When a friend who is on a whaling crew recently offered us a few pounds of fresh beluga, we jumped at the opportunity to work with what for us is a new ingredient. The beluga chowders we’d sampled till this point had all started with beluga being added to canned clam chowder. We couldn’t wait to try beluga with our own recipe. The result was a rich, creamy, flavorful chowder.

We view all seafood through the lens of sustainability. Although commercial whaling and environmental factors have endangered a few of the world’s 29 separate beluga populations, in Arctic Alaska’s Chukchi Sea the species is abundant and appears to be unaffected by the relatively few numbers harvested for subsistence by Inupiat hunters. Typical belugas range in size from about 10 to 18 feet long and weigh between half a ton and two tons. Salmon and cod are among their preferred prey, but they feed opportunistically on a long list of other sea creatures. Interestingly, beluga’s closest relatives are narwhales.

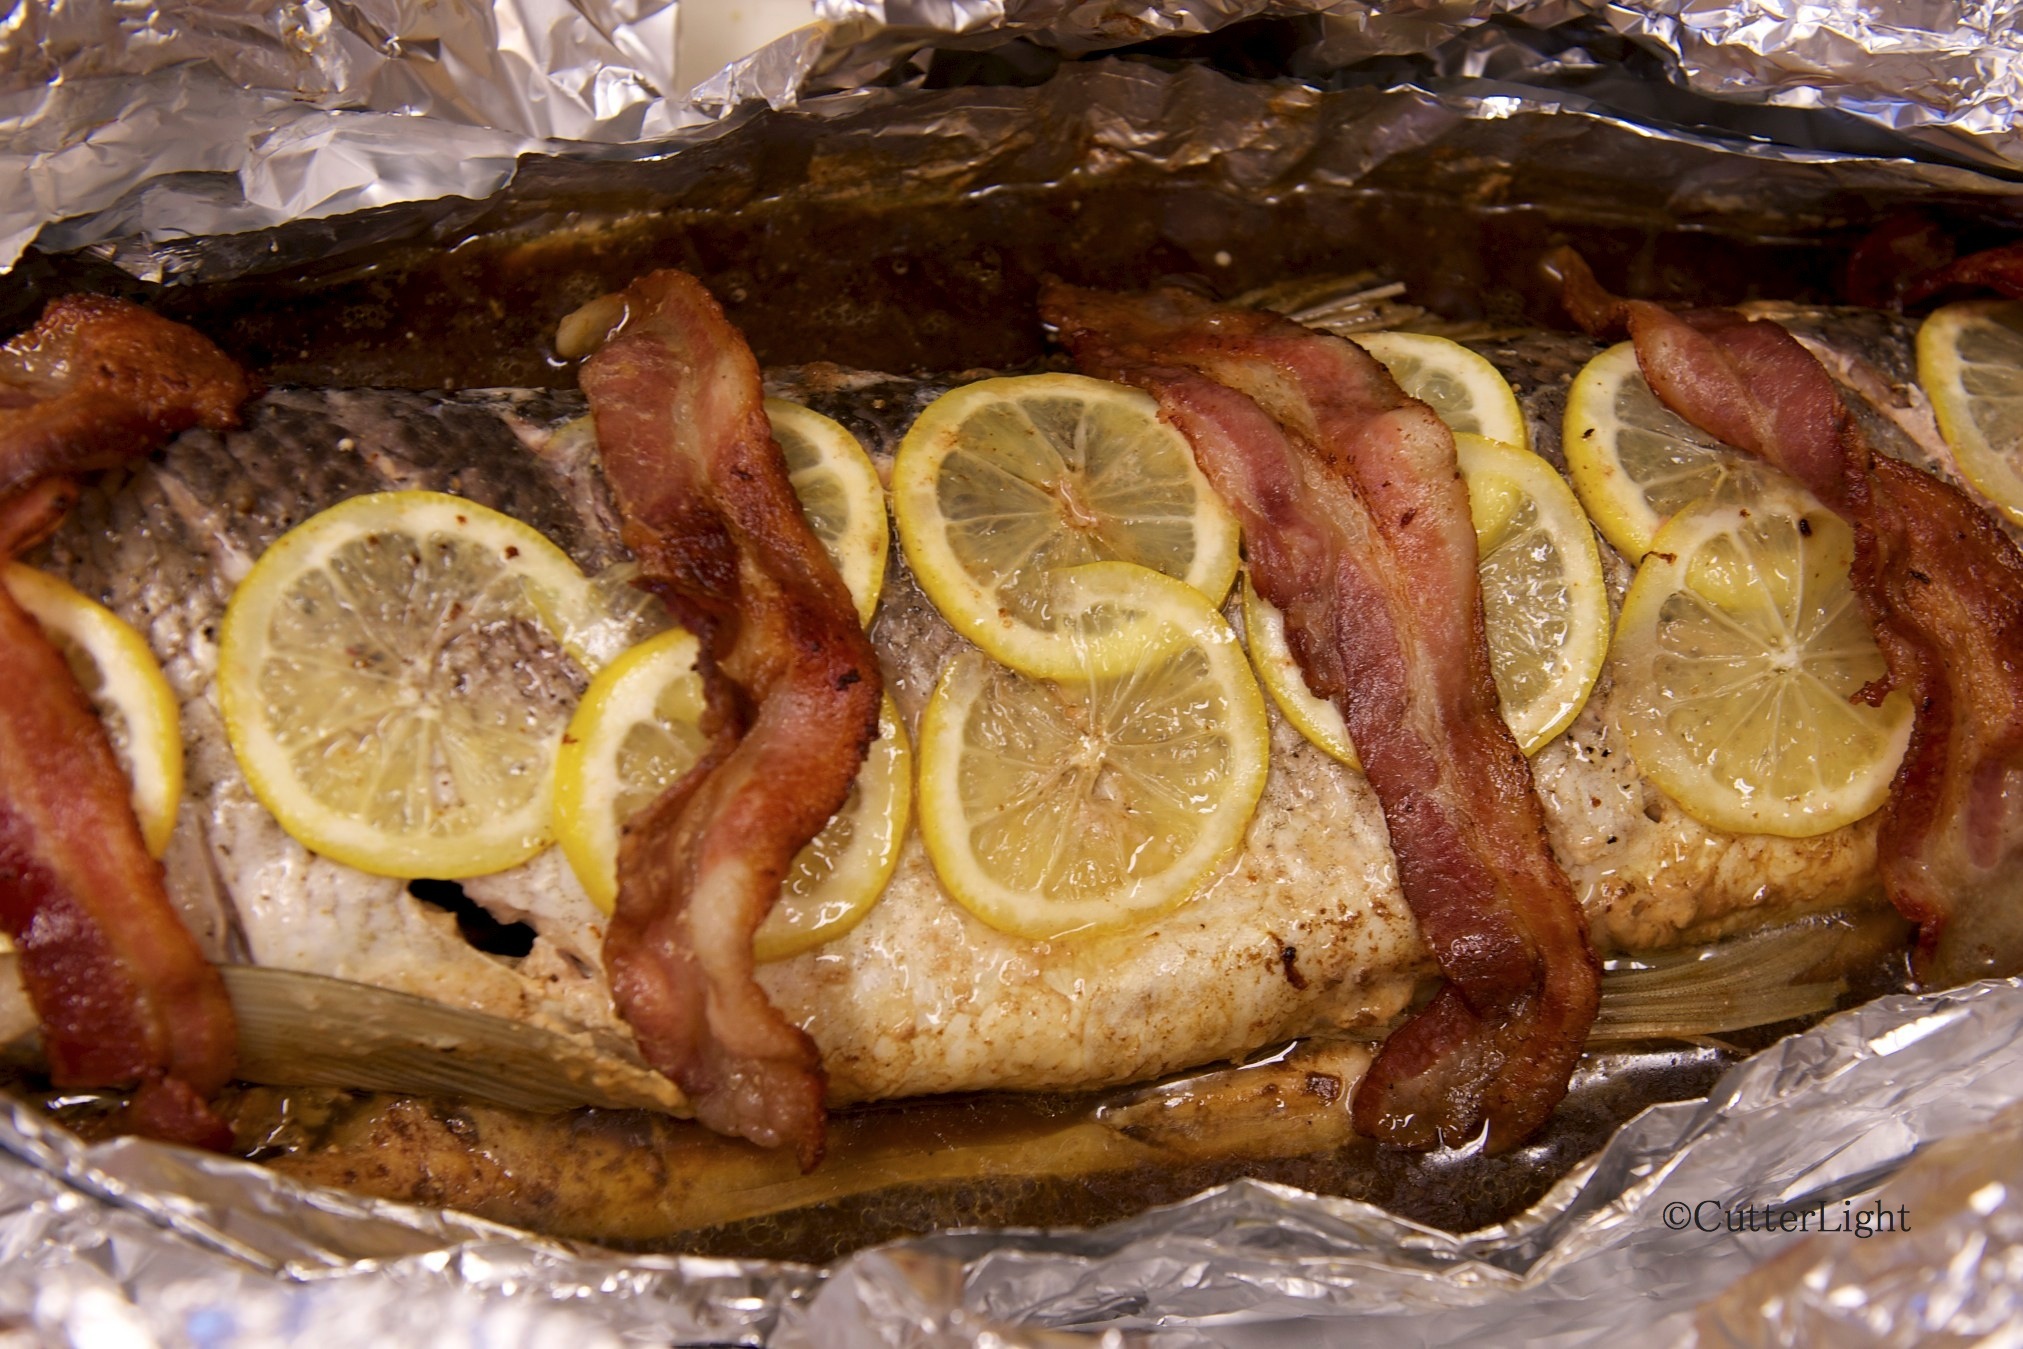
Beluga soups and chowders are very popular among Eskimos. The skin and a little bit of the attached blubber is cut into slices about 1/16 – 1/4 inch thick (.25 – .5 cm) and about 1/2 – 1 inch in width and length. We cut ours thin – about 1/6 inch. Chunks this size become tender after about 10 minutes of simmering, with the skin retaining just the right amount of subtle crunch to it – a bit like conch or whelk. Using our favorite clam chowder recipe as a base, our beluga chowder had guests mopping their bowls with fresh-baked bread and asking for more. See recipe below.

beluga chowder bowl_n

Sweet corn, potatoes, bacon, butter, olive oil, sautéed onions, garlic, salt and pepper are a great base for all kinds of seafood chowder recipes. After that, whether the featured ingredient is razor clams, beluga whale or the assorted catch of the day is up to you. A little tarragon is nice, too.

Beluga and Clam Chowder

Ingredients:

  • 2 pounds beluga whale (skin with blubber), cut into slices 1/16 inch thick and abut 1 inch x 3/4 inch. Each piece should have skin plus about 1/4 inch to 1/2 inch of blubber attached.
  • 1 pound razor clams or other clams, chopped coarse (This is the weight of clams after they have been drained. But save and set aside their juice.)
  • clam juice you’ve set aside. The more, the better.
  • 4 1/2 pounds Yukon Gold or yellow potatoes. (These cook up creamier than than Russets)
  • 2 sweet onions, chopped coarse
  • 1/2 pound bacon, cut into small pieces
  • 4 cups milk
  • 2 cups heavy cream
  • 6 cloves of garlic, chopped fine
  • 1 1/2 pound sweet corn (optional)
  • 1/2 cup flour
  • 4 tablespoons olive oil
  • 4 tablespoons butter
  • 2 tablespoons sea salt
  • 1/2 tablespoon Italian seasoning (The Spice Hunter’s Italian blend is excellent)
  • 1 teaspoon freshly ground pepper (either black or rainbow)
  • 1 teaspoon dry tarragon, crushed (optional)
  • 1/2 teaspoon nutmeg (optional)
  • 6 – 8 very thin slices of lemon

Directions:

  1. Place sliced beluga in a pot. Add just enough water or clam juice to cover. Add a little salt. Over high heat, bring to a boil then reduce to simmer. Cook till beluga is tender (skin is easily pierced by a fork) but still a bit crunchy. About 10 minutes. Use a colander and a bowl to drain water, but keep water. Set beluga aside.
  2. Fry bacon pieces till tender. Do not crisp. Drain the grease and set bacon aside.
  3. Wash potatoes and remove any eyes, but do not remove the skins. Cut into ½ inch cubes and place in a large bowl. Cover with cold water, rinse and drain.
  4. Return water used for cooking beluga to pot. Add potatoes. If necessary, add additional water or clam juice to cover potatoes. Bring to a boil over high heat. Reduce heat and simmer till potatoes are tender.
  5. Meanwhile, place olive oil in a large skillet and heat over medium heat. Add onions, flour and seasoning (optional). Reduce heat and stir frequently for about five minutes until onions begin to turn translucent. Add garlic and bacon and stir again, cooking for about 1 minute.
  6. Add onion mixture, milk, cream, beluga, cream, salt and pepper to potatoes and water. Heat thoroughly, but do not boil.

Serve piping hot with sourdough bread.

See also: Alaska Razor Clam Chowder

Manhattan-Style Razor Clam Chowder

Alaska Seafood Chowder

The Tropics Meet The Arctic

Coconut Aqpik cookies_n

Sometimes a small batch of cookies is all you need. These thumbprint cookies combine the creamy sweetness of Arctic cloudberries with the tropical essence of coconut in an airy confection.

Sorry to temp you with a berry that rarely sees a latitude much south the Arctic Circle. Our favorite berry has yet to be cultivated on any large scale as far as we know, but almost any jam could serve as a substitute in these cookies. Perhaps there is an equivalent rare berry from another interesting part of the world you could taunt us back with?

Read more at Cloudberry Country, Cloudberry Freezer JamCloudberry Cake,  and Cloudberry Sorbet.

Coconut Aqpik Thumbprints

Ingredients

  • 1/4 lb. unsalted butter, room temperature
  • 1/3 cup granulated sugar
  • 1 tsp vanilla extract
  • 1 cup all purpose flour
  • 1/4 tsp salt
  • 1 egg beaten with 1 tbsp water (egg wash)
  • 1/3 cup coconut flakes
  • cloudberry jam (or jam of your choice)

Directions

  1. In a stand mixer fitted with paddle attachment, cream together butter and sugar.
  2. Mix in vanilla.
  3. With mixer on low speed, slowly add flour and salt to butter mixture. Mix until dough comes together.
  4. Roll dough into about 1-inch balls.
  5. Get a bowl ready with egg wash and a plate ready with coconut flakes.
  6. Dip each ball into egg wash.
  7. Roll each ball in coconut.
  8. Place each cookie on parchment-lined baking sheet.
  9. Press an indentation into each cookie. I used the handle end of a silverware knife.
  10. Fill each indentation with jam.
  11. Bake cookies for 20 – 25 minutes, until coconut is golden brown.
  12. Cool and serve.

Makes 15 cookies.

Inspired by Rice Flour and Cardamom

cardamom rice cookies_n

Light rice cookies with a pinch of cardamom give zest to your afternoon tea or coffee.

Dreaming about the fun of making udon noodles and mochi stuffed with adzuki bean paste caused me to impetuously purchase 25 pounds of rice flour during last year’s annual shopping trip… without having first researched how to make these items. Turns out, udon is made with wheat flour and the rice flour used to make mochi is a sweet rice flour. I now had 25 pounds of flour with no inspiration! A “no inspiration item” often transforms itself into an inspiration in our kitchen. We’ve learned that rice flour is a much better thickener in stews and soups than wheat flour or corn starch. We’ve also learned that rice flour makes light and airy cookies. When matched with the exotic flavor of cardamom, you’ve got a trip to India during your afternoon tea!

The original recipe was for Persian rice cookies. The recipe came out way too crumbly. I set the dough in the refrigerator and contemplated how to fix it. With the addition of a couple more eggs, the cookie dough was very soft and looked like scoops of vanilla ice cream while it waited to be baked. Our initial test for the cookie is dough flavor… yum. Again, it was very light with a punch from the cardamom. After they were baked and fully cooled, they were as delightful.

Cardamom Rice Cookies

Ingredients

  • 1  1/2 cups granulated sugar
  • 1/2 cup water
  • 1 tbsp orange extract
  • 3 cups rice flour
  • 5 eggs
  • 1 cup unsalted butter, room temperature
  • 1/2 cup vegetable oil
  • 2 tbsp superfine sugar
  • 1 tsp ground cardamom
  • 2 tbsp poppy seeds

Directions

  1. Combine granulated sugar and water in small pot over medium heat.
  2. Bring mixture to a boil, stirring well to dissolve sugar.
  3. Reduce heat and summer for 7 – 10 minutes. Mixture should thicken and reduce to about one cup.
  4. Remove from heat. Stir in orange extract and set aside.
  5. In a medium bowl, stir together rice flour and cardamom. Set aside.
  6. In a bowl of a stand mixer, whisk eggs with superfine sugar until smooth.
  7. Add butter and oil to eggs and beat until fluffy.
  8. Add flour to butter mixture, mix until incorporated.
  9. Gradually add in one cup of the sugar syrup and beat well with mixer.
  10. Place the dough in a container, cover with a plastic wrap and refrigerate for about six hours.
  11. Pre-heat the oven to 350 degrees F and line two baking sheets with parchment paper.
  12. Use a cookie scoop to drop out rounds of dough onto baking sheets. Flatten drops slightly with the back of the cookie scoop.
  13. Sprinkle poppy seeds on top of each cookie.
  14. Bake for 12-15 minutes. Bottoms of cookies will be lightly browned.
  15. Remove from the oven and gently place on the cooling racks.

Makes 4 dozen cookies.

Pebble Mine: This is the Time to Save Bristol Bay Alaska Salmon

Please take a moment to help ensure that healthy populations of wild salmon remain part of Alaska’s heritage forever. Thanks. Jack and Barbra Donachy

flyfishingtravel's avatarThe Venturing Angler

Image

This is the time to work for the protection of Bristol Bay, Alaska.

Groups such as Trout Unlimited are putting the full court press on keeping Pebble Mine out of Bristol Bay. Please take a moment to add your voice. Click here to support Trout Unlimited’s efforts to squash Pebble Mine.

View original post

Easy Wheat Bread with Complex Flavors of Coffee, Cocoa and Honey

brown wheat_n

Tasty wheat bread with subtle flavors of coffee and chocolate goes well with both savory and sweet accompaniments.

While the all-purpose flour stores in our pantry are diminishing, we still have an abundance of wheat flour. The exceptional wheat bread we made earlier this year was fabulous, but it is time and labor intensive. This weekend called for a loaf with more “auto-pilot” in the directions – and more of the work being done by our trusty Zojirushi bread machine. We found a well-reviewed recipe that included wheat flour. After sampling a slice of the finished product with butter and honey, we both agreed it was a delicious addition to our bread rotation.

Infused Wheat Bread

Ingredients

  • 1 1/4 cup water
  • 1 tsp coffee extract
  • 1/4 cup honey
  • 2 cups all-purpose flour
  • 1 1/4 cups whole wheat flour
  • 1 1/2 tbsp unsalted butter, room temperature
  • 3/4 tsp salt
  • 1 tbsp unsweetened Dutch processed cocoa powder
  • 1 tbsp granulated sugar
  • 2 tsp yeast

Directions

  1. Place ingredients in the bread machine pan in the order recommended by the manufacturer and select regular bread setting.
  2. Start machine and relax while the machine does the work!

Recipe adapted from Allrecipes.com.

Rocky Road Ice Cream

rocky road_nRich chocolate ice cream coupled with homemade marshmallows put this ice cream flavor in a top-two tie with Cloudberry Sorbet among our all-time favorites.

Really good chocolate ice cream can be made with really good Dutch processed cocoa. But great chocolate ice cream adds in depth of flavor with quality semi-sweet chocolate. This recipe topped the charts by not adding ordinary marshmallows, but adding extraordinary homemade marshmallows to the ingredients.

Rocky Road Ice Cream

Ingredients

  • 2 cups heavy cream
  • 3 tbsp unsweetened Dutch-process cocoa powder
  • 5 oz. semisweet chocolate chips
  • 1 cup whole milk
  • ¾ cup sugar
  • pinch of salt
  • 5 egg yolks
  • ½ tsp vanilla extract
  • 1 cup marshmallow pieces
  • 1 cup chopped almonds

Directions

  1. Warm 1 cup of the cream with the cocoa powder in a medium saucepan, whisking to thoroughly blend the cocoa.
  2. Bring to almost a boil (mixture will steam) and whisk in chocolate chips, whisking until smooth.
  3. Remove from heat and stir in remaining cup of whipping cream. Pour mixture into bowl and set aside.
  4. Warm the milk, sugar, and salt in the original saucepan.
  5. In a separate medium bowl, whisk together the egg yolks.
  6. Slowly pour the warm milk into the egg yolks, whisking constantly, then scrape the warmed egg yolks back into the saucepan.
  7. Stir the mixture constantly over medium heat with a heatproof spatula, scraping the bottom as you stir, until the mixture thickens and coats the spatula and creates a custard (and reaches 170 degrees F on an instant-read thermometer).
  8. Pour the custard into the chocolate mixture  and stir until smooth.
  9. Then stir in the vanilla.
  10. Chill the mixture thoroughly in the refrigerator.
  11. Freeze it in your ice cream maker according to the manufacturer’s instructions.
  12. During the last 10 minutes of churning, add in almonds and marshmallow pieces.

Recipe adapted from The Brown Eyed Baker.

Moist Mocha Cake with Chocolate Drizzle (and a Powdered Sugar Experiment)

mocha cake_n

Both the chocolate cake batter and the frosting have an essence of coffee which adds an element of complexity. Eggs and buttermilk make this cake moist and rich. 

The frosting for this decadent cake included an experimental element inspired by the fact that we’d run out of powdered sugar. Based on Internet research, I found  that powdered sugar could be created by putting granulated sugar and a little cornstarch in a blender for 15 minutes. We employ an immersion blender with a nut grinder attachment for these kinds of jobs. After about seven minutes, I decided the sugar looked powdered. The flavor of the frosting was spot on, but the slight graininess proved otherwise. Next time, I’ll muscle through the whole 15 minutes – or ship up enough powdered sugar to last the whole season in the bush.

Mocha Cake

Ingredients

  • Butter for greasing the pans
  • 1  3/4 cups all-purpose flour, plus more for pans
  • 2 cups granulated sugar
  • 3/4 cups dutch processed cocoa powder
  • 2 tsp baking soda
  • 1 tsp baking powder
  • 1 tsp kosher salt
  • 1 cup buttermilk, shaken
  • 1/2 cup vegetable oil
  • 3 eggs, at room temperature
  • 1 tsp pure vanilla extract
  • 3 tsp coffee extract
  • Mocha Buttercream Frosting, recipe follows

Directions

  1.  Preheat oven to 350 degrees F.
  2. Line two 9-inch springform pans with parchment paper. Butter and flour pans. Set aside.
  3. Sift flour, sugar, cocoa powder, baking soda, baking powder and salt into mixing bowl of a stand mixer fitted with a paddle attachment.
  4. Mix on low speed until combined.
  5. In a second bowl, mix together buttermilk, oil, eggs, vanilla and coffee extract.
  6. With mixer on low speed, slowly pour wet ingredients in with dry.
  7. Pour batter into two pans, evenly divided.
  8. Bake for 35 minutes, or until cake tester comes out clean.
  9. Cool cakes in pans for 30 minutes.
  10. Finish cooling completely on wire racks.
  11. Place one cake, flat side up, on a cake pedestal or flat plate.
  12. Spread top of cake with frosting.
  13. Place second cake, flat side down, on first frosted cake.
  14. Spread remaining frosting evenly on top and sides of cake.

Buttercream Frosting

Ingredients

  • 6 oz. semi-sweet chocolate chips
  • 2 sticks (1/2 lb.) unsalted butter, room temperature
  • 1 egg yolk, room temperature
  • 1 tsp. vanilla extract
  • 1  1/4 sifted confectioner’s sugar
  • 3 tsp coffee extract

Directions

  1. Melt chocolate chips in a double boiler. Stir until smooth. Set aside to cool.
  2. Cream the butter in the bowl of a stand mixer with a paddle attachment, about 3 minutes.
  3. Add egg yolk and vanilla. Continue beating for about 3 minutes.
  4. Turn the mixer to low and gradually stir in confectioner’s sugar.
  5. Beat until smooth and creamy.
  6. Mix in melted chocolate.
  7. Add coffee extract and mix until smooth.
  8. Spread immediately on cooled cake.

Recipe adapted from Food Network

Whole Sheefish (or any fish) Poached in Foil

sheefish whole poached in foil_n

A large fish poached and served whole makes for a dramatic presentation and a first-class dining experience. You don’t need a fancy fish poacher to pull this off. Aluminum foil works beautifully in the galley, on the grill, over a campfire, or in the kitchen. Here are the basics. 

Sheefish whole poach_n

This past winter, we’ve been dining on sheefish (inconnu) in the six-to-eight-pound class. Measuring 25 – 30 inches, these fish of the far north are just small enough to fit into our oven and serve whole. Because sheefish is bony and not easily filleted, they are well-suited to this cooking method; when served, the meat comes easily off the bones. With firm white meat in large, sweet, flakey chunks, sheefish are comparable to striped bass, European seabass, Japanese seabass (suzuki) and similar fish. Here in Alaska, foil poaching works beautifully with salmon, rockfish, char and small halibut.

Poaching and steaming recipes need not be complicated. Although we generally start with a court bouillon or dashi and add Chardonnay when we have it, equal parts of water and Chardonnay alone make a perfectly acceptable basic poaching stock. No wine on hand? A little water – enough to keep the fish bathed in steam – is sufficient. Anything else is a matter of taste. We’ve found it difficult to improve on a combination of sea salt, freshly cracked pepper, lemon, butter and bacon. Olive oil makes a good substitution for butter and bacon.

One of the beautiful things about this recipe is that the ingredients can be prepared beforehand so that they’re ready for a shore lunch or camp dinner to celebrate a special catch.

Incidentally, wakame (dried kelp) and dried bonito flakes are an ideal base for fish stock for campers and sailors. These ingredients are light, easy to store, and last indefinitely. This dashi-style stock can be enhanced with salt, soy sauce, white wine, sherry or sake.sheefish

See more of Detlef Buettner’s beautiful art at: http://home.gci.net/~lifesize.fish/salmonids.htm

Poached fish is an excellent meal to serve with freshly baked French bread or sourdough bread. We and our guests enjoyed the above sheefish served on saffron rice cooked in a clam juice broth, spooning the poaching broth onto our rice and fish.

Ingredients:

  • 1 whole fish, scaled, gutted, gilled, rinsed off and patted dry.
  • aluminum foil sufficient to entirely wrap around the fish. We double wrap to prevent leaking.
  • poaching/steaming liquid – approximately 1/3 cup per pound of fish. (About 2 1/2 cups for an 8-pound fish.) See below for easy poaching liquid recipe.
  • 1 tbsp butter per pound of fish. (An 8-pound fish takes 1 stick of butter.)
  • very thin slices of lemon to cover one side of fish
  • strips of bacon to cover one side of fish. (about 5 strips for an 8-pound fish)
  • lemon juice to rinse stomach cavity – approximately 2 tbsp for an 8-pound fish
  • sea salt and freshly cracked pepper to rub into cavity and both sides of fish – approximately 2 – 3 tbsp sea salt for an 8-pound fish

Directions:

  1. Place large baking sheet in oven and preheat to 450 °F.
  2. Arrange aluminum foil on flat surface. Thoroughly coat foil with butter where fish will be placed.
  3. Rub lemon juice into fish’s stomach cavity. 
  4. Use a very sharp knife to make shallow diagonal slashes spaced about 1 inch apart from the head of the fish to the tail. Do this on both sides.
  5. Rub salt and pepper mixture onto both sides of fish and into cavity.
  6. Place fish onto buttered foil.
  7. Rub butter into fish’s cavity. Rub remaining butter on top side of fish.
  8. Arrange lemon slices on top side of fish.
  9. Arrange bacon slices atop fish.
  10. Pour poaching liquid along the sides of fish, taking care not to rinse the off the top of the fish.
  11. Close foil around fish and place on baking sheet (or on grill, etc.) Cook until a few dorsal fin rays can be easily pulled from fish. Total time will be approximately 5 – 6 minutes per pound. An 8-pound fish will cook for 40 minutes.
  12. Note: We like to remove the bacon when the fish is finished cooking, crisp it up in a pan, and return the bacon to the top of the fish prior to serving. The bacon drippings can be drizzled atop the fish as well.

Poaching Liquid Recipe:

Ingredients:

  • 3 cups water
  • 5 inch square of wakame (dried kelp – available in Asian grocers.)
  • 5 grams (0.17 ounces) dried bonito flakes
  • 1/4 teaspoon sea salt (or 1/2 teaspoon soy sauce)
  • 1 tbsp miso paste (optional)
  • Optional: replace 1/2 cup water with white wine or sake

Directions:

  1. Place water in pan and heat over high heat. Add wakame and salt, stir occasionally and continue heating but do not boil.
  2. When Wakame is soft, add bonito flakes. Cook briefly in steaming water and stir gently. Do not boil.
  3. Pour mixture through wire strainer into pan or bowl.
  4. If desired, return strained soup to low heat and stir in miso paste till dissolved.

Farmed Atlantic Salmon: The Deadliest Catch

If you believe that farmed salmon are part of a solution, to anything, we hope you’ll watch Salmon Confidential. If you believe farmed salmon are a healthy food choice, we hope you’ll watch this video.

The setting is British Columbia, Canada. The protagonists are wild salmon, river keepers, and scientists. The film is a fast-paced hour that will leave anyone who watches it and who cares about the food they eat, about our planet’s wild places, and about government transparency and its proper role in mega-farming of all descriptions with serious questions.

“…and the kid looks at you and says, how could there have been thousands of salmon here, you’re just an old man exaggerating. And then I have to correct him, not thousands, tens of thousands.” Russell Chatham in Rivers of a Lost Coast talking about one small west coast river

Nose Pressed to Glass

Sea Ice1_n

Sea ice fascinates us. Our village can be seen in the upper left of this photo. At the time of the photo, north winds had blown much of the ice away from the land. The “sticky ice,” the ice which clings to the shore, can usually be relied on to be safe to walk on. Even this sticky ice is subject to the whim of Mother Nature’s strong winds and current. 

Sea Ice2_n

Piles of ice form along pressure points of the frozen surface of the sea. There are many histories of boats navigating too late in the season and becoming stranded or crushed between these pressure points.

Sea Ice3_n

Recently, wind from the south has closed this lead – the open water to the right. The view from our village today is solid ice as far as the eye can see. The villagers are readying their seal skin boats to go whaling. Soon the bowhead migration will begin. When the north wind blows open a lead, the whaling crews of Tikigaq will patrol the open water in hopes of catching animals that are in their Spring migrations. These whales make up a critical part of the subsistence catch in this Inupiat village.

Project Chariot_n

I’ve recently been reading the book The Firecracker Boys. This true story is about a crazy post WWII idea some engineers and scientists had for using a nuclear bomb to blast a harbor between the peak in the center of this photo and the ridge on the left. This is about 25 miles east of Point Hope. The proposed  H-bomb  was to be 163 times the strength of the bomb that was dropped on Hiroshima. Scientists and engineers promised to sculpt the land based on human requirements. It was part marketing (using bombs for good) and part wild scientific experimentation. It’s a shocking and crazy true story!

PHO 1_n

Nose pressed to glass, I peered out from the bush plane window as we lifted straight up, like a helicopter, in the 40 m.p.h. north wind. It seemed scary on the ground. With gusts well above 40 m.p.h., the plane arrived, landed on the airstrip and never turned into the usual parking area. I fought my way toward the plane, slipping along the airstrip as if being pushed down by a strong arm. Once in the plane, I felt calm and safe with skilled bush pilots at the controls.

PHO 2_n

From the air, the village looks like a patchwork quilt as rooftops peak above a blanket of snow. If the snow and ice were sand, Point Hope could be any beachfront real estate in the world!