Unknown's avatar

About Jack & Barbra Donachy

Writers, photographers, food lovers, anglers, travelers and students of poetry

Honeymoon Crabs: Dungeness Crabs in Miso and Beer with Lime, Soy, Olive Oil, Butter and Garlic Sauce

crabs honeymoon clase d800By themselves, freshly caught Dungeness crabs make the Pacific Northwest a worthy food destination. Steam boiling them in a large, covered frying pan results in a gourmet meal for two. This recipe works equally well with both fresh and pre-cooked crabs.

Growing up, a highlight of every summer was our vacations on North Carolina’s Outer Banks where a kettle of freshly boiled blue crabs were spread out on a newspaper tablecloth, crab crackers were passed out, and lunch was served. Blue crabs are relatively small, but their succulent meat makes the pickin’ totally worth the effort. In those days, we dipped chunks of crab in straight melted butter or somewhat fancier drawn butter if we were at a restaurant.

crabs honeymoon d800

A large 12.5 inch skillet is perfect for two Dungeness crabs as each can fully sit in the simmering liquid. Your choice of bread with this meal may be as important as your choice of wine. It’s hard to beat a loaf of good sourdough bread and a buttery Chardonnay. La Crema has proven year in and year out to produce just such a wine at a reasonable price.

Years later I moved to Oregon and discovered Dungeness crabs. Weighing in at around a pound-and-three-quarters each, there’s enough meat in one Dungeness to satisfy a hearty eater. And their flavor? We’ve eaten all kinds of of crabs; our favorites are Dungeness and blues, but other types are delicious as well. This is our favorite cooking method, and after years of experimenting with different dipping sauce combinations, we’ve perfected a combination of lime, soy sauce, olive oil, butter and garlic.

Honeymoon Dungeness Crabs

Ingredients: (You will need a large frying pan with a lid. We use a Swiss Diamond 12.5 inch pan.)

  • 2 whole Dungeness crabs, preferably fresh but pre-cooked is absolutely fine
  • 12 ounces of a good beer such as a red amber
  • 3 – 4 tablespoons miso paste
  • 2 cups of water
  • 1 tsp sea salt

Directions: (A general rule is to cook Dungeness crabs for about 15 – 18 minutes – roughly 7 – 8 minutes per pound.)

  1. Rinse crabs. Use a brush to remove any mud.
  2. Over high heat, mix ingredients thoroughly and position crabs bottom side down.
  3. Bring to a low boil, reduce to a simmer and cook for about 7 minutes.
  4. Use tongs to flip crabs onto their backs and continue simmering for 7 minutes.
  5. Remove crabs from skillet and let them rest on their backs for a few minutes before flipping over and serving belly side down.

Lime, Soy, Olive Oil, Butter and Garlic Dipping Sauce

Ingredients: (measurements are approximate)

  • 6 tbsp butter
  • 3 tbsp extra virgin olive oil
  • 2 – 3 tbsp soy sauce
  • a few cloves of garlic either chopped fine or minced
  • juice from 1 large lime or 2 small limes

Directions:

  1. In small pan over medium-low heat, melt 2 tbsp butter. Add the garlic and lightly sauté for a minute or two.
  2. Reduce heat to low and add the rest of the butter and completely melt.
  3. Add the remaining ingredients, mix and heat through thoroughly.
  4. Pour into separate dipping bowls and serve.

Great Cameras and Joel Sartore’s Great Course

moose calf d4_n
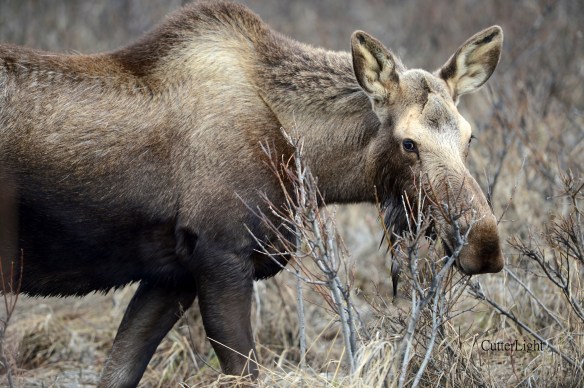
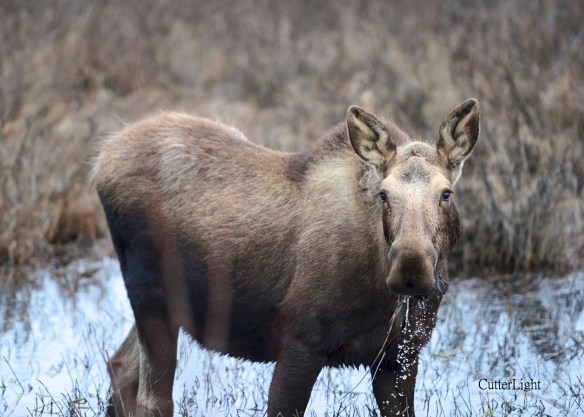
The drive from Anchorage to Seward can usually be counted on for wildlife viewing. Grizzly bears, black bears, Dall sheep and moose are all possiblities, and eagles are a given. On our first trip of 2013, we found a young moose grazing on pond weeds and willow buds. 

Last year at this time we were shooting with a Nikon D60 and a D90. Our three most frequently used lenses were a Tamaron landscape lens, a Nikon 60 mm prime and a Sigma 50-500. We got some really good photos with this gear, but we were eager to make some upgrades.

moose calf d800

Although it’s late May, Alaska’s Kenai Peninsula is still pretty brown and you don’t have to go very high in elevation to find everything covered in snow. But spring is definitely here. Today (May 24), temperatures in Seward broke 60 under cloudless blue skies.

After months of reading and research and lengthy discussions with a new friend who knows way more about this than we do, we purchased a D800, a D4 and several new lenses. Equally important was taking Joel Sartore’s 24-lecture course Fundamentals of Photography, a first-rate DVD course offered through The Great Courses. We had been reading all kinds of articles and books and we subscribe to Outdoor Photographer. We had also taken a few courses at Ritz Camera back when we were living in Sacramento, California. All of this was useful. But none if it provided the learning experience Fundamentals of Photography gave us. Armed with our new gear and committed to faithfully following Joel’s lessons, we could see our skills improving from week to week.

moose calf 2 d4_n

Our usual MO while driving Alaska’s highways and hiking the trails is to have either a landscape lens or a normal lens on one camera body and a larger wildlife lens on the other. We still talk about the time when, new to this part of the world, we saw two magnificent bull moose feeding near each other at a small lake. “I’m sure we’ll see lots of these now that we’re up here,” one of us said as the other kept driving. Needless to say, we’re still looking for another shot like that one. Lesson learned. 

Hopefully this summer will be another Alaskan safari – packed with birds, fish, mammals, wildflowers and the kind of scenery that causes one’s jaw to drop and hang.

Another Great Year in Point Hope: On to Seward!

uniak on ice waiting_n

An umiak with its recently sewn seal skin stretched tight sits on the Chukchi Sea ice, waiting for whaling season to begin in March. 

May 17, Point Hope, Alaska: Near-blizzard conditions forced a one-hour delay to the start of school yesterday, the day before the end of our school year. A little snow and high winds notwithstanding, all 30 of our 3rd, 4th and 5th grade  students eventually arrived. It’s much more calm today. Scattered snow flurries have been breaking up an otherwise sunny day, and at 19 degrees Fahrenheit, the McKay’s buntings and gulls that showed up a few weeks ago when the weather was warmer (in the low 30’s) are out again. Looks like clear weather for our flight out tomorrow.

hiking out on ice_n

Near shore, the going is easy across the frozen sea. But the ice ridge on the horizon hints at the arduous work involved in breaking the trails that will allow whaling crews to get their boats and gear out to the lead (open water).

This marks our third year in Arctic Alaska. We’ll be back for a fourth in August. We’re up here in Point Hope at a time in our lives when Time to study, Time to write, and Time to hone our skills as photographers, writers and chefs is especially valuable. Yes, it’s cold – brutally so at times-, and there is the entire month in mid-winter when we do not see the sun. But that’s part of the narrative. So are the dazzling displays of northern lights, the sublimely sweet cloudberries that grow only in these extreme latitudes, and the Arctic foxes, snowy owls, polar bears and whales that are part of the fabric of life up here. Learning to stock a gourmet kitchen in the bush nearly 1,000 roadless miles from stores in Anchorage has prompted us to master “from scratch” cooking to a level of expertise I doubt we would achieved had we remained in our comfortable bungalow back in California.

ice sculpture chukchi sea_n

A fresh dusting of snow powders  ice sculptures that were pushed up when shifting winds caused  massive plates of ice to collide. Anytime you’re out on the ice, you’re mindful that another shift in the wind could push the ice apart again, leaving you stranded. You learn to keep an eye on the cracks.

By this time next week, we’ll be in Seward living aboard our summer home, the sailing vessel Bandon. Among other things we’re looking forward to is an intensive wine appreciation course we’ll be taking with another couple. We’re also eager to do some serious shooting with our new Nikkor 200-400 mm telephoto lens- a tool that should help us get intimate photographs of the amazing wildlife in and around Resurrection Bay. Daughter Maia will come up in July for our annual visit centered around fishing, hiking, great meals (and great conversation) and general catching up. The puzzles of turning out excellent meals from our small galley, figuring out where the salmon are in the nearby sea, experimenting with our new tenkara fly rods on smaller streams and maybe finally getting good photos of wary tundra swans are among other things that will keep us happily occupied in the coming months.

jack and bar on chukchi_n

A whaling hook marks the trail out to the camps. This was a good year in Point Hope – five bowhead whales, lots of beluga whales, and everyone came back safe. Each whale represents tens of thousands of dollars worth of groceries that didn’t necessitate a river being drained for irrigation, fertilizer being spread (that ends up over-nutrifying nearby water systems), or a single drop of pesticide being sprayed. Nor were barrels of fossil fuel burned getting this food up here. 

An important part of our summer in Seward involves seeing to our own provisions. When we return to Point Hope in August, we’ll bring with us 200 pounds of salmon, halibut, rockfish and lingcod fillets – enough for us and for gifts for our friends up here. We’ll also be making shopping runs to Costco and other stores and ship up the usual bags of flour, rice, beans and sugar as well as everything from jars of Kalamata olives to tins of anchovies.

jack and bar on chukchi b_n

Wherever this summer finds you, we hope you’ll be following your dreams or taking steps to make those dreams come true. And we hope you’ll continue reading CutterLight.

Sincerely, Jack and Barbra

Galley and Kitchen: What’s on our Spice Racks

Penzeys Spices_n

So that we’re ready to hit the ground running (or to hit the kitchen cooking) when we return to Point Hope in August, we place our Penzeys Spices order in April. 

Onboard our summer home, the sailing vessel Bandon, galley space is limited and so the question If you had to choose just a few herbs and spices… is answered out of necessity. Sea salt, Tellicherry pepper, powdered garlic, powdered wasabi, an Italian seasoning blend, herbs de provence and a couple of spicy chili-pepper-based blends or rubs are essentials in our kitchen. We also keep on hand soy sauce, Cholula sauce, olive oil (both light olive oil for frying and extra virgin for other uses), and when we can, sherry. Our meals tend to center around fresh seafood, and these minerals, herbs, spices and condiments go well with fresh fish.

Up in Point Hope where our kitchen is much larger, our herb and  spice collection is far more extensive and includes a variety of extracts as well. We’ve discovered that even something as basic as salt can vary greatly from one type to another. For example, smoked sea salt can be the “secret ingredient” that makes a stew, soup or chili stand out. And if you haven’t tried grey sea salt on fish, you’re in for a pleasant surprise when you do. It’s usually packaged coarse or slightly coarse, but it’s  damp, so don’t be tempted to put it in a grinding mill. Use it in its coarse form. Also called Celtic sea salt or sel gris, this mineral-rich salt from the Brittany region of France  is especially nice on broiled salmon. Like many others in this food-appreciating time we live in, we’ve come a long way from the days when Morton’s Iodized  was the only salt in our kitchen.

Another change we’ve been making is a gradual shift away from prepared spice and herb blends toward our own hand-crafted blends. We keep our old bottles of blends like Northwoods Fire, Southwest Seasoning, Italian Seasoning, Curry Seasoning and so forth, but these days those bottles are filled with similar-but-unique creations. The modifications we make to the original recipes have resulted in blends we are really pleased with, and it’s satisfying to grind and mix our own chili-pepper-based rubs. Carefully considering the ingredients that go into these blends has led us to a fuller understanding of herbs and spices.

This past year our “great discovery” was Penzeys Spices’ whole smoked chipotle chili peppers. Ground with our immersion blender as we need them, these peppers add a rich, smokey heat to chili, squash soups, cloudberry or raspberry chipotle sauce, and chicken noodle soup. Blended into a rub, smoked chipotle’s add another dimension to broiled halibut, salmon, moose or pork. 

The spice we’re most anticipating using in the coming year is high-grade Kashmir Mogra saffron. We’ve been using Spanish Coupé  which is very nice, but we’ve been wondering if the higher quality Kashmir Mogra is worth it. We’ll let you know what we conclude this fall.

Less than two weeks till we’re back aboard Bandon in Seward!

Cloudberry Cheesecake Cookie Bars

oat wheat aqpik bars_n

Make these! Really, we couldn’t believe how good these jam-and-cream-cheese bars came out. You’ll have to patiently wait while they chill in the refrigerator to get the most flavor. 

The end of our school year provides us with an education on amounts over or under-ordered in our annual shopping. We ended up a little short on all-purpose flour and a little heavy on whole wheat. The challenge with 100% whole wheat is the heaviness and denseness it lends to baked goods. Mixing finely chopped nuts into the whole wheat crust and layering lighter flavors on top solved the problem in a delicious way.

This recipe would work with any jam. Of course, we love cloudberries and as long as we’re in the Arctic these delicious, rare berries will be our fruit of choice.

Cloudberry Cheesecake Cookie Bars

Crust

  • 1/4 cup pecans, finely chopped
  • 2/3 cup whole wheat flour
  • 3 tbsp granulated sugar
  • 4 tbsp unsalted butter, melted

Cheesecake layer

  • 8 oz. cream cheese, softened
  • 1/4 cup granulated sugar
  • 1 egg
  • 1 tsp vanilla extract

Top layers

  • 1/4 cup granulated sugar
  • 1/4 cup whole wheat flour
  • 1/2 cup rolled oats
  • 1/4 cup pecans, finely chopped
  • 4 tbsp unsalted butter, melted
  • 2 cups cloudberry jam

Directions

  1. Preheat oven to 350 degrees F.
  2. Butter 8 x 8 inch glass baking dish. Set aside.
  3. Mix crust ingredients until coarse meal forms.
  4. Press crust mixture into bottom of glass baking dish.
  5. Bake for 15 minutes, or until edges are lightly browned.
  6. Prepare cheesecake layer while crust is baking.
  7. Beat cream cheese, sugar, egg and vanilla until smooth.
  8. Pour cream cheese mixture evenly over baked crust.
  9. Return baking dish to oven and bake for an additional 25 minutes, until layer sets.
  10. Mix the remaining ingredients for top layer (except jam) until crumbly.
  11. Evenly and gently spread jam over cream cheese layer taking care not to disturb the cheese layer.
  12. Sprinkle crumble on top of jam.
  13. Return to oven and bake for another 20 minutes, or until top begins to turn golden brown and jam bubbles.
  14. Let cool completely in the pan on a wire rack.
  15. For best results, chill pan in the refrigerator for several hours or overnight before cutting.

Cloudberries, also called aqpik in the Eskimo language of Inupiaq, are a sublimely sweet, berry that grow in the extreme north. Read more about them in these articles:

Cloudberry Country

Cloudberry Syrup

Cloudberry Cake

Cloudberry Sorbet

Coconut Aqpik Thumbprints

The Year-End Pantry: Applesauce Caramel Cookies

Applesauce carmel cookies_n

Wrapping up another year in the Arctic before we go to our summer home in Seward, these caramel-topped applesauce cookies were a terrific way to work through the last of our supply of applesauce. 

A few lonely jars, bottles and boxes remain atop the cabinetry that lines the walls off our kitchen. Over five meters (sixteen-and-a-half feet) of uninterrupted shelf space that in August was packed tight to the ceiling with everything from chocolate to olives to nuts to jarred jalapenos is now mostly space. The remaining jars of salsa, soy sauce, sun dried tomatoes, Cholula and assorted other items stand like lonely sentinels overlooking our kitchen. It is the same throughout our house as freezers and pantries that had once been packed and piled with nine months worth of food are now nearly empty. And while our spice racks look full, it’s a deception. Many of the bottles are empty or nearly so. Our bulk order for next year went in to Penzeys Spices last week.

Applesauce is a healthful moistening agent in a number of baking recipes. It’s also terrific in oatmeal, as a blintz topping and in pancake batter, and makes for a light snack on its own. When we lived within driving distance of Northern California’s Apple Hill and the numerous orchards there, we made our own applesauce. Up here, we annually purchase a couple of cases of Tree Top Organic from Costco. The cookies in this recipe feature the fall flavor of applesauce in a light, soft cookie. The crunchy carmel-flavored topping adds another layer of sweetness and texture.

Applesauce Caramel Cookies

Ingredients

  • 2  1/2 cups all purpose flour
  • 1 tsp baking soda
  • 1 tsp baking powder
  • 1 tsp cinnamon
  • 1/4 tsp ground mace
  • 1 cup granulated sugar
  • 1/2 cup unsalted butter, room temperature
  • 2 eggs
  • 1 cup applesauce
  • caramel topping (see below)

Directions

  1. Preheat oven to 375 F.
  2. In a large bowl, sift together flour, baking soda, baking powder, cinnamon, and mace.  Set aside.
  3. Cream sugar and butter together.
  4. Add eggs and applesauce and mix well.
  5. Add in dry ingredients and mix until well incorporated.
  6. Drop tablespoons of batter onto parchment-lined baking sheets, 1 – 2 inches apart.
  7. Bake for 8 – 10 minutes, until edges of cookies begin to become golden brown.
  8. While cookies are cooling, prepare topping.

Caramel Topping

Ingredients

  • 3 tbsp unsalted butter
  • 1/4 cup heavy cream
  • 1/2 cup packed brown sugar
  • 3/4 cup granulated sugar
  • 1 tsp vanilla extract

Directions

  1. In a medium saucepan over medium heat, combine butter, heavy cream, brown sugar and granulated sugar.
  2. Cook, stirring occasionally until mixture just begins to boil and the sugars are melted.
  3. Remove from heat.
  4. Stir in vanilla.
  5. Scoop caramel mixture from pan with a teaspoon and drip onto cookies.
  6. Let caramel topped cookies fully cool before enjoying them.

Makes 3 dozen cookies.

Recipe adapted from Chef In Training

Waiter! There’s a Whale in my Soup! Beluga Chowder

beluga chowder spoonful_n

Not your everyday ingredient, beluga whale has a firm, slightly crunchy texture and delicious flavor making it a perfect ingredient in traditional seafood chowders. 

When a friend who is on a whaling crew recently offered us a few pounds of fresh beluga, we jumped at the opportunity to work with what for us is a new ingredient. The beluga chowders we’d sampled till this point had all started with beluga being added to canned clam chowder. We couldn’t wait to try beluga with our own recipe. The result was a rich, creamy, flavorful chowder.

We view all seafood through the lens of sustainability. Although commercial whaling and environmental factors have endangered a few of the world’s 29 separate beluga populations, in Arctic Alaska’s Chukchi Sea the species is abundant and appears to be unaffected by the relatively few numbers harvested for subsistence by Inupiat hunters. Typical belugas range in size from about 10 to 18 feet long and weigh between half a ton and two tons. Salmon and cod are among their preferred prey, but they feed opportunistically on a long list of other sea creatures. Interestingly, beluga’s closest relatives are narwhales.

Beluga soups and chowders are very popular among Eskimos. The skin and a little bit of the attached blubber is cut into slices about 1/16 – 1/4 inch thick (.25 – .5 cm) and about 1/2 – 1 inch in width and length. We cut ours thin – about 1/6 inch. Chunks this size become tender after about 10 minutes of simmering, with the skin retaining just the right amount of subtle crunch to it – a bit like conch or whelk. Using our favorite clam chowder recipe as a base, our beluga chowder had guests mopping their bowls with fresh-baked bread and asking for more. See recipe below.

beluga chowder bowl_n

Sweet corn, potatoes, bacon, butter, olive oil, sautéed onions, garlic, salt and pepper are a great base for all kinds of seafood chowder recipes. After that, whether the featured ingredient is razor clams, beluga whale or the assorted catch of the day is up to you. A little tarragon is nice, too.

Beluga and Clam Chowder

Ingredients:

  • 2 pounds beluga whale (skin with blubber), cut into slices 1/16 inch thick and abut 1 inch x 3/4 inch. Each piece should have skin plus about 1/4 inch to 1/2 inch of blubber attached.
  • 1 pound razor clams or other clams, chopped coarse (This is the weight of clams after they have been drained. But save and set aside their juice.)
  • clam juice you’ve set aside. The more, the better.
  • 4 1/2 pounds Yukon Gold or yellow potatoes. (These cook up creamier than than Russets)
  • 2 sweet onions, chopped coarse
  • 1/2 pound bacon, cut into small pieces
  • 4 cups milk
  • 2 cups heavy cream
  • 6 cloves of garlic, chopped fine
  • 1 1/2 pound sweet corn (optional)
  • 1/2 cup flour
  • 4 tablespoons olive oil
  • 4 tablespoons butter
  • 2 tablespoons sea salt
  • 1/2 tablespoon Italian seasoning (The Spice Hunter’s Italian blend is excellent)
  • 1 teaspoon freshly ground pepper (either black or rainbow)
  • 1 teaspoon dry tarragon, crushed (optional)
  • 1/2 teaspoon nutmeg (optional)
  • 6 – 8 very thin slices of lemon

Directions:

  1. Place sliced beluga in a pot. Add just enough water or clam juice to cover. Add a little salt. Over high heat, bring to a boil then reduce to simmer. Cook till beluga is tender (skin is easily pierced by a fork) but still a bit crunchy. About 10 minutes. Use a colander and a bowl to drain water, but keep water. Set beluga aside.
  2. Fry bacon pieces till tender. Do not crisp. Drain the grease and set bacon aside.
  3. Wash potatoes and remove any eyes, but do not remove the skins. Cut into ½ inch cubes and place in a large bowl. Cover with cold water, rinse and drain.
  4. Return water used for cooking beluga to pot. Add potatoes. If necessary, add additional water or clam juice to cover potatoes. Bring to a boil over high heat. Reduce heat and simmer till potatoes are tender.
  5. Meanwhile, place olive oil in a large skillet and heat over medium heat. Add onions, flour and seasoning (optional). Reduce heat and stir frequently for about five minutes until onions begin to turn translucent. Add garlic and bacon and stir again, cooking for about 1 minute.
  6. Add onion mixture, milk, cream, beluga, cream, salt and pepper to potatoes and water. Heat thoroughly, but do not boil.

Serve piping hot with sourdough bread.

See also: Alaska Razor Clam Chowder

Manhattan-Style Razor Clam Chowder

Alaska Seafood Chowder

The Tropics Meet The Arctic

Coconut Aqpik cookies_n

Sometimes a small batch of cookies is all you need. These thumbprint cookies combine the creamy sweetness of Arctic cloudberries with the tropical essence of coconut in an airy confection.

Sorry to temp you with a berry that rarely sees a latitude much south the Arctic Circle. Our favorite berry has yet to be cultivated on any large scale as far as we know, but almost any jam could serve as a substitute in these cookies. Perhaps there is an equivalent rare berry from another interesting part of the world you could taunt us back with?

Read more at Cloudberry Country, Cloudberry Freezer JamCloudberry Cake,  and Cloudberry Sorbet.

Coconut Aqpik Thumbprints

Ingredients

  • 1/4 lb. unsalted butter, room temperature
  • 1/3 cup granulated sugar
  • 1 tsp vanilla extract
  • 1 cup all purpose flour
  • 1/4 tsp salt
  • 1 egg beaten with 1 tbsp water (egg wash)
  • 1/3 cup coconut flakes
  • cloudberry jam (or jam of your choice)

Directions

  1. In a stand mixer fitted with paddle attachment, cream together butter and sugar.
  2. Mix in vanilla.
  3. With mixer on low speed, slowly add flour and salt to butter mixture. Mix until dough comes together.
  4. Roll dough into about 1-inch balls.
  5. Get a bowl ready with egg wash and a plate ready with coconut flakes.
  6. Dip each ball into egg wash.
  7. Roll each ball in coconut.
  8. Place each cookie on parchment-lined baking sheet.
  9. Press an indentation into each cookie. I used the handle end of a silverware knife.
  10. Fill each indentation with jam.
  11. Bake cookies for 20 – 25 minutes, until coconut is golden brown.
  12. Cool and serve.

Makes 15 cookies.

Inspired by Rice Flour and Cardamom

cardamom rice cookies_n

Light rice cookies with a pinch of cardamom give zest to your afternoon tea or coffee.

Dreaming about the fun of making udon noodles and mochi stuffed with adzuki bean paste caused me to impetuously purchase 25 pounds of rice flour during last year’s annual shopping trip… without having first researched how to make these items. Turns out, udon is made with wheat flour and the rice flour used to make mochi is a sweet rice flour. I now had 25 pounds of flour with no inspiration! A “no inspiration item” often transforms itself into an inspiration in our kitchen. We’ve learned that rice flour is a much better thickener in stews and soups than wheat flour or corn starch. We’ve also learned that rice flour makes light and airy cookies. When matched with the exotic flavor of cardamom, you’ve got a trip to India during your afternoon tea!

The original recipe was for Persian rice cookies. The recipe came out way too crumbly. I set the dough in the refrigerator and contemplated how to fix it. With the addition of a couple more eggs, the cookie dough was very soft and looked like scoops of vanilla ice cream while it waited to be baked. Our initial test for the cookie is dough flavor… yum. Again, it was very light with a punch from the cardamom. After they were baked and fully cooled, they were as delightful.

Cardamom Rice Cookies

Ingredients

  • 1  1/2 cups granulated sugar
  • 1/2 cup water
  • 1 tbsp orange extract
  • 3 cups rice flour
  • 5 eggs
  • 1 cup unsalted butter, room temperature
  • 1/2 cup vegetable oil
  • 2 tbsp superfine sugar
  • 1 tsp ground cardamom
  • 2 tbsp poppy seeds

Directions

  1. Combine granulated sugar and water in small pot over medium heat.
  2. Bring mixture to a boil, stirring well to dissolve sugar.
  3. Reduce heat and summer for 7 – 10 minutes. Mixture should thicken and reduce to about one cup.
  4. Remove from heat. Stir in orange extract and set aside.
  5. In a medium bowl, stir together rice flour and cardamom. Set aside.
  6. In a bowl of a stand mixer, whisk eggs with superfine sugar until smooth.
  7. Add butter and oil to eggs and beat until fluffy.
  8. Add flour to butter mixture, mix until incorporated.
  9. Gradually add in one cup of the sugar syrup and beat well with mixer.
  10. Place the dough in a container, cover with a plastic wrap and refrigerate for about six hours.
  11. Pre-heat the oven to 350 degrees F and line two baking sheets with parchment paper.
  12. Use a cookie scoop to drop out rounds of dough onto baking sheets. Flatten drops slightly with the back of the cookie scoop.
  13. Sprinkle poppy seeds on top of each cookie.
  14. Bake for 12-15 minutes. Bottoms of cookies will be lightly browned.
  15. Remove from the oven and gently place on the cooling racks.

Makes 4 dozen cookies.

Pebble Mine: This is the Time to Save Bristol Bay Alaska Salmon

Please take a moment to help ensure that healthy populations of wild salmon remain part of Alaska’s heritage forever. Thanks. Jack and Barbra Donachy

flyfishingtravel's avatarThe Venturing Angler

Image

This is the time to work for the protection of Bristol Bay, Alaska.

Groups such as Trout Unlimited are putting the full court press on keeping Pebble Mine out of Bristol Bay. Please take a moment to add your voice. Click here to support Trout Unlimited’s efforts to squash Pebble Mine.

View original post