Unknown's avatar

About Jack & Barbra Donachy

Writers, photographers, food lovers, anglers, travelers and students of poetry

Sometimes Things Freeze in the Arctic (Mochi Cake With Black Bananas)

Mochi Banana Bread_n

A delicious way to use the unusable, banana mochi bread has the moistness and flavor of banana and the dense, rich texture of mochi cake. Slathered with cream cheese this is a delicious afternoon snack.

Guided by a philosophy of not wanting to waste anything, we are sometimes the recipients of fruit past its prime. This week boxes of bananas arrived for snacks for our students at Tikigaq School in Point Hope, Alaska. Unfortunately, many had frozen on the plane on the way up. Most people will not eat thawed-out, blackened bananas. And then there are people like us.

The obvious response to these bananas was banana bread. I have a tried and true fruit bread recipe which I’ve used for bananas, blueberries, cloudberries, and pears. But this is the time of year to be a bit more creative in order to use up pantry items. With this in mind, I give you mochi banana bread. Mochi is a Japanese creation which uses sweet rice flour to make a dense, rich, but not-too-sweet dessert. With previous success baking a chocolate mochi cake, I wanted to give bananas a try.

The results of this experiment were a sugary-crisp crust enclosing the nicely dense banana bread I was going for. Blog worth! (Of course, we only publish the good stuff!)

Banana Mochi Bread

Ingredients

  • 1 1/4 cup all-purpose flour
  • 1 1/4 cup mochiko (sweet rice flour)
  • 1 1/2 tsp baking soda
  • 1 1/2 tsp ground cinnamon
  • pinch salt
  • 1 1/2 cups smashed overripe bananas (about 6)
  • 3 eggs
  • 1/2 cup brown sugar
  • 1/2 cup vegetable oil (substituting applesauce will lighten the bread)
  • 1 tsp Penzeys double strength vanilla extract (or 2 tsp regular vanilla extract)

Directions

  1. Preheat oven to 350 degrees F. Grease 9″ x 5″ loaf pan. Set aside.
  2. In a medium bowl, thoroughly mix dry ingredients.
  3. In bowl of stand mixer, mix together all wet ingredients until thoroughly mixed.
  4. Stir dry ingredients into wet. Mix until just incorporated.
  5. Pour batter into loaf pan.
  6. Bake for 55 – 60 minutes, until toothpick inserted in center of cake comes out clean.
  7. Cool loaf pan on wire rack until it can be handled. Then remove loaf from pan and continue cooling on wire rack.

Sour Cream Double Corn Muffins

Sour cream double corn muffins_n

Speckled with red bell pepper and corn kernels, these corn muffins are waiting for a bowl of chili to happen.

With our time left in Point Hope numbered in weeks, we are going through the annual process of creating recipes based on what remains in our pantry. The last of the tri-tip roasts in our freezer inspired Jack to recreate his “Chili Done Large.” We’ll be closing out our lunches in style.

To accompany his chili, I brought out an almost-finished bag of corn meal. Usually the time-tested recipes on product packaging are pretty good, but this time relying on the maker’s recipe was a mistake. The corn muffins came out dry and bland. Time to create my own moist and flavorful version that would stand up to the merits of Jack’s flavor-packed chili con carne!

I wanted my muffins to have a rustic texture and also be moist. Coarse ground cornmeal and sour cream would be the key ingredients. The addition of whole sweet corn kernels added texture and complexity. Minced dried onions helped add another layer of flavor. And finally, I added dried bell peppers as “confetti” to give some color and zest to the muffins. A little butter smeared on to the muffins along with a drizzle of honey make these a satisfying balance to a bowl of spicy, smoky chili.

Sour Cream Double Corn Muffins

Ingredients

  • 1 cup all purpose flour
  • 1 cup coarse ground cornmeal
  • 2 tbsp granulated sugar
  • 2 tsp baking powder
  • generous pinch salt
  • 1 large egg
  • 1 cup sour cream
  • 1/3 cup milk
  • 2 tbsp applesauce
  • 1 tsp dried minced onion
  • 2 tbsp dried red bell peppers
  • 1 cup thawed frozen corn

Directions

  1. Preheat oven to 400 degrees F. Grease 12 cup muffin tin. Set aside.
  2. Combine dry ingredients in a medium bowl. Set aside.
  3. In a large bowl, mix together wet ingredients except for corn.
  4. Pour dry ingredients into wet and stir until just mixed.
  5. Fold in corn.
  6. Pour batter into muffin tin.
  7. Bake for 20 – 25 minutes. Muffins should be just browning on the outside. A toothpick inserted in center of muffin should come out clean to indicate doneness.

Twisted Cinnamon Loaf Overnight French Toast

cinnamon twist french toast_n

Swirling with, pecans, cinnamon, butter and maple syrup, this decadent creation puffs up like a soufflé in the oven. You and your guests will be inspired to linger over a leisurely morning table with a second mimosa.

We recently baked a loaf of twisted cinnamon bread, which is never better than on the morning it comes out of the oven. Since our Arctic kitchen is quite arid, items left out tend to dry out quickly, which gives us the opportunity to get creative with leftovers.

Overnight French toast is not a new recipe for us. But starting with a base of this wonderful twisted cinnamon bread was new. Soaking the bread overnight in an egg and cream mixture causes the bread to puff up magically during baking. Drizzled with maple syrup and served with a strip of thick bacon this cinnamon loaf French toast was a great way to start a weekend!

Twisted Cinnamon Bread Overnight French Toast

Ingredients

  • 8 inch-thick slices twisted cinnamon bread
  • 5 eggs
  • 1 cup half and half or heavy whipping cream
  • 1/2 cup whole milk or soy milk
  • 2 tbsp granulated sugar
  • 1 tsp vanilla extract
  • 1 tsp ground cinnamon

Ingredients for pecan topping:

  • 4 tbsp unsalted butter, melted
  • 4 tbsp packed brown sugar
  • 1 cup chopped pecans

Directions

  1. Butter an 8 x 8 inch glass baking dish.
  2. Lay slices of bread on bottom of glass baking dish.
  3. Thoroughly mix together eggs, cream, milk, sugar, vanilla, and cinnamon.
  4. Pour egg mixture over bread. Cover dish and place in refrigerator overnight.
  5. Bring bread mixture out of refrigerator and set on counter to come toward room temperature while preheating oven to 350 degrees F.
  6. Prepare pecan topping by mixing butter, pecans, and brown sugar.
  7. Bake for 20 minutes then top with pecan mixture.
  8. Continue baking another 20 minutes, until golden and puffed.
  9. Serve with maple syrup.

Twisted Brunch: Twisted Loaf Cinnamon Bread

cinnamon braid_n

This sugary, buttery, cinnamon-laced, melt-in-your-mouth braided cinnamon loaf is centerpiece-worthy at the breakfast or bunch table.

In a quest for a visually unique loaf of bread, I came across a recipe for a Nutella twist which looked gorgeous. Reading through the instructions, I was surprised at how simple an intricate looking braid could be created. With plenty of cinnamon on hand, I decided to give this loaf a go sans Nutella. The result of my experiment is captured in the photo above and was a delicious compliment to plates of sunny-side-up friend eggs and mugs of French roast coffee.

However, upon further investigation, it turned out my “original” recipe idea had already been conceived and executed on the site Home Cooking Adventure. Nonetheless, here is my version of Estonian Kringle adapted for my dough machine.

Cinnamon Braid

Ingredients

Bread

  • 2 1/4 cups all purpose flour
  • 1/2 tsp salt
  • 3/4 cup lukewarm milk
  • 1 tbsp  granulated sugar
  • 2 1/4 tsp active dry yeast
  • 2 tbsp unsalted butter, melted
  • 1 large egg

Filling

  • 5 tbsp unsalted butter, softened
  • 5 tbsp granulated sugar
  • 3 tsp cinnamon

Directions

  1. Preheat oven to 400 degrees F.
  2. Place bread ingredients in bread machine in the order recommended by the manufacturer.
  3. Set cycle to “dough” and start machine.
  4. Make cinnamon filling while waiting for dough by combining filling ingredients in a medium bowl and mixing thoroughly.
  5. Roll dough out on a lightly floured surface to a rectangle, approximately 18″ x 12″.
  6. Spread cinnamon filling over dough evenly. Leave about 1/2″ border.
  7. Roll up dough jelly-roll style to form a long log.
  8. Cut log down the middle, the long way.
  9. Braid by wrapping the two cut pieces around each other, always leaving the cut sides up.
  10. Pinch ends of dough so that they will bake together.
  11. Bake for 20 – 25 minutes, until golden brown.

Roasted Onion Cheddar Knots: Savory Stuffed Rolls for a Cold Winter’s Day

Roasted onion cheese knots_n

Stuffed with cheddar cheese and warm out of the oven, these rolls are just the thing to go with a bowl of hot tomato soup on a chilly winter afternoon.

Cheddar knot rolls are fun to make, and just about everyone loves baked goods stuffed with tasty ingredients. Investing a little extra effort in roasting the onions for the top and cutting strips of cheese for the inside of the ropes results in a perfect accompaniment to soup as well as a savory take-along snack for a winter’s day walk or hike.

If you and your family and friends like these, try our Arctic Anpan 2 Ways for additional creative recipes for sweet and savory stuffed rolls.

Roasted Onion Cheddar Knots

Ingredients

  • 1 cup water
  • 5 tbsp powdered milk
  • 2 tsp active dry yeast
  • 3 tbsp granulated sugar
  • 2 tbsp olive oil
  • 3 cups flour
  • 1 1/2 tsp salt
  • 3 oz. cheddar cheese cut into matchstick strips
  • 3 thin slices (discs) of onion
  • olive oil, smoked sea salt, and freshly cracked pepper
  • 1 egg, beaten

Directions

  1. Place first 7 ingredients into the pan of your bread machine, in the order recommended by the manufacturer.
  2. Turn machine on, dough cycle.
  3. When cycle is finished, turn dough out onto lightly floured surface.
  4. Cut dough into 6 equal pieces.
  5. Roll and stretch each piece into ropes approximately 12 inches long.
  6. Flatten each rope. Place about four matchstick-shaped pieces of cheese down the middle of the flattened rope.
  7. Pinch dough closed around the cheese pieces so that you still have about a 12 inch rope with cheese enveloped in the center. Make sure you’ve really pinched these shut so they don’t pop open during baking.
  8. Tie the rope into a knot shape. Repeat with all the ropes.
  9. Let knots rest covered on a parchment-lined baking sheet for about 45 minutes in a warm place. Knots should almost double in size.
  10. Meanwhile, heat oven to 400 degrees F.
  11. Toss onions with olive oil, smoked salt, and freshly cracked pepper. Onion rings should be separated and all should be well coated.
  12. Roast onions on baking sheet for about 10 minutes. They should be translucent and just starting to brown.
  13. Remove onions from oven and set aside. Reduce oven temperature to 375 degrees F.
  14. Brush knots with beaten egg. Place roasted onions atop egg-washed knots.
  15. Bake for 15 – 20 minutes. Finished rolls should be golden brown.

Seafood Kebabs on Forbidden Rice

salmon kabab n

Seasoned cubes of wild Coho salmon, fat, succulent Kodiak scallops, sweet Alaska deep sea shrimp and artichoke hearts drenched in olive oil alternate on this broiled seafood kebab.

The early Persians were onto something. Skewered meats, seafoods and vegetables deftly seasoned and grilled or broiled to perfection are easy to whip up and always a hit. The variations on these Alaskan seafood kebabs are endless. We seasoned ours with a mixture of ginger, toasted sesame seeds, black sesame seeds, sea salt, sugar, garlic, pepper and a sprinkle of toasted coconut. Add a little soy sauce, too, and serve on a bed of nutrition-packed forbidden rice.

Seafood Kebobs

Ingredients

A dash or two each of

  • ginger (freshly grated or powdered)
  • toasted sesame seeds
  • black sesame seeds
  • sea salt
  • ground pepper
  • ground peppers such as chipotle or cayenne
  • garlic (fresh chopped fine or powdered)
  • toasted coconut
  • seafood such as chunks of salmon or other fish, whole scallops, prawns, etc.
  • vegetables such as cherry tomatoes, artichoke hearts, bell pepper, etc.
  • olive oil

Directions:

  1. Place broiler pan in oven and preheat on broil, or fire up grill.
  2. Combine ingredients in a mixing bowl and mix to thoroughly coat seafood and vegetables.
  3. Put food on skewers and place on preheated broiling pan or on hot grill. Cook for about 5 to 10 minutes, turning once or twice.
  4. Serve hot.

Smoked Salmon Avocado Dip: Tasty California-Alaska Fusion

smoked salmon avacado dip n
Served in avocado half-shells, this Alaskan twist on guacamole is as eye-catching as it is delicious! See the super quick and easy recipe below.

In our Arctic kitchen, homemade smoked salmon is an essential pantry staple for which there seems to be no end of uses. Mix a little in with the stuffing in deviled eggs to create salmon stuffed eggs, and you’ve never seen this standard party dish disappear so quickly. A smoked salmon and seafood frittata or smoked salmon crepes make a gourmet’s breakfast. Or stuff a Portabella cap with smoked salmon and a favorite cheese and fire up the grill for a dinner guests will savor.

Our most recent use for smoked salmon came about when Barbra returned from a trip to Anchorage with two large, perfectly ripe avocados. This turned out to be a “Why didn’t we think of this before?” dish that we pass along here.

Smoked Salmon Avocado Dip

  • Cut a soft, ripe avocado in half lengthwise. Use a spoon to gently scoop out the insides, taking care to not break the shell.
  • Place the avocado in a bowl and smash with a fork. Add approximately an equal amount of smoked salmon and some coarsely ground black or multi-colored pepper. Gently mix together. More avocado results in a creamier dip, more salmon makes for a chunkier dip.
  • Return mixture to avocado halves. Serve with crackers or tortilla chips and a favorite ale or lager.

“Bring Some Chocolate Home…”

Triple Chocolate_n

Three types of chocolate plus melted toffee bits on the top nestled in a chewy cookie will satisfy even the strongest chocolate craving. 

When traveling from the tiny bush village of Point Hope to the big city of Anchorage, it is customary to bring home produce or other items that are difficult to find in the village.

Standing in the produce section of our favorite Anchorage grocer surrounded by a bounty of colorful, crisp, juicy offerings such as asparagus, leeks, zucchini, avocados, and mangoes, I call Jack to see if there is anything special he wants me to bring back. “Bring Some Chocolate Home,” he requests (demands). Knowing I still have ten pounds of chocolate chips to use up in the next two-and-a-half months, I respond as my students do to me in their cute, slightly cheeky way: “Nope.” Poor guy was suffering not only from a lack of chocolate, but from a lack of freshly baked goods as well due to my absence of several days.

So, this delicious, chocolate-stuffed, brownie-like cookie is dedicated to Jack. When I asked him what he thought of this recipe, he merely pointed to his empty plate indicating a request for another. That’s my Jack.

Triple Chocolate Toffee Almond Cookies

Ingredients

  • 2 1/4 cups all purpose flour
  • 1 tsp baking soda
  • 1/2 cup dutch pressed cocoa
  • dash salt
  • 2 sticks unsalted butter, softened
  • 1 cup granulated sugar
  • 3/4 cup brown sugar
  • 3 eggs
  • 1/2 tbsp Penzeys double vanilla extract
  • 1 cup semi-sweet chocolate chips
  • 1/2 cup white chocolate chips
  • 1/2 cup crushed toffee bits
  • 1 cup chopped almonds

Directions

  1. Preheat oven to 375 degrees F. Line two cookie sheets with parchment paper. Set aside.
  2. In a medium mixing bowl, whisk together flour, salt, baking soda, and cocoa. Set aside.
  3. In bowl of stand mixer, blend together butter, sugars, and vanilla.
  4. Gradually stir in flour mixture into butter mixture.
  5. Stir in chocolate chips, toffee bits and almonds.
  6. Drop dough by tablespoons onto parchment-lined cookie sheets.
  7. Baked for 10 minutes.
  8. Cool on wire rack.
  9. Store in airtight container.

Changes: With Feet in Two Worlds Now

Point Hope from plane n

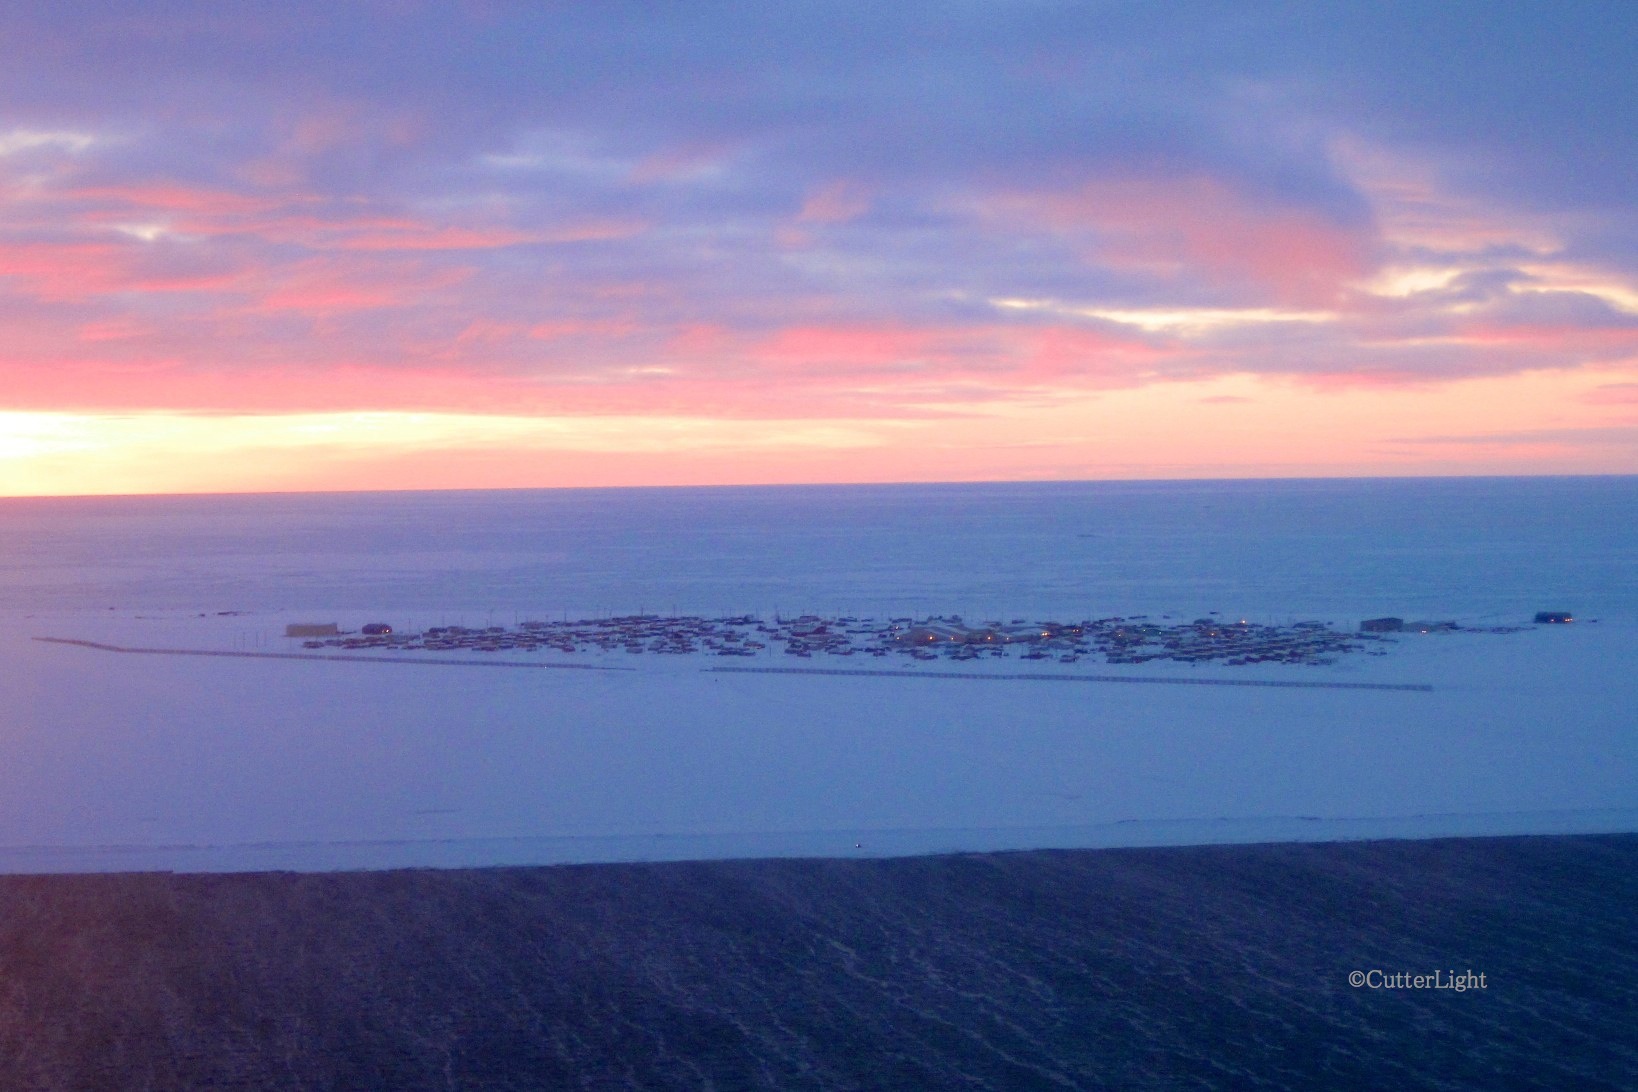
From the air on the south side of the peninsula, our village of Point Hope is a small interruption in a vast, roadless, icy land. This photo was taken in late January from a little six-seat plane as we flew in from a trip to Anchorage. What’s missing in this picture? Sea ice. There should be a thick sheet of it in the foreground where this year there is only open water.

Back in early November, we made the decision that this would be our final year in Point Hope. We’ve loved living here, and the decision was not easy. The people of this village – our adopted hometown these past three years – have been kind and generous and fierce and proud, attributes we greatly admire. Our students have been wonderful, and when you teach in a building where from kindergarten through senior high there are fewer than 200 students, they all become your students. In our combined 30+ years of teaching, neither of us had ever bonded with students the way we bonded with the students of Tikigaq School.

freezing rain point hope n

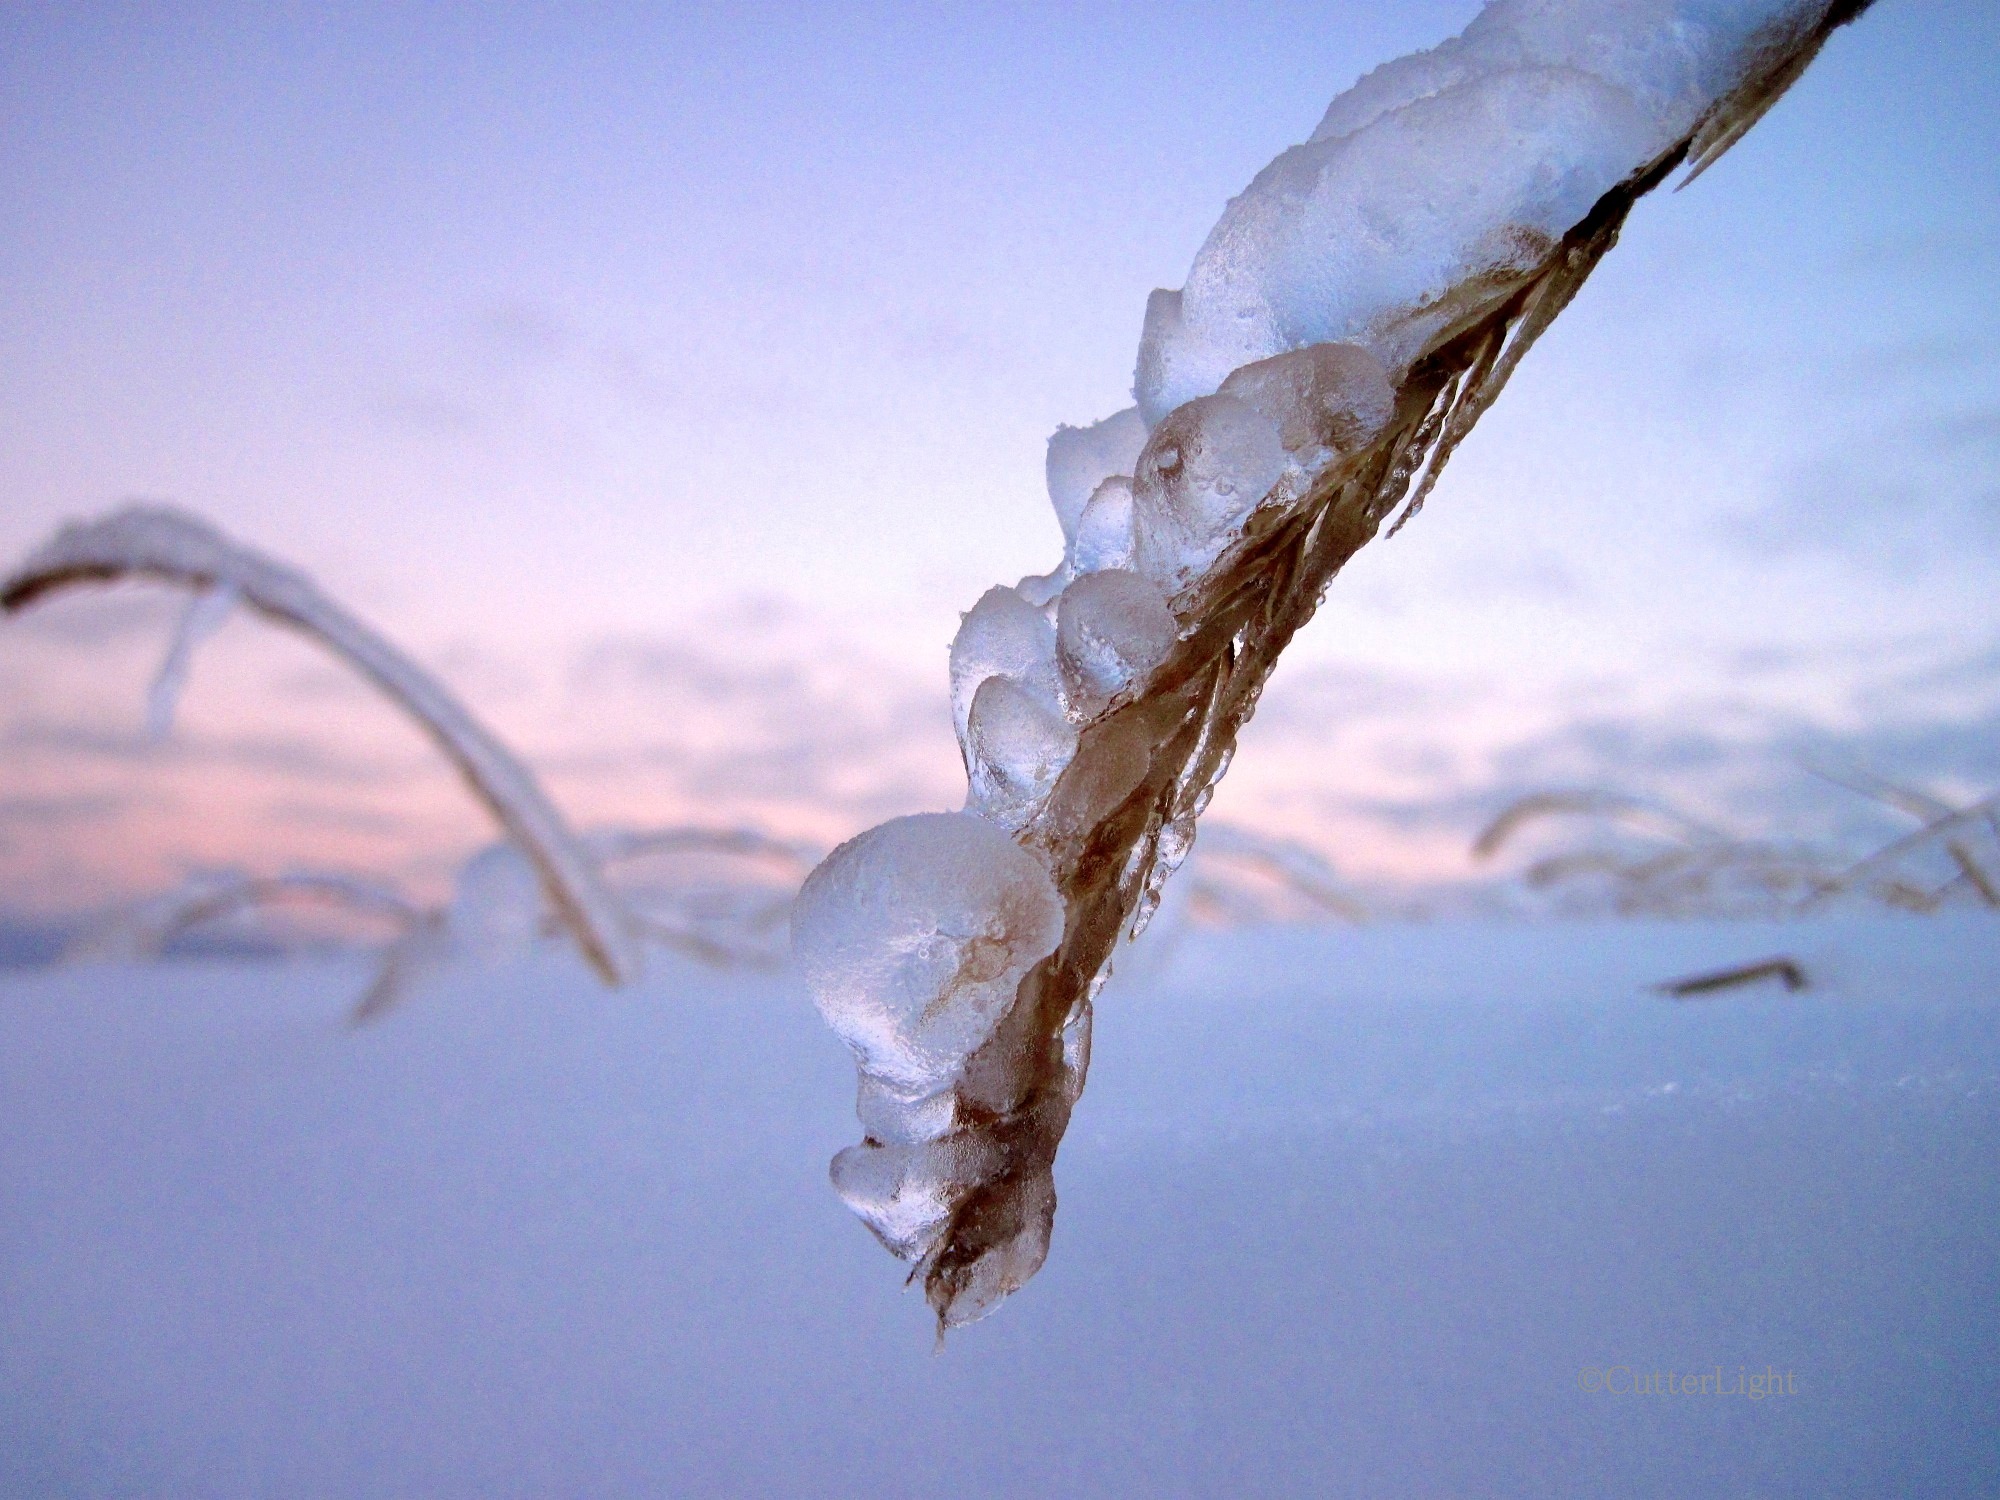
Freezing rain turned this stalk of grass into a silvery jewel. Rain in January in Point Hope is not completely unheard of, but days in a row of such weather during what is usually the coldest month of the year is highly unusual.

In mid-December we turned in our resignations, not sure where we would go next, urged only be the sense that it was time for us to go. The pull is a feeling that is difficult to describe or explain. The letters of resignation were short, polite, appreciative, but with them we cut the cord. No safety net. No turning back. We began to focus on our next move.

Aurora feb 2014 a n

A few nights ago, the aurora borealis put on a show. This was not one of the dancing, colorful displays we’ve seen in the past, but a steady, emerald swath glowing just above the northern horizon. 

At first, we were limiting our consideration to Alaska, dreaming of a situation in the Southeast where we might live within an easy walk of our boats and our new school. Our free time was consumed wtih the routine but critical tasks associated with a job search: revising our resumés, shoring up our references, researching schools and communities, distilling our careers and lives into tightly written letters of introduction. As two souls with nomadic DNA and Gypsy blood caught in this modern “career path” world, it’s a process we’ve been through many times.

But this time around, there was a twist to the job hunting. We both constructed online career histories on Linkedin, a networking website for professionals. Out of the blue, Barbra received a query from a headhunter with an agency that places teachers, administrators and technology experts with overseas schools. Although the particular company the inquiring person represented didn’t interest us, it got us thinking.

What if…?

Could we…?

What would we do with our boats?!?

tikigaq old bones_new

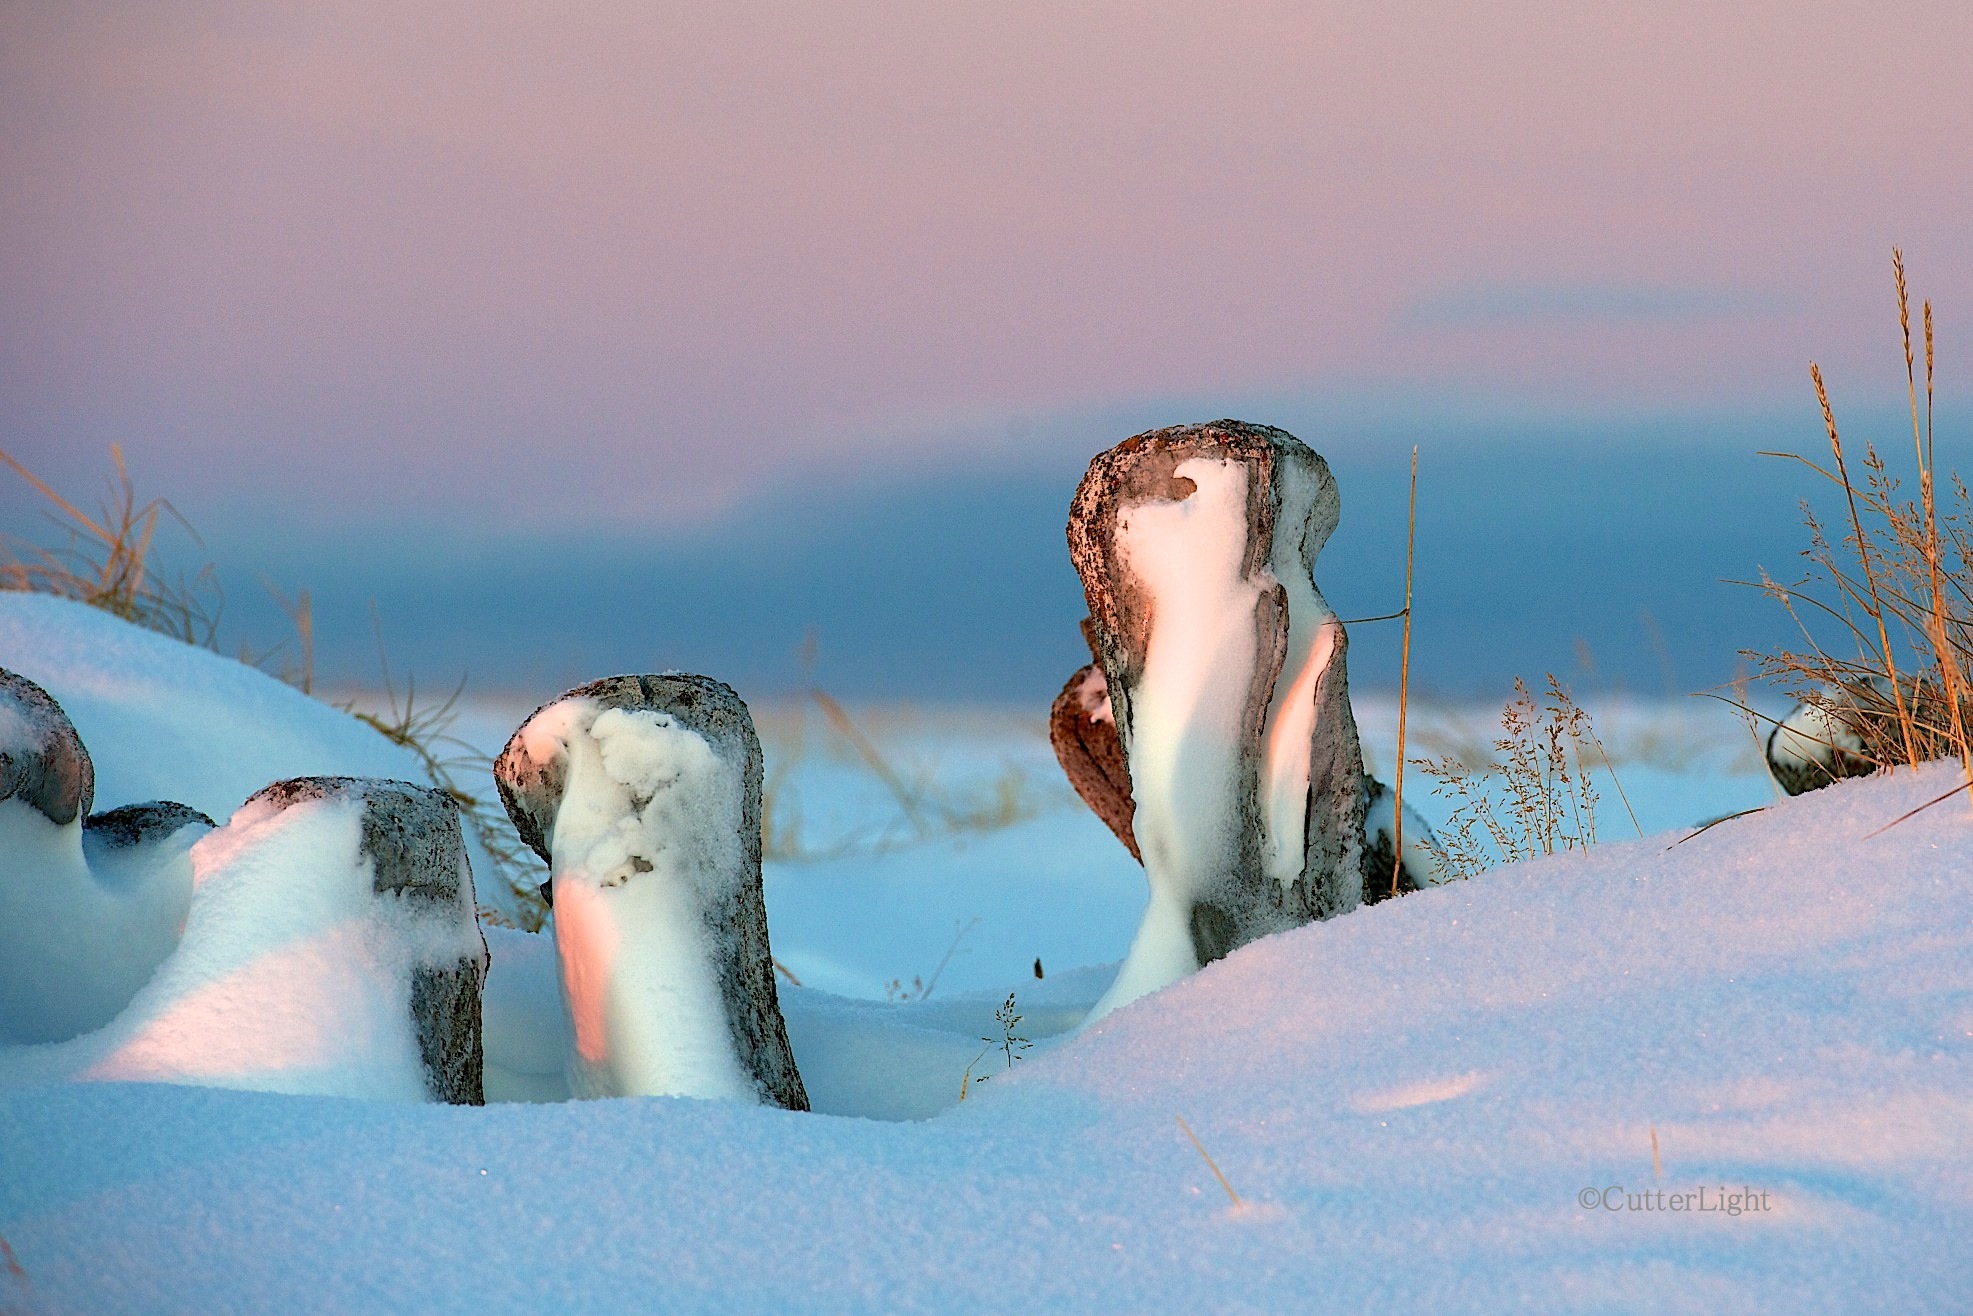
Early morning light bathes whale bones in the ghost town of Old Tikigaq pink and gold after a night of fresh snow.

After careful research, we signed aboard with Search Associates, an agency that works with over 600 internationally-minded schools in 160 countries. While we lacked the experience with International Baccalaureate programs these schools desired, our backgrounds are rich in quality experience and our references are strong. We allowed ourselves to dream, and although we thought that in order to get our foot in the door we’d accept the right position in virtually any country, there were a few countries that were very much on our short list. Our dream list.

One of those countries was Mongolia. Several years ago, when we were living in Sacramento, our local Trout Unlimited chapter invited a guest who had recently made a film about fly fishing in Mongolia for lenok (an ancient form of trout) and taimen (the world’s largest trout/salmon). The vast, sparsely populated countryside was sublime. The rivers were pristine. The idea of a remote camp out on the steppes, the guides speaking Mongolian, the huge night sky filled with stars after a day spent pursuing species of fish few anglers will ever encounter, our stomachs filled with rock roasted meat, our minds pleasantly humming with yak-milk vodka, and beyond the camp neither a light nor a human sound for as far as one could see or hear, is an idea that has been growing in us ever since.

We are due in country on July 31. It appears that we’ve already found a nice apartment just a few minute’s walk from the International School of Ulaanbaatar in Mongolia’s capital of Ulaanbaatar. We’re thrilled. This is just the dose of “New” we’ve been craving.

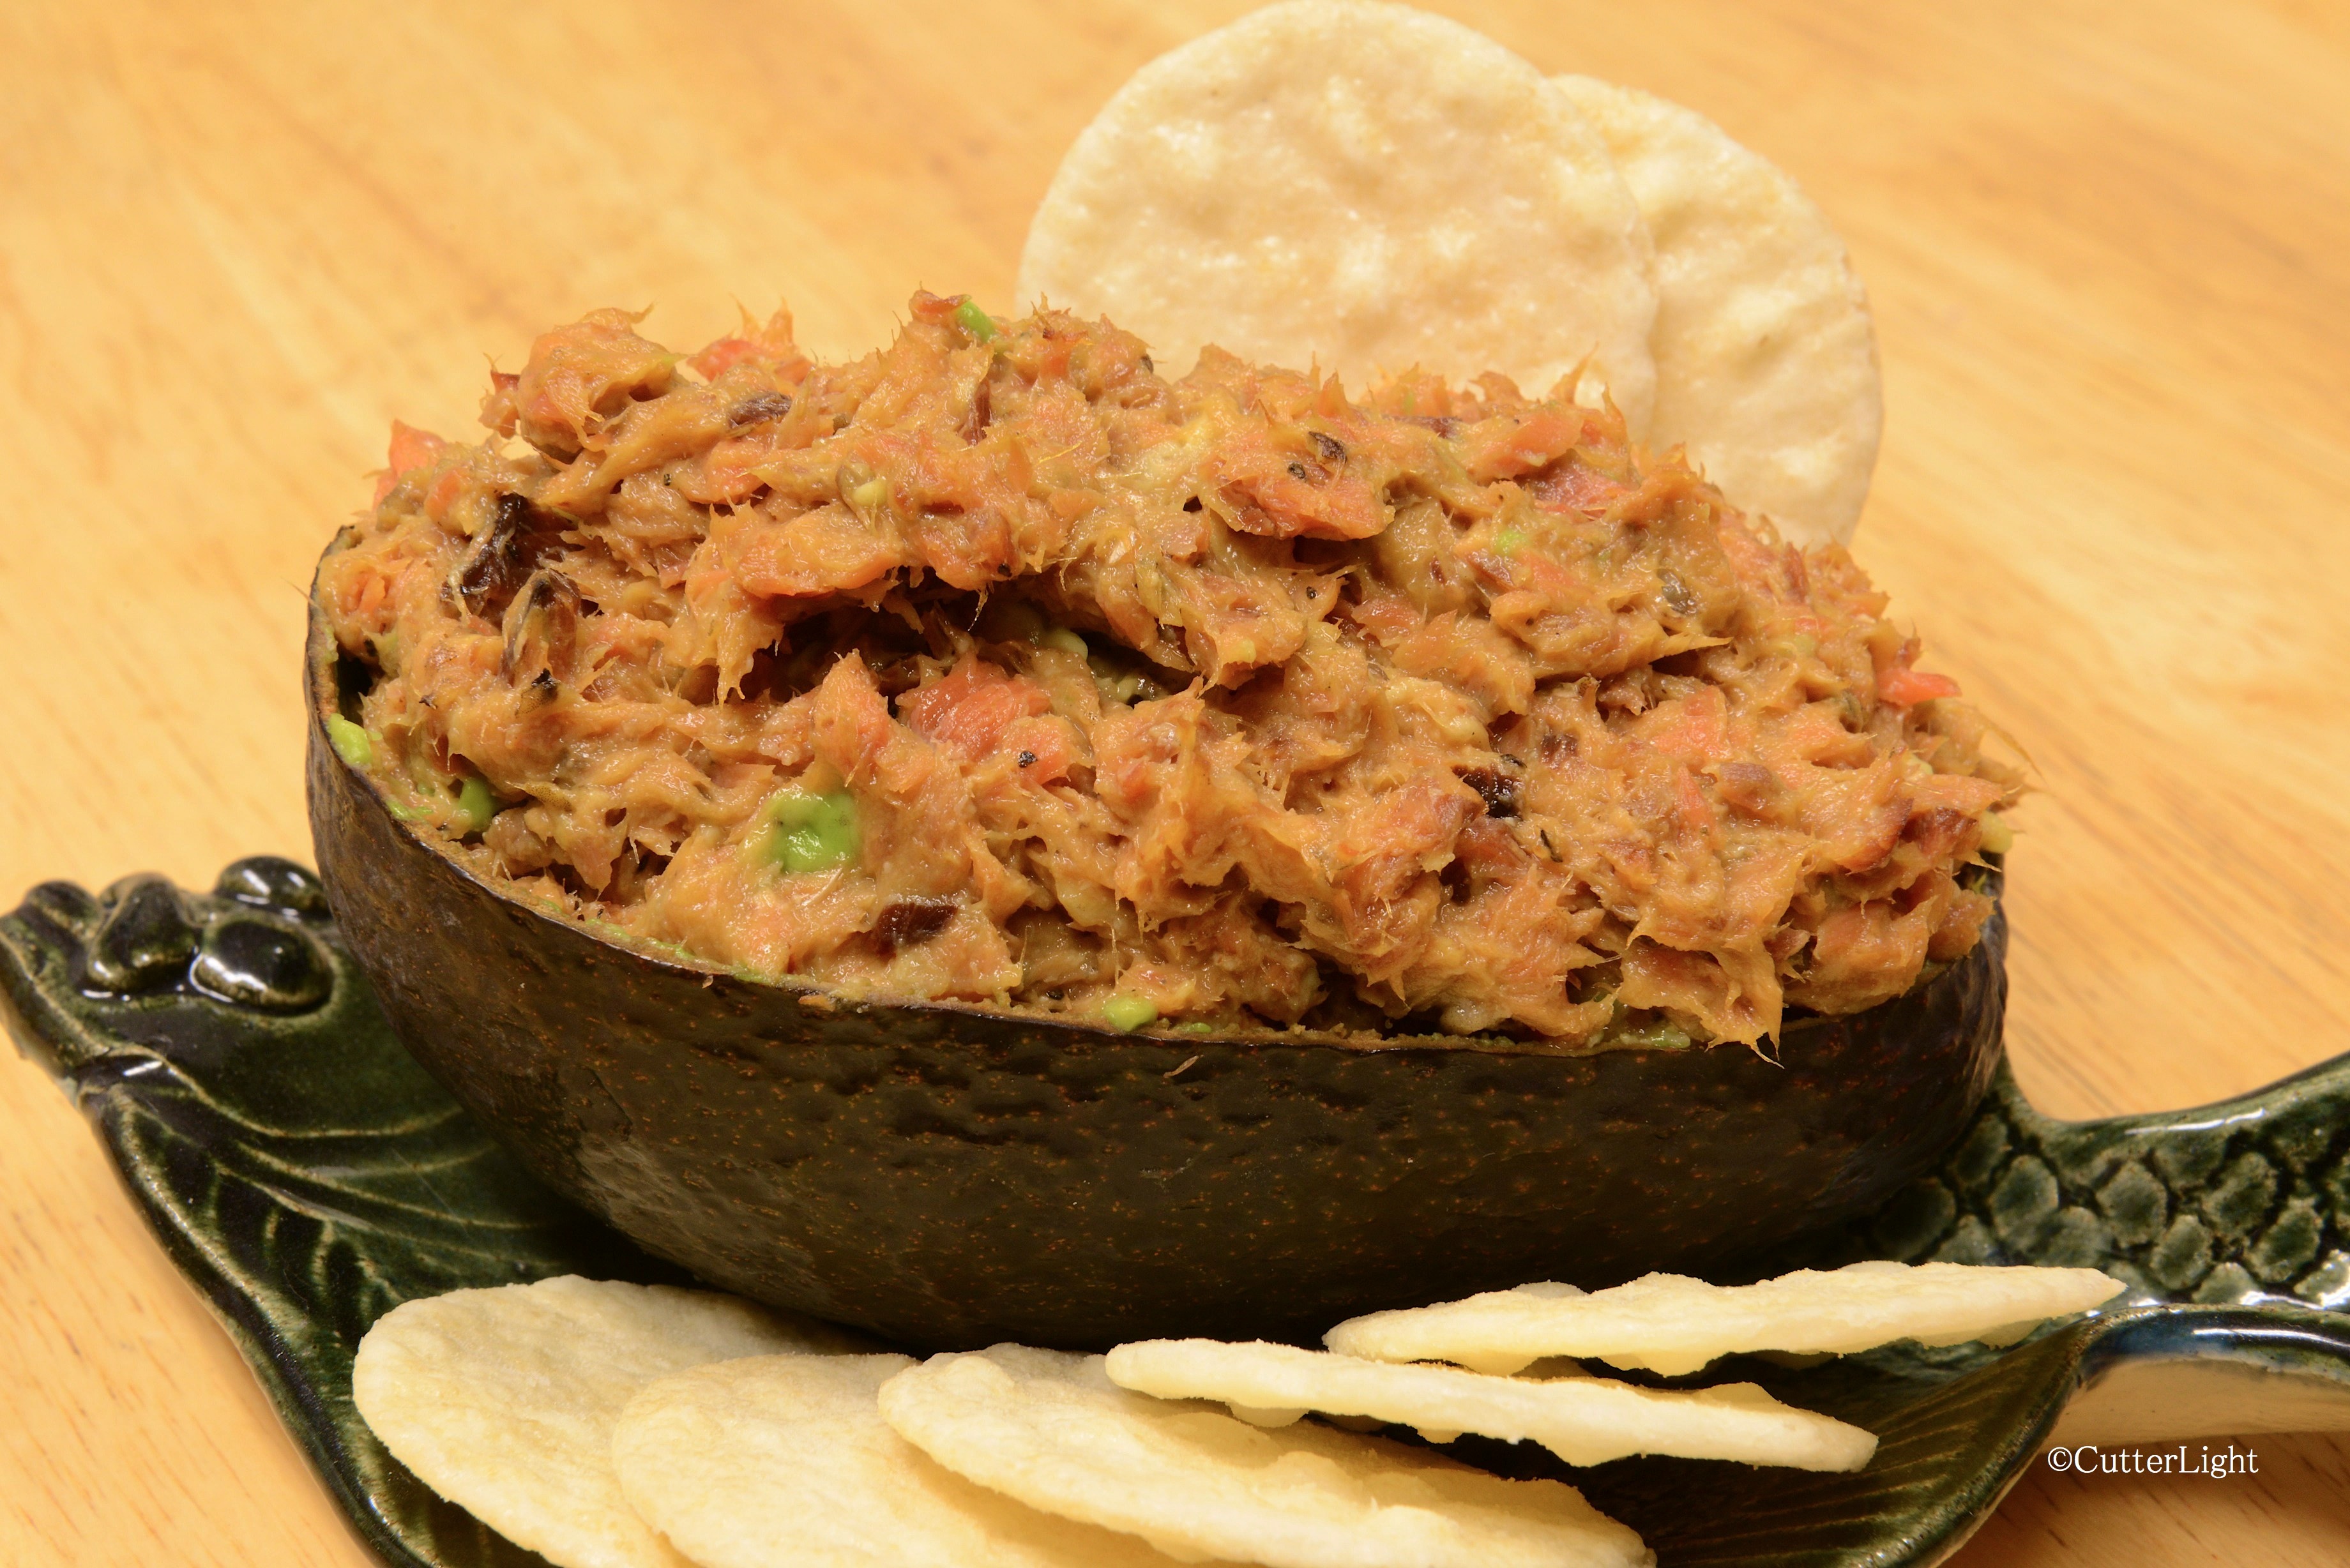
A couple of weeks ago, we were in the Anchorage airport, flying back to Point Hope when we suddenly encountered a scent that, for us, will always be pleasantly, irresistibly memorable. Muktuk. Whale fat. We looked around and soon found a small group of people who appeared to be Eskimo pushing a cart loaded with coolers, no doubt the source of the mildly sweet, rich smell. “We’re two among 0.00000-something percent of people in the world who can instantly identify that smell,” I said to Barbra as we laughed about our arcane expertise.

This morning one of Barbra’s students, Dmitri, came to school wearing the same scent. “Wow,” Barbra said with a smile. “You smell like muktuk!”

“Yeah,” Dmitri smiled back. “It’s good, isn’t it.”

Little stories like that keep us wanting to explore and experience.

pt hope from plane dawn n

Sunrise over Point Hope, a village by the Chuckchi sea.

Venison Broccoli Stir Fry with Brown Sugar & Soy Sauce

venison broccoli stir fry n

Tasty, quick, easy and attractive, beef (or wild game) and broccoli is a dish almost nobody doesn’t like. Here’s our twist on a classic favorite.

More than half-way through our year in the Arctic, our freezers remain abundantly stocked with Alaskan seafood and wild game. Featured in this dish is a lean, tender cut of Sitka black-tailed deer. Asian-style stir fry such as this is perfect for days when you want something quick but delicious.

Most recipes for this dish call for corn starch. For a cleaner taste and presentation while still achieving the thick broth desired for this dish, try substituting rice flour for the corn starch. A generous drizzle of sesame oil toward the end of cooking really brings this dish together. As we live far from a well-stocked grocer, we used powdered seasonings.

Venison Broccoli Stir Fry

Ingredients: (for two servings)

  • 1/2 pound lean, tender wild game or beef, cut into slender 2″ strips
  • 1 tbsp rice flour + 1/2 tbsp rice flour, separated (or use corn starch)
  • 1 tbsp water
  • 1/2 tbsp olive oil
  • a scant 1/2 tsp powdered garlic
  • 1/2 tsp powdered ginger
  • 1 tbsp brown sugar
  • 2 tbsp soy sauce
  • 3/4 cup onion, chopped very coarse
  • frying oil such as light olive oil
  • 2 cups broccoli florets
  • sesame oil
  • 1/2 tbsp sesame seeds

Directions:

  1. In a bowl, combine venison strips, 1 tbsp rice flour, water, olive oil, garlic and ginger. Mix thoroughly so that each meat strip is thoroughly coated with mixture. Set aside.
  2. In a small bowl, whisk together soy sauce and brown sugar. Set aside.
  3. In a wok or large skillet, heat olive oil over medium-high heat. When oil is hot, add venison, stirring continuously for about 2 – 3 minutes to sear and lightly cook through. Remove venison to a bowl and set aside.
  4. Add a little more oil to the pan and add the onions. Stirring frequently, cook until onions just begin turning translucent but are still fairly crunchy. Add broccoli and continue stir frying till broccoli begins to turn bright green, adding a little more oil if necessary.
  5. Add venison, sesame oil, sesame seeds and brown sugar and soy sauce mixture, stirring quickly to thoroughly mix ingredients together. Cook just long enough to reheat venison.
  6. Serve immediately on a bed of steaming rice.