Salmon Candy Canapés: Lox, Ikura & Cream Cheese on Buckwheat Blinis

lox-ikura-blini-n

See below for recipes for salmon roe, lox and buckwheat blinis.

Upon arriving in Chignik Lake last summer, one of our first orders of business was to stock our freezers with enough salmon to see us through the coming months. Fortunately, catching plenty of Reds and Silvers was no problem as hundreds of thousands of wild salmon ascend the Chignik River from summer through fall. Although the Sockeye (Red Salmon) roe is somewhat smaller than that of other species, it nonetheless cures into a beautifully translucent ikura that tastes as good as it looks. Coho fillets (Silver Salmon) are our favorites for making lox. Separated by a slice of cream cheese, garnished with a wisp of nori and arranged on a savory buckwheat blini, these appetizers are perfect as Super Bowl party snacks or as a pre-dinner hors d’œuvre complimented with champagne or fine sake (酒).

Recipes:

Ikura: Curing Salmon Roe

Salmon Lox or Gravlax

Buckwheat Blini

Ingredients

  • 1/3 cup buckwheat flour
  • 2/3 cup all purpose flour
  • 1/2 tsp baking powder
  • generous pinch salt
  • 3/4 cup whole milk
  • 2 eggs, whisked
  • 1 tbsp butter, melted
  • additional butter for griddle

Directions

  1. Whisk together flours, baking powder and salt.
  2. In a separate bowl, whisk together milk, eggs and melted butter.
  3. Whisk wet ingredients into dry.
  4. Heat griddle and coat lightly with butter.
  5. Drop a tablespoon of batter onto griddle. Repeat with additional tablespoons.
  6. Cook for about 2 minutes, small bubbles will form on top of blini, like pancakes.
  7. Flip blini and cook an additional minute on flipped side.
  8. Serve warm or at room temperature.

Home Brewed Amber and our Razor Clam Fritter Recipe: Dinner in the Alaska Bush

amber-beer-n-clam-fritters-n

A wonderful marriage – home brewed dark amber beer by brewmeister Barbra and razor clam fritters by chef Jack. See the fritter recipe below.

Jack has been making razor clam fritters for years. He has culinary ties to the delicious shellfish from his life on the Oregon Coast. When we first visited Alaska, we dug the biggest razor clams either one of us had ever seen and promptly turned them into soups, pasta sauces, sashimi and fried dishes. These delicious beauties are something we try to stock in our pantry every year… we dig them ourselves or pick them up at our Anchorage Costco. The following recipe is tried and true. It’s been with us for years. We may change the seasoning up a bit, otherwise, we stick to the original, which has proved hard to improve upon.

To accompany our delicious fritters, we opted for our amber home-brew. It was only a matter of time before my yeastly attentions turned from bread to brew. Now that we live in a “damp” community, we are free to experiment with adult libations. Thanks to a company called Mr. Beer, I’ve been able to experiment with beer-making with great success. In addition to the amber beer (pictured above), we also are enjoying a slightly more complicated kit which yielded a robust, slightly-citrusy hefeweizen. We currently have a nut brown ale and a Mexican style lager fermenting. The beer we’re turning out would stand up nicely against any of the favorites we typically order in restaurants or buy at the package store. Brewing beer seems a natural addition to our kitchen. It certainly has been a tasty and satisfying compliment to our cuisine!

Clam Fritters: serves 4

Ingredients

  • 1 cup chopped clams
  • 1 egg, lightly beaten
  • 1 tsp lemon juice
  • 1 tbsp chopped tarragon (or substitute dry tarragon or marjoram)
  • 1 tsp baking soda
  • 1 cup flour
  • 1/4 cup clam juice
  • 1/4 cup milk
  • 1 1/2 tbsp melted butter
  • couple dashes cayenne pepper (to taste)
  • freshly ground black pepper to taste
  • oil for frying

Directions

  1. Chop clams on a cutting board. Not too fine. Place them in a mixing bowl.
  2. Add the egg, lemon juice, tarragon, cayenne, black pepper, baking soda and flour and lightly stir together.
  3. Blend the clam juice and milk. Add gradually to the clam mixture along with the butter, continuing to stir. Do not make the batter too runny and do not over-stir.
  4. Heat about 1/8 inch of oil in a frying pan.
  5. Drop batter in the hot oil – about 2 tablespoons per fritter. (They’ll cook better if they’re fairly small.)
  6. Turn when the bottom is browned, as you would for pancakes.
  7. Finish cooking till golden-brown. Serve with a side of slaw and a favorite ale or lager.

Improved Gingerbread Cookies – Hold the Molasses

gingerbread-cookies-n

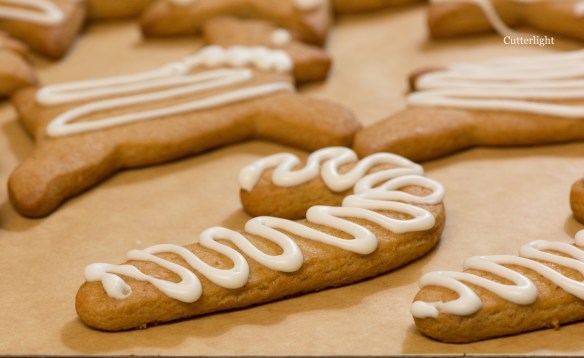
The look and smell of December – warm, spicy gingerbread cookies straight from the oven, or let them cool and frost them for a more traditional treat.

‘Tis the season for hot toddies and gingerbread cookies. Out in the Alaskan bush, we have to plan ahead for any special ingredients. Ginger, yes. Cloves, yes. Molasses? When stocking up our pantry, I was on the fence when it came to molasses. I really don’t like molasses. It’s not a flavor I would normally add to any of my creations. But it is very traditional in a couple of bread and cookie recipes. In Point Hope, we kept it as a pantry item and only used it once over three years. So, I opted against stocking it again here at “the Lake.”

Here it is December, and I have a hankering for gingerbread cookies, but I have no molasses… Throwing molasses to the wind, I altered a gingerbread cookie recipe by upping the ginger and using a combination of honey and pure maple syrup instead of the traditional molasses. The result? A flavorful, spicy cookie with enough “brownness” to satisfy the eye and a flavor to satisfy my December craving. After frosting these little babies and bringing them to my students, I was met with many compliments and requests for more. Who says elementary student palates don’t know what’s good? The adults who sampled the cookies concurred with my young tasters. I patted myself on the back for improving a long-standing recipe and also for avoiding an expedited shipment of molasses from the nearest grocery store – nearly 500 air miles away!

Improved Gingerbread Cookies

Ingredients

  • 1/2 cut unsalted butter, melted
  • 1/4 cup brown sugar
  • 1/4 cup granulated sugar
  • 1/4 cup honey
  • 1/4 cup pure maple syrup
  • 1 egg, beaten
  • 2 1/2 cups all purpose flour
  • 1 tsp baking soda
  • 1/2 tbsp ground ginger
  • 1/2 tsp ground cinnamon
  • 1/4 tsp ground cloves
  • pinch salt
  • Royal icing (optional)

Directions

  1. Mix butter and sugars.
  2. Mix in honey and maple syrup.
  3. Mix in egg.
  4. Sift together flour, baking soda, spices and salt in a large bowl.
  5. Stir butter mixture into flour mixture.
  6. Turn dough out onto a floured work surface and form into two large disks.
  7. Wrap each disk in plastic wrap and refrigerate for at least two hours.
  8. Preheat oven to 400 degrees F (200 degrees C).
  9. Cover baking sheet with parchment paper.
  10. Roll out dough of one disk between two sheets of waxed paper. Dough should be about 1/4 inch thick.
  11. Using cookie cutters, cut out figures. Use an offset spatula to move cookies to prepared baking sheet.
  12. Repeat with remaining dough.
  13. Gather up scraps and roll out and cut as with original dough.
  14. Bake cookies until lightly browned, about 6 minutes.
  15. Let the cookies cool on sheet for about 5 minutes before transferring to wire rack to finish cooling.
  16. Decorate cookies with Royal icing, if desired.

I’ve Become a Baking Nerd – Cranberry Pecan Rugelach

rugelach-cranberry-n

These sweet little cookies are common at Hanukkah, but filled with pecans and cranberries they will be welcomed at any Thanksgiving, Christmas or fall festivities table.

If you’ve been following our life off the beaten path, you know Jack and I love to read. The chilly, rainy days that encourage us to be inside only fuel our fires for reading. We read together almost every morning and most nights as well. We are in the midst of a tome of poetry for our morning sessions. The Top 500 Poems edited by William Harmon has been taking us on a poetic journey through the ages from Chaucer and Shakespeare to Ginsberg and Plath. In the evening, we are currently enjoying Truman Capote’s timeless classic Breakfast at Tiffany’s. In addition to our joint reading adventures, each of us is immersed in yet another read. My current book is excruciatingly nerdy  – The Professional Pastry Chef by Bo Friberg. It contains details and procedures for doing things only a baking nerd would love to do – like making marzipan from scratch, for example. And, yes, that is on my goal list now.

‘Tis the season for making pies, so I’ve delved into the section on infallible pie crusts. The author didn’t claim infallibility, but I am certainly trying to find one that never fails. I would like to be known as “The Pope of Pie Crusts.” The author did say that “a mastery of dough making is critical to the success of a professional pastry kitchen.” My kitchen is not professional, but I would like my crusts to have the taste and texture like those of the professionals. One pie crust which caught my eye includes cream cheese as part of the primary fat.

However, before I take on the intimidating world of pie crust perfection, I thought I would inch toward it with a cookie called rugelach that uses a similar cream cheese dough. The cookie dough spirals around a tasty filling. They are lovely to look at and even lovelier to eat!

Bo uses apricots and walnuts as her filling. I adapted her published recipe to make the directions simpler, and I also swapped her choice of fruit and nuts for what I had in my Alaska pantry. The resulting cookie recipe makes it easy to substitute any dried fruit and nut for the cranberries and pecans I used.

Pecan Cranberry Rugelach

Ingredients

Dough

  • 2 sticks unsalted butter (1 cup), room temperature
  • 8 oz. cream cheese, room temperature
  • 2 cups all purpose flour

Filling

  • 1/2 cup Craisins
  • 1 cup pecans, chopped coarse
  • 1 cup brown sugar
  • 1 tsp cinnamon
  • 3 tbsp unsalted butter, melted
  • 1 egg, beaten

Directions

  1. Beat 2 sticks butter and cream cheese together with mixer.
  2. Add in flour by 1/2 cups.
  3. Divide dough into thirds. Form 3 discs. Wrap each disc with plastic wrap and refrigerate for at least 2 hours.
  4. Rehydrate Craisins. Place Craisins in pan with enough water to cover. Bring water to boil, then remove pan from heat and let Craisins cool.
  5. Drain Craisins.
  6. Combine pecans, sugar, and cinnamon in a bowl.
  7. Preheat oven to 350 degrees F (180 degrees C). Line a baking sheet with parchment paper.
  8. Roll dough into 10-inch circles.
  9. Paint circles with melted butter.
  10. Sprinkle dough with pecan mixture.
  11. Evenly sprinkle with Craisins.
  12. With a pizza wheel, cut each circle into 12 even wedges.
  13. Roll the wedges from edge to center. Place cookies on prepared baking sheet.
  14. Paint all the cookies with beaten egg.
  15. Bake for 15 minutes. Finished rugelach will be golden when finished.

Alaska Gourmet: Pan-Fried Salmon with Herbed Butter on Butternut Squash Ravioli

salmon-on-pumpkin-ravioli-n

Fall food themes continue with this pièce de résistance fit for a king. Chinook salmon holds center stage drizzled with herbed butter and served on butternut squash ravioli. Food stylist extraordinaire Barbra came up with the idea of rolling shaved parmesan into tubes. 

With plenty of sockeye salmon harvested, cleaned and packaged in our freezers, it nonetheless wasn’t a case of “coals to Newcastle” when a friend offered up a couple fat fillets of Chinook. Reds, pinks, chums and silvers – they’re all welcome at our dinner table any time. But kings… with their higher percentage of healthful fat and their decadent melt-in-your-mouth texture… kings are special.  With a batch of butternut and ricotta ravioli in the freezer courtesy of Barbra, I knew just what I wanted to do with one of the fillets. This was as fine a meal as we’ve ever enjoyed. (Barbra promises the pumpkin/squash ravioli recipe will be posted soon!)

This dish goes particularly well with Brussels sprouts, a vegetable we especially appreciate out here in the Alaska bush because they ship well and have a long shelf-life in the refrigerator. Our favorite cooking method is to cut the Brussels sprouts in half lengthwise, toss them in a bowl with olive oil, sea salt and cracked pepper, and then place them cut-side down in sizzling olive oil in a frying pan. Turn the heat down (but make sure they’re still sizzling) and cover the pan. Check, and when the cut side has browned, flip the sprouts to the leafy side. Turn up the heat a little to get things really sizzling again, then turn it back down to a little below medium and cover the pan. The leaves will brown up and caramelize and a few will blacken. They’re ready to be served.

Pan-Fried Salmon with Herbed Butter on Butternut Squash Ravioli

Ingredients (serves 2)

  • 1-pound fillet of any wild-caught Pacific salmon, skin on
  • sea salt
  • black pepper
  • (Optional) mirin or white wine – just a little
  • 2 tbsp butter
  • 1 or 2 shallots, sliced fine
  • 1/2 tbsp tarragon (dried) or 1 tbsp fresh
  • 2 servings worth of ravioli stuffed with pumpkin, squash, mushrooms or light cheeses
  • parmesan cheese, grated or sliced, to garnish
  • Extra virgin olive oil

Directions

  1. Prepare ravioli per directions, timed so that it’s ready when the salmon is ready.
  2. Rinse fillet, pat dry with paper towels and cut into two portions. Inspect for pin bones, which can easily be pulled out with a pair of kitchen pliers. Sprinkle with sea salt and a little black pepper.
  3. Add a tablespoon or 2 of olive oil to a frying pan and turn to a little hotter than medium heat. When oil is ready to sizzle, carefully place fillets in the pan skin side up. Add just a splash of mirin. Cover and cook for 2 minutes, till meat is seared.
  4. Turn salmon over so that it is skin side down. Add another splash of mirin. Turn heat down to just below medium, cover. A general rule of thumb for fish is to cook for about 8 to 10 minutes per inch of thickness. When white substance appears on fillet, it is cooked through. Avoid overcooking.
  5. Meanwhile, over medium-low heat, melt butter in a small pan. Add shallots and tarragon and sauté just long enough to soften the shallots and release the tarragon’s aroma.
  6. Serve ravioli and arrange salmon on top. Spoon on herbed butter.
  7. Serve hot with a couple of fingers of your favorite bourbon.


Perfect Sourdough English Muffins: Easier than You Think!

english-muffins-n

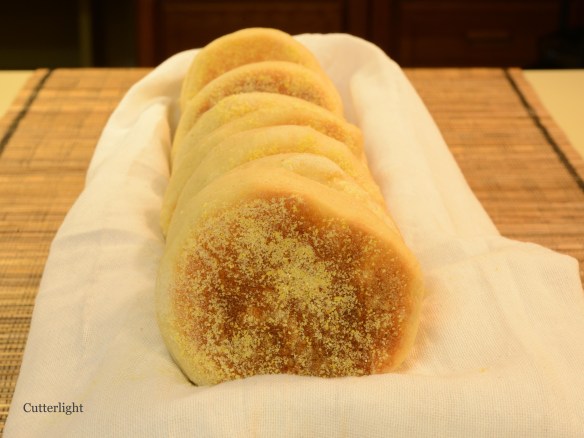
Perfectly round. Perfectly chewy. Perfect little breakfast breads. Why did I quit on you so quickly. my Darlings?

With success under my belt making sourdough bread, I found myself contemplating what other types of delicious baked goods I could make with my sourdough starter. A friend in the village lent me an old Alaskan recipe book with a huge collection of recipes that are truly Alaskan. Did you ever wonder how to cook up beaver meat? Or fireweed stalks? These are just a couple of the interesting recipes found in this volume. Of course, there was a substantial section on sourdough. I don’t know if many people realize this, but sourdough is a very Alaskan thing.  In fact, you can find starters that date back to the Klondike gold rush! It was an easy thing for people of that time to keep fresh starter going. They only had to regularly feed it. Delicious pancakes and breads could then be whipped up in a snap.

Now that I have a healthy starter going (I actually have two, thanks to another friend), I started playing around with recipe ideas that would showcase this unique ingredient. In short order, an idea came to me from a recipe that I’d failed at several years ago…

I got into serious baking when we first came out to the Alaska bush. At that time, we decided to make as much of our food as we could from scratch, knowing that our local store would have limited supplies. We shipped out ingredients in bulk, like 50-pound bags of flour and sugar and 25-pound bags of rice and beans. It was lovely to have a year’s worth of ingredients in our pantry. Lately, I’ve been contemplating how my baking skills and confidence have grown since the days of bread machine loaves and basic chocolate chip cookies to what I turn out in our kitchen now: lattice-topped pies with homemade crusts and my own “Twix” bars in which every layer of the candy is crafted from scratch.

I can’t remember what about my first English muffins was so bad, but I do remember being quite frustrated and promptly turning my back on these little breads. Until now. I’m glad I came around. These round beauties came out better than store bought. They had that lovely sour tang to them, the chewiness that is the hallmark of good English muffins with the expected crunch of cornmeal on the outside. Of course, we split them with forks before serving them toasted with butter and homemade jam. We also use these muffins for tasty breakfast sandwiches of fried egg, salmon, and melting cheddar cheese. As it turns out, these tasty baked breads are actually pretty easy to make. Who knows what wrong I did to this recipe so many years ago.

Sourdough English Muffins

Ingredients

  • 2 tbsp granulated sugar
  • 2 cups warm water (about 110 degrees F)
  • 1 tbsp active dry yeast
  • 7 cups all-purpose flour
  • 1 cup sourdough starter
  • ½ cup nonfat dried milk
  • ¼ unsalted butter
  • 1 tbsp salt
  • cornmeal, for coating

Directions

  1. Combine all of the dough ingredients (except cornmeal) in a large bowl.
  2. Mix and knead. Dough should be elastic and not too sticky.
  3. Place dough in a lightly greased bowl. Cover with plastic and let rise for about 1 hour.
  4. Turn dough out on a lightly flour surface.
  5. Divide dough in half.
  6. Roll dough to about ½ inch thick. Cut into 3” rounds with cookie cutter. Or just cut dough into squares, using a knife.
  7. Re-roll and cut any remaining scraps.
  8. Repeat with remaining half of dough.
  9. Place rounds onto cornmeal-sprinkled baking sheets. Sprinkle with additional cornmeal.
  10. Cover with plastic wrap and let them rise for another hour.
  11. Preheat a large griddle over medium-low heat.
  12. Place as many muffins as you can (without crowding) on griddle.
  13. Cook muffins for 10 minutes on each side.
  14. Remove muffins from griddle and cool on a wire rack. Store tightly wrapped at room temperature for about 5 days. Freeze for longer storage.

Recipe adapted from King Arthur Flour.

Happy Holidays! Lowbush Cranberry (Lingonberry) Upside-Down Cake

lingonberry-upside-down-cake_n

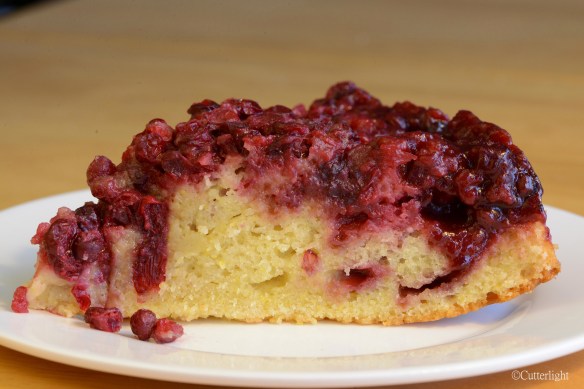
Bursting with the flavors and colors of the holidays, this lowbush cranberry cake makes a beautiful centerpiece for a fall table and, if there is any left, the breakfast table the next day!

Oh, these little red gems, these sour little beauties. They go straight from the freezer into a delicious batter and bake up into a cake you’ll want to share with friends.

Lowbush cranberries (as they are known here in Alaska) are our superstar fruit of fall and winter. Known as lingonberries elsewhere, these tart, tiny red berries grow close to the ground in cold, boggy habitat of northern climes. They taste similar to the cranberries we used to buy in the store, but they are so much better. As with many small, wild fruits, they are packed with more flavor than their mass-produced counterparts. And according to the University of Alaska, our lowbush cranberries contain more antioxidants due to clean air and long summertime sunlight hours. The berries are easy to pick and easy to clean and are widely available in our neck of the woods just around the time of the first frost. So far, we’ve made them into hot juice drinks and cranberry sauce. Now they are starring in this sumptuous upside down cake.

Lingonberry aka Lowbush Cranberry Upside Down Cake

Ingredients

Bottom Layer

  • 4 tbsp unsalted butter
  • ¾ cup dark brown sugar
  • 3 cups lowbush cranberries (or substitute store-bought cranberries)

Batter

  • 1 ¼ cup all purpose flour
  • ¼ cup corn meal
  • 1 ½ tsp baking powder
  • ¼ tsp salt
  • ½ cup unsalted butter, melted or browned
  • ¾ cup granulated sugar
  • 1 tsp Penzeys powdered lemon zest (or zest of 1 lemon)
  • 2 large eggs, beaten
  • 1 tsp vanilla extract
  • ½ cup whole milk

Directions

  1. In a small saucepan, heat 4 tbsp unsalted butter and brown sugar.
  2. Stir constantly until butter and sugar are melted together and bubbling.
  3. Pour mixture into bottom of 9 inch cake pan. Set aside.
  4. Preheat oven to 350 degrees F (180 degrees C).
  5. Whisk together flour, corn meal, baking powder and salt in a large bowl.
  6. In a small bowl, whisk together melted butter, sugar, lemon zest, eggs, vanilla and milk.
  7. Pour wet ingredients into dry and whisk together until mixed.
  8. Pour cranberries evenly on top of butter mixture in the 9-inch pan.
  9. Pour batter evenly over cranberries.
  10. Bake cake in preheated oven for 50 minutes. Wooden pick inserted into center will be clean when cake is done.
  11. Let cake cool in pan on wire rack for 10 minutes.
  12. Run a knife around the circumference of cake. Invert on cake platter to serve.
  13. Serve warm.

Recipe adapted from David Lebovitz.

Diminutive Raspberry Cheesecakes with a Sweet Raspberry Jam

diminutive-cheesecakes_n

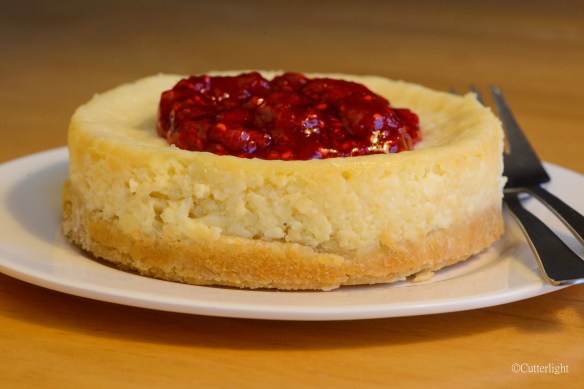
Cheesecakes for one – creamy vanilla with the tang of cream cheese. Top it with some favorite jam and Wow, this makes for a delicious, elegant dessert.

Out in the Alaska bush, I don’t usually stock cream cheese in my pantry. But during a recent visit to a neighboring village I happened across a two-pound block at the store. It doesn’t freeze very well, which makes for a perfect excuse to immediately create lots of baked items with this delicious ingredient. I’ve made these lovely little cheesecakes before using matcha green tea as the flavoring. This recipe is a perfect base in which to add in a variety of flavors. For this batch, I wanted to showcase my raspberry freezer jam, so I created a complementary vanilla-flavored cake.

Diminutive Vanilla Cheesecakes

Ingredients

Crust

  • 1 1/2 cups all purpose flour
  • 1/3 cup granulated sugar
  • 1 egg, beaten
  • 1/2 cup butter, melted

Filling

  • 1 package of cream cheese, 250 grams, softened to room temperature
  • 1/2 cup granulated sugar
  • 1 large egg, beaten
  • 1 tsp vanilla extract

Directions

  1. Preheat oven to 300 degrees F (150 degrees C). Line 8 standard-sized muffin tin cups with paper liners.
  2. In a medium bowl, mix together crust ingredients.
  3. Evenly divide crust mixture into lined muffin tin cups. Press down to form bottom of cheesecakes.
  4. Bake crusts for 5 minutes. Let cool.
  5. In a large bowl, whisk together filling ingredients. There should be no lumps and all ingredients should be mixed well.
  6. Divide filling evenly into paper lined cups.
  7. Bake cheesecakes until set, about 16 – 18 minutes. Centers should not jiggle.
  8. Refrigerate cheesecakes for 3 hours before serving.

The Damp Times: The News on Home Brewing in Chignik Lake

beer-first-n

With no place to pick up a case of beer for our Octoberfest sausage (grilling in the background), we decided to have a go at brewing our own. The results? A pilsner as light and crisp as the autumn weather we enjoyed today here in Chignik Lake.

Nothing compliments fried oyster po’ boys, grilled sausages with caramelized onions, deep fried rockfish or the end of a good run like a crisp, cold lager or ale. Living in a “damp” village where alcohol is permitted but not sold, we added “learn to make beer” to our list of culinary goals for this year.

For us, a kit was the way to go. The one we ordered came with a can of wort – the thick, molasses-like mixture that is the base of beer -, bottles, and everything else we needed. Total brewing time was about six weeks.

beer-first-w-grill-n

And the results… Well, take a look! We’ve already got our next brew going. Looks like it’s time to purchase proper beer glasses!

Beading the Dolly Varden… And how Did they get that name?

OLYMPUS DIGITAL CAMERA

Spawning salmon attract opportunistic Dolly Varden char looking for easy pickin’s of fresh roe. It’s the perfect opportunity to grab a fly-rod, a handful of beads and hit the water. 

Chignik Lake’s main road begins at the dirt airstrip on the west side of the village and terminates at the riverside boat landing to the east. The 3.3 miles in-between, often marked with clumps of bear scat, moose tracks and even wolf prints, runs past a tiny post office on the ground floor of the postmaster’s home and a clinic only occasionally manned by itinerate healthcare providers who fly in from other villages. Along the way, the mostly dirt road winds past a school with a total enrollment of 19 students, a tiny Greek Orthodox church, a community center and a sparse collection of houses that are home to the village’s 50 or so inhabitants. Patches of salmonberries, alders and fireweed edge most of the road, which at one point crosses a crystalline stream that fills up with spawning char each fall.

The only practical ways in and out of the village are by bush plane or boat. And so, when a friend told us he’d be flying into the sister village of Chignik Bay and suggested we come down for some fishing, we needed to hitch a ride on someone’s skiff in order to make the 16-mile run down the Chignik River, through Chignik Lagoon, around the headlands and into Chignik Bay. Fortunately this didn’t present a problem, as we’re virtually the only two people in the village who don’t have an aluminum Lund v-hull with an outboard motor – the Chignik Lake version of a pickup truck

OLYMPUS DIGITAL CAMERA

Chignik resident Clinton Boskofsky runs his 18’ aluminum skiff down the Chignik River on a sunshine-filled day in early fall.

A few bald eagles eyed us cooly from bank-side perches as the skiff bounced down the remote river toward the Alaska Gulf. Two weeks ago on this same river I’d seen a handful of bears drawn by thousands of sockeye salmon teaming in the shallows, their bodies crimson red, heads moss green. But today salmon were scarce and the bears had moved up into the feeder streams where the fish were still spawning. 

Gradually, the brisk fall air took on a familiar briny scent as we approached the lagoon. The bones of an old gillnetter fishing boat rested along the southern shoreline and an abandoned cannery came into view on the opposite side, vestiges of a not-so-distant past.

old-wooden-fishing-boat-n

“Love this smell!” Barbra called out over the steady hum of the outboard.

“Tide’s out a little, flat calm. No bears I guess, but it’s a good day to see otters!” I called back.

Sure enough, as we broke into open water, a raft of sea otters popped up their heads to give us a curious look.

sea-otter-mother-n-baby-n

Puffins, kittiwakes, murres, gulls, cormorants, auklets and leaping salmon were also in the mix of wildlife as we hung a right, arced around the headlands and cruised into Chignik Bay. Surrounded by a semi-circle of mountains, the evening light over the village was fading fast. As the bow of the skiff nosed into the gravel beach with a metallic crunch, our friend Jerry walked down to greet us.

“Any fish up in the creek?” I asked him.

“I dunno,” he replied. “I just got here myself. Haven’t been up to look yet. I guess we’ll find out tomorrow morning.”

Work in Mongolia having pulled us away from our adopted state for the past two years, it had been awhile since we’d last seen our old friend. With lots of drinking… er… catching up to do, we ended up getting a late start the next day. Fortunately, it wouldn’t matter. If salmon were in the stream the Dollies would be close behind, sucking up any loose eggs that failed to get buried in the spawning redds. The char wouldn’t be fussy as long as we showed them beads approximating the size and color of the roe they were feeding on. 

Shortly after lunch the next day, the three of us were standing on a bridge at the edge of Chignik Bay village overlooking Indian Creek’s pellucid waters. A month ago, this very stretch of the stream had been thick with spawning pink salmon. That run was over. With and without polarized sunglasses, we strained our eyes hoping to catch a tell-tale flash or shadow below the rippled surface.

“There’s a salmon!” I looked to see where Jerry was pointing.

“Oh, yeah!” Barbra exclaimed. “There’s a few!”

Mildly irritated that I still hadn’t found the fish, I narrowed my eyes and kept looking. Gradually, almost magically, some of the multi-colored stream bed rocks I’d been staring at began to reveal themselves as animate objects, little light-gray torpedoes casting faint shadows. Pinks. Looking more closely, other, smaller shapes subtly shifting in the current materialized. Dollies.

OLYMPUS DIGITAL CAMERA

Colored rocks below a rippled surface paint a mosaic on Indian Creek.

Each of us rigged up with a standard 9’ leader terminating in a 5x tippet, threaded on an egg-sized bead somewhere in the orangish-red spectrum, tied on a small black hook, pinched down the barb and affixed a hot pink, fingernail-sized strike indicator a few feet above the egg. A translucent silicon stopper inserted into the bead would allow us to keep the egg in place a couple of inches above the hook.

Fishing beads is fairly straightforward. When salmon spawn, the female uses her caudal fin – her tail – to dig out a depression in the stream’s gravel bed. This nest is called a redd. As she deposits her eggs, a male releases milt. The female then moves upstream and again uses her tail to push gravel over the fertilized eggs. Thus buried, the eggs will remain well oxygenated and safe from predators until they hatch in the coming months.

OLYMPUS DIGITAL CAMERA

Male Dolly Varden in brilliant fall spawning colors. Note the orange bead “egg” just below its jaws. In a few hours of fishing covering two days, the three of us caught dozens and dozens of char from 10 to 19 inches. We kept 10 fish for the kitchen – a few small fish to charcoal grill whole and three larger fish for other recipes. (See Rustic Char and Dolly Varden Shioyaki.)

But there are invariably eggs that drift out of the redd before they can be buried. Mergansers, gulls, sculpins, trout, char and ravens are among a host of opportunists that seek out these loose eggs. On Indian Creek we encountered American dippers, a fascinating songbird able to hop into a stream and walk along the bottom, availing themselves of drifting roe.

OLYMPUS DIGITAL CAMERA

Dollies are fall spawners and the abdomen of this beautifully-marked female is swelled with her own eggs.

The objective is to present the bead so that it gently bounces along the bottom as a natural egg would. A cast straight upstream or quartering upstream is generally most effective. When a char intercepts the bead, the strike indicator floating with the current will hesitate. With a small, sharp, barbless hook, simply lifting the rod while tightening the line is sufficient to achieve a hookup.

OLYMPUS DIGITAL CAMERA

This male Indian Creek Dolly Varden was stuffed to the gills with fresh salmon roe. Note the red dot on the egg closest to the Dolly; it indicates that the egg has been fertilized.

The next morning, with a few hours to spare before our boat ride was scheduled to show up, we decided to have another go at Indian Creek. This time we wanted to give our tenkara rods a try. It’s origins in Japan, tenkara angling exemplifies simplicity at its finest.

There is no reel. Instead, a long line is attached directly to the tip of a light, delicate but strong, telescoping rod. Our tenkara rods are about 12 feet in length but telescope down to a mere 21 inches. The entire set-up weighs less than 2 1/2 ounces. Rated for a maximum tippet strength of about five pound test, these rods are perfect for hiking and stream exploring in pursuit of fish of a few inches up to a couple of pounds. Between the long rod, a slightly longer line and an outstretched arm, a cast of nearly 30 feet is achievable – plenty long enough to cover the water on streams, small rivers and even the weedy margins of a lakeshore. 
OLYMPUS DIGITAL CAMERA

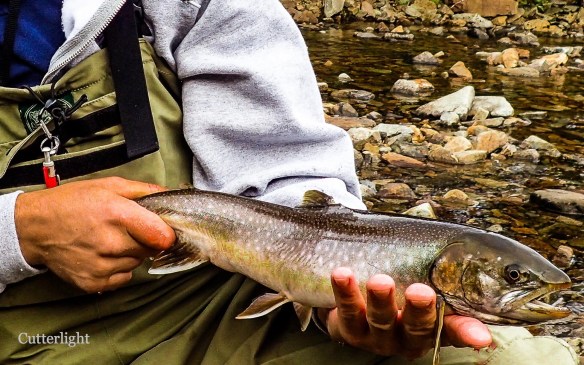
Jerry took this stunning female Dolly on a tenkara rod and a bead. Rod, line, lure and pristine water… Angling doesn’t get any more beautifully simple.

Fishing over the same water we’d hit the previous day, we expected fewer fish. Happily, that wasn’t the case. In fact, our two largest char came on the tenkara rods. And for the second day in a row, except for a pair of dippers and a belted kingfisher, we had the stream to ourselves.

OLYMPUS DIGITAL CAMERA

So how did this fascinating member of the trout and char clan come to be called “Dolly Varden?” Glad you asked.

It seems that sometime in the 1870’s anglers on northern California’s McCloud River were catching a species of brightly-colored trouty-looking fish. Admiring the brilliant spots and colorful markings, the anglers called them “calico trout” after the floral-patterned cloth. A group of fisherman were looking over a catch of these “calico trout” and lamenting that there wasn’t a better name for them when a 16-year old girl, the daughter of local resort owners, happened along. The girl had been reading Charles Dickens’ Barnaby Rudge in which there is a character by the name of Dolly Varden. This character was named for the feminine fashion of the time, a  muslin dress worn over a brightly colored petticoat. In fact, the girl had recently received a dress and petticoat in that very style. “Why not call them ‘Dolly Varden?’” she suggested.

The name stuck, and so this most colorful salmonid came to known by a most colorful name.

screen-shot-2016-10-19-at-8-08-24-pm

The eponymous Dolly Varden fashion of the 1870s…

OLYMPUS DIGITAL CAMERA

 …And an exquisite specimen of Salvalinus malma – the Dolly Varden char.

Back in the skiff heading home, a squall packing icy rain hit us square in the face as we rounded the cape. We pulled jacket hoods tight and hunkered down, following Clinton’s directions to shift our weight against changes in wind and current in order to keep the boat on an even keel. No complaints. A few fish iced down in a small tub, time on a beautiful piece of water, a friendship renewed… And we never take for granted how fortunate we are to live in this land of staggering abundance.

OLYMPUS DIGITAL CAMERA

Sleeves rolled up and arms elbow deep in Indian Creek’s frigid waters, I snapped a few frames not sure what, if anything, I’d get. There appear to be four species of salmon as well as a couple of dozen char in this shot. 
bead-egg-rig-n

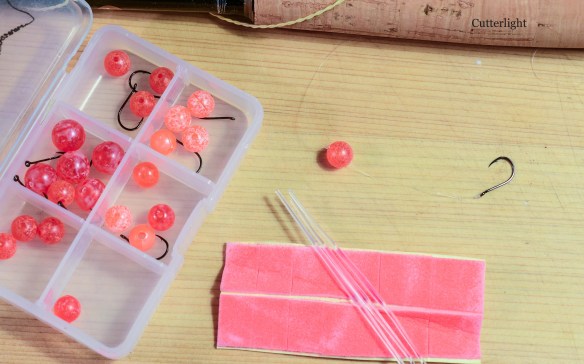
A basic bead kit includes a box with a few beads and a few short-shank hooks, silicon toothpicks (if you’ve been using wood, try silicon), and a card of self-adhesive strike indicators. (There are 12 pink, fingernail-sized self-adhesive foam squares on this card.) The strike indicators can be slid up and down the line depending on water depth. The bead, pegged to the line with a silicon toothpick (inserted and trimmed close to the egg) can also be slid. Note that the egg is affixed about two inches above the hook. This positioning ensures that fish are consistently and neatly hooked in or just outside the jaw, minimizing injury. A pack of small split-shot sinkers to keep the egg near the bottom is also handy. There’s still one more step before this rig is finished – can you spot it?
OLYMPUS DIGITAL CAMERA

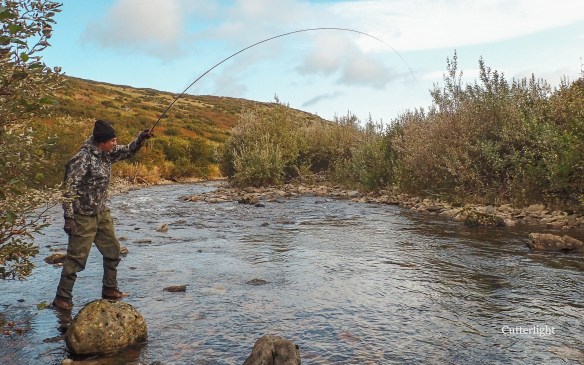
Look Ma! No reel! Determined fighters, even small Dollies put a nice arc in a tenkara rod. My connection with genus Salvalinus, the chars, began when I was about seven years old and caught my first brook trout, S. fontinalis, on Minister Creek in Pennsylvania. It’s an arbitrary thing, I suppose, to have a favorite fish, but if I had to name mine…