A Chignik River Springtime Float

We began the float by paddling our Alpacka Gnu to the north shore of Chignik Lake opposite of Chignik Lake village, which looks as tiny as it actually is tucked up against the Chignik Mountains. Chignik means “big winds.” Not on the morning of April 14. (For a look at this same float in December, 2017, see: Early December in Paradise – a Float down the Chignik River.)

It was one of those days when we woke with no plans, and now the day was making a plan for us. The sun slid through a few thin clouds hovering above snowcapped mountains downriver to the east, casting a silvery light across the glassy lake. From our dining room window we could see fish rising, leaving little rings on the lake’s surface.

“We should do a float,” Barbra said. “It’s beautiful.”

“I’ll get breakfast going if you’ll start putting our gear together,” I replied.

Within an hour we were on the water, our inflatable canoe gliding down the lake to the narrows where the water quickens to become Chignik River. Magpies and chickadees called from the banks and as we slipped past the White Spruce Grove we could hear a cacophony rising from the 30 or so Pine Siskins that have spent the winter here. Salmon fry, fingerlings and parr dimpled the river surface all round us, occasionally leaping clear to add a shimmer of silver to the morning light. A kingfisher rattled as it flew overhead. With the shoreline suddenly teaming with small salmon and sticklebacks, our kingfishers will soon be back in numbers. Maybe this will be the year I find a nest.

Behind polarized sunglasses we let our eyes to adjust to the water’s clear-green depths, searching the cobblestone riverbed for the year’s first Sockeyes, a big Dolly Varden or a rare steelhead. No luck, but a neighbor has already found two ocean-bright salmon in his net, the year’s first. A million more are on their way, and with them eagles, harbor seals and bears.

With the wind down and as much time as we cared to take to float the two miles to the barge landing, we let the easy current do most of the work, dipping in our paddles mainly to keep a true course. Being the first boat on the water, we had a good chance to encounter any ducks or swans that might be around. And you never know: bears are just beginning to wake up, and the shores are frequently patrolled by foxes, otters and mink and less frequently by wolves, lynxes and wolverines. We spoke softly, scanned the banks, and listened.

Long before we came around a bend and saw them, we could hear Tundra Swans and mallards honking and quacking in one of their favorite stretches of water. There were just two swans, stately, regal, gracefully gliding along the shoreline to our left. The mallards were a bit of a surprise. There must’ve been 20 or more drakes and hens paired up, feeding on vegetation in the shallows, warily bursting into fight as our raft drifted close.

Further down the river, we came upon a pair of Barrow’s Goldeneyes, a rare species in the Chigniks. We sometimes get Common Goldeneyes in the dozens, but years go by between reports of Barrow’s. It’s possible that they might nest here if they can find the right sort of rocky crevice or opening in an abandoned structure of some sort.

On the North side of the river there’s a feeder stream we’d been talking about exploring. So when we came to it, we beached the raft, tied it down and began hiking. The stream is just eight to 15 feet wide on average and shallow enough in places to cross in Muck boots. But the water runs cold and fast and clear over clean rocks and gravel, pooling and eddying in ways that are attractive to salmon. Peering into a riffle, I noticed what appeared to be one long, continuous set of redds – salmon nests – before I thought to give the banks a closer look.

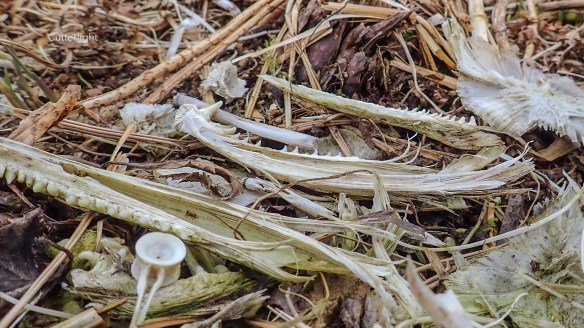
Above are the remains of a couple of salmon that became a brown bear banquet. Last fall, the Chignik system filled with the highest number of Pink and Silver Salmon anyone had seen in a long time. Fat autumn bears make for fat spring cubs. 

On both sides of the creek, the vegetation had been trampled down in broad swaths, a sure sign that bears heavily use this stream. Sure enough, when we looked down we found the area littered with the winter-bleached spines, gill plates, and tooth-filled jaws of Pink Salmon. We agreed that we’d have to make sure to fish the stream this fall when sea-run char marked in spectacular greens, reds and oranges would follow Pinks into the stream to pick off eggs that aren’t successfully buried in the redds. In places where stands of alder choked down foot traffic, the narrow trails had been worn inches deep into the soil, the work of centuries or perhaps millennia of brown bear comings and goings. Along the shoreline, every patch of sand held a carpet of fox tracks, some old, some fresh.

By the time we returned to our raft, the morning sun was high and temperatures had climbed into the 40s. Millions of tiny black midges were hatching, skittering across the water as they struggled to free themselves from the husks of their pupal stage – activity that was eliciting slashing rises from pinky-sized salmon as well as a few larger char. Mixed in with the midge hatch were a few dark stoneflies as well as big, creamy-brown caddisflies. With days warming and insects hatching, our swallows should be on their way.

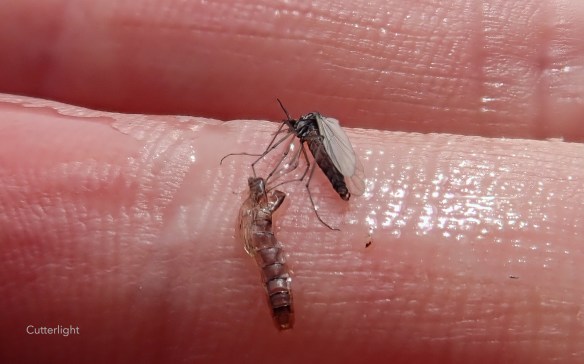
They’re small, but to some of our favorite fish and bird species (trout, char, salmon and swallows) they are indispensable food items. They’re midges, order Diptera from the Greek indicating that they use two wings to fly. During a hatch such as the one we found ourself in the midst of, midge pupae trap gas in their thorax, ascend to the water’s surface, shake off their pupal exoskeleton and emerge as winged adults – as this one on my ring finger has just done.

Drifting along the rocky bluff across from the salmon-counting weir that the Department of Fish & Game operates from June through September, we came across two large piles of sticks in the still leafless alders – active magpie nests, egg-shaped and roughly the size of a couple of basketballs. Our chickadees, too, seem to be establishing territory and selecting mates, and everywhere new green shoots are pushing up through winter-browned grass.

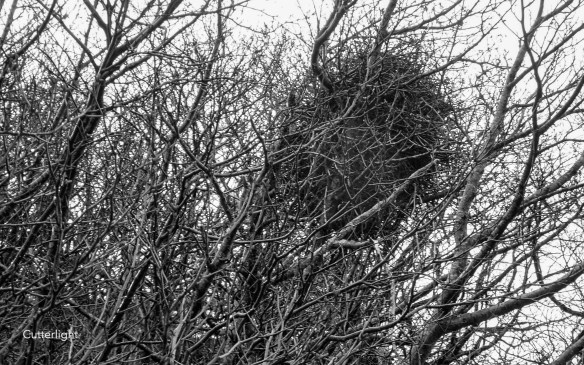
Chignik’s magpies began nesting about two weeks ago, giving away locations as they ferry large sticks into thick, brush growth along banks or into spruce trees. Somewhere in that jumble there very likely are half-a-dozen or so lightly speckled gray-green eggs. 

We beached the boat at the barge landing, deflated it, rolled it up, stuffed it in a backpack and began the three-mile hike home. Along the way we took note of bright green salmonberry shoots, the beginnings of wild irises, an unfamiliar warmth in the air. Earlier in the week it had snowed. But winter’s fighting a losing battle at this point. And every living thing knows it.

Another $8 Cookie, Please

The best chocolate chip cookie on the planet? There’s one way to find out!

Break out all the best ingredients you’ve been hoarding and make yourself a batch of these…now!

A couple of years ago, I read about a cookie that really sells for $8. Could I create a cookie worth such a price? Oh boy, yes! The secret to this cookie is not gold flecks or a butler to serve it, but fine ingredients and an investment of some time. The recipe demands high quality chocolates, browned butter, toasted almonds, and vanilla paste. Serving them slightly cooled from the oven is a key to the experience. I make a batch of dough, cookie scoop out portions and freeze them. When we are in the mood for these decadent beauties, I pop a couple in the oven while we are eating dinner in order to serve them as a perfectly warm $8 dessert.

The $8 Cookie

Ingredients

  • 1 large egg
  • 1/3 cup dark brown sugar
  • 3 tbsp granulated sugar
  • 1/3 cup unsalted butter, browned
  • 2 tsp vanilla paste
  • 1/2 tsp almond extract
  • 3/4 cup plus 2 tbsp all-purpose flour
  • 1/2 tsp baking soda
  • pinch salt
  • 1/3 cup toasted almonds, chopped
  • 1/3 cup good quality milk chocolate chips
  • 1/3 cup good quality white chocolate, chopped

Directions

  1. Mix the sugars and the egg well.
  2. Add in the browned butter.
  3. Mix in vanilla paste and almond extract.
  4. Stir flour, baking soda and salt into the mixture.
  5. Fold in the almonds and chocolate pieces.
  6. Chill the dough for at least 1 hour.
  7. Line a baking sheet with parchment paper.
  8. Preheat oven to 325 degrees F (160 degrees C).
  9. Scoop tablespoon-sized balls using a small ice cream scoop onto the baking sheet. Bake for 8 – 10 minutes.
  10. Let the cookies set on the baking sheet for about 3 minutes before removing them to a wire cooling rack.
  11. Continue to cool for another two minutes on the wire rack.
  12. Serve cookies while still warm.

Makes 12 cookies.

Move Over Bacon – Smoked Wild Salmon Fried Rice

A dollop of homemade ikura adds a tasty finishing touch to a bowl of Alaskan soul.

You know it’s a good day when a recipe for bacon fried rice shows up in your inbox. That’s just what happened a few days ago when our blog friend Chef Mimi posted a recipe for this very dish. Who doesn’t love fried rice? The slightly nutty flavor of sautéed day-old rice tossed with scrambled eggs and onions is a regular on menus from Kodiak to Kyoto. Add bacon, and a favorite truism comes into play: anything is better with bacon. Right?

Well, we actually didn’t ship out any bacon in our annual shopping this past year. Don’t worry, we’re hardly turning vegan. 😉 We just decided that as much as we love the flavor, the texture, the – well, everything – about bacon, it really isn’t good for our health. We’ve discovered that we can substitute smoked salmon in most recipes that call for bacon and be very satisfied.

Enter Chef Mimi’s recipe for bacon fried rice. A quick check of our pantry revealed that we had on hand most of the ingredients she uses and delicious substitutions for those we didn’t. A swap of smoked salmon for bacon, a switch of snow peas for petite peas, a few extra splashes of flavors we have around and, voila, we came up with an Alaska twist which came out beautiful and delicious. We give you Smoked Wild Salmon Fried Rice.

Smoked Wild Salmon Fried Rice

Ingredients

  • 4 cups cooked rice, leftover rice works great
  • 1 tbsp fish sauce
  • 1 tbsp soy sauce
  • 1 tbsp lime juice
  • 1 tbsp mirin
  • 2 tbsp extra virgin olive oil
  • 1 1/2 cups diced sweet onion such as Walla Walla
  • 1/4 cup chopped garlic
  • 1/2 cup diced carrots
  • 1 cup chopped snow peas
  • 3/4 cup canned corn
  • 2 large eggs, lightly beaten
  • 8 oz. smoked salmon

Directions

  1. Set out cooked rice to bring to room temperature.
  2. In a small bowl, mix together fish sauce, lime juice, soy sauce, and mirin. Set aside.
  3. In a large pan, heat oil over medium-high heat.
  4. Sauté onions for about 2 minutes.
  5. Add garlic and continue to cook for about 2 additional minutes.
  6. Add carrots and sauté for another 2 minutes.
  7. Mix in snow peas and corn. Cook for an additional minute.
  8. Gently stir in rice. Let mixture heat thoroughly.
  9. Make a well in center of pan.
  10. Add eggs and scramble them in the well.
  11. When eggs are just cooked through, add in salmon.
  12. Stir entire mixture so that all ingredients are evenly distributed.
  13. Toss the rice mixture with fish sauce mixture.
  14. Optionally, garnish with green onions, or salmon roe.
  15. Serve immediately.


Two Thumbs Up – Meet the Alula

Hovering as she hunted for flying insects at a Montana pond, this female Red-winged Blackbird was able to keep from “stalling out” by redirecting air flow over her wings with her alulae, the tufts sticking up on the fore edge of her wings.

It’s easy to find oneself marveling at the ease and grace with which a raptor or songbird flies – the seamless changes of direction, the steep climbs, the ability to hover, the smooth landings. Aiding in these intricate maneuvers is a small tuft of tiny feathers that the bird can manipulate to create a pocket of whirling air – a vortex – which helps it finesse some of its most amazing moves.

It appears that the alula evolved approximately 130 million years ago during the Cretaceous Period, first in genus Protopteryx and a few million years later in Eoalulavis, or Dawn Bird. Earlier species such as the bird-like dinosaur Archaeopteryx, Old Wing, lacked alulae, indicating that while they probably were capable of gliding, they most likely did not fly in the sense that modern birds fly.


Bearing 3 to 5 small, asymmetrical flight feathers, the alula is found on modern bird species as well as on some pre-avian dinosaurs that were capable of flight. It’s the bird’s first digit, analogous to the human thumb. Illustrations courtesy of: Muriel Gottrop – https://commons.wikimedia.org/wiki/File:BirdWingFeatherSketch.png

Fancy Prices & Fancy Ingredients? Don’t Bother. Try this Easy, Zesty Raspberry Chipotle Sauce Recipe

A little sweet and a little heat, this couldn’t-be-easier raspberry chipotle sauce brings another dimension to Thai-spiced scallops (above), broiled fish fillets, chicken, pork, wild game and grilled vegetables.

The past two years, we’ve been able to pick a surfeit of big, beautiful raspberries from a patch gone ferrel a half-mile from our home here on Chignik Lake. Barbra takes this fruit and turns out tangy freezer jam as well as traditional jam. The jams in turn go into airy raspberry mousse, raspberry almond tarts, mixed with our steel cut oats for breakfast, stirred into our homemade yogurt, drizzled onto lemon bars and cheesecakes, and spread on our peanut butter sandwiches. We even add a touch of raspberry to one of our favorite cocktails, Raspberry Bourbon Berets.

One of my favorite ways to use our jam is in raspberry chipotle sauce. It’s quick, it’s easy, it keeps well in the fridge, and it’s absolutely terrific on fish, pork and poultry. The directions couldn’t be easier, and your favorite store-bought raspberry jam will probably work fine. Try this on salmon fillets.

Raspberry Chipotle Sauce

Ingredients & Directions

Mix together 1/2 cup raspberry jam, 1/2 tablespoon balsamic vinegar, and 1/2 teaspoon powdered chipotle pepper. Alternatively, you can substitute a favorite powdered chile blend, but choose one with a good amount of chipotle as the smokey flavor really compliments fish, meat and poultry.

Hope you’re sitting down for this one! Chocolate Tahini Overnight French Toast

Overnight chocolate tahini french toast – Sunday brunch is served.

If you have been following along, you’ll know that we get most of our groceries delivered via the United State Postal Service. The majority of our food mail comes from either Amazon or our “local” Fred Meyer grocery store 466 roadless miles away in Anchorage. The same goes for our co-workers here at the Lake. Once in a while, one of my colleagues receives a wrong order or too much of something and I become the recipient of some kind of random ingredient. When that happens, I like to imagine that I’m a contestant on one of those cooking shows that presents the competitors with a basket of ingredients – usually showcasing something foreign or little-known to the chef. Of course, I have the luxury of time and the Internet to compliment my culinary imagination.

My last “gift,” a jar of tahini, has been sitting on my shelf for a few weeks. Tahini is best described as a peanut-butter style condiment made from sesame seeds. It has a nutty flavor. But is has a sharpness to it, in my opinion, that can overtake the flavor. My first experience with tahini was as an ingredient in hummus. I actually prefer making hummus without tahini (see my recipe here).

So, the jar had been sitting, waiting for inspiration, until last Sunday. While perusing the culinary blogs I follow, I came across an article for chocolate tahini challah buns from Smitten Kitchen. The buns were beautiful. The idea of chocolate and tahini together evoked memories of a delicious treat I used to regularly enjoy – chocolate halvah – a rich Middle Eastern confection made of sesame flour and honey. Eggy challah bread is something I enjoy making and we both enjoy eating. This seemed like the perfect recipe to try on a baking Sunday.

We opted to drizzle a lemony glaze atop our buns and absolutely loved them. Yum! They were were loaded with complimentary flavors and weren’t overly sweet, making them worth the investment of time they required. (Be ready for hours to let the dough rise.) An abject lack of willpower had us eating half the buns on the day they were baked. But that meant more than half the buns were left over the next day. They were already partially dried out and had lost their appeal. How to resurrect them? A stroke of brilliance followed. A great way to revitalize day old bread is to turn it into overnight French toast.

Our review? Holy smokes! Forget eating the buns on the first day and go straight to the overnight French toast! The challah soaked up the creamy, eggy mixture and puffed up to a golden brown when baked. The swirled flavors of the chocolate and tahini couldn’t be beat. The presentation of lovely chocolate stripes sprinkled with sesame seeds and drizzled with a lemony glaze is a guaranteed home run for your next Sunday brunch, or Monday breakfast, or Tuesday dinner. 😉

Chocolate Tahini Overnight French Toast

Ingredients

  • 4 or 5 chocolate tahini challah buns, enough to fill the baking dish (see recipe below)
  • 4 eggs, beaten
  • ½ cup whole milk
  • ½ cup heavy cream
  • 1 tsp vanilla extract
  • 4 tbsp granulated sugar

Directions

  1. Lightly grease an 8 x 8 inch glass baking dish.
  2. Cut buns into 9 pieces, 3 slices in one direction and then 3 slices in the other (think tic-tac-toe.
  3. Spread the bun cubes evenly in baking dish.
  4. Mix together eggs, milk, cream, vanilla, and sugar.
  5. Pour egg mixture over cubes. Cover and refrigerate overnight.
  6. Remove the baking dish from refrigerator 30 minutes before baking.
  7. Preheat oven to 350° F (175° C).
  8. Cover dish with foil and bake for 30 minutes.
  9. Uncover and continue baking for 25 – 30 minutes. Surface should be lightly browned and the center will be firm.

Chocolate tahini bun

Chocolate Tahini Challah Buns

Recipe from Smitten Kitchen

Ingredients

Dough

  • 2 large eggs
  • 1 large egg yolk
  • 1/4 cup granulated sugar
  • 1/2 cup vegetable oil
  • 2/3 cup milk
  • 3 3/4 cups all-purpose flour, plus more for the counter
  • 1 packet instant yeast
  • 1 1/4 teaspoons salt
  • Butter for baking pan

Filling

  • 3/4 cup semi-sweet chocolate chips
  • 1/2 cup unsalted butter
  • 1/2 cup powdered sugar
  • 1/4 cup cocoa powder
  • 1/4 cup tahini, well-stirred
  • 1 large egg, beaten
  • Sesame seeds

Glaze

  • 2 cups powdered sugar
  • 3 to 4 tablespoons juice

Directions

  1. In a large bowl, whisk eggs, yolk, sugar, oil and milk.
  2. Add flour, yeast and salt.
  3. Mix until it comes together. Continue to knead dough for 5 to 7 minutes.
  4. Oil a large bowl and let dough rise at room temperature for 2 to 2 1/2 hours, until slightly shy of doubled.
  5. Butter a 9×13-inch or equivalent size baking dish, or coat it with nonstick spray.
  6. Melt butter and chocolate together until smooth.
  7. Stir in powdered sugar, cocoa and tahini. Mixture should be a spreadable consistency.
  8. Assemble buns. On a very well-floured counter, roll out dough into a rectangle about 18 inches wide (side facing you) and as far away from you (i.e. length) as it comfortably goes, usually 12 to 15 inches.
  9. Dollop chocolate mixture over and spread it over dough evenly.
  10. Roll dough in a tight spiral.
  11. Cut log very gently — it’s going to be a soft mess, use a sharp serrated knife, sewing thread works well here too — into 1 1/2-inch to 2-inch segments.
  12. Arrange cut side up in prepared pan.
  13. Beat egg in small bowl. Brush tops of buns and tops of sides with egg and cover with plastic wrap.
  14. Leave it at room temperature to proof for another 60 to 90 minutes, until puffed a bit.
  15. Heat oven to 350 degrees F.
  16. Gently brush tops and sides with egg wash again and sprinkle with sesame seeds. Bake for 30 minutes, until golden-bronzed.
  17. Let cool slightly.
  18. Whisk glaze ingredients until smooth.
  19. Drizzle this over the buns right before serving.

Corrupting a Child into the Art of Angling: a Journey from Granny Knots to 8-Weights

The 2018 cover of the Southwest Alaska Fishing Regulations featuring my photography: I was out on the ice last winter when I happened upon these two cuties (Barbra’s students) trying their luck for Dolly Varden Char and smelt on Chignik Lake. Teaching a young person to fish is an action that can have long legs and far-reaching positive consequences.

My father started my little sister and me with granny knots, #6 hooks, 10 lb test line, wine cork bobbers and solid fiberglass poles sans reels. Hers had a red handle. Mine was green. Half-a-mile below our house down the winding Route 322 hill lay Piney Dam Reservoir, an impoundment on western Pennsylvania’s Clarion River which, back in those days, was fairly fishless thanks primarily to acid runoff from coal strip mines and effluent from a paper mill 60 miles upstream. This was in the days before President Nixon’s executive order establishing the Environmental Protection Agency. The river looked clean – but the acid runoff left it relatively sterile, bereft of the web of aquatic weeds, tiny crustaceans and insect that make up a healthy ecosystem. These days, the coal mines are mostly gone, grown over with mixed forests of white pine and oak and other hardwoods that have reclaimed the landscape from the war-zone look I remember from childhood. Thanks to EPA regulations, the mining operations that remain are much more responsibly operated. Meanwhile, the paper mill modernized, also guided by EPA regulations. Now trout, bass, muskellunge, decent-sized panfish and, I’m told, even walleyes swim in waters that back in my day held little more than a few stunted sunfish, perch, shiners and bullheads.

Given time, if the Earth isn’t damaged too much, it can heal.

On the sunny side of the valley at the foot of the old 322 bridge was a small, wooden, long-abandoned dock. The steps leading down the steep embankment were rotting and coming apart. The dock itself wasn’t in much better shape. But unclaimed, we called it ours, as in “Let’s go fishing at our dock.”

Even digging up a coffee can’s worth of worms in preparation for those trips was an adventure, and with my dad being a biologist, something of a science lesson as well. For starters, we discovered that there were different kinds of worms; the little red ones worked best. And turned up by Dad’s spade would be other creatures: beetles and beetle larvae, centipedes and millipedes and alien-looking chrysalises. Sometimes garter snakes and little green snakes would glide out of the weeds ahead of us, and a rock turned over might reveal mice tunnels, big black crickets or shy red-backed salamanders with their protruding, otherworldly eyes.

There are four indispensable characteristics an adult must possess if he or she expects to successfully corrupt a child into the art of angling:

  1. The adult must know where there are fish an inexperienced child would be able to catch…
  2. …and he or she must know how to catch those fish in the easiest manner conceivable.
  3. Once conditions one and two have been met, the adult must possess the abundance of patience necessary to allow the young person to figure out how to catch those fish.

To his credit, although my dad took along his own outfit, after casting far from the cover of the dock out into featureless water where there would be no fish, he would set his rod down, ignore it, and focus on my sister and me. That way, if one of us might say, “Dad, you should fish too,” he could truthfully reply, “I am fishing.”

There were always a few panfish hanging out in the dock’s shade – diminutive bluegills and pumpkinseeds, a shiner or two, and our favorites for their combination of size, brilliant orange fins and qualities on the table, yellow perch. The shiners, too bony to deal with, went back into the water. As for the rest of the fish, five-inches was enough to make a “keeper,” and those went on a hand-made stringer. As long as we didn’t fish it too often, the dock could be counted on for a meal’s worth of fish.

The fourth characteristic necessary to develop an enthusiastic young fisherman is probably the most important. The adult must know when enough is enough. My sister and I were diligent in our attention to our wine-cork bobbers, staying with them as they rocked in the wake of ski boats, not moving our eyes from them for long minutes when they just sat there on placid water doing nothing. We didn’t miss many bites. But as time went by and we thinned the dock’s population of fish, bites became fewer and further between. The sun climbed higher and grew hotter. Small stomachs started to growl.

My father seemed to have a sixth sense for impeccably timing the question, Are you ready to call it a day?

No! Not yet! Let’s stay! Just one more? We’d plead.

Well, my dad would wisely say while enthusiasm was still running high, We’ve got enough for a meal. Your mother’s going to be wondering where we are. It’s time to go.

Aw-ww! That’s the response you hope to hear from someone you’re trying to teach anything to when it’s time to call it a day. Aw-ww, in at least two syllables.

Weeks went by between our trips to the dock, but my sister and I never lost track of whose turn it was to carry the stringer back to the car and triumphantly in through the kitchen door. Down in the basement, Dad would spread out yesterday’s Pittsburgh Press and we’d get to watch as he cleaned the catch. Too small to bother filleting, he’d scale the fish and gut them and remove their heads, so that by the age of six I knew enough about fish anatomy to pass a biology exam. We’d even open their stomachs to examine the dragonfly larvae, midge pupae and other tiny animals they fed on.

Upstairs in the kitchen, Mom made them Appalachian style – rolled in cornmeal seasoned with salt and pepper and fried golden brown and so crisp their tails were like potato chips. The three of us unerringly remembering whose plate the catch-of-the-day belonged on – usually a nice perch. Bread and butter and a big salad of lettuce, tomatoes and cucumbers from my dad’s garden rounded out the meal. Those summertime meals of fresh fish and garden salad are far and away my favorite childhood food memory.

Leftovers? Or Canned Salmon’s all You’ve Got? No Worries. Salmon Avocado Sandwich

Whip up this restaurant-worthy salmon sandwich in no time with a can of salmon, an avocado, and a couple of ingredients you probably already have on hand. Serve it with something creative from your Soda Stream (that’s a Currant Fizz in the photo) or a glass of sparkling water with a slice of lemon.

Canned salmon is cost-effective, convenient and delicious. In fact, a lot of us who catch all the salmon we need to get us through the year can our own. It’s great in salmon burgers, salmon dip, salmon sausage, as a pasta topping or in any number of other recipes. When we lived in Mongolia, canned Alaskan salmon was the only salmon readily available. We always have this versatile, tasty ingredient in our pantry. Of course, you can easily make this sandwich with grilled or broiled salmon – or leftovers. We’ve made this sandwich with all of that, and have found king, red, silver and pink salmon all to work nicely. For environmental reasons, we don’t use Atlantic salmon.

Ingredients & Directions for Salmon Spread (makes 2 sandwiches)

In a bowl, combine.

Taste for salt and seasoning and set aside.

Ingredients & Directions for Avocado Spread

In a bowl, combine:

  • 1 avocado
  • 1 tsp lime juice
  • 1/2 tsp chipotle based spice mix
  • a little Cholula Chili Lime or similar hot sauce

Spread the two spreads on a toasted bun. Serve with tangy beverage such as sparkling water with a slice of lemon or a crisp ale.

Rise and Roast! Sunday Morning Stout Slow Cooked Moose

Aromas of mushrooms, tarragon, Italian herbs and root vegetables pulled together with a sweet, rich coffee stout make the temptation to steal a taste of this moist, nearly falling apart roast irresistible.

With winter hurling itself at us one more time last weekend and with a two-and-a-half pound cut of moose in the fridge, I decided it would be the perfect day to try something new – a slow-cooked roast. While I had in my imagination something beef brisket like, moist and practically falling apart, having never cooked anything like that, I wasn’t really sure how to go about the task. The cut of moose I had was very lean. Meanwhile, Barbra’s home-brewed Sunday Morning Stout, a rich, sweet, dark beer with a hint of coffee had just finished bottle-aging. How about a slow-cooked Sunday Morning Moose Roast?

I’m happy to report that after six hours in the oven, the roast came out moist, flavorful and pulling apart with ease. That evening, we served this dish on rice with a wonderful bottle of Malbec while snow fell outside our dining room window. Over the following days, the moose was featured in omelets, pulled moose barbecue sandwiches (yum!), on lumaca rigata pasta (the hollow shape captured the broth perfectly), and, once the moose meat was gone, as a hearty vegetable soup.

This dish was surprisingly easy. Although I prepared it in a sauteuse in the oven, I’m sure this recipe would work well in a slow cooker. Canned soup soup or broth could be substituted for the from-scratch broth described below, but don’t skimp on the stout. Use a generous amount of a good one. Beef or lamb would no doubt be delicious in this recipe as well. Add a few chunks of rutabaga or parsnips for additional flavor.

Sunday Morning Moose Roast

You will need an oven-safe sauteuse with a lid or a lidded pot large enough to hold the meat and vegetables. Alternatively, a slow-cooker can be used.

Ingredients

  • 2 to 3 pound cut of meat suitable for roasting. I used moose shoulder.
  • 4 cups dehydrated mushrooms* (or use 1 pound fresh mushrooms and beef or mushroom broth)
  • 1 cup cream
  • 16 ounces of a favorite stout beer (I used a coffee stout)
  • small whole potatoes
  • (optional) rutabaga, parsnips or other root vegetables, cut into chunks
  • 3 shallots, sliced (or substitute 1 sweet onion)
  • 1 bulb garlic, cloves peeled and slightly crushed, but left whole
  • carrots cut into chunks (or use baby carrots)
  • 2 or 3 stocks of celery, cut into 1 1/2 inch pieces
  • Worcestershire Sauce
  • freshly cracked black pepper
  • sea salt
  • tarragon
  • Italian herb blend
  • extra virgin olive oil

Directions

  1. Place oven rack on next to lowest level. Preheat oven to 220° F.
  2. Season meat liberally on all sides with cracked pepper and sea salt. Set aside.
  3. Place dehydrated mushrooms in a sauteuse or other sufficiently large pan and add water to hydrate – about 6 to 8 cups. Bring to a boil, then cover and reduce heat to simmer till mushrooms are tender.
  4. Remove mushrooms and set aside but keep the mushroom broth.
  5. Stir cream into the mushroom broth, add tarragon, Worcestershire sauce and sea salt to taste. Continue cooking at a high simmer until broth is slightly reduced.
  6. Stir in stout and add Italian herb blend. Continue simmering over low heat.
  7. Meanwhile, in a separate frying pan, heat olive oil over medium heat. Add shallots and garlic and sauté until just soft. Add shallots and garlic to mushroom broth.
  8. Remove pan from heat. Place seasoned meat into broth.
  9. Add mushrooms and all the vegetables except for the celery, arranging them in the liquid around the meat. There should be sufficient liquid to cover just over half the roast.
  10. Cover the pan and place into oven.
  11. After 4 hours, add the celery. Cover and continue cooking for two more hours.
  12. After 6 hours, remove pan from oven. Taste broth to determine if additional salt or seasonings are needed.
  13. Serve over rice, on pasta or as is. Accompany with the same stout used in cooking, or with a full-bodied red wine such as a Zinfandel, Cabernet or Malbec.

*The Dried Gourmet Mushroom Mix from the Wild Mushroom company works particularly well in this dish.

Sunshine on a Snowy Day – Raspberry Lemon Curd Bars

Sunshine on a winter’s day… Lemon bars drenched in tangy-sweet raspberry jam

I love chocolate – in every form, flavor, and dish. I love dark, white, and milk chocolate. Except for a weird, avant-garde chocolate bar infused with pepper (??), I can’t think of a chocolate creation I haven’t enjoyed. Almost neck-in-neck with chocolate are desserts made with lemon. The difference with lemon is that it not only has a wonderfully tart flavor, but it also has a strong seasonal connection to summer. One bite or sip of lemon brings me back to sunshine splashed afternoons and evenings cooled by gentle breezes sitting in our little piece of paradise behind our home in California among Meyer lemon trees. When we moved to Alaska, I even made up a gallon’s worth of Meyer lemon simple syrup in order to ease the separation from those prolific trees.

As we hit the middle of March, our minds drift toward Spring! In our former life, I would be itching to get the planting pots and garden beds ready. In Chignik Lake, I’m ready to pull the Pack Rafts out and head down nearby rivers. Mother Nature has had three little words in response to these inclinations…”Not. So. Fast.” All the snow we didn’t see this past winter has been just now swirling around our windows and creating lovely white drifts. Our lake iced over, started to thaw, and is now covered in ice again.

As Jack tends to his culinary diversion, a slow-cooked moose roast, I decide on my own diversion…one that will bring a little sunshine into our home. I took a tried and true lemon curd bar recipe from my Williams and Sonoma Baking Book and adapted it with items from my bush pantry. All I can say is Wowee! After the initial mix of sweet and tart lemon, you are rewarded with a blanket of pure raspberry bliss. A definite blast of summer, in the best way possible.

Raspberry Lemon Curd Bars

Ingredients

Crust

  • 1 cup all-purpose flour
  • 1/3 cup granulated sugar
  • pinch salt
  • pinch cinnamon
  • ½ cup unsalted butter, melted

Filling

  • ¾ cup granulated sugar
  • 2 tbsp all-purpose flour
  • pinch salt
  • 3 large eggs (I used powdered eggs)
  • ½ cup lemon juice (I used good quality bottled lemon juice)
  • 3 tbsp heavy whipping cream

Topping

  • Raspberry jam (I used freezer jam which has a much brighter color and flavor)
  • Confectioners’ sugar

Directions

  1. Make crust.
  2. Preheat oven to 350° F (180° C).
  3. Grease an 8-inch square glass baking dish.
  4. Mix crust ingredients together.
  5. Press dough into bottom of baking dish.
  6. Bake for 20 minutes. Crust should be a pale golden color.
  7. Let the crust cool in the baking dish on a wire rack while you prepare filling.
  8. Reduce oven temperature to 325° F (165° C).
  9. Whisk together filling ingredients.
  10. Pour the mixture over the baked crust.
  11. Bake until filling is set, about 20 minutes. It may slightly jiggle when dish is shaken.
  12. Let lemon bars cool in the dish on a wire rack for at least 30 minutes.
  13. When ready to serve, run a knife around the edge of the pan. Cut into 12 or 16 rectangles.
  14. Remove from dish with a spatula and place pieces to be served on a serving dish.
  15. Spoon desired amount of jam on each piece.
  16. Dust each piece with confectioners’ sugar right before serving.