Jiro Dreams of Sushi: A Philosophy of Life and Sushi

Yanagiba (sushi knife), ohashi (chopsticks) properly resting on an ivory spotted seal hashioki, and David Gelb’s documentary of world-renowned sushi chef Jiro Ono. Let the feast begin.

The shots of sushi will wow you. Segments depicting 85-year-old Jiro Ono magically transforming rice and fish into pieces of art that are at once too beautiful to be eaten and yet must be eaten will mesmerize you. The manner in which he and his 51-year-old son run Sukiayabashi Jiro, a 10-seat sushi restaurant in the underground subway system in Tokyo’s ritzy Ginza District will, perhaps, prompt you to make subtle (or not so subtle) changes in the way you run your own kitchen. At the very least, you are likely to come away from the film with a heightened appreciation of tamagoyaki – the grilled egg dish frequently served on nigiri sushi menus. Sukiabashi Jiro is the only sushi restaurant in the world to earn Michelin’s top rating – the coveted three stars. The simple definition of a three-star restaurant is this: a restaurant that by itself makes a trip to that country worthwhile.

As a self-taught chef, as a father, as a person who is seeking to perfect my own path in life, and as one who lived in Japan for nine years and came to deeply appreciate the Japanese sensibility toward life, this film profoundly moved me. Jiro Ono embodies the characteristics of the shokunin – a master craftsman or artisan who, while possessing superb technical skills in his field, is also aware of his responsibility to model an honorable life and to look out for the welfare of others. In the film, Masahiro Yamamoto, one of Japan’s leading food critics,  identifies the five attributes of a great chef. These attributes are no doubt valued by all shokunin.

1. A serious attitude toward one’s work

2. Aspiration to improve – to strive for perfection

3. Cleanliness (which includes a proper order in one’s life and work)

4. Lead rather than collaborate

5. Bring passion to one’s work, (and through that passion to discover moments of ecstasy)

I’m going to add a sixth element to Yamamoto’s list. If Jiro’s life is about striving for perfection, the question is begged, “Perfection to what end?” To what purpose are the above five attributes?

It is this: They are all aimed toward providing others with an ultimate experience. Jiro dreams of sushi, yes. But what he really dreams of is providing his customers with a perfect dining experience. That is the sixth attribute: The desire to provide others with a penultimate experience.

Some of these attributes are, perhaps, antithetical to current western thinking. Therein lies the core of the criticisms of this film. Aren’t we supposed to value collaboration? Is the emphasis on cleanliness really so important? Is Jiro truly interested in others, or is he merely a shallow, self-inflated ego with no meaningful connection to other human beings – including his wife and his two sons? Doesn’t taking one’s work too seriously lead to imbalance in life?

I think this much is fair to observe: The path Jiro Ono has chosen in life is not a path that would suit everyone. But it is a path I admire. In the director’s cut, it is mentioned that a regret is that Jiro’s wife was unable to be in the film. This seems to be owing to the health of a woman in her 80’s, not about a failed partnership. His sons are both key players in the film, and speak of their father with honor, respect and love. They have both chosen to follow in his line of work, to embrace his teaching and have become highly respected sushi chefs in their own right. In turn, Jiro speaks with pride and admiration of both of his sons. As a father, I can very much relate to Jiro’s philosophy regarding child-rearing. You spend your life teaching and guiding, and in the end you hope a good bit of it takes root. In both of Jiro’s sons, his teaching did stick, his guidance payed off, and because his sons worked for many years in his restaurant, he ultimately spent more time with them than most fathers ever spend with their children.

As to taking one’s work too seriously and carving out one’s own path rather than collaborating, I grew up in a family wherein, not just in my nuclear family but in all the uncles and aunts in my extended family, the life philosophy most frequently espoused was an admonition to not take work (or anything else) too seriously. It was a philosophy that did not work for me, and ultimately inspired an opposing philosophy.

At the age of 4o, I began the long, sometimes arduous, deeply satisfying process of remaking my life. Part of the remaking has been rooted in a newfound freedom – a self-given permission to pursue life with renewed passion, dedication and a commitment to honor and excellence.  As I move forward with this life as a sailor, chef, writer, photographer, father and husband, this film that so eloquently captures the life and spirt of a true shokunin resonates.
Chasing the Elusive Perfectly Flaky Crust: Double-Crust Apple Apricot Pie

This rustic-style pie evoked images of apron-clad moms setting out steaming-hot baked goods on windowsills to cool. The scent of baked apple and cinnamon filled the entire house, contributing to the sense of nostalgia.

I’d always heard that baking the elusive flaky pie crust was so difficult, it wasn’t worth the time and effort. The standard advice was, “Buy pre-made crusts. They’ll come out better.” But as someone who has baked her own graham crackers, I wasn’t so easily deterred.

After doing some research, I began to understand why people shied away from making their own crusts. Fastidious attention to temperature of the ingredients seems to be the key. My first crusts came out fairly decent, but I wasn’t completely happy with the texture. Then this month’s Food & Wine magazine ran an article about making a perfectly flaky crust.

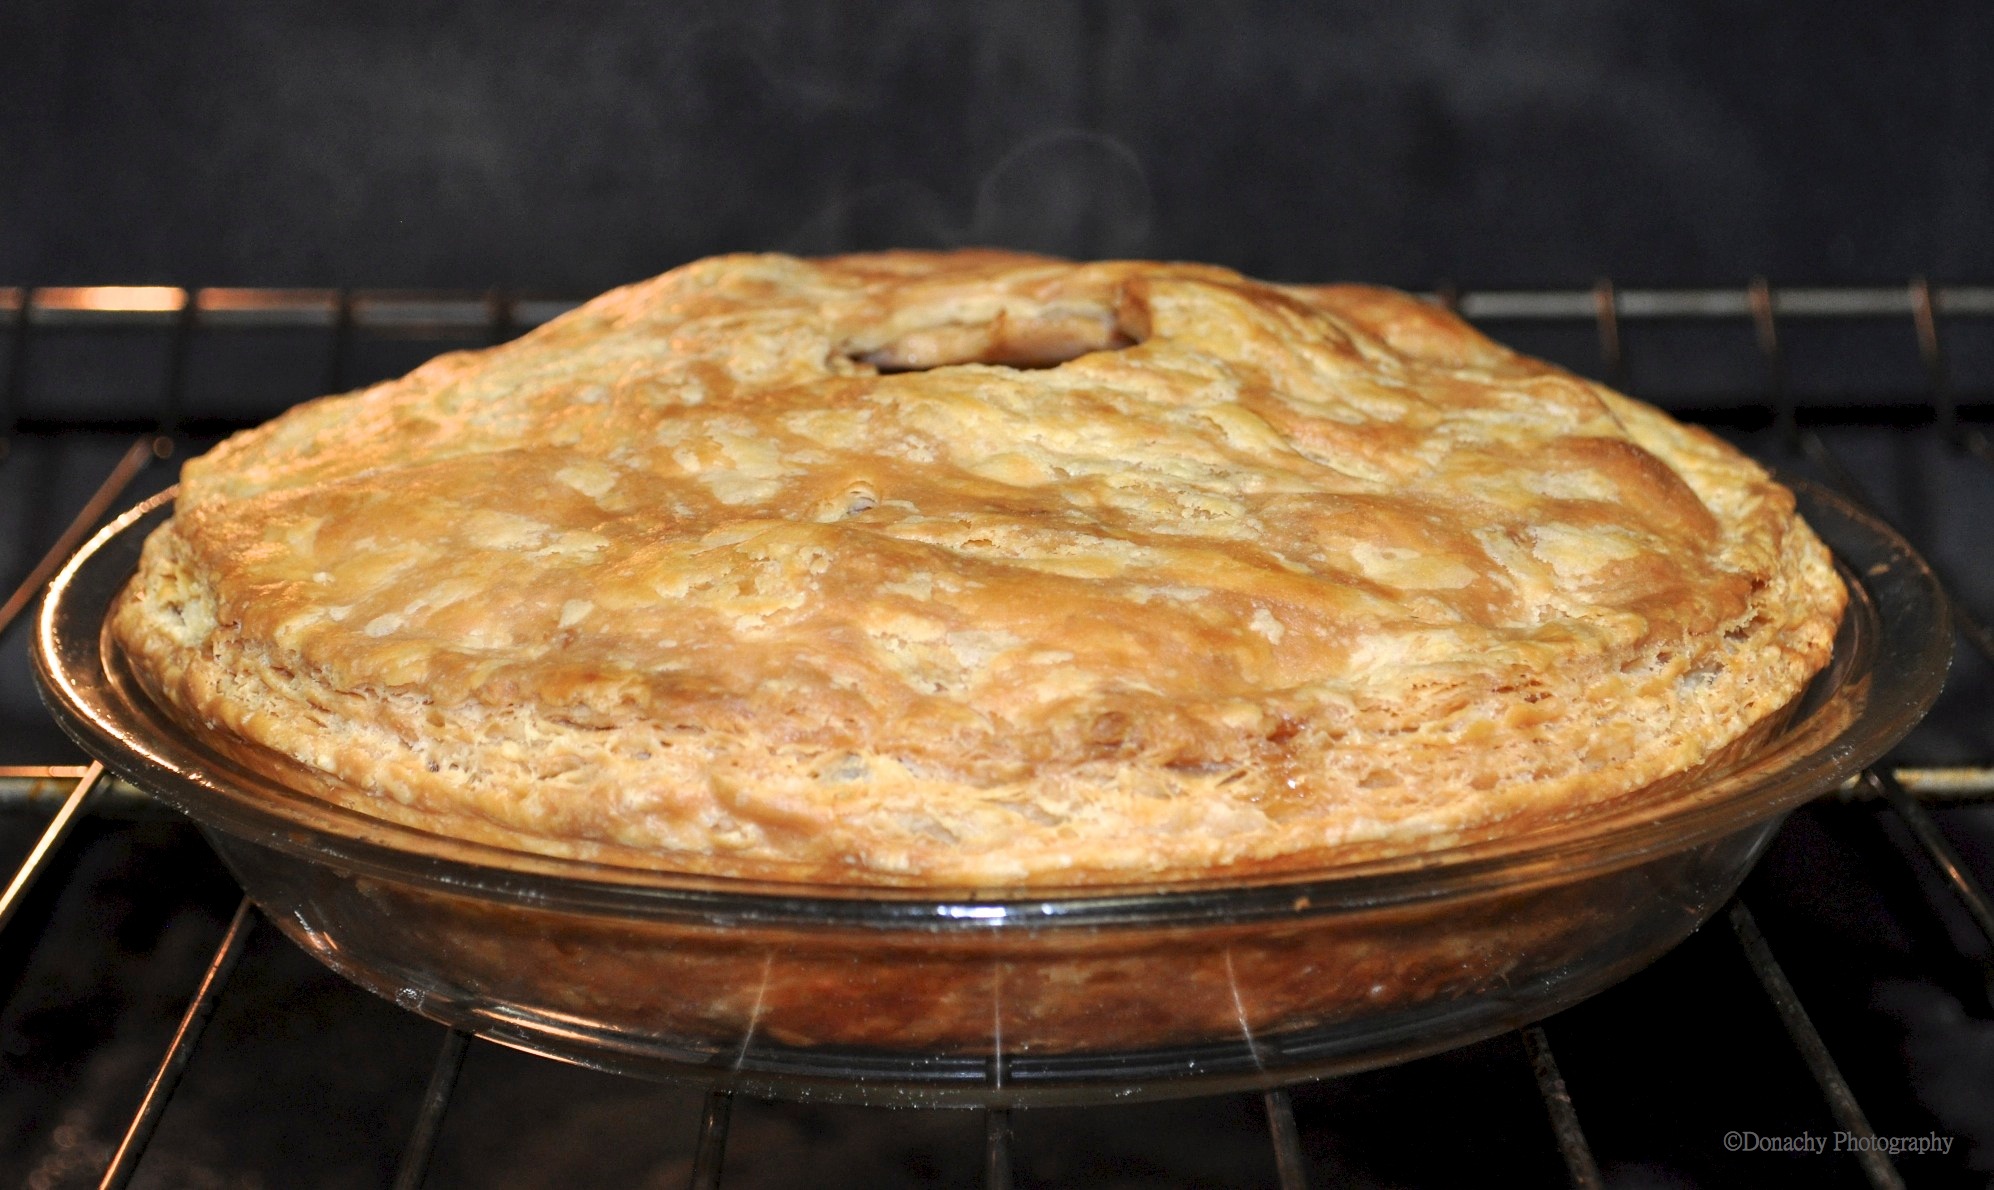
Along with directions for “perfectly flaky butter pie dough,” the magazine also had a recipe for a double-crust apple-apricot pie. Perfect! Granny Smith apples are available at our Native Grocery Store, and dried apricots are a staple in our pantry. The finished pie came out of the oven steaming with the scent of apples and apricot and with a golden-brown crust puffed up into a flaky  top.

Double-Crust Apple-Apricot Pie

Ingredients

  • 1 tbsp all-purpose flour
  • dough for two pie crusts (see link below for pie crust recipe and directions)
  • 1 egg white, beaten
  • 5 large Granny Smith apples, peeled, cored, quartered, and cut into thick slices
  • 1/2 cup granulated sugar
  • 1/2 cup diced dried apricots
  • 1 tsp finely grated orange zest
  • 1 tsp ground cinnamon

Directions

  1. Roll out a little more than half of the dough into a 13-inch disc. Transfer to a 9-inch glass pie dish.
  2. Roll out the remaining dough into a 12-inch disc and keep in refrigerator until you are ready for it.
  3. Preheat oven to 400 degrees F.
  4. In a large bowl, toss together apples, apricots, orange zest, flour, cinnamon and sugar.
  5. Pour apple mixture into crust.
  6. Brush edge of crust with egg white. This will help seal the two crusts together.
  7. Place second pie crust on top of first. Trim edges and decoratively crimp. Cut slashes in top crust to allow steam to vent.
  8. Place oven rack on lower third of oven. Place pie on a baking sheet and put in over to bake for 1 hour. Cover edges of pie with a pie ring or aluminum foil during last 20 minutes of baking to prevent burning.
  9. Remove pie from oven and allow to cool before serving.

We served this pie with extra rich vanilla ice cream, which was excellent. A slice of sharp cheddar cheese is another traditional option.

Recipe adapted from Food & Wine Magazine, November 2012 issue.

Quiche de Poireaux: Leek Quiche with Oysters and Smoked Salmon

Just a hint of spice is enough in this quiche that combines sautéed leeks, small oysters and smoked salmon.

When a friend recently bestowed upon us three large leeks, our thoughts converged on a family favorite: leek quiche. Craig Claiborne includes a recipe for this classic dish in his New York Times Cookbook. His Quiche de Poireaux includes ham, which, in our kitchen, had become bacon and more recently smoked salmon. One of the things we like best about quiche is its versatility, working equally well as a breakfast, lunch or dinner item.

When choosing oysters for this quiche, choose the smallest you can find. If fresh oysters aren’t available, canned oysters such as Pacific Pearl are an excellent substitute. Add spices sparingly so that the flavor of the sautéed leeks shines through. Accompanied by a lightly chilled glass of viognier, a morning with not much to do, and a crossword puzzle, this quiche makes an excellent breakfast or brunch entrée.

Ingredients:

  • 1 unbaked, standard-sized pie crust (or use one a bit deeper than usual)
  • 4 large eggs
  • 1/2 cup heavy cream
  • 3/4 cup milk
  • 2 large leeks, diced into thin circles
  • 6 oz extra small oysters (fresh or canned)
  • 3 oz smoked salmon, broken into chunks
  • 1 cup shredded Swiss, Gruyére or similar cheese
  • 2 healthy pinches ground smoked chipotle pepper
  • healthy pinch arbol or cayenne pepper
  • couple dashes paprika
  • 1/2 tsp teaspoon oregano
  • several grinds black pepper
  • 1/2 tsp smoked sea salt
  • 1 tbs olive oil
  • 1 tbs butter

Directions:

  1. Shape pie dough to pan. Cover and refrigerate to keep cool.
  2. Preheat oven to 400 degrees F.
  3. Heat a large frying pan over medium heat, add olive oil, butter and diced leeks. Stir occasionally, until leeks separate and are tender – about 5 minutes. Place in a bowl and set aside to cool.
  4. In a large mixing bowl, whisk eggs together till well-blended. Add seasonings, salt, pepper, milk and cream and stir together with a spoon. Stir in cheese and leeks. Last, gently stir in smoked salmon and oysters, taking care not to break them up.
  5. Remove pie shell from refrigerator and pour mixture into chilled shell. Place pie pan on baking sheet and put into preheated oven.
  6. Bake at 400 degrees for 15 minutes.
  7. Lower oven temperature to 375 degrees F. Cover exposed pie crust with foil or pie ring (to prevent crust from burning) and continue baking for 30 minutes, or until quiche is set. (The filling will no longer jiggle when gently shaken.)
  8. Remove from oven and let cool on a wire rack for 10 minutes before serving.

Serve with fresh fruit such as grapes, melon, sliced pears or other fresh fruit. Given the mildly spicy nature of this quiche, it would pair well with a viognier.

Pear and Ricotta Tart

Creamy, sweetened homemade ricotta cheese makes for a lighter, healthier delicious alternative to cream cheese in this cheesecake-like tart. In this version, slices of pears have been brushed with peach preserves prior to baking.

I was surprised how easy it was to make a ricotta-style cheese at home. My first batch of ricotta went into Jack’s moose cannelloni. A second batch was split between blintzes and a pear and ricotta tart. Infused with vanilla, the beaten egg and ricotta base was smooth, creamy and light. The sliced pears were brushed with a vanilla peach jam which added another subtle layer of flavor.

Pear and Ricotta Tart

Ingredients

  • pie crust
  • 2 cups ricotta cheese
  • 3 eggs
  • 1/2 cup granulated sugar
  • 1 tsp vanilla extract
  • 2 d’Anjou pears, halved, cored and sliced
  • 1 heaping tbsp of peach preserves

Directions

  1. Preheat oven to 375 degrees F.
  2. Press pie dough into a 9-inch springform pan and bake for 5 minutes then remove from oven.
  3. Reduce oven heat to 350 degrees F.
  4. Beat together ricotta, eggs, sugar and vanilla.
  5. Pour ricotta mixture into pre-baked pie shell.
  6. Arrange sliced pears on top of ricotta mixture.
  7. Brush pears with preserves.
  8. Bake for 50 minutes, or until tart no longer jiggles in the center.
  9. Let cool. Cover and place in refrigerator until ready to serve. Remove from springform pan just before serving.

Hearty Bean, Roasted Squash and Sausage Soup

Hunks of crusty, toasted baguette and parmesan cheese accompany one of our favorite wintertime soups.

We don’t get many fresh vegetables up here in Arctic Alaska. Squash really shines. It ships well and keeps for months, so every August we fill a tub with an assortment of acorn, butternut and spaghetti squash, put in in the mail, and use them in pies, soups and entrées over the following months. Puréed butternut squash is a terrific way to thicken hearty soups. I do a version of bean and sausage soup every winter in my big soup kettle. This year’s was our favorite to date, and although ingredients on hand will always necessitate minor changes, we’ve now got a base recipe that’s a keeper.

Although ingredients can be freely substituted, the combination of smoked chipotle peppers and star anise is especially nice. Make this dish even tastier by roasting the squash and the tomatoes on a charcoal grill.

Hearty Bean, Roasted Squash and Sausage Soup

Ingredients:  Makes about 2 gallons. If you do not have whole peppers, substitute powdered cayenne or similar pepper, or use a good chili or Thai blend.

  • 1 medium butternut squash
  • 1o cups black and pinto beans (or use all black beans), soaked, tender and ready for cooking
  • 3 stars of star anise
  • 8 cloves garlic, chopped coarse or sliced
  • 3 smoked chipotle peppers, ground fine (use a food processor)
  • 1 ancho pepper, ground fine
  • 1 tbs oregano
  • 1/2 tbs thyme
  • 1 bay leave
  • two sweet onions, chopped coarse
  • several grinds black pepper
  • 1 1/2 pounds sweet corn
  • 1 pound sausage, sliced (I used chicken sausage.)
  • olive oil
  • chicken broth – enough to cover beans plus some additional broth to use when puréeing the squash. (I use Better Than Bouillon to make the broth.)
  • 2 pounds diced tomatoes, canned or fresh, seeds removed
  • smoked sea salt, to taste

Directions:

  1. Place a cooking sheet in an oven and preheat to 400 degrees F.
  2. Squash: Cut away the stem and slice into discs approximately one inch thick. Quarter these slices. Remove seeds and stringy flesh. Leave the skin on.
  3. Place the squash in a large pan, add olive oil, and toss till all pieces are well coated.
  4. Lightly oil the heated baking sheet in the oven and place the oiled squash pieces on the pan. Roast until thoroughly cooked through and soft – about 20 minutes.
  5. Place cooked squash on a large cutting board. When cool enough to work with, use a knife to remove the skin.
  6. Use a stick blender or food processor to purée the squash a few chunks at a time. Keep the mixture fairly thick.
  7. When all the squash has been puréed, place in a container and set aside.
  8. Meanwhile, in a large soup kettle combine the beans, star anise, garlic, chipotles, anchos, oregano, thyme, black pepper, bay leave, enough chicken broth to cover all the ingredients, and 2 tablespoons olive oil. Bring to a simmer, stirring occasionally, and continue cooking on a low simmer for about 20 minutes.
  9. Stir in the puréed squash.
  10. Add the tomatoes, corn and sausage. Add smoked sea salt, if needed.
  11. The soup is ready to serve, but will be even better if it rests for an hour or more.

Serve with freshly baked French baguettes. 

A Ghost Town, Grizzlies, and the Best Fish and Chips Anywhere

Patrolling Hyder, Alaska’s Fish Creek like she owns it, 600-pound Monica fattens up on a freshly subdued chum salmon.

With a population of fewer than 100 residents, Hyder, Alaska, bills itself as “The Friendliest Ghost Town in Alaska.” The town is one of those gems that is far enough off the beaten path to still be something of a secret, known mainly to the relatively few people who travel the Cassiar Highway in western British Columbia. Many of these travelers are on their way to or from Alaska, and not even all of these travelers are aware of what Hyder offers.

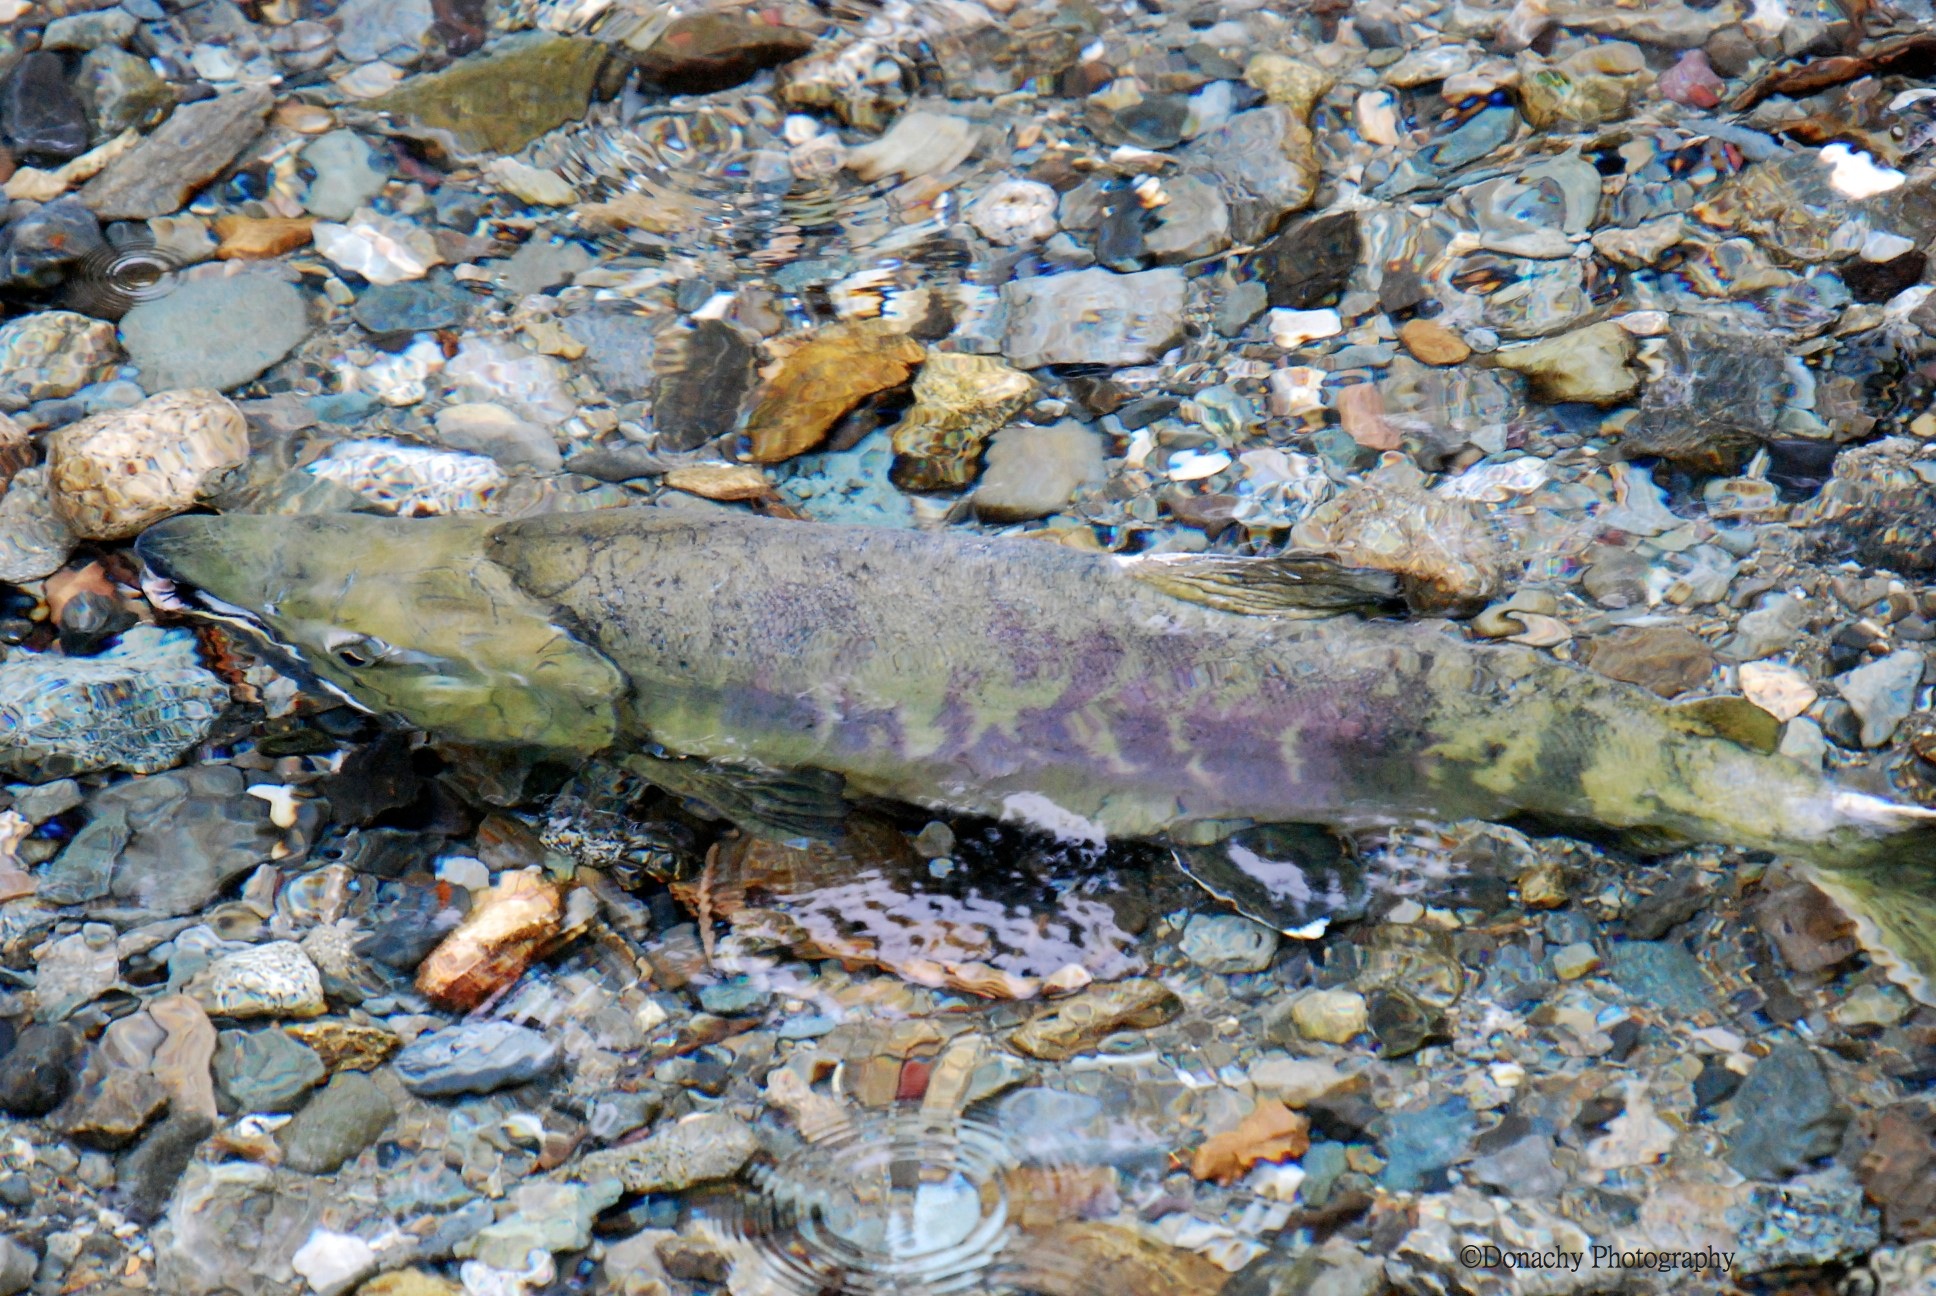
A prize for any grizzly, this beautifully marked chum salmon makes its way up the air-clear water of Fish Creek. 

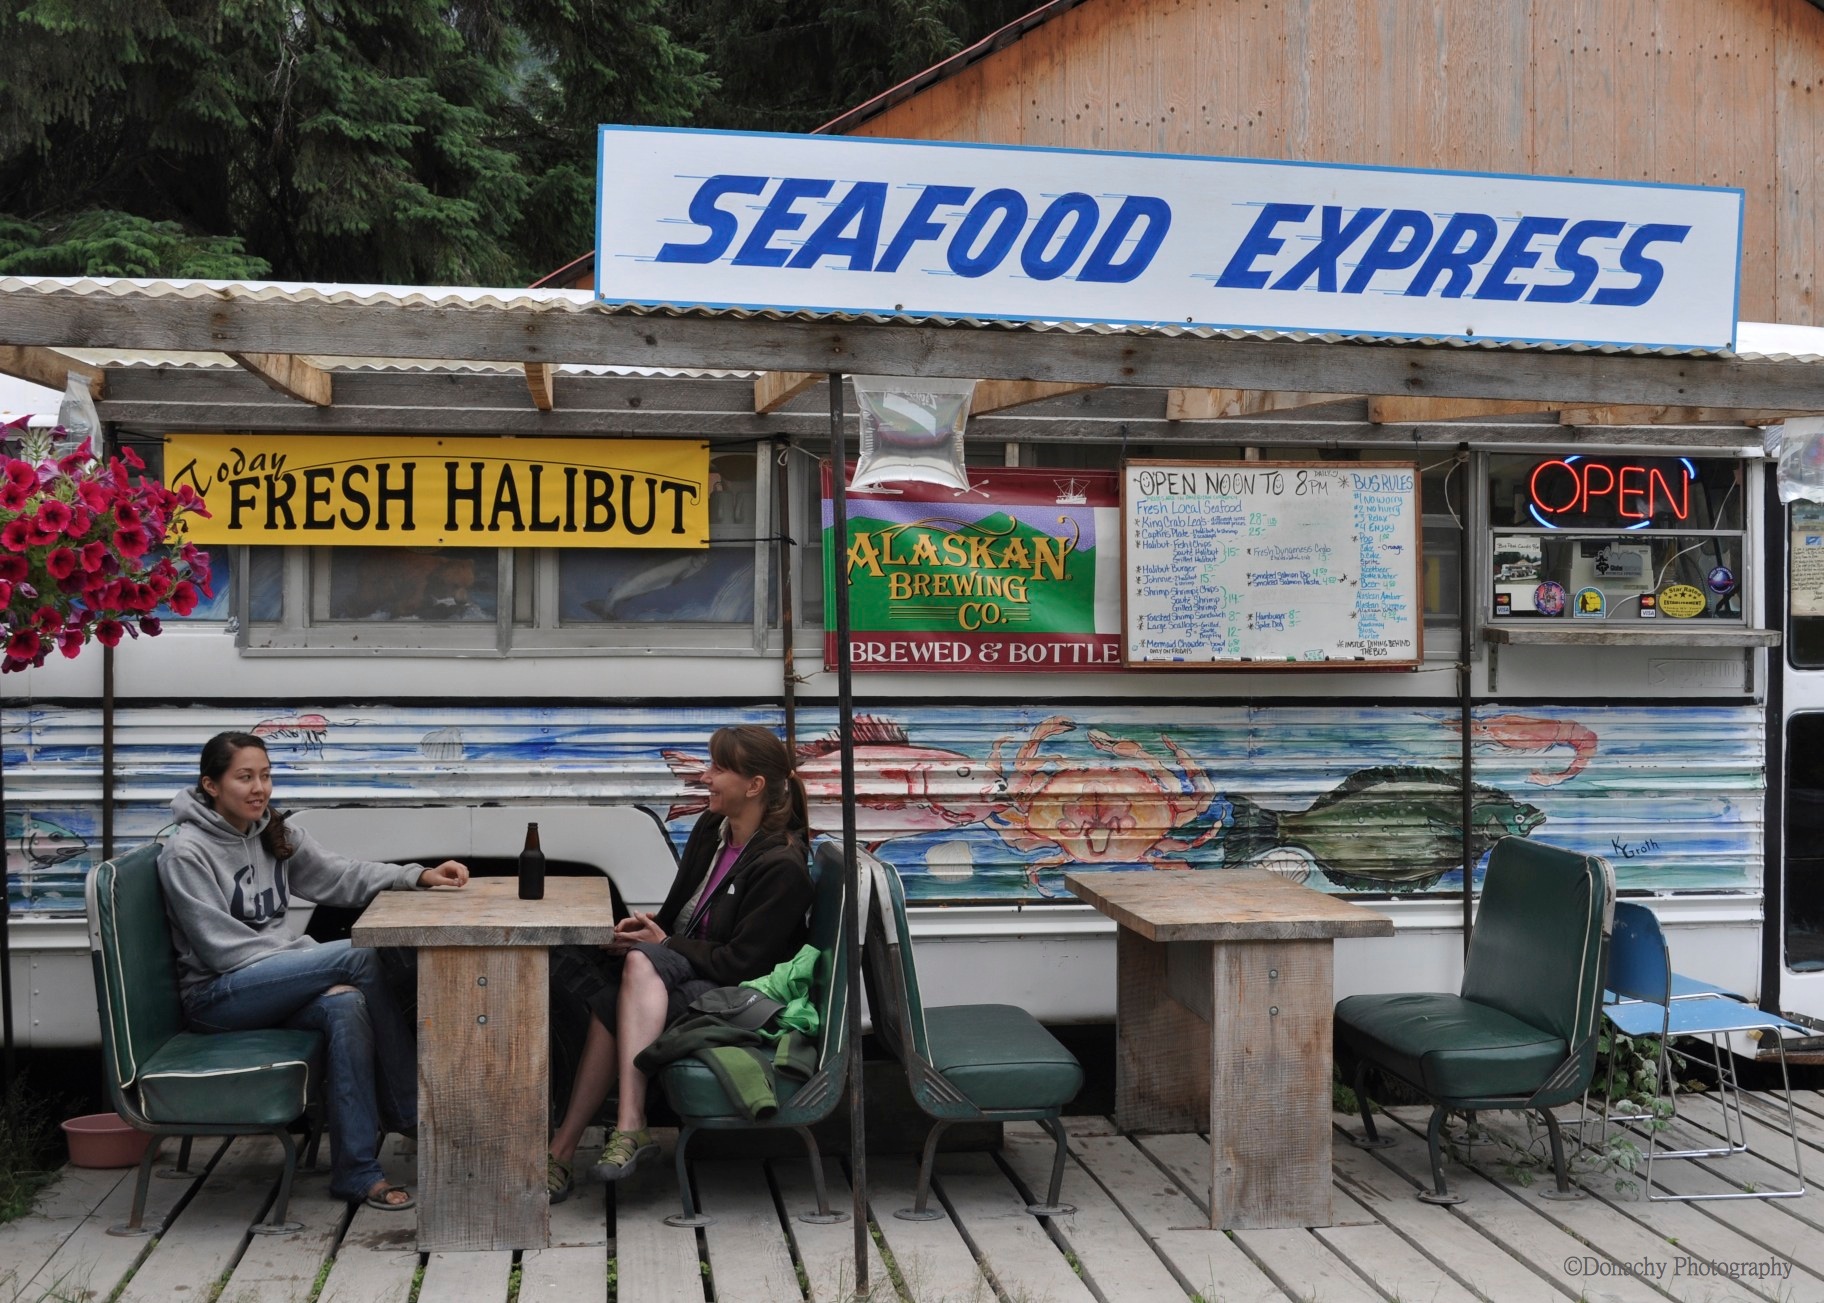
In addition to rare opportunities to watch and photograph grizzlies up close from a safe vantage point (an elevated viewing deck runs along a short portion of Fish Creek), Hyder boasts what is surely one of the world’s most unusual destination restaurants. We’ve written about the Seafood Express in a previous post. Established in 1998, the school bus Jim and Diana Simpson converted into a restaurant continues to turn out the very best fish and chips we’ve ever had. Even when the salmon and bears aren’t in, the restaurant alone makes taking the turnoff to Hyder worthwhile. Jim, a fisherman by trade, supplies the fresh salmon, halibut, shrimp and prawns Diana magically transforms into perfectly crispy, golden-brown, airily light creations that seem to disappear in one’s mouth. Complimented by a bottle of Alaskan Amber Ale, lingering over a meal there is the perfect way to relax after a morning of nature watching while Rufous Hummingbirds trill musically from the nearby spruce and fir forest.

A female common merganser (Mergus merganser) leads her brood of chicks (next photo) down Fish Creek’s crystalline currents.

Merganser chicks scurry to keep up with their mother. This type of duck typically nests in tree cavities near water. They feed on small fish, insects and (I’m guessing) salmon eggs when they can find them.

Since 1998, the Seafood Express has been serving up gourmet-quality fish and chips. 

The viewing platform on Fish Creek provides one of the very few places in North America where people can routinely and safely view wild grizzlies from a fairly close distance. The platform is manned by knowledgable U. S. Forest Service Rangers. The best viewing is from late July through September.

A trip to Alaska through British Columbia by car, camper or motorhome is a trip of a lifetime. If your route takes you along the Cassiar Highway, Hyder should be a “must visit” destination!

For more, click here to see our iReport on CNN.

White Chocolate Chip Cherry Pecan Chunk Cookies

Cookies bursting with chewy cherry chunks, white chocolate chips and delicious pecans are so good straight from the oven and even better a couple of days later… if they make it that long! 

It was a cold, overcast afternoon 200 miles north of the Arctic Circle. After two late nights of work in a row, we  were rewarded with a two-hour head start on our weekend. All we needed was a cup of hot tea and some warm cookies to go with. What? No cookies? A quick perusal of the pantry revealed a bag of white chocolate chips, dried cherries, and pecan halves. Don’t worry, Jack, fresh warm cookies are on the way!

White Chocolate Chip Cherry Pecan Chunk Cookies

Ingredients

  • 12 tbsp unsalted butter, softened
  • 1 cup packed brown sugar
  • 1/2 cup granulated sugar
  • 2 eggs
  • 1 tsp vanilla extract
  • 3 cups all-purpose flour
  • 1 tsp baking soda
  • 2 tbsp milk
  • 1 cup chopped pecans
  • 1/2 cup dried cherries, chopped
  • 1 cup white chocolate chips

Directions

  1. Preheat oven to 350 degrees F.
  2. Cream together butter and sugars.
  3. Mix in eggs, one at a time.
  4. Mix in vanilla.
  5. Mix in milk.
  6. In a separate bowl, combine flour and baking soda.
  7. Stir flour into butter mixture until just combined.
  8. Use same bowl as flour to mix together nuts, cherries, and chocolate chips.
  9. Stir nut mixture into dough, until just combined.
  10. Drop by tablespoons onto parchment-covered baking sheets.
  11. Bake for 11 minutes.
  12. Let cool on wire racks.

Recipe adapted from food network.com.

Moose and Spinach Cannelloni with Homemade Ricotta and Homemade Pasta

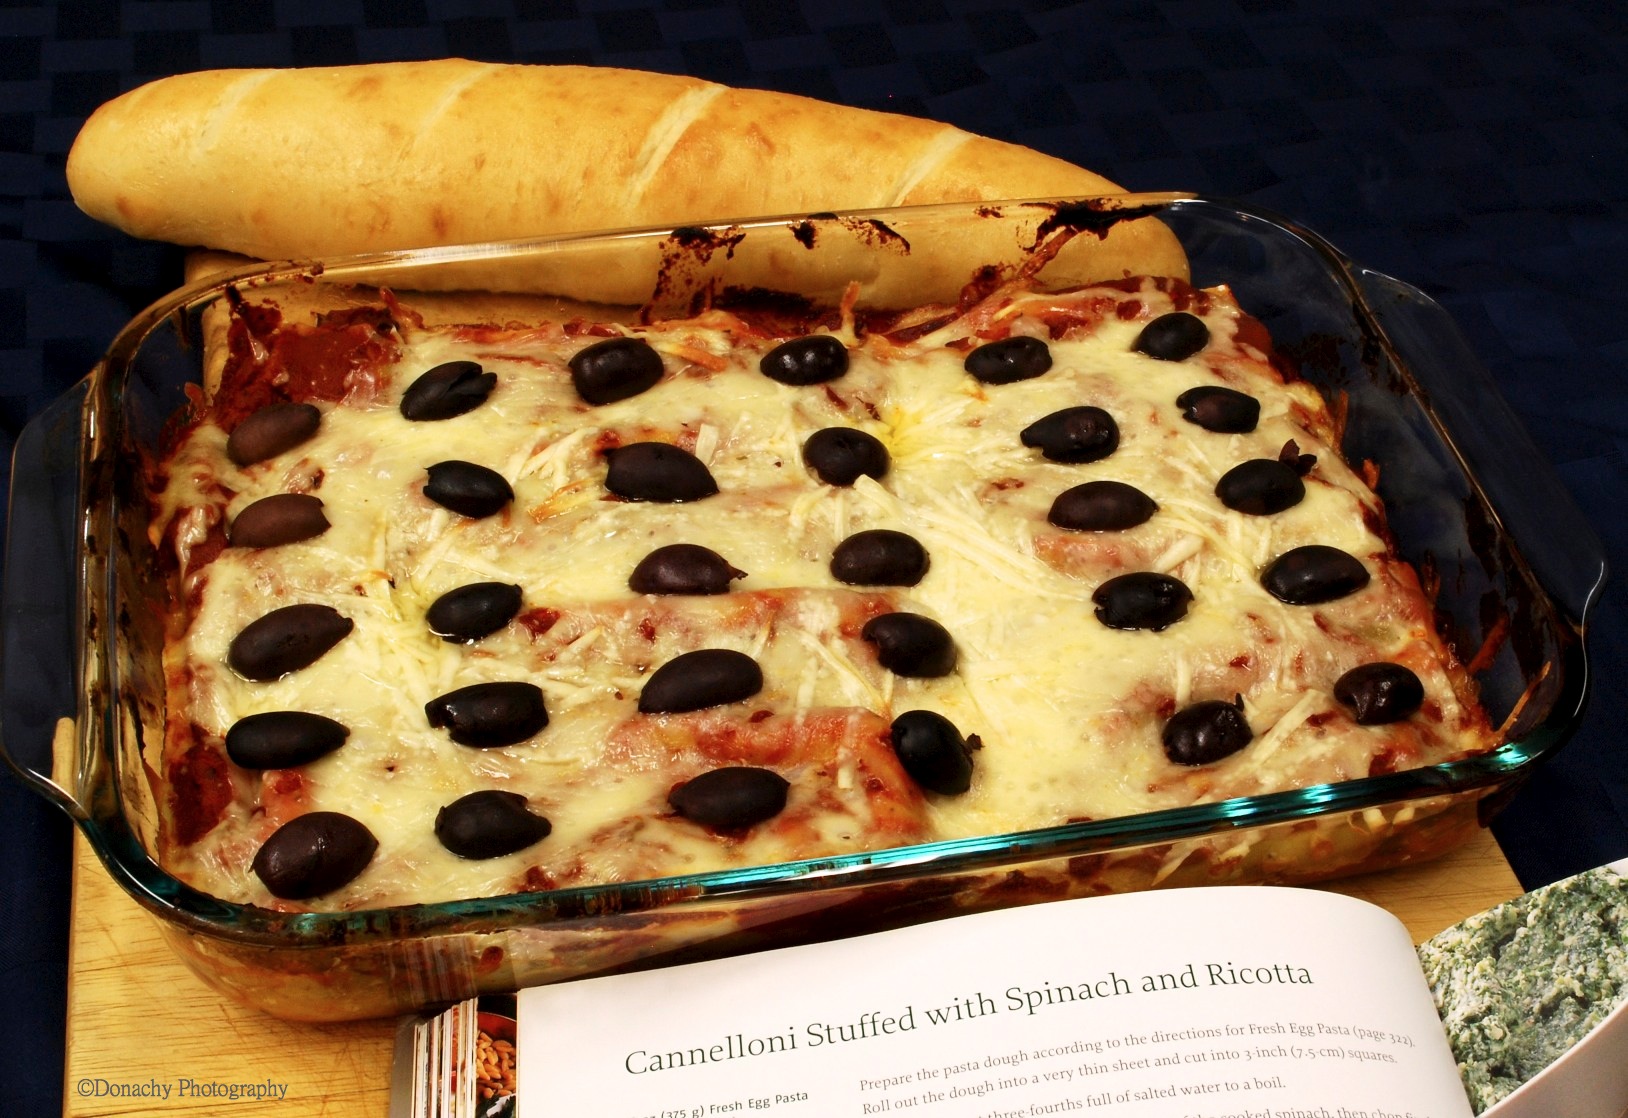
New Traditions. Smothered in mozzarella and parmesan and topped with Kalamata olives, 10 individual cannelloni pastas stuffed with homemade ricotta cheese, ground moose, and spinach await dinner guests.

Cooking in bush Alaska requires a certain amount of ingenuity and flexibility. Last year when I made a couple of pans of moose lasagna, with no ricotta cheese on hand I substituted mozzarella and called it lasagna anyway. It was excellent. The hot, stringy mozzarella was reminiscent of a deep dish Margherita pizza.

When a friend gave me a few pounds of moose again this year, Barbra said, “I’ll make you ricotta cheese for your lasagna.” She also made the pasta – 20 five-inch-by five-inch squares, ready to be rolled around ricotta cheese, spinach, sautéed  moose burger and tomato sauce. This is not traditional cannelloni, but, like last year’s lasagna, has twin roots in Italy and Alaska.

A serving of two moose, spinach and ricotta cannelloni fresh out of the oven. Each cannelloni (literal translation, “big reed”) is a five-inch-long cylinder of fresh pasta wrapped around ricotta cheese and other ingredients. 

Moose and Spinach Cannelloni

Ingredients for one 13 x 9 inch baking dish:

  • 1/2 pound ground moose, sautéed in olive oil till browned
  • pasta to make ten 5 x 5 inch tubes (cannelloni). (Or substitute store-bought manicotti.)
  • three 6-oz. cans tomato paste with enough water to thin the sauce to the thickness of marinara sauce
  • fresh spinach, cut so that the leaves will easily fit into cannelloni tubes (or substitute frozen spinach)
  • 1 1/2 cups ricotta cheese
  • 1/4 pound mozzarella cheese grated (about 1 cup)
  • 1/4 cup parmesan cheese grated fine
  • 1 1/2 tablespoons Italian herbs, separated into 2 equal parts
  • 1 tsp ground fennel (optional)
  • 2 or 3 cloves garlic, minced
  • several grinds of black pepper
  • 2 tbsp olive oil
  • salt (optional)
  • additional mozzarella and parmesan cheese to top cannelloni before baking (optional)
  • Kalamata olives, sliced in half lengthwise (optional)

Directions:

  1. Preheat oven to 350 degrees F.
  2. Place tomato paste, garlic, olive oil, black pepper, half the Italian herbs, fennel (and salt, if desired) in a nonreactive bowl and mix together, adding water to thin till sauce is just pourable.
  3. Cover a 9 x 13 inch baking dish with a layer of tomato sauce. Set aside remaining sauce.
  4. Place ricotta, mozzarella and parmesan into a large bowl. Add remaining Italian seasoning, a few grinds of pepper and mix together well by hand.
  5. Shape a piece of ricotta blend so that it lays end-to-end across one of the pasta squares. Position a few pieces of spinach leaves next to the ricotta. Use a spoon to lay down a thin bed of tomato sauce Add moose meat. Roll the pasta into a tube, pinch/press closed and position the tube seam side down atop the tomato sauce in the baking dish.
  6. Repeat till all the pasta squares have been filled and placed in the baking dish. Cover the cannelloni with the remaining sauce.
  7. (Optional). If desired, sprinkle grated mozzarella and parmesan atop the sauce-covered cannelloni. Top with Kalamata olives.
  8. Cover baking dish with aluminum foil and place on center rack of oven. Bake for 30 minutes.
  9. Remove foil and finish baking for an additional 5 to 10 minutes – to melt and lightly brown the cheese.

Homemade “Ricotta” – A Successful Experiment with Powdered Milk and Powdered Cream

Simple, delicious cheese you can make at home without any additives or preservatives. What a revelation! Perfect for cannelloni, lasagna, cannoli, ravioli, calzone or the Indian dessert Ras Malai.

A culinary goal for my Arctic kitchen this year was to experiment with cheese-making. I’m all for anything we can make at home in order to reduce our consumption of chemicals, stabilizers, and other weird junk. In addition to the drawbacks of processed foods, our Native Store here in Point Hope isn’t much larger than a typical quick-shop convenience store, and often doesn’t have items we need. Last year, a friend brought up ricotta cheese for us. This year, I decided to make my own.

Our store does not sell cream or whole milk, so my experiment with homemade cheese had one unusual ingredient – dried milk and cream. The only powdered milk I could find during our annual summer shopping in Anchorage was non-fat. Yuck. Thank goodness for the Internet! And especially thank goodness for Amazon’s free shipping. I bought two large cans of powdered whole milk (apparently abundant in Mexico!) and a can of powdered 72% butterfat cream. These would be the main ingredients for my “ricotta.” And by the way, the end product – made with powdered ingredients – was delicious.

The cheese that resulted is not a true ricotta, but is more like an unpressed paneer – with a slightly tangy, lighter taste than ricotta. In any case, it’s going into Jack’s moose cannelloni later today, rolled into homemade cannelloni tubes. Yum!

Homemade “Ricotta” – Perfect for Sweet or Savory Dishes

Ingredients

  • 2 cups whole milk powder
  • 1 cup powdered cream
  • 8 cups of water
  • 4 tbsp distilled white vinegar
  • 1/2 tsp salt

Directions

  1. Place powdered milk and cream into a large pot. Add water. Whisk until incorporated.
  2. Heat mixture until it steams but doesn’t boil (between 165 and 180 degrees F using an instant read or candy thermometer).
  3. Remove from heat.
  4. Slowly stir in vinegar. Milk should curdle.
  5. Stir in salt.
  6. Cover pot with clean cloth and let sit for 2 hours.
  7. Line colander with cheesecloth. I read paper towels or a kitchen towel will also work.
  8. Scoop curds out of pot and into lined colander.
  9. Let whey (watery substance) drain out of curds. I let it drain overnight in the refrigerator because I wanted a less watery product for the lasagna.

Brown Sugar and Butter Plum Upside Down Cake – for Breakfast or Dessert

Persimmon slices add a splash of fall orange to a breakfast that will get you ready for weekend chores. 

For most of the year, we rely on the fresh fruits and vegetables that make their way up to Point Hope by way of  the school and the Native Store. This means most of the fresh fruit we get is of the type that travels well – apples, pears and occasionally kiwis. This week, purple plums arrived. They were a bit on the hard side, so instead of gobbling up our coveted fresh fruit right away, Jack and I set them aside to ripen with thoughts of baking something interesting.

The result was this scrumptious upside down plum cake featuring ample amounts of brown sugar and butter. A friend returning to Point Hope from the big city (Anchorage) brought back fresh persimmons, Jack fried eggs seasoned with his special blend of Italian herbs, and breakfast was on. This cake went equally well with homemade extra rich vanilla ice cream for an after dinner dessert.

Brown Sugar and Butter Plum Upside Down Cake

Ingredients

  • 12 tbsp softened unsalted butter
  • 1/2 cup packed light brown sugar
  • 5 medium plums, pitted and sliced
  • 3/4 cup granulated sugar
  • 1 tbsp lemon juice
  • 3 eggs
  • 1  1/3 cup all purpose flour
  • 1  1/2 tsp baking powder
  • 1/4 tsp salt
  • 1 tsp cinnamon
  • 1/2 cup whole milk

Directions

  1. Preheat oven to 350 degrees F.
  2. Place 4 tablespoons of butter in an 8-inch square cake pan and heat in oven until butter is melted.
  3. Remove pan from oven and sprinkle brown sugar evenly on bottom of pan.
  4. Arrange plum slices on top of brown sugar and set aside.
  5. In a large mixing bowl, cream remaining butter with sugar and lemon juice. Add eggs, one at a time, beating until combined.
  6. In a medium bowl, mix together flour, baking powder, salt and cinnamon.
  7. Add about 1/3 of flour mixture to butter mixture along with about 1/3 of the milk. Mix together. Repeat with second 1/3 and third 1/3 of flour and milk.
  8. Pour cake batter over plums. Spread evenly.
  9. Bake until a toothpick inserted in center of cake comes out clean, about 40 minutes.
  10. Let cool 10 minutes.
  11. Invert onto serving dish. Let cool slightly before serving.

Recipe adapted from the Cake Duchess.