Chocolate Pots for Two

Chocolate Pots for Two_n

Creamy dark chocolate pots with an almond essence are an elegant dessert, perfect for two.

Our holiday guest has left and we are back to just the two of us in our home in the Arctic. I like to scale down recipes so that Jack and I can enjoy freshly made sweets without having too many around to tempt us. These chocolate pots are rich and delicious, and half-cup servings provided a gourmet finish to a meal of caribou stroganoff. While I flavored these with a hint of almond, adding orange zest, a sprig of mint, or a very thin curl of lime peel would be among numerous other delectable variations. We topped the pots with a chocolate covered pomegranate.

Chocolate Pots

Ingredients: (For two 1/2 cup servings)

  • 1/2 cup semi-sweet chocolate chips
  • 1 tbsp granulated sugar
  • 1/3 cup heavy cream
  • 2 egg yolks
  • 1 tsp vanilla extract
  • 1 tsp almond extract

Directions

  1. Place chocolate chips, sugar and cream in a small pot.
  2. Heat chocolate mixture over low heat. Stir continuously until mixture is smooth. Turn off heat.
  3. Whisk yolks and extracts in a small bowl.
  4. Slowly pour half of the melted chocolate mixture into egg yolks while whisking to temper eggs.
  5. Pour egg mixture back into small pot.
  6. Heat pot over low heat while stirring continuously for 3 – 5 minutes. Mixture should thicken slightly.
  7. Pour chocolate into two decorative ramekins.
  8. Let chill in refrigerator uncovered. Serve fully chilled and topped with something fun – a candied nut or a chocolate covered espresso bean.

More lacquering

“Tsuribito” means “angler” in Japanese, but Adam’s blog The Complete Tsuribito delves into much more than fishing. This is a terrific idea for a greener (and more aesthetically pleasing) New Year: beautifully crafted, two-piece chopsticks to go anywhere you go. Jack & Barbra

Adam's avatarthe Compleat Tsuribito

This time culinary rather than angling: “collapsible” screw-in chopsticks.  These I bought with the screw fittings already set in the raw wood and the whole cut down to the right size; I just sanded the wood smooth, shaped the chopsticks a little and then lacquered them.  This time I used a technique called “Rubbed Urushi” which looks a little different to the kind of finish you get on bamboo fishing rods.

Most restaurants here in Japan will be happy for you to bring your own chopsticks as it saves them the expense of a pair of wooden ones, which are  thrown away after use.  If you eat out just one meal out of 21 in a week, in a year that is a saving of more than 50 pairs.  Some restaurants these days in fact try to cut down on their use of wood chopsticks and have changed to…

View original post 360 more words

Pumpkin Pancakes: A Tasty, Healthy Way to Start the Day

Pumpkin Pancakes

Give your pancakes a tasty nutritional boost by stirring in some pumpkin purée left over from baking pies. Hot off the grill, these especially light pancakes are served with chopped pecans and a slice of smoked Alaskan salmon.

Pumpkin pie is practically a staple at our Thanksgiving and Christmas meals. Easy to make and inexpensive (pumpkins can generally be had for pennies per pound), pumpkin is also one of the more healthful pies. In fact, we sometimes have a slice sans whipped cream along with an egg for breakfast. But what to do with the leftover pumpkin purée, particularly if all you have is a cup or so? One of our favorite solutions is pumpkin pancakes. Use the same spices you would with pumpkin pie, hold the sugar, and you’ve got a great start to your day!

Pumpkin Pancakes 

Ingredients (4 medium-sized pancakes):

  • 1/2 cup pumpkin purée (or use butternut squash)
  • 1 cup your favorite pancake mix (we use Krusteaz buttermilk mix, which we buy in bulk at Costco)
  • approximately 3/4 cup cold water
  • 2 tbsp light olive oil
  • 1 – 2 tbsp butter
  • a healthy dash of nutmeg
  • a healthy dash of ginger
  • 1/4 tsp cinnamon

Directions:

  1. Place purée and pancake mix in a small bowl or large measuring cup. Add cold water and stir. Mixture should be thick but pourable. Do not overstir. Batter should have lumps. This ensures for better rising pancakes.
  2. Meanwhile, heat a griddle or large frying pan over medium heat. Place the olive oil and butter onto the griddle. When oil is hot enough to sizzle when a small drop of batter is added, it’s ready. Pour batter onto the griddle in 4 separate portions and reduce heat to medium-low.
  3. When the surface of the pancakes have formed bubbles and the bottoms are golden brown, turn them over with a spatula.
  4. Reduce heat further, if necessary, and continue cooking pancakes till golden brown.

Once the griddle or pan is hot and the batter has been poured, reducing the heat will allow the pancakes to rise better. A fairly thick, heavy griddle or pan works best.

See also:

Big, Fluffy Blueberry One-Pan Pancakes

Smoked Salmon with Soy Sauce and Brown Sugar Brine

Maple Pecan Pumpkin Pie

Pumpkin and Pecan Pies

Fluffy Hamburger Buns

Fluffy Hamburger Buns_n

Tempting to eat straight from the oven, these soft rolls are perfect for any savory filling. The dough can be shaped to accommodate big burgers, sliders, or even hot dogs. Most recently, we enjoyed them with barbecued turkey sandwiches made from Christmas dinner leftovers.

I first made these soft and delicious buns to go with Jack’s Bison Sloppy Joes with Roasted Bell Peppers.  They came out perfectly soft and fluffy with no trace of doughiness. I’ve since made variations by adding dried onions into the dough as well as different toppings, such as sesame seeds. This recipe is now the go-to recipe for buns in our home.

Perfect Hamburger Buns

Ingredients

  • 1 cup warm water
  • 2 tbsp extra light olive oil
  • 2 cups all purpose flour
  • 1 tbsp granulated sugar
  • 3/4 tsp salt
  • 2  1/4 tsp yeast

Directions

  1. Place all the dough ingredients into the bread machine pan in the order recommended by the manufacturer.
  2. Set machine to dough setting. Start machine.
  3. Line a baking sheet with parchment paper.
  4. Turn finished dough onto a lightly oiled work surface.
  5. Knead for 2 – 3 minutes.
  6. Cut dough into 8 equal pieces.
  7. Take each piece and roll into ball using cupped hands.
  8. Place dough balls onto baking sheet.
  9. Flatten each dough ball into bun-size and shape. Dough balls should be about an inch thick.
  10. Cover with a cloth and let dough rise for 30 minutes.
  11. Preheat oven to 350 degrees F.
  12. Bake rolls for 12 minutes, or until tops are golden.
  13. Cool on wire rack before slicing.

Adapted from Allrecipes.com.

Winter Sunshine – Honey Almond Cherry Nougat

Honey Almond Cherry Nougat_n

Chewy honey-flavored candy flecked with bits of cherries and almonds provides for fun in the kitchen and tasty results.

Locked in the heart of winter, it’s dark most of the day north of the Arctic Circle. Cold, too. And if the dark and cold don’t make you want to stay inside with a good book or movie, the infamous Point Hope wind will. (It’s 9° F and blowing 40 miles an hour for a windchill of about -20° F as I write this – and that’s not particularly cold for this time of year.) Some people suffer from the lack of sunshine up here. Our kitchen is our winter sunshine. It fills our home with warmth, good smells, and lots of entertainment. Today’s entertainment – honey almond cherry nougat.

Honey Almond Cherry Nougat pre-cut_n

Ready to be cut and wrapped into bite-size candies.

These reminded us of the Bit O Honey candies that we both loved as kids – although they were agreeably softer and more complex in flavor.

Honey Almond Cherry Nougat

Ingredients

  • 2 cups granulated sugar
  • 1  1/2 cups honey
  • pinch salt
  • 1/4 cup water
  • 2 egg whites
  • 2 sticks butter, at room temperature
  • 1 cup chopped almonds
  • 1 cup chopped dried cherries

Directions

  1. Combine sugar, honey, salt and water in a medium saucepan.
  2. Stir over medium heat until sugar is dissolved.
  3. Continue cooking without stirring until sugar reaches hard ball stage (250 degrees F).
  4. Place egg whites in a stand mixer bowl. Fit mixer with whisk attachment. Whip egg whites until they are stiff.
  5. While mixer is running, very slowly pour 1/4 of hot sugar mixture into whipped egg whites. Continue mixing until egg whites hold their shape.
  6. Return saucepan to stovetop with the remaining hot sugar mixture and continue cooking until mixture reaches hard crack stage (300 degrees F).
  7. Turn stand mixer on again. Pour remaining sugar mixture into egg mixture in a slow stream. Continue mixing until egg white mixture holds it shape.
  8. Add butter, one tablespoon at a time, and continue mixing. Mixture should look thick and satiny.
  9. Turn off mixer and fold in almonds and cherries.
  10. Pour mixture onto a buttered baking sheet. Let stand until totally cooled.
  11. Turn out cooled mixture onto cutting board. I coated mine with rice flour.
  12. Cut into 1 x 1.5 inch pieces and wrap in waxed paper.

Recipe adapted from foodnetwork.com.

Light, Crunchy Pecan Pralines

Pecan Pralines_n

A yummy homemade gift or a favorite snack – either way, these pralines are easy to make and great to have around.

There is something particularly satisfying about making candy. Put the right ingredients together, add the right amount of heat, and suddenly chemistry takes over and a pot of nondescript stuff is transformed into an irresistible confection. It is magical. The process is especially satisfying when the creation results in “wow” or “amazing” accompanied by smiles from those who get to taste the samples. These Pecan Pralines will do just that. The following recipe, which uses sour cream, results in pralines that are especially light and crunchy.

Pecan Pralines

Ingredients

  • 1  1/2 cups pecan halves
  • 2 tbsp unsalted butter
  • 1/2 cup granulated sugar
  • 1/2 cup brown sugar
  • 1/2 tsp coarse salt
  • 1/4 cup sour cream
  • 1  1/2 tsp vanilla extract

Directions

  1. Pan toast pecans by continuously stirring nuts over medium heat for 3 minutes. They should start to emit a toasted scent and be barely browned. Remove from heat and set aside.
  2. Line a baking sheet with parchment paper. Set aside.
  3. Melt butter in a medium saucepan over low heat.
  4. Stir in sugars, salt, and sour cream.
  5. Increase heat to medium-low. Whisk ingredients until sugars have melted.
  6. Increase to medium high. Stir frequently until mixture reaches 240 degrees F.
  7. Remove from heat and stir in vanilla.
  8. Let mixture cool for 2 minutes, then stir in pecans until they are fully coated.
  9. Drop spoonfuls onto baking sheet.
  10. Let stand until set, about 30 minutes.

Adapted from Southern Sour-Cream Pralines.

Chocolate Mochi Cake

Chocolate Mochi Cake_n

Dense, lightly-sweetened chocolate cake made with rice flour offers a satisfyingly sweet bite at the end of a Japanese meal.

I learned today that there is a difference between rice flour and glutinous rice flour (mochiko flour). Rice flour can be used in baking. Glutinous rice flour is used to make sweet desserts like mochi, which is what I wanted to learn how to make. I also learned that I purchased twenty-five pounds of the wrong kind of flour in our annual shopping trip. What to do?

Obviously, I had nothing to lose by experimenting. The following recipe is a modification of one published by The Polynesian Cultural Center. The results were quite tasty. Adding half a tablespoon of baking soda will give this recipe a more cake-like result if you prefer. Following the recipe below will yield a dense mochi-like cake.

Chocolate Mochi Cake

Ingredients

  • 1 cup rice flour
  • 1 cup granulated sugar
  • 1/4 cup butter, softened
  • 1/2 cup semi-sweet chocolate chips
  • 12 oz. evaporated milk
  • 1 tsp vanilla extract
  • 2 eggs, beaten

Directions

  1. Preheat oven to 350°F.
  2. Butter a 9 x 9-inch baking pan.
  3. Mix rice flour and sugar in a medium bowl. Set aside.
  4. Heat butter and chocolate chips in a small saucepan over low heat. Stir until chocolate is melted and butter is incorporated.
  5. Pour melted chocolate mixture into bowl of a stand mixer.
  6. Stir in evaporated milk, vanilla, and eggs into the chocolates mixture on low speed until mixed.
  7. Mix in dry ingredients until batter is smooth.
  8. Pour batter into baking pan and bake for 45 minutes. Batter should no longer jiggle.
  9. Remove from oven and fully cool.
  10.  Store covered on counter. Do not refrigerate.

Ikura: Curing Salmon Eggs

Ikura, transluscent, close_n

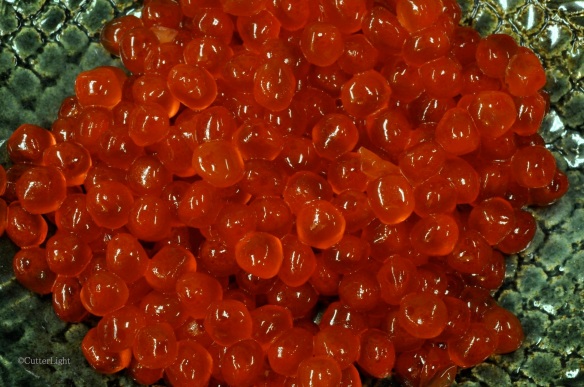
Like fire opals lit from within, freshly cured salmon eggs are ready to be served as ikura sushi, sprinkled on a bowl of rice (ikuradon), as a seafood garnish, with cream cheese and rice crackers, or simply gobbled by the spoonful!

At $40 to $50 a pound wholesale (and more expensive than that at the grocery store, when you can find it), cured salmon roe is not a regularly featured food in most kitchens. But if you catch your own salmon – or are friends with someone who does – it can be. Although the process of curing fresh salmon roe is somewhat time consuming, it is not difficult, and with patience almost anyone can turn out a sushi-grade batch of this delicacy.

Salmon eggs, King, in sacs_n

These two matching skeins of eggs, or roe sacs, from a Chinook salmon were frozen this past summer and went into one of our ice chests when we flew to our home in Point Hope, Alaska this fall. Japanese chefs typically prefer the eggs of chum salmon (they’re big), but the eggs from any salmon species are fine. In fact, very attractive cured roe can be made from the smaller eggs of large char, too.

Whether you use fresh or fresh-frozen eggs, the first step (once the roe is completely thawed) is to separate the individual eggs from the skein. The riper the eggs, the easier this process will be. There’s a trick that makes this process much easier than it might otherwise be. Bring a pot of water to a temperature of about 120 degrees Fahrenheit and plunge the whole skein into the hot water. Remove the pot from heat and gently swirl the eggs around. You’ll probably want a pair of nitrile or plastic gloves for this. As you do this, you’ll notice the eggs becoming opaque – cream colored. They’ll look as though you’ve ruined the batch. You haven’t.

Ikura after soaking in hot water_n

Hot water temporarily colors the roe and makes it easier to remove from the membranous roe sac. Provided you have kept the water temperature below 140° F, do not be concerned if your eggs become whiter and more opaque than those in the above photograph.

Next, pour the eggs and the water into a strainer. Plastic colanders, with their smooth surfaces, work well for this step. A lot of the extraneous tissue will drain off at this point. Place the strainer with the eggs in a large pot, fill with cold water, and continue to swirl the eggs around. The fat and other unwanted tissue will tend to rise above the eggs and can be skimmed off with a wire mesh skimmer. Some of the eggs will still have tissue attached. These can be cleaned by hand.

Ikura before and after being cured_n

Left: Salmon roe separated and cleaned and ready to be cured. Right: the finished product – fresh, salty ikura.

The next step is magical. For each cup of salmon roe, add just less than a teaspoon of salt. Finely ground sea salt or kosher salt works best for this step. Gently but thoroughly mix the salt into the eggs with your hands. The eggs will immediately begin to turn bright and translucent. Taste and roe and, if desired, add additional salt.

Finally, place the eggs in a strainer one more time to allow excess liquid to drain off. The cured roe will keep for several days in the refrigerator. It can also be kept in the freezer in tightly sealed jars.

Ikura on plaice plate_n

One you get the basic method down, you can substitute soy sauce for some of the salt or add a splash or two of sake (酒) to create subtly different flavors.

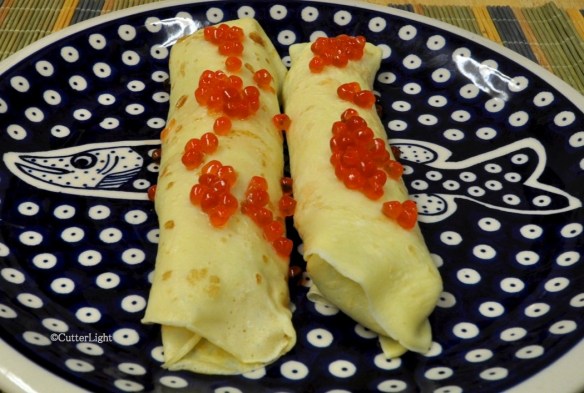
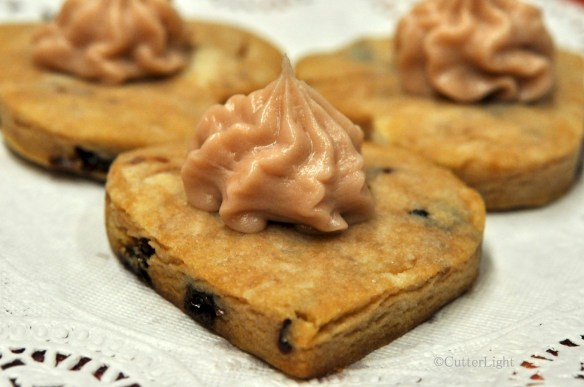
We serve ikura on everything from scrambled eggs to seafood pizza, as well as on traditional Japanese dishes such as chawan-mushi and zaru soba. Below, they add a splash of color and flavor to crepes wrapped around smoked Alaskan salmon and herbed cream cheese.

Crepes w smoked salmon & herbed cheese_n

Sour Cherry Almond Hearts

Sour Cherry Almond Hearts_n

Tart dried cherries, sour cherry concentrate and almond extract combine to create wonderful flavors in these cookies which can be cut into fun and festive shapes to suit any holiday. 

One flavor we enjoy in our culinary creations is sour cherry. It has a wonderful flavor and stirs memories of our home in Sacramento and our sour cherry tree laden with ripe, bright red fruit. We always looked forward to seeing the birds this tree attracted as well as the ice creams, biscotti and sauces for pork and chicken the fruit starred in. While we can’t get sour cherries here in the Arctic, dried cherries are a must on our annual shopping list. This past summer during our annual bulk shopping, we came across sour cherry concentrate at Natural Pantry, a health food store in Anchorage. The concentrate, which claims  antioxidant benefits when consumed daily, was in the store’s vitamin section.

Of course, our first thoughts upon finding this concentrate went to the kitchen where we imagined an extraordinarily tangy-sweet syrup for our homemade Italian-style sodas and for Jack’s giant pancakes. The combination of the concentrate and the dried cherries sets these cookies far apart from the ordinary. Cherry liqueur might be a good substitute for the concentrate in the dough recipe.

Sour Cherry Almond Cookies

Ingredients

Cookie dough:

  • 6 tbsp unsalted butter, softened
  • 1 oz. cream cheese, softened
  • 1/4 cup granulated sugar
  • 1/2 tsp almond extract
  • pinch salt
  • 1  1/4 cup all purpose flour
  • 1/4 cup finely chopped dried cherries
  • 1 tbsp sour cherry concentrate

Frosting:

  • 2 oz. cream cheese
  • 2 tbsp unsalted butter, softened
  • 1 tbsp sour cherry concentrate
  • 1 cup powdered sugar

Directions

  1. Preheat oven to 325 degrees F.
  2. Line a baking sheet with parchment paper.
  3. In a mixing bowl, combine butter and cream cheese. Beat with an electric mixer on medium speed until incorporated.
  4. Add sugar, almond extract, salt and sour cherry concentrate. Mix until well incorporated.
  5. Mix in half the flour until combined.
  6. Mix in dried cherries and remaining flour until combined.
  7. On a lightly floured surface, roll out dough to 1/4 inch thick. Cut out desired shapes using a cookie cutter.
  8. Place cut cookies on cookie sheet.
  9. Bake for 14 minutes, or until bottoms are lightly browned.
  10. Cool on cookie sheet for 2 minutes and then finish cooling on wire rack.
  11. While cookies are cooling, make frosting.

Frosting Directions:

  1. Clean and dry mixer bowl and beater.
  2. Combine cream cheese, butter and sour cherry concentrate in mixer bowl and mix on low speed for about 30 seconds.
  3. Gradually beat in powdered sugar. Frosting should be of spreading consistency.
  4. When cookies are cooled, pipe frosting onto center of cookie.

Recipe makes 2 dozen cookies.

Cheese Blintzes with Arctic Blueberry Jam

blintzes_n

Thin, lightly fried crepes wrap a sweetened homemade cheese filling. Traditionally served with applesauce and sour cream, we enjoyed ours with jam made from local Arctic blueberries.

Some foods just make us happy. Bagels fresh out of the oven, the day’s catch charcoal grilled, and a piping hot skillet of most excellent nachos come to mind. Blintzes fall into this category as well. A brunch classic but great served anytime, they remind me of my Jewish grandmother’s home which always seemed to be filled with the scent of vanilla and hot oil.

Cheese Blintzes

Ingredients for approximately 13 blintzes

Blintz Wrapper

  • 6 eggs
  • 1 1/2 cup flour
  • 1/4 cup sugar
  • 1 cup milk
  • 1/2 cup water
  • 1  1/2  tsp vanilla
  • Pinch of salt
  • Vegetable oil with a high smoke point for frying (grapeseed or peanut oil works best); I used light olive oil

Filling

  • 1 cup ricotta cheese
  • 1 package (8 oz.) cream cheese
  • 1/4 cup sugar
  • 1 egg yolk
  • 2 tsp fresh lemon juice
  • 1 tsp vanilla
  • Pinch of salt

Directions

  1. Blend all of the blintz ingredients together using an immersion blender or electric hand mixer to ensure there are no lumps.
  2. Warm up a nonstick skillet or a crepe pan on medium heat until hot. The pan is ready when a drop of water sizzles on the surface of the pan.
  3. Butter the entire surface of the hot pan.
  4. Pour the blintz batter by 1/3 cupfuls into the center of the pan, then tilt the pan in a circular motion till the batter coats the entire bottom of the pan in a large, thin circular shape.
  5. Cook the blintz wrapper for about a minute, until edges are dry and tiny bubbles form in center. Flip the wrapper and cook for another 30 seconds. Use a spatula to remove from pan and place on a plate.
  6. After wrappers are cooked, make the filling.
  7. Place all filling ingredients in a medium bowl and mix thoroughly with a fork. Filling can be slightly lumpy.
  8. To fill wrappers, place a heaping tablespoon of filling onto center bottom third of wrapper. Fold bottom of wrapper up over filling. Fold in left and right sides. Finish rolling like a burrito.
  9. When all blintzes are stuffed and rolled, heat up oil in a frying pan on medium heat.
  10. Fry blintzes in oil, flap side down for 2 minutes, or until golden brown. Flip blintzes and brown on other side for 2 minutes, or until golden brown.
  11. Serve warm with sour cream and applesauce or homemade jam.

Recipe adapted from TheShiksa.com