Pumpkin Risotto with Spicy Scallops

risotto w scallops n

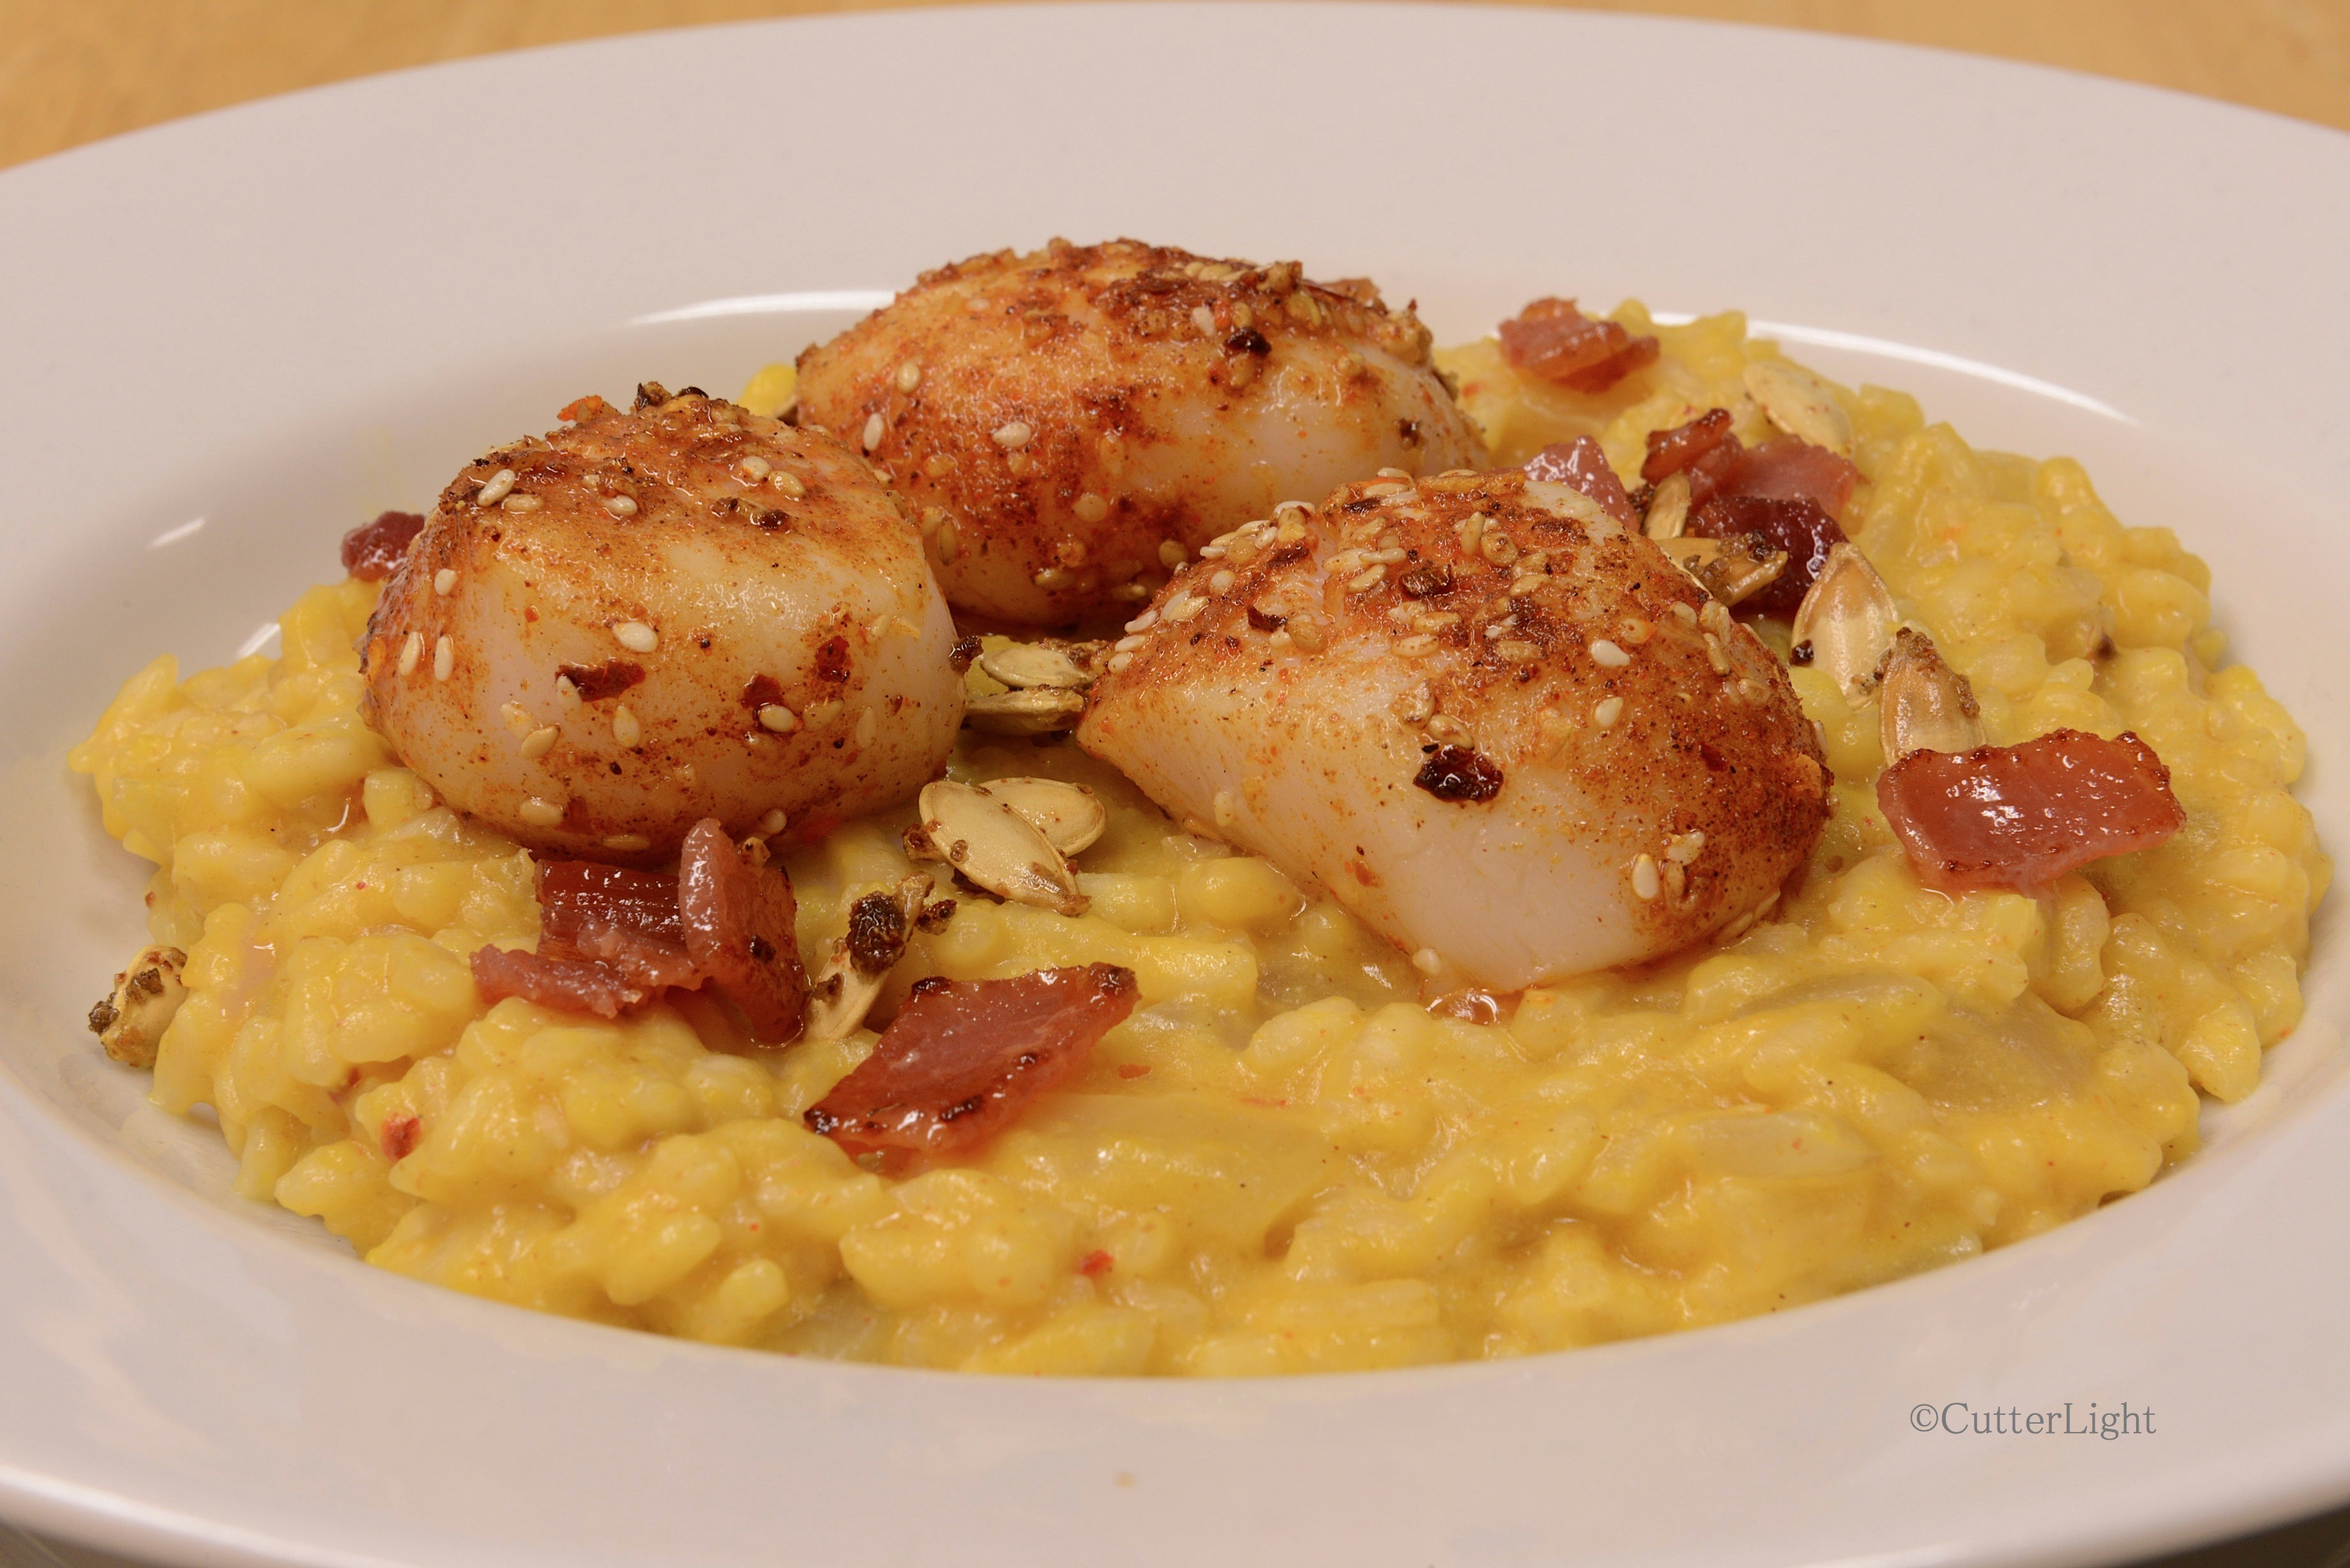
Creamy risotto flavored with seasonal roasted pumpkin and topped with spicy scallops warm up an icy Arctic evening.

With our shared goal of making risotto this year, Arborio rice went on the annual shopping list, and recently when a tiny, 1.5 pound pumpkin arrived in our Full Circle Farms box, we decided to make it a featured ingredient in our first attempt at homemade risotto. The idea to pair spicy scallops with the risotto stemmed from the visual impact we thought they’d have: white scallops dusted with ground peppers, nutmeg and cinnamon atop a mellow-orange base. The visual was complimented by the blend of textures and flavors of this dish. Compared with more usual methods for preparing rice, the risotto was a bit labor intensive. But the results left us anticipating making this dish again soon, perhaps next time with Alaska sweet shrimp.

Pumpkin Risotto with Spicy Scallops
Serves 4

Ingredients: (We use our own blend of spices, but any good Thai-style blend such as Penzeys Spices Bangkok Blend works well.)

  • 1¼ cups pumpkin purée
  • 2 tbsp heavy cream
  • 1 tbsp spice blend, such as Penzeys Bangkok Blend
  • 6 tbsp unsalted butter, divided
  • 5 cups chicken broth (We use Better than Bouillon.)
  • 2 tbsp extra virgin olive oil
  • 1 medium onion, diced
  • 1 clove garlic, minced
  • 2 cups Arborio rice
  • 2 tbsp goat cheese, softened
  • ¼ cup parmesan cheese, grated
  • salt and pepper to taste
  • seared scallops (see below)
  • candied bacon (see below)

Directions

  1. Stir together pumpkin purée and cream in a small pot and bring to a simmer. If it seems too thick, stir in a few tbsp of chicken broth.
  2. Simmer for about 5 minutes. Remove mixture from heat. Season with spice blend, salt and pepper.
  3. Add ¼ cup of butter to the pumpkin mixture, 1 tbsp at a time. Stir until smooth.
  4. Pour the pumpkin mixture into a bowl and set aside.
  5. Pour the chicken broth into a medium pot and warm over low heat.
  6. Place a large pan such as a sautoir (a sauté pan with high, straight sides) or a pot over medium heat and melt the remaining 2 tbsp butter and olive oil.
  7. Add the onion and garlic and sauté for about 3 minutes.
  8. Add the rice and sauté for 3 to 5 minute or until each grain of rice is coated in oil and there is a white dot in the center of each grain.
  9. Begin adding the warm broth to the rice, one ladleful at a time, stirring frequently.
  10. Each time the liquid evaporates, add another ladle of broth and continue to stir.
  11. Continue to add liquid and stir until the rice is al dente, 20-25 minutes.
  12. Stir in the pumpkin mixture until completely combined.
  13. Stir in the goat cheese and parmesan until smooth. Season with salt and pepper.
  14. Place 3 seared scallops atop a portion of risotto.
  15. Finish dish with candied bacon just prior to serving.

Spicy Scallops

Ingredients

  • 12 large scallops, cleaned
  • 1 tbsp spicy seasoning mix, for example Penzeys Bangkok blend (Optional: add sesame seeds to the spice blend)
  • salt to taste

Directions

  1. Heat oil in a heavy skillet over medium-high heat.
  2. Lightly roll each scallop in spice mix and sprinkle with salt
  3. Using tongs or chopsticks to maneuver scallops, quickly sear each one on each side – a few seconds on each side. Do not overcook.
  4. Serve immediately.

Candied Bacon

Ingredients

  • 4 strips of thick cut bacon, chopped into micro pieces
  • 2 tbsp brown sugar

Directions

  1. Heat skillet over medium high heat
  2. Add the bacon to the pan and cook until the fat has rendered off and the bacon has just become crispy.
  3. Drain all but 2 tsp of grease from the pan and return to the stove, over medium heat.
  4. Sprinkle brown sugar over the bacon and stir vigorously until the sugar melts and coats the bacon.
  5. Spread the candied bacon onto a sheet pan lined with parchment and allow to cool and slightly harden.

November Light: Old Tikigaq and Project Chariot – 160 Hiroshimas in the Arctic

umiak sunrise n

November 29, 12:46 p.m.: Framed below a seal skin umiak whaling boat, the sun edged itself above the southern horizon and lingered for just two hours and 24 minutes. On December 7, the sun will stay below the horizon and remain there for 28 days.

In 1958, under the direction of Edward Teller, the U.S. Atomic Energy Commission (AEC) devised a plan to detonate a series of nuclear devices 160 times the force of the bomb dropped on Hiroshima. These bombs were to be exploded just 30 miles southwest of the Inupiat village of Point Hope, Alaska. Teller’s plan – if an action so dangerous and misguided can even be called such – was to blast out a harbor in this far north coastline. The United States government didn’t bother to tell the local residents of this scheme. Nor did they take into consideration that the land in question dId not belong to the United States government; it was and still is sovereign Inupiat territory.

old tikigaq bones nov light n

Whale bones mark a sod igloo buried in snow in the ghost town of Old Tikigaq, which was abandoned in the mid 1970’s. Although the sun is only in the sky briefly in November, it is a glorious time of year. This is the November light we have been waiting for.

A caribou hunting party stumbled across AEC engineers and para-military personnel encamped at the mouth of Ogoturuk Creek, near Cape Thompson. That’s when the questions and the lies began.

grass snow dawn n

Grass silhouetted against the southern sky just before dawn, the frozen sea stretching to the horizon near Point Hope, Alaska.

In the end, Teller’s heartless plan was stopped. The bombs were never detonated. The experiment to determine how much radiation local flora, fauna and humans could survive was never carried out.

This is a story of heroes. There was Howard Rock, the co-founder of the Tundra Times, a highly educated, literate Inupiat leader who wrote the first, insistent letters to the United States government demanding that this plan be immediately halted. There were the white scientists from the University of Fairbanks, Pruitt and Viereck, who raised their voices against the project, and in standing up for the Inupiat people and standing against the government were fired by University President, William Wood, who played a less noble role in this story. There were the millions of citizens in the United States and all over the world who were in the streets, protesting nuclear tests of this kind. And there are the people of Point Hope who stood up to the government then and who are still fighting to force the United States government to tell the whole story of Project Chariot.

Because this story is not over.

old tikigaq house winter n

Over time, as erosion steadily ate away the finger of land jutting into the Chukchi Sea, the old town had to be abandoned. This fall, the entire area was inundated with water when high winds and hurricane force gusts pushed sea water over the rock sea wall protecting the north side of the point.

Although Teller lost his bid to detonate the world’s most destructive arms, in what feels like a tit-for-tat payback, under his direction, in secret, another group of engineers and military personnel were dispatched to the Project Chariot site. This time, they spread radioactive waste on the ground and in the stream. And they buried something there. Something in large, sealed drums.

To this day, the United States government has refused to divulge what was buried.

Since that time, the incidence of cancer has been higher than the national norm among the people of Point Hope. Higher than it should be, even taking into consideration other factors. These are some of the best people we’ve ever had the honor to be associated with. Kind, generous, resourceful, resilient, tough. Their government owes them answers.

whale jaw arches dawn n

Tell-tale tracks leave evidence that an Arctic fox was patrolling Old Tikigaq just before we hiked out. These whale bone jaws located near the airstrip a mile and a half from town welcome visitors to Point Hope. The area around Point Hope is one of the oldest continuously inhabited places in the Americas – maybe the oldest. While many Inupiat (Eskimo) cultures were nomadic, here the animals came to the people. The point of Point Hope formerly extended far to the west out into the Chukchi sea, bringing the land in close proximity to migratory paths of seals, whales, walruses, char, salmon and other fish. Two impressive capes, Thompson to the south, Lisburne to the north, are home to tens of thousands of sea birds. To the east, Point Hope is situated near the migratory route of thousands of caribou. The sea and the land are the garden that has sustained people here for thousands of years.

For more about Project Chariot, see the book The Firecracker Boys by Dan O’Neill. And although it is difficult to obtain a copy, there is an excellent, 73-minute documentary film titled Project Chariot, copyrighted 2013 NSBSD & Naninaaq Productions: UNCIVILIZED FILMS.

Homemade Goat Cheese

goat milk cheese n

With powdered goat milk, you can make delicious goat milk cheese virtually anywhere. This ball is slated for a hearty layered beet salad and a spicy lamb (or caribou!) pizza.

After last year’s success with homemade “ricotta,” we included powdered goat milk (widely available) in our annual shopping list. We love the flavor and texture of soft cheeses, and with some recipes there is no adequate hard cheese substitute. At the end of summer, we sent a small quantity of various soft cheeses up to our Arctic home. Since it doesn’t matter if they get crumbly, these cheeses are good candidates for the freezer till they’re needed. But that supply has come to its end, and so it was time to try making our own goat cheese.

Following our own directions for a ricotta-style cheese, the hands-on time for creating this cheese took just five minutes. The remainder of the time needed is for draining the whey – a process that took about eight hours. The resulting cheese was creamy, mildly tangy in just the right way, and ready for salads, pizza or crackers and smoked salmon. Slightly salting the finished cheese improves its flavor and shelf life.

Soft Homemade Goat Cheese

Ingredients

  • 1 cup powdered goat milk
  • 4 cups water
  • 2 tbsp white vinegar
  • salt to taste

Directions

  1. Mix powdered milk and water well in a medium pot.
  2. Over medium heat, bring the milk to between 165 degrees F to 180 degrees F.
  3. Remove pot from heat.
  4. Stir in vinegar. Milk should curdle. (This is the whey separating).
  5. Cover pot with clean dish towel and let sit for 2 hours.
  6. Lay a piece of cheesecloth over a sufficiently large container. (I used a 4 cup food storage container.) Secure the cheesecloth in place with a rubber band.
  7. Pour contents of pot onto cheesecloth. Whey should drain through, while curds remain in cheesecloth. You can toss the initial drained whey.
  8. Place container in refrigerator overnight to continue draining. It does not matter if the container is covered or not.
  9. In the morning, turn out cheese ball that is in cheesecloth to a larger bowl and mix in salt, to taste.
  10. Store goat cheese covered in refrigerator.

Recipe makes approximately 1 1/2 cups of goat cheese.

First Sea Ice, Point Hope 2013

snow arc point hope beach n

Wind and cold sculpted this mixture of sea spray and snow into a delicate arch. The sea ice has been late in coming to the Chukchi Sea this year. This photo was taken at 3:00 p.m. with the winter sun already skimming low on the horizon. Our month of day-long darkness will begin December 6.

The thick, slushy sea ice hisses and softly moans as it moves with the current past ice already frozen fast to shore. The hissing is vaguely reminiscent of a soft autumn breeze filtering through the dry leaves of oaks and maples in my native Pennsylvania. The moans sound like the muted voices of whales deep below the sea. All else is still, the ice stretching out as far as one can see. There is no wind, and there is no other sound.

sea jelly caught in ice n

This sea jelly, entombed in shore ice, is about the size of a polar bear’s paw.

We searched for signs of life, perhaps a seal out on the ice or a snowy owl coursing the shoreline, or even the tracks of an Arctic fox. There is nothing, just the steady hiss of the ice as it flows before us. We walk along the pebbled beach for maybe a mile and finally spot a small group of ravens. Tough birds, making a living up here during the winter.

point hope frozen beach n

If you look closely among the rocks along the Point Hope Beach, it’s common to find jade. Less common are fragments of mastodon tusks.

first sea ice 2013 n

Thick ice prevents the shore from eroding during winter storms. Polar bears depend on the ice to hunt seals. Things are changing up here. The ice seems to be coming later, and there is less of it. Red foxes are becoming more common, pushing out their smaller Arctic cousins. Once winter truly locks up the sea and the sun sinks below the horizon, there is no place on earth that is quieter. It is cold and stark but beautiful. 

sea jelly caught in ice b n

We don’t always take our big cameras along on walks. Today we relied on “Little Blue,” our Cannon PowerShot D10, our trusty point and shoot.

Light and Airy Smoked Salmon, Alaska Shrimp and Leek Frittata

frittata smoked salmon shrimp n

Breakfast, lunch or dinner, this frittata this is sure to draw rave reviews.

This past summer in Seward, we had a series of some of the best meals we’ve had in Alaska – or anywhere for that matter – at an inconspicuous little restaurant called The Smoke Shack. In our view, this is hands down Seward’s best restaurant. The head chef smokes all his seafood and meat himself, and combines these with a variety of proprietary sauces to provide an authentic Alaskan dining experience, complete with the kind of consistently good service that is hit and miss at Seward’s two mega-large waterfront tourist restaurants.

One of the meals that most impressed us at The Smoke Shack was the smoked salmon frittata. Light, airy, flavorful and standing over an inch tall, we made a mental note to attempt to replicate this breakfast dish in our own kitchen. There are two keys to this dish: Start with top-notch smoked salmon, and separate the egg whites and whip them before folding in the other ingredients. We added shrimp and leeks and our own blend of seasonings. The beauty of frittatas is that with a little imagination, you can come up with your own specialty. Here’s ours.

frittata ready for oven n

Splashed with Cholula sauce and ready for the oven. It helps to start the frittata by cooking it for a few minutes on the stove before placing it in the oven. A non-stick pan such as the excellent ones made by Swiss Diamond are a good choice, as they are oven safe.

fritatta baked n

Piping hot out of the oven and ready to serve, every piece is generously packed with smoked salmon, sweet Alaska shrimp and leeks.fritatta ingredients n

One pan, eggs, whatever additional ingredients are on hand, and seasoned to taste a frittata will feed a lot of hungry sailors, campers or house guests. 

Smoked Salmon, Alaska Shrimp and Leek Frittata

Ingredients (For an 11 inch pan)

  • non-stick, 11″ oven-safe pan
  • light olive oil or other frying oil
  • eight eggs, yolks and whites separated
  • 4 oz smoked salmon (canned or vacuum packed).
  • 4 oz Alaska shrimp, peeled
  • 1 large or 2 small potatoes such as Yukon golds, diced
  • 1 1/2 cups shredded Jarlsberg cheese (We chose this variety for its buttery, sweet flavor, but many other types of cheese would work well.)
  • 1 cup leeks, chopped course
  • fine sea salt, to taste
  • Cholula sauce
  • chili spice blend such as Penzeys’ Northwoods Fire, or any blend featuring a combination of black pepper, smoked chipotle, smoked paprika, cayenne or similar peppers and a pinch of oregano

Directions

  1. Preheat oven to 350 degrees F with rack at center position.
  2. Heat 3 tbsp olive oil in 11-inch pan over medium heat. Add potatoes and cook till tender, adding salt to taste. Remove from heat, set aside potatoes in bowl, wipe pan clean if necessary.
  3. Add 1 tbsp olive to pan over medium low heat. Add leeks and a pinch of salt and cook for about 5 minutes, until tender. Set aside leeks in bowl. Wipe pan clean if necessary.
  4. Meanwhile, place egg whites in mixing bowl, add 1/2 tsp sea salt and beat or whisk till soft peaks are formed. Do not create stiff peaks.
  5. Add chili spice blend to egg yolks, mix together, and add mixture to whites beating at slow speed until just incorporated. Do not over mix.
  6. Place a scant tablespoon of olive oil in pan over low heat and add cooked potatoes. Pour in egg mixture. Top with smoked salmon, shrimp and leeks. Add cheese. Add a few splashes of Cholula. Allow to cook approximately 5 minutes to firm up bottom.
  7. Place pan in oven and cook for 20 minutes.

This frittata pairs nicely with Champagne.

We use Alaska shrimp because they are uniquely tasty and are sustainably harvested. We harvest our own wild Alaska salmon and encourage readers to look for the “wild” or “wild-caught” label when purchasing salmon, as this is the only sustainable choice for salmon.

Pecan Persimmon Upside Down Cakes

pecan persimmon upside down_nCrunchy on the outside, moist in the middle, and topped with a mixture of caramel and persimmon, this small batch of individual-sized cakes will warm up a chilly fall afternoon.

Hachiya persimmons can be tannic and astringent, according to Full Circle Farms. After eating two raw with breakfast, Jack and I were not excited about the lingering mouthfeel, a term we’ve adopted from our culinary professors. They were beautiful and tasty on the first encounter, but left an acidic dryness. I thought the process of baking the fruit would retain the delicious flavor and eye appeal, and that by releasing sugars, the acidity might be reduced.  Since we only had one persimmon remaining, I opted for mini-cakes baked in a muffin tin. The result was six perfectly-sized individual cakes with a crunchy texture on the outside, a moist and flavorful inside, and caramel-glazedl baked persimmons on the top.

Pecan Persimmon Upside Down Cakes

Ingredients

  • 6 tbsp unsalted butter, room temperature, divided
  • 1/2 cup brown sugar
  • 6 whole half pecans
  • 1 persimmon, sliced and then quartered
  • 1/2 cup granulated sugar
  • 1/2 tsp vanilla
  • 1 egg
  • 1/4 cup whole milk
  • 3/4 cup all-purpose flour
  • 3/4 tsp baking powder
  • pinch salt
  • generous 1/4 cup chopped pecans

Directions

  1. Grease a six muffin tin (regular sized).
  2. Melt 2 tbsp of butter in a pan over medium heat.
  3. Add brown sugar. Stir until sugar is melted and begins to bubble.
  4. Divide sugar mixture into bottom of muffin tin.
  5. Place a half of a pecan into center of sugar mixture, upside down.
  6. Place sliced persimmon quarters in a circular fashion on top of the sugar and pecan. Set aside.
  7. Preheat oven to 350 degrees F.
  8. Beat 4 tbsp butter and granulated sugar until fluffy.
  9. Add in vanilla. Mix thoroughly.
  10. Mix in egg.
  11. Mix in milk. Continue mixing until fully blended.
  12. Sift together flour, baking powder and salt.
  13. Pour sifted mixture into wet ingredients.
  14. Mix until just blended, do not overmix.
  15. Fold in chopped pecans by hand.
  16. Scoop 1/6 of batter on top of each persimmon layer.
  17. Bake for 25 minutes. Cakes are done when they pull away from sides and an inserted toothpick comes out clean.
  18. Let cool for 5 minutes in baking pan.
  19. Invert cakes to present. Enjoy with mugs of steaming hot tea.

Yam, Goat Cheese and Shallot Tart

yam goat cheese tart_n

The sweetness of yams and sautéed shallots, the creamy tartness of goat cheese, the zip of parmesan, and a sprinkle of thyme make this savory, aromatic tart perfect served as an appetizer, as a light meal, or as a side dish.

Our CSA (Full Circle Farm) sends a regular delivery of fruits and vegetables to our remote home in Arctic Alaska. In addition to the fresh, organic produce, they insert a recipe flyer into each box. Every recipe we’ve tried has been fantastic. And just in time for Thanksgiving, their test kitchen absolutely nailed a savory vegetable tart. Although we used yams, a number of substitutes came to mine as we were enjoying this tart with falling-off-the-bone tender pork ribs that Jack had slow cooked in the oven. Carrots, turnips, and especially parsnips would all work well. We love parsnips!

Yam, Goat Cheese and Shallot Tart

Ingredients

  • 3 tbsp olive oil
  • 1/4 cup shallots, finely chopped
  • 1 1/4 lb yams, peeled and thinly sliced
  • 1 tbsp thyme
  • 3/4 tsp salt
  • 1/2 cup parmesan cheese, freshly grated
  • 1 cup goat cheese, crumbled

Directions

  1. Preheat oven to 400 degrees F.
  2. In a medium pan, heat olive oil over medium-high heat. Add shallots and sauté until soft (about 2-3 minutes). Remove from heat and set aside.
  3. Grease a springform pan.
  4. Place yam slices in overlapping layers, starting at outer edge and spiraling inwards to make one layer.
  5. Sprinkle some of the thyme, shallots, cheeses, salt and pepper.
  6. Repeat process 3 times to create 3 layers.
  7. Cover top of tart with cheese.
  8. Bake until top is golden brown and tart is easily pierced with a fork, about 45 minutes.
  9. Let cool in pan for 10 minutes.
  10. Remove from pan and cut into wedges to serve.

Rustic Reuben with Righteous Rye and Robust Russian Dressing

reuban from scratch b nBursting with flavor, this satisfying from-scratch version of an East Coast classic was delicious to the last caraway seed!

Jack suggested we make reuben sandwiches with the gorgeous purple kraut I’d just created. For this menu request, I would need my freshly baked righteous rye bread, corned beef, Russian dressing (see below), Swiss cheese, and butter. I already had all these items on hand except for the corned beef, and since this year the majority of the protein in our freezers is fish, that was going to be a challenge.

I wrinkled up my nose at Jack’s suggestion that we walk to the Native Store to see if they had any canned corned beef. Lo and behold, they did. “Premium” canned corned beef – it even had a little key on the side with which to open the can. This was new to me. I have had canned tuna and chicken, but neither of those items came with a key. I stared at this can turning it over and over to try and figure out how to open the darn thing. Thanks to YouTube, I now know how to open a can of corned beef!

Fortunately the homemade elements of this reuben added enough to the premium canned corned beef to make it a terrific, bush-style sandwich. Had this sandwich been made with homemade corned beef, or corned caribou, it would have been fit for Food and Wine magazine! Sounds like I have a new goal as soon as I can trade for caribou (or wild mountain goat, Bixlers, if you’re reading this)!

For this phenomenal reuben sandwich you need:

  • 2 thick slices of rye bread
  • Russian dressing
  • corned beef
  • sauerkraut
  • swiss cheese
  • butter or olive oil

Instructions

  1. Generously spread butter on one side of each slice of bread.
  2. On the opposite side of bread, generously spread Russian dressing.
  3. Place enough corned beef to cover one piece of bread.
  4. Add a layer of Swiss cheese.
  5. Add a layer of sauerkraut.
  6. Cover sandwich with second piece of bread.
  7. Place sandwich in heavy skillet on stovetop over medium heat.
  8. Press sandwich down while cooking, about 5 minutes on one side.
  9. Flip sandwich.
  10. Press sandwich down on second side, and cook for another 5 minutes. Cheese should be melting out of the sandwich.
  11. Slice sandwich diagonally and serve with a dill pickle.

The Russian dressing is taken directly from Zingerman’s deli recipe which was posted on Food Network’s website. The only adaptations I made were to use my own homemade mayonnaise and to omit parsley.

Russian Dressing

Ingredients

  • 3/4 cup mayonnaise
  • generous 1/4 cup chili sauce
  • 2 tbsp sour cream
  • 1 1/2 tbsp minced shallots
  • 1 1/2 tbsp minced dill pickle
  • 1/2 tsp lemon juice
  • 1/2 tsp grated horseradish
  • 1/4 tsp Worcestershire sauce

Directions

  1. Combine all ingredients in a bowl and mix well.

DIY Small Batch Purple Sauerkraut

sauerkraut diy_n

To make this beautiful purple kraut, you need only a few days of fermenting time and items you already have in your kitchen.

Every year I pick one thing I want to learn to make and force the issue by removing it from our annual shopping list. Last summer, a friend had us taste her homemade kraut infused with locally picked highbush cranberries, which grow in Alaska. It was delicious. Her quick directions gave me confidence that I could easily make sauerkraut, too.

The purpose of lacto-fermenting vegetables is to store the summer harvest so that vegetables can be enjoyed throughout the year. Since I had only one head of cabbage which weighed a pound-and-a-half,  I turned to small batch food preservation methods. Credit for the following directions goes to a blog called The Kitchn where the author posts all sorts of information about lacto-fermentation, photos, and step-by-step directions.

Our first menu with the finished kraut was a knock-your-socks-off reuben. We’ll post that  recipe in an upcoming article.

DIY Small Batch Purple Sauerkraut

Ingredients

  • 1 small head purple cabbage (about 1.5 lbs.)
  • 1 tbsp kosher salt
  • 1 tbsp caraway seeds
  • 1 tbsp dried juniper berries

Directions

  1. Gather materials you will need to process kraut: 2 quart container, cutting board, chef’s knife, gallon Ziploc bag, large mixing bowl, and lidded quart container for final product.
  2. Slice cabbage into ribbons. Discard core.
  3. Place cabbage ribbons into large mixing bowl. Sprinkle salt all over cabbage.
  4. Knead, massage, and squeeze salt into cabbage, until cabbage begins to become shiny and loses liquid. This will take about 10 minutes.
  5. Mix in caraway seeds and juniper berries.
  6. Pack mixture into 2 quart container. Pour any liquid from mixing bowl into container, too.
  7. Fill Ziploc bag with water and set inside 2 quart container to weigh down and cover cabbage.
  8. Press down cabbage every few hours. This will cause air to come to the surface.
  9. If there is not enough liquid to cover the cabbage in 24 hours, add 1 cup water mixed with 1 tsp salt.
  10. Keep the container out of light and at a temperature of 65 – 75 degrees F.
  11. Allow to ferment from 3 – 10 days. Begin tasting at 3 days. Mine tasted just right at 3 days. The longer you leave it, the more sour it will be.
  12. Put finished sauerkraut in a 1 quart container and store in the refrigerator. It should keep for several months.

Really Righteous Rye for Reubens

Rye bread_nWith a golden-brown crust and a soft inside, this flavorful combination of rye flour and caraway seeds is the perfect loaf to be sliced thick for home-made reuben sandwiches. 

One of our favorite sandwiches is an East Coast style reuben with the rye sliced thick and everything piled high. Up here in the Arctic, the only way to get a sandwich like that is to make it ourselves. So, based on several recipes and my own calculations, I created a rye bread recipe for my Zojirushi “dough machine.” After four years of fairly heavy use (we bake all our own breads), this built-like-a-tank bread machine is still going strong. After it had done its magic, I kneaded the dough once more by hand and shaped it into an oval for one last rise.

I gave the dough two quick slashes, brushed it with egg, popped it in the oven and 35 minutes later our kitchen was filled with the delicious aroma of freshly baked rye bread – the final ingredient for our “up-town” Arctic lunch of hot tomato soup and reubens! Our recipe for DIY sauerkraut to follow.

Bread Machine Rye Bread

Ingredients

  • 3 tbsp melted unsalted butter
  • 1 egg
  • 1 cup whole milk
  • 1 tsp extra virgin olive oil
  • 1 1/2 cups all-purpose flour
  • 1 cup rye flour
  • 1 tbsp caraway seeds (a few more for the top)
  • 1 envelope active dry yeast
  • 1 tbsp granulated sugar
  • 1  1/2 tsp salt
  • 1 egg (to brush the top of the loaf)

Directions

  1. Place all items except the last egg in the bread machine in the order recommended by the manufacturer.
  2. Set machine to dough setting.
  3. Start machine.
  4. Remove dough from machine and place onto lightly floured board. Knead dough a few times and shape into ball.
  5. Place dough ball on a parchment-lined baking sheet and cover with a damp cloth. Let rise until almost doubled in size.
  6. Preheat oven to 350 degrees F.
  7. Slash a big X on top of loaf.
  8. Brush loaf with egg and sprinkle a few more caraway seeds on top of loaf.
  9. Bake for 35 minutes. Finished loaf should should have a golden brown crust and sound hollow when tapped.