Another $8 Cookie, Please

The best chocolate chip cookie on the planet? There’s one way to find out!

Break out all the best ingredients you’ve been hoarding and make yourself a batch of these…now!

A couple of years ago, I read about a cookie that really sells for $8. Could I create a cookie worth such a price? Oh boy, yes! The secret to this cookie is not gold flecks or a butler to serve it, but fine ingredients and an investment of some time. The recipe demands high quality chocolates, browned butter, toasted almonds, and vanilla paste. Serving them slightly cooled from the oven is a key to the experience. I make a batch of dough, cookie scoop out portions and freeze them. When we are in the mood for these decadent beauties, I pop a couple in the oven while we are eating dinner in order to serve them as a perfectly warm $8 dessert.

The $8 Cookie

Ingredients

  • 1 large egg
  • 1/3 cup dark brown sugar
  • 3 tbsp granulated sugar
  • 1/3 cup unsalted butter, browned
  • 2 tsp vanilla paste
  • 1/2 tsp almond extract
  • 3/4 cup plus 2 tbsp all-purpose flour
  • 1/2 tsp baking soda
  • pinch salt
  • 1/3 cup toasted almonds, chopped
  • 1/3 cup good quality milk chocolate chips
  • 1/3 cup good quality white chocolate, chopped

Directions

  1. Mix the sugars and the egg well.
  2. Add in the browned butter.
  3. Mix in vanilla paste and almond extract.
  4. Stir flour, baking soda and salt into the mixture.
  5. Fold in the almonds and chocolate pieces.
  6. Chill the dough for at least 1 hour.
  7. Line a baking sheet with parchment paper.
  8. Preheat oven to 325 degrees F (160 degrees C).
  9. Scoop tablespoon-sized balls using a small ice cream scoop onto the baking sheet. Bake for 8 – 10 minutes.
  10. Let the cookies set on the baking sheet for about 3 minutes before removing them to a wire cooling rack.
  11. Continue to cool for another two minutes on the wire rack.
  12. Serve cookies while still warm.

Makes 12 cookies.

Hope you’re sitting down for this one! Chocolate Tahini Overnight French Toast

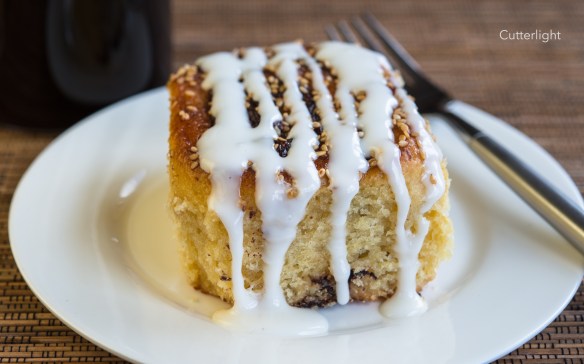
Overnight chocolate tahini french toast – Sunday brunch is served.

If you have been following along, you’ll know that we get most of our groceries delivered via the United State Postal Service. The majority of our food mail comes from either Amazon or our “local” Fred Meyer grocery store 466 roadless miles away in Anchorage. The same goes for our co-workers here at the Lake. Once in a while, one of my colleagues receives a wrong order or too much of something and I become the recipient of some kind of random ingredient. When that happens, I like to imagine that I’m a contestant on one of those cooking shows that presents the competitors with a basket of ingredients – usually showcasing something foreign or little-known to the chef. Of course, I have the luxury of time and the Internet to compliment my culinary imagination.

My last “gift,” a jar of tahini, has been sitting on my shelf for a few weeks. Tahini is best described as a peanut-butter style condiment made from sesame seeds. It has a nutty flavor. But is has a sharpness to it, in my opinion, that can overtake the flavor. My first experience with tahini was as an ingredient in hummus. I actually prefer making hummus without tahini (see my recipe here).

So, the jar had been sitting, waiting for inspiration, until last Sunday. While perusing the culinary blogs I follow, I came across an article for chocolate tahini challah buns from Smitten Kitchen. The buns were beautiful. The idea of chocolate and tahini together evoked memories of a delicious treat I used to regularly enjoy – chocolate halvah – a rich Middle Eastern confection made of sesame flour and honey. Eggy challah bread is something I enjoy making and we both enjoy eating. This seemed like the perfect recipe to try on a baking Sunday.

We opted to drizzle a lemony glaze atop our buns and absolutely loved them. Yum! They were were loaded with complimentary flavors and weren’t overly sweet, making them worth the investment of time they required. (Be ready for hours to let the dough rise.) An abject lack of willpower had us eating half the buns on the day they were baked. But that meant more than half the buns were left over the next day. They were already partially dried out and had lost their appeal. How to resurrect them? A stroke of brilliance followed. A great way to revitalize day old bread is to turn it into overnight French toast.

Our review? Holy smokes! Forget eating the buns on the first day and go straight to the overnight French toast! The challah soaked up the creamy, eggy mixture and puffed up to a golden brown when baked. The swirled flavors of the chocolate and tahini couldn’t be beat. The presentation of lovely chocolate stripes sprinkled with sesame seeds and drizzled with a lemony glaze is a guaranteed home run for your next Sunday brunch, or Monday breakfast, or Tuesday dinner. 😉

Chocolate Tahini Overnight French Toast

Ingredients

  • 4 or 5 chocolate tahini challah buns, enough to fill the baking dish (see recipe below)
  • 4 eggs, beaten
  • ½ cup whole milk
  • ½ cup heavy cream
  • 1 tsp vanilla extract
  • 4 tbsp granulated sugar

Directions

  1. Lightly grease an 8 x 8 inch glass baking dish.
  2. Cut buns into 9 pieces, 3 slices in one direction and then 3 slices in the other (think tic-tac-toe.
  3. Spread the bun cubes evenly in baking dish.
  4. Mix together eggs, milk, cream, vanilla, and sugar.
  5. Pour egg mixture over cubes. Cover and refrigerate overnight.
  6. Remove the baking dish from refrigerator 30 minutes before baking.
  7. Preheat oven to 350° F (175° C).
  8. Cover dish with foil and bake for 30 minutes.
  9. Uncover and continue baking for 25 – 30 minutes. Surface should be lightly browned and the center will be firm.

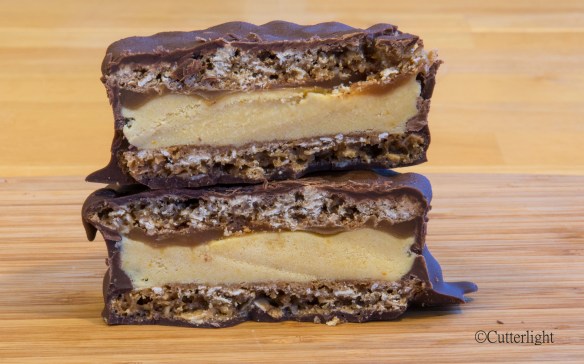
Chocolate tahini bun

Chocolate Tahini Challah Buns

Recipe from Smitten Kitchen

Ingredients

Dough

  • 2 large eggs
  • 1 large egg yolk
  • 1/4 cup granulated sugar
  • 1/2 cup vegetable oil
  • 2/3 cup milk
  • 3 3/4 cups all-purpose flour, plus more for the counter
  • 1 packet instant yeast
  • 1 1/4 teaspoons salt
  • Butter for baking pan

Filling

  • 3/4 cup semi-sweet chocolate chips
  • 1/2 cup unsalted butter
  • 1/2 cup powdered sugar
  • 1/4 cup cocoa powder
  • 1/4 cup tahini, well-stirred
  • 1 large egg, beaten
  • Sesame seeds

Glaze

  • 2 cups powdered sugar
  • 3 to 4 tablespoons juice

Directions

  1. In a large bowl, whisk eggs, yolk, sugar, oil and milk.
  2. Add flour, yeast and salt.
  3. Mix until it comes together. Continue to knead dough for 5 to 7 minutes.
  4. Oil a large bowl and let dough rise at room temperature for 2 to 2 1/2 hours, until slightly shy of doubled.
  5. Butter a 9×13-inch or equivalent size baking dish, or coat it with nonstick spray.
  6. Melt butter and chocolate together until smooth.
  7. Stir in powdered sugar, cocoa and tahini. Mixture should be a spreadable consistency.
  8. Assemble buns. On a very well-floured counter, roll out dough into a rectangle about 18 inches wide (side facing you) and as far away from you (i.e. length) as it comfortably goes, usually 12 to 15 inches.
  9. Dollop chocolate mixture over and spread it over dough evenly.
  10. Roll dough in a tight spiral.
  11. Cut log very gently — it’s going to be a soft mess, use a sharp serrated knife, sewing thread works well here too — into 1 1/2-inch to 2-inch segments.
  12. Arrange cut side up in prepared pan.
  13. Beat egg in small bowl. Brush tops of buns and tops of sides with egg and cover with plastic wrap.
  14. Leave it at room temperature to proof for another 60 to 90 minutes, until puffed a bit.
  15. Heat oven to 350 degrees F.
  16. Gently brush tops and sides with egg wash again and sprinkle with sesame seeds. Bake for 30 minutes, until golden-bronzed.
  17. Let cool slightly.
  18. Whisk glaze ingredients until smooth.
  19. Drizzle this over the buns right before serving.

Sunshine on a Snowy Day – Raspberry Lemon Curd Bars

Sunshine on a winter’s day… Lemon bars drenched in tangy-sweet raspberry jam

I love chocolate – in every form, flavor, and dish. I love dark, white, and milk chocolate. Except for a weird, avant-garde chocolate bar infused with pepper (??), I can’t think of a chocolate creation I haven’t enjoyed. Almost neck-in-neck with chocolate are desserts made with lemon. The difference with lemon is that it not only has a wonderfully tart flavor, but it also has a strong seasonal connection to summer. One bite or sip of lemon brings me back to sunshine splashed afternoons and evenings cooled by gentle breezes sitting in our little piece of paradise behind our home in California among Meyer lemon trees. When we moved to Alaska, I even made up a gallon’s worth of Meyer lemon simple syrup in order to ease the separation from those prolific trees.

As we hit the middle of March, our minds drift toward Spring! In our former life, I would be itching to get the planting pots and garden beds ready. In Chignik Lake, I’m ready to pull the Pack Rafts out and head down nearby rivers. Mother Nature has had three little words in response to these inclinations…”Not. So. Fast.” All the snow we didn’t see this past winter has been just now swirling around our windows and creating lovely white drifts. Our lake iced over, started to thaw, and is now covered in ice again.

As Jack tends to his culinary diversion, a slow-cooked moose roast, I decide on my own diversion…one that will bring a little sunshine into our home. I took a tried and true lemon curd bar recipe from my Williams and Sonoma Baking Book and adapted it with items from my bush pantry. All I can say is Wowee! After the initial mix of sweet and tart lemon, you are rewarded with a blanket of pure raspberry bliss. A definite blast of summer, in the best way possible.

Raspberry Lemon Curd Bars

Ingredients

Crust

  • 1 cup all-purpose flour
  • 1/3 cup granulated sugar
  • pinch salt
  • pinch cinnamon
  • ½ cup unsalted butter, melted

Filling

  • ¾ cup granulated sugar
  • 2 tbsp all-purpose flour
  • pinch salt
  • 3 large eggs (I used powdered eggs)
  • ½ cup lemon juice (I used good quality bottled lemon juice)
  • 3 tbsp heavy whipping cream

Topping

  • Raspberry jam (I used freezer jam which has a much brighter color and flavor)
  • Confectioners’ sugar

Directions

  1. Make crust.
  2. Preheat oven to 350° F (180° C).
  3. Grease an 8-inch square glass baking dish.
  4. Mix crust ingredients together.
  5. Press dough into bottom of baking dish.
  6. Bake for 20 minutes. Crust should be a pale golden color.
  7. Let the crust cool in the baking dish on a wire rack while you prepare filling.
  8. Reduce oven temperature to 325° F (165° C).
  9. Whisk together filling ingredients.
  10. Pour the mixture over the baked crust.
  11. Bake until filling is set, about 20 minutes. It may slightly jiggle when dish is shaken.
  12. Let lemon bars cool in the dish on a wire rack for at least 30 minutes.
  13. When ready to serve, run a knife around the edge of the pan. Cut into 12 or 16 rectangles.
  14. Remove from dish with a spatula and place pieces to be served on a serving dish.
  15. Spoon desired amount of jam on each piece.
  16. Dust each piece with confectioners’ sugar right before serving.

Where did it go? Bourbon Pecan Mini Skillet Brownie

This delicious little dessert was supposed to be for two. Fudgy, chocolatey, with a nutty crunch and a hint of caramely bourbon. Maybe it wasn’t enough!

We had just finished dinner – bowls brimming with homemade clam chowder served with a hunk of toasted garlic sourdough on the side. The forecast was for snow, but instead Chignik’s famously howling winds were slamming our house with torrents of icy rain blown sideways. Soup alone was not enough in the face of such weather.

We had a stash of chocolate squares to nibble for dessert, but even those didn’t sound satisfying. Something quick and freshly baked might do the trick, I thought. Armed with a six-inch cast iron skillet, a few tablespoons of this and a dollop that, 25 minutes later all that was left was the two bites you see above. Well, that’s not true. We paused for a photographic intermission and then devoured the last two bites. Now that was satisfying!

Bourbon Pecan Mini Skillet Brownie for Two

Ingredients

  • 5 tbsp all purpose flour
  • 6 ½ tbsp granulated sugar
  • 2 ½ tbsp Dutch processed cocoa powder
  • pinch salt
  • 3 tbsp vegetable oil, we use canola
  • 1 egg
  • 1 tbsp bourbon
  • 1/3 cup semi-sweet chocolate chips
  • 1/3 cup pecans, chopped coarse

Directions

  1. Heat oven to 350° F. Lightly grease 6” cast iron skillet.
  2. In a medium bowl, whisk together flour, sugar, cocoa powder and salt.
  3. Add in oil, egg, and bourbon.
  4. Stir until well mixed.
  5. Fold in chocolate chips.
  6. Fold in pecans.
  7. Spoon batter into prepared pan.
  8. Bake for 20 minutes. Center should look done. Cook a little longer for a more well-done brownie. We like ours nice and fudgy, so 20 minutes was perfect.
  9. Let cool for 10 minutes and then dig in!


Pumpkin Caramel Ice Cream Sandwiches – They are It!

The crème de la crème of frozen desserts – creamy spiced pumpkin ice cream on a layer of caramel sandwiched between the chewy perfection of oatmeal cookies. The whole creation is dipped in a rich, crunchy chocolate coating.

December may not be the time that most people think of ice cream. But in our home, this is the time of the year when camping and fishing gear are stowed away and the stormy weather outdoors has us working on projects inside. One of my favorite winter hobbies is creating with baked goods.

I’m not sure what caused me to think of It’s Its, but somehow they overtook my thoughts last weekend. It’s Its are a San Francisco frozen creation that I was introduced to during a visit to the great city while in high school. It is really a simple dessert – vanilla ice cream sandwiched between two oatmeal cookies and dipped in chocolate that instantly hardens. Simple but a perfect balance of flavors and textures – the ingredients have so much flavor and the cookies have the best texture. The sandwich is messy enough that you have to pay attention to the potential loss of ice cream, chocolate bits and cookie, but it manages to stay together long enough so you never lose one little bit.

This time of the year, I’m drawn to pumpkin-flavored creations. This being the case, I have a quart of homemade spiced pumpkin ice cream tucked away in our freezer. I also had a jar of caramel topping in the fridge. An It’s It-type dessert made with this ice cream and topping seemed like a winning combination. All I needed was a chewy oatmeal cookie and a chocolate dip that hardens and then cracks just right to turn this memory into a reality with a pumpkin-caramel twist.

Let the experiment begin!

Would the caramel be too hard? Would the frozen cookies remain chewy? Would the coating have that wonderful crunch? The answer, as you’ve probably guessed, is a resounding Yes! They are a bit time consuming to make because of having to wait in between steps for freezing. It’s totally worth it. After all the time put in to making these at home, we have eight delicious ice cream sandwiches to enjoy and to share with friends.

Pumpkin Caramel Ice Cream Sandwiches

Ingredients

  • 8 scoops pumpkin ice cream (click here for recipe)
  • 16 oatmeal cookies (see below)
  • caramel ice cream topping
  • chocolate dipping sauce (see below)

Directions

  1. Line baking sheet with parchment paper.
  2. Pair up oatmeal cookies so that cookies are of equal sizes.
  3. Spread caramel topping on one side one of the pair of oatmeal cookies.
  4. Place one scoop of ice cream atop caramel topping.
  5. Sandwich second cookie atop ice cream.
  6. Place sandwiches on prepared baking sheet and freeze for 30 minutes.
  7. While sandwiches are freezing, prepare chocolate dipping sauce.
  8. Use a pair of forks to maneuver sandwiches. Place one sandwich at a time into dipping sauce. Flip sandwich. Remove from dipping sauce and place back on parchment-lined baking sheet.
  9. Repeat with all sandwiches.
  10. Freeze for one hour.
  11. Enjoy right away or wrap tightly in plastic wrap and keep in the freezer until you are ready to eat.

Chewy Oatmeal Cookies

Ingredients

  • ½ cup unsalted butter, melted
  • ½ cup brown sugar
  • ½ cup granulated sugar
  • ½ tsp vanilla
  • 1 egg
  • 1 cup all purpose flour
  • ½ tsp salt
  • ½ tsp baking soda
  • ¾ tsp cinnamon
  • 1 ½ cup rolled oats (instant or regular)

Directions

  1. Combine butter and sugars. Mix well.
  2. Add vanilla. Mix well.
  3. Add egg. Mix well.
  4. In a separate bowl, whisk together flour, salt, baking soda, and cinnamon.
  5. Mix flour mixture into butter mixture.
  6. Stir in oats.
  7. Refrigerate dough for at least 30 minutes.
  8. Heat oven to 375° F. Line baking sheet with parchment paper.
  9. Scoop out dough and roll it into 1-inch balls. Place balls on prepared baking sheet.
  10. Flatten cookies with fingers, or base of a flat glass. Use a small amount of water on your fingers or on the bottom of the glass to prevent sticking.
  11. Bake cookies for 8 minutes.
  12. Allow to cool in pan for a couple of minutes. Finish cooling on a wire rack.

Chocolate Coating

Ingredients

  • 8 oz semi-sweet chocolate chips
  • 1 ½ tbsp coconut oil

Directions

  1. Place chips and coconut oil in top of double boiler.
  2. Melt mixture over simmering water.
  3. Stir thoroughly.
  4. Use coating immediately in above recipe.

Frosted Chocolate Orange Cupcakes

Moist chocolate cake infused with orange topped with super creamy rich chocolate buttercream frosting…. happy birthday to me!

Another stellar recipe from my Williams-Sonoma Baking book. I can’t say enough good things about this cookbook. Every recipe is great. In addition to being great recipes, they are also great bases to build from or tinker with. For my birthday, I had narrowed down my celebratory dessert to three chocolate wonders from this cookbook. The combination of chocolate and orange is my all-time favorite, so the chocolate orange cupcakes won. The picture says it all – these delicious little cakes will start a party just by showing up.

Chocolate Orange Cupcakes

Ingredients

  • 3 tbsp Dutch processed cocoa powder
  • ¼ cup hot water
  • 1 ¼ cups all purpose flour
  • ½ tsp baking powder
  • ½ tsp baking soda
  • ¼ tsp salt
  • zest of 1 orange
  • 2 large eggs, at room temperature
  • ¾ cup granulated sugar
  • ½ cup buttermilk, at room temperature
  • ½ tsp pure vanilla extract
  • ¼ unsalted butter, melted, at room temperature

Frosting

  • 6 oz. semi-sweet chocolate chips
  • 1 cup unsalted butter, at room temperature
  • 2 cups confectioner’s sugar

Directions

  1. Preheat oven to 350° F.
  2. Line 12 standard muffin cups with paper liners.
  3. In a small bowl, stir cocoa with hot water until it is dissolved. Set aside.
  4. Whisk flour, baking powder, baking soda, and salt together in medium bowl.
  5. Mix orange zest into flour mixture. Set aside.
  6. In a large bowl, whisk eggs and granulated sugar together.
  7. Whisk in buttermilk and vanilla.
  8. Whisk in cocoa.
  9. Whisk in melted butter.
  10. Stir in flour mixture.
  11. Spoon batter into each muffin cup. Fill each cup about ½ full.
  12. Bake cupcakes until puffed and a cake tester inserted into the center of a cupcake comes out clean, about 15 – 20 minutes.
  13. Let cool completely on wire rack. Remove cupcakes when pan is cool.
  14. Make frosting. Put chocolate chips in top of double boiler. Melt chocolate over simmering water. Let cool to room temperature.
  15. Beat butter and confectioner’s sugar until creamy and smooth, about 3 minutes.
  16. Beat in melted chocolate until well-mixed.
  17. Fill a pastry bag fitted with a 12mm star tip (1/2 inch) with frosting.
  18. Pipe a spiral on top of each cupcake.
  19. Refrigerate the cupcakes until 30 minutes before serving to set the frosting.

Definitely Thankful for This – Almond Raspberry Tart

Tis the season for decadent desserts! Imagine a bite of smooth, sweet almond swathed in fresh raspberry jam atop flaky layers of buttery piecrust. Oh yeah!

Sure, our Thanksgiving always ends with Jack’s pumpkin pie. It’s a delicious tradition we don’t skip. When we plan the big feast, one dessert never seems to be enough. Some years, the second dessert has been a caramel apple pie, a lemon meringue pie or even a chocolate layer cake. This year, I really wanted to use almond paste that I sent out in our annual shopping. It’s an ingredient I rarely use, but love so much. Many years ago, when I first discovered bakeries and baked goods, I would always go for almond croissants. The combination of the sweet, smooth almond paste and the buttery, flakey croissant were irresistible. This tart has the same elements along with an added bonus – homemade raspberry jam. Some of the jam I made this year was a freezer jam. In other words, it wasn’t cooked. The fresh berries are stirred with some sugar and pectin and put straight into the freezer. This method of making jam preserves the fresh bright flavor of the raspberries straight from the vine.

The tart starts with a buttery, flaky piecrust that is partially blind baked to keep it light and airy. The crust is brushed with jam and then covered with an almond paste mixture, which is the main event. The whole tart is sprinkled with almond slices which provide the finishing touch. What a delicious combination! We all enjoyed the beautiful and delicious addition to this year’s table. Sadly, it is now just a fond memory.

Raspberry Almond Tart

Ingredients

  • pie dough for one crust
  • 1/2 cup unsalted butter, at room temperature
  • 8 oz. almond paste, cut into small cubes
  • 1/4 cup granulated sugar
  • 2 large eggs
  • 1/3 cup all purpose flour
  • 1/3 cup good quality raspberry jam
  • 1/3 cup sliced almonds

Directions

  1. Roll out dough to a 12-inch disk. Cover a 9 ½ inch tart pan or a 9 inch springform pan.
  2. Trim off excess if using a tart pan. If using a springform pan, trim off dough 1 ½ inches up the side of the pan. The dough will shrink when baked, so make sure to extend the dough higher than you want your end product.
  3. Freeze the shell for 30 minutes or until firm.
  4. Place oven rack in lower third of oven. Preheat to 375° F.
  5. Partially blind bake shell for 20 minutes. Shell will be done when it is pale gold and dry looking.
  6. Remove pan from oven and cool on a wire rack.
  7. Reduce oven temperature to 350° F.
  8. In a large bowl, beat butter until smooth.
  9. Add almond paste, a couple pieces at a time. Continue beating until smooth. Add more pieces and repeat beating. Continue with remaining almond paste pieces.
  10. Add sugar to almond paste mixture and beat until smooth.
  11. Add eggs, one at a time, beating after each addition.
  12. Stir in flour.
  13. Spread jam evenly on base of tart shell.
  14. Spoon almond mixture atop jam. Smooth the top.
  15. Sprinkle almond slices evenly over tart.
  16. Bake until filling is golden and the middle is firm, 35-45 minutes.
  17. Cool on wire rack.

Serve at room temperature.

Recipe adapted from The Williams-Sonoma Baking Book


Homemade Crispy Thin Wheat Crackers in a Snap

Warm from the oven or cooled and ready for a party, these crispy little wafers with a hint of sweet, a hint of wheat and a touch of salt are sure to please.

A Thanksgiving gathering at our house prompted me to come up with an appetizer that I could conjure out of our bush kitchen. In other words, I couldn’t pop over to the nearest grocery store to pick up phyllo dough or other fun ingredients that I might have available back when I lived in a city.

A great ingredient we do always have on hand is salmon – in this case I had in mind a jar of smoked salmon. We also happened to have a block of cream cheese in our freezer. Mix those two and you have a show-stopping spread. Yummy appetizers with smoked salmon spread can be served on many tasty items – mini bagels, crepes, crostini, and of course, crackers.

I love making homemade crackers. They have a satisfying crunch and flavors of their store-bought siblings. But the homemade versions lack the stabilizers and other mystical, less than healthful ingredients. These thin wheat crackers are no different.

You can simply roll out the dough with a rolling pin, but in this case I ran the dough through my pasta roller. The pasta roller not only produces thinner dough than I can achieve with a rolling pin, it also creates more uniformly even dough resulting in more evenly baked crackers.

By the time Jack’s perfectly roasted chickens came out of the oven, three dozen crackers and a bowl of smoked salmon spread were gone!

Homemade Thin Wheat Crackers

Ingredients

  • 1 1/4 cups whole wheat pastry flour
  • 1 1/2 tbsp granulated sugar
  • 1/2 tsp salt
  • 1/4 tsp smoked paprika
  • 4 tbsp unsalted butter, frozen
  • 1/4  cup ice cold water

Directions

  1. Whisk together flour, sugar, salt, and paprika in a medium bowl.
  2. Grate frozen butter into flour mixture using a cheese grater.
  3. Cut butter into flour mixture using two knives to form smaller bits of butter. Mixture is ready when butter bits are the size of small peas and the mixture looks like coarse cornmeal.
  4. Add water, stir with fork until dough comes together. If dough seems too dry, add additional cold water by tablespoons until dough comes together. Knead once or twice. Don’t over knead.
  5. Preheat oven to 350 degrees F. Line baking sheet with parchment paper.
  6. Divide dough in half. Lightly flour work area. Roll out dough into a very thin rectangle.
  7. Cut dough into cracker shapes. I used a pastry wheel to cut one batch and a knife to cut the other. Both worked well.
  8. Use a fork to prick crackers several times.
  9. Place crackers on prepared baking sheet. They can be close together as they won’t spread.
  10. Optional: I sprinkled the crackers with more salt before I baked them to add to the look and to provide additional flavor.
  11. Bake crackers until crisp, about 7 minutes. Flip crackers and bake an additional 7 minutes. If your crackers are thicker, you may need to bake a bit longer.
  12. Cool on wire racks. Repeat process with second half of dough.
  13. Enjoy crackers right away. Store extras in an airtight container to keep them crisp.


Better Bagels (it’s the sourdough)

The addition of sourdough gives these bagels texture and flavor.

I’m been really happy with my sourdough starter. I’ve used it for pancakes, waffles, and English muffins. Every week, I use this delicious starter to turn out two beautiful loaves of sourdough bread to accompany many of our meals. Recently, I finished a batch of homemade lox. I wondered what would happen if I included some of my trusty starter in my bagel recipe.

Wow. What an improvement. The resulting bagels have a subtle sourdough flavor. But the flavor wasn’t the main improvement – it was the texture. These bagels have a perfectly soft interior and a perfectly chewy exterior. We couldn’t believe the difference from an already tried and true recipe. I’ve made the recipe twice now with the same happy results. It’s a keeper!

Sourdough Chewy Bagels

Ingredients

  • 2 tsp active dry yeast
  • 1 1/2 tbsp granulated sugar
  • 1 1/2 cups warm water (105° F/40° C)
  • ½ cup sourdough starter
  • 3 cups all-purpose flour
  • 1 1/2 tsp salt
  • 3 qts water
  • 3 tbsp granulated sugar
  • 1 egg, beaten
  • toppings such as poppy seeds, toasted onions, sesame seeds, etc. (optional)

Directions

  1. In a large bowl, stir together yeast, 1 1/2 tbsp sugar and water. Let sit for about 5 minutes to make sure the yeast is good. (It will foam.)
  2. Stir in sourdough starter
  3. Stir in salt and the flour, 1/2 cup at a time. The last 1/2 cup, you will need to knead in by hand.
  4. Knead the dough until it is smooth and elastic.
  5. Coat the inside of a large bowl with oil and place the dough inside.
  6. Cover bowl with plastic wrap and let dough rise until doubled, about an hour.
  7. Line baking sheet with parchment paper.
  8. Cut dough into 8 equal pieces.
  9. Roll pieces into balls.
  10. Flatten balls slightly.
  11. Poke your finger through center of each ball and twirl dough around your finger to enlarge the hole.
  12. Place bagels on parchment-lined baking sheet to rest.
  13. Bring 3 qts water to boil in large pot. Stir in 3 tbsp sugar.
  14. Place 4 bagels in boiling water. Boil for 1 minute. Flip bagels and let boil for another minute.
  15. Place boiled bagels on clean, dry towel.
  16. Place remaining 4 bagels in boiling water. Repeat boiling process with these bagels.
  17. Take bagels from towel and place them on parchment-lined baking sheet.
  18. Preheat oven to 375° F (190° C).
  19. Brush bagels with beaten egg.
  20. Sprinkle desired toppings on bagels (poppy seeds, sesame seeds, charnushka, minced dried onion and minced dried garlic are some of our favorites).
  21. Bake in preheated oven for 20 – 25 minutes, until browned.

What to do with leftover instant oatmeal packets? Maple and Brown Sugar Muffins, Of Course!

Instant oatmeal packets – overly sticky-sweat on their own –  can be transformed into moist, tasty, healthy breakfast treats. 

I really hate to see food wasted. So when we recently discovered several instant oatmeal packs fated to be thrown out, I grabbed them up thinking they might make decent breakfast fare for backpacking. Unfortunately, as it turns out the oatmeal is way over-processed and there’s far too much sugar. So I began thinking about how else they might be used. Muffins! I added leftover trail mix to the batter as well as to the topping to add some crunch and flavor. Moist and flavorful,  these muffins along with some fruit and freshly brewed coffee make for a quick and delicious breakfast. In fact, we’ve found ourselves snacking on them throughout the day!

Maple and Brown Sugar Oatmeal Muffins

Ingredients

Streusel Topping

  • 3 tbsp all purpose flour
  • 3 tbsp brown sugar
  • 1/2 tsp cinnamon
  • 1/4 cup nuts, chopped coarse
  • 2 tbsp unsalted butter, melted

Muffins

  • 1 3/4 cup all purpose flour
  • 1/2 cup brown sugar
  • 1 tbsp baking powder
  • 1/4 tsp salt
  • 2 packets flavored instant oatmeal
  • 2 eggs, beaten
  • 1/4 cup milk
  • 3/4 cup plain yogurt
  • 1/4 cup vegetable oil
  • 1 tsp vanilla
  • 2 tbsp real maple syrup
  • 1 cup trail mix, chopped coarse

Directions

  1. Preheat oven to 400 degrees F (200 degrees C). Grease 12-muffin cup tin.
  2. In a small bowl, combine all streusel ingredients. Mix with fork until the mixture resembles coarse crumbs. Break larger pieces. Set aside.
  3. In a large bowl, add first 5 muffin ingredients. Mix together using a whisk.
  4. In a medium bowl, whisk together eggs, milk, yogurt, oil, vanilla and syrup.
  5. Mix wet ingredients into dry.
  6. Fold in trail mix.
  7. Spoon batter into prepared muffin tin. Each cup will be about 2/3 full.
  8. Sprinkle streusel topping on each muffin.
  9. Bake in preheated oven for 15 minutes. When done, a wooden pick inserted into center of muffin will come out clean.
  10. Let cool in pan on wire rack for 5 minutes before serving.