Perfect Sourdough English Muffins: Easier than You Think!

english-muffins-n

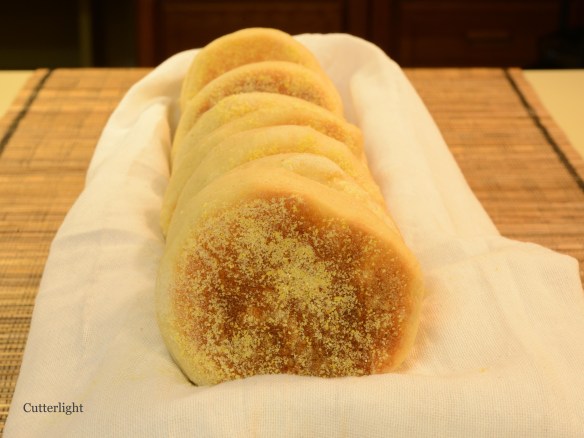
Perfectly round. Perfectly chewy. Perfect little breakfast breads. Why did I quit on you so quickly. my Darlings?

With success under my belt making sourdough bread, I found myself contemplating what other types of delicious baked goods I could make with my sourdough starter. A friend in the village lent me an old Alaskan recipe book with a huge collection of recipes that are truly Alaskan. Did you ever wonder how to cook up beaver meat? Or fireweed stalks? These are just a couple of the interesting recipes found in this volume. Of course, there was a substantial section on sourdough. I don’t know if many people realize this, but sourdough is a very Alaskan thing.  In fact, you can find starters that date back to the Klondike gold rush! It was an easy thing for people of that time to keep fresh starter going. They only had to regularly feed it. Delicious pancakes and breads could then be whipped up in a snap.

Now that I have a healthy starter going (I actually have two, thanks to another friend), I started playing around with recipe ideas that would showcase this unique ingredient. In short order, an idea came to me from a recipe that I’d failed at several years ago…

I got into serious baking when we first came out to the Alaska bush. At that time, we decided to make as much of our food as we could from scratch, knowing that our local store would have limited supplies. We shipped out ingredients in bulk, like 50-pound bags of flour and sugar and 25-pound bags of rice and beans. It was lovely to have a year’s worth of ingredients in our pantry. Lately, I’ve been contemplating how my baking skills and confidence have grown since the days of bread machine loaves and basic chocolate chip cookies to what I turn out in our kitchen now: lattice-topped pies with homemade crusts and my own “Twix” bars in which every layer of the candy is crafted from scratch.

I can’t remember what about my first English muffins was so bad, but I do remember being quite frustrated and promptly turning my back on these little breads. Until now. I’m glad I came around. These round beauties came out better than store bought. They had that lovely sour tang to them, the chewiness that is the hallmark of good English muffins with the expected crunch of cornmeal on the outside. Of course, we split them with forks before serving them toasted with butter and homemade jam. We also use these muffins for tasty breakfast sandwiches of fried egg, salmon, and melting cheddar cheese. As it turns out, these tasty baked breads are actually pretty easy to make. Who knows what wrong I did to this recipe so many years ago.

Sourdough English Muffins

Ingredients

  • 2 tbsp granulated sugar
  • 2 cups warm water (about 110 degrees F)
  • 1 tbsp active dry yeast
  • 7 cups all-purpose flour
  • 1 cup sourdough starter
  • ½ cup nonfat dried milk
  • ¼ unsalted butter
  • 1 tbsp salt
  • cornmeal, for coating

Directions

  1. Combine all of the dough ingredients (except cornmeal) in a large bowl.
  2. Mix and knead. Dough should be elastic and not too sticky.
  3. Place dough in a lightly greased bowl. Cover with plastic and let rise for about 1 hour.
  4. Turn dough out on a lightly flour surface.
  5. Divide dough in half.
  6. Roll dough to about ½ inch thick. Cut into 3” rounds with cookie cutter. Or just cut dough into squares, using a knife.
  7. Re-roll and cut any remaining scraps.
  8. Repeat with remaining half of dough.
  9. Place rounds onto cornmeal-sprinkled baking sheets. Sprinkle with additional cornmeal.
  10. Cover with plastic wrap and let them rise for another hour.
  11. Preheat a large griddle over medium-low heat.
  12. Place as many muffins as you can (without crowding) on griddle.
  13. Cook muffins for 10 minutes on each side.
  14. Remove muffins from griddle and cool on a wire rack. Store tightly wrapped at room temperature for about 5 days. Freeze for longer storage.

Recipe adapted from King Arthur Flour.

Happy Holidays! Lowbush Cranberry (Lingonberry) Upside-Down Cake

lingonberry-upside-down-cake_n

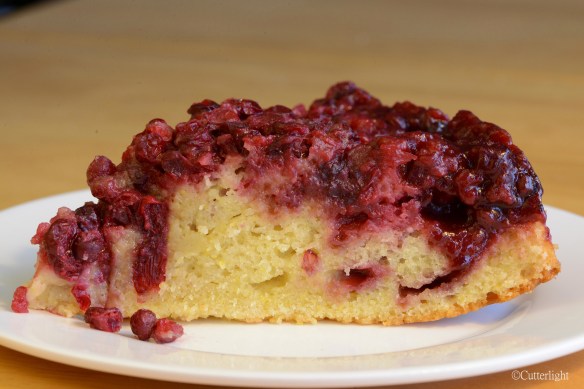
Bursting with the flavors and colors of the holidays, this lowbush cranberry cake makes a beautiful centerpiece for a fall table and, if there is any left, the breakfast table the next day!

Oh, these little red gems, these sour little beauties. They go straight from the freezer into a delicious batter and bake up into a cake you’ll want to share with friends.

Lowbush cranberries (as they are known here in Alaska) are our superstar fruit of fall and winter. Known as lingonberries elsewhere, these tart, tiny red berries grow close to the ground in cold, boggy habitat of northern climes. They taste similar to the cranberries we used to buy in the store, but they are so much better. As with many small, wild fruits, they are packed with more flavor than their mass-produced counterparts. And according to the University of Alaska, our lowbush cranberries contain more antioxidants due to clean air and long summertime sunlight hours. The berries are easy to pick and easy to clean and are widely available in our neck of the woods just around the time of the first frost. So far, we’ve made them into hot juice drinks and cranberry sauce. Now they are starring in this sumptuous upside down cake.

Lingonberry aka Lowbush Cranberry Upside Down Cake

Ingredients

Bottom Layer

  • 4 tbsp unsalted butter
  • ¾ cup dark brown sugar
  • 3 cups lowbush cranberries (or substitute store-bought cranberries)

Batter

  • 1 ¼ cup all purpose flour
  • ¼ cup corn meal
  • 1 ½ tsp baking powder
  • ¼ tsp salt
  • ½ cup unsalted butter, melted or browned
  • ¾ cup granulated sugar
  • 1 tsp Penzeys powdered lemon zest (or zest of 1 lemon)
  • 2 large eggs, beaten
  • 1 tsp vanilla extract
  • ½ cup whole milk

Directions

  1. In a small saucepan, heat 4 tbsp unsalted butter and brown sugar.
  2. Stir constantly until butter and sugar are melted together and bubbling.
  3. Pour mixture into bottom of 9 inch cake pan. Set aside.
  4. Preheat oven to 350 degrees F (180 degrees C).
  5. Whisk together flour, corn meal, baking powder and salt in a large bowl.
  6. In a small bowl, whisk together melted butter, sugar, lemon zest, eggs, vanilla and milk.
  7. Pour wet ingredients into dry and whisk together until mixed.
  8. Pour cranberries evenly on top of butter mixture in the 9-inch pan.
  9. Pour batter evenly over cranberries.
  10. Bake cake in preheated oven for 50 minutes. Wooden pick inserted into center will be clean when cake is done.
  11. Let cake cool in pan on wire rack for 10 minutes.
  12. Run a knife around the circumference of cake. Invert on cake platter to serve.
  13. Serve warm.

Recipe adapted from David Lebovitz.

Diminutive Raspberry Cheesecakes with a Sweet Raspberry Jam

diminutive-cheesecakes_n

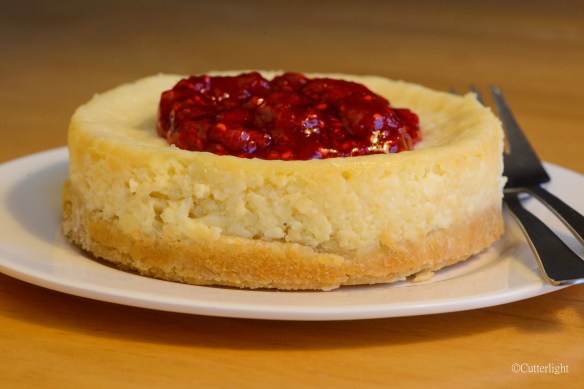
Cheesecakes for one – creamy vanilla with the tang of cream cheese. Top it with some favorite jam and Wow, this makes for a delicious, elegant dessert.

Out in the Alaska bush, I don’t usually stock cream cheese in my pantry. But during a recent visit to a neighboring village I happened across a two-pound block at the store. It doesn’t freeze very well, which makes for a perfect excuse to immediately create lots of baked items with this delicious ingredient. I’ve made these lovely little cheesecakes before using matcha green tea as the flavoring. This recipe is a perfect base in which to add in a variety of flavors. For this batch, I wanted to showcase my raspberry freezer jam, so I created a complementary vanilla-flavored cake.

Diminutive Vanilla Cheesecakes

Ingredients

Crust

  • 1 1/2 cups all purpose flour
  • 1/3 cup granulated sugar
  • 1 egg, beaten
  • 1/2 cup butter, melted

Filling

  • 1 package of cream cheese, 250 grams, softened to room temperature
  • 1/2 cup granulated sugar
  • 1 large egg, beaten
  • 1 tsp vanilla extract

Directions

  1. Preheat oven to 300 degrees F (150 degrees C). Line 8 standard-sized muffin tin cups with paper liners.
  2. In a medium bowl, mix together crust ingredients.
  3. Evenly divide crust mixture into lined muffin tin cups. Press down to form bottom of cheesecakes.
  4. Bake crusts for 5 minutes. Let cool.
  5. In a large bowl, whisk together filling ingredients. There should be no lumps and all ingredients should be mixed well.
  6. Divide filling evenly into paper lined cups.
  7. Bake cheesecakes until set, about 16 – 18 minutes. Centers should not jiggle.
  8. Refrigerate cheesecakes for 3 hours before serving.

Roasted Squash Pecan Bread

squash-pecan-bread-n

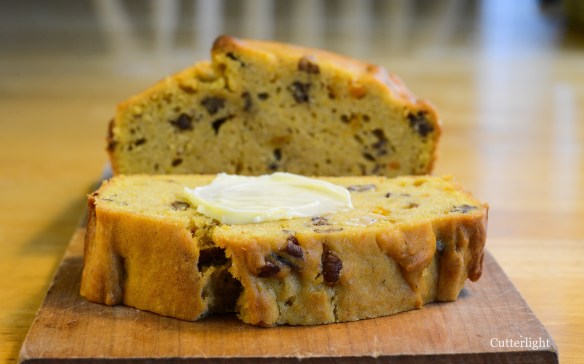
Imbued with traditional fall flavors, we have a feeling this bread could become a new Thanksgiving tradition!

During our annual shopping in July, we picked up several acorn and butternut squashes – favorite centerpieces in many of our recipes. There is also a practical side to squashes when living in the bush… they ship well and last a long time in a cool, dry location. Up in Point Hope, we used to keep squash and potatoes for months in our mudroom. Here in Chignik Lake, a much more damp location, the fridge serves as our long-term storage area.

Recently, after oven-roasting a butternut squash in olive oil and garlic, I decided to try something new. I have a time-tested base recipe for fruit bread, but instead of the usual pears or other fruit, I used the roasted squash. Even the raw dough was quite tasty! (I know, I know, I’m not supposed to eat raw dough…but I always do). The squash helps to make the bread moist and satisfying and pumpkin pie spices give it a sense of holiday seasons. Pecans add a layer of flavor and a hearty crunch. This would be a perfect Thanksgiving bread!

Roasted Butternut Squash Pecan Bread

Ingredients

  • 2 cups mashed roasted butternut squash (any roasted squash will work)
  • ½ cup vegetable oil
  • ½ cup unsalted butter, melted
  • 4 large eggs, beaten
  • 2 tsp vanilla extract
  • 1 ½ cups granulated sugar
  • 1 tsp galangal (or ground ginger)
  • ½ tsp ground nutmeg
  • 1 tsp ground cinnamon
  • 3 ½ cups all purpose flour
  • 1 tsp baking powder
  • ½ tsp salt
  • 1 cup chopped pecans

Directions

  1. Grease two 8 in. x 4 in. x 2 in. loaf pans. Set aside.
  2. Preheat oven to 350 degrees F (175 degrees C).
  3. In a large bowl mix together squash, oil, butter.
  4. Mix in eggs and vanilla.
  5. Mix in sugar.
  6. Sift in spices, flour, baking powder and salt.
  7. Mix well, but do not over mix.
  8. Fold in pecans.
  9. Pour batter into two prepared pans.
  10. Bake for 60 minutes or until a wooden pick inserted into center of loaf comes out clean.
  11. Top should be lightly browned.
  12. Cool for a few minutes in pans. Remove loaves and finish cooling on wire racks.

It’s All in the Details – Super Rich Chocolate Chip Brownies and the Writing Process

brownies-chocolate-chip-n

Moist, cakey, fudgy… forget the description, just give me some of that!

Sometimes the lines get blurred between teaching elementary students and baking. *Warning* Do not read the following blog on an empty stomach. In writing, young students often find it difficult to add appropriately intriguing details to their writing. In order to teach these skills, I often model an example by writing in front of them. I will write something very simple like “My favorite dessert is a brownie sundae.” I will explain that interesting writing about food should make the reader hungry. They usually agree that my initial example didn’t accomplish this goal. Then I will write something like the following –

Imagine a brownie. Not just any brownie. This one is cooling from the oven. Its texture is somewhere between a rich chocolate cake and gooey chocolate fudge. The warm brownie has been saturated with melted chocolate chips that have been baked into this brownie. Atop this brownie mountain is a scoop of custardy French vanilla ice cream speckled with seeds from real vanilla beans. Homemade whipped cream with a faint aroma of vanilla is on top of the ice cream. Hot, thick fudge is dripped over the top of the dessert. It is warm enough to slightly melt the ice cream, but not hot enough to hurt your tongue. Of course, the whole sundae is topped with salty peanuts and a sweet, red maraschino cherry.

By the time I get to the description of the fudge, the students are usually squirming in misery. And my point is made.

The centerpiece and foundation of this favorite dessert is the brownie. Many people are staunch cakey brownie lovers. In the other camp are those who demand the gooey fudgy brownie. This brownie recipe results in a balance of moist cake texture with enough gooeyness to satisfy those who need that intense dense brownie. Enjoy this brownie in your favorite sundae – or straight from the oven. Do let it cool a bit before you dig in!

Super Rich Chocolate Chip Brownie

Ingredients

  • 2 cups granulated sugar
  • 5 large eggs
  • 1 cup canola oil (or other light vegetable oil)
  • 1 tsp vanilla extract
  • 1 1/3 cups all purpose flour
  • ½ cup Dutch processed cocoa powder
  • generous pinch salt
  • 1 cup semi-sweet chocolate chips

Directions

  1. Grease a 9 x 13 inch glass baking dish. Set aside.
  2. Preheat oven to 350 degrees F (175 degrees C).
  3. In a large bowl, stir together sugar, eggs, oil, and vanilla extract.
  4. Sift flour, cocoa powder and salt into egg mixture.
  5. Mix until moistened, do not overmix.
  6. Evenly spread batter into prepared baking dish.
  7. Sprinkle chocolate chips over batter.
  8. Bake for 30 minutes. Brownies will start to pull away from edge of dish when finished.
  9. Be patient. Allow to cool a bit before cutting.

Hot Spiced Lingonberry Tea (aka Hot Lowbush Cranberry Tea)

lingonberry-hot-tea-n

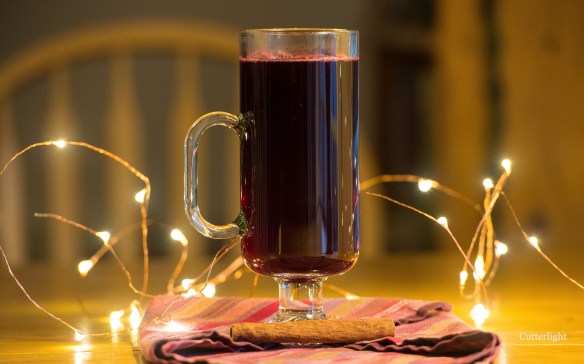
Hot spiced lingonberry juice – a magical potion.

When we were in Mongolia, we were served hot fruit tea, particularly sea buckthorn berry tea. Based on our experience with teas, we expected this drink to be made from tea leaves along with dried fruit. The tea we were served was not really tea, but heated fruit juice infused with spices. Although we’d both previously enjoyed hot, spiced cider, it hadn’t occurred to us to heat other juices and enjoy them this way. Thank you, Mongolia.

Fast-forward to the present. Now is the time to pick lowbush cranberries in Alaska. We’ve been told for years to wait until after the first frost to pick these bright red beauties. In Point Hope, the first frost often coincided with snow and the first Arctic blasts from points still further north. By the time this happened, it was painfully cold to go out and pick these gems. Chignik Lake lies at a much lower latitude, and mornings that begin with a glaze of frost have been warming up into the 50’s. So, we’ve been picking lowbush cranberries by the gallon. Lowbush cranberries, otherwise known as lingonberries, are the wild cousins of the big juicy cranberries that appear in stores around Thanksgiving. Because of my recent experience with Mongolian fruit teas, I processed my lowbush cranberries into juice, saving the remaining pulp to make delicious cranberry sauce to go with dishes such as roast turkey and grilled pork tenderloins.

Making the juice was easy. I combined four cups of berries with two-and-a-half cups of water. I brought the water to a simmer for about ten minutes. While the berries were simmering, I took a silicon spatula and stirred and squashed the berries. After ten minutes, I hung a piece of cheesecloth in a tall food storage container and placed the berry mixture in the cheesecloth in order to separate the pulp and the juice. I froze the resulting juice in ½ cup portions. I also froze the pulp to be made into cranberry sauce later.

After all this lingonberry processing, I was ready to sit down and enjoy a cup of hot berry tea! A steaming, aromatic cup of this juice spiced with warm wintertime flavors was a perfect reward for my work in the kitchen. I can’t adequately describe how satisfying this tea is. The aroma and flavor evoked the best memories of a warm, cozy home on cold winter nights, kind of like mulled cider. At the same time, I felt like I was pouring some incredibly healthy elixir into my body. It is something like the feeling, I imagine, of drinking a magical potion from a friendly witch.

Hot Spiced Lingonberry Tea

Ingredients

  • 1 cup brown sugar, packed
  • 4 cups lingonberry juice
  • ½ tsp allspice
  • 1 stick cinnamon
  • 6 whole cloves
  • dash ground nutmeg

Directions

  1. Place juice and brown sugar in a pot. Whisk until well blended.
  2. Add allspice, cinnamon and cloves.
  3. Simmer 10 minutes.
  4. Ladle tea into mugs through a fine wire mesh sieve.
  5. Grate a dash of nutmeg onto hot juice and serve immediately.

Blueberry Jam Bars – The Best Part of a Survival Kit for Stormy Afternoons

blueberry-jam-bars-n

Stormy afternoon survival kit: A great book, freshly brewed tea, and blueberry jam bars still warm from the oven.

My morning chores were to make a batch of yogurt, sourdough loaves for the week and sourdough pizza crusts for the freezer. Those tasks complete, it would have been nice to go outside for a walk. But this Saturday’s weather turned it into a stay-inside kind of day. We’ve heard that October is the month that Chignik Lake earned its name. Chignik means big winds in the native language. Saturday, it poured rain sideways. The lake was blown into a froth of whitecaps. Our little home here hunkered down solidly, just like our little house in Point Hope. It was the kind of day to curl up with a warm drink, a book, and a blanket. In our house, this scene also begs for a home-baked accompaniment. With a shelf of preserves made from berries we picked earlier, I had no trouble baking up a batch of oat bars filled with jam. The hardest part was to choose which jam – blueberry, currant, raspberry, or cranberry. Blueberry! In just over 30 minutes, I had delicious bars ready to go. This recipe is as easy as pie… or as blueberry oat bars.

Blueberry Oat Bars

Serves 9 polite eaters, or 2 ( if you have limited willpower)

Ingredients

  • 1/2 cup dark brown sugar, packed
  • 1 cup all-purpose flour
  • 1/4 tsp baking soda
  • pinch salt
  • 1 cup rolled oats
  • 1/2 cup unsalted butter, melted
  • 1 cup homemade blueberry jam (substitute any jam you have on hand)

Directions

  1. Preheat oven to 350 degrees F (175 degrees C).
  2. Grease 8 inch square baking dish.
  3. Combine sugar, flour, baking soda, salt, and oats in a medium bowl.
  4. Drizzle melted butter into flour mixture.
  5. Toss until mixture is crumbly.
  6. Press 2 cups of the mixture evenly into bottom of baking dish.
  7. Spread jam on top of flour mixture.
  8. Sprinkle remaining flour mixture atop jam, as even as you can.
  9. Lightly press flour mixture into jam.
  10. Bake for 35 minutes. Finished bars should be lightly browned.
  11. Allow to cool before cutting.

Rustic Char

char-rustic-in-pan-n

A great pleasure in life is obtaining seasonally fresh ingredients to take back to the kitchen. With Dolly Varden char at their fattest in fall and entering local streams, now is the time to go out and get them. Brookies and small lake trout shine equally well in this simple, exceptionally satisfying dish, as do Arctic char which are sustainably farmed and available in markets.

Char generally have a flavor that is richer than trout but lighter than most salmon. The keys to this dish are hearty vegetables, fresh charr, thyme, butter or quality olive oil and a good white wine. Add a spritz of lemon juice and a dash of salt and pepper. Don’t get hung up on specific ingredients; this is camp-style fare at its finest. And by all means, if you live where fresh herbs are available, substitute them for the dried herbs we use here in Chignik Lake.

rustinc-char-photo-n

This dish can easily be made in one pan. Simply hold the fish in reserve and add to the vegetables during the last half of cooking. Otherwise, prepare in two pans as follows.

The vegetables:

Ingredients

  • 3 or 4 cups hearty vegetables such parsnips, carrots, potatoes, sweet potatoes, butternut squash, pumpkin, etc. chopped coarse
  • sweet onion, chopped coarse
  • approximately 8 to 10 garlic cloves, cut in half
  • 1/2 tbsp thyme (dry)
  • 1/4 tbsp rosemary (dry)
  • 1 tablespoon olive oil
  • 1 tablespoon butter
  • 1/4 cup white wine
  • sea salt and freshly ground pepper to taste

Directions

  1. Add butter and olive oil to pan and heat over medium-high heat.
  2. Add vegetables and seasonings, turning to ensure everything is well coated and seasoned.
  3. Add wine, stir and cover pan. Reduce heat. Stir occasionally. When done, a fork will easily pass through vegetables.

The fish:

Ingredients

  • 1 fresh char of about 2 lbs, gutted, head and tail removed, rinsed and patted dry
  • 1 tablespoon olive oil
  • 1 tablespoon butter
  • 1/2 tbsp thyme
  • 1/2 tbsp tarragon (optional)
  • 1/2 tbsp marjoram (optional)
  • lemon juice
  • splash or two of white wine
  • sea salt and freshly ground pepper to taste
  • additional olive oil or butter for prepping fish

Directions

  1. Sprinkle lemon juice inside and outside of fish.
  2. Use fingers or a brush to cover fish inside and out with a light coating of butter or olive oil. Gently rub thyme and other herbs (if used) inside cavity and outside. Cut fish into three or four pieces and set aside.
  3. Place butter and olive oil in a pan and heat over medium-high heat.
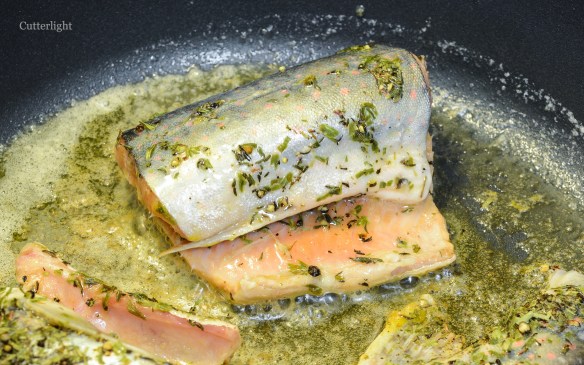
  4. When oil/butter are hot enough to sizzle, add fish pieces. Add salt, pepper and a splash of white wine. Cover and lower heat to medium-low. Cook for six minutes.
  5. Gently turn fish. Sprinkle salt and pepper and add a splash of white wine. Cook for six minutes.
  6. Fish is done when flesh is opaque inside the cavity.
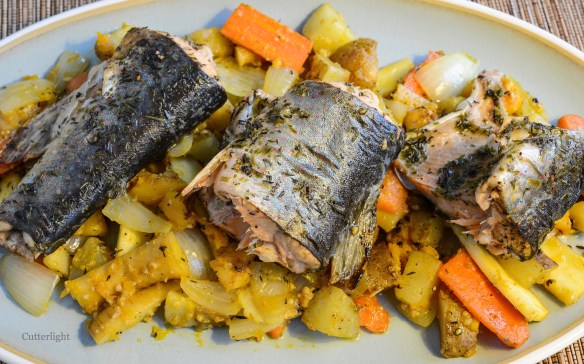
  7. Arrange vegetables on plates or serving platter, top with fish and serve piping hot with a favorite Chardonnay, Viognier or dry Riesling.

Dolly Varden Shioyaki (Salted, Grilled Char)

char-shioyaki-n

As the autumn air grows clear and crisp, Dolly Varden – close relatives of brook trout – are ascending streams on annual spawning runs. Salted and grilled over charcoal, there is no finer way to celebrate the coming of fall.

The small, icy-cold, brilliantly crystalline stream that flows less than 100 meters from our home has suddenly become positively choked with char. Only a week ago, the pools were bereft of anything but a smattering of fingerling salmon parr and equally diminutive juvenile Dolly Varden. The scene changed overnight when we woke to see the mountains rimming Chignik Lake gleaming with the season’s first snow. As the day warmed and the snow melted, the village stream filled to its brim with fresh snowmelt as clear and bracing as an Alaska September morning. Apparently that’s the signal Chignik Lake’s char were awaiting. When I checked that evening, each of the lower pools was packed with one of our favorite fish – Dolly Varden char. To be sure, there were no trophies among them, although a couple appeared to be pushing 16 inches. That’s fine. Eight to 12 inch fish (20 to 30 cm) are the perfect size for one of our very favorite foods – fresh char salted and grilled over charcoal.

I first encountered this simple but elegant fare while living in Japan. At festivals, fairs and inns in mountain villages, ayu (a trout-like fish highly regarded in Japan and South Korea) and iwana (white-spotted char very similar to Dolly Varden, Arctic Char and Brook Trout) are salted, skewered on bamboo sticks and roasted over hot coals till their skin turns a crisp golden-brown. With very small char, the bones are soft; it is common practice to eat the entire fish from tail to head.

char-salted-slashed-n

Char Shioyaki (Salted Grilled Char)

Ingredients

  • 8-to-16-inch char, gutted and gilled but with head left intact. (Brook Trout, Dolly Varden or Arctic Char)
  • Sea Salt (We have found coarse gray sea salt, Sel Gris, to be best for complimenting salmon, trout and char.)
  • Wooden skewers, soaked in water to prevent them from burning (Bamboo is traditional, but skewers fashioned from hardwoods such as alder, peach, apple, hickory and similar woods also work well.)

Directions

  1. Prepare a charcoal grill or campfire. (Alternatively, fish can be broiled on a baking sheet on the top rack of the oven.)
  2. Thoroughly clean stomach cavity and gills from fish. Do not scale. Leave head intact. Rinse in cold water and pat dry with paper towels.
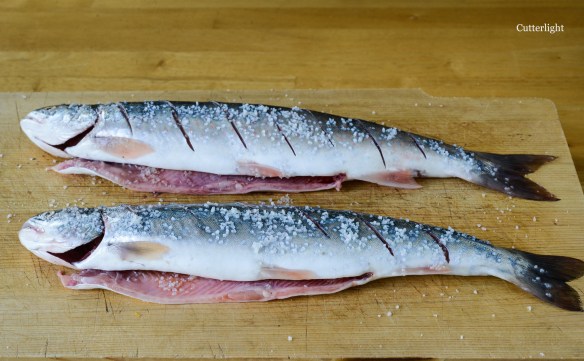
  3. Using a very sharp knife, make shallow oblique cuts spaced about 1″ apart through the skin. Avoid cutting too deeply.
  4. Run sharpened skewer into fish’s mouth and through the body, making sure fish is securely skewered.
  5. Liberally salt the fish inside and outside.
  6. Placed directly on a very hot grill. To prevent skin from sticking to grill, do not move fish. Turn only once, gently loosening with a spatula if necessary. Roast till skin, tail and fins are crisp and golden brown, eyes are white and opaque, and meat is splitting where slashed. Alternatively, fish can be roasted on roasting stick over hot coals.

Serve with cider, a favorite bourbon, sake, or Pinot Gris.


Out of Chocolate! Now What? Chewy Almond Thins to the Rescue

chewy-almond-crisps-n

These candy-like cookies are ridiculous. Chewy and flavorful – a cure for a terminal sweet tooth.

At the end of most evening meals, Jack and I enjoy a piece of dark chocolate or a little something sweet with a cup of tea. I have a terrible sweet tooth that seems to be sated by this little habit. Thinking that I would bake more than I have been, we didn’t send out very much chocolate for our après dinner tradition. Now our chocolate is all gone – at least till the next Amazon order arrives via bush plane.

In these kinds of emergencies, my Williams-Sonoma Baking book always seems to save the day. It is a solid baking book with a number of foundational recipes that can be followed directly or easily adapted. I remembered a quick cookie recipe loaded with almonds that I hoped would do the trick. The authors of the recipe called these cookies Almond Crisps. Mine turned out beautifully flat and a bit lacy. They were pleasantly chewy, like a really satisfying caramel. I think this is due to the combination of sugar and brown sugar. Delicious. I adorned these cookies with a chocolate drizzle made from a few semi-sweet chips I had stashed in my pantry.

Our problem now is that three dozen of these cookies have up and disappeared!

Chewy Almond Thins

Ingredients

  • ½ cup unsalted butter, room temperature
  • 1 cup brown sugar
  • 1 large egg
  • 1 tsp vanilla extract
  • ¾ cup all purpose flour
  • 1 tsp baking powder
  • pinch salt
  • ½ cup finely chopped almonds

Directions

  1. In the bowl of a stand mixer, cream butter.
  2. Add sugar and continue to beat until sugar and butter are well mixed.
  3. Add egg and vanilla into mixture. Mix on low speed until well mixed.
  4. Sift flour, baking powder, and salt together.
  5. Stir flour mixture into butter mixture.
  6. Stir in almonds.
  7. Preheat oven to 400 degrees F (200 degrees C).
  8. Line a baking sheet with parchment paper.
  9. Drop teaspoonfuls of batter onto prepared baking sheets. Space cookies about 2 inches apart. They will spread.
  10. Bake 5 minutes. Edges will be golden brown, but cookies will still be soft.
  11. Let cookies cool on baking sheet for exactly 5 minutes. Then remove to wire rack to finish cooling.