Smokey, Spicy Mix: In Hearty Soups, as a Rub for Poultry and Pork, and on Salmon, our Go-To Seasoning

jacks-smokey-blend-n

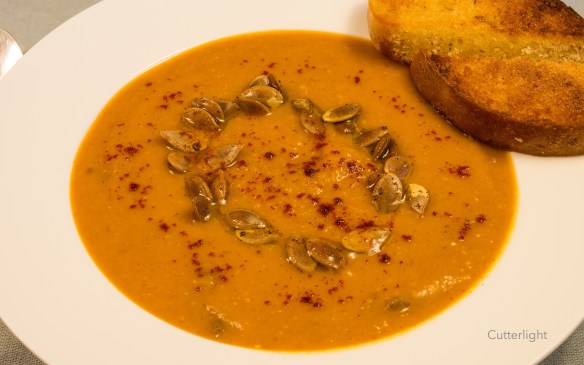
Jack’s Mix: Nine herbs, spices and seasonings create a blend that adds deep flavor and an agreeable spike of heat to pumpkin soup, chicken breasts, pork, broiled salmon fillets, moose meat pizza and more. 

Every kitchen should have a few items like this in stock – a house dressing, a specialty dipping sauce, or a proprietary spice or herb blend. This is “the secret:” the bottle that invariably gets emptied first, the jar that has to be replenished again and again while other similar items languish with their contents intact.

In the case of Jack’s Mix, sure, there are a wide variety of commercial rubs available, and most of them are quite tasty. But we wanted something a little smokier in flavor and with a certain zip that would best compliment our style of cooking. And since we prefer to add salt as a separate item in cooking, we wanted a salt-free blend. So we came up with our own blend from a handful of ingredients we always have on hand.

Our message in this post is to encourage you to give it a try. Pick something you use frequently – salsa, an Italian herb blend, barbecue sauce, salad dressing or a spicy rub and instead of continuing to purchase Brand X at the store, start experimenting with your own creation. It’s fun, you’ll likely learn something valuable about the way flavors work together, and when a guest exclaims, “This _____ is fantastic! What kind is it?” You can smile and casually reply, “It’s mine, just a little something I threw together.”


Adzuki Maple Bars with Matcha Maple Frosting

maple-bars-w-azuki-and-matcha-frosting-n

Mmmmm – matcha green tea and sweet adzuki bean paste – a flavor combination we love add a Japanese twist to an American classic. Just the thing with piping hot green tea after a cold morning of birding.

Matcha green tea powder and adzuki beans may not be in everyone’s pantry, but they are always in ours. If you’ve been following this blog, you know that this flavor combination makes a regular appearance in our kitchen. When a friend gave me a recipe for maple bars, I couldn’t help imagining them stuffed with sweet adzuki bean paste (directions to make the paste here), and changing up the frosting recipe to include the zip of spiced matcha tea along with maple syrup. I think the original maple bar recipe somehow reminded me of cinnamon rolls. I’d made a version of cinnamon rolls where the adzuki bean paste was spiraled into a dough which in turn was infused with matcha tea powder. That was delicious! So why not tinker around with this maple bars?

Today’s recipe initially started out with my friend’s successful recipe. Her dough recipe is deliciously flavored with cinnamon. After baking, I sliced the rolls in half and spread them generously with adzuki bean paste. I did change up her maple icing and made more of a donut glaze that I then flavored with matcha green tea powder and real maple syrup. (Thank you JW for sending us some real Pennsylvania maple syrup!)

Matcha powder is used to make high quality green tea. I enjoy baking with this flavorful ingredient – adding it to breads, cookies, cakes, and even custard dishes. If you are not convinced that I really do enjoy this ingredient, just search “matcha” in the search bar on our blog and look at all the lovely recipes. 😉 I’m happy to report that both adzuki beans and matcha green tea powder are easy to procure – even in remote places like Chignik Lake, Alaska – thanks to the Internet.

Adzuki Maple Bars with Matcha Maple Frosting

Ingredients

Maple Bars

  • 1 1/2 cups milk
  • 1/3 cup unsalted butter
  • 4 tbsp granulated sugar
  • 2 tsp cinnamon
  • 4 1/2 tsp instant yeast
  • 2 large eggs, beaten
  • 4 3/4 cups all purpose flour
  • 2 cups sweet adzuki bean paste

Frosting

  • 1/4 cup unsalted butter
  • 1/2 cup real maple syrup
  • 1 cup powdered sugar
  • 1 tsp matcha green tea powder

Directions

  1. Combine milk, butter, sugar, and cinnamon in a medium saucepan.
  2. Stir over medium heat until butter is melted. Remove from heat.
  3. Let milk mixture cool slightly. Mixture should cool to about 110 8° F, or cooler.
  4. Pour milk mixture into a large mixing bowl. Stir in yeast.
  5. Stir beaten eggs into mixture.
  6. Stir in flour, one cup at a time.
  7. The last 3/4 cup of flour will need to be kneaded in.
  8. Once flour is well incorporated and dough can remain in the shape of a ball, let rise in the mixing bowl for an hour covered with plastic in a warm place with no draft.
  9. Punch down dough and roll out to about a 1″ thickness.
  10. Cut dough into 16 rectangular pieces. Place bars on baking sheet covered with parchment paper. Cover with plastic wrap and let rise for another 30 minutes.
  11. Heat oven to 425° F. Remove plastic covering and bake bars for 8 – 10 minutes. Finished bars should be lightly browned.
  12. Let bars cool on wire rack for 15 minutes before icing.
  13. Make icing by mixing together icing ingredients and stirring until smooth.
  14. Cut bread bars in half, like a sandwich.
  15. Spread adzuki bean paste on lower half of bar.
  16. Take top half and dip it into matcha maple frosting.
  17. Place dipped top part of bread onto bottom which has been prepared with adzuki paste.
  18. Serve immediately or  serve later the same day. Just make sure to cover them with plastic so they don’t dry out.

Uni & Ikura Amuse Bouche (Sea Urchin & Salmon Roe)

sea-urchin-amuse-bouche-n

Fresh from the sea, uni and ikura create a salty, savory combination.

Much as is true of most Japanese people, most Alutiiqs love virtually anything harvested from the sea. From octopus to chitons (locally known as bidarki), if it’s fresh from the ocean it’s likely to find its way onto the menu here in Chignik Lake. Sea urchins are highly prized.

And there’s really nothing to preparing them. Insert a small knife into the opening on the bottom of the shell, cut the shell open, and remove the bright yellow lobes, which are the urchins’ reproductive organs.  (They are not roe.) Most people are careful to remove the dark colored matter inside the shell, but the urchins we had were small and including this substance added, we thought, both a subtle additional flavor and contrasting color. In Alaska, we almost always have a jar or cured salmon roe on hand. This bright, salty, translucent salmon caviar is a perfect finishing touch on many dishes. For a popular recipe for making your own ikura, click here.

Oh, Daddy! Umami! Clam Fettuccine and Sea Urchin Amuse-Bouches

dorner-bay-clams-n-urchins-n

Fresh sea urchin appetizers, clams still wet with Chignik Bay brine, freshly made fettuccine, and  home-brewed Bavarian Weissbier – Ringing in 2017 Off the Beaten Path. Oh, Daddy! Umami! (Recipe below)

clam-fettucini-dorner-bay-n

When a friend showed up at our door on New Year’s Eve with a big bowl of fresh-from-the-sea clams and sea urchins, we immediately began planning out a celebratory dinner to greet 2017. While Barbra whipped up two servings of fettuccine, I set to work cleaning and preparing the seafood. A carafe of hot sake might have been perfect, but Barbra’s medium-bodied, slightly citrusy, Weissbier proved to be an excellent compliment to a shellfish feast that couldn’t have been any fresher.

sea-urchin-amuse-bouche-n

Umami Power: Sea urchin topped with salmon roe. Note to self: Stock a few bottles of sake for these occasions!

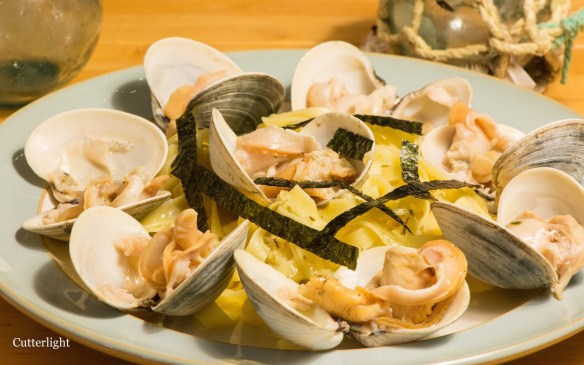
Clam Fettuccine for Two: This is a simple yet elegant dish. The standard butter and garlic mixture really comes to life with the addition of tarragon and a dash or two of grey sea salt.

Ingredients

  • Fettuccine
  • Cherrystone Clams, Butter Clams, Cockles or Ark Clams, rinsed to remove any debris. Clams should be closed tight. If a clam isn’t closed, give it a few vigorous taps. If it still doesn’t close, discard it, as it’s dead and may be unfit to eat.
  • Butter, preferably unsalted
  • Olive Oil
  • 4 large cloves of Garlic, chopped fine
  • 1/2 tsp dried Tarragon crumbled fine (or 1 tsp fresh chopped)
  • 1/4 tsp Coarse Grey Sea Salt
  • Nori (dried laver) cut into thin strips for garnish

Directions

  • Prepare the fettuccine as you normally would. Drain and then return to the pan with a little olive oil and toss together. This will prevent the noodles from sticking together.
  • In a small pan, heat about 6 tablespoons of butter and 2 tablespoons of olive oil over medium-low heat. Once butter has melted, place on very low heat to keep warm. Just before serving, return to medium heat, add the garlic, tarragon and sea salt and briefly cook while stirring. In about 30 seconds, you’ll begin to smell the aromas of the garlic and tarragon. Provided you have chopped the garlic fine, that’s all the cooking it needs.
  • Meanwhile, place clams in a metal strainer – one that will fit into a larger pot. Add an inch or so of water to the pot and place clams in strainer inside pot. The clams should be above the water so that they steam rather than boil. (Hint: If you place the clams inside a heat-proof bowl inside the strainer, you can save the juice from them as they steam open. The juice can be used in soups, sauces or in Bloody Mary Cocktails.) Cover clams with a lid and bring water to a boil. When clams are cooked, the shells will pop open. This generally takes about five minutes.
  • Meanwhile, place clams in a metal strainer – one that will fit into a larger pot. Add an inch or so of water to the pot and place clams in strainer inside pot. The clams should be above the water so that they steam rather than boil. (Hint: If you place the clams inside a heat-proof bowl inside the strainer, you can save the juice from them as they steam open. The juice can be used in soups, sauces or in Bloody Mary Cocktails.) Cover clams with a lid and bring water to a boil. When clams are cooked, the shells will pop open. This generally takes about five minutes.
  • Use a small knife to cut the clam’s abductor muscles away from the shell so that they can be easily eaten, but leave the clam meat inside the shell for a more attractive presentation.
  • Place the fettuccine on serving plates. (It helps to keep plates warm in the oven.) Arrange the clams on the plate. Pour the butter sauce on the clams and pasta. Add nori. Serve with slightly chilled Chardonnay or warm sake.

Linzertorte with Raspberry Freezer Jam – A Bright Idea!

linzertorte-n

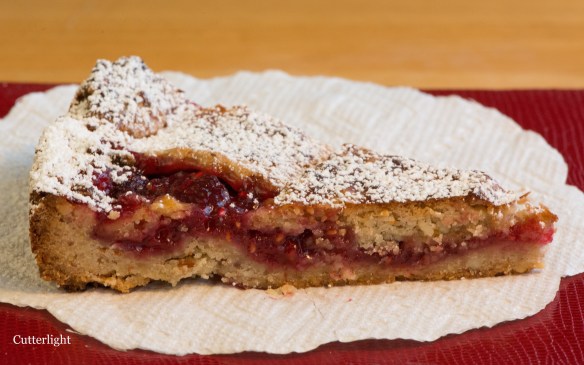
Lovely rich texture of ground almonds brightened by fresh, tart raspberry jam. Yes, sir, I’ll have another!

Linzertorte is not a new creation. I read that the first published recipes for this lovely dessert appeared in the early 1700’s. Sidestepping a culinary history lesson, I can happily report that you we love this torte. What makes ours a bit different is freezer jam – which is a magical concoction made from a mix of fresh berries, pectin and sugar without using heat. The result is a fresh, bright flavor, featuring the sweet, tart Pow of right-off-the-bushes raspberry taste. Click here to read more about freezer jam.

Freezer Jam Linzertorte

Ingredients

  • 1 1/2 cups all purpose flour
  • 1/2 tsp ground cinnamon
  • 1/8 tsp ground cloves
  • pinch salt
  • 1 cup whole almonds
  • 1 cup confectioners’ sugar
  • 3/4 cup unsalted butter, melted
  • 2 large egg yolks
  • 1 1/2 cups raspberry freezer jam

Directions

  1. Whisk together flour, cinnamon, cloves and salt in a bowl. Set aside.
  2. In a food processor, process almonds with confectioner’s sugar. Almonds should be finely ground.
  3. Pour butter into almond mixture and mix well.
  4. Add in egg yolks. Mix well.
  5. Add flour mixture to almond mixture and mix well.
  6. Separate about 1/3 of the dough. Flatten it into a disc. Wrap in plastic and refrigerate.
  7. Take remaining dough and press it into a greased, fluted tart pan. I used a springform pan and that worked well, too.
  8. Spread dough with jam. Place this part of torte into refrigerator.
  9. Take chilled dough and roll out into a circle about 1/4 inch thick.
  10. Using a fluted roller, cut the rolled dough into 6 strips.
  11. Criss-cross strips on top of torte.
  12. Press edges together to seal.
  13. Place torte in refrigerator while preheating oven.
  14. Preheat oven to 350 degrees F (180 degrees C).
  15. Bake torte until crust is browned and jam is bubbling, about 45 minutes.
  16. Let cool on wire rack until torte is just warm. Remove torte from pan and move it to a serving plate.
  17. Dust top of Linzertorte with confectioners’ sugar to serve.

Salmon Candy Canapés: Lox, Ikura & Cream Cheese on Buckwheat Blinis

lox-ikura-blini-n

See below for recipes for salmon roe, lox and buckwheat blinis.

Upon arriving in Chignik Lake last summer, one of our first orders of business was to stock our freezers with enough salmon to see us through the coming months. Fortunately, catching plenty of Reds and Silvers was no problem as hundreds of thousands of wild salmon ascend the Chignik River from summer through fall. Although the Sockeye (Red Salmon) roe is somewhat smaller than that of other species, it nonetheless cures into a beautifully translucent ikura that tastes as good as it looks. Coho fillets (Silver Salmon) are our favorites for making lox. Separated by a slice of cream cheese, garnished with a wisp of nori and arranged on a savory buckwheat blini, these appetizers are perfect as Super Bowl party snacks or as a pre-dinner hors d’œuvre complimented with champagne or fine sake (酒).

Recipes:

Ikura: Curing Salmon Roe

Salmon Lox or Gravlax

Buckwheat Blini

Ingredients

  • 1/3 cup buckwheat flour
  • 2/3 cup all purpose flour
  • 1/2 tsp baking powder
  • generous pinch salt
  • 3/4 cup whole milk
  • 2 eggs, whisked
  • 1 tbsp butter, melted
  • additional butter for griddle

Directions

  1. Whisk together flours, baking powder and salt.
  2. In a separate bowl, whisk together milk, eggs and melted butter.
  3. Whisk wet ingredients into dry.
  4. Heat griddle and coat lightly with butter.
  5. Drop a tablespoon of batter onto griddle. Repeat with additional tablespoons.
  6. Cook for about 2 minutes, small bubbles will form on top of blini, like pancakes.
  7. Flip blini and cook an additional minute on flipped side.
  8. Serve warm or at room temperature.

Home Brewed Amber and our Razor Clam Fritter Recipe: Dinner in the Alaska Bush

amber-beer-n-clam-fritters-n

A wonderful marriage – home brewed dark amber beer by brewmeister Barbra and razor clam fritters by chef Jack. See the fritter recipe below.

Jack has been making razor clam fritters for years. He has culinary ties to the delicious shellfish from his life on the Oregon Coast. When we first visited Alaska, we dug the biggest razor clams either one of us had ever seen and promptly turned them into soups, pasta sauces, sashimi and fried dishes. These delicious beauties are something we try to stock in our pantry every year… we dig them ourselves or pick them up at our Anchorage Costco. The following recipe is tried and true. It’s been with us for years. We may change the seasoning up a bit, otherwise, we stick to the original, which has proved hard to improve upon.

To accompany our delicious fritters, we opted for our amber home-brew. It was only a matter of time before my yeastly attentions turned from bread to brew. Now that we live in a “damp” community, we are free to experiment with adult libations. Thanks to a company called Mr. Beer, I’ve been able to experiment with beer-making with great success. In addition to the amber beer (pictured above), we also are enjoying a slightly more complicated kit which yielded a robust, slightly-citrusy hefeweizen. We currently have a nut brown ale and a Mexican style lager fermenting. The beer we’re turning out would stand up nicely against any of the favorites we typically order in restaurants or buy at the package store. Brewing beer seems a natural addition to our kitchen. It certainly has been a tasty and satisfying compliment to our cuisine!

Clam Fritters: serves 4

Ingredients

  • 1 cup chopped clams
  • 1 egg, lightly beaten
  • 1 tsp lemon juice
  • 1 tbsp chopped tarragon (or substitute dry tarragon or marjoram)
  • 1 tsp baking soda
  • 1 cup flour
  • 1/4 cup clam juice
  • 1/4 cup milk
  • 1 1/2 tbsp melted butter
  • couple dashes cayenne pepper (to taste)
  • freshly ground black pepper to taste
  • oil for frying

Directions

  1. Chop clams on a cutting board. Not too fine. Place them in a mixing bowl.
  2. Add the egg, lemon juice, tarragon, cayenne, black pepper, baking soda and flour and lightly stir together.
  3. Blend the clam juice and milk. Add gradually to the clam mixture along with the butter, continuing to stir. Do not make the batter too runny and do not over-stir.
  4. Heat about 1/8 inch of oil in a frying pan.
  5. Drop batter in the hot oil – about 2 tablespoons per fritter. (They’ll cook better if they’re fairly small.)
  6. Turn when the bottom is browned, as you would for pancakes.
  7. Finish cooking till golden-brown. Serve with a side of slaw and a favorite ale or lager.

Improved Gingerbread Cookies – Hold the Molasses

gingerbread-cookies-n

The look and smell of December – warm, spicy gingerbread cookies straight from the oven, or let them cool and frost them for a more traditional treat.

‘Tis the season for hot toddies and gingerbread cookies. Out in the Alaskan bush, we have to plan ahead for any special ingredients. Ginger, yes. Cloves, yes. Molasses? When stocking up our pantry, I was on the fence when it came to molasses. I really don’t like molasses. It’s not a flavor I would normally add to any of my creations. But it is very traditional in a couple of bread and cookie recipes. In Point Hope, we kept it as a pantry item and only used it once over three years. So, I opted against stocking it again here at “the Lake.”

Here it is December, and I have a hankering for gingerbread cookies, but I have no molasses… Throwing molasses to the wind, I altered a gingerbread cookie recipe by upping the ginger and using a combination of honey and pure maple syrup instead of the traditional molasses. The result? A flavorful, spicy cookie with enough “brownness” to satisfy the eye and a flavor to satisfy my December craving. After frosting these little babies and bringing them to my students, I was met with many compliments and requests for more. Who says elementary student palates don’t know what’s good? The adults who sampled the cookies concurred with my young tasters. I patted myself on the back for improving a long-standing recipe and also for avoiding an expedited shipment of molasses from the nearest grocery store – nearly 500 air miles away!

Improved Gingerbread Cookies

Ingredients

  • 1/2 cut unsalted butter, melted
  • 1/4 cup brown sugar
  • 1/4 cup granulated sugar
  • 1/4 cup honey
  • 1/4 cup pure maple syrup
  • 1 egg, beaten
  • 2 1/2 cups all purpose flour
  • 1 tsp baking soda
  • 1/2 tbsp ground ginger
  • 1/2 tsp ground cinnamon
  • 1/4 tsp ground cloves
  • pinch salt
  • Royal icing (optional)

Directions

  1. Mix butter and sugars.
  2. Mix in honey and maple syrup.
  3. Mix in egg.
  4. Sift together flour, baking soda, spices and salt in a large bowl.
  5. Stir butter mixture into flour mixture.
  6. Turn dough out onto a floured work surface and form into two large disks.
  7. Wrap each disk in plastic wrap and refrigerate for at least two hours.
  8. Preheat oven to 400 degrees F (200 degrees C).
  9. Cover baking sheet with parchment paper.
  10. Roll out dough of one disk between two sheets of waxed paper. Dough should be about 1/4 inch thick.
  11. Using cookie cutters, cut out figures. Use an offset spatula to move cookies to prepared baking sheet.
  12. Repeat with remaining dough.
  13. Gather up scraps and roll out and cut as with original dough.
  14. Bake cookies until lightly browned, about 6 minutes.
  15. Let the cookies cool on sheet for about 5 minutes before transferring to wire rack to finish cooling.
  16. Decorate cookies with Royal icing, if desired.

I’ve Become a Baking Nerd – Cranberry Pecan Rugelach

rugelach-cranberry-n

These sweet little cookies are common at Hanukkah, but filled with pecans and cranberries they will be welcomed at any Thanksgiving, Christmas or fall festivities table.

If you’ve been following our life off the beaten path, you know Jack and I love to read. The chilly, rainy days that encourage us to be inside only fuel our fires for reading. We read together almost every morning and most nights as well. We are in the midst of a tome of poetry for our morning sessions. The Top 500 Poems edited by William Harmon has been taking us on a poetic journey through the ages from Chaucer and Shakespeare to Ginsberg and Plath. In the evening, we are currently enjoying Truman Capote’s timeless classic Breakfast at Tiffany’s. In addition to our joint reading adventures, each of us is immersed in yet another read. My current book is excruciatingly nerdy  – The Professional Pastry Chef by Bo Friberg. It contains details and procedures for doing things only a baking nerd would love to do – like making marzipan from scratch, for example. And, yes, that is on my goal list now.

‘Tis the season for making pies, so I’ve delved into the section on infallible pie crusts. The author didn’t claim infallibility, but I am certainly trying to find one that never fails. I would like to be known as “The Pope of Pie Crusts.” The author did say that “a mastery of dough making is critical to the success of a professional pastry kitchen.” My kitchen is not professional, but I would like my crusts to have the taste and texture like those of the professionals. One pie crust which caught my eye includes cream cheese as part of the primary fat.

However, before I take on the intimidating world of pie crust perfection, I thought I would inch toward it with a cookie called rugelach that uses a similar cream cheese dough. The cookie dough spirals around a tasty filling. They are lovely to look at and even lovelier to eat!

Bo uses apricots and walnuts as her filling. I adapted her published recipe to make the directions simpler, and I also swapped her choice of fruit and nuts for what I had in my Alaska pantry. The resulting cookie recipe makes it easy to substitute any dried fruit and nut for the cranberries and pecans I used.

Pecan Cranberry Rugelach

Ingredients

Dough

  • 2 sticks unsalted butter (1 cup), room temperature
  • 8 oz. cream cheese, room temperature
  • 2 cups all purpose flour

Filling

  • 1/2 cup Craisins
  • 1 cup pecans, chopped coarse
  • 1 cup brown sugar
  • 1 tsp cinnamon
  • 3 tbsp unsalted butter, melted
  • 1 egg, beaten

Directions

  1. Beat 2 sticks butter and cream cheese together with mixer.
  2. Add in flour by 1/2 cups.
  3. Divide dough into thirds. Form 3 discs. Wrap each disc with plastic wrap and refrigerate for at least 2 hours.
  4. Rehydrate Craisins. Place Craisins in pan with enough water to cover. Bring water to boil, then remove pan from heat and let Craisins cool.
  5. Drain Craisins.
  6. Combine pecans, sugar, and cinnamon in a bowl.
  7. Preheat oven to 350 degrees F (180 degrees C). Line a baking sheet with parchment paper.
  8. Roll dough into 10-inch circles.
  9. Paint circles with melted butter.
  10. Sprinkle dough with pecan mixture.
  11. Evenly sprinkle with Craisins.
  12. With a pizza wheel, cut each circle into 12 even wedges.
  13. Roll the wedges from edge to center. Place cookies on prepared baking sheet.
  14. Paint all the cookies with beaten egg.
  15. Bake for 15 minutes. Finished rugelach will be golden when finished.

Alaska Gourmet: Pan-Fried Salmon with Herbed Butter on Butternut Squash Ravioli

salmon-on-pumpkin-ravioli-n

Fall food themes continue with this pièce de résistance fit for a king. Chinook salmon holds center stage drizzled with herbed butter and served on butternut squash ravioli. Food stylist extraordinaire Barbra came up with the idea of rolling shaved parmesan into tubes. 

With plenty of sockeye salmon harvested, cleaned and packaged in our freezers, it nonetheless wasn’t a case of “coals to Newcastle” when a friend offered up a couple fat fillets of Chinook. Reds, pinks, chums and silvers – they’re all welcome at our dinner table any time. But kings… with their higher percentage of healthful fat and their decadent melt-in-your-mouth texture… kings are special.  With a batch of butternut and ricotta ravioli in the freezer courtesy of Barbra, I knew just what I wanted to do with one of the fillets. This was as fine a meal as we’ve ever enjoyed. (Barbra promises the pumpkin/squash ravioli recipe will be posted soon!)

This dish goes particularly well with Brussels sprouts, a vegetable we especially appreciate out here in the Alaska bush because they ship well and have a long shelf-life in the refrigerator. Our favorite cooking method is to cut the Brussels sprouts in half lengthwise, toss them in a bowl with olive oil, sea salt and cracked pepper, and then place them cut-side down in sizzling olive oil in a frying pan. Turn the heat down (but make sure they’re still sizzling) and cover the pan. Check, and when the cut side has browned, flip the sprouts to the leafy side. Turn up the heat a little to get things really sizzling again, then turn it back down to a little below medium and cover the pan. The leaves will brown up and caramelize and a few will blacken. They’re ready to be served.

Pan-Fried Salmon with Herbed Butter on Butternut Squash Ravioli

Ingredients (serves 2)

  • 1-pound fillet of any wild-caught Pacific salmon, skin on
  • sea salt
  • black pepper
  • (Optional) mirin or white wine – just a little
  • 2 tbsp butter
  • 1 or 2 shallots, sliced fine
  • 1/2 tbsp tarragon (dried) or 1 tbsp fresh
  • 2 servings worth of ravioli stuffed with pumpkin, squash, mushrooms or light cheeses
  • parmesan cheese, grated or sliced, to garnish
  • Extra virgin olive oil

Directions

  1. Prepare ravioli per directions, timed so that it’s ready when the salmon is ready.
  2. Rinse fillet, pat dry with paper towels and cut into two portions. Inspect for pin bones, which can easily be pulled out with a pair of kitchen pliers. Sprinkle with sea salt and a little black pepper.
  3. Add a tablespoon or 2 of olive oil to a frying pan and turn to a little hotter than medium heat. When oil is ready to sizzle, carefully place fillets in the pan skin side up. Add just a splash of mirin. Cover and cook for 2 minutes, till meat is seared.
  4. Turn salmon over so that it is skin side down. Add another splash of mirin. Turn heat down to just below medium, cover. A general rule of thumb for fish is to cook for about 8 to 10 minutes per inch of thickness. When white substance appears on fillet, it is cooked through. Avoid overcooking.
  5. Meanwhile, over medium-low heat, melt butter in a small pan. Add shallots and tarragon and sauté just long enough to soften the shallots and release the tarragon’s aroma.
  6. Serve ravioli and arrange salmon on top. Spoon on herbed butter.
  7. Serve hot with a couple of fingers of your favorite bourbon.