Caribou Stroganoff: A Classic Favorite Featuring Wild Game

Caribou Stroganoff on homemade fettuccine_n

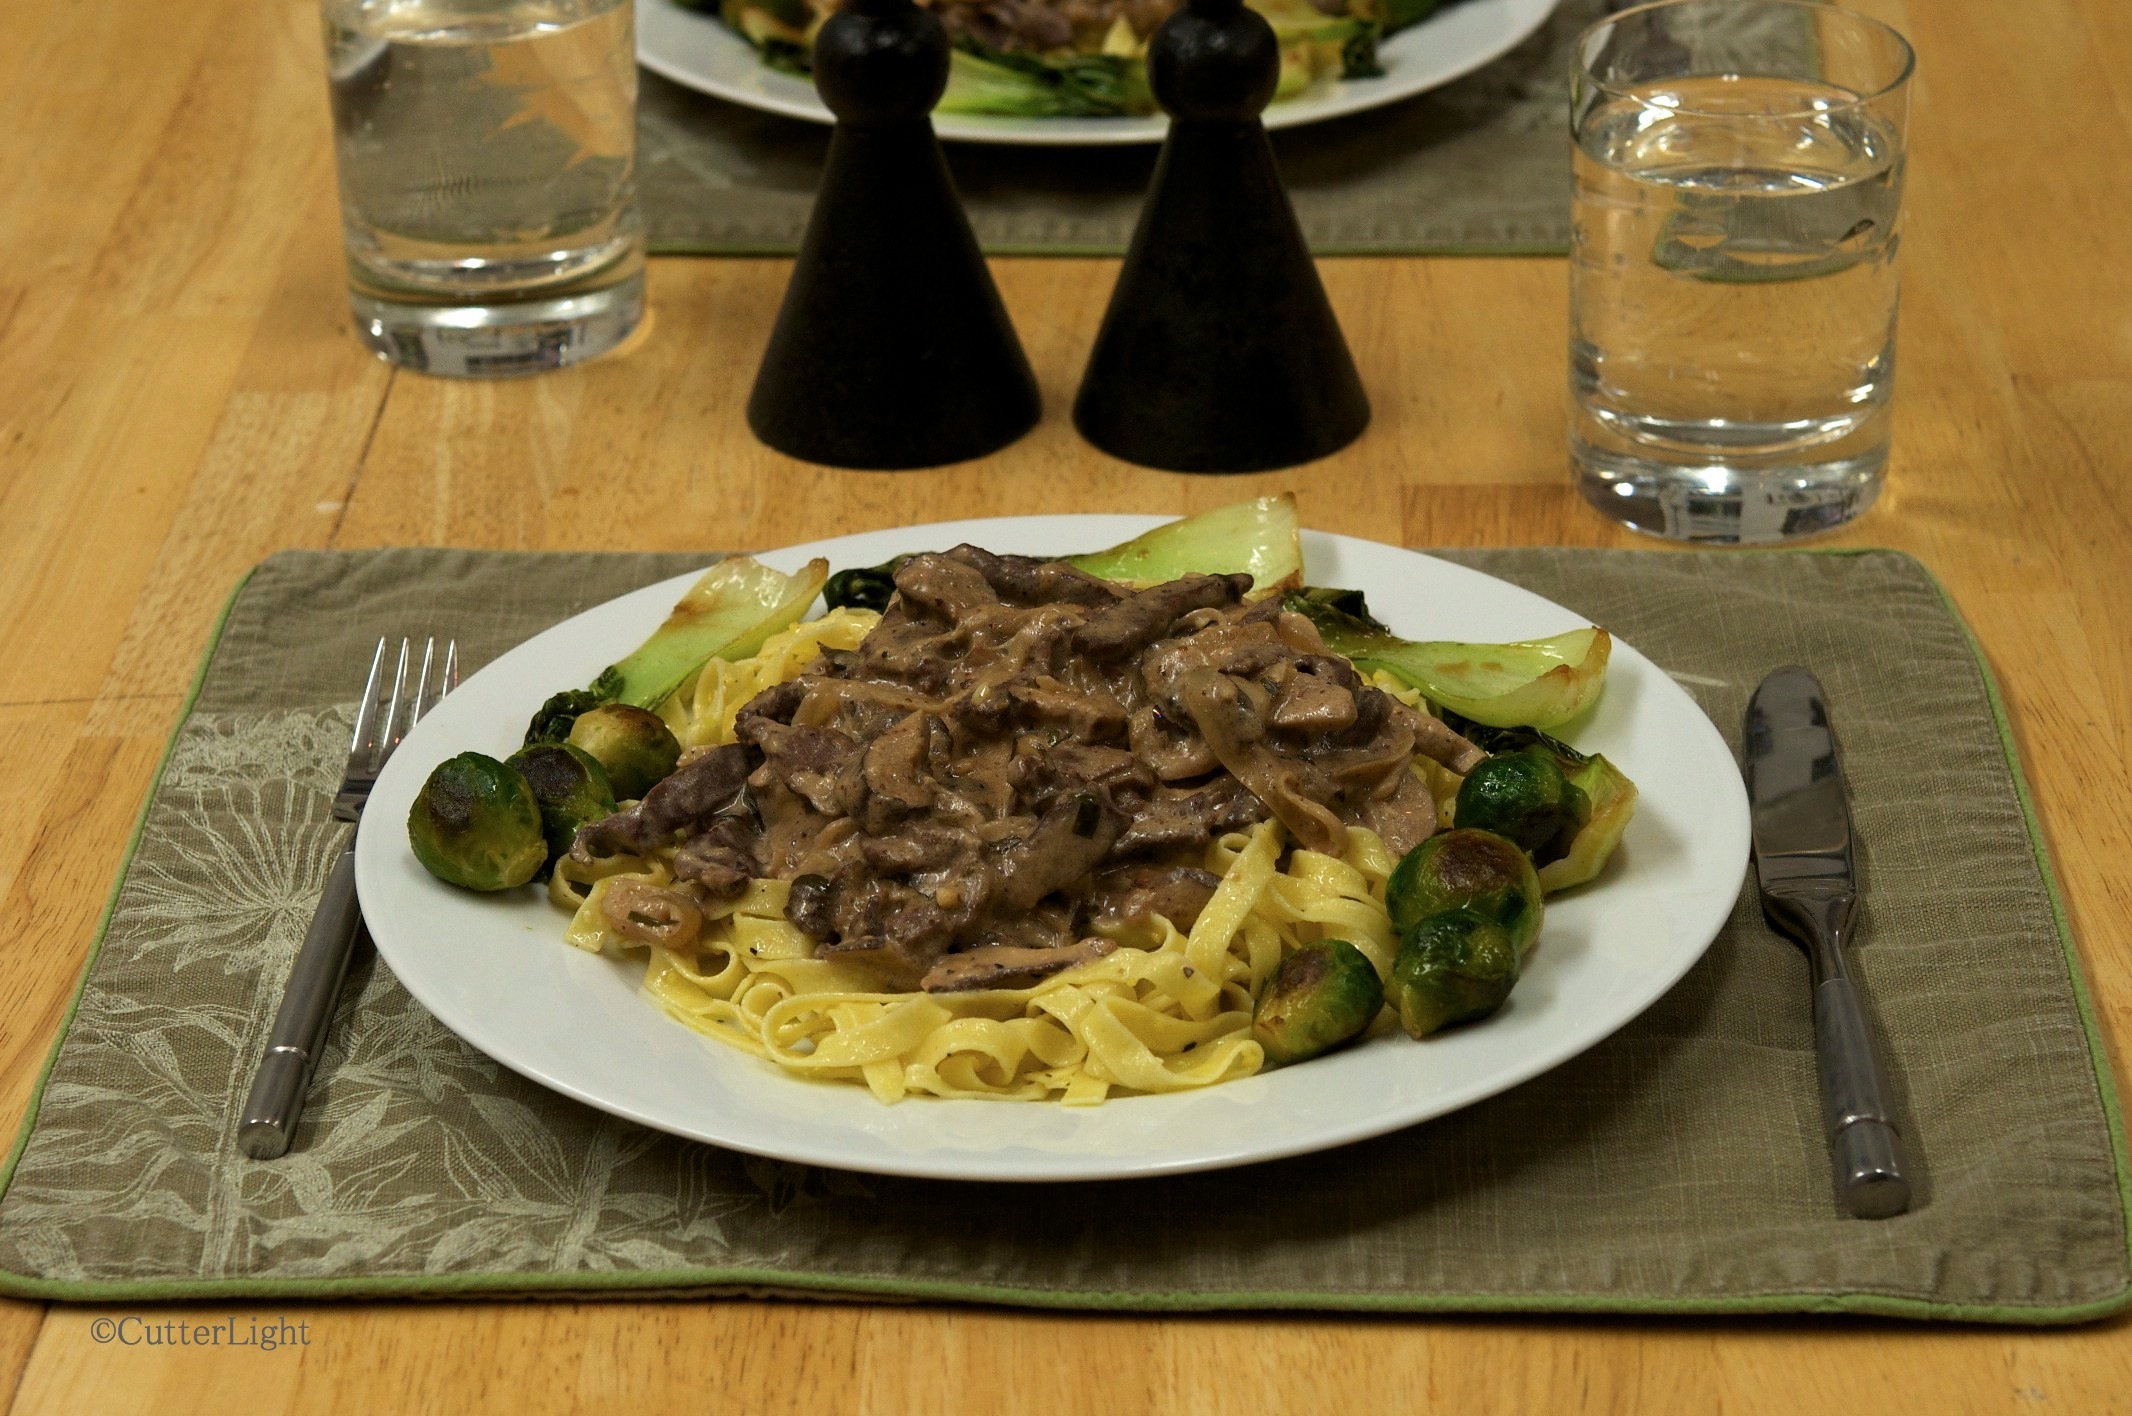
From San Francisco to Sydney and from Tokyo to Toronto, Beef Stroganoff is a popular dinner item. Here’s a twist on a classic favorite.

Ever since its origination in 19th century Russia, Stroganoff has been served to rave reviews. Early iterations were created with beef cubes and and early written recipe for the sauce included mustard. Mushrooms and onions came later. These days, cubes have largely given way to thin strips of meat and mustard is considered optional by many cooks.

I’d not made Stroganoff till recently. Happy to fill requests, I put some caribou we’d recently been given to good use. The Stroganoff came out can’t-stop-eating-it good and we and our guests made short work of it. But even as I was simmering the sauce, I knew next time I’d add tarragon.

In our view, the addition of this herb really brought the dish alive. Other than that, be gentle with additional flavors, including garlic. This dish is about meat and mushrooms.

Caribou Stroganoff

Ingredients

  • 1 pound caribou cut into thin strips, about 1/4″ x 1″ (or use similar meat game such as elk, venison or lean beef)
  • 1/2 cup beef broth. (Excellent broth can be made using Better than Bouillon)
  • 3/4 tbsp Dijon mustard
  • 1/2 tsp Worcestershire sauce
  • 1/2 pound mushroom caps, sliced thin (Shitake mushrooms are a good choice. Here in bush Alaska, we use dried mushrooms.)
  • 1/2 large onion, sliced thin
  • 1 clove garlic, chopped fine
  • 1/2 tbsp soy sauce
  • 1 cup sour cream
  • 1/2 cup heavy cream
  • 2 tbsp flour, separated into equal portions
  • 1 tbsp butter
  • 2 tbsp olive oil separated into equal portions
  • salt
  • freshly ground pepper
  • 1/2 tsp dried tarragon
  • red wine – just a splash

Directions

  1. In a bowl, combine Dijon mustard, Worcestershire sauce, soy sauce, sour cream, heavy cream, a few grinds of pepper and tarragon. Set aside.
  2. Place caribou strips in a large bowl. Add 1 tbsp flour and a few grinds of fresh pepper and mix ingredients so that meat is coated.
  3. In a large pan over medium heat, heat 1 tbsp olive oil. When oil is hot enough to cause a drop of water or a pinch of flour to sizzle, add the meat. Stir and turn meat frequently to ensure all sides are seared. When meat is cooked through (about 5 minutes), place in a bowl and set aside.
  4. Pour pan juices into a bowl and set aside to cool.
  5. Deglaze the pan with a splash of red wine. Add 1 tbsp olive oil and butter, heat over medium heat, and add the onions. Stir frequently. After about two minutes, add the mushrooms and garlic and sprinkle the pan’s contents with flour, reducing heat if necessary. Continue to cook and stir just till onions begin to become translucent (about 5 minutest total).
  6. Return the meat to the pan. Thoroughly mix ingredients together and add the beef broth. Cover and simmer over low heat till broth is well reduced (cooked down) – about 15 to 30 minutes.
  7. Combine pan juices with sour cream mixture and stir into the pan. Heat to piping hot (but do not boil) and serve over fettucini, other pasta, or rice.

Serve with fall vegetables and a gin and tonic with a wedge of lime.

Pre-Workout Almond, Craisin, Chocolate, Honey Granola Bars

Granola Almond Energy Bars_n

Soft and chewy granola bars packed with helpful protein and complex carbohydrates are a tasty, energy-packed pre-workout snack.

At this time of year, many people are re-tooling their workout program or starting a new one. Two hundred miles north of the Arctic Circle, that part of life is no different. We mostly confine ourselves to the weight room and gym at our school for workouts. With typical days featuring windchill below zero, running means treadmill workouts. Jack likes running workouts on the treadmill. I am slowly becoming accustomed to them. Running gives us a little cushion in terms of burning calories so we can enjoy all the sumptuous meals we cook, and it keep us in shape for our active lifestyle.

The most convenient time for our workouts is after school – a time of day when we often need an energy boost. I thought about making some kind of cookie that was filled with nuts and raisins, envisioning something soft and chewy. I also wanted to use up some of the staples in our pantry. What resulted was a chewy bar stuffed with craisins, coconut, nuts, peanut butter and honey. A homemade version of sweetened condensed milk is the binding agent. We snacked on them before our workout today and thought they came out great: tasty and energy boosting!

I imagine that any dried berries or nuts could be used in this recipe. I’m already planning on baking up a few batches to take with us on our summer adventures hiking, fishing and boating around the Kenai Peninsula.

Granola Bars

Ingredients

  • 3 cups rolled oats
  • 1 cup chopped almonds
  • 1 cup dried cranberries
  • 1/2 cup semi-sweet chocolate chips
  • 1/2 cup unsweetened coconut
  • 1/4 cup peanut butter
  • 1/2 cup boiling water
  • 1 cup powdered non-fat milk
  • 2/3 cup granulated sugar
  • 3 tbsp unsalted butter, softened
  • honey

Directions

  1. Preheat oven to 350 degrees F.
  2. Line a 13 x 9-inch glass baking dish with parchment paper. Paper should go all the way up the sides of the dish.
  3. In a large bowl, mix together oats, nuts, cranberries, chocolate chips and coconut. Set aside.
  4. Using a blender, (I prefer an immersion blender), blend sugar, boiling water, and non-fat milk powder.
  5. Add butter and peanut butter to milk mixture. Blend until fully mixed.
  6. Add enough honey to bring liquid mixture to 16 ounces. Blend until fully mixed.
  7. Pour milk mixture into oat mixture and thoroughly mix.
  8. Press dough into baking dish.
  9. Bake for 20 minutes.
  10. Allow bars to cool for 5 minutes in pan.
  11. Lift bars out of pan by holding parchment paper. Set on a wire rack to continue cooling.
  12. Allow the bars to cool completely on parchment paper on a wire rack before cutting.
  13. Store cut bars in an airtight container.

Winter Light and Polar Bear Prints, Point Hope, Alaska

Sun, 3 PM Dec 22, Point Hope_n

This photo was taken on December 22, 2012, a day in the midst of the month during which the sun does not rise above the horizon in Point Hope, Alaska. 

The sun dipped below the horizon 31 days ago on December 6 and did not rise again till yesterday, January 6. And yet, there was light each day, dim, brief, often breath taking.

We walked to the beach on one of those days when the sun didn’t rise. It was about 3:00 pm, and the sky was filled with shades of red, violet, amber and gold. The sea, which lies just 300 meters or so from our doorstep, is locked in ice. This time of year, polar bears are always a possibility as they roam the ice, searching for food.

Maia's hand in Polar Bear Track, Dec 22, 2012_n

Maia’s hand is dwarfed by a fresh polar bear paw print. 

Edging the beach where ice met land was a fresh set of polar bear tracks. The evidence that we share this environment with these magnificent animals was thrilling – but also a reminder that caution is in order. We scanned in every direction as far as our eyes would take us. No movement. The bear had probably passed through in the dark of early morning.

Polar Bear Tracks on South Beach Dec 22, 2012_n

Arctic foxes often follow polar bears in hopes of dining on scraps of the bear’s kill. Above, you can see the small paw prints of a fox near the bear’s tracks. Notice the tell-tale scrape marks in the snow on the forward edge of some of the bear tracks. Their long claws leave these scrapes as the bears amble along.

We waited and watched and listened. The wind moving over the seemingly endless frozen sea was all we could hear. In the distance to the east, we could see Cape Thompson’s snowy cliffs bathed in light etched against the pink horizon. As we walked along the edge of the sea, we found a murre, apparently exhausted, tucked into a snowy alcove against a bank of ice. The bird was lucky the fox had already passed by. Although the murre found the strength to take flight as we drew near, it is doubtful it went far. The Arctic winter is unforgiving.

Maia walking to ocean Dec 22 Point Hope II_n

Walking west, toward the sea, on a December day in Point Hope…

Daughter Maia was in the village for a two-week visit over winter break from college. Unfortunately, the Northern Lights didn’t cooperate, but the sky still put on some amazing displays.

Point Hope South Beach Dec 22 3 pm Nikon D90

Arctic Anpan 2 Ways: Azuki and Caribou Cha Sui (Sweetened Red Bean and Marinated Caribou)

Anpan with Sweet Azuki Paste_n

Delicious steamed buns filled with sweetened red bean paste were the finishing touch to an Asian-inspired meal. All that was lacking was a cold Sapporo Beer… The beer will have to wait until summer.*

Wintertime fishing, birding or just bike riding with my daughter Maia in Japan is indelibly linked with one of my happiest food memories: stopping by a local bakery and purchasing piping hot steamed buns filled with sweetened bean filling (anpan) or marinated pork (nikuman). The filling was so hot we’d have to be careful not to burn our tongues. Those steamed buns were the perfect on-the-go snack on chilly days.

Anpan ready for the steamer_n

Filled with bean paste or marinated meat and ready for the steamer…

Known as bao or baozi in China, steamed buns were on our list of items to try making this year. With Maia in Point Hope visiting over winter break from Berkeley, the anpan and nikuman Barbra created turned out just like the ones we’d enjoyed back in Japan. After devouring anpan with sweet red bean filling, we all could imagine the buns stuffed with a variety of other fillings: vegetable mixtures, curry, barbequed caribou, fruit, or even chocolate!

Anpan freshly steamed_n

Light, freshly steamed, piping hot and ready to be lifted out of our fish poacher, anpan definitely fit the category “comfort food.”  The ones we made were about the size of tangerines.

Because we rely on our Zojirushi bread machine to regulate the temperature for consistently rising dough, the following recipe has been created for the dough cycle of a bread machine. As an alternative to steaming, the dough can be given an egg wash and baked at 350 degrees F for 15 minutes. A recipe for Caribou Cha Sui follows the anpan recipe below. Click here to see a recipe for sweetened red bean filling.

Anpan

Ingredients

  • 1 cup water
  • 1 tbsp extra light olive oil
  • 1  3/4 cups all purpose flour
  • 1  1/2 tbsp granulated sugar
  • 1/4 tsp salt
  • 1 tbsp dry yeast
  • 1/2 tsp baking powder
  • 1 tbsp white vinegar

Directions

  1. Place first 6 ingredients into pan of bread machine in the order recommended by the manufacturer.
  2. Set machine to dough cycle. Start.
  3. After cycle is complete, punch down dough on a lightly floured surface.
  4. Sprinkle baking powder evenly over surface of dough.
  5. Knead dough for 5 minutes.
  6. Divide dough in half. Place half of dough in a covered bowl.
  7. Cut the remaining dough into 12 equal pieces.
  8. Roll dough pieces into balls and then flatten. Make sure that edges are thinner than the center.
  9. Fill dough with 1 teaspoon of desired filling. Bring edge of circle up to pinch closed so that none of the filling is showing.
  10. Place filled dough on a small piece of waxed or parchment paper. Continue with remaining dough balls.
  11. Repeat process with dough that has been covered in the bowl.
  12. Let all filled dough balls stand covered for another 30 minutes.
  13. Steaming process could be done in a steamer basket or a wok. I have a fish poacher with a raised grate and used this to steam the buns.
  14. Bring water and 1 tbsp vinegar to a boil in steamer.
  15. Place as many buns as will fit in steamer, allowing for about an inch between buns so that they don’t stick together as they cook.
  16. Cover with lid. Steam over boiling water for 15 minutes.

———————————————————————————————————————

Caribou Cha Sui (Works well with venison, moose, elk, lean beef or similar meat)

The first step is to create a marinade and let the tenderized caribou absorb the flavors overnight in the refrigerator. The next day, make a filling with the marinated caribou and stuff the anpan. The filling will make enough for 6 steamed buns (nikuman). This recipe is best started a day in advance to ensure the meat is properly marinated.

Ingredients (Makes 6 nikuman)

Filling:

Ingredients

  • 1/4 lb caribou, pounded/tenderized till 1/2 inch thick or thinner
  • cha sui marinade (see below)
  • 1/4 cup finely diced onions
  • 2 tbsp soy sauce
  • 1 tbsp honey
  • 1 tsp sesame oil
  • 1/4 cup beef stock (we use Better than Bouillon)
  • 1 tsp cornstarch
  • extra light olive oil

Directions:

  1. Place tenderized caribou in a glass bowl or container and completely cover with marinade.
  2. Cover glass container and place in refrigerator overnight.
  3. The following day…
    1. In a medium-sized frying pan, heat 1/2 tbsp oil over medium-high heat until a drop of water sizzles in pan.
    2. Sear caribou on each side to seal in the juices.
    3. Reduce heat to medium and cover pan. Continue cooking for 3 minutes on each side. Meat should be cooked to “medium.”
    4. Remove pan from heat and place cooked meat on a cutting board to rest a few minutes.
    5. Dice cooked caribou into 1/4 inch cubes and set aside.
    6. In a small bowl, mix cornstarch and beef stock and set aside
    7. Wipe out the pan used to cook the caribou. Heat 1/2 tbsp oil over medium heat.
    8. Add diced caribou and onion to pan. Cook for about 1 minute, stirring occasionally.
    9. Add soy sauce, honey and sesame oil to pan. Stir fry for another minute.
    10. Add cornstarch and stock mixture to pan and continue cooking until sauce thickens, about 2 minutes.
    11. Place caribou in bowl to cool prior to filling anpan rolls.
    12. See above directions for anpan to complete recipe.

Cha Sui Marinade:

Combine the following ingredients in a glass bowl:

  • 4 large cloves garlic, minced or chopped fine
  • 1/2 tsp dried ginger
  • 1 tbsp honey
  • 2 tbsp soy sauce
  • 1/4 tsp white pepper
  • 1/4 tsp dry fennel
  • 1/4 tsp ground cinnamon
  • 1/2 tsp sesame oil
  • pinch salt

*Point Hope, like many bush villages in Alaska, is dry. Every now and again a certain meal calls for a special adult beverage. At these times we miss being able to enjoy an alcoholic beverage. Most of the time we are content to wait until summer, which we spend in the “wet” town of Seward, Alaska or traveling.

Sweet, Smooth, Delicious Azuki Bean Paste

Azuki paste and azuki beans_n

Popular in Japan, sweetened azuki beans are a key ingredient in sumptuous desserts and baked goods. (The above photo marks the debut of our new Nikon D800.)

Many years ago, I lived in San Francisco. Walking along shopping streets lined with boutiques, a waft of warm vanilla  drew me into a tiny shop with just two tables. Behind the counter was very large crepe pan and a chalkboard menu filled with tempting daily specials. I was drawn to the vanilla crepe stuffed with red bean paste and topped with green tea ice cream. The textures, sweetness and interplay of flavors made for a satisfying dessert for a die-hard sweet tooth.

Many years later, 200 miles north of the Arctic Circle, supplied with dried azuki beans from a speciality shop in Anchorage, I was ready to try my hand at homemade azuki bean paste. It came out perfect and was featured in anpan (Japanese-style steamed rolls) to rave reviews. We can’t wait to try this paste in our own crepes.

Azuki Bean Paste

Ingredients

  • 1 cup dried adzuki beans
  • 5 cups water
  • 1  1/2 cups granulated sugar
  • pinch salt

Directions

  1. Soak dried beans overnight. Make sure beans are generously covered in several inches of water, as the water will be absorbed.
  2. The following morning, pour beans into a colander and rinse thoroughly with cold water.
  3. Place beans in a large pot along with 5 cups of water.
  4. Bring water to a boil over high heat.
  5. Reduce heat to low, cover and simmer for 1  1/2 hours. Beans should be soft.
  6. Put a wire strainer over a bowl.
  7. Pour beans and liquid into strainer. Strainer should be low enough that beans are partially immersed in water.
  8. Using a wooden spoon, smash beans through strainer into water. Skins should remain in the strainer.
  9. Line a bowl with cheesecloth and pour strained beans and liquid into cheesecloth.
  10. Draw up edges of cheesecloth and squeeze out excess liquid.
  11. Put squeezed out bean paste back into pot.
  12. Add sugar and salt to the beans and stir mixture over low heat. Continue stirring until mixture is glossy and has the consistency of mashed potatoes.
  13. Store in refrigerator.

See also: Arctic Anpan 2 Ways: Sweet Azuki Paste and Caribou Cha Sui

More lacquering

“Tsuribito” means “angler” in Japanese, but Adam’s blog The Complete Tsuribito delves into much more than fishing. This is a terrific idea for a greener (and more aesthetically pleasing) New Year: beautifully crafted, two-piece chopsticks to go anywhere you go. Jack & Barbra

Adam's avatarthe Compleat Tsuribito

This time culinary rather than angling: “collapsible” screw-in chopsticks.  These I bought with the screw fittings already set in the raw wood and the whole cut down to the right size; I just sanded the wood smooth, shaped the chopsticks a little and then lacquered them.  This time I used a technique called “Rubbed Urushi” which looks a little different to the kind of finish you get on bamboo fishing rods.

Most restaurants here in Japan will be happy for you to bring your own chopsticks as it saves them the expense of a pair of wooden ones, which are  thrown away after use.  If you eat out just one meal out of 21 in a week, in a year that is a saving of more than 50 pairs.  Some restaurants these days in fact try to cut down on their use of wood chopsticks and have changed to…

View original post 360 more words

Winter Sunshine – Honey Almond Cherry Nougat

Honey Almond Cherry Nougat_n

Chewy honey-flavored candy flecked with bits of cherries and almonds provides for fun in the kitchen and tasty results.

Locked in the heart of winter, it’s dark most of the day north of the Arctic Circle. Cold, too. And if the dark and cold don’t make you want to stay inside with a good book or movie, the infamous Point Hope wind will. (It’s 9° F and blowing 40 miles an hour for a windchill of about -20° F as I write this – and that’s not particularly cold for this time of year.) Some people suffer from the lack of sunshine up here. Our kitchen is our winter sunshine. It fills our home with warmth, good smells, and lots of entertainment. Today’s entertainment – honey almond cherry nougat.

Honey Almond Cherry Nougat pre-cut_n

Ready to be cut and wrapped into bite-size candies.

These reminded us of the Bit O Honey candies that we both loved as kids – although they were agreeably softer and more complex in flavor.

Honey Almond Cherry Nougat

Ingredients

  • 2 cups granulated sugar
  • 1  1/2 cups honey
  • pinch salt
  • 1/4 cup water
  • 2 egg whites
  • 2 sticks butter, at room temperature
  • 1 cup chopped almonds
  • 1 cup chopped dried cherries

Directions

  1. Combine sugar, honey, salt and water in a medium saucepan.
  2. Stir over medium heat until sugar is dissolved.
  3. Continue cooking without stirring until sugar reaches hard ball stage (250 degrees F).
  4. Place egg whites in a stand mixer bowl. Fit mixer with whisk attachment. Whip egg whites until they are stiff.
  5. While mixer is running, very slowly pour 1/4 of hot sugar mixture into whipped egg whites. Continue mixing until egg whites hold their shape.
  6. Return saucepan to stovetop with the remaining hot sugar mixture and continue cooking until mixture reaches hard crack stage (300 degrees F).
  7. Turn stand mixer on again. Pour remaining sugar mixture into egg mixture in a slow stream. Continue mixing until egg white mixture holds it shape.
  8. Add butter, one tablespoon at a time, and continue mixing. Mixture should look thick and satiny.
  9. Turn off mixer and fold in almonds and cherries.
  10. Pour mixture onto a buttered baking sheet. Let stand until totally cooled.
  11. Turn out cooled mixture onto cutting board. I coated mine with rice flour.
  12. Cut into 1 x 1.5 inch pieces and wrap in waxed paper.

Recipe adapted from foodnetwork.com.

Tufted Puffins, a Name Change and Best Wishes for 2013

Tufted puffin near Homer I_nUnmistakable with their toucan-like bright orange beaks and combed back white tufts of head feathers, tufted puffins (Fratercula cirrhata) are among Alaska’s most familiar ambassadors.

When we began this blog a little over two years ago, it was for ourselves. The blog was to be a place to catalogue our recipes and keep a photographic record of our travels and adventures. And so we named it Frozen Moments and didn’t think too much about it. It seemed an appropriate name for a blog where photographs are highlighted (frozen moments) and especially so since our home nine months of the year is in Arctic Alaska (frozen months).

Tufted puffin near Homer II_nBut as we got more into it, we discovered that Frozen Moments was a little too obvious. Others were already using the name. We realized we’d eventually want to make a change. CutterLight has its origins in two sources. Cutter derives from our summer home in Seward – our cutter-rigged sailboat. To us, the term evokes images not just of sailing, but of travel and adventure in general, as well as a spirit of being willing to learn and experience new things.

Tufted puffin near Homer III_nLight, too, holds multiple meanings for us. There is of course the “light” which all photographers are concerned with. As our skills and interest in photography grow, we are finding that we are becoming, inevitably perhaps, obsessed with light. It permeates our world now in ways it never did before, and this newfound awareness affects everything from the way we watch movies to how we perceive the world around us to how we deal with the deceptively elusive basic elements of photography.

Tufted puffin near Homer IV_nBut Light holds a second meaning – one which is perhaps even more central to our lives. As we move forward toward fulfilling our goals as writers, photographers and sailors, we have pared away much of what we once considered necessary. Not much fits on a 35-foot sailboat. A succession of yard sales and donations to thrift shops allowed us to part with most of our possessions before we moved to Alaska three years ago. Since then, every new item we add to our lives is carefully evaluated for the value it brings in terms of utility and pleasure. Few items make the cut. We are moving forward with a life that feels lighter yet stronger. It is a wonderful feeling.

Lower Cook Inlet near Homer_nLooking out over lower Cook Inlet from the bluffs above Homer, Alaska.

As we look back on 2012, it is with a deep sense of appreciation. Many new friends came into our lives this year, and we also were fortunate to have had some really special reconnections with people from our former lives. We are happy, too, that our blog is finding an appreciative audience. We wish one and all fair winds and following seas in the coming year.

Jack and Barbra Donachy

Cheese Blintzes with Arctic Blueberry Jam

blintzes_n

Thin, lightly fried crepes wrap a sweetened homemade cheese filling. Traditionally served with applesauce and sour cream, we enjoyed ours with jam made from local Arctic blueberries.

Some foods just make us happy. Bagels fresh out of the oven, the day’s catch charcoal grilled, and a piping hot skillet of most excellent nachos come to mind. Blintzes fall into this category as well. A brunch classic but great served anytime, they remind me of my Jewish grandmother’s home which always seemed to be filled with the scent of vanilla and hot oil.

Cheese Blintzes

Ingredients for approximately 13 blintzes

Blintz Wrapper

  • 6 eggs
  • 1 1/2 cup flour
  • 1/4 cup sugar
  • 1 cup milk
  • 1/2 cup water
  • 1  1/2  tsp vanilla
  • Pinch of salt
  • Vegetable oil with a high smoke point for frying (grapeseed or peanut oil works best); I used light olive oil

Filling

  • 1 cup ricotta cheese
  • 1 package (8 oz.) cream cheese
  • 1/4 cup sugar
  • 1 egg yolk
  • 2 tsp fresh lemon juice
  • 1 tsp vanilla
  • Pinch of salt

Directions

  1. Blend all of the blintz ingredients together using an immersion blender or electric hand mixer to ensure there are no lumps.
  2. Warm up a nonstick skillet or a crepe pan on medium heat until hot. The pan is ready when a drop of water sizzles on the surface of the pan.
  3. Butter the entire surface of the hot pan.
  4. Pour the blintz batter by 1/3 cupfuls into the center of the pan, then tilt the pan in a circular motion till the batter coats the entire bottom of the pan in a large, thin circular shape.
  5. Cook the blintz wrapper for about a minute, until edges are dry and tiny bubbles form in center. Flip the wrapper and cook for another 30 seconds. Use a spatula to remove from pan and place on a plate.
  6. After wrappers are cooked, make the filling.
  7. Place all filling ingredients in a medium bowl and mix thoroughly with a fork. Filling can be slightly lumpy.
  8. To fill wrappers, place a heaping tablespoon of filling onto center bottom third of wrapper. Fold bottom of wrapper up over filling. Fold in left and right sides. Finish rolling like a burrito.
  9. When all blintzes are stuffed and rolled, heat up oil in a frying pan on medium heat.
  10. Fry blintzes in oil, flap side down for 2 minutes, or until golden brown. Flip blintzes and brown on other side for 2 minutes, or until golden brown.
  11. Serve warm with sour cream and applesauce or homemade jam.

Recipe adapted from TheShiksa.com

How Have Long Life: Life Philosophy from Alaska’s Longest Reindeer Herder

winter sky_n

The sun doesn’t rise now. In its absence, there is darkness and dusk. And there is beauty in the pink hues and  blue silhouettes of midday.

Words to live by from the longest reindeer herder, Chester Asakak Seveck.

For long live and joy life,

I believe these things –

Keep busy and do good work.

Have much good exercise.

Eat good food,

no waste anything

and every day enjoy what it gives

and do not spoil this day with much worry of tomorrow.

Be happy.

I know this way

how I be “Longest Reindeer Herder.”

Start 1908, finish 1954,

altogether 46 years herd reindeer.

From Longest Reindeer Herder: A true life story of an Alaskan Eskimo covering the period from 1890 to 1973, by Chester Asakak Seveck