Diminutive Raspberry Cheesecakes with a Sweet Raspberry Jam

diminutive-cheesecakes_n

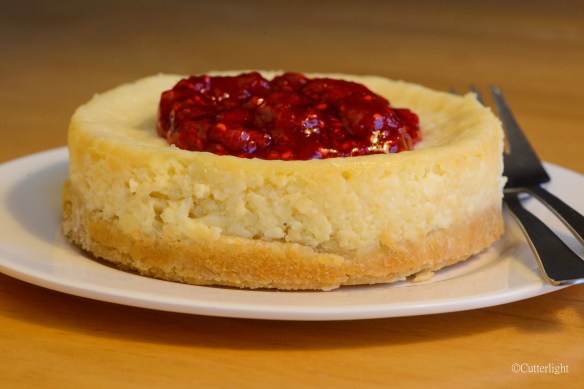
Cheesecakes for one – creamy vanilla with the tang of cream cheese. Top it with some favorite jam and Wow, this makes for a delicious, elegant dessert.

Out in the Alaska bush, I don’t usually stock cream cheese in my pantry. But during a recent visit to a neighboring village I happened across a two-pound block at the store. It doesn’t freeze very well, which makes for a perfect excuse to immediately create lots of baked items with this delicious ingredient. I’ve made these lovely little cheesecakes before using matcha green tea as the flavoring. This recipe is a perfect base in which to add in a variety of flavors. For this batch, I wanted to showcase my raspberry freezer jam, so I created a complementary vanilla-flavored cake.

Diminutive Vanilla Cheesecakes

Ingredients

Crust

  • 1 1/2 cups all purpose flour
  • 1/3 cup granulated sugar
  • 1 egg, beaten
  • 1/2 cup butter, melted

Filling

  • 1 package of cream cheese, 250 grams, softened to room temperature
  • 1/2 cup granulated sugar
  • 1 large egg, beaten
  • 1 tsp vanilla extract

Directions

  1. Preheat oven to 300 degrees F (150 degrees C). Line 8 standard-sized muffin tin cups with paper liners.
  2. In a medium bowl, mix together crust ingredients.
  3. Evenly divide crust mixture into lined muffin tin cups. Press down to form bottom of cheesecakes.
  4. Bake crusts for 5 minutes. Let cool.
  5. In a large bowl, whisk together filling ingredients. There should be no lumps and all ingredients should be mixed well.
  6. Divide filling evenly into paper lined cups.
  7. Bake cheesecakes until set, about 16 – 18 minutes. Centers should not jiggle.
  8. Refrigerate cheesecakes for 3 hours before serving.

Roasted Squash Pecan Bread

squash-pecan-bread-n

Imbued with traditional fall flavors, we have a feeling this bread could become a new Thanksgiving tradition!

During our annual shopping in July, we picked up several acorn and butternut squashes – favorite centerpieces in many of our recipes. There is also a practical side to squashes when living in the bush… they ship well and last a long time in a cool, dry location. Up in Point Hope, we used to keep squash and potatoes for months in our mudroom. Here in Chignik Lake, a much more damp location, the fridge serves as our long-term storage area.

Recently, after oven-roasting a butternut squash in olive oil and garlic, I decided to try something new. I have a time-tested base recipe for fruit bread, but instead of the usual pears or other fruit, I used the roasted squash. Even the raw dough was quite tasty! (I know, I know, I’m not supposed to eat raw dough…but I always do). The squash helps to make the bread moist and satisfying and pumpkin pie spices give it a sense of holiday seasons. Pecans add a layer of flavor and a hearty crunch. This would be a perfect Thanksgiving bread!

Roasted Butternut Squash Pecan Bread

Ingredients

  • 2 cups mashed roasted butternut squash (any roasted squash will work)
  • ½ cup vegetable oil
  • ½ cup unsalted butter, melted
  • 4 large eggs, beaten
  • 2 tsp vanilla extract
  • 1 ½ cups granulated sugar
  • 1 tsp galangal (or ground ginger)
  • ½ tsp ground nutmeg
  • 1 tsp ground cinnamon
  • 3 ½ cups all purpose flour
  • 1 tsp baking powder
  • ½ tsp salt
  • 1 cup chopped pecans

Directions

  1. Grease two 8 in. x 4 in. x 2 in. loaf pans. Set aside.
  2. Preheat oven to 350 degrees F (175 degrees C).
  3. In a large bowl mix together squash, oil, butter.
  4. Mix in eggs and vanilla.
  5. Mix in sugar.
  6. Sift in spices, flour, baking powder and salt.
  7. Mix well, but do not over mix.
  8. Fold in pecans.
  9. Pour batter into two prepared pans.
  10. Bake for 60 minutes or until a wooden pick inserted into center of loaf comes out clean.
  11. Top should be lightly browned.
  12. Cool for a few minutes in pans. Remove loaves and finish cooling on wire racks.

It’s All in the Details – Super Rich Chocolate Chip Brownies and the Writing Process

brownies-chocolate-chip-n

Moist, cakey, fudgy… forget the description, just give me some of that!

Sometimes the lines get blurred between teaching elementary students and baking. *Warning* Do not read the following blog on an empty stomach. In writing, young students often find it difficult to add appropriately intriguing details to their writing. In order to teach these skills, I often model an example by writing in front of them. I will write something very simple like “My favorite dessert is a brownie sundae.” I will explain that interesting writing about food should make the reader hungry. They usually agree that my initial example didn’t accomplish this goal. Then I will write something like the following –

Imagine a brownie. Not just any brownie. This one is cooling from the oven. Its texture is somewhere between a rich chocolate cake and gooey chocolate fudge. The warm brownie has been saturated with melted chocolate chips that have been baked into this brownie. Atop this brownie mountain is a scoop of custardy French vanilla ice cream speckled with seeds from real vanilla beans. Homemade whipped cream with a faint aroma of vanilla is on top of the ice cream. Hot, thick fudge is dripped over the top of the dessert. It is warm enough to slightly melt the ice cream, but not hot enough to hurt your tongue. Of course, the whole sundae is topped with salty peanuts and a sweet, red maraschino cherry.

By the time I get to the description of the fudge, the students are usually squirming in misery. And my point is made.

The centerpiece and foundation of this favorite dessert is the brownie. Many people are staunch cakey brownie lovers. In the other camp are those who demand the gooey fudgy brownie. This brownie recipe results in a balance of moist cake texture with enough gooeyness to satisfy those who need that intense dense brownie. Enjoy this brownie in your favorite sundae – or straight from the oven. Do let it cool a bit before you dig in!

Super Rich Chocolate Chip Brownie

Ingredients

  • 2 cups granulated sugar
  • 5 large eggs
  • 1 cup canola oil (or other light vegetable oil)
  • 1 tsp vanilla extract
  • 1 1/3 cups all purpose flour
  • ½ cup Dutch processed cocoa powder
  • generous pinch salt
  • 1 cup semi-sweet chocolate chips

Directions

  1. Grease a 9 x 13 inch glass baking dish. Set aside.
  2. Preheat oven to 350 degrees F (175 degrees C).
  3. In a large bowl, stir together sugar, eggs, oil, and vanilla extract.
  4. Sift flour, cocoa powder and salt into egg mixture.
  5. Mix until moistened, do not overmix.
  6. Evenly spread batter into prepared baking dish.
  7. Sprinkle chocolate chips over batter.
  8. Bake for 30 minutes. Brownies will start to pull away from edge of dish when finished.
  9. Be patient. Allow to cool a bit before cutting.

Blueberry Jam Bars – The Best Part of a Survival Kit for Stormy Afternoons

blueberry-jam-bars-n

Stormy afternoon survival kit: A great book, freshly brewed tea, and blueberry jam bars still warm from the oven.

My morning chores were to make a batch of yogurt, sourdough loaves for the week and sourdough pizza crusts for the freezer. Those tasks complete, it would have been nice to go outside for a walk. But this Saturday’s weather turned it into a stay-inside kind of day. We’ve heard that October is the month that Chignik Lake earned its name. Chignik means big winds in the native language. Saturday, it poured rain sideways. The lake was blown into a froth of whitecaps. Our little home here hunkered down solidly, just like our little house in Point Hope. It was the kind of day to curl up with a warm drink, a book, and a blanket. In our house, this scene also begs for a home-baked accompaniment. With a shelf of preserves made from berries we picked earlier, I had no trouble baking up a batch of oat bars filled with jam. The hardest part was to choose which jam – blueberry, currant, raspberry, or cranberry. Blueberry! In just over 30 minutes, I had delicious bars ready to go. This recipe is as easy as pie… or as blueberry oat bars.

Blueberry Oat Bars

Serves 9 polite eaters, or 2 ( if you have limited willpower)

Ingredients

  • 1/2 cup dark brown sugar, packed
  • 1 cup all-purpose flour
  • 1/4 tsp baking soda
  • pinch salt
  • 1 cup rolled oats
  • 1/2 cup unsalted butter, melted
  • 1 cup homemade blueberry jam (substitute any jam you have on hand)

Directions

  1. Preheat oven to 350 degrees F (175 degrees C).
  2. Grease 8 inch square baking dish.
  3. Combine sugar, flour, baking soda, salt, and oats in a medium bowl.
  4. Drizzle melted butter into flour mixture.
  5. Toss until mixture is crumbly.
  6. Press 2 cups of the mixture evenly into bottom of baking dish.
  7. Spread jam on top of flour mixture.
  8. Sprinkle remaining flour mixture atop jam, as even as you can.
  9. Lightly press flour mixture into jam.
  10. Bake for 35 minutes. Finished bars should be lightly browned.
  11. Allow to cool before cutting.

Out of Chocolate! Now What? Chewy Almond Thins to the Rescue

chewy-almond-crisps-n

These candy-like cookies are ridiculous. Chewy and flavorful – a cure for a terminal sweet tooth.

At the end of most evening meals, Jack and I enjoy a piece of dark chocolate or a little something sweet with a cup of tea. I have a terrible sweet tooth that seems to be sated by this little habit. Thinking that I would bake more than I have been, we didn’t send out very much chocolate for our après dinner tradition. Now our chocolate is all gone – at least till the next Amazon order arrives via bush plane.

In these kinds of emergencies, my Williams-Sonoma Baking book always seems to save the day. It is a solid baking book with a number of foundational recipes that can be followed directly or easily adapted. I remembered a quick cookie recipe loaded with almonds that I hoped would do the trick. The authors of the recipe called these cookies Almond Crisps. Mine turned out beautifully flat and a bit lacy. They were pleasantly chewy, like a really satisfying caramel. I think this is due to the combination of sugar and brown sugar. Delicious. I adorned these cookies with a chocolate drizzle made from a few semi-sweet chips I had stashed in my pantry.

Our problem now is that three dozen of these cookies have up and disappeared!

Chewy Almond Thins

Ingredients

  • ½ cup unsalted butter, room temperature
  • 1 cup brown sugar
  • 1 large egg
  • 1 tsp vanilla extract
  • ¾ cup all purpose flour
  • 1 tsp baking powder
  • pinch salt
  • ½ cup finely chopped almonds

Directions

  1. In the bowl of a stand mixer, cream butter.
  2. Add sugar and continue to beat until sugar and butter are well mixed.
  3. Add egg and vanilla into mixture. Mix on low speed until well mixed.
  4. Sift flour, baking powder, and salt together.
  5. Stir flour mixture into butter mixture.
  6. Stir in almonds.
  7. Preheat oven to 400 degrees F (200 degrees C).
  8. Line a baking sheet with parchment paper.
  9. Drop teaspoonfuls of batter onto prepared baking sheets. Space cookies about 2 inches apart. They will spread.
  10. Bake 5 minutes. Edges will be golden brown, but cookies will still be soft.
  11. Let cookies cool on baking sheet for exactly 5 minutes. Then remove to wire rack to finish cooling.

Super Sourdough Success

sourdough-loaf-n

Two loaves of sourdough bread fresh out of the oven. As soon as they cooled enough to cut, we were in. Delicious!

Every July, I make culinary goals for myself as this is the time of year we do our bulk shopping for our year in the Alaskan bush. My two big goals this year were to master working with sourdough starter and to make cheese.

I’ve tried making sourdough bread with starter before. A friend gave me some of hers which she had had going for several years. For whatever reason, my sourdough did not turn out. Jack called it an epic fail. I don’t remember it being epic. That would have involved tears, bread in the trash, and possibly my fists pounding the floor like a tantrumming child. Don’t ask me about the time I tried to hard boil eggs! That was an epic fail. I do remember that my last attempt making sourdough bread wasn’t good. So, it went on the goal list to try again.

Most people go to their local store to buy the things they need. If they are lucky, they live in a place with specialty shops where they can find unique tools to help them achieve their culinary goals. Out here in the bush, we rely on the U.S. Postal Service to deliver items we can find via the Internet. This involves lots of planning and lots of patience waiting for items to show up. Last week, my sourdough starter finally arrived. I’ve been diligently feeding it every day and it’s been bubbling away on the countertop in a nifty glass jar I bought especially for this purpose.

Today was the big day. The starter smelled nicely sour. I gathered my ingredients and set to work. Happily, the two loaves came out lightly sour and made for a great accompaniment to Jack’s clam chowder. Hurrah! It will be interesting to see if the starter changes flavor as it continues to age. I am also curious to see how the starter will taste in sourdough pancakes. Stay tuned to find out!

Homemade Sourdough Bread

Ingredients

  • 3 ¾ cups all purpose flour
  • 2 tbsp granulated sugar
  • 2 ¼ tsp active dry yeast
  • 1 cup whole milk
  • 2 tbsp unsalted butter
  • 1 ½ cups sourdough starter
  • 2 tsp salt
  • 2 tbsp olive oil
  • 1 egg
  • 1 tbsp water

Directions

  1. In a large bowl, combine 1 cup flour, sugar, and yeast. Whisk together.
  2. Place butter and milk in small pot on stove. Warm to about 110 degrees F.
  3. Whisk milk mixture into flour mixture.
  4. Whisk in sourdough starter.
  5. Stir another cup of flour into dough mixture.
  6. Stir and then knead in one more cup of flour and salt. (I actually knead in the large bowl.)
  7. Knead in final ¾ cup of flour. Dough should be well mixed and slightly sticky.
  8. Turn dough out of bowl and coat bowl with 2 tbsp olive oil. Place dough back in bowl.
  9. Cover with plastic wrap and rise for 1 hour or until doubled in size.
  10. Punch dough down. Divide dough in half and shape each half into a loaf-shaped log.
  11. Place loaves on a parchment-lined baking sheet.
  12. Cover and let rise for an hour, or until doubled in size.
  13. Heat oven to 375 degrees F.
  14. Mix egg and water and brush loaves generously with this mixture.
  15. Bake loaves for 25 minutes. Finished loaves will be golden brown and have a hollow sound when the bottom is tapped.

Reduced Guilt Cinnamon Rolls – Banana, Wheat and Pecans, Yum!

wheat banana cinnamon rolls n

A delicious and satisfying cinnamon roll – this reduced guilt version has more fiber from the whole wheat, natural sweetness and flavor from bananas, and a pecan crunch.

A few years ago, a friend graciously helped us out with taxi service for one of our 4 a.m. flights back to the bush. After dropping us off by the ticket counter, he disappeared and quickly reappeared laden with Cinnabon cinnamon rolls for all three of us. How sweet, right? Really, how sweet! I’ve always thought there must be a way to create a cinnamon roll with lots of flavor and sweetness, but not so much sweetness that when you’ve finished eating it, you feel gut-bombed. Sorry, Cinnabon. This banana-wheat creation did the trick. The dough gets moistness and flavor from smashed bananas. The swirl of banana slices, cinnamon, sugar and nuts give you that tasty, satisfying, fun unwrapping and unrolling experience that we expect from eating a cinnomon roll. And the drizzle of glaze on the top gives a sweet Pow you’d expect on traditional cinnamon rolls without overloading them. So, go ahead and enjoy a healthier version of this breakfast treat today!

Banana Wheat Pecan Cinnamon Rolls

Ingredients

  • 2 1/2 tsp instant yeast
  • 1 cup milk (any kind of milk will work)
  • 8 tbsp unsalted butter, separated
  • 1/3 cup granulated sugar, separated
  • pinch salt
  • 1/2 cup mashed ripe banana
  • 1/2 cup sliced bananas
  • 2 cups all purpose flour
  • 1 cup whole wheat pastry flour
  • 1 tbsp ground cinnamon
  • 1/2 chopped pecans

Directions

  1. Place yeast and 1 tbsp of granulated sugar in a large bowl.
  2. Warm milk and 2 tbsp butter to 105 degrees F (40 degrees C).
  3. Stir milk mixture into yeast mixture and let stand until foamy, about 10 minutes.
  4. Mix in mashed banana and salt.
  5. Mix in flours, 1/2 cup at a time. Dough should be sticky.
  6. Knead dough on a lightly floured surface for another minute.
  7. Place dough in a bowl lightly coated with light oil, like canola. Cover with plastic wrap. Let rise in a warm, draft free place until doubled in size, about an hour.
  8. Grease an 8×8 square pan (or equivalent round). Set aside.
  9. On a lightly floured surface, roll out dough into a long rectangle which is about 1/4 inch thick (about 6 mm).
  10. Melt 4 tbsp butter. Mix in remaining sugar and cinnamon.
  11. Brush dough with butter mixture. Evenly sprinkle chopped pecans over dough. Evenly spread out banana slices over dough.
  12. Roll dough jelly-roll style. Make sure the seam side is down. Slice the dough log into 10 pieces with a serrated knife.
  13. Place cut pieces in the prepared pan. Brush the rolls with remaining melted butter. Sprinkle additional sugar and nuts on top, if desired.
  14. Cover the rolls with plastic wrap and let rise again while you preheat oven to 350 degrees F (175 degrees C).
  15. Bake rolls for 25-35 minutes. They should be slightly golden brown.
  16. Let cool slightly and serve warm.
  17. These rolls are delicious without glaze. If you need a glaze, you can make one quickly by mixing 1 cup powdered sugar with a couple of tsp of milk (glaze should be consistency of honey). Drizzle glaze over rolls.

Whole Wheat Pita – Our Go-To Weekly Bread

whole wheat pita n

Versatile, soft and tasty pita pockets perfect for so many things – sandwiches, mini pizzas, and anything else you can imagine.

These delicious little breads are quite literally better than sliced bread. We’ve stuffed them with hummus and cucumber. We’ve enjoyed them warm along with a hearty homemade soup. Just this morning, Jack made a breakfast pizzas with these delicious pitas as the base, topped with a hearty roasted tomato sauce, mozzarella and a perfectly poached egg. We’ve even had them smeared (to Jack’s chagrin) with peanut butter and jelly for a quick and easy lunch. They’re also great stuffed with cheese and salmon and toasted.

I’ve made pita bread before using only white flour. Jack and I really enjoy the pizza crusts I make with half and half wheat and white all purpose flour. I was confident the pita would also be enjoyable with the wheat and white mixture. The wheat does add some healthful fiber, but it also adds a nice flavor and a little heartier texture. We enjoy this bread so much, I make a batch every weekend. I freeze the extra pitas and thaw them as I need them throughout the week. The thawed bread tastes like it just came out of the oven. Perfect!

Whole Wheat Pita Bread

Ingredients

  • 2 1/2 tsp active dry yeast
  • 1 tsp honey
  • 1 1/4 cups warm water
  • 1/4 cup extra virgin olive oil (plus extra for coating the bowl)
  • 1 1/2 cups all purpose flour
  • 1 1/2 cups whole wheat pastry flour
  • 1 tsp salt

Directions

  1. Stir together yeast, honey and warm water in a large bowl. Let stand about 5 minutes. Mixture should become foamy indicating the yeast is good.
  2. Stir in olive oil.
  3. Whisk in 1/2 cup of all purpose flour and 1/2 cup whole wheat flour. Mix until smooth.
  4. Stir in another 1/2 cup of all purpose flour, 1/2 cup whole wheat flour and salt.
  5. Knead in last 1/2 cups of flours until dough is smooth and elastic.
  6. Form dough into a ball and set in a clean, oil-coated bowl. Cover with plastic wrap and let rise in a warm, draft-free place. Let rise until doubled, about an hour.
  7. Punch dough down and cut into 10 equal pieces.
  8. Form each piece into a ball. Flatten and roll out into about 5 – 6 inch rounds.
  9. Cover with a clean kitchen towel and let rest for 30 minutes.
  10. Preheat oven to 400 degrees F (200 degrees C). Place baking sheet in center of oven while oven preheats.
  11. Place two pitas on baking sheet and bake for 3 minutes. Flip and continue to bake for 2 minutes.
  12. Cool baked pitas on a cooling rack and cover with a clean kitchen towel.
  13. Repeat with remaining pitas.
  14. Serve warm or store in zip top bags in the freezer.

Chocolate Pistachio Biscotti

chocolate pistachio biscotti n

Crunchy chocolate biscotti speckled with delightfully tasty green pistachios. Where’s my latte?

I am a huge fan of the soft cookie with the slightly crunchy exterior. You know, that perfect chocolate chip cookie with an almost melty interior and an exterior that holds it perfectly together? This biscotti recipe is worth momentarily turning away from my favorite cookie texture. One thing I like about this biscotti recipe is the expected crispy biscotti-like texture without the hard crunch. You can have this biscotti with tea and still hear your conversation. Then there’s the flavor. There is the bang of chocolately cocoa followed by zips of salty toasted pistachios. Yum! The intent with the smaller batch is that we would have a few cookies around to enjoy at the end of the day with tea. The reality is… I’ve already made a second batch.

Chocolate Pistachio Biscotti

Ingredients

  • 1 cup all purpose flour
  • 1/4 cup dutch processed cocoa
  • 1/2 tsp baking soda
  • pinch salt
  • 1/2 cup granulated sugar
  • 1 large egg
  • 3 tbsp unsalted butter, melted
  • 1/2 cup shelled, roasted and salted pistachios

Directions

  1. Preheat oven to 350 degrees F (175 degrees C). Line a baking sheet with parchment paper. Set aside.
  2. In a medium bowl, sift together flour, cocoa, baking soda and salt.
  3. In a small bowl whisk together the sugar and the egg until light and creamy.
  4. Add melted butter to egg mixture. Whisk.
  5. Add flour mixture to egg mixture. Stir until until stiff dough forms.
  6. Shape into a flattened log, about 2 inches wide.
  7. Cut the log in half so you can sprinkle the pistachios in the middle, like a sandwich. Put the log back together and smooth out the cut with your hands. This will ensure each biscotti has an even amount of nuts.
  8. Place on prepared baking sheet and bake for about 25 minutes. Cookie should be slightly firm. Allow to cool for about 5 minutes.
  9. Using a serrated knife, cut log into pieces about 1 inch thick. Place each cookie on the cut side. Reduce oven temperature to 300 degrees F (145 degrees C). Bake cut cookies for an additional 8 minutes.
  10. Flip cookies over and continue to bake for an additional 5 minutes.

Chocolate Chip Strawberry Oat Bran Nutty Muffins

muffins oat chocolate strawberry nut n

These moist and flavorful muffins packed with beautiful strawberries and speckles of chocolate will start your day off with a guiltless smile and maybe even a happy dance.

Every now and again, I come across a product that I love. I’ve become a huge fan of Bob’s Red Mill whole wheat pastry flour. If you follow this blog, you’ll know we love cooking. But you’ve probably noticed that we are obsessed with baking. Ok, the obsessed baker is actually Barbra. In Ulaanbaatar, Mongolia, finding unique and interesting products to cook and bake with is kind of a scavenger hunt. A couple of weeks ago, I checked the “specialty” food section at one of our stops on our regular shopping rounds. I noticed a bag of Bob’s Red Mill whole wheat pastry flour. The packaging boasted that it is “America’s best baking flour.” The words “biscuits, muffins, pie crusts, and pancakes” were in large print to catch the’ attention of bakers. Nice job, marketing department. Hooked me!

I purchased a three-pound bag and began experimenting. Increasingly, I’ve been reading about replacing all-purpose flour with whole wheat – or at least replacing some of the white flour with whole wheat. What I’ve noticed with Bob’s Red Mill whole wheat pastry flour is that it is very light – not even making a noticeable difference when I tried out recipes with half wheat and half white flour. I wanted the wheat benefits without the heavy “wheat” feeling in my baked goods. Today I tried substituting all the white flour called for in my muffin recipe with the whole wheat pastry flour. The results? Delicious! There was definitely a wheat flavor which was nicely balanced with the oat bran.

This recipe is a great base. The fruits and nuts could be substituted with any kind of fruits and nuts. If you don’t want the chocolate chips, simply omit them. These muffins are not overly sweet. In this case, I liked the little bits of chocolate which complemented the unsweetened frozen strawberries.

Chocolate Chip Strawberry Oat Bran Nutty Muffins

Ingredients

  • 1 1/2 cups oat bran
  • 1 1/2 cups whole wheat pastry flour
  • 2 tsp baking soda
  • 2 tsp baking powder
  • 1 tsp ground cinnamon
  • pinch salt
  • 1/2 cup semi-sweet chocolate chips
  • 2 eggs, beaten
  • 1/2 cup packed brown sugar
  • 1 1/4 cups applesauce
  • 1 tsp vanilla extract
  • 1/2 cup chopped pecans
  • 1 1/2 cups chopped strawberries (fresh or frozen)

Directions

  1. Grease 16 regular-sized muffin cups. I used a 12-muffin tin and a 6-muffin tin and only greased 4 of the 6 in the smaller tin.
  2. Preheat oven to 400 degrees F (200 degrees C).
  3. In a large bowl, whisk together oat bran, pastry flour, baking soda, baking powder, cinnamon and salt.
  4. Stir chocolate chips into flour mixture. Set aside.
  5. In a medium bowl, whisk together eggs and sugar until well blended.
  6. Mix applesauce and vanilla into egg mixture.
  7. Mix egg mixture into flour mixture.
  8. Fold pecans into dough.
  9. Fold strawberries into dough.
  10. Using an ice cream scoop, place scoopfuls of dough into each muffin section of the muffin tins.
  11. Bake muffins for 15 minutes. An inserted toothpick should come out clean when muffins are done.
  12. Let cool in tin on wire rack for about 5 minutes before removing from tin.