The flower petals have dropped. Tiny, hard berries are taunting me with their promise. It will be quite some time before they will be ripe and ready for picking. Normally, when I can’t stand the wait for this summer’s fruit, I usually have last year’s berries stashed in my freezer to bake with while I oh-so-patiently wait for this year’s fruit to mature. With the move this year, we gifted our stash to friends at the Lake. So, I wait.
We all know I’m not really going to wait to play in the kitchen. 😉 Now that I have not one, but two grocery stores nearby, I don’t have to keep a stocked pantry like we did at the Lake. But pantry items do drive inspiration. We mailed quite a bit of dry goods that we hadn’t used up. Boxes of pasta, pounds of rice and cans of pumpkin puree didn’t trigger any ideas. There was this bag of mini-marshmallows tucked away. I had purchased them for hot cocoa. What about hot cocoa cookies? Rocky road bars? Marshmallow thumbprints? None of these ideas appealed to me. Then I thought s’mores! I am a s’mores fan, but only in small quantities. I enjoy the summertime fireside treat in ones or twos. What if the essence of chocolate, graham crackers, and toasted marshmallows were featured in cookies instead of their original over-sweet form? The result? A chewy cookie with bursts of chocolate, crunches of graham cracker, and bites of gooey marshmallow.
The recipe was a successful distraction until the real show starts. (C’mon berries!) Between now and then, I will keep myself occupied with processing spruce tip syrup. And maybe figuring out a way to bake with pasta, rice, and pumpkin? Or not.
Double Chocolate S’more Cookies – small batch
Ingredients
1 cup all-purpose flour
3 tbsp dutch-processed cocoa powder
1/4 cup graham cracker crumbs
1 tsp baking soda
Pinch salt
1 stick unsalted butter, room temperature
1/2 cup packed brown sugar
1/4 cup granulated sugar
1 tsp pure vanilla extract
1 large egg
1/2 cup semi-sweet chocolate chips
1/2 cup mini marshmallows (and a few extra for finishing)
1 sheet graham cracker, roughly chopped
Directions
Preheat oven to 375°F.
Line a baking sheet with parchment paper.
In a bowl, whisk together flour, cocoa powder, graham cracker crumbs, baking soda, and salt. Set aside.
Using electric mixer, beat butter and sugars until light and fluffy.
Mix in vanilla.
Mix in egg.
Slowly add in flour mixture. Mix until incorporated.
Fold in chocolate chips, marshmallows and chopped graham cracker.
I used a 1 1/2 tbsp cookie scoop to spoon out 12 portions of dough to place on prepared cookie sheet.
Bake cookies for 10 minutes.
Quickly remove baking sheet from oven and add a few more marshmallows on each cookie. Place back in the oven for 2 additional minutes.
When done, cookies will be firm on the edges and soft in the middle. Allow to cool for about 5 minutes on sheet before removing to cool completely on a wire rack.
Light and creamy vanilla cheesecake drizzled flooded with wineberry syrup. Just building the anticipation for berry-picking season.
For most, I imagine spring flowers sow hope for warmer weather and start dreams of sunny summer adventures. The flowers of this particular spring were different for me.
For the last two summers, Jack and I have spent countless hours studying and identifying all the flowers we could find in the surrounding areas of Chignik Lake. It was a beautiful education. The flowering season began with chocolate lilies and ended with tiny white yarrow with lilac-colored geranium sustaining throughout. Along the growing months from May through October, a rainbow of blossoming gems ebbed and flowed. Although I loved seeing and identifying all the blooms, the flowers that gave me the most joy were the ones that I knew would transform into fruit. As we hiked through the months, I would monitor the progress of my miniature crops as they turned from tiny bud to flower to hard little fruit, and then to the final stage of delectable berry treasures that were ready to harvest.
Whenever Jack and I visit different places, we regularly look for flowers. It is interesting to us to see which flowers we have learned about at the Lake which also grow in other places. As it turns out, we are now in a new place. Yes, a surprising plot twist.
We would not have guessed we were going to make a move…even as late as this recent February. A principal job was opening at my school and I was just about finished with my credentialing coursework. We loved our community and our home. We have close friends and a deep connection to Chignik Lake. But life happens. Way leads to way. Turned out the way that opened was a door we had been keeping an eye on for a long time.
If you’ve been following our story for a long while (like thirteen years long), you’ll remember that our whole Alaska adventure began with a summer-long trip. It was one of those once-in-a-lifetime trips that people do. A hobby at that time had been running destination half marathons. Jack found an interesting destination that would align this hobby with a blend of other interests like road-tripping, camping, boating, and of course visiting Alaska. With just six days to make it up the Al-Can, launching our trusty C-Dory in Valdez, and boating over to the destination Salmon Jam Half Marathon in Cordova Alaska, we would start a journey that we had no idea would change our life. On the way home from that Epic Alaska Summer Adventure, we decided that Alaska would become home. In the way life sometimes circles and spirals, we find ourselves back in Cordova. This time, it is not a travel destination, but a new home.
A common thread in all of our our Alaskan homes has been the opportunity to forage for interesting edible plants. How fortunate are we to live in a big beautiful state that offers so many wild foods…among my all-time favorites – berries! We discovered many flowers on our initial hikes on the trails in the Chugach National Forest. I’m happy to report blueberry, low bush and high bush cranberry, salmonberry, currant, nagoonberry and lots of strawberry flowers. Now, in this new place, I get to follow my familiar summertime tradition of monitoring all of these flowers’ progress from bud to fruit. With any luck, we’ll find lots to harvest later this summer.
Jack suggested I share my process for making wineberry (aka nagoonberry) syrup. Most people find the process to be tedious. It’s pretty simple, actually. After picking the precious gems from your secret spot, take them home and xxxxxxx xxxxxxx xxxxxxxxxx xxxxxxx xxxxxxx xxxxx xxxxxxxx xxxxxx. For each cup of processed berries add 1/4 cup of water. Simmer the berries until soft. Smash the mixture with a potato masher. Separate the juice from the pulp by suspending a cheesecloth over a . Every time I try to publish this, it gets redacted. I guess the FBI doesn’t want it shared – (Fruit and Berry Interagency). 😉
For this creation, I used a no-bake cheesecake recipe adapted from a blog I follow, Sally’s Baking Addiction. I modified it to make a 4-inch version, which is perfect for two hungry writers, or can be served to four for a nice little sweet bite at the end of a meal. I like the no-bake version to complement fruit syrups because it is light and airy but still retains the tanginess of the flavor you’d expect from a cheesecake.
4-inch No Bake Cheesecake
Ingredients
Crust
1/2 cup graham cracker crumbs
1.5 tbsp brown sugar
3 tbsp unsalted butter, melted
Cheesecake
1/4 cup + 1 tbsp heavy whipping cream
6 oz. cream cheese, room temp
2 tbsp granulated sugar
1/2 tbsp powdered sugar
1 tbsp sour cream
1/2 tsp lemon juice
1/2 tsp pure vanilla extract
Directions
To make the crust, stir together crust ingredients. Pour into a 4-inch springform pan. Use the back of a spoon to pack the crust tightly against the bottom and sides of the pan. Place pan in freezer while the filling is being made.
Using an electric mixer fitted with a whisk attachment, whisk heavy cream until stiff peaks are formed. Scrape whipped cream into a separate bowl.
Using the original bowl you used for whipping cream, beat cream cheese and granulated sugar together until smooth.
Add powdered sugar, sour cream, lemon and vanilla. Beat again until mixture is smooth.
Gently fold whipped cream into cream cheese mixture.
Spread cheesecake filling into prepared crust.
Cover with plastic wrap and let cheesecake chill and set. I left it in the fridge for about 18 hours.
When ready to serve, loosen the chilled cheesecake by running a knife around the perimeter of the pan before springing it open. I prefer to serve the cheesecake without any syrup and let my guests adorn their own. It definitely adds to the anticipation and the wow factor.
This summer, one of my goals was to reignite my writing spark. To that end, I signed up for a couple of writing workshops. First stop, Tutka Bay, Alaska.
Several years ago, I acquired the Tutka Bay Lodge Cookbook. It has become one of my two absolute favorite culinary resources. Through the book, I became acquainted with people whom I thought would be kindred spirits. The chefs sought to sustainably use and showcase what they could forage from the lodge’s nearby wilderness. The lodge’s location seemed idyllic – a fjord only accessible by boat surrounded by forest. The cookbook is filled with culinary wonders featuring harvested beach greens, foraged berries and mushrooms, and wild caught fish. When I first read the cookbook, I learned that a cooking school is held on site. I began dreaming of a visit. As with most lodge visits in Alaska, a stay there is expensive. So, it remained a dream – I would say a recurring dream. But I visited the lodge virtually and fueled this dream by regularly adapting the cookbook’s many recipes to create dishes and meals with items we forage and gather here at the Lake.
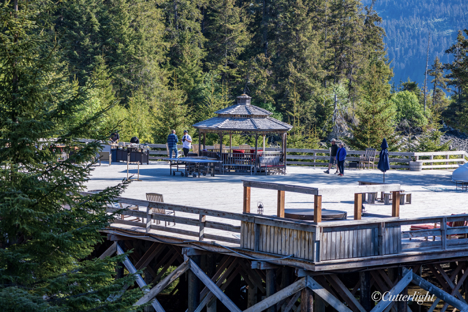
Set among spruce trees and overlooking a narrow fjord off Kachemak Bay, the deck at Tutka Bay Lodge was an ideal place for cooking classes, a soak in the hot tub, or just relaxing and listening to the songs of forest birds.
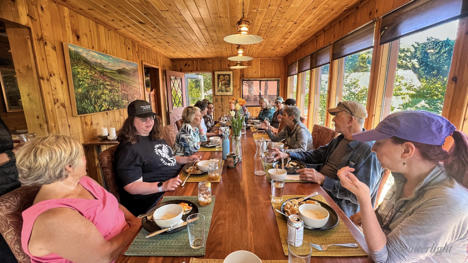
During this same time, Jack contributed writing and photos to a lovely “local” magazine called Edible Alaska. The magazine features food-related stories from all over our beautiful state. Earlier this past Spring, the Edible magazine people organized a culinary writing retreat at Tutka Bay Lodge. We were lucky to be invited to this retreat along with what turned out to be an intimate group of fourteen enthusiastic foodies.
What was a day in the life of an Alaskan culinary writers’ retreat like? As Tutka Bay Lodge is noted for being a dining destination, the days were filled with delicious food. Days started with spruce tip sprinkled breads, house-made lox, fluffy scrambled eggs infused with the lodge’s greenhouse herbs, and bacon sourced from a farm across Kachemak Bay. One of our lunches featured a fresh tossed raw vegetable dish with a grilled open-faced halibut salad sandwich accompanied by a bowl of cream of celery root soup topped with julienned Granny Smith apples. Each dinner began with appetizers paired with wines. Among other starters was a beautiful cold charcuterie lain out along with fresh pretzel bites doused in butter and a Moroccan eggplant tagine. Family-style dinners followed with menu offerings such as king crab infused mashed potatoes, a perfectly cooked beef tenderloin, tossed salads, and herbed biscuits. The most memorable dessert was a Spanish-style baked cheesecake topped with a caramel sauce made from foraged beach kelp.
Due to the workshop atmosphere, there were plenty of opportunities to learn about local foods. Across Kachemak Bay in the town of Homer, we went on guided tours of Stoked Beekeeping Company, Blood, Sweat and Food farm, and Synergy organic vegetable farm. At a dinner hosted by Synergy Farm, we tasted and learned about mead from Sweetgale Wines. Back at the lodge, we foraged the beach at low tide with naturalist guides. Tutka Bay Chefs taught classes on Moroccan spices, salmon preparation and sushi-making. A local oyster farmer taught us about her business followed by an oyster tasting session. I came home loaded with culinary ideas and goals for the summer. I am more inspired than ever to make bull kelp pickles and to find goose tongue and other beach greens from our nearby ocean beaches.
As writers, we were happy for the opportunity to work with Kirsten Dixon, author and lodge owner. She led us through a writing workshop, connecting modern and ancient stories to Tutka Bay. She shared some of her personal writing as well as other writing that inspired her. Kirsten suggested some writing themes and encouraged participants to share their work at the end of the retreat. The lodge features a cozy writer’s loft which Jack and I found to be ideal as we composed our thoughts surrounded by beautiful views and birdsong.
I departed our retreat inspired to write more regularly. But that wasn’t what left the biggest impression. One of the participants I met on the first day confided that she hadn’t been around people in two months. She seemed particularly uncomfortable in social setting settings that were part of life at the lodge. The funny thing is that as she shared this with me, I realized that I felt similarly. For all of us, this retreat was the first time since Covid began that we had been in an intimate setting with new people. A warm feeling was growing in the group. What was it? One person articulated it well. “This experience has been like coming out of a fog” she said. It felt freeing to be in place that invited the sharing of ideas and thoughts, a lovely counter to feelings of suspicion and worry that seemed to pervade social gatherings these past two years.
It was a wonderful visit with newly made friends. I now have a new group I can share culinary ideas with. I have more inspiration to gather and create. I have new ideas to draw writing from. I feel like my fog, too, has lifted.
In honor of this feeling and inspired by my new friends and my new cookbook, Living Within the Wild, I give you a small batch of “Coming Out of the Fog Cookies.”
In Kirsten Dixon and Mandy Dixon’s new cookbook, they shared a recipe for berry chocolate chip cookies. The idea is to take a great chocolate chip cookie and embed a surprise of berry jelly in the center. With this recipe bouncing around my head for a few days, I came up with my own version of this cookie. My idea is to take the best part of a monster cookie and stuff it with a complementary jam surprise. This batch is small. (Two people should only eat eight cookies between them, right?) Of course, this recipe can easily be doubled or tripled if need be.
I invite you to join me in coming out of the fog.
Coming Out of the Fog Cookies
Ingredients
2 tbsp unsalted butter, melted
2 tbsp granulated sugar
2 tbsp brown sugar
1 large egg, beaten
½ tsp vanilla extract
2 tbsp creamy peanut butter
8 tbsp all-purpose flour
6 tbsp quick oats
¼ tsp baking soda
Pinch salt
8 tsp jam
Directions
Preheat oven to 325° F (160° C).
Line baking sheet with parchment paper.
In a large bowl, mix together first 6 ingredients.
Stir in flour, oats, baking soda, and salt.
Chill dough for about 15 minutes.
Divide dough into 8 pieces and roll into balls.
Flatten balls.
Place 1 tsp of jam in center of flattened dough.
Close dough around jam. *
Place stuffed cookies, smooth side up, on prepared baking sheet.
Bake for 18-20 minutes, until lightly browned.
Let cookies cool on baking sheet for a few minutes and finish cooling on wire rack.
Enjoy slightly warm or room temperature with a glass of freshly brewed ice tea.
*If your dough is too sticky, butter your hands to work with the dough.
Delightfully crispy and packed with flavor: cheese-like tang, garlic, onion, with a hit of salt. You’ll never discard your discard starter again.
One day, I noticed a friend had posted on a community webpage that she had extra sourdough starter if anyone wanted it. It made me wonder about extra starter – a problem I don’t seem to encounter. Due to a combination of where we live and our predisposition to avoid waste, we generally don’t have “extra.” Of course, shortly after coming to the conclusion that we’d never have extra starter, I had a week where I skipped making sourdough loaves and wound up with “extra starter.” One of my recipe books recommended discarding the extra. What?! I decided to taste it, to see if the flavor would inspire a recipe. Tasting raw starter was a bad idea. Yuck!
After a bit of research, I decided to tinker with a cracker recipe I found on the King Arthur Flour website. My first batch came out wonderfully flavored, but too soft. The problem was the thickness. My rolling pin and I could not get the dough thin enough. The solution came to me after rolling lasagna noodles – the pasta machine! If you’ve only ever thought of your pasta machine as a noodle machine, think again. Besides wonderfully flavored and textured linguini and spaghetti, I’ve also cranked out perfect bowties, ravioli and even wonton wrappers. This seemingly single-purposed machine helps perfectly roll sourdough to make satisfyingly crunchy crackers.
If you don’t have a pasta machine, I highly recommend the Atlas model we have. It is a heavy beast, but it is a kitchen tool that’s made the cut every time we’ve had to pack up and move. If you don’t want to add another item to your cupboards, a rolling pin will still work with this recipe. Be patient and aim to roll a thickness of about 1/16”.
The finished crackers have a tangy cheese-like flavor from the sourdough starter. This in combination with a mixture of onion and garlic and a hit of grey sea salt make these crackers very addicting. Serve with the complementary topping of your choice. Or enjoy their flavor unadorned, as I usually do.
Don’t Discard the Discard Sourdough Crackers
Ingredients
1 cup whole wheat flour
1/2 tsp sea salt
1 tsp granulated shallots (onion powder would work, too)
1 tsp granulated garlic
1 cup sourdough starter, unfed
4 tbsp unsalted butter, melted
olive oil for brushing
coarse salt for sprinkling on top (I like grey sea salt)
Directions
Mix first 6 ingredients to form a smooth dough.
Tightly cover in plastic and refrigerate for at least 30 minutes. I often refrigerate for several days.
Preheat oven to 350 degrees F.
Cover a baking sheet with parchment paper or reusable liner.
Cut off 1/4th of refrigerated dough and roll until it’s about 1/16” thick. I roll it like it is pasta on the pasta machine down to the 5th setting.
Placed rolled dough on prepared baking sheet.
Using a knife, or pastry roller, cut dough into cracker shapes. There is no need to move the crackers apart.
Brush dough with olive oil.
Sprinkle with coarse sea salt.
Bake for 9 minutes.
Crackers will be lightly browned when done.
Let cool on wire rack. Store cooled crackers in an airtight container at room temperature.
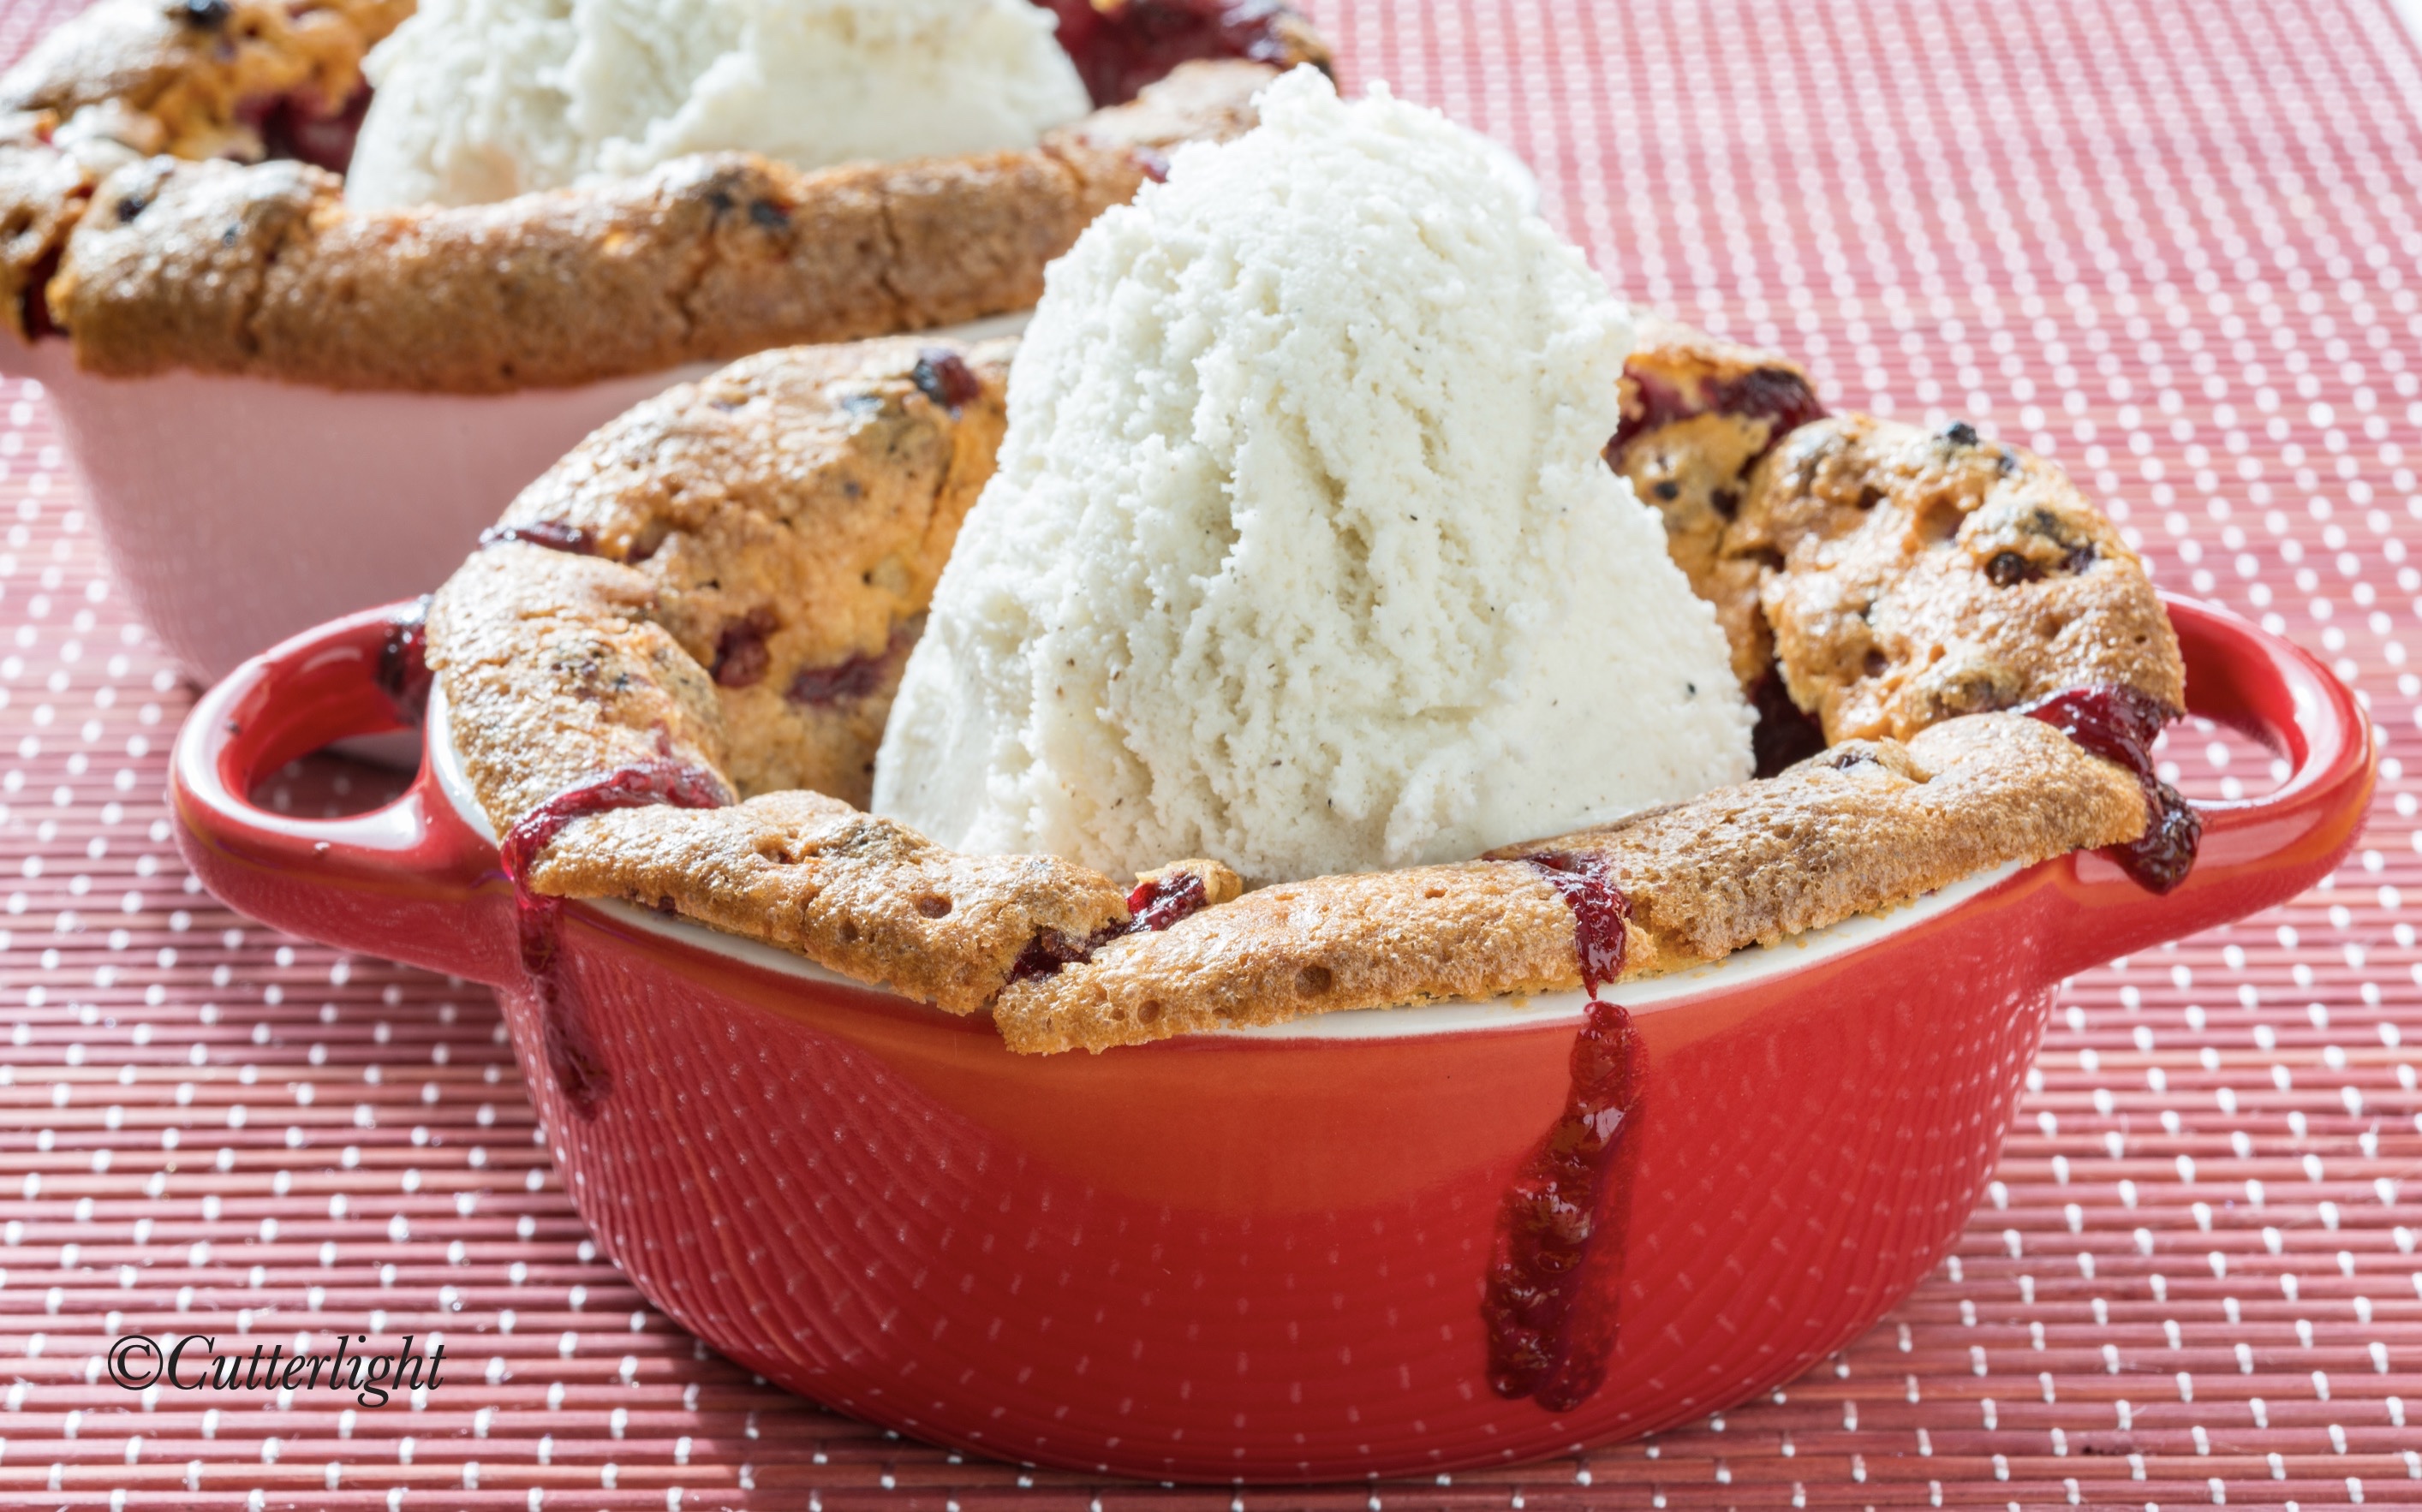
Flaugnarde is a lovely French name for a baked dessert which has fruit baked into a batter. The flaugnarde process creates a lightly crisped crust and a thick custard-like middle. Topped with ice cream, you’ll have a grand slam last course to any meal.
Lingonberries, known around here as low bush cranberries, are the last berry we forage for before we tuck in for winter. Collectors of these sour, flavorful gems are advised to wait until after the first frost for the best berries. We’ve learned that as long as the berries are fully red, the freezer also seems to do the same trick of enhancing their subtle sweetness.
Last year we found a killer spot for lingonberries across the lake. Looking back on the calendar where we kept noteworthy events, I noted that our several gallons of lingonberries in the freezer were collected in only two picking sessions. Now that’s a great spot!
Lingonberries can be used for cranberry recipes and vice versa. We’ve made lingonberry relish to go with roast turkey or moose, lingonberry breads to accompany poached egg breakfasts, and lingonberry juice for a hot spiced drink to warm up with on cold winter nights.
One of the tastiest recipes I’ve made with lingonberries is a version of Cranberry Chess Pie. It’s creamy filling packs a cranberry-orange, sweet-sour flavor punch inside a beautiful flaky pastry dough crust. This is the recipe I was channeling when I came up with a crustless version, which was supposed to be a little lighter on the calories. I can’t say I was successful with the calorie reduction. But I can say, it was incredibly delicious. I told Jack that I wished I could record his mmmming and ooohhing while he was eating this dessert. That would have been worth a thousand words.
Although this dessert is perfectly delicious on its own, I highly recommend serving it while it’s still warm with a scoop of vanilla bean ice cream. The dish will come out of the oven with a beautifully browned dome top. While it’s cooling, the flaugnarde will fall, creating a hollow perfectly shaped for a scoop of ice cream.
Lingonberry Flaugnarde
Ingredients
1/2 cup + 2 tbsp granulated sugar
1/4 cup unsalted butter, melted
Pinch salt
1 extra large egg or 2 small eggs
2 tbsp flour
1 1/2 tbsp Greek yogurt
1 tsp almond extract
1 1/2 cups lingonberries
Directions
Grease two 8 oz ramekins. Set aside.
Heat oven to 375 degrees F (190C).
In the bowl of a stand mixer, add sugar, butter, and salt. Mix together.
Mix in eggs.
Mix in flour.
Mix in yogurt and almond extract.
Mix well.
Stir in lingonberries.
Divide mixture into the prepared ramekins.
Bake until top is golden brown and filling is firm, about 50 minutes.
Cool ramekins on wire rack.
Top warm flaugnarde with scoops of vanilla bean ice cream. Devour immediately.
Springtime in Mongolia meant every kind of weather. Recently, this similarity to Chignik Lake has seemed to be especially true. A few days ago the lunchtime thermometer read 42 degrees under sunny skies and only a few patches of a deep snow that had blanked the landscape remained. We were inspired to go for a Honda ride to look for whatever new growth we might find. That was a few days ago…
Yesterday, we awoke to drizzly rain that morphed into melty, wet snow. Next thing we knew, we were immersed in a blizzard that blanketed us in again in a winter wonderland. This morning, the new day greeted us with broken skies, gusts of wind, a thermometer registering a chilly 16°, and new skim ice near the shoreline.
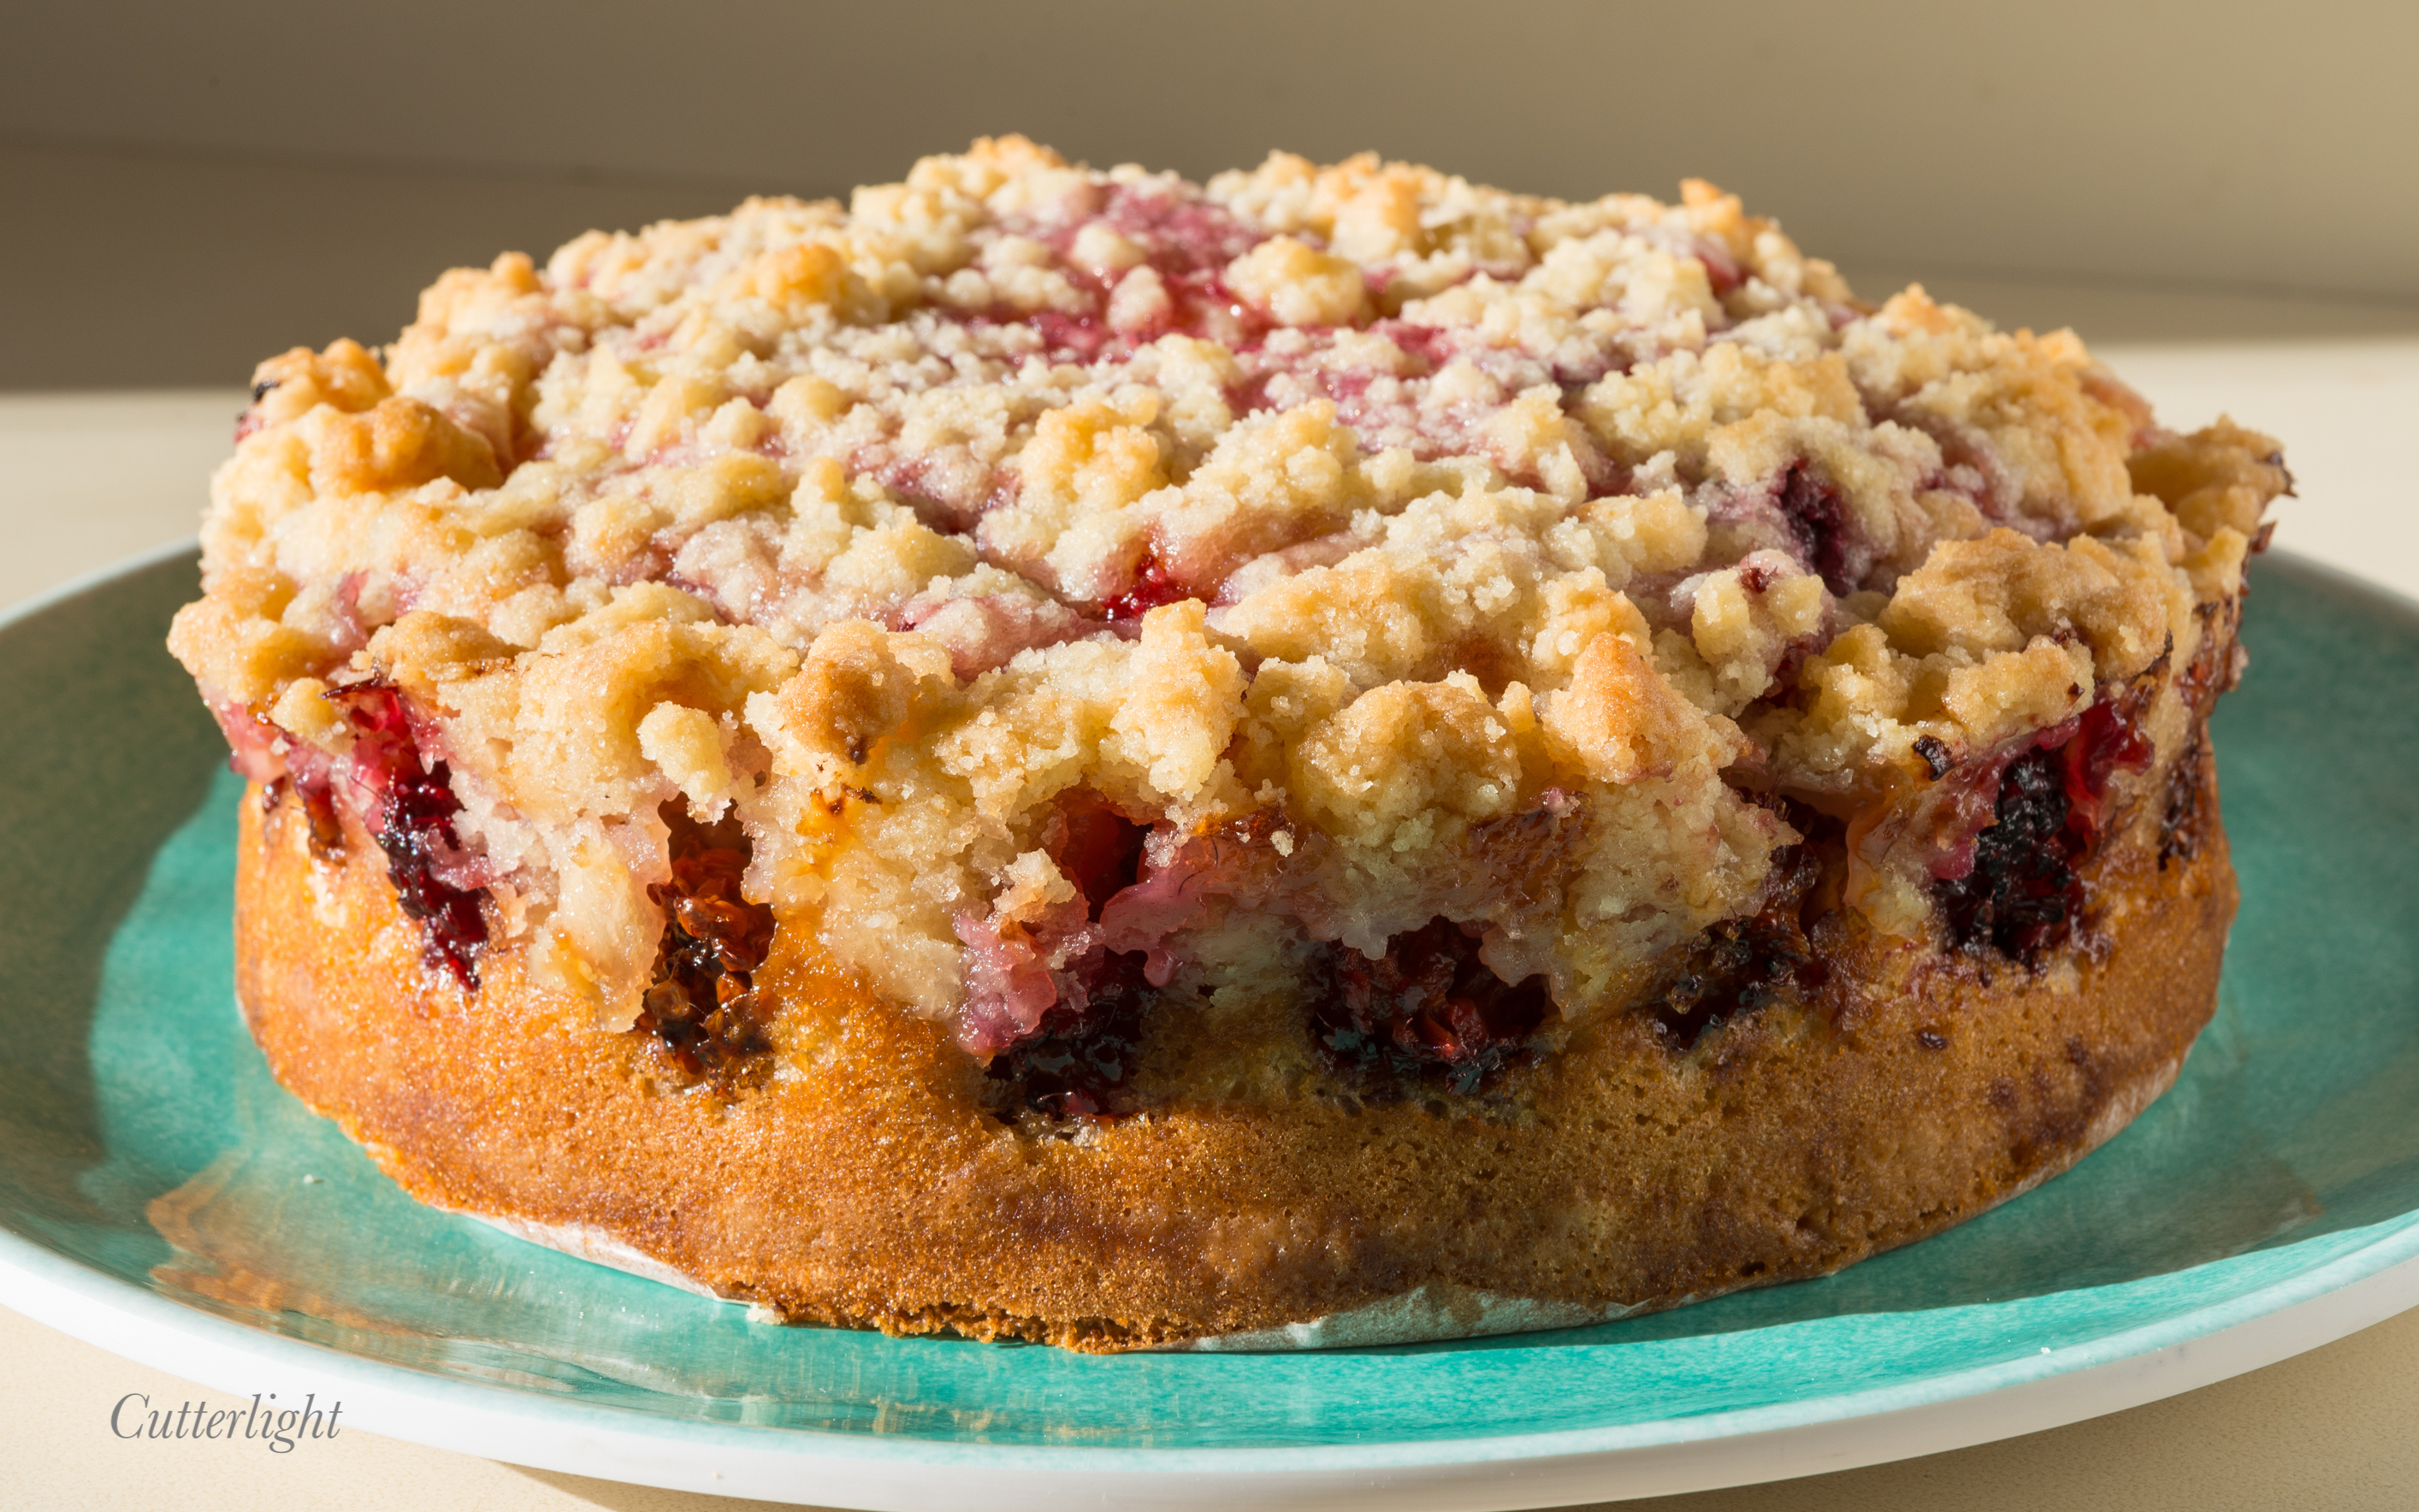
The warmth streaming in through our windows a few days ago prompted thoughts of summer – fishing, berry picking, mushroom hunting, boating, and the like. But the honda ride confirmed that even though the warmth of the sun is returning, the land is still in a deep wintery slumber. The blizzard kept me indoors, antsy – I really wanted a taste of summer, even though I know it is still months away. There is nothing more evocative of Alaskan summers than berries. Last year, we picked gallons of wild berries and carefully preserved them in our freezer – blueberries, raspberries, salmonberries, wineberries and lingonberries. Lately, I’ve been favoring the blueberries to top my oatmeal or to mix in with homemade yogurt. But to satisfy my craving for asummer creation, I found myself drawn to the beautiful, multi-colored gems that are salmonberries. They have a tangy, sweet-sour flavor that pairs perfectly with almond – an ingredient I wanted to feature.
I was very happy with how this cake turned out. The diminutive dessert was just right for the two of us to share. The berries baked into the batter, retaining their jewel-like beauty. The cake was delectably moist. The flavors incorporated the lovely balance of natural sweet and sour. Each bite was complimented by the crumbly sweet almond topping. Full disclosure – it was intended for two desserts. We managed to finish the whole thing off in one delicious fell swoop.
Salmonberry Sour Cream Crumble Cake for Four (Or two. Or one.)
Ingredients
Topping
1/2 cup all purpose flour
1/3 cup granulated sugar
1/2 tsp almond extract
4 tbsp unsalted butter, melted
Cake
3/4 cup + 2 tbsp all purpose flour
1/2 cup granulated sugar
1 tsp baking powder
1/4 tsp baking soda
Pinch salt
1 extra large egg (1 1/2 large eggs)
1/2 cup sour cream
1/2 tsp almond extract
1 1/2 cups salmonberries (if frozen, let thaw and drain off extra liquid)
Directions
Heat the oven to 350 degrees F (180C).
Line bottom of 7-inch springform pan with parchment paper. Grease the sides of the pan with butter. Set aside.
In a small bowl, mix together topping ingredients. Stir with a fork until mixture is crumbly. Set aside.
For the cake, in another bowl, whisk together flour, sugar, baking powder, baking soda and salt. Set aside.
In a bowl of a stand mixer, mix together eggs, sour cream and almond extract.
Add flour mixture for cake into the egg mixture. Beat until smooth, about 2 minutes.
Pour batter into prepared springform pan.
Top with salmonberries.
Sprinkle crumble mixture evenly over berry layer.
Bake until topping is golden brown the the center is cooked, about 40 minutes. Test this with a toothpick. It should come out clean when inserted into the middle of the cake.
Let cake cool on wire rack in the pan for 20 minutes before removing springform sides.
Cut into slices and serve warm or at room temperature.
The delightful pinks and greens of rhubarb make this cake a beauty. The creaminess of almond flour and zippy tartness of rhubarb keep you coming back for more. We started this photo shoot with eight pieces. 😉
Happily, we are the recipients of the Farm Lodge produce boxes again. Every week we receive a mystery box packed with their latest ripened crops. The most recent box of vegetables we received was picked the same morning we received them! Most people probably would not find this remarkable, but we live very far away from sources of fresh fruits and veggies and so these Farm Lodge boxes serve as our Farmers’ Market. With the nearest grocery store hundreds of miles away, our fresh produce usually is limited to items which can withstand several days in a box while traveling through the U.S. Postal system to our home on the Alaska Peninsula. Thus, the veggie drawers of our fridge are usually stocked with carrots, Brussels sprouts, cabbage, onions, potatoes and the like. Being able to cook with freshly picked zucchini, tomatoes, cucumbers, and herbs is a summertime treat we relish.
One thing we’ve come to enjoy about the Farm Lodge produce is the surprise factor. The last box included a bright pink bunch of rhubarb stalks. Last summer, I really fell in love with this vegetable. Tartness is a flavor I adore. This ingredient has tartness in spades which compliments sweetness perfectly…it’s like a lemon’s brother from another mother. Our favorite rhubarb creation from last year was a sauce which we used to drizzle on top of warm brie and on grilled salmon fillets.
Wanting to do something different with this bunch, I looked back on recipe ideas I never got to try last year. On my list was a rhubarb custard pie. Jack loves custard and he loves pie, so I knew this one would be a winner. The problem was that one of the key ingredients I needed, heavy whipping cream, was not going to happen. Back to square one. I had seen a recipe of an almond cake made with almond flour. The almond paste-marzipan type flavor and dense texture sounded like a great pairing for the tart stems. With a bit of tinkering, I came up with a winner.
The finished cake was lighter than I had expected it would be. The almond and rhubarb flavors complemented each other very well. And the rhubarb kept its lovely pink hue, making for a stunning presentation. What did Jack think? He’s not usually a cake guy. This one got high marks. “Kind of like a custard pie,” he said between big bites of his second piece. Seeing how he is my main customer, I’ll put this one in the keeper section.
Rhubarb Almond Cake
Ingredients
3/4 cup almond flour
3/4 cup granulated sugar, divided
1 cup all purpose flour
1 1/4 tsp baking powder
pinch salt
1/2 cut butter, melted
3 large eggs
1/2 tsp almond extract
2 cups sliced or chopped rhubarb
Directions
Preheat oven to 350°F.
Grease a 9-inch springform pan. Set aside.
In a large bowl, mix together almond flour and 1/4 cup sugar.
Remove 1/4 cup of the mixture and set aside.
Add flour, baking powder, remaining sugar, and salt to the original large bowl.
Mix butter, eggs, and almond extract into flour mixture.
Pour batter into prepared springform pan.
Sprinkle half of the reserved almond-sugar mixture over batter.
Evenly place rhubarb atop batter.
Sprinkle remainder of reserved almond-sugar mixture on rhubarb.
Bake cake for 50 minutes. A wooden pick inserted to middle of the cake will come out clean when cake is done.
Cool cake in pan on wire rack. Let cool to room temperature before serving.
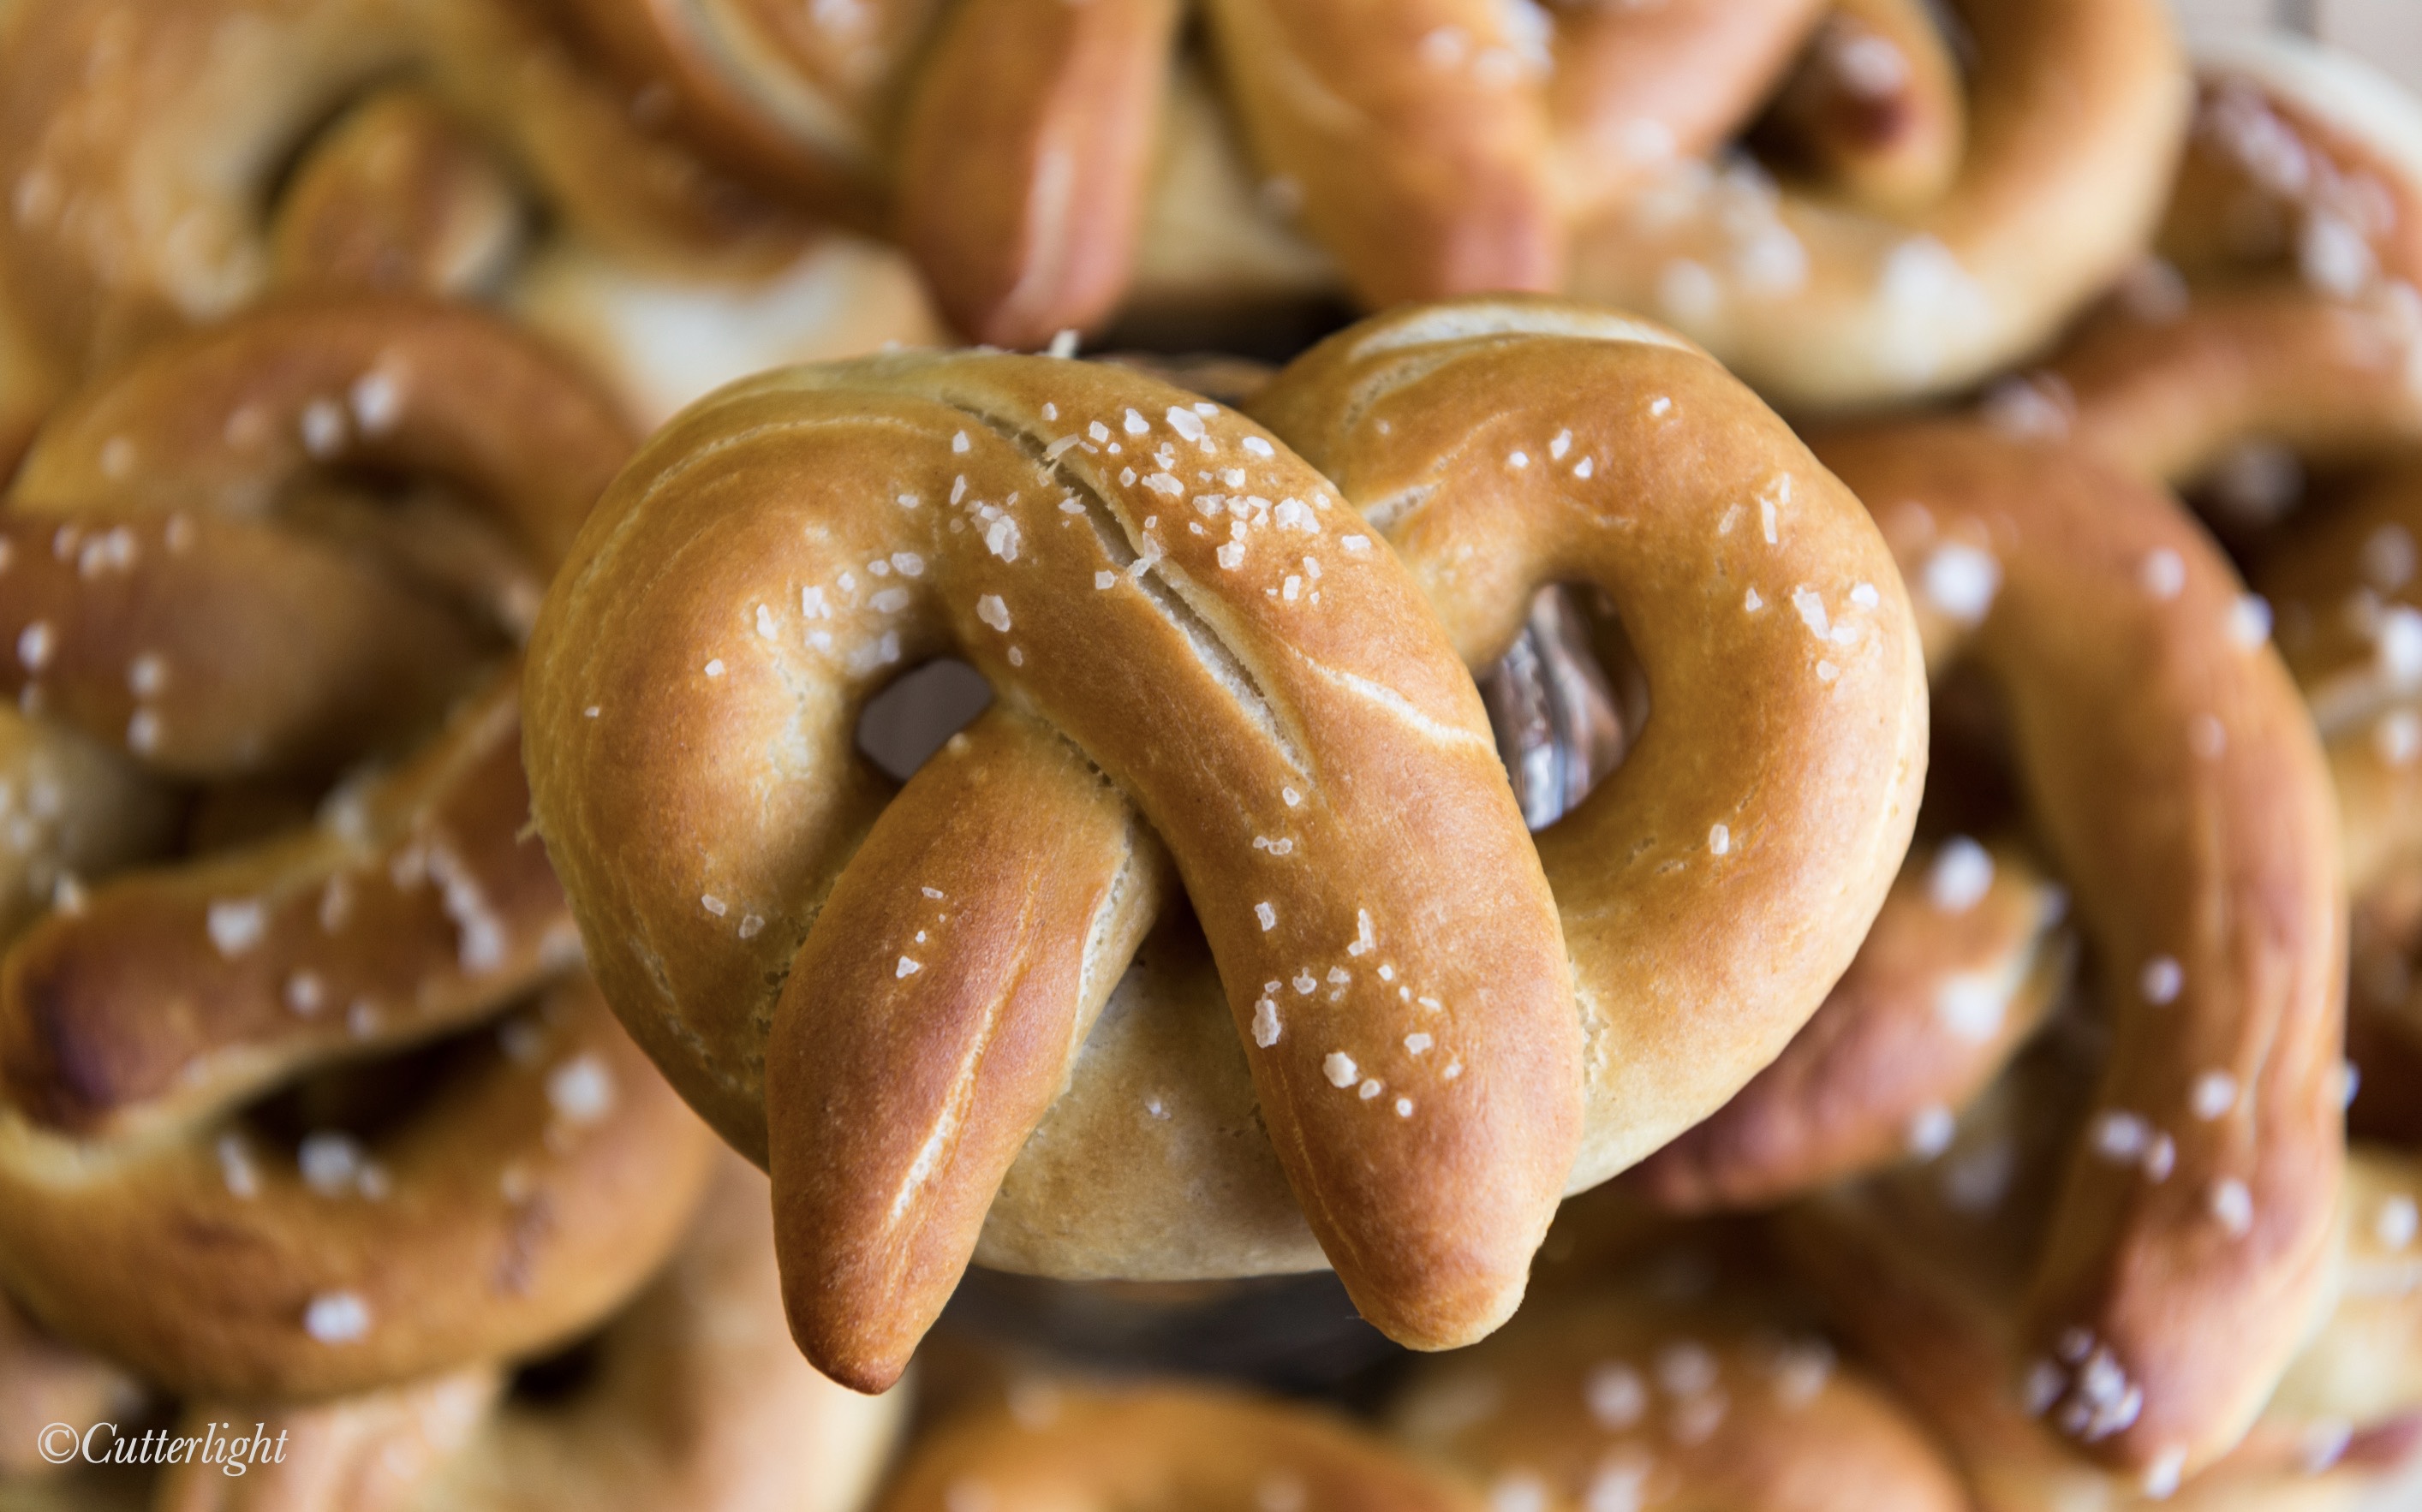
Some untwist them. Some peel them apart. Some just tear into them. What’s your favorite way to eat a soft pretzel warm from the oven?
Some foods take you places. Sourdough bread transports me to San Francisco – specifically Fisherman’s Wharf. When I was young, my family would visit that magical city. Our journey would always include a stop to the Boudin Store where we would pick up a couple of loaves of freshly baked sourdough bread. Our unrefined tradition did not involve picnic blankets or even a knife for that matter. We each would take turns reaching into the long thin bag, grab a hold of the baguette and rip. What you tore was the piece you got to munch on while walking around Fisherman’s Wharf. The delicious sour aroma that wafted from the broken piece always enticed me. The outer crust was perfectly crunchy and gave way to a soft interior which was ideally balanced with a dose of chewiness. Those loaves never made it home. When I grew up and began to visit and eventually move to San Francisco, I never outgrew those wonderful loaves and that unsophisticated tradition.
After mastering the beginners art to baking, I set a goal to learn to work with sourdough. Initially, I used a freeze-dried starter that I brought it to life as a regular part of our pantry. Later, I learned how to make my own starter with a yogurt base. Over the years, sometimes I would score a share of a long-tended strain of sourdough yeast from a generous friend. This last sort is the one I have on hand now.
The day before we left Newhalen, one of our friends stopped by with a parting gift – a snack-sized zip-top bag containing a small amount of starter. He had been tending it for a while and was really happy with the flavor. I hand-carried the treasure back to Chignik Lake and dutifully fed it. It immediately came to life. Soon it was bubbling away. After a few daily feedings, I had enough starter to give it the real test – a couple of loaves of my San Francisco Sourdough bread. Yum! Our friend was right. This one is a winner.
It turns out that starter is actually pretty easy to work with. It is like a pet. You have to regularly feed it and make sure to regularly clean its home. The flavor gradually develops, becoming more complex over time. So, if you start your own, you need to be patient. The best thing about the starter gift I received was that it was already aged and wonderfully flavored.
I don’t remember what put this thought in my head, but after finishing the first two loaves, I had developed a craving for sourdough soft pretzels hot from the oven served up with a serving of deli mustard. Or maybe Dijon. I decided to make the pretzels a little smaller than the original recipe called for. Turns out the extra pretzels froze really well – as long as you get them into the freezer before the salt “melts” into the pretzels. Thawed, wrapped in foil and heated for about 15 minutes in a 350°F oven, the pretzels were as satisfying as their freshly made cousins.
Line a baking sheet with parchment paper. Set aside.
Mix and knead the dough ingredients — by hand or mixer — to make a cohesive, fairly smooth dough. It should be slightly sticky; if it seems dry, knead in an additional tablespoon or two of water.
Cover the dough and let it rest for 45 minutes. It will rise minimally. Towards the end of the rising time, preheat the oven to 350°F.
Turn the dough out onto a lightly greased work surface, fold it over a few times to gently deflate it, then divide it into 16 pieces.
Roll each piece of dough into a long rope. Shape each rope into a pretzel.
Bring 1/3 cup baking soda and 9 cups of water to a boil in a large pot.
Drop 3-4 pretzels into the boiling water for 20-30 seconds. Any more than that and your pretzels will have a metallic taste.
Using a slotted spatula, lift the pretzels out of the water and allow as much of the excess water to drain off.
Place pretzels onto prepared baking sheet. They only need to be about an inch apart.
Sprinkle each with coarse sea salt.
Repeat with remaining pretzels.
Bake for 12-15 minutes or until golden brown.
Remove from the oven and serve warm with your favorite mustard.
Why mess with perfection? Skillet cookies were introduced to us a long time ago. They bake perfectly in a large cast iron pan. Served straight from the oven and topped with vanilla ice cream, you can’t get a better blast of sweet and the flavors… chocolatel-y, carmel-y, vanilla-y. The cookie is gooey in the middle and crispy on the edges. As they say in our part of the world – it’s a dandy!
After consuming many of these cookies baked in a way-too-big, 10-inch cast iron pan, I converted the recipe to fit my more-modestly-sized 6-inch pans. The cookies are smaller, but following the original recipe, all the sugar and fat was still a bit much. So I’d been thinking about how to transform this favorite yet again. While I won’t throw out the original recipe (it is too yummy), what about recreating this treat with a lot less sugar? And more fiber? Maybe an extra kick of protein? Less fat? Could I make a delicious version that was heathy?
It was a dark and stormy day. Cold rain was pelting the window from a nearly horizontal angle. This was the day it was going to happen. As I headed to the kitchen, I already had an idea. I have been experimenting with puréed beans in baking recipes for quite some time. They are a good flour replacement and do the trick of adding more nutrition by way of fiber and protein. Small white beans cook up nice and soft and have no discernible flavor in baked goods. For the sweetness, I had been reading about using puréed dates as a sugar substitute. They have a wonderful caramel flavor and they are powerfully sweet. I still planned to use semi-sweet chocolate chips because… chocolate!
With the first batch out of the oven and cooled, I set a piece before Jack – my expert taster – and took another piece for myself. I told him it was a healthy version of a skillet cookie. He frowned. Since I needed him to have at least some semblance of an open mind, I did not tell him the cookie was actually gluten free and had virtually no sugar. While we agreed that the cookie was not nearly as decadent as the original, it was still full of the satisfying flavors you want in a skillet cookie – it turned out surprisingly sweet and quite tasty. The next day, Jack suggested we put a warm vanilla custard on it. Oh Jack, that kind of kills the healthy factor…but now he’s got me thinking. We did enjoy one topped with raspberry preserves, which was excellent!
The Other Chocolate Chip Skillet Cookie
Ingredients
1 cup pitted dates, soaked in 1/3 cup hot water to soften
1 ½ cups cooked small white beans, or 1 15 oz can white beans rinsed and drained
2 tbsp unsweetened applesauce
2 tbsp vegetable oil, or light olive oil
1 egg
1 tsp pure vanilla extract
¼ tsp baking soda
1 tsp baking powder
Pinch salt
½ cup quick oats
½ cup semi-sweet chocolate chips
Directions
Preheat oven to 350° F. Grease two 6-inch cast iron pans or a 12-muffin pan.
Smooth dates and water into a paste using a stick blender or food processor.
Add beans, applesauce, oil, egg and vanilla into date mixture. Continue to process until all are incorporated and smooth.
Stir baking soda, baking powder, salt, and oats into mixture.
Fold in chocolate chips.
Divide mixture evenly into prepared pans.
If using cast iron pans bake for about 25 minutes. If using a muffin tin, bake for about 15 minutes. Cookies should be brown and firm when done.
Let cookies cool for about 20 minutes before serving.
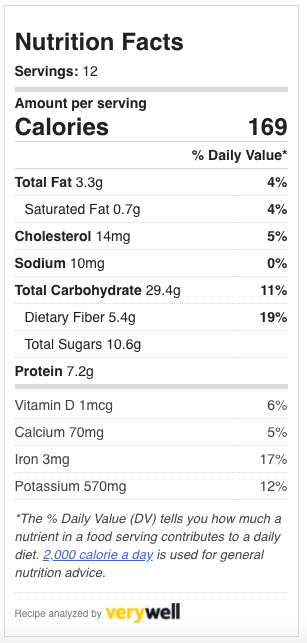
I was curious about all the nutritional details. Thanks to an online nutrition analyzer, I can easily share what I’ve found with you.
The scone itself is a handheld delight. It is the perfect size not to share and it pairs perfectly with a freshly brewed cup of French roast. Its base recipe is the ideal vehicle with which to switch up a few ingredients in order to transform this pastry from sweet to savory. Although, I generally like to keep this one sweet. The ultimate scone will have a crunchy exterior and a buttery, flaky interior.
Butter and cream. Of course those are the key ingredients. Add in some sugar and some white flour. There you have the quintessential list for a heart attack, right? So, how could I alter this recipe and still have a treat I wouldn’t have to apologize for before I serve it. “Here are some freshly made wholesome scones, Jack. Sorry, they may be a bit dry and flavorless. That’s because I used whole wheat flour and no sugar to make it healthy. Enjoy them. They’re good for you!”
___________________________________________________________________
We interrupt this blog writing to go shoot a bear! Please stand by.
In the middle of the photo shoot for the scones, we received an urgent text message. “Bear in the creek right below my house! I think it’s eating grass. It’s a big one!” Ah, a day in the life of chefs and photographers. Within a skinny minute, we had the scone shoot safely stowed inside (away from the magpies), lenses changed, tripods attached, bear spray in hand and we were out the door. Sure enough, Big Boy was filling up on a tasty snack of plants while patiently waiting for the salmon run to get into full swing. This guy looks like he’s packed away plenty of calories already!
Back to the scones…
Summertime means finding ocean bright salmon to fish for and searching for ripe blueberries, raspberries, and lingonberries (known locally as low bush cranberries). Summer also means it’s time to empty out the freezer of the remaining items stockpiled from last year. Down to the final fillets of salmon, a few quarts of blueberries, and a bag of lingonberries, this is a fun and easy task.
My reinvented scone recipe had lingonberries written all over it. I had a half a gallon of the bright red beauties waiting in the freezer door. To keep this recipe healthy, I wanted unsweetened fruit – so no Craisins allowed. This recipe resulted in fewer calories, half the fat, lower cholesterol, lower salt, three times the fiber, a third of the sugar, and more protein – and yet, it passed the Jack taste test with flying colors.
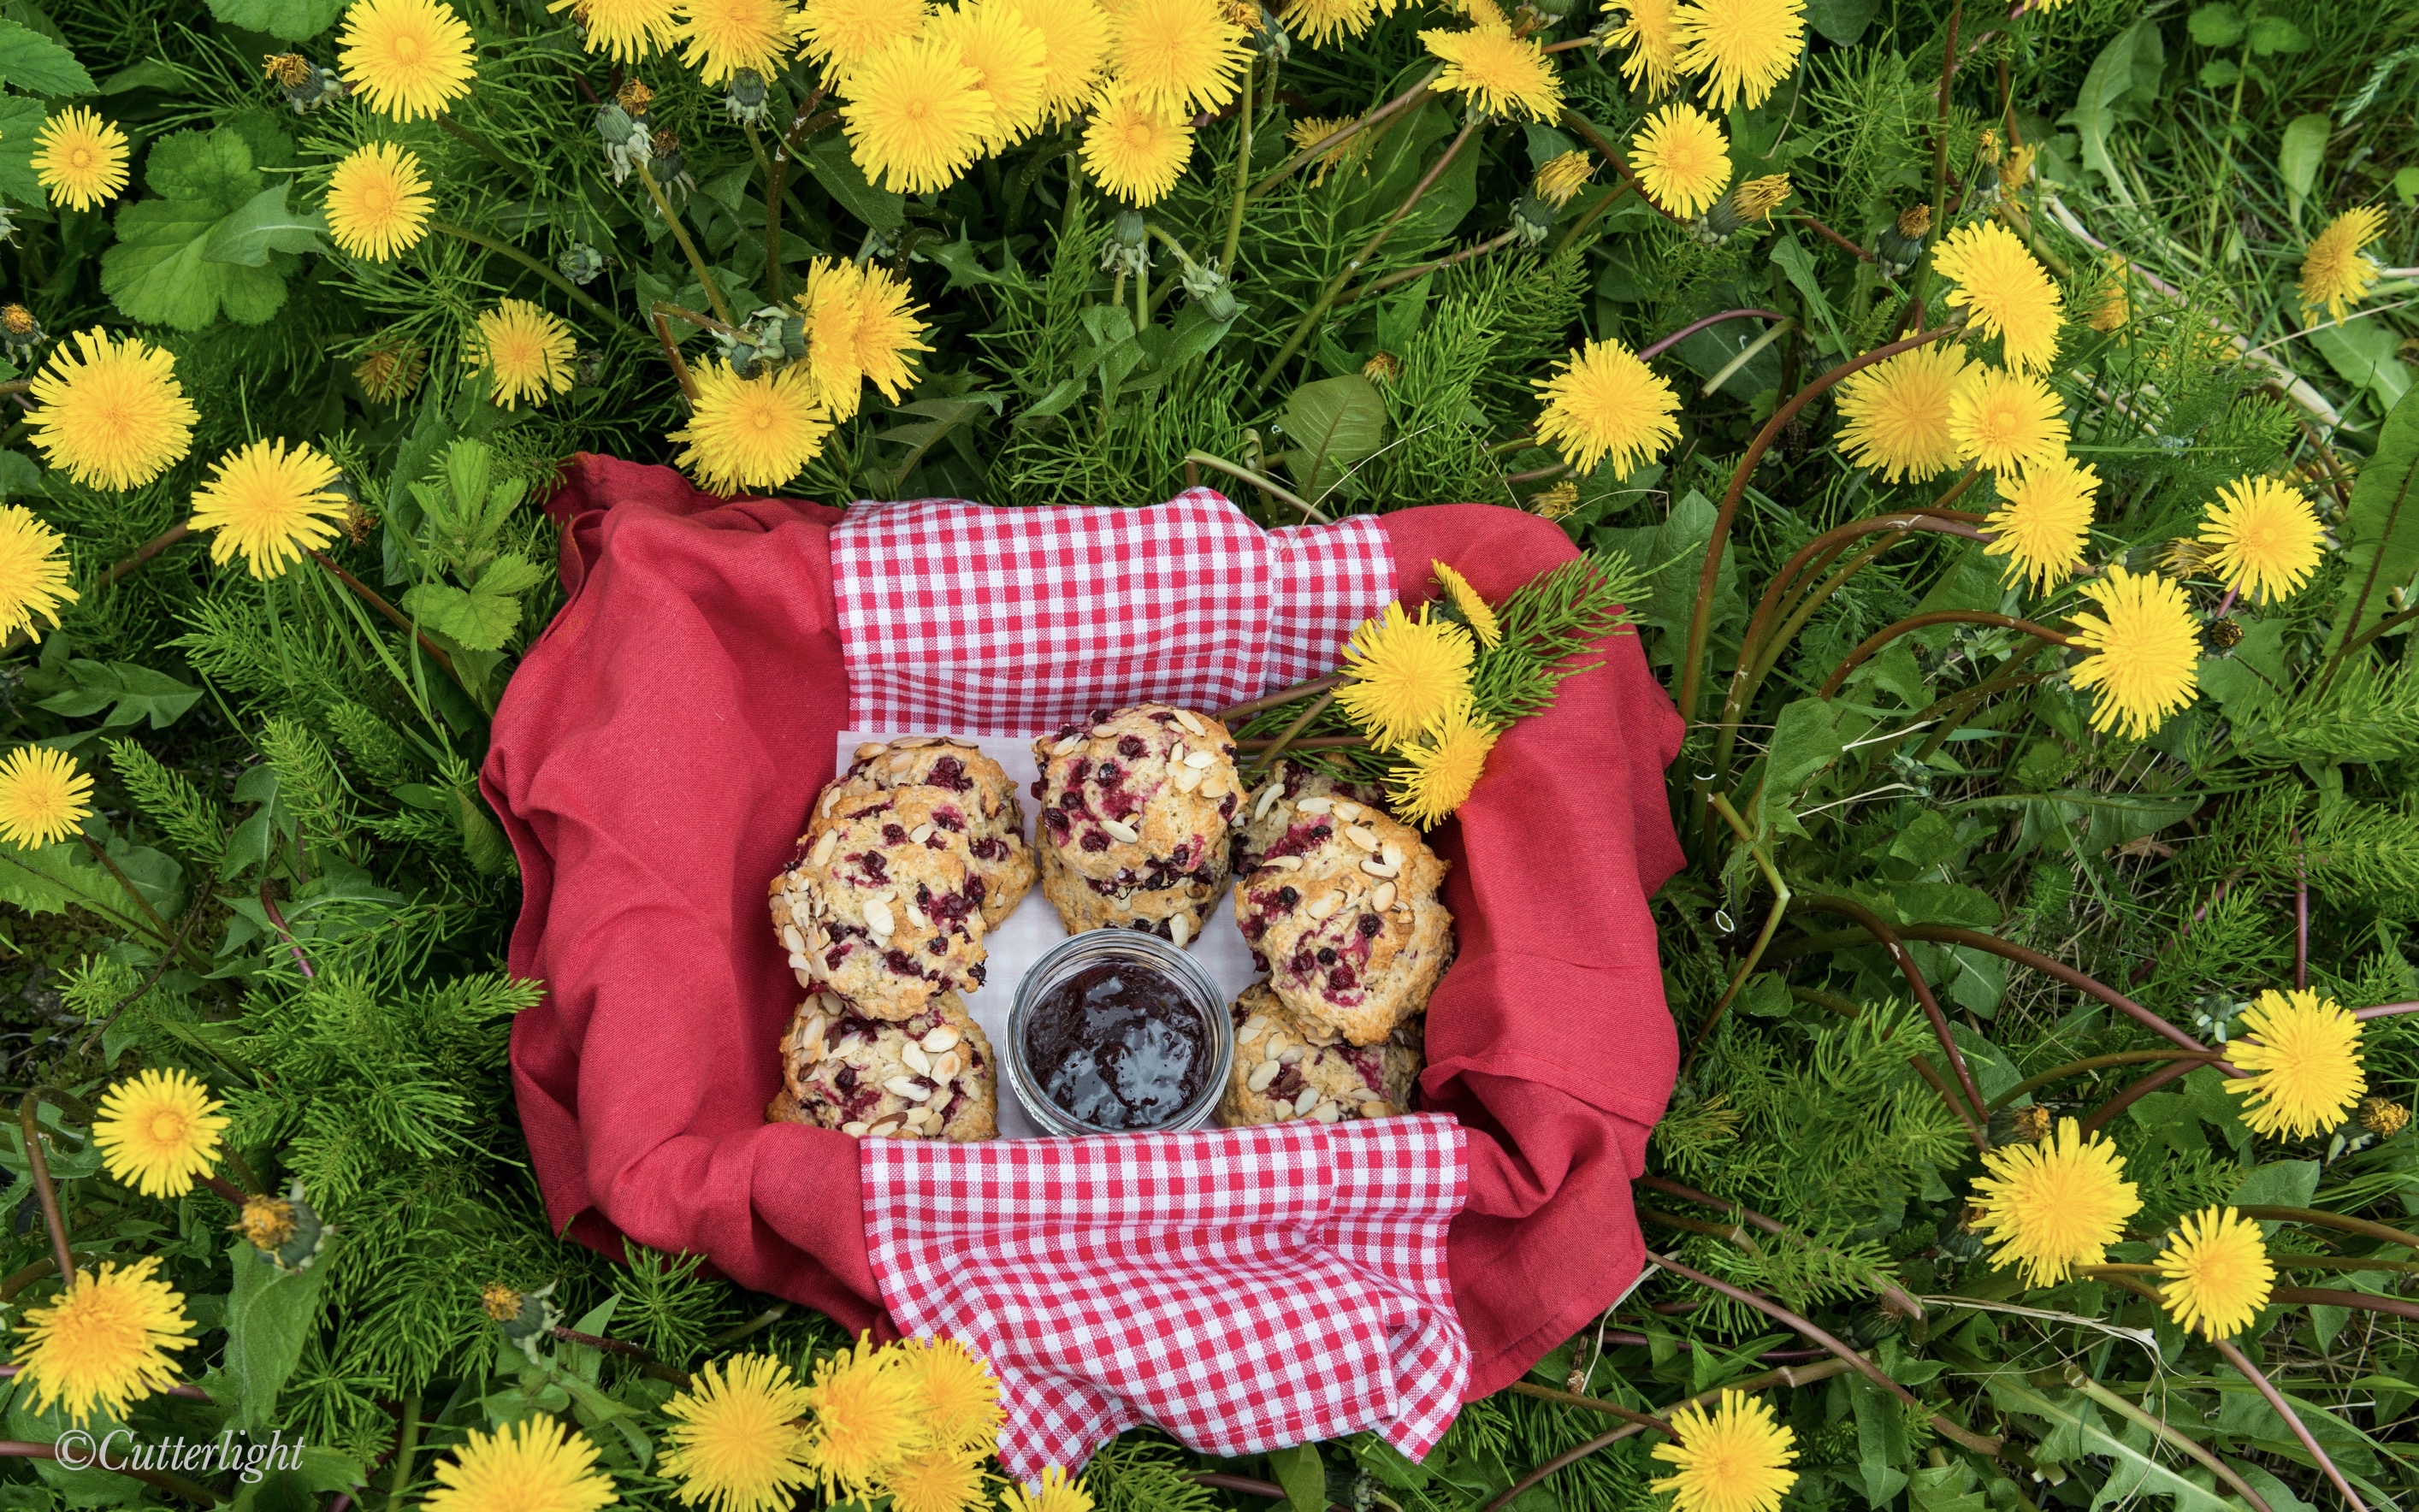
Have you ever gone to a bakery and ordered a bran muffin? They’re usually not very tasty, right? But you feel like you did something good for your body by ordering one. Well, this recipe resulted in scones that are waaayyy better than those muffins. If I went into a bakery and found this scone on the “healthy menu” I would actually be excited! It has the nice crunchy texture you want on the outside. The scone is soft and moist on the inside and rises nicely in craggy peaks. It has a subtle sweetness from the little bit of sugar. The lingonberries are downright sour, but in the best possible way. For our picnic, I did sweeten them up a bit by bringing along a jar of banana lingonberry jam to turn the scones into a dessert.
Wholesome Almond Lingonberry Scones
Ingredients
1 cup all-purpose flour
1 cup whole wheat pastry flour
¼ cup granulated sugar
Pinch salt
½ tsp baking soda
1 tsp baking powder
¼ stick unsalted butter, frozen
¾ cup plain low-fat yogurt
1 egg
1 tsp vanilla extract
½ tsp almond extract
1 cup frozen lingonberries
¼ cup sliced almonds
Directions
Preheat oven to 400° F.
Line a baking sheet with parchment paper. Set aside.
In a large bowl, whisk together first six ingredients.
Grate butter into flour mixture (use largest shredding holes of a cheese grater).
Toss butter shreds in flour but keep them separated – not clumped.
In a smaller bowl mix together yogurt, egg, and extracts.
Use a fork to stir the wet ingredients into the dry.
Fold in lingonberries and ½ of the almonds.
Break the dough into eight pieces.
Place each piece onto the parchment-lined baking sheet.
Bake in center of oven for 18-27 minutes.
When the scones are done, a wooden pick inserted in the center should come out clean. Mine needed a few more minutes than 18.
Let cool for a few minutes and serve. Or store in an airtight container to serve later.


 Scones, how do I love thee? Let me count the ways…

