Coming Out of the Fog – a Culinary Retreat (a cookie recipe, too!)

This summer, one of my goals was to reignite my writing spark. To that end, I signed up for a couple of writing workshops. First stop, Tutka Bay, Alaska.

Several years ago, I acquired the Tutka Bay Lodge Cookbook. It has become one of my two absolute favorite culinary resources. Through the book, I became acquainted with people whom I thought would be kindred spirits. The chefs sought to sustainably use and showcase what they could forage from the lodge’s nearby wilderness. The lodge’s location seemed idyllic – a fjord only accessible by boat surrounded by forest. The cookbook is filled with culinary wonders featuring harvested beach greens, foraged berries and mushrooms, and wild caught fish. When I first read the cookbook, I learned that a cooking school is held on site. I began dreaming of a visit. As with most lodge visits in Alaska, a stay there is expensive. So, it remained a dream – I would say a recurring dream. But I visited the lodge virtually and fueled this dream by regularly adapting the cookbook’s many recipes to create dishes and meals with items we forage and gather here at the Lake.


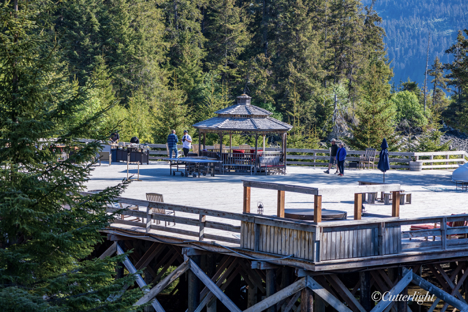
Set among spruce trees and overlooking a narrow fjord off Kachemak Bay, the deck at Tutka Bay Lodge was an ideal place for cooking classes, a soak in the hot tub, or just relaxing and listening to the songs of forest birds.

During this same time, Jack contributed writing and photos to a lovely “local” magazine called Edible Alaska. The magazine features food-related stories from all over our beautiful state. Earlier this past Spring, the Edible magazine people organized a culinary writing retreat at Tutka Bay Lodge. We were lucky to be invited to this retreat along with what turned out to be an intimate group of fourteen enthusiastic foodies. 

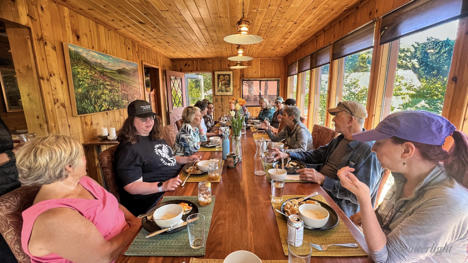
What was a day in the life of an Alaskan culinary writers’ retreat like? As Tutka Bay Lodge is noted for being a dining destination, the days were filled with delicious food. Days started with spruce tip sprinkled breads, house-made lox, fluffy scrambled eggs infused with the lodge’s greenhouse herbs, and bacon sourced from a farm across Kachemak Bay. One of our lunches featured a fresh tossed raw vegetable dish with a grilled open-faced halibut salad sandwich accompanied by a bowl of cream of celery root soup topped with julienned Granny Smith apples. Each dinner began with appetizers paired with wines. Among other starters was a beautiful cold charcuterie lain out along with fresh pretzel bites doused in butter and a Moroccan eggplant tagine. Family-style dinners followed with menu offerings such as king crab infused mashed potatoes, a perfectly cooked beef tenderloin, tossed salads, and herbed biscuits. The most memorable dessert was a Spanish-style baked cheesecake topped with a caramel sauce made from foraged beach kelp. 

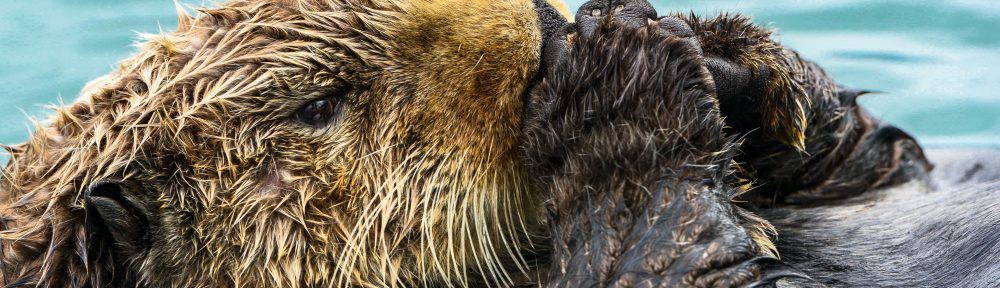
Due to the workshop atmosphere, there were plenty of opportunities to learn about local foods. Across Kachemak Bay in the town of Homer, we went on guided tours of Stoked Beekeeping Company, Blood, Sweat and Food farm, and Synergy organic vegetable farm. At a dinner hosted by Synergy Farm, we tasted and learned about mead from Sweetgale Wines. Back at the lodge, we foraged the beach at low tide with naturalist guides. Tutka Bay Chefs taught classes on Moroccan spices, salmon preparation and sushi-making. A local oyster farmer taught us about her business followed by an oyster tasting session. I came home loaded with culinary ideas and goals for the summer. I am more inspired than ever to make bull kelp pickles and to find goose tongue and other beach greens from our nearby ocean beaches.

As writers, we were happy for the opportunity to work with Kirsten Dixon, author and lodge owner. She led us through a writing workshop, connecting modern and ancient stories to Tutka Bay. She shared some of her personal writing as well as other writing that inspired her. Kirsten suggested some writing themes and encouraged participants to share their work at the end of the retreat. The lodge features a cozy writer’s loft which Jack and I found to be ideal as we composed our thoughts surrounded by beautiful views and birdsong. 

I departed our retreat inspired to write more regularly. But that wasn’t what left the biggest impression. One of the participants I met on the first day confided that she hadn’t been around people in two months. She seemed particularly uncomfortable in social setting settings that were part of life at the lodge. The funny thing is that as she shared this with me, I realized that I felt similarly. For all of us, this retreat was the first time since Covid began that we had been in an intimate setting with new people. A warm feeling was growing in the group. What was it? One person articulated it well. “This experience has been like coming out of a fog” she said. It felt freeing to be in place that invited the sharing of ideas and thoughts, a lovely counter to feelings of suspicion and worry that seemed to pervade social gatherings these past two years. 

It was a wonderful visit with newly made friends. I now have a new group I can share culinary ideas with. I have more inspiration to gather and create. I have new ideas to draw writing from. I feel like my fog, too, has lifted.

In honor of this feeling and inspired by my new friends and my new cookbook, Living Within the Wild, I give you a small batch of “Coming Out of the Fog Cookies.”

In Kirsten Dixon and Mandy Dixon’s new cookbook, they shared a recipe for berry chocolate chip cookies. The idea is to take a great chocolate chip cookie and embed a surprise of berry jelly in the center. With this recipe bouncing around my head for a few days, I came up with my own version of this cookie. My idea is to take the best part of a monster cookie and stuff it with a complementary jam surprise. This batch is small. (Two people should only eat eight cookies between them, right?) Of course, this recipe can easily be doubled or tripled if need be.

I invite you to join me in coming out of the fog.

Coming Out of the Fog Cookies

Ingredients

  • 2 tbsp unsalted butter, melted
  • 2 tbsp granulated sugar
  • 2 tbsp brown sugar
  • 1 large egg, beaten
  • ½ tsp vanilla extract
  • 2 tbsp creamy peanut butter
  • 8 tbsp all-purpose flour
  • 6 tbsp quick oats
  • ¼ tsp baking soda
  • Pinch salt
  • 8 tsp jam

Directions

  1. Preheat oven to 325° F (160° C).
  2. Line baking sheet with parchment paper.
  3. In a large bowl, mix together first 6 ingredients.
  4. Stir in flour, oats, baking soda, and salt.
  5. Chill dough for about 15 minutes.
  6. Divide dough into 8 pieces and roll into balls.
  7. Flatten balls.
  8. Place 1 tsp of jam in center of flattened dough.
  9. Close dough around jam. *
  10. Place stuffed cookies, smooth side up, on prepared baking sheet.
  11. Bake for 18-20 minutes, until lightly browned.
  12. Let cookies cool on baking sheet for a few minutes and finish cooling on wire rack.
  13. Enjoy slightly warm or room temperature with a glass of freshly brewed ice tea.

*If your dough is too sticky, butter your hands to work with the dough. 

Vanilla-Orange-Chocolate-Nut-Filling Sandwich Cookie

Sugary, light vanilla cookies pizzazzed up with orange zest sandwich creamy almond-chocolate filling.

Still have to come up with a better name for these . Maybe you could help. The idea for this creation started with the chocolate-almond spread I made a couple of days ago. I thought it would make a delicious filling in a sandwich cookie, and since the spread is chocolate, I wanted the cookie to be vanilla. I found a basic sugar cookie recipe, omitted the chocolate the recipe called for and added vanilla and orange zest. “Perfect!” I thought. A vanilla cookie with orange zest sandwiching chocolate almond spread. How about the name VOCNFS Cookie to borrow from the texting world? Uh… no. I’m open to suggestions!

Vanilla Orange Sandwich Cookie

Ingredients:

  • 1 1/4 cups all-purpose flour
  • 1 tsp baking soda
  • 1/4 tsp baking powder
  • 1/4 tsp salt
  • 1 1/4 cups sugar
  • 1/2 cup plus 2 tbsp (1 1/4 sticks) room-temperature, unsalted butter
  • 1 large egg
  • 1 tsp vanilla
  • almond-chocolate spread

Directions:

  1. Preheat oven to 375°F.
  2. In a medium bowl, mix the flour, baking soda, baking powder, salt, and sugar. Add zest. Mix. Add butter. Mix. Then add egg and vanilla. Continue mixing until dough comes together.
  3. Take rounded teaspoons of batter. Roll into a ball and flatten for uniform cookies. Place approximately two inches apart on a parchment-paper-lined baking sheet. Bake for 9 minutes, until cookies are slightly cracked on the top.
  4. Remove from oven and set baking sheets on a rack to cool.
  5. To assemble the sandwiches: take one cookie and smear chocolate-nut spread evenly on the bottom of the cookie (because the bottom side will be flat. You want the cracked tops of the cookie to be on the outside.) Take a matching cookie and gently press flat side into the chocolate spread. Voila! You have a sandwich cookie. Continue with remainder of cookies.

We took these cookies to our friends’ house. They gave these cookies high marks on the would-you-buy-these-in-a fancy-cookie-shoppe test!

Florentines – Chocolate or Plain?

These crispy yet chewy cookies can be made as a sandwich with a layer of chocolate to hold them together, chocolate dipped, or with a drizzle of chocolate. And they are wonderful without any chocolate at all.

When I was young my family sometimes went to a deli in San Francisco where, out of an assortment of scrumptious confections, I was allowed to pick out a cookie after our meal. Often, I chose a chocolate dipped florentine, a delicious almond cookie flavored with the essence of orange zest, one of my favorite combinations.

We are trying to keep our kitchen as simple as possible in order to ready ourselves for life on a boat with only a relatively small galley kitchen. So it was only after serious contemplation that we recently added a new gadget to our galley – a Miallegro stick blender. Our manual nut chopper has worked well for most duties, but would have been tough to chop almonds fine and consistent enough to meet the needs of this recipe. The stick blender is much smaller than our counter top blender and much more versatile. With 550 watts of power and a dedicated nut chopper attachment, I had finely ground, perfectly uniform coarse almond flour in less than one minute!

Even with the help of the chopper, this recipe was time consuming, but our cookie taste testers all agreed: the result was fabulous. The first step was blanching and skinning the almonds. After some trial and error, I figured out that the easiest way to skin the almonds was to boil them for two minutes and then pinch them out of their skins while they were soaking in cold water. After this step, the almonds had to dry. I let them sit out on a cookie sheet overnight. After the dough is made, it needs to sit for about a half an hour in order to cool enough to handle. I could only bake six cookies at a time, which also added to the time. Lastly, if you dip the cookies or drizzle them in chocolate, this has to be done after the cookies have cooled. Wait! You still can’t serve them until the chocolate sets up. This investment in time results in cookies that end up disappearing quickly! I don’t know which I like better… the chewy yet crunchy texture, or the combination of the orange, almond, and chocolate flavors.

Florentine Cookies

Yields 24 six-inch cookies

  • 1 3/4 cups blanched almonds, sliced (about 5 ounces)
  • 3 tablespoons all-purpose flour
  • Finely grated zest of 1 orange (about 2 tablespoons)
  • 1/4 teaspoon fine salt
  • 3/4 cup sugar
  • 2 tablespoons heavy cream
  • 2 tablespoons light corn syrup
  • 5 tablespoons unsalted butter
  • 1/2 teaspoon pure vanilla extract
Chocolate topping (optional):
  • 2 to 4 ounces semisweet chocolate, chopped
Directions
  1. Position a rack in the center of the oven and preheat to 350 degrees F. Line a baking sheet with a silicone baking mat or parchment paper.
  2. Pulse the almonds in a food processor until finely chopped, but not pasty. Stir together the nuts, flour, zest and salt in a large bowl.
  3. Put the sugar, cream, corn syrup and butter in a small saucepan. Cook over medium heat, stirring occasionally, until mixture comes to a rolling boil and sugar is completely dissolved. Continue to boil for 1 minute. Remove from heat and stir in the vanilla, then pour this mixture into almond mixture and stir just to combine. Set aside until cool enough to handle, about 30 minutes.
  4. Scoop rounded teaspoons (for 3-inch cookies) or rounded tablespoons (for 6-inch cookies) of batter and roll into balls. Place on prepared baking sheet, leaving about 3 to 4 inches between each cookie since they spread as they bake.
  5. Bake 1 pan at a time, until the cookies are thin and an evenly golden brown in color, rotating pans halfway through baking time, about 10 to 11 minutes. Cool on baking sheet for 5 minutes, then transfer to cooling racks. Repeat with remaining batter.
Optional chocolate topping
  1. Put the chocolate in a medium sized, heatproof bowl. Bring a saucepan filled with 1 inch of water to a very low simmer; set the bowl over the water, but not touching the water. Stir the chocolate occasionally until melted and smooth.
  • For sandwiches, drop about 1/2 teaspoon chocolate onto the flat side of half of the cookies and press remaining halves onto the chocolate covered halves. Return to rack and let chocolate set.
  • For chocolate decor, drizzle melted chocolate over florentines as desired. Set aside at room temperature until chocolate has set.
Recipe courtesy of http://www.foodnetwork.com/recipes/food-network-kitchens/florentines-italy-recipe/index.html

A Merry Christmas with Linzer Cookies

Happy Holidays!

Tired of cookies yet? We’re not. I’m still baking through memories from my youth. Linzer cookies remind me of visits to my family in Switzerland. My aunt would take me to Swiss bakeries with shelves full of tasty choices. Linzer was a regular choice.

I knew that sandwich-type cookies were going to be more effort than others that I’ve made, and I was right. My kitchen has limited gadgetry which makes for a really hands-on experience. I followed this recipe from the Williams-Sonoma Baking Book. The first step is toasting the almonds and then chopping them fine. I did this with a hand-powered nut chopper. I probably should have prepared this before my Insanity workout; it seemed to take a really long time to chop with wobbly muscles. Zesting an orange means carefully peeling off the outside layer and mincing the peel with a large sharp kitchen knife. When the chilled dough came out of the fridge, it felt too crumbly. I worked with it anyway, following the advice to roll the dough between sheets of waxed paper. The whole process took several hours. All in in, the cookies turned out wonderfully. Jack’s review, “The finest tea cookie I’ve ever tasted.” Today, they will go to a Christmas cookie exchange. Hopefully the recipients will enjoy them, too.

Gather some elves (preferably the kind that make cookies), put on some good music, and here’s the recipe:

Linzer Cookies (courtesy of The Wiliams-Sonoma Baking Book p. 12)

Makes about 1 dozen cookies.

Ingredients

  • 1 cup almonds, toasted
  • 1/2 cup unsalted butter, at room temperature
  • 1/2 cup granulated sugar
  • 1 large egg yolk
  • 1 tsp finely grated orange zest
  • 3/4 tsp pure vanilla extract
  • 1/4 tsp pure almond extract
  • 1 cup all-purpose flour
  • 1/2 tsp ground cinnamon
  • 1/4 tsp salt
  • 1/4 cup seedless raspberry jam
  • Confectioners’ sugar for dusting

Toast almonds by spreading them in a single layer on a baking sheet and bake them in a 350 degree oven for about 8 minutes. In a food processor, finely grind the cooled toasted almonds using short pulses. Set aside. In a large bowl, using an electric mixer on high speed, cream the butter until fluffy and pale yellow. Add the granulated sugar and continue beating until combined. Add the egg yolk, orange zest, vanilla, an almond extract and beat on low speed until well blended.

Sift flour, cinnamon, and salt together into another bowl. Add the ground almonds and stir to blend. Add the flour-nut mixture to the butter mixture and mix on low speed or stir with a wooden spoon until blended. The dough should be soft. Turn the dough out of the bowl, divide into 4 equal portions, and wrap each in plastic wrap. Refrigerate until chilled, about 1 hour.

Preheat the oven to 350 degrees. Lightly grease 2 baking sheets or line them with parchment (baking) paper. Remove 1 portion of the dough at a time from the refrigerator, place between 2 sheets of waxed paper, and roll out to 1/4 inch thickness. Using a cookie cutter about 2 1/2 inches in diameter, cut out the cookies. Cut a hole in the center of half of the cookies with a 1 1/4 inch cutter. Repeat to roll out remaining dough portions, then reroll the dough scraps as needed to make 24 cutouts in all, cutting holes in half of them. If the dough becomes sticky, wrap it and chill in the freezer for about 10 minutes before rolling out.

Using a thin spatula, carefully transfer the cookies to the prepared pans, Bake until firm to the touch, about 12 minutes. Transfer the pans to wire racks. Loosen the cookies from the pans with the spatula, but leave in place on the pans until cooled.

To assemble, spread the solid cookies with about 1 teaspoon of the raspberry jam to within about 1/4 inch of the edges. Using a fine-mesh sieve, dust the cookies with the center cut-out (the cookies that go on top) with confections’ sugar. Top the solid cookies with the cutout cookies.

Enjoy these cookies with a steaming cup of hot tea.