Our Violet-greens are Back at The Lake!

A single Violet-green Swallow can consume hundreds of mosquitoes and midges a day. With 40 or so nesting box cavities scattered throughout the village of Chignik Lake (population 50), these iridescently-plumaged little fellows and their Tree Swallow cousins are local favorites.

Chignik Lake’s first swallows, multi-hued Violet-greens, made their seasonal debut yesterday, May 15. This morning we went out to get photos of these much anticipated first arrivals. Tree Swallows, which will also use the dozens of nesting boxes residents have put up, should be arriving any time now along with the Bank Swallows that have established a colony on a bluff a mile or so down the Chignik River.

The Native American tradition of hanging nesting cavities for swallows goes as far back as anyone knows. Writing in the 1800’s, John J. Audubon noted that:

The… Indian is also fond of the Martin’s company. He frequently hangs up a calabash on some twig near his camp, and in this cradle the bird keeps watch, and sallies forth to drive off the Vulture that might otherwise commit depredations on the deer-skins or pieces of venison exposed to the air to be dried. The slaves in the Southern States take more pains to accommodate this favourite bird. The calabash is neatly scooped out, and attached to the flexible top of a cane, brought from the swamp, where that plant usually grows, and placed close to their huts. Almost every country tavern has a Martin box on the upper part of its sign-board; and I have observed that the handsomer the box, the better does the inn generally prove to be. 

It’s sad to see those annoying, energy-wasting, indiscriminate electric bug zappers, which kill beautiful moths along with everything else, hung more often than nesting boxes in these modern times. A nesting pair of birds will do a better job keeping pests under control, add cheer to any property, and when the wooden box has seen its best days it can be be left to return to soil rather than discarded to fill our world with yet more plastic, toxic parts and slowly-decomposing metal.

If nesting boxes around our village are any indication, they need not be elaborate. All that’s needed is untreated wood, a saw, a means to cut a hole, nails or screws and the appropriate tool for securing that hardware. Although it is often recommended that boxes be cleaned out annually, we know of no one here who does so. The swallows themselves seem perfectly capable of spring cleaning when they arrive, as they have done with natural cavities for as long as swallows have been around. However, if you’d feel better about cleaning out the boxes once the nesting season is finished, by all means go for it; you’ll be creating a clean space for birds that use the boxes as overnight and foul weather shelters during wintertime.

Engaged in housekeeping (removing his offsprings’ excrement) this Violet-green and his mate made a nest behind a knothole in the side of a store in McCarthy, Alaska.  

Two additional tips for your own backyard nesting boxes:

  1. Do Not put any sort of ledge or peg in front of the hole. As you can see in the photo below, swallows and other cavity nesters don’t need a perch. Their claws are adapted to cling to the sides of trees. The only purpose a ledge or peg serves is to give nest-raiders such as magpies, crows and other predators a perch from which to get at eggs and nestlings.
  2. Give some thought to the species of bird you hope to attract, then research the size of entry hole and the size of the interior cavity that bird prefers.

To those tips, we’ll add a third. Invasive European Starlings and House Sparrows haven’t yet found us out here on the Alaska Peninsula. If they are a problem where you live, we urge that they be discouraged from nesting by any means necessary. Both of these birds represent a significant, growing threat to species diversity.

Don’t have the time or the right tools to build your own boxes? Consider purchasing. A cedar box will last a long time, making it an economical gift to birds for years or even decades to come. And don’t be discouraged if your boxes don’t attract guests right away. Sometimes it takes more than one season for birds to move in.

Flowers are blooming, insects are out, swallows are returning and salmon are beginning to stage in the bay for their annual spawning run up the Chignik River. It still feels like spring, but summer is just around the corner.

Lucky Day! Herring Roe from Togiak

A modest quota of herring roe is allotted to non-commercial harvest in Togiak, Alaska each year. Thanks to a neighbor here in Chignik Lake, we got in on this celebrated Bristol Bay delicacy.

Each April, millions of gravid Pacific Herring gather in Bristol Bay’s coves in a spawning event that turns the water creamy white with milt. The individual eggs are initially sticky and adhere to kelp, other seaweed and even tree branches placed in the water by people eager to harvest this bounty. There are so many herring, their numbers aren’t counted. Instead, the Alaska Department of Fish and Game estimates their abundance in biomass measured in weight. This year that figure was put at a mind boggling 217,548 tons. With the population healthy, a modest percentage of the spawn was made available for subsistence harvest. Almost all of these eggs are distributed by Alaskans to fellow Alaskans.

If you are a connoisseur of sushi, you are no doubt familiar with kazunoko, firm, intact sacs of herring roe typically wrapped with a strip of nori (seaweed) and presented as nigiri-zushi. Served with a little soy sauce, the crunchy texture and clean, salty flavor are a delicacy that symbolizes family health and prosperity. The pop the tiny eggs make when bitten into is a traditional feature of New Year’s celebrations. (The eggs freeze well and can be preserved this way for months.)

When a friend and neighbor here at The Lake texted with a message to come on over and get some herring spawn, we didn’t waste a moment. The tiny, translucent, pale yellow eggs were firmly attached to strands of kelp. All they needed was a quick rinse in cold water and a light dip in our favorite soy sauce. Crunch, pop, umami yum! Sides of Silver Salmon sashimi and sweet Alaska deepwater shrimp along with bows of sushi rice made for a meal celebrating a great early morning hike out to Clarks River, our first of season sightings of Savanah Sparrows, and the arrival of the year’s first Tree Swallows and Violate-green Swallows.

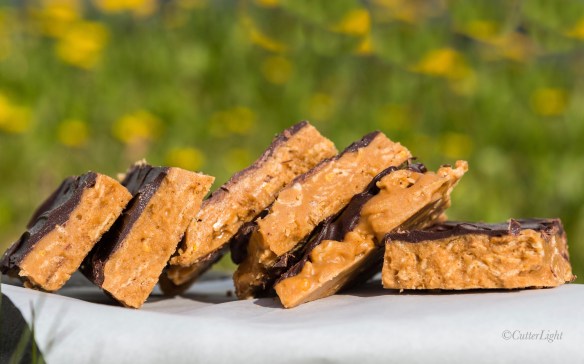
Better Than Butterfingers Bark

Crispy, crunchy, peanut buttery and topped with chocolate. No hydrogenated this or that. No artificial flavors or colors. What’s not to love? 

Recently, Jack and I have cut way back on the sugary treats. But we’re not crazy, we haven’t cut them completely out. We’ve been trying out a new eating style which is working really well. It’s not a fad diet. It’s simply mindful eating. Everyone knows it is healthy to eat a diet with lots of veggies, legumes and whole grains. We’ve been employing a strategy to eat a great variety of food at every meal with an emphasis on those healthy food groups. Jack’s goal has been to serve meals with at least seven different foods as the ingredients. It’s been a delicious experiment that has us feeling fueled up and satisfied.

Do sweets still fit in to this mindful eating plan? Absolutely! I have always enjoyed having something sweet at the end of dinner. I’ve been experimenting with different kinds of natural sweeteners as well as different portion sizes. Rocky Road fudge and Monster Cookie Freezer fudge were a couple of the first hits in the lineup. Aside from natural sweeteners like maple syrup, honey and dates, I still used a tried and true pantry item – granulated sugar. As long as the portions are kept small, sweets will always be part of my repertoire.

One of our favorite candy bars has always been Butterfingers. We both love the flavor combination of chocolate and peanut butter and especially love the crispy crunch that only Butterfingers have. In my quest to use up all the items in our pantry, I came across a recipe for homemade Butterfinger bars. What?!? How is possible to make that crispy crunch at home? I always thought that magic could only be created in a cauldron, or maybe a factory. 😉 Turns out, the recipe is quite simple. Katie over at Chocolate Covered Katie figured out the basics. I’ve adapted her recipe to be even simpler. No shaping bars or dipping technique needed. It’s a few minutes of stirring, some time chilling, a little bit of melting, and a moment of spreading melted chocolate and Voila! – best tasting Butterfinger bark you’ve ever made – guaranteed!

Better Than Butterfingers Bark

Ingredients

  • 1/3 cup honey
  • 3 1/2 tbsp granulated sugar
  • 1 cup smooth peanut butter
  • 2 cups flake cereal (I used whole grain frosted flakes)
  • 2/3 cup semi-sweet chocolate chips

Directions

  1. Line a baking sheet with foil. Grease foil with butter. Set aside.
  2. Combine honey and sugar in a small saucepan.
  3. Over medium heat, bring mixture to a boil.
  4. Boil for a minute while stirring continuously.
  5. Remove pan from heat and stir in peanut butter. It will look like a paste when it’s done.
  6. Fold in flake cereal. Stir well to coat.
  7. Turn mixture out onto the foil-lined baking sheet.
  8. Press mixture until it is about 1/2 inch thick.
  9. Place bark in freezer for 30 minutes.
  10. Melt chocolate chips in a double boiler.
  11. Spread melted chocolate mixture over bark.
  12. Place bark back in freezer to set.
  13. Cut bark to portion as you like.

Recipe adapted from chocolatecoveredkatie.com

Grandma’s Secret Is Out or Cabbage Roll Soup Meets the Alaska Bush

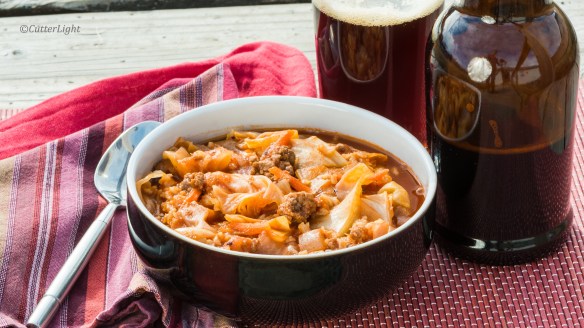
The tang of tomatoes, the zip of lemon, and the hint of sweetness from a bit brown sugar all mixed in with cabbage and some of Alaska’s best game meat – moose. Grandma’s secret is out!

My strongest memories of my grandmother are connected with food. She lived in Queens. Meanwhile my family was bouncing around from Brooklyn out to New Mexico and back to Albany before finally ending up in California, and so we only got to see her once in a while. When we did, I remember heartily enjoying all of her culinary creations – Jewish staples like kugel, brisket, blintzes, and of course, stuffed cabbages. I don’t know if she intended to keep her recipes secret. Maybe she thought I was too young to understand them. Maybe she thought – well, I don’t know. I could only guess. Unfortunately she passed away when I was still only in my 20s. Over the years, I have tried to make a few of her standards, producing what I think have been successes. I was particularly pleased with a crock pot recipe for cabbage rolls that I came across many years ago which I thought tasted just like hers. The problem with that recipe was that it took For Ever.

Fast forward to now. Jack and I have entered a favorite time of year. It’s the time when we look in our freezers and pantry and try to use up whatever we have on hand a la the show Chopped. With bunches of carrots, heads of cabbage, a few pounds of ground moose, and way too many onions, I thought of stuffed cabbage. It’s really a perfect recipe for the bush. We lucked into a healthy amount of moose this year. (Half a moose was flown into our village from a hunting camp earlier this year…another story.) Cabbages, carrots, and onions ship reliably through the postal service from Anchorage. Even if they get stalled at our mail hub in King Salmon for days in a row, which happens regularly, these items arrive relatively unmarred. The best stuffed cabbage is made with big, beautiful leaves. That wasn’t what I had. And time. I didn’t have that, either.

I started to think about what made my grandmother’s stuffed cabbages so good. I liked the rolls. But what I especially liked the flavor, and I liked what was left on the bottom on the pot when the cabbages fell apart. Why not make just that? Turns out, this recipe has the exact flavor of my grandma’s “secret recipe” but the time and effort is cut down – way down. With a few minutes of prep, and 45 minutes of “simmer time,” this recipe is a keeper!

Stuffed Cabbage Soup

Ingredients

  • 1 lb. moose meat (substitute lean ground beef)
  • 2 tbsp olive oil
  • 1 medium sweet onion, like Walla Walla, chopped
  • 3 cloves garlic, chopped
  • 4 cups beef bouillon (we like Penzeys beef soup base)
  • 12 ounces tomato paste reconstituted with 2 cups hot water
  • 2 tbsp brown sugar
  • 1 tsp salt
  • 1/2 tsp dried oregano
  • 1/2 tsp black pepper
  • 1/2 cup uncooked long grain brown rice
  • 5 cups green cabbage, chopped large
  • 1 cup shredded carrots
  • 2 bay leaves
  • 1 1/2 tbsp lemon juice

Directions

  1. Use a large soup pot. Place olive oil and meat in the pot.
  2. Add onions.
  3. Sauté until meat is browned.
  4. Add garlic and stir.
  5. Add broth, reconstituted tomato paste, brown sugar, salt, oregano, pepper and rice. Mix well.
  6. Add cabbage and carrots. Stir to mix.
  7. Place bay leaves in pot.
  8. Bring mixture to a boil. Reduce heat to simmer and cover the pot. Cook until rice is tender, about 45 minutes.
  9. Remove pot from heat and stir in lemon juice.
  10. Let soup rest for a few minutes before serving.

Powering Up With Freezer Fudge: Rocky Road and Monster Cookie Recipes

I suppose you should wait a few minutes for these bites to thaw a bit before diving in…but who are we kidding? They are satisfying straight out of the freezer!

I was late to the banana ice cream party. It was only a few summers ago that I discovered that blending frozen bananas has the taste and texture of delicious creamy banana ice cream. I added all sorts of flavors to this fantastic base to help us keep cool during warm air conditioner-less summers in Mongolia. As a newcomer to this confection, and back on a serious workout regimen, it only just occurred to me to take this dessert and transform it to a pre or post workout snack. The new base has a combination of frozen bananas, peanut butter and maple syrup. After that, add what you like. The idea is to keep it simple, flavorful, and leaning toward healthy choices. Ahem, a few itty-bitty mini marshmallows or M&Ms won’t kill you!

I used my silicone mini muffin pan to initially freeze the treats. The cookies pop out easily and you’re ready for another batch. Simply store your freezer fudge in a freezer-safe container lined with parchment paper, and your workout snacks will be ready when you are.

Rocky Road Freezer Fudge

Ingredients

  • 1/2 cup peanut butter
  • 1 overripe banana
  • 2 tbsp real maple syrup
  • 1/4 cup Dutch Processed cocoa powder
  • pinch salt

Directions

  1. Use a stick blender or a food processor to combine and smooth all ingredients.
  2. Scoop out tablespoon-sized portions and place in a silicone ice tray or mini muffin pan.
  3. Place tray or pan in freezer until confections are solid.
  4. Pop out the confections and place them in a freezer-safe container lined with parchment paper.
  5. Power up with a couple of these before a workout, or reward yourself after for a job well-done!

We are huge fans of monster cookies, especially monster-sized monster cookies. This freezer fudge flavor is a nod to those not-so-healthy-but-oh-so-good treats. The peanut butter base is perfect with a stir-in of the same candies that give monster cookies their famous flavor and look.

Freezer Fudge a la Monster Cookie

Ingredients

  • 1/2 cup peanut butter
  • 1 overripe banana
  • 2 tbsp real maple syrup
  • 2 tbsp M&Ms candies
  • 2 tbsp white chocolate chips
  • 2 tbsp semi-sweet chocolate chips
  • pinch salt

Directions

  1. Use a stick blender or a food processor the combine and smooth peanut butter, banana and maple syrup.
  2. Fold in M&Ms and chocolate chips.
  3. Scoop out tablespoon-sized portions and place in a silicone ice tray or mini muffin pan.
  4. Place tray or pan in freezer until confections are solid.
  5. Pop out confections and place them in a freezer-safe container lined with parchment paper.
  6. Power up with a couple of these before a workout, or reward yourself after for a job well-done!

A Snack That Can’t be Beet – Bright Magenta Beet Hummus

beet hummus n

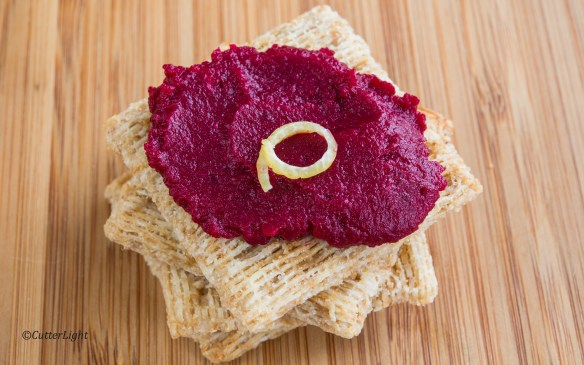
Healthy? Yes, but more importantly beautiful and delicious! Imagine this wine-colored spread on crispy crackers or as part of a vibrant plate of garden-fresh crudités.

This hummus is just as creamy and smooth as my white bean hummus recipe. My favorite thing about hummus is the flavorful marriage of garlic, lemon, and cumin. Inspired by a couple of beets in the fridge, I decided to do what beets like best – roast them. Roasting brings out the sweetness in this beautiful root vegetable. I substituted beets for the white beans in my original recipe and was really happy that the main garlic, lemon, and cumin flavors still shine through. The beets add a subtle earthy, sweet flavor. Best of all, they take the presentation through the roof with their color.

Roasted Beet Hummus

Ingredients

  • 2 medium beets
  • 1 15 oz. can garbanzo beans
  • 3 tbsp lemon juice
  • 2 tsp cumin
  • 2 cloves garlic, chopped
  • a few dashes hot sauce. We like Cholula.
  • 1 tsp salt
  • 1/2 cup olive oil
  • pepper

Directions

  1. Preheat oven to 375° F (190 C. Remove the stem from the beets. Scrub and wash them with cold water.
  2. Place beets in foil, drizzle with olive oil, wrap tightly and roast for one hour or until the tines of a fork pass through without resistance. They should be tender. Let cool slightly.
  3. You should be able to rub the skin off of the beets. Otherwise, use a paring knife to peel off the roasted skin.
  4. Cut beets into chunks. Place in deep bowl.
  5. Rinse and drain beans. Add to bowl.
  6. Combine lemon, cumin, garlic, hot sauce, salt and half of the olive oil with beet mixture. Use a stick blender to mix and purée hummus. This can also be done in a food processor.
  7. Process mixture until smooth, adding more olive oil to reach desired consistency.
  8. Serve with a drizzle of olive oil and a crack of black pepper.


Pretzel Dogs – or Finally, a Food Post!

Chewy, soft pretzels with a not-so subtle just-right hit of salt, stuffed with your favorite hot dog – a recipe for a delicious lunch easy to take with or one to stay in with on a snowy spring day.

Many years ago, actually just approaching ten, we decided to move to Alaska. There are many different Alaskas within this beautiful state. The one we chose to move to was the Alaska Bush, a place we knew would be challenging, fascinating and exciting and a place where we knew we would need indoors hobbies to entertain us during cold and dark winters. One of my first goals was to become a baker. To set myself up for success, I sent out hundreds of pounds of different flours, sugars, flavorings, pans, cutters, and a beautiful tapered rolling pin with inlaid bamboo for inspiration (a lovely gift from Jack).

As my baking skills improved, I graduated from bread-in-a-rice-cooker to a a bonafide bread machine. As I continued to improve my baking, I ditched the machines and really dug into the whole process of baking. During my initial education, I enlisted the help of The Great Courses and chef Stephen Durfee from the Culinary Institute of America (via the online class). For six Sundays in a row, the three of us dutifully watched these classes and then baked – with feedback from countless taste-testers. We learned how to create lattice-crusted pies, ganache-topped éclairs, and mousse-filled many layered chocolate cakes. That was just the start. By the way, if you’ve ever wanted to really learn how to bake, I highly recommend the Baking Pastries & Desserts class from the Great Courses. I also highly recommend sharing the experience with friends. It was a lovely introduction into serious baking.

Of course, spending this much quality time with friends can only make friendships grow. After completing our class, my friend Reba and I continued to bake together, share recipes and swap tastes of new creations. Pretzel dogs always remind me of Reba and those baking days in Point Hope. This recipe produces an agreeably light, airy roll and is part of my permanent rotation. Thanks to Reba for the spiral wrapping style!

Pretzel Dogs

Ingredients

  • 1 3/4 cups milk
  • 2 tsp instant yeast
  • 2 tbsp olive oil
  • 1 1/2 tsp salt
  • 4 cups all purpose flour
  • 10 good quality hot dogs
  • coarse sea salt
  • 1/2 cup baking soda
  • 16 cups water

Directions

  1. Whisk milk and yeast together in a large bowl. Let stand for a few minutes until yeast starts to foam.
  2. Stir in oil.
  3. Stir in 1 cup flour and mix until well combined.
  4. Stir in salt.
  5. Mix in remaining 3 cups of flour.
  6. Turn dough out onto floured surface.
  7. Knead until smooth and elastic, about 10 minutes.
  8. Place dough in an oiled bowl, covered with plastic wrap. Let rise until doubled, about 1 ½ to 2 hours.
  9. Line a baking sheet with parchment paper.
  10. Cut dough into 10 equal pieces.
  11. Roll dough pieces into long snakes. Coil dough around each hot dog, pinching the end pieces of the dough to secure it.
  12. Let pretzel dogs rest while you prepare pretzel bath.
  13. Preheat oven to 400° F.
  14. In a large pot, boil 16 cups water and salt.
  15. When water is boiling, stir in baking soda.
  16. Place 2 pretzel dogs in boiling water for 30 seconds. Flip and continue to boil for 30 more seconds. Remove from water with slotted spoon and place on parchment-lined baking sheet.
  17. Repeat with remaining pretzel dogs.
  18. Sprinkle each pretzel dog with coarse salt.
  19. Bake for 20 minutes. Pretzel dogs are finished when they are a rich dark brown.
  20. Let cool for a couple of minutes on baking sheet. 
  21. Serve warm with Dijon or another good quality deli mustard and a delicious red ale.

Easy, healthy, but most importantly – Delicious Chocolate Cranberry Almond Oat Bites

Whether you are getting ready to get on the treadmill, go for a hike or maybe just need a little sweet, these are the cookies – a satisfying bite packed with flavor! Good-bye chocolate chip cookies, hello packed oat cookies!

There is something quite inspiring in completing a major fitness challenge. Jack and I returned home from our 1,300 mile bike trek in Hokkaido revved and looking ahead to The Next Big Thing. With roads outside often treacherously icy and the fact that wild animals in these parts make the whole village nervous if anyone is seen going for a run, we’ve pieced together a gym in our living room. (By the way, all ice is definitely not created equal. Chignik Lake has the slickest ice we’ve ever experienced).

Our gym which is comprised of a treadmill, a stationary spinning cycle, a set of Powerblock dumbbells, and a TRX resistance band. These four pieces of equipment take up very little space and gives us plenty of variety with which to accomplish our fitness goals. Plus, a spin on a bike or a run on a treadmill goes by fairly painlessly with a view of the lake out the window. (Yesterday a group of river otters was playing and fishing on the ice.)

Of course, when we work out, we have to eat – a golden opportunity to get in the kitchen and bake something. In Point Hope, I baked us batches of homemade granola bars to fuel us. During our bike training last year, I made little bites of tahini fudge speckled with coconut and chocolate chips. This time, I wanted to try a granola type creation that would be more like a cookie. These two-bite cookies are packed with oats, dried cranberries, chocolate chips, and almonds -and no processed sugar. They have the texture of a soft cookie and tons of flavor. Better still, they are easy and super quick to make. I’ve been making batches and keeping them in the freezer. After they thaw, they have the same texture and flavor as when they’ve cooled out of the oven. Perfect!

Chocolate Cranberry Almond Oat Bites

Ingredients

  • 1 cup quick oats
  • 3/4 cup whole wheat flour (I use Bob’s Red Mill Whole Wheat Pastry Flour)
  • 1 1/2 tsp baking powder
  • 1 tsp cinnamon
  • pinch salt
  • 2 tbsp unsalted butter, melted
  • 1 egg
  • 1 tsp vanilla extract
  • 1/2 cup pure maple syrup
  • 1/2 cup dried cranberries
  • 1/4 cup semi-sweet chocolate chips
  • 1/4 cup coarse-chopped almonds

Directions

  1. Preheat oven to 325° F. Line baking sheet with parchment paper. Set aside.
  2. Whisk together oats, flour, baking powder, cinnamon and salt in a large bowl. Set aside.
  3. In a medium bowl, whisk together melted butter, egg, vanilla and maple syrup.
  4. Pour maple syrup mixture into oat mixture. Stir until combined.
  5. Fold in cranberries, chocolate chips and almonds.
  6. Using a small cookie scoop or tablespoon, scoop out dough and place balls on prepared baking sheet. The cookies will not spread much. Slightly flatten cookies.
  7. Bake cookies for 12 minutes. Let cookies cool on baking sheet for 10 minutes before transferring them to wire cooling rack.
  8. Store cookies in airtight container for a few days. Cookies will freeze well.


When Evergreens are too Precious to Cut, Why not Craft Your Own Christmas Tree?

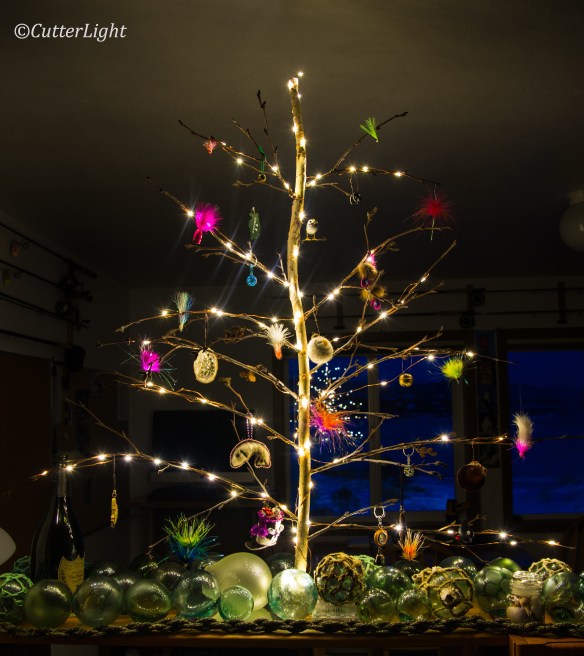
A beaver obliged by stripping the bark from the trunk of this hand-crafted holiday tree. A drill and a few Alder branches were the only other materials required. With almost all of our Christmas ornaments in storage in Sacramento, California, we had fun hanging items on hand here in Chignik Lake. 

The few White Spruce trees around Chignik Lake are not native to the area. They were brought from Kodiak Island and are too valuable for what they add to the landscape and as refuges for birds (they love the dense cover and the cone seeds) to even contemplate cutting for use as Christmas trees. So we crafted our own tree using abundant Alders as branches and a section of a beaver-gnawed stick we’d found while out hiking.

When we lived in Shishmaref and Point Hope, we had a tree we’d crafted from driftwood from the beaches of Sarichef Island where Shishmaref is located. It was nice, but we like our new tree even better. With all the decorations from that first tree carefully packed away and put in storage when we moved to Mongolia for two years, we didn’t have much on hand when it came to decorating our Alder tree. So we used our imaginations.

An assortment of seashells, brass bells (presented to us for good luck), tiny decorative birds and carved wooden trout we’d collected on our recent bike trek in Hokkaido were rounded out with some of our more colorful salmon fishing flies. We placed our collection of Japanese glass fishing floats beneath the boughs along with a decorative lamp made from recycled glass we also sent back from Hokkaido. Two strings of fairy lights competed the decorations.

Lights on we stepped back…

…and had to agree that of all the trees we’ve put up over the years, this is our favorite.

Salmon with Creamy Fresh Dill Sauce: A Last Taste of Summer

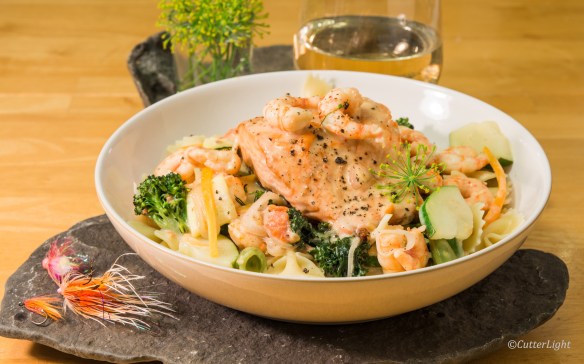
This dish features a classic summertime herb along with garden vegetables and our favorite Autumn fish for a recipe to hold off winter for at least one more evening. While a California Chardonnay would pair well with the rich cream and Coho Salmon, we went with a Willamette Valley Pinot Gris, a lighter wine that let the dill shine.

Dill, dill, dill. What to do with dill? It’s not a seasoning I often use, but thanks to our friends up the Alaska Peninsula at The Farm Lodge in Port Alsworth, we found ourselves with an abundance of this pleasantly aromatic herb blooming in a glass jar on a windowsill. How about using it in a cream sauce to bring together fillets of freshly caught Chignik River Silver Salmon, farfalle pasta, and some of the last zucchini and summer squash we’re likely to see for awhile?

Salmon with Creamy Fresh Dill Sauce for Two

Ingredients

  • 2 fresh wild salmon fillets, skin on, pin bones removed, rinsed and patted dry
  • 2 cups farfalle pasta
  • 1 cup or a little more diced fresh tomato
  • 2 leaves of kale, cut away from the stem and cut into smaller pieces
  • 1 cup or more yellow summer squash, sliced into circles and then cut into smaller pieces
  • 1 cup or more zucchini, sliced into circles and cut into smaller pieces
  • 1/2 cup carrot sliced julienne style
  • other fresh vegetables, as desired/available
  • 3 or 4 cloves of garlic, sliced julienne style
  • 1 shallot, sliced thin to make about 3/4 cup
  • 1/2 cup heavy cream
  • 1 tbsp butter
  • olive oil
  • sea salt
  • juice from 1/2 lemon
  • a loose 1/2 cup of dill leaves and flowers (or use a smaller quantity of dried dill)
  • sherry (or white wine)
  • black pepper
  • 1 cup or more deepwater Alaska shrimp shelled, deveined and patted dry (optional)
  • 1 tbsp corn starch mixed into 2 tbsp cold water

Directions

  1. Prepare pasta.
  2. Meanwhile…

Directions for the salmon

  1. Turn on oven broiler and preheat heavy broiling pan on middle rack for the salmon. Nothing works better for this than seasoned cast iron.
  2. Sprinkle the salmon with sea salt. Our favorite is large grain gray sea salt.
  3. When the broiling pan is sizzling hot, pour on a little olive oil, place the salmon skin side down on the oil and broil for about 9 minutes.
  4. Remove salmon from broiler, place on cutting board or plate and cover loosely with a bowl or foil to rest.

Directions for the cream sauce

  1. Put some olive oil in a fairly large skillet or sauteuse pan over medium heat.
  2. When the oil is hot, add kale, a little sea salt, and a tablespoon or two of sherry. Stir and sauté until kale just begins to wilt. Next, place in zucchini, summer squash and julienne carrots, which will not  take as long to cook. Add a little more salt and sherry, stir and sauté until vegetables just begin to soften. At this point, add the cream and mix together.
  3. Meanwhile, place butter in a separate skillet. When it’s hot, add shallots, a sprinkle of salt, and cook till they’re soft. Add garlic and a healthy splash of sherry, stir and cook till garlic begins to release its odor and soften. If you’re including shrimp, add them and a sprinkle of salt when you add the garlic. It takes only about 2 minutes to cook shrimp through.
  4. Add the shallot mixture to the vegetables, a few grinds of black pepper, the lemon juice, mix together and taste. To thicken the cream sauce, slowly stir in the corn starch mixture. Serve immediately.

Place the pasta on large plates or in pasta bowls. Spoon on the vegetable cream sauce. Place the salmon on top, add a little more cream sauce and another grind of two of pepper. Garnish with fresh dill and pair with a chilled Willamette Valley Pinot Gris.