A Snack That Can’t be Beet – Bright Magenta Beet Hummus

beet hummus n

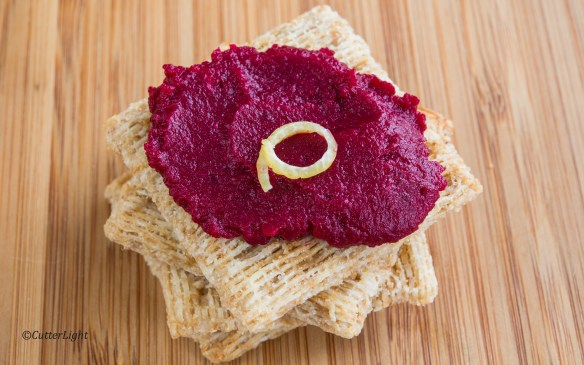
Healthy? Yes, but more importantly beautiful and delicious! Imagine this wine-colored spread on crispy crackers or as part of a vibrant plate of garden-fresh crudités.

This hummus is just as creamy and smooth as my white bean hummus recipe. My favorite thing about hummus is the flavorful marriage of garlic, lemon, and cumin. Inspired by a couple of beets in the fridge, I decided to do what beets like best – roast them. Roasting brings out the sweetness in this beautiful root vegetable. I substituted beets for the white beans in my original recipe and was really happy that the main garlic, lemon, and cumin flavors still shine through. The beets add a subtle earthy, sweet flavor. Best of all, they take the presentation through the roof with their color.

Roasted Beet Hummus

Ingredients

  • 2 medium beets
  • 1 15 oz. can garbanzo beans
  • 3 tbsp lemon juice
  • 2 tsp cumin
  • 2 cloves garlic, chopped
  • a few dashes hot sauce. We like Cholula.
  • 1 tsp salt
  • 1/2 cup olive oil
  • pepper

Directions

  1. Preheat oven to 375° F (190 C. Remove the stem from the beets. Scrub and wash them with cold water.
  2. Place beets in foil, drizzle with olive oil, wrap tightly and roast for one hour or until the tines of a fork pass through without resistance. They should be tender. Let cool slightly.
  3. You should be able to rub the skin off of the beets. Otherwise, use a paring knife to peel off the roasted skin.
  4. Cut beets into chunks. Place in deep bowl.
  5. Rinse and drain beans. Add to bowl.
  6. Combine lemon, cumin, garlic, hot sauce, salt and half of the olive oil with beet mixture. Use a stick blender to mix and purée hummus. This can also be done in a food processor.
  7. Process mixture until smooth, adding more olive oil to reach desired consistency.
  8. Serve with a drizzle of olive oil and a crack of black pepper.


Pretzel Dogs – or Finally, a Food Post!

Chewy, soft pretzels with a not-so subtle just-right hit of salt, stuffed with your favorite hot dog – a recipe for a delicious lunch easy to take with or one to stay in with on a snowy spring day.

Many years ago, actually just approaching ten, we decided to move to Alaska. There are many different Alaskas within this beautiful state. The one we chose to move to was the Alaska Bush, a place we knew would be challenging, fascinating and exciting and a place where we knew we would need indoors hobbies to entertain us during cold and dark winters. One of my first goals was to become a baker. To set myself up for success, I sent out hundreds of pounds of different flours, sugars, flavorings, pans, cutters, and a beautiful tapered rolling pin with inlaid bamboo for inspiration (a lovely gift from Jack).

As my baking skills improved, I graduated from bread-in-a-rice-cooker to a a bonafide bread machine. As I continued to improve my baking, I ditched the machines and really dug into the whole process of baking. During my initial education, I enlisted the help of The Great Courses and chef Stephen Durfee from the Culinary Institute of America (via the online class). For six Sundays in a row, the three of us dutifully watched these classes and then baked – with feedback from countless taste-testers. We learned how to create lattice-crusted pies, ganache-topped éclairs, and mousse-filled many layered chocolate cakes. That was just the start. By the way, if you’ve ever wanted to really learn how to bake, I highly recommend the Baking Pastries & Desserts class from the Great Courses. I also highly recommend sharing the experience with friends. It was a lovely introduction into serious baking.

Of course, spending this much quality time with friends can only make friendships grow. After completing our class, my friend Reba and I continued to bake together, share recipes and swap tastes of new creations. Pretzel dogs always remind me of Reba and those baking days in Point Hope. This recipe produces an agreeably light, airy roll and is part of my permanent rotation. Thanks to Reba for the spiral wrapping style!

Pretzel Dogs

Ingredients

  • 1 3/4 cups milk
  • 2 tsp instant yeast
  • 2 tbsp olive oil
  • 1 1/2 tsp salt
  • 4 cups all purpose flour
  • 10 good quality hot dogs
  • coarse sea salt
  • 1/2 cup baking soda
  • 16 cups water

Directions

  1. Whisk milk and yeast together in a large bowl. Let stand for a few minutes until yeast starts to foam.
  2. Stir in oil.
  3. Stir in 1 cup flour and mix until well combined.
  4. Stir in salt.
  5. Mix in remaining 3 cups of flour.
  6. Turn dough out onto floured surface.
  7. Knead until smooth and elastic, about 10 minutes.
  8. Place dough in an oiled bowl, covered with plastic wrap. Let rise until doubled, about 1 ½ to 2 hours.
  9. Line a baking sheet with parchment paper.
  10. Cut dough into 10 equal pieces.
  11. Roll dough pieces into long snakes. Coil dough around each hot dog, pinching the end pieces of the dough to secure it.
  12. Let pretzel dogs rest while you prepare pretzel bath.
  13. Preheat oven to 400° F.
  14. In a large pot, boil 16 cups water and salt.
  15. When water is boiling, stir in baking soda.
  16. Place 2 pretzel dogs in boiling water for 30 seconds. Flip and continue to boil for 30 more seconds. Remove from water with slotted spoon and place on parchment-lined baking sheet.
  17. Repeat with remaining pretzel dogs.
  18. Sprinkle each pretzel dog with coarse salt.
  19. Bake for 20 minutes. Pretzel dogs are finished when they are a rich dark brown.
  20. Let cool for a couple of minutes on baking sheet. 
  21. Serve warm with Dijon or another good quality deli mustard and a delicious red ale.

Easy, healthy, but most importantly – Delicious Chocolate Cranberry Almond Oat Bites

Whether you are getting ready to get on the treadmill, go for a hike or maybe just need a little sweet, these are the cookies – a satisfying bite packed with flavor! Good-bye chocolate chip cookies, hello packed oat cookies!

There is something quite inspiring in completing a major fitness challenge. Jack and I returned home from our 1,300 mile bike trek in Hokkaido revved and looking ahead to The Next Big Thing. With roads outside often treacherously icy and the fact that wild animals in these parts make the whole village nervous if anyone is seen going for a run, we’ve pieced together a gym in our living room. (By the way, all ice is definitely not created equal. Chignik Lake has the slickest ice we’ve ever experienced).

Our gym which is comprised of a treadmill, a stationary spinning cycle, a set of Powerblock dumbbells, and a TRX resistance band. These four pieces of equipment take up very little space and gives us plenty of variety with which to accomplish our fitness goals. Plus, a spin on a bike or a run on a treadmill goes by fairly painlessly with a view of the lake out the window. (Yesterday a group of river otters was playing and fishing on the ice.)

Of course, when we work out, we have to eat – a golden opportunity to get in the kitchen and bake something. In Point Hope, I baked us batches of homemade granola bars to fuel us. During our bike training last year, I made little bites of tahini fudge speckled with coconut and chocolate chips. This time, I wanted to try a granola type creation that would be more like a cookie. These two-bite cookies are packed with oats, dried cranberries, chocolate chips, and almonds -and no processed sugar. They have the texture of a soft cookie and tons of flavor. Better still, they are easy and super quick to make. I’ve been making batches and keeping them in the freezer. After they thaw, they have the same texture and flavor as when they’ve cooled out of the oven. Perfect!

Chocolate Cranberry Almond Oat Bites

Ingredients

  • 1 cup quick oats
  • 3/4 cup whole wheat flour (I use Bob’s Red Mill Whole Wheat Pastry Flour)
  • 1 1/2 tsp baking powder
  • 1 tsp cinnamon
  • pinch salt
  • 2 tbsp unsalted butter, melted
  • 1 egg
  • 1 tsp vanilla extract
  • 1/2 cup pure maple syrup
  • 1/2 cup dried cranberries
  • 1/4 cup semi-sweet chocolate chips
  • 1/4 cup coarse-chopped almonds

Directions

  1. Preheat oven to 325° F. Line baking sheet with parchment paper. Set aside.
  2. Whisk together oats, flour, baking powder, cinnamon and salt in a large bowl. Set aside.
  3. In a medium bowl, whisk together melted butter, egg, vanilla and maple syrup.
  4. Pour maple syrup mixture into oat mixture. Stir until combined.
  5. Fold in cranberries, chocolate chips and almonds.
  6. Using a small cookie scoop or tablespoon, scoop out dough and place balls on prepared baking sheet. The cookies will not spread much. Slightly flatten cookies.
  7. Bake cookies for 12 minutes. Let cookies cool on baking sheet for 10 minutes before transferring them to wire cooling rack.
  8. Store cookies in airtight container for a few days. Cookies will freeze well.


Wild Alaska Salmon Lox – an Edible Treasure

Miniature three-inch bagels are perfect for a snack-size taste of Alaskan salmon lox.

The winter holidays are a time of canapés and party food, which makes this post relevant to the holiday season. For us, agreeably salty lox on a fresh homemade bagel slathered with cream cheese is just plain good food anytime of year. With a river with strong salmon runs flowing right past our home, getting the main ingredient for these sandwiches isn’t a problem. In fact, we normally get plenty of fish for our own needs as well as a few additional fish to give to elders in our village. 

Making lox takes a bit of time, so there is some patience involved, but the method itself is easy. Simply pack salmon fillets in a salt-sugar-pepper mixture.  Let the salt draw out the excess liquid. Turn the fillets daily for about a week. It’s a fairly magical process, in the end transforming the fillets into firm, bright orange jewels. Sliced thin, lox is perfect in scrambled eggs or atop blini as well as on the traditional bagel du jour smeared with cream cheese and sprinkled with capers. Delectable, Wild Alaskan Salmon – an edible treasure.

Homemade Lox

Ingredients

  • 1 lb. fresh salmon fillets, skin on. The fillets need not be scaled, but do take pains to ensure that all bones are removed.
  • ¼ cup coarse sea salt
  • ¼ cup brown sugar
  • 1 tbsp freshly ground black pepper

Directions

  1. Rinse fish and dry thoroughly.
  2. Remove any pin bones in fillet with tweezers or needle nose pliers.
  3. Mix together salt, sugar and pepper. (This recipe works well when multiplied. Our last batch was 5 pounds of fillets.)
  4. Pack salt mixture around fish. Do this skin side down.
  5. Sandwich two pieces of fish together, flesh against flesh, skin side out.
  6. Pack any leftover sugar mixture onto exposed fillet.
  7. Wrap sandwiched pieces tightly with plastic wrap. Leave sides slightly open so liquid can drain while the salmon cures.
  8. I use a large plastic container with a top. Place a smaller food storage container inside the large one to create a raised place for the fish to set. This will allow the juice to drain away from the fish. A fish poacher with a bottom insert that allows drainage also works well.
  9. Place sandwiched salmon in container from step 8.
  10. Finally, you need to ensure that the fillets are tightly pressed together. This can be accomplished by placing full canning jars atop the fillets if you’re using a fish poacher. As I was using a tall plastic container, I simply placed another smaller container on top of the salmon pieces. The smaller container was just the right size so that when I put the lid on the larger container, it pressed down firmly on the fillets without squishing them. The idea is to create just enough weight or pressure to facilitate squeezing out excess moisture as the salt pulls liquid from the fish.
  11. Place container in refrigerator.
  12. For 7 days, every 24 hours pour off liquid from the bottom of the container and flip the fillet sandwiches.
  13. At the end of 7 days, take the salmon out of the plastic wrap and thoroughly rinse using very cold water.
  14. Thoroughly pat dry.
  15. Slice very thin and enjoy!

Store leftovers in refrigerator or wrap tightly in plastic and freeze in airtight containers.

Salmon with Creamy Fresh Dill Sauce: A Last Taste of Summer

This dish features a classic summertime herb along with garden vegetables and our favorite Autumn fish for a recipe to hold off winter for at least one more evening. While a California Chardonnay would pair well with the rich cream and Coho Salmon, we went with a Willamette Valley Pinot Gris, a lighter wine that let the dill shine.

Dill, dill, dill. What to do with dill? It’s not a seasoning I often use, but thanks to our friends up the Alaska Peninsula at The Farm Lodge in Port Alsworth, we found ourselves with an abundance of this pleasantly aromatic herb blooming in a glass jar on a windowsill. How about using it in a cream sauce to bring together fillets of freshly caught Chignik River Silver Salmon, farfalle pasta, and some of the last zucchini and summer squash we’re likely to see for awhile?

Salmon with Creamy Fresh Dill Sauce for Two

Ingredients

  • 2 fresh wild salmon fillets, skin on, pin bones removed, rinsed and patted dry
  • 2 cups farfalle pasta
  • 1 cup or a little more diced fresh tomato
  • 2 leaves of kale, cut away from the stem and cut into smaller pieces
  • 1 cup or more yellow summer squash, sliced into circles and then cut into smaller pieces
  • 1 cup or more zucchini, sliced into circles and cut into smaller pieces
  • 1/2 cup carrot sliced julienne style
  • other fresh vegetables, as desired/available
  • 3 or 4 cloves of garlic, sliced julienne style
  • 1 shallot, sliced thin to make about 3/4 cup
  • 1/2 cup heavy cream
  • 1 tbsp butter
  • olive oil
  • sea salt
  • juice from 1/2 lemon
  • a loose 1/2 cup of dill leaves and flowers (or use a smaller quantity of dried dill)
  • sherry (or white wine)
  • black pepper
  • 1 cup or more deepwater Alaska shrimp shelled, deveined and patted dry (optional)
  • 1 tbsp corn starch mixed into 2 tbsp cold water

Directions

  1. Prepare pasta.
  2. Meanwhile…

Directions for the salmon

  1. Turn on oven broiler and preheat heavy broiling pan on middle rack for the salmon. Nothing works better for this than seasoned cast iron.
  2. Sprinkle the salmon with sea salt. Our favorite is large grain gray sea salt.
  3. When the broiling pan is sizzling hot, pour on a little olive oil, place the salmon skin side down on the oil and broil for about 9 minutes.
  4. Remove salmon from broiler, place on cutting board or plate and cover loosely with a bowl or foil to rest.

Directions for the cream sauce

  1. Put some olive oil in a fairly large skillet or sauteuse pan over medium heat.
  2. When the oil is hot, add kale, a little sea salt, and a tablespoon or two of sherry. Stir and sauté until kale just begins to wilt. Next, place in zucchini, summer squash and julienne carrots, which will not  take as long to cook. Add a little more salt and sherry, stir and sauté until vegetables just begin to soften. At this point, add the cream and mix together.
  3. Meanwhile, place butter in a separate skillet. When it’s hot, add shallots, a sprinkle of salt, and cook till they’re soft. Add garlic and a healthy splash of sherry, stir and cook till garlic begins to release its odor and soften. If you’re including shrimp, add them and a sprinkle of salt when you add the garlic. It takes only about 2 minutes to cook shrimp through.
  4. Add the shallot mixture to the vegetables, a few grinds of black pepper, the lemon juice, mix together and taste. To thicken the cream sauce, slowly stir in the corn starch mixture. Serve immediately.

Place the pasta on large plates or in pasta bowls. Spoon on the vegetable cream sauce. Place the salmon on top, add a little more cream sauce and another grind of two of pepper. Garnish with fresh dill and pair with a chilled Willamette Valley Pinot Gris.

Alaska Wild Blueberry Skillet Pies

For us, late summer in Alaska means harvest time. This is the time of year for berry picking and fishing for Sockeyes and Silver Salmon in the Chignik River system. Only a short walk away from our home, there is a lovely patch of feral raspberries with plenty of ripe berries. And not so far away in the other direction is a place we call the blueberry bog, where, as you’ve already guessed, we can pick low bush blueberries to our hearts’ content. 

Now that I’ve finally mastered the Buttery Flaky Pie Crust (a culinary goal checked off last winter), I am confident when Jack requests pie for dessert. Today’s request – Alaskan Wild Blueberry Pie.  Jack and our houseguest Isabel knew what they had to do while I was busy teaching my students. Armed with bear spray and berry collecting containers, they hiked the mile or so to the bog. Their efforts were rewarded with fresh slices of pie topped with scoops of extra rich homemade vanilla ice cream.

Alaska Wild Blueberry Skillet Pies

(Makes 2 6-inch skillet pies)

Ingredients

  • 1 double pie crust
  • 3/4 cup sugar
  • 3 tablespoons cornstarch
  • 1/8 teaspoon salt
  • 1/4 cup cold water
  • 5 cups fresh blueberries, divided
  • 1 tablespoon butter
  • 1 tablespoon lemon juice

Directions

  1. In a saucepan over medium heat, combine sugar, cornstarch, salt and water until smooth. Add 3 cups blueberries. Bring to a boil; cook and stir for 2 minutes or until thickened and bubbly.
  2. Remove from the heat. Add butter, lemon juice and remaining berries; stir until butter is melted. Cool. 
  3. Preheat your oven to 350 degrees F.
  4. Cut four circles out of of pie dough. Each dough circle should be about 1/2 inch larger than the mini skillet you’re using as your guide. Place the dough circle into the skillet, being careful not to stretch the dough. With a knife trim off any excess dough.
  5. Ball up all of the extra dough and roll it out on a lightly floured surface. Cut out four more circles large enough to cover the top of a mini skillet.
  6. Next, evenly divide the blueberry filling among the skillets. Top each with approximately 1/2 tablespoon of cubed, cold butter.
  7. Cover each skillet with a piece of dough. Using your fingers, crimp the edge of dough all the way around to seal. Brush with egg wash and sprinkle lightly with sugar. Place skillets onto a cookie sheet for baking.
  8. Bake for 35-40 minutes or until crust is golden and the filling is bubbly. (If the top crust starts to get brown before the inside is hot, cover with aluminum foil.)
  9. Cool before serving. Top with ice cream.


Raspberry Vanilla Custard Tart in a Swanky Almond Crust

Sixty-six days on a bike, 1,300 miles pedaled, more miles walked, hiked, climbed, and canoed. Before we knew it, we were back home with thousands of photos and a lifetime of stories to prepare for publication. What better way to transition back from the world of bicycle trekking to our home in Chignik Lake than baking? I can’t think of one.

I arrived back home to my patiently waiting, full, lovely pantry. Translucent jars of raspberry jam caught my eye on from the shelf where they’d been stored. With this year’s fruit quickly ripening, it’s time to use up last year’s stores. What a great excuse to bake with one of my favorite flavors – raspberry. Jack “I-don’t-have-a-sweet-tooth” Donachy’s secret weakness is custard desserts. For no better reason than pure love (of custard and raspberry), this little baby was created. Wait… I’m not saying that little baby Jack was created just to eat custard. I’m saying that this dessert… never mind.

A crust infused with almonds. Then a creamy vanilla custard topped with a smooth, delicious layer of homemade jam – I prefer raspberry. I set it out to photograph, and it was gone in a flash.

For those of you following along, we will have plenty of photos and stories coming from our bicycle trek around Hokkaido. Jack is up to is elbows in the sorting and editing process as well as catching the last of Chignik Lake’s migratory birds before they head south. Stay tuned. For now, sit back and enjoy a slice, or two, of this delicious tart.

Raspberry Vanilla Custard Tart

Crust

Ingredients

  • 1 cup all purpose flour
  • 1/2 cup finely chopped almonds
  • 3 tbsp granulated sugar
  • 2 large egg yolks
  • 1 tbsp cold water
  • generous pinch salt
  • 1/4 cup cold unsalted butter

Directions

  1. In a large bowl, whisk together flour, almonds, and sugar.
  2. In a medium bowl, whisk egg yolks and water.
  3. Grate butter into flour mixture. Toss butter so that it is fully coated. Use two sharp knives (I used steak knives) to chop the butter into smaller pea-sized pieces.
  4. Pour egg mixture into flour mixture. Stir with fork until dough comes together. It should be shaggy looking. If it’s too dry add tiny amounts of cold water until it comes together.
  5. Turn dough out into a 9-inch springform pan or tart pan with removable bottom.
  6. Press dough into bottom of pan and up the sides of pan (about 1 inch) with fingertips.
  7. Prick dough with fork. Freeze for 20 – 30 minutes.
  8. Preheat oven to 350°F.
  9. Bake crust for 35 minutes. It will be golden brown when finished.
  10. Let cool completely. You can store the crust at room temperature if it’s tightly wrapped in plastic.

Vanilla Custard Filling and Raspberry Topping

Ingredients

  • 2 cups whole milk
  • 1 tsp vanilla paste
  • 4 large egg yolks
  • 1/3 cup granulated sugar
  • 4 tbsp cornstarch
  • pinch salt
  • 3 tbsp unsalted butter
  • 1/2 cup homemade raspberry jam (here’s a good recipe for quick jam)

Directions

  1. Bring milk and vanilla to a simmer in a medium pot. Remove from heat.
  2. While heating milk mixture, thoroughly whisk together egg, sugar, cornstarch and salt in a medium bowl.
  3. Slowly, while whisking, pour milk mixture into egg mixture.
  4. Pour custard back into the medium pot.
  5. Continue whisking mixture over medium heat. Mixture should begin to bubble and become thick. Remove from heat.
  6. Whisk in butter, one tablespoon at a time.
  7. Transfer back to medium bowl. Cover with plastic wrap so that wrap is against surface of custard.
  8. Cool completely in refrigerator.
  9. To assemble, whisk cooled custard until smooth.
  10. Pour custard into cooled crust.
  11. Spread jam evenly on top of custard.
  12. Serve immediately.

Recipe adapted from Bon Appétit  Magazine.

Powering Through with Coconut Chocolate Chip Tahini Fudge

Fueling up with fudge. These tasty snacks helped us through today’s 3½ hour bicycle training ride. Sixteen days till we arrive in Hokkaido!

We are beginning to wrap up the preparation for our 3-month bicycle adventure in Hokkaido, Japan. Our home looks like an outdoor store that has barely survived a tornado attack. Bicycles with halfway-packed panniers are leaned up against walls, an assortment of bags are strewn about having either passed or failed packing tests, and there are a number of items that have not quite yet found a home in our portable summer transportation scheme. If anyone were to peek into on our home, they would surely worry for us. Will we really be ready to start sending our gear on this Wednesday’s flight out of Chignik Lake? In reality, this light-at-the-end-of-the-tunnel mess is absolutely normal for us right before everything comes together.

Along with the flurry of final packing, we still are relentlessly adhering to our fitness-training schedule. We both have a lot of experience with preparing for running events, but a bicycle adventure is new. It turns out that prepping is not as simple as setting up a beginner, intermediate or advanced program as we would for a running event. We’ve had to take into account that we need enough “seat time” to avoid sore rear ends. We also factored in our ages and an overall goal that emphasizes endurance over speed. Our Hokkaido schedule will be very flexible. Free from the pressure of reservations (we’ll be tent camping throughout the summer), we’ll be able to ride very short days if we want to stay in a particular location – but we also want to be in shape to put some serious mileage behind us when we want to get somewhere.

After doing quite a bit of research, we settled on a training program called “Sofa to 50k.” With an 8-week schedule culminating today with a 3½ ride, this program is set up similarly to a marathon running schedule. Yikes! Did I say 3½ hours? OK, saddle up!

We usually start our Sundays – the day of our long rides – with steel cut oatmeal. We like to add homemade yogurt and homemade jam for extra flavor and calories. As the long ride days grew longer, we’ve needed to add additional mid-ride calories. Trail mix, nuts, or Figgy-pops have been our go-to snacks. But with a 3½ hour ride looming, I wanted some kind of a nutrition-packed snack that we would look forward to. We couldn’t be more sick of Figgy-pops! With half a jar of tahini left over from a previous recipe, I had an idea for a fudge-like confection packed with protein and energy. After sharing an entire batch today on our longest ride, we both agreed these little treats were fantastic! One tip: You’ll want to keep these in the fridge till you’re ready to eat them. They get sticky at room temperature.

Coconut Chocolate Chip Tahini Fudge

Ingredients

  • ½ cup tahini
  • ½ cup unsweetened coconut flakes
  • ¼ cup honey
  • 2 tbsp coconut oil, melted
  • ½ tsp cinnamon
  • ½ tsp vanilla paste (or extract)
  • ¼ cup semi sweet chocolate chips, chopped
  • pinch salt

Directions

  1. Mix all ingredients thoroughly.
  2. Place tablespoon-sized scoops in a silicon ice cube tray.
  3. Freeze for at least 30 minutes.
  4. Pop frozen confections out of tray and store in an airtight container in the refrigerator.

The Real Breakfast of Champions


Creamy roasted butternut squash filling on a flakey, buttery crust – top it off with a lightly salted & peppered sunny-side up egg and serve a cup of French Roast on the side. Good morning, Chignik Lake.

Pumpkin pie for breakfast – it’s either just after Thanksgiving or Christmas, or we’re nearing the end of another year in the bush. In fact, we’re almost having to pinch ourselves to get our heads around the fact that there are just four days till the end of Barbra’s school year. With a very early summer vacation in sight, we’ve been in the process of clearing out our freezer. Several months ago we roasted and freezer-packed  a couple of butternut squashes. When we rediscovered them last weekend, they were still in excellent condition thanks to our manual defrost freezer.

Having never perfected crusts, I got out of the pie baking business when I married Barbra, but she still uses my pumpkin pie filling recipe – an adaptation from Craig Claiborne’s The New York Times Cookbook. She put a bush twist on the recipe this time, substituting Hoosier Hill Farm Premium Heavy Cream Powder for real heavy cream, which can be notoriously difficult to get out to the bush. The pie came out just fine.

And so this past week we’ve been starting our mornings right with one of our favorite breakfasts: Pumpkin Pie with a Fried Egg and a cup of joe. Our sparrows have begun returning, Cranes are starting to nest up on Black Lake, the bears are up and about and this morning I think I saw a salmon jump down at the bend. C’mon summer!

For our favorite pumpkin pie/squash pie recipe, see: A Cookbook for the Ages: Pumpkin and Pecan Pies from Craig Claiborne

3 Easy Steps & 16 Minutes to Perfection: Pork Chops Cooked “Just Right” Every Time

Consistency is a key to turning out a perfectly cooked cut of meat. We’ve been following this straightforward recipe to turn out “just right” pork chops on stovetops, grills and even countertop toaster-ovens for years

Time tested and true, there are three keys to this recipe:

1. Start with a thick pork chop. Costco offers an excellent value on a package of exactly the kind of boneless pork loin chops this recipe calls for. If Costco quantities are too much, visit your local butcher. You want a two-inch thick (5 cm) chop, preferably one with a bit of fat.

2. Pick a great rub. Our favorites feature a balance of powdered chilis such as ancho, cayenne, Aleppo and chipotle as well as other seasonings such as mesquite, black pepper and paprika. Penzeys Southwest Seasoning or their Northwest Fire are good examples.

3. Use a sufficiently thick frying pan (one with a lid) to ensure even heating and to avoid burning the meat. Nonstick Swiss Diamond and Scanpan cookware handle heat well and make clean-up a breeze. Good stainless steel or well-seasoned cast iron pans are also good choices.

Once you’ve got the pork chop, the rub and the pan ready, the rest is a breeze. We find that one Costco-sized chop served with rice is plenty for two diners. In fact, we often have enough left over for a killer omelet the following morning.

I should add a note here: Stoves and pans vary. You may have to fine tune the heat, but once you’ve got it, you’ve got it. The same approach works for perfecting your favorite cut of steak, chicken breasts or thighs, or fish fillets.

Click here for an easy raspberry chipotle sauce.

16-minute Perfect Pork Chop

Ingredients

1 pork chop, 2 inches thick, rinsed and patted dry

chili based rub such as Penzeys Southwest Seasoning

soy sauce (or substitute sea salt)

1 or 2 tablespoons olive oil

Directions

Gently rub in a generous amount of seasoning on all sides

Meanwhile, in a frying pan, heat olive oil at a little higher than medium heat till it’s sizzling hot. Don’t allow it to smoke.

Set timer to 16 minutes and place chop in pan. Cover and cook for 1 minute to sear. Use tongs to turn the cutlet to the other side, lower temperature to medium-low, cover and allow to cook for 8 minutes.

Turn chop back to the side you first seared, drizzle with soy sauce, cover and cook for the remaining 7 minutes.

Remove chop and place on a wooden cutting board. Cover with a bowl or tent loosely with aluminum foil and allow to rest for 5 minutes.

Cut into two pieces. Top with raspberry chipotle sauce and serve with rice, couscous or potatoes.