Sour Cherry Almond Hearts

Sour Cherry Almond Hearts_n

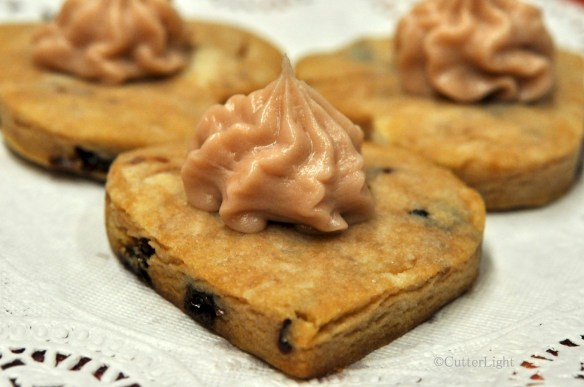
Tart dried cherries, sour cherry concentrate and almond extract combine to create wonderful flavors in these cookies which can be cut into fun and festive shapes to suit any holiday. 

One flavor we enjoy in our culinary creations is sour cherry. It has a wonderful flavor and stirs memories of our home in Sacramento and our sour cherry tree laden with ripe, bright red fruit. We always looked forward to seeing the birds this tree attracted as well as the ice creams, biscotti and sauces for pork and chicken the fruit starred in. While we can’t get sour cherries here in the Arctic, dried cherries are a must on our annual shopping list. This past summer during our annual bulk shopping, we came across sour cherry concentrate at Natural Pantry, a health food store in Anchorage. The concentrate, which claims  antioxidant benefits when consumed daily, was in the store’s vitamin section.

Of course, our first thoughts upon finding this concentrate went to the kitchen where we imagined an extraordinarily tangy-sweet syrup for our homemade Italian-style sodas and for Jack’s giant pancakes. The combination of the concentrate and the dried cherries sets these cookies far apart from the ordinary. Cherry liqueur might be a good substitute for the concentrate in the dough recipe.

Sour Cherry Almond Cookies

Ingredients

Cookie dough:

  • 6 tbsp unsalted butter, softened
  • 1 oz. cream cheese, softened
  • 1/4 cup granulated sugar
  • 1/2 tsp almond extract
  • pinch salt
  • 1  1/4 cup all purpose flour
  • 1/4 cup finely chopped dried cherries
  • 1 tbsp sour cherry concentrate

Frosting:

  • 2 oz. cream cheese
  • 2 tbsp unsalted butter, softened
  • 1 tbsp sour cherry concentrate
  • 1 cup powdered sugar

Directions

  1. Preheat oven to 325 degrees F.
  2. Line a baking sheet with parchment paper.
  3. In a mixing bowl, combine butter and cream cheese. Beat with an electric mixer on medium speed until incorporated.
  4. Add sugar, almond extract, salt and sour cherry concentrate. Mix until well incorporated.
  5. Mix in half the flour until combined.
  6. Mix in dried cherries and remaining flour until combined.
  7. On a lightly floured surface, roll out dough to 1/4 inch thick. Cut out desired shapes using a cookie cutter.
  8. Place cut cookies on cookie sheet.
  9. Bake for 14 minutes, or until bottoms are lightly browned.
  10. Cool on cookie sheet for 2 minutes and then finish cooling on wire rack.
  11. While cookies are cooling, make frosting.

Frosting Directions:

  1. Clean and dry mixer bowl and beater.
  2. Combine cream cheese, butter and sour cherry concentrate in mixer bowl and mix on low speed for about 30 seconds.
  3. Gradually beat in powdered sugar. Frosting should be of spreading consistency.
  4. When cookies are cooled, pipe frosting onto center of cookie.

Recipe makes 2 dozen cookies.

Cheese Blintzes with Arctic Blueberry Jam

blintzes_n

Thin, lightly fried crepes wrap a sweetened homemade cheese filling. Traditionally served with applesauce and sour cream, we enjoyed ours with jam made from local Arctic blueberries.

Some foods just make us happy. Bagels fresh out of the oven, the day’s catch charcoal grilled, and a piping hot skillet of most excellent nachos come to mind. Blintzes fall into this category as well. A brunch classic but great served anytime, they remind me of my Jewish grandmother’s home which always seemed to be filled with the scent of vanilla and hot oil.

Cheese Blintzes

Ingredients for approximately 13 blintzes

Blintz Wrapper

  • 6 eggs
  • 1 1/2 cup flour
  • 1/4 cup sugar
  • 1 cup milk
  • 1/2 cup water
  • 1  1/2  tsp vanilla
  • Pinch of salt
  • Vegetable oil with a high smoke point for frying (grapeseed or peanut oil works best); I used light olive oil

Filling

  • 1 cup ricotta cheese
  • 1 package (8 oz.) cream cheese
  • 1/4 cup sugar
  • 1 egg yolk
  • 2 tsp fresh lemon juice
  • 1 tsp vanilla
  • Pinch of salt

Directions

  1. Blend all of the blintz ingredients together using an immersion blender or electric hand mixer to ensure there are no lumps.
  2. Warm up a nonstick skillet or a crepe pan on medium heat until hot. The pan is ready when a drop of water sizzles on the surface of the pan.
  3. Butter the entire surface of the hot pan.
  4. Pour the blintz batter by 1/3 cupfuls into the center of the pan, then tilt the pan in a circular motion till the batter coats the entire bottom of the pan in a large, thin circular shape.
  5. Cook the blintz wrapper for about a minute, until edges are dry and tiny bubbles form in center. Flip the wrapper and cook for another 30 seconds. Use a spatula to remove from pan and place on a plate.
  6. After wrappers are cooked, make the filling.
  7. Place all filling ingredients in a medium bowl and mix thoroughly with a fork. Filling can be slightly lumpy.
  8. To fill wrappers, place a heaping tablespoon of filling onto center bottom third of wrapper. Fold bottom of wrapper up over filling. Fold in left and right sides. Finish rolling like a burrito.
  9. When all blintzes are stuffed and rolled, heat up oil in a frying pan on medium heat.
  10. Fry blintzes in oil, flap side down for 2 minutes, or until golden brown. Flip blintzes and brown on other side for 2 minutes, or until golden brown.
  11. Serve warm with sour cream and applesauce or homemade jam.

Recipe adapted from TheShiksa.com

Maple Pecan Pumpkin Pie

Pumpkin Pie with Pecans & Maple Syrup_n

Crunchy pecans drenched in maple syrup add an inviting twist to this classic autumn and wintertime dessert.

Two hundred miles north of the Arctic Circle, we’re a long way from the closest pumpkin patch, and at $65.00 and up, the pumpkins brought into the Native Store for Halloween didn’t tempt us. But Jack kept his eye on them, and as predicted, the day after Halloween the price fell by half. We held out a few days beyond that and the prices dropped another 50%. One of the wonderful things about squashes and pumpkins is that they keep well, and so we purchased a 17-pound beauty no worse for the extra week or two it had spent on the store shelves for only $18.00. Jack then set to work cutting up and roasting the pumpkin, seeds and all. The seeds were tossed with olive oil, garlic, salt, and a blend of Italian seasonings. Crisp, crunchy and zesty, they were devoured immediately. The pumpkin was roasted plain and then puréed with several uses in mind.

I used the first two cups of pumpkin purée to create a pie inspired by the superb Pennsylvania maple syrup that a friend had sent to us. Along with a healthy dollop of bourbon, maple syrup is the perfect compliment to the flavors in pumpkin pie filling. The pecans in this recipe come out sweet, light and crunchy.

Maple Pecan Pumpkin Pie

Ingredients

Filling:

  • pastry crust for one 9-inch pie
  • 3 eggs
  • 2 cups pumpkin purée
  • 1 cup heavy whipping cream
  • 1/4 cup maple syrup
  • 2 tsp vanilla extract
  • 1/4 cup granulated sugar
  • 1 tsp ground cinnamon
  • 1/2 tsp ground ginger
  • 1/2 tsp mace
  • 2 tbsp bourbon (optional)

Pecan Topping:

  • 1 tbsp unsalted butter, melted
  • 3 tbsp firmly packed brown sugar
  • 3 tbsp maple syrup
  • 1/4 tsp cinnamon
  • 1 cup pecan halves

Directions

  1. Preheat oven to 425 degrees F.
  2. Line a 9-inch pie pan with pastry crust.
  3. In a large mixing bowl, beat eggs until frothy.
  4. Add pumpkin, whipping cream, maple syrup, vanilla, sugar, cinnamon, ginger, and mace. Beat well to mix. Pour mixture in the pastry-lined pie pan.
  5. Bake for 40 minutes.
  6. Meanwhile, make pecan topping. Combine butter, sugar, syrup, and cinnamon. Mix thoroughly.
  7. Add pecan halves to topping mixture. Stir well.
  8. After pie has baked for 40 minutes, arrange pecan topping on top of pie.
  9. Cover edges of pie with foil to prevent burning and return pie to oven. Continue baking for 20 – 25 minutes, or until a knife inserted in the center of pie comes out clean.
  10. Remove from oven and cool on a wire rack.
  11. Cover and refrigerate within 2 hours.

Adapted from The Baking Pan

Chocolate Chip Yogurt Cookies – It’s All About the Penzeys Dutch Processed Cocoa

These dark, rich, chocolatey cookies disappeared within 24 hours of their creation. 

For this season in the Alaska bush, we ordered most of our spices and seasonings from Penzeys Spices. Whether we’re using their smoked chipotle chili peppers in a squash soup, the Italian seasoning blend we make from a combination of their herbs and spices, or a cup of hot cocoa, the quality of Penzeys’ products has been notable. In these cookies, its Penzeys’ Dutch-processed cocoa that takes them to a higher level.

By the way, yogurt is easy and economical to make in your own kitchen!

Chocolate Chip Yogurt Cookies

Ingredients

  • 1 cup all purpose flour
  • 1/2 tsp baking soda
  • 5 tbsp unsalted butter
  • 7 tbsp dutch processed cocoa
  • 2/3 cup granulated sugar
  • 1/3 cup brown sugar
  • 1/3 cup plain yogurt
  • 1 tsp vanilla extract

Directions

  1. Preheat oven to 350 degrees F.
  2. Measure flour and baking soda into a medium bowl. Set aside.
  3. Melt butter in a large pan over medium heat. Remove from heat.
  4. Stir in cocoa and sugars.
  5. Add yogurt and vanilla. Mix well.
  6. Add flour just until combined.
  7. Drop by tablespoon onto parchment-covered baking sheet, about 2 inches apart.
  8. Bake for 8 – 10 minutes. Cool on pan for a few minutes until firm. Finish cooling on wire racks.

Adapted from Myrecipes.com.

A Cookbook for the Ages: Pumpkin and Pecan Pies from Craig Claiborne

Stained and well-worn, a favorite cookbook is like an old friend. 

I bought my copy of Craig Claiborne’s The New York Times Cookbook in 1984, just after finishing an enlistment in the navy. At the time, I couldn’t do much in the kitchen beyond heating up a can of soup or frying eggs and bacon and the trout I caught. Even these modest attempts at cooking typically ended in less than satisfactory meals: eggs crusty and rubbery on one side and undercooked on the other, hit and miss bacon, and the trout… well, those noble fish deserved a more able chef.

I was rapidly growing tired of a rotation of dinners centered around hotdogs, frozen this or that, and canned glop. I loved good food, but the kind of well-executed cooking I occasionally treated myself to at fine restaurants seemed a million miles away.

My problem, as I look back on those days, is clear: I had no theory. And so, even when I did get something right – a hamburger reasonably well-seared and juicy, perfect bacon, or even an especially good fried egg, I didn’t know why it came out better than other efforts.

When I bought Claiborne’s book, the first thing I did was to pour over the first 44 pages, the chapter titled De Gustibus (regarding taste). The next thing I did was tackle his recipe for Chili con Carne with Cubed Meat. To my surprise and joy, it came out great; I was on my way to becoming a self-taught chef.

These days, my cookbook collection includes volumes on everything from Japanese fusion to regional American cooking, and of course now there’s the Internet as well. By modern standards, Claiborne’s 751-page tome – without a single photograph – is antiquated. But he offers something that has proved far more valuable than photos: from cover to cover The New York Times Cookbook is seasoned with anecdotes, insights, observations and theory that expand and deepen one’s appreciation of selecting, preparing, presenting and enjoying food.

A caveat regarding his approach to food is that Claiborne cooked with generous amounts of fat and sugar, and, comparatively speaking, not a great variety of spices. Recipes are suggestions, and most readily lend themselves to modification.  So it is with Claiborne’s. In our kitchen, olive oil has largely replaced the copious amounts of butter he calls for, I drain off most of the fat from bacon and other meat rather than cook with it, and I typically cut the sugar by a third or more. Influenced by French cooking, there’s a lot of cream in many of Claiborne’s dishes. Sometimes I go with the full-on amount he calls for; other times I skirt around the cream with substitutions that emphasize other flavors.

The New York Times Cookbook has been the one constant in my kitchen for the past 28 years. It has survived numerous moves, a fair share of food spills and, recently, received a much deserved rebinding.

The following two pie recipes, part of Thanksgiving tradition for many years in my kitchen, are based on those in Craig Claiborne’s The New York Times Cookbook with my own modifications. By the way, both pies are excellent served with whipped cream that has been sweetened with a little sugar and flavored with a dollop of the rum, Grand Marnier or bourbon that went into the pie.

Mississippi Pecan Pie

Ingredients:

  • pastry for a 10-inch pie. Keep chilled till ready to use.
  • 1 1/2 cups chopped pecans
  • 1 cup dark corn syrup
  • 3 tablespoons melted butter
  • 3/4 cup sugar
  • 5 whole eggs
  • 1 tsp vanilla extract
  • 2 tbsp dark rum, Grand Marnier,  or quality bourbon

Directions:

  1. Place a baking sheet in oven and preheat to 350 degrees F.
  2. Combine the corn syrup and sugar in a saucepan and cook over low heat, stirring until sugar is completely dissolved. Let cool a little, but don’t let it crystalize. You want it warm rather than piping hot so it doesn’t cook the eggs when you add it to the egg mixture.
  3. Beat the eggs in a mixing bowl. Gradually add the sugar mixture. Continue beating and add the other ingredients.
  4. Pour the mixture into the pie shell. Bake for 50 minutes to an hour, or until the pie is set. You may need to use a pie ring or aluminum foil to keep the edge of the crust from burning.
  5. Let cool. Serve with whipped cream.

———————————————————————-

Pumpkin Cream Pie

Ingredients:

  • pastry for a 10-inch pie. Keep chilled till ready to use.
  • 3 cups fresh pumpkin purée (Small “sugar” pumpkins are the best, but the big pumpkins work well, too.)
  • 1/2 cup sugar
  • 1/2 tsp salt
  • 1/2 tsp grated nutmeg
  • 1/4 tsp grated cinnamon
  • 1/4 tsp ground ginger (or use 1 tsp freshly grated ginger)
  • 3 large eggs, lightly beaten
  • 1 cup heavy cream
  • 2 tbsp good bourbon

Directions:

  1. Place a baking pan in oven and preheat to 425 degrees F.
  2. Combine the remaining ingredients in a bowl. Blend thoroughly and pour into pie shell.
  3. Bake for 15 minutes.
  4. Reduce heat to 350 degrees F. and bake for an additional 40 minutes, or until the filling is set.
  5. Let cool and serve with whipped cream. (Without whipped cream, pumpkin pie makes for a wonderful breakfast. Try a slice with a fried egg on the side.)

Tis the Season for Cranberry Bliss Bars

Sweetened dried cranberries and white chocolate chips pair up in a dessert especially appropriate to the winter holidays.

People in our generation sometimes still flinch a little when cranberries are mentioned – as they invariably are here in America – around holiday time. Gloppy canned cranberry sauce heated (or not) and served alongside such tasty items as turkey dressing, rutabaga with raisons and mashed potatoes with giblet gravy were, for many of us, the original “I don’t want any of that touching the rest of my food” item. It was always something of a puzzle to me. The packages of whole, fresh cranberries at the grocery store looked so pretty. Why didn’t the grownups use those? It seemed that the advent of mass-produced, mass-marketed food had caused generations of Americans to forget what real cranberries taste and look like, and a debased form of the fruit was kept on menus as a nod to tradition rather than gustatory pleasure.

Years later, we discovered the pleasure of cooking with whole, fresh cranberries in our own kitchens, and dishes such as cranberry sauce with tangerines became a much anticipated Thanksgiving and Christmas-time tradition. The tart, bright-red berries sweetened with sugar and cooked on the stovetop are the perfect accompaniment to a holiday bird that has been brined overnight and roasted to perfection.

While the following dessert uses dried cranberries rather than fresh, it keeps our cranberry tradition going strong here in the Alaskan Arctic where the local grocer doesn’t carry fresh berries. If you’ve never had a really great cranberry dish, forget everything you thought you knew about these festive berries. You’ll want to save room for this scrumptious cranberry dessert!

Cranberry Bliss Bars

Ingredients

Cake:

  • 3/4 cup unsalted butter, softened
  • 1  1/4 cups packed brown sugar
  • 3 eggs
  • 1 tbsp ground ginger
  • 1  1/2 tsp vanilla extract
  • 1  1/2 cups all purpose flour
  • 1/2 tsp baking powder
  • 3/4 cup dried cranberries (we used Craisins, which are made from cranberries and sugar)
  • 4 oz. white chocolate chips

Frosting:

  • 5 oz. cream cheese, softened
  • 3 cups powdered sugar
  • 5 tsp lemon juice
  • 1 tsp vanilla extract
  • 1/4 cup dried cranberries (Craisins)

Drizzle:

  • 1/2 cup powdered sugar
  • 1 tbsp milk

Directions

  1. Preheat oven to 350 degrees F.
  2. Butter 9 x 13 inch glass baking dish.
  3. Beat butter and brown sugar until smooth.
  4. Incorporate eggs, one at a time, into butter mixture.
  5. Mix in ginger and vanilla.
  6. Gradually mix in flour and baking powder.
  7. Fold in craisins and white chocolate chips.
  8. Pour batter into baking pan. Even out batter so that it is uniformly on bottom of pan.
  9. Bake for 25 – 30 minutes, or until lightly browned on top.
  10. Let cake cool in pan on wire rack.
  11. Make frosting by mixing cream cheese, powdered sugar, lemon juice and vanilla extract with an electric mixer until smooth.
  12. When cake has cooled, spread frosting evenly over the top of the cake.
  13. Sprinkle  1/4 cup craisins on frosting.
  14. Make drizzle icing by whisking powdered sugar and milk.
  15. Fill small Ziploc bag with drizzle icing. Cut off a small piece of the bottom corner of bag. Squeeze out drizzle icing over the frosted cake in zig-zags.
  16. Cover cake and refrigerate for a couple of hours.
  17. Slice the cake down the middle, lengthwise. Then slice the cake across the width, three time. You will have 8 rectangular pieces. Cut each of these pieces in half, diagonally, to make 16 decorative pieces.

Recipe adapted from topsecretrecipes.com.

Chasing the Elusive Perfectly Flaky Crust: Double-Crust Apple Apricot Pie

This rustic-style pie evoked images of apron-clad moms setting out steaming-hot baked goods on windowsills to cool. The scent of baked apple and cinnamon filled the entire house, contributing to the sense of nostalgia.

I’d always heard that baking the elusive flaky pie crust was so difficult, it wasn’t worth the time and effort. The standard advice was, “Buy pre-made crusts. They’ll come out better.” But as someone who has baked her own graham crackers, I wasn’t so easily deterred.

After doing some research, I began to understand why people shied away from making their own crusts. Fastidious attention to temperature of the ingredients seems to be the key. My first crusts came out fairly decent, but I wasn’t completely happy with the texture. Then this month’s Food & Wine magazine ran an article about making a perfectly flaky crust.

Along with directions for “perfectly flaky butter pie dough,” the magazine also had a recipe for a double-crust apple-apricot pie. Perfect! Granny Smith apples are available at our Native Grocery Store, and dried apricots are a staple in our pantry. The finished pie came out of the oven steaming with the scent of apples and apricot and with a golden-brown crust puffed up into a flaky  top.

Double-Crust Apple-Apricot Pie

Ingredients

  • 1 tbsp all-purpose flour
  • dough for two pie crusts (see link below for pie crust recipe and directions)
  • 1 egg white, beaten
  • 5 large Granny Smith apples, peeled, cored, quartered, and cut into thick slices
  • 1/2 cup granulated sugar
  • 1/2 cup diced dried apricots
  • 1 tsp finely grated orange zest
  • 1 tsp ground cinnamon

Directions

  1. Roll out a little more than half of the dough into a 13-inch disc. Transfer to a 9-inch glass pie dish.
  2. Roll out the remaining dough into a 12-inch disc and keep in refrigerator until you are ready for it.
  3. Preheat oven to 400 degrees F.
  4. In a large bowl, toss together apples, apricots, orange zest, flour, cinnamon and sugar.
  5. Pour apple mixture into crust.
  6. Brush edge of crust with egg white. This will help seal the two crusts together.
  7. Place second pie crust on top of first. Trim edges and decoratively crimp. Cut slashes in top crust to allow steam to vent.
  8. Place oven rack on lower third of oven. Place pie on a baking sheet and put in over to bake for 1 hour. Cover edges of pie with a pie ring or aluminum foil during last 20 minutes of baking to prevent burning.
  9. Remove pie from oven and allow to cool before serving.

We served this pie with extra rich vanilla ice cream, which was excellent. A slice of sharp cheddar cheese is another traditional option.

Recipe adapted from Food & Wine Magazine, November 2012 issue.

Pear and Ricotta Tart

Creamy, sweetened homemade ricotta cheese makes for a lighter, healthier delicious alternative to cream cheese in this cheesecake-like tart. In this version, slices of pears have been brushed with peach preserves prior to baking.

I was surprised how easy it was to make a ricotta-style cheese at home. My first batch of ricotta went into Jack’s moose cannelloni. A second batch was split between blintzes and a pear and ricotta tart. Infused with vanilla, the beaten egg and ricotta base was smooth, creamy and light. The sliced pears were brushed with a vanilla peach jam which added another subtle layer of flavor.

Pear and Ricotta Tart

Ingredients

  • pie crust
  • 2 cups ricotta cheese
  • 3 eggs
  • 1/2 cup granulated sugar
  • 1 tsp vanilla extract
  • 2 d’Anjou pears, halved, cored and sliced
  • 1 heaping tbsp of peach preserves

Directions

  1. Preheat oven to 375 degrees F.
  2. Press pie dough into a 9-inch springform pan and bake for 5 minutes then remove from oven.
  3. Reduce oven heat to 350 degrees F.
  4. Beat together ricotta, eggs, sugar and vanilla.
  5. Pour ricotta mixture into pre-baked pie shell.
  6. Arrange sliced pears on top of ricotta mixture.
  7. Brush pears with preserves.
  8. Bake for 50 minutes, or until tart no longer jiggles in the center.
  9. Let cool. Cover and place in refrigerator until ready to serve. Remove from springform pan just before serving.

White Chocolate Chip Cherry Pecan Chunk Cookies

Cookies bursting with chewy cherry chunks, white chocolate chips and delicious pecans are so good straight from the oven and even better a couple of days later… if they make it that long! 

It was a cold, overcast afternoon 200 miles north of the Arctic Circle. After two late nights of work in a row, we  were rewarded with a two-hour head start on our weekend. All we needed was a cup of hot tea and some warm cookies to go with. What? No cookies? A quick perusal of the pantry revealed a bag of white chocolate chips, dried cherries, and pecan halves. Don’t worry, Jack, fresh warm cookies are on the way!

White Chocolate Chip Cherry Pecan Chunk Cookies

Ingredients

  • 12 tbsp unsalted butter, softened
  • 1 cup packed brown sugar
  • 1/2 cup granulated sugar
  • 2 eggs
  • 1 tsp vanilla extract
  • 3 cups all-purpose flour
  • 1 tsp baking soda
  • 2 tbsp milk
  • 1 cup chopped pecans
  • 1/2 cup dried cherries, chopped
  • 1 cup white chocolate chips

Directions

  1. Preheat oven to 350 degrees F.
  2. Cream together butter and sugars.
  3. Mix in eggs, one at a time.
  4. Mix in vanilla.
  5. Mix in milk.
  6. In a separate bowl, combine flour and baking soda.
  7. Stir flour into butter mixture until just combined.
  8. Use same bowl as flour to mix together nuts, cherries, and chocolate chips.
  9. Stir nut mixture into dough, until just combined.
  10. Drop by tablespoons onto parchment-covered baking sheets.
  11. Bake for 11 minutes.
  12. Let cool on wire racks.

Recipe adapted from food network.com.

Brown Sugar and Butter Plum Upside Down Cake – for Breakfast or Dessert

Persimmon slices add a splash of fall orange to a breakfast that will get you ready for weekend chores. 

For most of the year, we rely on the fresh fruits and vegetables that make their way up to Point Hope by way of  the school and the Native Store. This means most of the fresh fruit we get is of the type that travels well – apples, pears and occasionally kiwis. This week, purple plums arrived. They were a bit on the hard side, so instead of gobbling up our coveted fresh fruit right away, Jack and I set them aside to ripen with thoughts of baking something interesting.

The result was this scrumptious upside down plum cake featuring ample amounts of brown sugar and butter. A friend returning to Point Hope from the big city (Anchorage) brought back fresh persimmons, Jack fried eggs seasoned with his special blend of Italian herbs, and breakfast was on. This cake went equally well with homemade extra rich vanilla ice cream for an after dinner dessert.

Brown Sugar and Butter Plum Upside Down Cake

Ingredients

  • 12 tbsp softened unsalted butter
  • 1/2 cup packed light brown sugar
  • 5 medium plums, pitted and sliced
  • 3/4 cup granulated sugar
  • 1 tbsp lemon juice
  • 3 eggs
  • 1  1/3 cup all purpose flour
  • 1  1/2 tsp baking powder
  • 1/4 tsp salt
  • 1 tsp cinnamon
  • 1/2 cup whole milk

Directions

  1. Preheat oven to 350 degrees F.
  2. Place 4 tablespoons of butter in an 8-inch square cake pan and heat in oven until butter is melted.
  3. Remove pan from oven and sprinkle brown sugar evenly on bottom of pan.
  4. Arrange plum slices on top of brown sugar and set aside.
  5. In a large mixing bowl, cream remaining butter with sugar and lemon juice. Add eggs, one at a time, beating until combined.
  6. In a medium bowl, mix together flour, baking powder, salt and cinnamon.
  7. Add about 1/3 of flour mixture to butter mixture along with about 1/3 of the milk. Mix together. Repeat with second 1/3 and third 1/3 of flour and milk.
  8. Pour cake batter over plums. Spread evenly.
  9. Bake until a toothpick inserted in center of cake comes out clean, about 40 minutes.
  10. Let cool 10 minutes.
  11. Invert onto serving dish. Let cool slightly before serving.

Recipe adapted from the Cake Duchess.