Wildlife Wednesday: The Short, Happy Life of Chippy the Long-Tailed Weasel*

weasel-skull-02-2017-n

Alas, poor Chippy. I knew him, Barbra; a fellow of infinite jest; of most excellent fancy…

I was probably about 12 when I read Jean Craighead George’s My Side of the Mountain. In this book, which surely ranks as among the greatest adventure stories for young people ever written, the 15-year-old protagonist, Sam, leaves his parents’ confining New York City apartment and strikes out for his great grandfather’s abandoned farm in the Catskills. There, he takes up residence in a hollow Hemlock Tree, catches trout, raises a Peregrin Falcon and…

Finds a weasel in a box trap he’d set in hopes of catching animals for sustenance. Sam allows the weasel to come and go as it pleases. The weasel hangs around and Sam bestows on it the name Barron for its bold, confident demeanor. How cool. wanted a weasel like that.

Imagine my thrill when, shortly after moving into our place here in Chignik Lake, one of these spry little fellows practically ran across my foot as he darted past me and dashed under the steps of our Arctic entrance as I opened our front door. The steps, while inside the foyer, are open and the foyer itself sits atop earth. It is a haven for voles, shrews and, of course, weasels. Chippy (I named him or her almost immediately) spun around, sat up and looked at me through the steps. What a handsome, self-assured creature with those large eyes, round ears, pink nose and whiskered face, dapper in a brown coat and white underbelly. In truth, I only saw Chippy a couple of times after that, and only for the briefest of moments each time. Nonetheless…

We had a weasel living with us.

But winter came, and neither of us had seen Chippy for quite some time. Occasionally in the early morning after a fresh snowfall, we’d see weasel tracks and although they could have belonged to any number of weasels (there is no shortage of them here in the village), we liked to imagine they were Chippy’s, evidence of happy nights spent chasing voles and other small creatures.

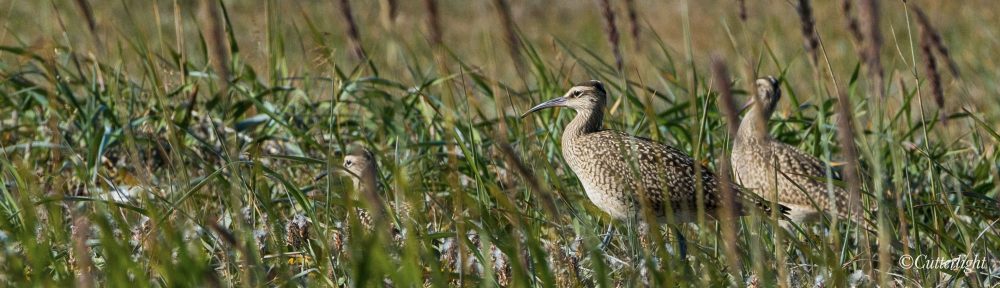
Meanwhile, the area beneath the owl trees has become a veritable boneyard. Magpie feathers, skulls and wishbones litter the ground along with smaller avian skulls, vole-sized pellets of mashed together bone, teeth and fur, jawbones of small mammals and…

The skull of a weasel. We’re very happy that our resident Great Horned Owls are making it through this unusually cold winter, but… Chippy, we hardly knew ye.

Short-tailed Weasel, Mustela erminea (Photo Credit: Steve Hillebrand, USFWS on Wikipedia)
Also known as Stoats and Ermine, Long-tailed Weasels are related to otters, mink, martens and wolverines. Although they’re only about 10 inches long (25 cm) from nose to tail tip, like their biological cousins, they are fierce predators, sometimes preying on much larger animals. In winter, their fur becomes snow white except for the tip of their tail which remains black. Six years is a long life for a Short-tailed Weasel.

*It is unlikely that the skull we found beneath the White Spruce Grove is actually Chippy’s – or that this is the only weasel Chignik Lake’s Great Horned Owls have dined on.

Fans of Shakespeare will recognize this passage from Hamlet’s musing on mortality as he holds in his hand the exhumed skull of a favorite court jester, Yorick.

This is the first article for Wildlife Wednesday, a new column on Cutterlight. Stay tuned (or sign up) for weekly articles on birds, mammals, insects, wildflowers and more.

Ink and Light: “Amber Eyes” with a quote by Sir David Attenborough

amber-eyes-11-16-2012-n

Amber Eyes: Arctic Fox, Point Hope, Alaska

The thick, soft fur of the Arctic Fox is the most efficiently warm of any land mammal.

It seems to me that the natural world is the greatest source of excitement; the greatest source of visual beauty; the greatest source of intellectual interest. It is the greatest source of so much in life that makes life worth living.
David Attenborough – BBC Life documentary series, 2009

Knighted in 1985, Sir David Attenborough turned 90 in 2016. The world’s most recognized narrator of natural history films, he remains in possession of amazing vitality.

Roasted Moose? Put it in a Pie and serve it with a Nut Brown Ale

moose-pie-2-01-17-n

Tender roasted moose, caramelized onions, potatoes, parsnips and mushrooms pulled together with moose gravy, topped with a flaky, golden-brown crust and served with our home-brewed Nut-Brown Ale. That’s how we do it in Alaska.

This has been a good year for moose hunting in Chignik Lake, and while I’m not sure we’d know what to do with a twelve-hundred pound bull, anytime a friend offers up a few pounds, we’re in. This moose pie is a long-standing favorite recipe, easily adapted for other wild game or beef. Start with a pound of tender roast, toss in your favorite vegetables, add time-tested seasonings and a little gravy, top with a savory pie crust and bake at 375° F for about 25 minutes. Serves four Alaska-sized appetites.

Rustic Moose Pot Pie

Ingredients

  • 1 3/4 cups beef broth or moose broth
  • 1 bay leaf
  • 1 teaspoon dried rosemary
  • 1 2/3 cups potatoes, cut into 1/2″ cubes, skin on
  • olive oil
  • 1/3 cup flour
  • 1 pound roasted moose meat, cut into 1/2″ cubes
  • 1/2 cup sweet corn
  • 1/2 Brussels sprouts, quartered
  • 1/2 cup carrots, sliced into discs or chopped coarse
  • 1/2 cup parsnips, sliced 1/4 inch think x 1/2 inch
  • 1/2 onion, cut into slices and caramelized
  • 1/2 cup mushrooms, chopped coarse
  • 1/2 rounded teaspoon cumin
  • 1 teaspoon dried sage
  • 1/2 teaspoon thyme
  • several generous grinds freshly cracked black pepper
  • salt, to taste

Directions

  1. Place a baking sheet on the center rack of oven and preheat to 375 °F (190° C).
  2. Place broth in a pot, add bay leaf. Taste to determine if salt needed.
  3. Add potatoes. Simmer potatoes till just tender, but do not overcook. Save broth and remove potatoes to a large bowl.
  4. Meanwhile, in a large frying pan, add olive oil to cover bottom and bring to sizzling hot over medium/medium-high heat. Brown the mushrooms, remove and set aside. Add onions. Season with salt and pepper and cook till caramelized. Remove onions and set aside.
  5. Add additional olive oil to frying pan as necessary and continue heating over medium heat. Add Brussels sprouts, parsnips and carrots. Season with salt and pepper. Cook till Brussels sprouts are browned and all vegetables are just tender, stirring occasionally. Remove vegetables from pan and add to bowl with potatoes.
  6. Over medium-low heat, place approximately 4 tablespoons olive oil into a small frying pan. When oil is heated but not sizzling hot, briskly stir in flour a little at a time. Continue stirring until mixture thickens. Remove from heat.
  7. Heating beef broth over medium heat, stir in oil and flour mixture. Combine thoroughly. Simmer till reduced to a thick gravy.
  8. To the bowl that already has the potatoes and vegetables, add the moose meat, mushrooms, gravy and the remaining seasonings and mix together. (There are a number of ways to make a thick gravy. Try using a dark ale to deglaze the pan you used for roasting the moose.)
  9. Pour meat and vegetable mixture directly into a deep pie dish. Cover with a crust. Be sure to make holes in the crust to allow steam to escape. Brushing on a beaten egg will help create a golden brown crust.
  10. Place on baking sheet and bake at 375 °F for 25 – 30 minutes or until crust is golden brown.

Although a full-bodied red wine such as an old vine Zinfandel, Malbec or Cabernet is a classic choice with this dish, a full-bodied ale pairs equally well.

Fine Dining for Two: Broiled Char or Trout

broiled-char-n

A hint of thyme compliments the delicate flavor of wild char, one or our favorite fish. No wild fish available? Look for Arctic Char at the fish market. They get high marks for being responsibly farmed and are delicious.

There’s something about wild char and trout that calls to simplicity. Among all species of fish, they are among the most demanding of unspoiled environments. Where streams, rivers and lakes are clean and lightly trammeled, these species often thrive, both their numbers and the setting they inhabit evoking bygone times. It is in such settings that light harvest of a few fish is sustainable.

When presented with such fish in the kitchen, the most basic ingredients are all that is wanted. Salt and butter, perhaps a little pepper or a pinch or two of an aromatic herb. A little lemon can be nice, too. Root vegetables such as potatoes, parsnips or rutabaga roasted or pan fried in olive oil and soy sauce make the perfect accompaniment on the serving platter.

Broiled Char or Trout for Two

Ingredients

    • 1 char or trout of about 16 to 18 inches (40 – 45 cm) (between 1 and two pounds, dressed)
    • fine sea salt (we use Grey Sea Salt in all of our salmon and trout recipes)
    • two light pinches of dry thyme (or about double that if you have fresh)
    • 1 lemon cut into thin slices, peel cut away
    • butter, sliced into thin pats
    • olive oil or canola oil
    • broiling pan. We use a Swiss Diamond cast iron griddle for this kind of broiling.

Directions

    1. Place a broiling pan near the top shelf in the oven and preheat on broil. You want the pan to be very hot when the fish is placed on it. This prevents the fish from sticking. Do not oil the pan yet.
    2. Rinse the fish in cold water and dry with paper towels. Make sure the gills and viscera have been removed.
    3. On a cutting board or platter, position the fish with its it’s open belly toward you.
    4. Using a very sharp knife, cut shallow, oblique slashes spaced about an inch apart (2.5 cm) down both sides of the fish. You want to break the skin without cutting all the way through to the body cavity.
    5. Rub fish inside and out with fresh lemon juice.
    6. Salt the fish inside and out. Sprinkle a little thyme inside the cavity on the sides.
    7. Place a few thin slices of butter inside the cavity and on top of the fish’s side.
    8. Place pieces of lemon on top of the fish’s side.
    9. Spread olive oil on broiling pan. A basting brush works well for this. Return pan to oven for about a minute to ensure that oil is very hot.
    10. Place fish on broiling pan or griddle. The fish should really sizzle when it hits the pan. Once the fish is on the pan, do not move it. (Moving a fish just after it hits a pan can cause it to stick to the pan.) Return to the oven and broil for 5 minutes.
    11. Remove pan from oven and gently flip the fish. Do this by rolling the fish on its back using spatulas. This will prevent the cavity from draining. Place additional pieces of butter and fresh slices of lemon on the up side of the fish and return to the oven. Broil for 3 or 4 more minutes.
    12. The fish is done when the slashes have opened, the skin is golden brown, the tail is crisp and the eyes are opaque.
    13. Serve with roasted root vegetables on warmed plates. Compliment with a light Chardonnay or a crisp ale.

Winter Landscape in Black and White: Spruce Tree with Mountain

spruce-tree-w-mountain-bw-copy-n

I made this photo just a few feet from my home in Chignik Lake. The challenge was to somehow clean up the assortment of utility poles, wires, satellite dishes and the dissonant array of scrub alder closer to eye level. I actually knew as soon as this assignment (Winter Landscape in Black and White – the second weekly assignment from Outdoor Photographer magazine) was posted the scene I wanted to shoot. I put on a long lens, waited for the right light, and got this frame.

Next Thursday: Patterns of Winter


Uni & Ikura Amuse Bouche (Sea Urchin & Salmon Roe)

sea-urchin-amuse-bouche-n

Fresh from the sea, uni and ikura create a salty, savory combination.

Much as is true of most Japanese people, most Alutiiqs love virtually anything harvested from the sea. From octopus to chitons (locally known as bidarki), if it’s fresh from the ocean it’s likely to find its way onto the menu here in Chignik Lake. Sea urchins are highly prized.

And there’s really nothing to preparing them. Insert a small knife into the opening on the bottom of the shell, cut the shell open, and remove the bright yellow lobes, which are the urchins’ reproductive organs.  (They are not roe.) Most people are careful to remove the dark colored matter inside the shell, but the urchins we had were small and including this substance added, we thought, both a subtle additional flavor and contrasting color. In Alaska, we almost always have a jar or cured salmon roe on hand. This bright, salty, translucent salmon caviar is a perfect finishing touch on many dishes. For a popular recipe for making your own ikura, click here.

Oh, Daddy! Umami! Clam Fettuccine and Sea Urchin Amuse-Bouches

dorner-bay-clams-n-urchins-n

Fresh sea urchin appetizers, clams still wet with Chignik Bay brine, freshly made fettuccine, and  home-brewed Bavarian Weissbier – Ringing in 2017 Off the Beaten Path. Oh, Daddy! Umami! (Recipe below)

clam-fettucini-dorner-bay-n

When a friend showed up at our door on New Year’s Eve with a big bowl of fresh-from-the-sea clams and sea urchins, we immediately began planning out a celebratory dinner to greet 2017. While Barbra whipped up two servings of fettuccine, I set to work cleaning and preparing the seafood. A carafe of hot sake might have been perfect, but Barbra’s medium-bodied, slightly citrusy, Weissbier proved to be an excellent compliment to a shellfish feast that couldn’t have been any fresher.

sea-urchin-amuse-bouche-n

Umami Power: Sea urchin topped with salmon roe. Note to self: Stock a few bottles of sake for these occasions!

Clam Fettuccine for Two: This is a simple yet elegant dish. The standard butter and garlic mixture really comes to life with the addition of tarragon and a dash or two of grey sea salt.

Ingredients

  • Fettuccine
  • Cherrystone Clams, Butter Clams, Cockles or Ark Clams, rinsed to remove any debris. Clams should be closed tight. If a clam isn’t closed, give it a few vigorous taps. If it still doesn’t close, discard it, as it’s dead and may be unfit to eat.
  • Butter, preferably unsalted
  • Olive Oil
  • 4 large cloves of Garlic, chopped fine
  • 1/2 tsp dried Tarragon crumbled fine (or 1 tsp fresh chopped)
  • 1/4 tsp Coarse Grey Sea Salt
  • Nori (dried laver) cut into thin strips for garnish

Directions

  • Prepare the fettuccine as you normally would. Drain and then return to the pan with a little olive oil and toss together. This will prevent the noodles from sticking together.
  • In a small pan, heat about 6 tablespoons of butter and 2 tablespoons of olive oil over medium-low heat. Once butter has melted, place on very low heat to keep warm. Just before serving, return to medium heat, add the garlic, tarragon and sea salt and briefly cook while stirring. In about 30 seconds, you’ll begin to smell the aromas of the garlic and tarragon. Provided you have chopped the garlic fine, that’s all the cooking it needs.
  • Meanwhile, place clams in a metal strainer – one that will fit into a larger pot. Add an inch or so of water to the pot and place clams in strainer inside pot. The clams should be above the water so that they steam rather than boil. (Hint: If you place the clams inside a heat-proof bowl inside the strainer, you can save the juice from them as they steam open. The juice can be used in soups, sauces or in Bloody Mary Cocktails.) Cover clams with a lid and bring water to a boil. When clams are cooked, the shells will pop open. This generally takes about five minutes.
  • Meanwhile, place clams in a metal strainer – one that will fit into a larger pot. Add an inch or so of water to the pot and place clams in strainer inside pot. The clams should be above the water so that they steam rather than boil. (Hint: If you place the clams inside a heat-proof bowl inside the strainer, you can save the juice from them as they steam open. The juice can be used in soups, sauces or in Bloody Mary Cocktails.) Cover clams with a lid and bring water to a boil. When clams are cooked, the shells will pop open. This generally takes about five minutes.
  • Use a small knife to cut the clam’s abductor muscles away from the shell so that they can be easily eaten, but leave the clam meat inside the shell for a more attractive presentation.
  • Place the fettuccine on serving plates. (It helps to keep plates warm in the oven.) Arrange the clams on the plate. Pour the butter sauce on the clams and pasta. Add nori. Serve with slightly chilled Chardonnay or warm sake.

Improved Gingerbread Cookies – Hold the Molasses

gingerbread-cookies-n

The look and smell of December – warm, spicy gingerbread cookies straight from the oven, or let them cool and frost them for a more traditional treat.

‘Tis the season for hot toddies and gingerbread cookies. Out in the Alaskan bush, we have to plan ahead for any special ingredients. Ginger, yes. Cloves, yes. Molasses? When stocking up our pantry, I was on the fence when it came to molasses. I really don’t like molasses. It’s not a flavor I would normally add to any of my creations. But it is very traditional in a couple of bread and cookie recipes. In Point Hope, we kept it as a pantry item and only used it once over three years. So, I opted against stocking it again here at “the Lake.”

Here it is December, and I have a hankering for gingerbread cookies, but I have no molasses… Throwing molasses to the wind, I altered a gingerbread cookie recipe by upping the ginger and using a combination of honey and pure maple syrup instead of the traditional molasses. The result? A flavorful, spicy cookie with enough “brownness” to satisfy the eye and a flavor to satisfy my December craving. After frosting these little babies and bringing them to my students, I was met with many compliments and requests for more. Who says elementary student palates don’t know what’s good? The adults who sampled the cookies concurred with my young tasters. I patted myself on the back for improving a long-standing recipe and also for avoiding an expedited shipment of molasses from the nearest grocery store – nearly 500 air miles away!

Improved Gingerbread Cookies

Ingredients

  • 1/2 cut unsalted butter, melted
  • 1/4 cup brown sugar
  • 1/4 cup granulated sugar
  • 1/4 cup honey
  • 1/4 cup pure maple syrup
  • 1 egg, beaten
  • 2 1/2 cups all purpose flour
  • 1 tsp baking soda
  • 1/2 tbsp ground ginger
  • 1/2 tsp ground cinnamon
  • 1/4 tsp ground cloves
  • pinch salt
  • Royal icing (optional)

Directions

  1. Mix butter and sugars.
  2. Mix in honey and maple syrup.
  3. Mix in egg.
  4. Sift together flour, baking soda, spices and salt in a large bowl.
  5. Stir butter mixture into flour mixture.
  6. Turn dough out onto a floured work surface and form into two large disks.
  7. Wrap each disk in plastic wrap and refrigerate for at least two hours.
  8. Preheat oven to 400 degrees F (200 degrees C).
  9. Cover baking sheet with parchment paper.
  10. Roll out dough of one disk between two sheets of waxed paper. Dough should be about 1/4 inch thick.
  11. Using cookie cutters, cut out figures. Use an offset spatula to move cookies to prepared baking sheet.
  12. Repeat with remaining dough.
  13. Gather up scraps and roll out and cut as with original dough.
  14. Bake cookies until lightly browned, about 6 minutes.
  15. Let the cookies cool on sheet for about 5 minutes before transferring to wire rack to finish cooling.
  16. Decorate cookies with Royal icing, if desired.

Alaska Gourmet: Pan-Fried Salmon with Herbed Butter on Butternut Squash Ravioli

salmon-on-pumpkin-ravioli-n

Fall food themes continue with this pièce de résistance fit for a king. Chinook salmon holds center stage drizzled with herbed butter and served on butternut squash ravioli. Food stylist extraordinaire Barbra came up with the idea of rolling shaved parmesan into tubes. 

With plenty of sockeye salmon harvested, cleaned and packaged in our freezers, it nonetheless wasn’t a case of “coals to Newcastle” when a friend offered up a couple fat fillets of Chinook. Reds, pinks, chums and silvers – they’re all welcome at our dinner table any time. But kings… with their higher percentage of healthful fat and their decadent melt-in-your-mouth texture… kings are special.  With a batch of butternut and ricotta ravioli in the freezer courtesy of Barbra, I knew just what I wanted to do with one of the fillets. This was as fine a meal as we’ve ever enjoyed. (Barbra promises the pumpkin/squash ravioli recipe will be posted soon!)

This dish goes particularly well with Brussels sprouts, a vegetable we especially appreciate out here in the Alaska bush because they ship well and have a long shelf-life in the refrigerator. Our favorite cooking method is to cut the Brussels sprouts in half lengthwise, toss them in a bowl with olive oil, sea salt and cracked pepper, and then place them cut-side down in sizzling olive oil in a frying pan. Turn the heat down (but make sure they’re still sizzling) and cover the pan. Check, and when the cut side has browned, flip the sprouts to the leafy side. Turn up the heat a little to get things really sizzling again, then turn it back down to a little below medium and cover the pan. The leaves will brown up and caramelize and a few will blacken. They’re ready to be served.

Pan-Fried Salmon with Herbed Butter on Butternut Squash Ravioli

Ingredients (serves 2)

  • 1-pound fillet of any wild-caught Pacific salmon, skin on
  • sea salt
  • black pepper
  • (Optional) mirin or white wine – just a little
  • 2 tbsp butter
  • 1 or 2 shallots, sliced fine
  • 1/2 tbsp tarragon (dried) or 1 tbsp fresh
  • 2 servings worth of ravioli stuffed with pumpkin, squash, mushrooms or light cheeses
  • parmesan cheese, grated or sliced, to garnish
  • Extra virgin olive oil

Directions

  1. Prepare ravioli per directions, timed so that it’s ready when the salmon is ready.
  2. Rinse fillet, pat dry with paper towels and cut into two portions. Inspect for pin bones, which can easily be pulled out with a pair of kitchen pliers. Sprinkle with sea salt and a little black pepper.
  3. Add a tablespoon or 2 of olive oil to a frying pan and turn to a little hotter than medium heat. When oil is ready to sizzle, carefully place fillets in the pan skin side up. Add just a splash of mirin. Cover and cook for 2 minutes, till meat is seared.
  4. Turn salmon over so that it is skin side down. Add another splash of mirin. Turn heat down to just below medium, cover. A general rule of thumb for fish is to cook for about 8 to 10 minutes per inch of thickness. When white substance appears on fillet, it is cooked through. Avoid overcooking.
  5. Meanwhile, over medium-low heat, melt butter in a small pan. Add shallots and tarragon and sauté just long enough to soften the shallots and release the tarragon’s aroma.
  6. Serve ravioli and arrange salmon on top. Spoon on herbed butter.
  7. Serve hot with a couple of fingers of your favorite bourbon.


Perfect Sourdough English Muffins: Easier than You Think!

english-muffins-n

Perfectly round. Perfectly chewy. Perfect little breakfast breads. Why did I quit on you so quickly. my Darlings?

With success under my belt making sourdough bread, I found myself contemplating what other types of delicious baked goods I could make with my sourdough starter. A friend in the village lent me an old Alaskan recipe book with a huge collection of recipes that are truly Alaskan. Did you ever wonder how to cook up beaver meat? Or fireweed stalks? These are just a couple of the interesting recipes found in this volume. Of course, there was a substantial section on sourdough. I don’t know if many people realize this, but sourdough is a very Alaskan thing.  In fact, you can find starters that date back to the Klondike gold rush! It was an easy thing for people of that time to keep fresh starter going. They only had to regularly feed it. Delicious pancakes and breads could then be whipped up in a snap.

Now that I have a healthy starter going (I actually have two, thanks to another friend), I started playing around with recipe ideas that would showcase this unique ingredient. In short order, an idea came to me from a recipe that I’d failed at several years ago…

I got into serious baking when we first came out to the Alaska bush. At that time, we decided to make as much of our food as we could from scratch, knowing that our local store would have limited supplies. We shipped out ingredients in bulk, like 50-pound bags of flour and sugar and 25-pound bags of rice and beans. It was lovely to have a year’s worth of ingredients in our pantry. Lately, I’ve been contemplating how my baking skills and confidence have grown since the days of bread machine loaves and basic chocolate chip cookies to what I turn out in our kitchen now: lattice-topped pies with homemade crusts and my own “Twix” bars in which every layer of the candy is crafted from scratch.

I can’t remember what about my first English muffins was so bad, but I do remember being quite frustrated and promptly turning my back on these little breads. Until now. I’m glad I came around. These round beauties came out better than store bought. They had that lovely sour tang to them, the chewiness that is the hallmark of good English muffins with the expected crunch of cornmeal on the outside. Of course, we split them with forks before serving them toasted with butter and homemade jam. We also use these muffins for tasty breakfast sandwiches of fried egg, salmon, and melting cheddar cheese. As it turns out, these tasty baked breads are actually pretty easy to make. Who knows what wrong I did to this recipe so many years ago.

Sourdough English Muffins

Ingredients

  • 2 tbsp granulated sugar
  • 2 cups warm water (about 110 degrees F)
  • 1 tbsp active dry yeast
  • 7 cups all-purpose flour
  • 1 cup sourdough starter
  • ½ cup nonfat dried milk
  • ¼ unsalted butter
  • 1 tbsp salt
  • cornmeal, for coating

Directions

  1. Combine all of the dough ingredients (except cornmeal) in a large bowl.
  2. Mix and knead. Dough should be elastic and not too sticky.
  3. Place dough in a lightly greased bowl. Cover with plastic and let rise for about 1 hour.
  4. Turn dough out on a lightly flour surface.
  5. Divide dough in half.
  6. Roll dough to about ½ inch thick. Cut into 3” rounds with cookie cutter. Or just cut dough into squares, using a knife.
  7. Re-roll and cut any remaining scraps.
  8. Repeat with remaining half of dough.
  9. Place rounds onto cornmeal-sprinkled baking sheets. Sprinkle with additional cornmeal.
  10. Cover with plastic wrap and let them rise for another hour.
  11. Preheat a large griddle over medium-low heat.
  12. Place as many muffins as you can (without crowding) on griddle.
  13. Cook muffins for 10 minutes on each side.
  14. Remove muffins from griddle and cool on a wire rack. Store tightly wrapped at room temperature for about 5 days. Freeze for longer storage.

Recipe adapted from King Arthur Flour.