Unknown's avatar

About Jack & Barbra Donachy

Writers, photographers, food lovers, anglers, travelers and students of poetry

Winter Sunshine – Honey Almond Cherry Nougat

Honey Almond Cherry Nougat_n

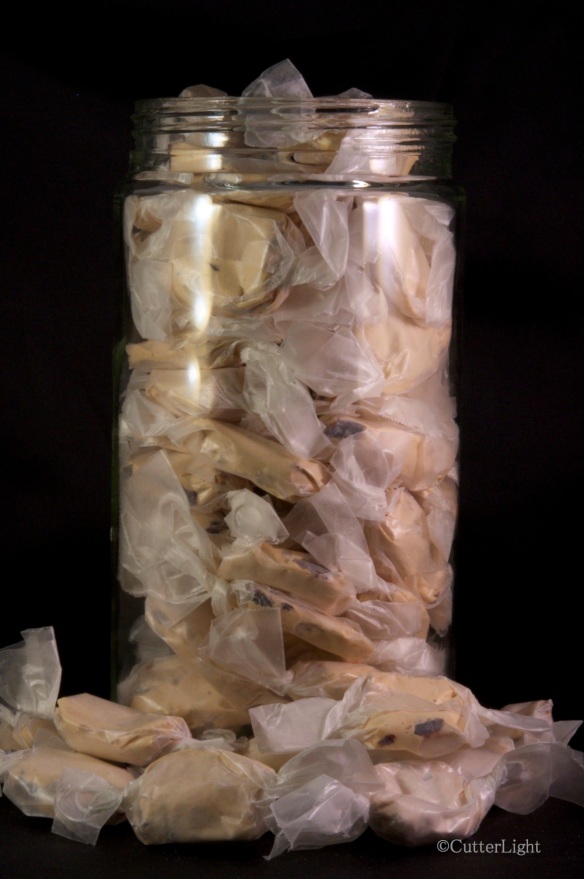
Chewy honey-flavored candy flecked with bits of cherries and almonds provides for fun in the kitchen and tasty results.

Locked in the heart of winter, it’s dark most of the day north of the Arctic Circle. Cold, too. And if the dark and cold don’t make you want to stay inside with a good book or movie, the infamous Point Hope wind will. (It’s 9° F and blowing 40 miles an hour for a windchill of about -20° F as I write this – and that’s not particularly cold for this time of year.) Some people suffer from the lack of sunshine up here. Our kitchen is our winter sunshine. It fills our home with warmth, good smells, and lots of entertainment. Today’s entertainment – honey almond cherry nougat.

Honey Almond Cherry Nougat pre-cut_n

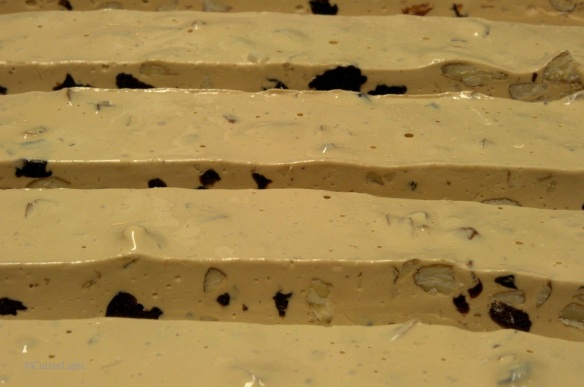
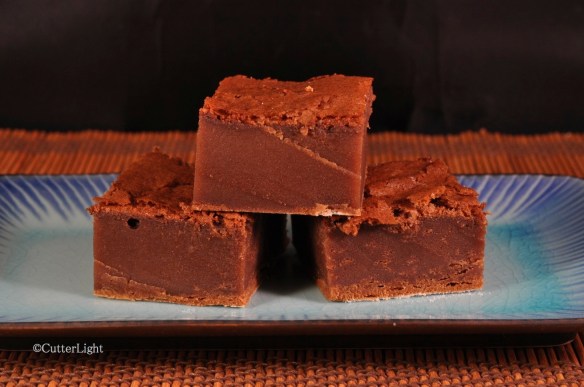
Ready to be cut and wrapped into bite-size candies.

These reminded us of the Bit O Honey candies that we both loved as kids – although they were agreeably softer and more complex in flavor.

Honey Almond Cherry Nougat

Ingredients

  • 2 cups granulated sugar
  • 1  1/2 cups honey
  • pinch salt
  • 1/4 cup water
  • 2 egg whites
  • 2 sticks butter, at room temperature
  • 1 cup chopped almonds
  • 1 cup chopped dried cherries

Directions

  1. Combine sugar, honey, salt and water in a medium saucepan.
  2. Stir over medium heat until sugar is dissolved.
  3. Continue cooking without stirring until sugar reaches hard ball stage (250 degrees F).
  4. Place egg whites in a stand mixer bowl. Fit mixer with whisk attachment. Whip egg whites until they are stiff.
  5. While mixer is running, very slowly pour 1/4 of hot sugar mixture into whipped egg whites. Continue mixing until egg whites hold their shape.
  6. Return saucepan to stovetop with the remaining hot sugar mixture and continue cooking until mixture reaches hard crack stage (300 degrees F).
  7. Turn stand mixer on again. Pour remaining sugar mixture into egg mixture in a slow stream. Continue mixing until egg white mixture holds it shape.
  8. Add butter, one tablespoon at a time, and continue mixing. Mixture should look thick and satiny.
  9. Turn off mixer and fold in almonds and cherries.
  10. Pour mixture onto a buttered baking sheet. Let stand until totally cooled.
  11. Turn out cooled mixture onto cutting board. I coated mine with rice flour.
  12. Cut into 1 x 1.5 inch pieces and wrap in waxed paper.

Recipe adapted from foodnetwork.com.

Light, Crunchy Pecan Pralines

Pecan Pralines_n

A yummy homemade gift or a favorite snack – either way, these pralines are easy to make and great to have around.

There is something particularly satisfying about making candy. Put the right ingredients together, add the right amount of heat, and suddenly chemistry takes over and a pot of nondescript stuff is transformed into an irresistible confection. It is magical. The process is especially satisfying when the creation results in “wow” or “amazing” accompanied by smiles from those who get to taste the samples. These Pecan Pralines will do just that. The following recipe, which uses sour cream, results in pralines that are especially light and crunchy.

Pecan Pralines

Ingredients

  • 1  1/2 cups pecan halves
  • 2 tbsp unsalted butter
  • 1/2 cup granulated sugar
  • 1/2 cup brown sugar
  • 1/2 tsp coarse salt
  • 1/4 cup sour cream
  • 1  1/2 tsp vanilla extract

Directions

  1. Pan toast pecans by continuously stirring nuts over medium heat for 3 minutes. They should start to emit a toasted scent and be barely browned. Remove from heat and set aside.
  2. Line a baking sheet with parchment paper. Set aside.
  3. Melt butter in a medium saucepan over low heat.
  4. Stir in sugars, salt, and sour cream.
  5. Increase heat to medium-low. Whisk ingredients until sugars have melted.
  6. Increase to medium high. Stir frequently until mixture reaches 240 degrees F.
  7. Remove from heat and stir in vanilla.
  8. Let mixture cool for 2 minutes, then stir in pecans until they are fully coated.
  9. Drop spoonfuls onto baking sheet.
  10. Let stand until set, about 30 minutes.

Adapted from Southern Sour-Cream Pralines.

Chocolate Mochi Cake

Chocolate Mochi Cake_n

Dense, lightly-sweetened chocolate cake made with rice flour offers a satisfyingly sweet bite at the end of a Japanese meal.

I learned today that there is a difference between rice flour and glutinous rice flour (mochiko flour). Rice flour can be used in baking. Glutinous rice flour is used to make sweet desserts like mochi, which is what I wanted to learn how to make. I also learned that I purchased twenty-five pounds of the wrong kind of flour in our annual shopping trip. What to do?

Obviously, I had nothing to lose by experimenting. The following recipe is a modification of one published by The Polynesian Cultural Center. The results were quite tasty. Adding half a tablespoon of baking soda will give this recipe a more cake-like result if you prefer. Following the recipe below will yield a dense mochi-like cake.

Chocolate Mochi Cake

Ingredients

  • 1 cup rice flour
  • 1 cup granulated sugar
  • 1/4 cup butter, softened
  • 1/2 cup semi-sweet chocolate chips
  • 12 oz. evaporated milk
  • 1 tsp vanilla extract
  • 2 eggs, beaten

Directions

  1. Preheat oven to 350°F.
  2. Butter a 9 x 9-inch baking pan.
  3. Mix rice flour and sugar in a medium bowl. Set aside.
  4. Heat butter and chocolate chips in a small saucepan over low heat. Stir until chocolate is melted and butter is incorporated.
  5. Pour melted chocolate mixture into bowl of a stand mixer.
  6. Stir in evaporated milk, vanilla, and eggs into the chocolates mixture on low speed until mixed.
  7. Mix in dry ingredients until batter is smooth.
  8. Pour batter into baking pan and bake for 45 minutes. Batter should no longer jiggle.
  9. Remove from oven and fully cool.
  10.  Store covered on counter. Do not refrigerate.

Ikura: Curing Salmon Eggs

Ikura, transluscent, close_n

Like fire opals lit from within, freshly cured salmon eggs are ready to be served as ikura sushi, sprinkled on a bowl of rice (ikuradon), as a seafood garnish, with cream cheese and rice crackers, or simply gobbled by the spoonful!

At $40 to $50 a pound wholesale (and more expensive than that at the grocery store, when you can find it), cured salmon roe is not a regularly featured food in most kitchens. But if you catch your own salmon – or are friends with someone who does – it can be. Although the process of curing fresh salmon roe is somewhat time consuming, it is not difficult, and with patience almost anyone can turn out a sushi-grade batch of this delicacy.

Salmon eggs, King, in sacs_n

These two matching skeins of eggs, or roe sacs, from a Chinook salmon were frozen this past summer and went into one of our ice chests when we flew to our home in Point Hope, Alaska this fall. Japanese chefs typically prefer the eggs of chum salmon (they’re big), but the eggs from any salmon species are fine. In fact, very attractive cured roe can be made from the smaller eggs of large char, too.

Whether you use fresh or fresh-frozen eggs, the first step (once the roe is completely thawed) is to separate the individual eggs from the skein. The riper the eggs, the easier this process will be. There’s a trick that makes this process much easier than it might otherwise be. Bring a pot of water to a temperature of about 120 degrees Fahrenheit and plunge the whole skein into the hot water. Remove the pot from heat and gently swirl the eggs around. You’ll probably want a pair of nitrile or plastic gloves for this. As you do this, you’ll notice the eggs becoming opaque – cream colored. They’ll look as though you’ve ruined the batch. You haven’t.

Ikura after soaking in hot water_n

Hot water temporarily colors the roe and makes it easier to remove from the membranous roe sac. Provided you have kept the water temperature below 140° F, do not be concerned if your eggs become whiter and more opaque than those in the above photograph.

Next, pour the eggs and the water into a strainer. Plastic colanders, with their smooth surfaces, work well for this step. A lot of the extraneous tissue will drain off at this point. Place the strainer with the eggs in a large pot, fill with cold water, and continue to swirl the eggs around. The fat and other unwanted tissue will tend to rise above the eggs and can be skimmed off with a wire mesh skimmer. Some of the eggs will still have tissue attached. These can be cleaned by hand.

Ikura before and after being cured_n

Left: Salmon roe separated and cleaned and ready to be cured. Right: the finished product – fresh, salty ikura.

The next step is magical. For each cup of salmon roe, add just less than a teaspoon of salt. Finely ground sea salt or kosher salt works best for this step. Gently but thoroughly mix the salt into the eggs with your hands. The eggs will immediately begin to turn bright and translucent. Taste and roe and, if desired, add additional salt.

Finally, place the eggs in a strainer one more time to allow excess liquid to drain off. The cured roe will keep for several days in the refrigerator. It can also be kept in the freezer in tightly sealed jars.

Ikura on plaice plate_n

One you get the basic method down, you can substitute soy sauce for some of the salt or add a splash or two of sake (酒) to create subtly different flavors.

We serve ikura on everything from scrambled eggs to seafood pizza, as well as on traditional Japanese dishes such as chawan-mushi and zaru soba. Below, they add a splash of color and flavor to crepes wrapped around smoked Alaskan salmon and herbed cream cheese.

Crepes w smoked salmon & herbed cheese_n

Tufted Puffins, a Name Change and Best Wishes for 2013

Tufted puffin near Homer I_nUnmistakable with their toucan-like bright orange beaks and combed back white tufts of head feathers, tufted puffins (Fratercula cirrhata) are among Alaska’s most familiar ambassadors.

When we began this blog a little over two years ago, it was for ourselves. The blog was to be a place to catalogue our recipes and keep a photographic record of our travels and adventures. And so we named it Frozen Moments and didn’t think too much about it. It seemed an appropriate name for a blog where photographs are highlighted (frozen moments) and especially so since our home nine months of the year is in Arctic Alaska (frozen months).

Tufted puffin near Homer II_nBut as we got more into it, we discovered that Frozen Moments was a little too obvious. Others were already using the name. We realized we’d eventually want to make a change. CutterLight has its origins in two sources. Cutter derives from our summer home in Seward – our cutter-rigged sailboat. To us, the term evokes images not just of sailing, but of travel and adventure in general, as well as a spirit of being willing to learn and experience new things.

Tufted puffin near Homer III_nLight, too, holds multiple meanings for us. There is of course the “light” which all photographers are concerned with. As our skills and interest in photography grow, we are finding that we are becoming, inevitably perhaps, obsessed with light. It permeates our world now in ways it never did before, and this newfound awareness affects everything from the way we watch movies to how we perceive the world around us to how we deal with the deceptively elusive basic elements of photography.

Tufted puffin near Homer IV_nBut Light holds a second meaning – one which is perhaps even more central to our lives. As we move forward toward fulfilling our goals as writers, photographers and sailors, we have pared away much of what we once considered necessary. Not much fits on a 35-foot sailboat. A succession of yard sales and donations to thrift shops allowed us to part with most of our possessions before we moved to Alaska three years ago. Since then, every new item we add to our lives is carefully evaluated for the value it brings in terms of utility and pleasure. Few items make the cut. We are moving forward with a life that feels lighter yet stronger. It is a wonderful feeling.

Lower Cook Inlet near Homer_nLooking out over lower Cook Inlet from the bluffs above Homer, Alaska.

As we look back on 2012, it is with a deep sense of appreciation. Many new friends came into our lives this year, and we also were fortunate to have had some really special reconnections with people from our former lives. We are happy, too, that our blog is finding an appreciative audience. We wish one and all fair winds and following seas in the coming year.

Jack and Barbra Donachy

Sour Cherry Almond Hearts

Sour Cherry Almond Hearts_n

Tart dried cherries, sour cherry concentrate and almond extract combine to create wonderful flavors in these cookies which can be cut into fun and festive shapes to suit any holiday. 

One flavor we enjoy in our culinary creations is sour cherry. It has a wonderful flavor and stirs memories of our home in Sacramento and our sour cherry tree laden with ripe, bright red fruit. We always looked forward to seeing the birds this tree attracted as well as the ice creams, biscotti and sauces for pork and chicken the fruit starred in. While we can’t get sour cherries here in the Arctic, dried cherries are a must on our annual shopping list. This past summer during our annual bulk shopping, we came across sour cherry concentrate at Natural Pantry, a health food store in Anchorage. The concentrate, which claims  antioxidant benefits when consumed daily, was in the store’s vitamin section.

Of course, our first thoughts upon finding this concentrate went to the kitchen where we imagined an extraordinarily tangy-sweet syrup for our homemade Italian-style sodas and for Jack’s giant pancakes. The combination of the concentrate and the dried cherries sets these cookies far apart from the ordinary. Cherry liqueur might be a good substitute for the concentrate in the dough recipe.

Sour Cherry Almond Cookies

Ingredients

Cookie dough:

  • 6 tbsp unsalted butter, softened
  • 1 oz. cream cheese, softened
  • 1/4 cup granulated sugar
  • 1/2 tsp almond extract
  • pinch salt
  • 1  1/4 cup all purpose flour
  • 1/4 cup finely chopped dried cherries
  • 1 tbsp sour cherry concentrate

Frosting:

  • 2 oz. cream cheese
  • 2 tbsp unsalted butter, softened
  • 1 tbsp sour cherry concentrate
  • 1 cup powdered sugar

Directions

  1. Preheat oven to 325 degrees F.
  2. Line a baking sheet with parchment paper.
  3. In a mixing bowl, combine butter and cream cheese. Beat with an electric mixer on medium speed until incorporated.
  4. Add sugar, almond extract, salt and sour cherry concentrate. Mix until well incorporated.
  5. Mix in half the flour until combined.
  6. Mix in dried cherries and remaining flour until combined.
  7. On a lightly floured surface, roll out dough to 1/4 inch thick. Cut out desired shapes using a cookie cutter.
  8. Place cut cookies on cookie sheet.
  9. Bake for 14 minutes, or until bottoms are lightly browned.
  10. Cool on cookie sheet for 2 minutes and then finish cooling on wire rack.
  11. While cookies are cooling, make frosting.

Frosting Directions:

  1. Clean and dry mixer bowl and beater.
  2. Combine cream cheese, butter and sour cherry concentrate in mixer bowl and mix on low speed for about 30 seconds.
  3. Gradually beat in powdered sugar. Frosting should be of spreading consistency.
  4. When cookies are cooled, pipe frosting onto center of cookie.

Recipe makes 2 dozen cookies.

Cheese Blintzes with Arctic Blueberry Jam

blintzes_n

Thin, lightly fried crepes wrap a sweetened homemade cheese filling. Traditionally served with applesauce and sour cream, we enjoyed ours with jam made from local Arctic blueberries.

Some foods just make us happy. Bagels fresh out of the oven, the day’s catch charcoal grilled, and a piping hot skillet of most excellent nachos come to mind. Blintzes fall into this category as well. A brunch classic but great served anytime, they remind me of my Jewish grandmother’s home which always seemed to be filled with the scent of vanilla and hot oil.

Cheese Blintzes

Ingredients for approximately 13 blintzes

Blintz Wrapper

  • 6 eggs
  • 1 1/2 cup flour
  • 1/4 cup sugar
  • 1 cup milk
  • 1/2 cup water
  • 1  1/2  tsp vanilla
  • Pinch of salt
  • Vegetable oil with a high smoke point for frying (grapeseed or peanut oil works best); I used light olive oil

Filling

  • 1 cup ricotta cheese
  • 1 package (8 oz.) cream cheese
  • 1/4 cup sugar
  • 1 egg yolk
  • 2 tsp fresh lemon juice
  • 1 tsp vanilla
  • Pinch of salt

Directions

  1. Blend all of the blintz ingredients together using an immersion blender or electric hand mixer to ensure there are no lumps.
  2. Warm up a nonstick skillet or a crepe pan on medium heat until hot. The pan is ready when a drop of water sizzles on the surface of the pan.
  3. Butter the entire surface of the hot pan.
  4. Pour the blintz batter by 1/3 cupfuls into the center of the pan, then tilt the pan in a circular motion till the batter coats the entire bottom of the pan in a large, thin circular shape.
  5. Cook the blintz wrapper for about a minute, until edges are dry and tiny bubbles form in center. Flip the wrapper and cook for another 30 seconds. Use a spatula to remove from pan and place on a plate.
  6. After wrappers are cooked, make the filling.
  7. Place all filling ingredients in a medium bowl and mix thoroughly with a fork. Filling can be slightly lumpy.
  8. To fill wrappers, place a heaping tablespoon of filling onto center bottom third of wrapper. Fold bottom of wrapper up over filling. Fold in left and right sides. Finish rolling like a burrito.
  9. When all blintzes are stuffed and rolled, heat up oil in a frying pan on medium heat.
  10. Fry blintzes in oil, flap side down for 2 minutes, or until golden brown. Flip blintzes and brown on other side for 2 minutes, or until golden brown.
  11. Serve warm with sour cream and applesauce or homemade jam.

Recipe adapted from TheShiksa.com

How Have Long Life: Life Philosophy from Alaska’s Longest Reindeer Herder

winter sky_n

The sun doesn’t rise now. In its absence, there is darkness and dusk. And there is beauty in the pink hues and  blue silhouettes of midday.

Words to live by from the longest reindeer herder, Chester Asakak Seveck.

For long live and joy life,

I believe these things –

Keep busy and do good work.

Have much good exercise.

Eat good food,

no waste anything

and every day enjoy what it gives

and do not spoil this day with much worry of tomorrow.

Be happy.

I know this way

how I be “Longest Reindeer Herder.”

Start 1908, finish 1954,

altogether 46 years herd reindeer.

From Longest Reindeer Herder: A true life story of an Alaskan Eskimo covering the period from 1890 to 1973, by Chester Asakak Seveck

Maple Pecan Pumpkin Pie

Pumpkin Pie with Pecans & Maple Syrup_n

Crunchy pecans drenched in maple syrup add an inviting twist to this classic autumn and wintertime dessert.

Two hundred miles north of the Arctic Circle, we’re a long way from the closest pumpkin patch, and at $65.00 and up, the pumpkins brought into the Native Store for Halloween didn’t tempt us. But Jack kept his eye on them, and as predicted, the day after Halloween the price fell by half. We held out a few days beyond that and the prices dropped another 50%. One of the wonderful things about squashes and pumpkins is that they keep well, and so we purchased a 17-pound beauty no worse for the extra week or two it had spent on the store shelves for only $18.00. Jack then set to work cutting up and roasting the pumpkin, seeds and all. The seeds were tossed with olive oil, garlic, salt, and a blend of Italian seasonings. Crisp, crunchy and zesty, they were devoured immediately. The pumpkin was roasted plain and then puréed with several uses in mind.

I used the first two cups of pumpkin purée to create a pie inspired by the superb Pennsylvania maple syrup that a friend had sent to us. Along with a healthy dollop of bourbon, maple syrup is the perfect compliment to the flavors in pumpkin pie filling. The pecans in this recipe come out sweet, light and crunchy.

Maple Pecan Pumpkin Pie

Ingredients

Filling:

  • pastry crust for one 9-inch pie
  • 3 eggs
  • 2 cups pumpkin purée
  • 1 cup heavy whipping cream
  • 1/4 cup maple syrup
  • 2 tsp vanilla extract
  • 1/4 cup granulated sugar
  • 1 tsp ground cinnamon
  • 1/2 tsp ground ginger
  • 1/2 tsp mace
  • 2 tbsp bourbon (optional)

Pecan Topping:

  • 1 tbsp unsalted butter, melted
  • 3 tbsp firmly packed brown sugar
  • 3 tbsp maple syrup
  • 1/4 tsp cinnamon
  • 1 cup pecan halves

Directions

  1. Preheat oven to 425 degrees F.
  2. Line a 9-inch pie pan with pastry crust.
  3. In a large mixing bowl, beat eggs until frothy.
  4. Add pumpkin, whipping cream, maple syrup, vanilla, sugar, cinnamon, ginger, and mace. Beat well to mix. Pour mixture in the pastry-lined pie pan.
  5. Bake for 40 minutes.
  6. Meanwhile, make pecan topping. Combine butter, sugar, syrup, and cinnamon. Mix thoroughly.
  7. Add pecan halves to topping mixture. Stir well.
  8. After pie has baked for 40 minutes, arrange pecan topping on top of pie.
  9. Cover edges of pie with foil to prevent burning and return pie to oven. Continue baking for 20 – 25 minutes, or until a knife inserted in the center of pie comes out clean.
  10. Remove from oven and cool on a wire rack.
  11. Cover and refrigerate within 2 hours.

Adapted from The Baking Pan

Chocolate Chip Yogurt Cookies – It’s All About the Penzeys Dutch Processed Cocoa

These dark, rich, chocolatey cookies disappeared within 24 hours of their creation. 

For this season in the Alaska bush, we ordered most of our spices and seasonings from Penzeys Spices. Whether we’re using their smoked chipotle chili peppers in a squash soup, the Italian seasoning blend we make from a combination of their herbs and spices, or a cup of hot cocoa, the quality of Penzeys’ products has been notable. In these cookies, its Penzeys’ Dutch-processed cocoa that takes them to a higher level.

By the way, yogurt is easy and economical to make in your own kitchen!

Chocolate Chip Yogurt Cookies

Ingredients

  • 1 cup all purpose flour
  • 1/2 tsp baking soda
  • 5 tbsp unsalted butter
  • 7 tbsp dutch processed cocoa
  • 2/3 cup granulated sugar
  • 1/3 cup brown sugar
  • 1/3 cup plain yogurt
  • 1 tsp vanilla extract

Directions

  1. Preheat oven to 350 degrees F.
  2. Measure flour and baking soda into a medium bowl. Set aside.
  3. Melt butter in a large pan over medium heat. Remove from heat.
  4. Stir in cocoa and sugars.
  5. Add yogurt and vanilla. Mix well.
  6. Add flour just until combined.
  7. Drop by tablespoon onto parchment-covered baking sheet, about 2 inches apart.
  8. Bake for 8 – 10 minutes. Cool on pan for a few minutes until firm. Finish cooling on wire racks.

Adapted from Myrecipes.com.