Unknown's avatar

About Jack & Barbra Donachy

Writers, photographers, food lovers, anglers, travelers and students of poetry

Point Hope, Alaska: Traditional Inupiat Dancing and Drumming

The dancers in this short video are 6th grade students at Tikigaq School in Point Hope, Alaska, an Inupiat village 200 miles above the Arctic Circle. They are performing traditional songs and dances, passed down through the generations, sung in their native language.

The annual school Christmas program in Point Hope is a little different than in most communities. Yes, there are seasonally popular songs and carols, but many of them are sung in Inupiaq, the language of the Tikigaqmuit, the Inupiat Eskimo people of this small whaling community on the edge of the Chukchi Sea. There is also lots of drumming, singing and dancing performed according to traditions that extend back in time beyond memory. The drums – which resonate much more loudly than one might suspect them capable of at first glance – are made from material such as the membrane of sea mammal organs stretched over wooden frames. The beautiful mukluks (boots) many of the participants wear are hand sewn from seal, caribou, beaver and other natural materials.

The dances celebrate the past and the present. Aaka Irma (Irma Hunnicutt), who volunteered her time to come to our school and teach the students these dances, has an honored place as an elder in this village. Although the students speak mainly English in their day-to-day lives, these celebrations give them the opportunity to honor their language and heritage. This is a place where traditions are still passed down generation to generation; where some of the clothing and much of the food is still provided by the surrounding land and sea; where traditions are alive and vibrant and honored.

On this occasion, the students and Aaka Irma invited their classroom teacher to dance with them.

Almond Breakfast Crumb Cake

Image

Moist cake loaded with almond flavor and a sweet, crunchy, crumbly top is guaranteed to make everyone in the house dash to the breakfast table. This cake is simple to make and delivers a triple dose of almond using almond paste, almond extract, and crunchy sliced almonds.

So, you’ve finished eating all ten polar bear claws and your appetite for almond flavored breakfast pastries is still not sated. You dip your finger into the leftover half-can of almond paste and quickly realize that this product is not intended to be eaten straight. The solution? Almond breakfast crumb cake. The beauty of this cake is that it can be eaten anytime, but since it has breakfast in the title there is no guilt about eating a slice or two first thing in the morning with your coffee. Or drizzle it with a berry syrup for a scrumptious dessert.

Almond Breakfast Crumb Cake

Ingredients

  • 2 cups all-purpose flour
  • 1 1/2 tsp baking powder
  • dash salt
  • 1/2 cup unsalted butter, softened
  • 1/2 cup almond paste
  • 1 cup granulated sugar
  • 2 eggs
  • 1 tsp vanilla
  • 1/2 tsp almond extract
  • 3/4 cup whole milk
  • crumb topping (see below)

Directions

  1. Preheat oven to 350 degrees F.
  2. Grease a 9-inch springform pan. Set aside.
  3. Sift together flour, baking powder and salt in a medium bowl.
  4. In bowl of a stand mixer, combine butter and almond paste. Beat on medium speed until smooth.
  5. Add sugar and mix until blended.
  6. Add eggs, vanilla and almond extract and mix until blended.
  7. Add half of the flour mixture and milk. Mix until blended.
  8. Add remainder of flour mixture and mix just until blended.
  9. Pour batter into prepared pan.
  10. Sprinkle crumb topping evenly over top of batter.
  11. Bake until toothpick inserted into center comes out clean, about 50 minutes.
  12. Let cool completely in pan on wire rack.
  13. Store at room temperature.

Crumb Topping Ingredients

  • 6 tbsp all purpose flour
  • 1/3 cup firmly packed brown sugar
  • 1/4 tsp ground cinnamon
  • 2 tbsp melted unsalted butter
  • 1 cup sliced almonds

Crumb Topping Directions

  1. Stir together first three ingredients.
  2. Add melted butter and stir mixture together until crumbly.
  3. Stir in almonds until mixed well.

Pumpkin Risotto with Spicy Scallops

risotto w scallops n

Creamy risotto flavored with seasonal roasted pumpkin and topped with spicy scallops warm up an icy Arctic evening.

With our shared goal of making risotto this year, Arborio rice went on the annual shopping list, and recently when a tiny, 1.5 pound pumpkin arrived in our Full Circle Farms box, we decided to make it a featured ingredient in our first attempt at homemade risotto. The idea to pair spicy scallops with the risotto stemmed from the visual impact we thought they’d have: white scallops dusted with ground peppers, nutmeg and cinnamon atop a mellow-orange base. The visual was complimented by the blend of textures and flavors of this dish. Compared with more usual methods for preparing rice, the risotto was a bit labor intensive. But the results left us anticipating making this dish again soon, perhaps next time with Alaska sweet shrimp.

Pumpkin Risotto with Spicy Scallops
Serves 4

Ingredients: (We use our own blend of spices, but any good Thai-style blend such as Penzeys Spices Bangkok Blend works well.)

  • 1¼ cups pumpkin purée
  • 2 tbsp heavy cream
  • 1 tbsp spice blend, such as Penzeys Bangkok Blend
  • 6 tbsp unsalted butter, divided
  • 5 cups chicken broth (We use Better than Bouillon.)
  • 2 tbsp extra virgin olive oil
  • 1 medium onion, diced
  • 1 clove garlic, minced
  • 2 cups Arborio rice
  • 2 tbsp goat cheese, softened
  • ¼ cup parmesan cheese, grated
  • salt and pepper to taste
  • seared scallops (see below)
  • candied bacon (see below)

Directions

  1. Stir together pumpkin purée and cream in a small pot and bring to a simmer. If it seems too thick, stir in a few tbsp of chicken broth.
  2. Simmer for about 5 minutes. Remove mixture from heat. Season with spice blend, salt and pepper.
  3. Add ¼ cup of butter to the pumpkin mixture, 1 tbsp at a time. Stir until smooth.
  4. Pour the pumpkin mixture into a bowl and set aside.
  5. Pour the chicken broth into a medium pot and warm over low heat.
  6. Place a large pan such as a sautoir (a sauté pan with high, straight sides) or a pot over medium heat and melt the remaining 2 tbsp butter and olive oil.
  7. Add the onion and garlic and sauté for about 3 minutes.
  8. Add the rice and sauté for 3 to 5 minute or until each grain of rice is coated in oil and there is a white dot in the center of each grain.
  9. Begin adding the warm broth to the rice, one ladleful at a time, stirring frequently.
  10. Each time the liquid evaporates, add another ladle of broth and continue to stir.
  11. Continue to add liquid and stir until the rice is al dente, 20-25 minutes.
  12. Stir in the pumpkin mixture until completely combined.
  13. Stir in the goat cheese and parmesan until smooth. Season with salt and pepper.
  14. Place 3 seared scallops atop a portion of risotto.
  15. Finish dish with candied bacon just prior to serving.

Spicy Scallops

Ingredients

  • 12 large scallops, cleaned
  • 1 tbsp spicy seasoning mix, for example Penzeys Bangkok blend (Optional: add sesame seeds to the spice blend)
  • salt to taste

Directions

  1. Heat oil in a heavy skillet over medium-high heat.
  2. Lightly roll each scallop in spice mix and sprinkle with salt
  3. Using tongs or chopsticks to maneuver scallops, quickly sear each one on each side – a few seconds on each side. Do not overcook.
  4. Serve immediately.

Candied Bacon

Ingredients

  • 4 strips of thick cut bacon, chopped into micro pieces
  • 2 tbsp brown sugar

Directions

  1. Heat skillet over medium high heat
  2. Add the bacon to the pan and cook until the fat has rendered off and the bacon has just become crispy.
  3. Drain all but 2 tsp of grease from the pan and return to the stove, over medium heat.
  4. Sprinkle brown sugar over the bacon and stir vigorously until the sugar melts and coats the bacon.
  5. Spread the candied bacon onto a sheet pan lined with parchment and allow to cool and slightly harden.

Honey Glazed Polar Bear Claws – Grrrr, Grrrr

bear claw n

A tempting polar bear claw from our Arctic bakery. No bears were harmed in the making of this pastry!

Topping my baking to-do list this winter were bear claws. There is something about the sweet almond filling that makes these a mainstay of bakery shops – or perhaps it’s their cool name. Jack and I usually pass on these confections because most bakeries prepare them with an overload of sweetness. In researching recipes, I found a plethora of styles, from giant grizzly-sized pastries smothered in sliced nuts to tiny paws with a perfectly manicured almond on the end of each claw, and everything in between.

The recipe I settled on took a bit of time and effort. I wanted a medium-sized confection that emphasized not sweetness but almond flavor.The resulting pastry was superb – a little lighter than standard bakeshop fare and with a nicely balanced taste of almond.

Polar Bear Claws

Ingredients

Dough:

  • 1 3/4 cups all purpose flour
  • 3/4 cup unsalted butter, cold
  • 1/4 cup warm water (105 – 115 degrees F)
  • 2 1/4 tsp yeast
  • 1/4 cup heavy whipping cream
  • pinch salt
  • 1 egg
  • 1/8 cup sugar
  1. Place flour and butter in a medium bowl. Mix together using a pastry blender until well blended and butter pieces are no larger than kidney beans.
  2. In a large bowl, dissolve yeast in warm water. Let stand 5 minutes.
  3. Stir cream, salt, egg, and sugar into yeast mixture.
  4. Pour flour mixture into cream mixture. Stir with a rubber spatula until ingredients are just moistened.
  5. Place dough in plastic wrap and chill overnight in the refrigerator.
  6. Turn dough out onto lightly floured surface. Dust dough with flour. Roll out dough to 14 x 18 inch rectangle. Fold into thirds, making three layers. Roll out again. Fold into thirds once more and place back into refrigerator while you make the filling.

Filling:

  • 1 egg white
  • 1/2 cup almond paste
  • 1/4 cup confectioners sugar
  • 1 tsp cinnamon
  1. Add all filling ingredients to bowl of a stand mixer. Mix on medium speed until all ingredients are well mixed and filling is smooth.

Assembling the pastries:

  1. On a lightly floured surface, roll the chilled dough to a 12 x 16 inch rectangle.
  2. Cut the dough in half, length-wise.
  3. Spread half of the filling down the middle of one piece of dough. Repeat with other piece of dough.
  4. Roll each dough rectangle jelly-roll style from the long side.
  5. Tuck seam under roll.
  6. Cut each long roll into 5 pieces.
  7. Cut three slits into each piece to make the toes.
  8. Place each pastry on a parchment-lined baking sheet, curving them slightly (to spread the toes).
  9. Allow pastries to rise in a warm place for about 20 minutes. They should puff up.
  10. Preheat oven to 400 degrees F.
  11. Brush each pastry with beaten egg.
  12. Generously sprinkle pastries with sliced almonds.
  13. Bake 12 minutes. Pastries should be lightly browned.
  14. Let cool slightly on wire rack. Drizzle with honey glaze.

Glaze:

  • 1/2 cup confectioners sugar
  • 1 tbsp honey
  • 1 tbsp milk
  1. Stir together ingredients until smooth. Add more confectioners’ sugar if too thin, or add more milk if too thick.  Drizzle over warm pastries.

November Light: Old Tikigaq and Project Chariot – 160 Hiroshimas in the Arctic

umiak sunrise n

November 29, 12:46 p.m.: Framed below a seal skin umiak whaling boat, the sun edged itself above the southern horizon and lingered for just two hours and 24 minutes. On December 7, the sun will stay below the horizon and remain there for 28 days.

In 1958, under the direction of Edward Teller, the U.S. Atomic Energy Commission (AEC) devised a plan to detonate a series of nuclear devices 160 times the force of the bomb dropped on Hiroshima. These bombs were to be exploded just 30 miles southwest of the Inupiat village of Point Hope, Alaska. Teller’s plan – if an action so dangerous and misguided can even be called such – was to blast out a harbor in this far north coastline. The United States government didn’t bother to tell the local residents of this scheme. Nor did they take into consideration that the land in question dId not belong to the United States government; it was and still is sovereign Inupiat territory.

old tikigaq bones nov light n

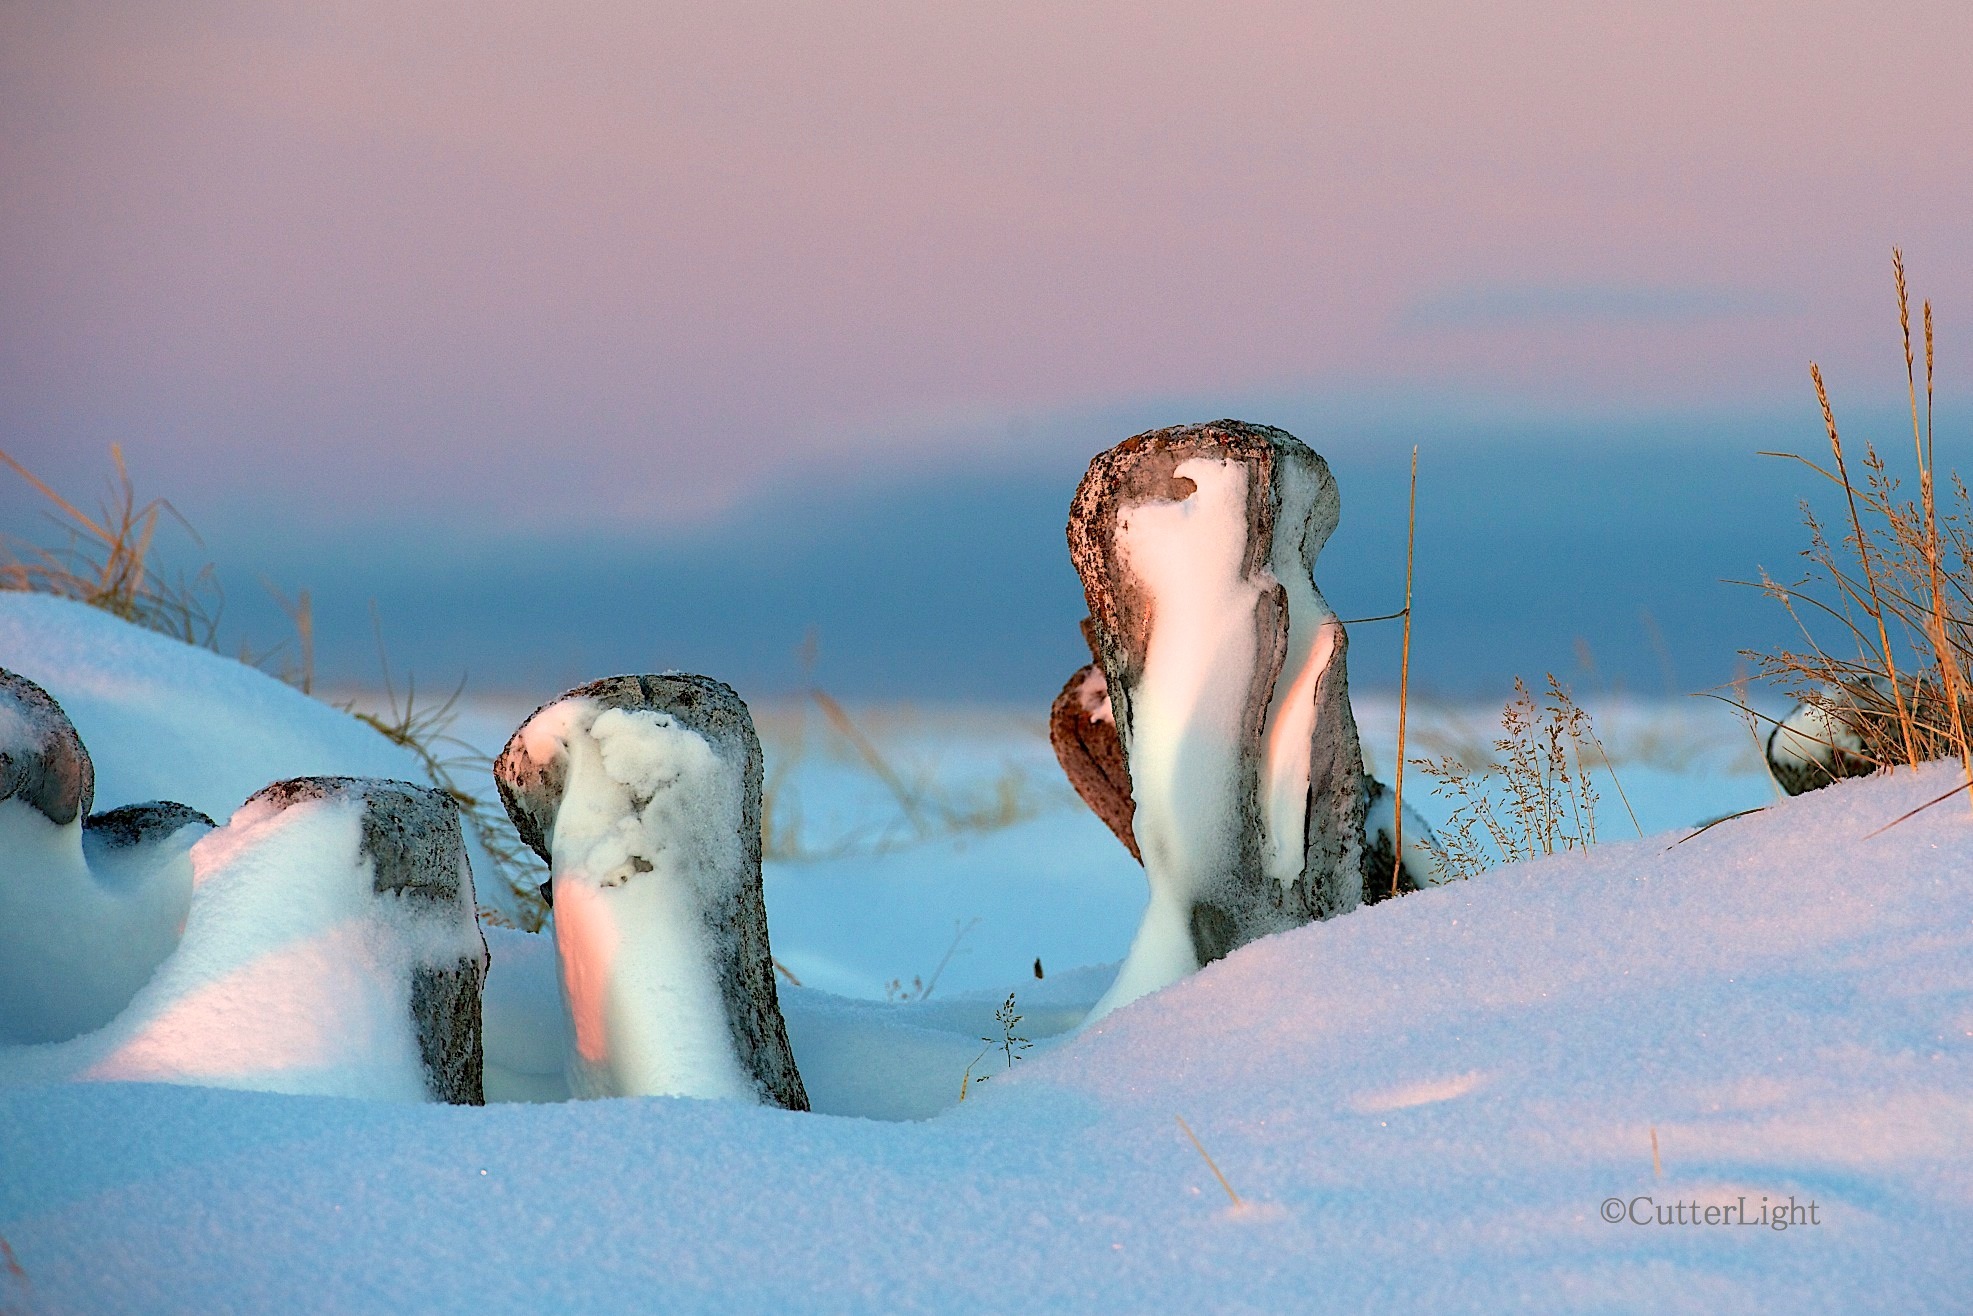
Whale bones mark a sod igloo buried in snow in the ghost town of Old Tikigaq, which was abandoned in the mid 1970’s. Although the sun is only in the sky briefly in November, it is a glorious time of year. This is the November light we have been waiting for.

A caribou hunting party stumbled across AEC engineers and para-military personnel encamped at the mouth of Ogoturuk Creek, near Cape Thompson. That’s when the questions and the lies began.

grass snow dawn n

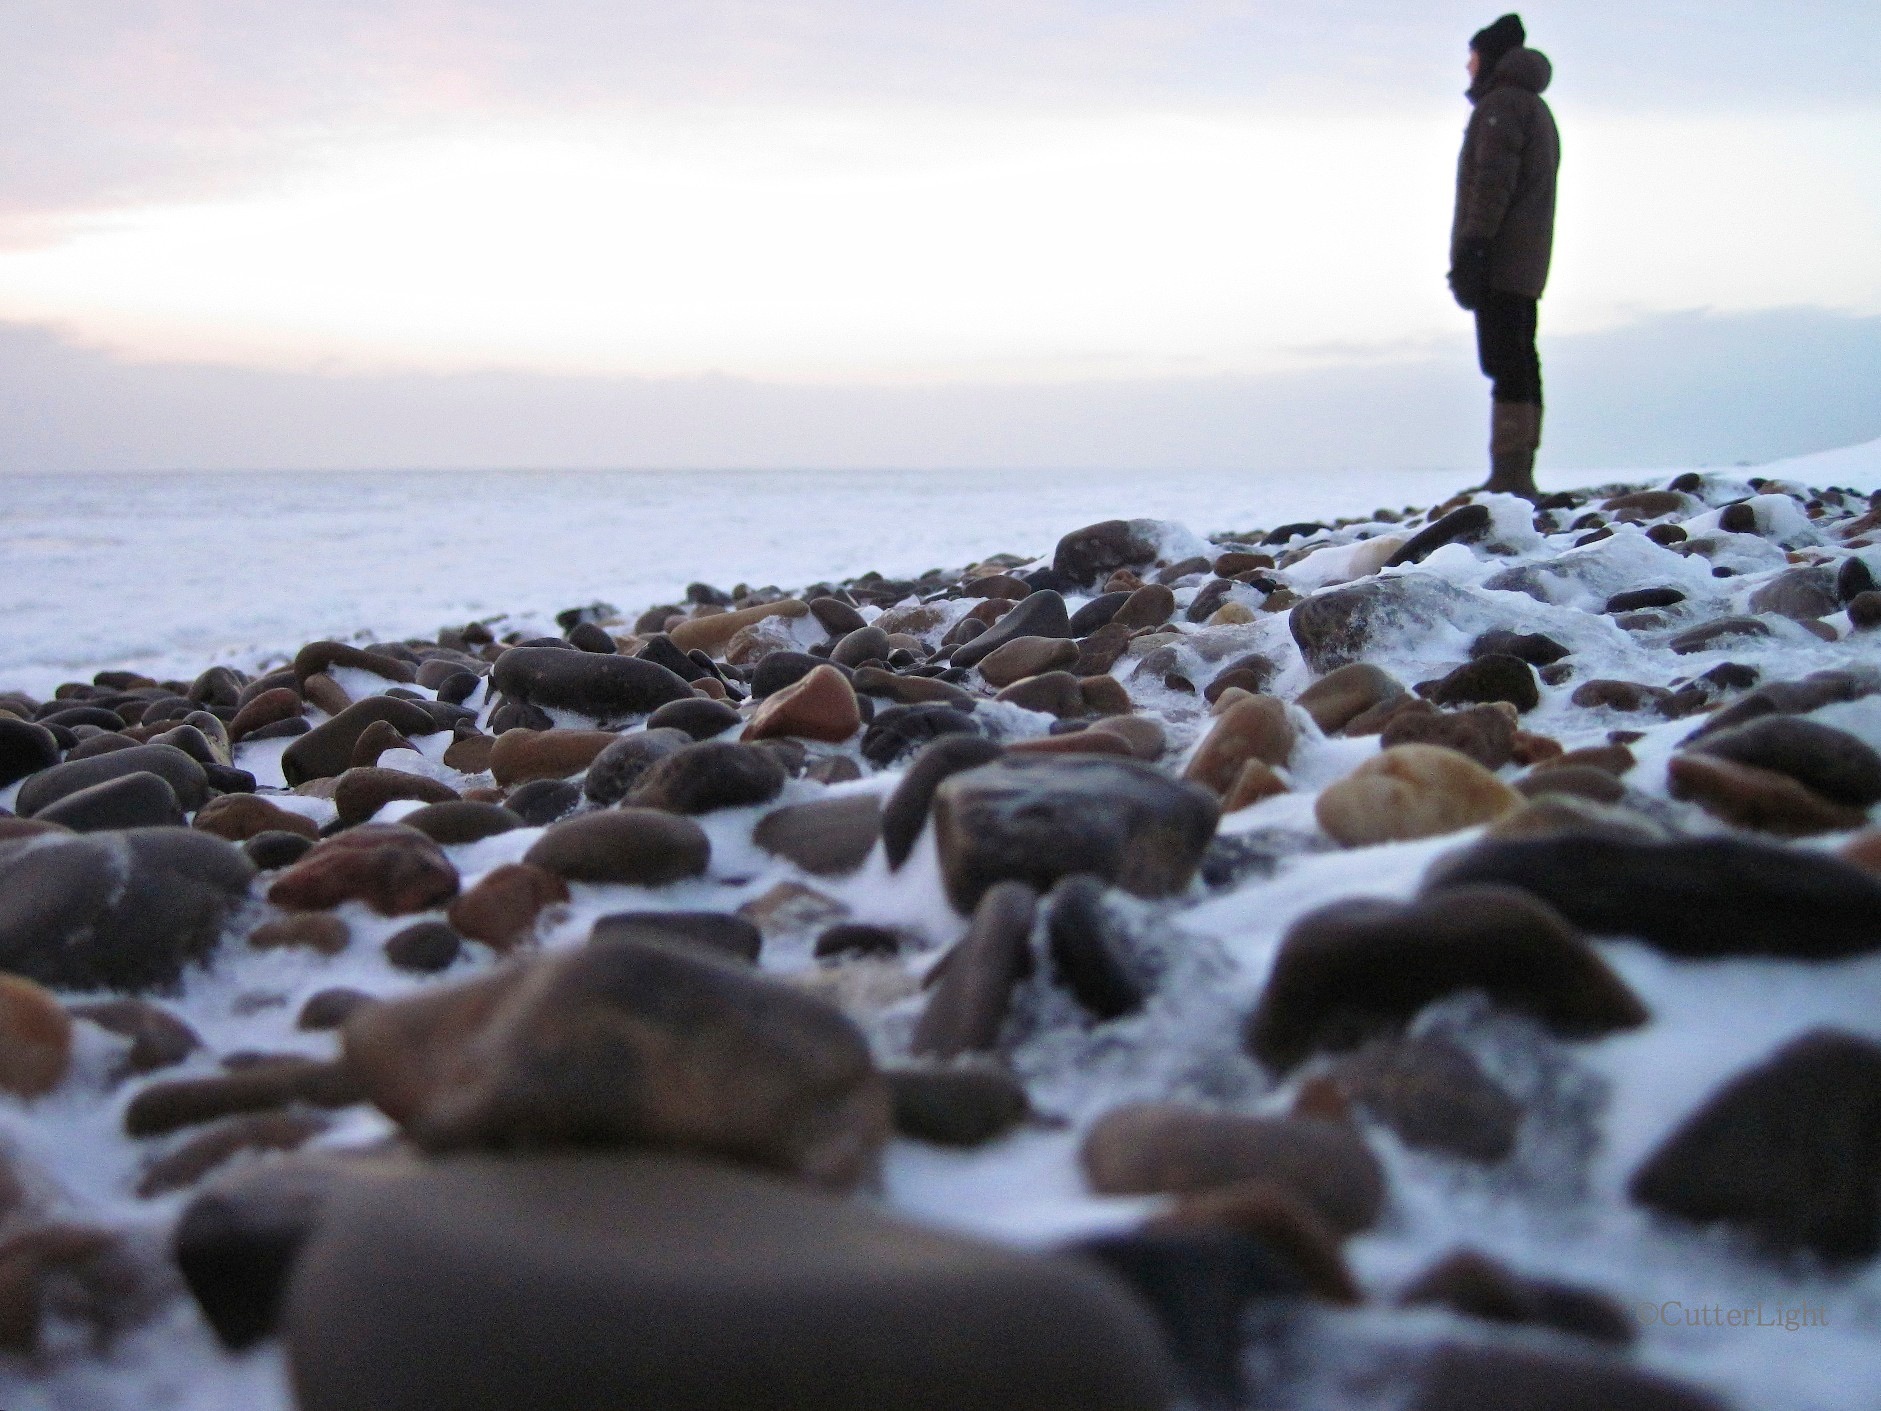
Grass silhouetted against the southern sky just before dawn, the frozen sea stretching to the horizon near Point Hope, Alaska.

In the end, Teller’s heartless plan was stopped. The bombs were never detonated. The experiment to determine how much radiation local flora, fauna and humans could survive was never carried out.

This is a story of heroes. There was Howard Rock, the co-founder of the Tundra Times, a highly educated, literate Inupiat leader who wrote the first, insistent letters to the United States government demanding that this plan be immediately halted. There were the white scientists from the University of Fairbanks, Pruitt and Viereck, who raised their voices against the project, and in standing up for the Inupiat people and standing against the government were fired by University President, William Wood, who played a less noble role in this story. There were the millions of citizens in the United States and all over the world who were in the streets, protesting nuclear tests of this kind. And there are the people of Point Hope who stood up to the government then and who are still fighting to force the United States government to tell the whole story of Project Chariot.

Because this story is not over.

old tikigaq house winter n

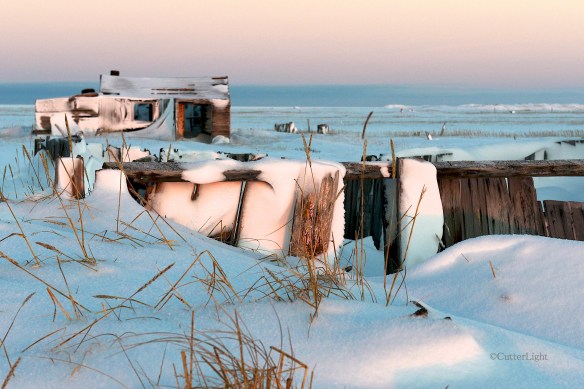
Over time, as erosion steadily ate away the finger of land jutting into the Chukchi Sea, the old town had to be abandoned. This fall, the entire area was inundated with water when high winds and hurricane force gusts pushed sea water over the rock sea wall protecting the north side of the point.

Although Teller lost his bid to detonate the world’s most destructive arms, in what feels like a tit-for-tat payback, under his direction, in secret, another group of engineers and military personnel were dispatched to the Project Chariot site. This time, they spread radioactive waste on the ground and in the stream. And they buried something there. Something in large, sealed drums.

To this day, the United States government has refused to divulge what was buried.

Since that time, the incidence of cancer has been higher than the national norm among the people of Point Hope. Higher than it should be, even taking into consideration other factors. These are some of the best people we’ve ever had the honor to be associated with. Kind, generous, resourceful, resilient, tough. Their government owes them answers.

whale jaw arches dawn n

Tell-tale tracks leave evidence that an Arctic fox was patrolling Old Tikigaq just before we hiked out. These whale bone jaws located near the airstrip a mile and a half from town welcome visitors to Point Hope. The area around Point Hope is one of the oldest continuously inhabited places in the Americas – maybe the oldest. While many Inupiat (Eskimo) cultures were nomadic, here the animals came to the people. The point of Point Hope formerly extended far to the west out into the Chukchi sea, bringing the land in close proximity to migratory paths of seals, whales, walruses, char, salmon and other fish. Two impressive capes, Thompson to the south, Lisburne to the north, are home to tens of thousands of sea birds. To the east, Point Hope is situated near the migratory route of thousands of caribou. The sea and the land are the garden that has sustained people here for thousands of years.

For more about Project Chariot, see the book The Firecracker Boys by Dan O’Neill. And although it is difficult to obtain a copy, there is an excellent, 73-minute documentary film titled Project Chariot, copyrighted 2013 NSBSD & Naninaaq Productions: UNCIVILIZED FILMS.

Pepperonata Breakfast Pizza: Healthy, Tasty, Easy

pepperonata breakfast pizza n

Individual-sized breakfast pizzas are a fun way to start the day. These can be whipped up in a sailboat galley, a mountain cabin, a lakeside camp, or virtually anywhere else. Who says pizza isn’t healthful?

The essence of pepperonata is stewed tomatoes, bell peppers and olive oil. In our Arctic kitchen and on our sailboat, the tomatoes are no problem. Although we occasionally get fresh tomatoes, we more often rely on diced canned tomatoes which, when cooked, are virtually indistinguishable from fresh. Finding good bell peppers at a reasonable price has been another matter. That’s where Penzeys Spices dried red bell pepper flakes shine. Cut into 3/8″ (1 cm) pieces, when hydrated these peppers come alive with aroma and flavor.  A four-ounce bag goes a long way, making them perfect for kitchens where getting to the market isn’t always feasible.

Small pizza crusts are generally available in supermarkets, but we make our own. These days, our favorite dough is a 50/50 blend of whole wheat and all-purpose flour. Crusts made from this balance have an excellent consistency and deliver a hearty flavor. We always keep on hand a few pizza crusts in both 5″ and 12″ size. To do this, we pre-bake our crusts for 10 minutes at 400 °F and then seal them in plastic bags and freeze them. When we’re ready to use the crusts, we pull what we need from the freezer, let them thaw while we’re preparing the topping, top them, and then bake them for the same 10 minutes at 400 °F. Pizza stones make a big difference; we even have a pair of small ones for our sailing vessel, Bandon that fit nicely in the small galley oven or on the boat’s propane grill. While we don’t have refrigeration or a freezer onboard, we’ve found shelf-stable pizza crusts that keep for months.

Pepperonata can be modified to accompany many dishes. Anchovies, olives, capers, herbs, spicy peppers and other vegetables can easily find their way into this versatile, chunky sauce. It’s an excellent topping for white fish and poultry, and is a perfect topping for toasted bread, too.

And the fried egg? We use a Swiss Diamond non-stick pan, low heat, and good olive oil. We like our sunny-side up eggs lightly salted with a grind or two of cracked pepper and a pinch of Italian seasonings, cooked in a covered pan till the whites are just firm.

Pepperonata Breakfast Pizza

Ingredients: (For 2 servings)

  • two, 5″ pizza crusts
  • 16 oz can of diced tomatoes, most of liquid drained (or 1 1/2  cups fresh tomatoes, diced, seeds and pulp removed)
  • 2 tablespoons Penzeys dried pepper flakes (or 1/2 cup diced red, orange or yellow bell pepper)
  • 1/4 cup sliced kalamata olives
  • olive oil
  • sea salt
  • freshly cracked pepper
  • Italian seasonings such as oregano, thyme, basil, etc. to taste
  • Two eggs, fried any style
  • finish with freshly grated parmesan and capers

Directions:

  1. Bake pizza crusts according to directions.
  2.  Hydrate dried bell peppers (if using dried).
  3. Meanwhile, heat olive oil in a pan over medium heat. Add tomatoes and a pinch of salt. Cook until tomatoes are tender and stew is thick. (About 10 minutes for canned. About 20 minutes for fresh.)
  4. Add bell peppers. Cook until tender.
  5. Meanwhile, prepare fried egg.
  6. When tomato mixture is cooked to desired consistency, add olives, seasonings and additional salt, if desired. Stir to mix thoroughly.
  7. Spoon mixture onto warm pizza crusts. Add capers. Add egg. Top with grated parmesan. This pizza is easiest to eat with a sharp knife and fork.

Homemade Goat Cheese

goat milk cheese n

With powdered goat milk, you can make delicious goat milk cheese virtually anywhere. This ball is slated for a hearty layered beet salad and a spicy lamb (or caribou!) pizza.

After last year’s success with homemade “ricotta,” we included powdered goat milk (widely available) in our annual shopping list. We love the flavor and texture of soft cheeses, and with some recipes there is no adequate hard cheese substitute. At the end of summer, we sent a small quantity of various soft cheeses up to our Arctic home. Since it doesn’t matter if they get crumbly, these cheeses are good candidates for the freezer till they’re needed. But that supply has come to its end, and so it was time to try making our own goat cheese.

Following our own directions for a ricotta-style cheese, the hands-on time for creating this cheese took just five minutes. The remainder of the time needed is for draining the whey – a process that took about eight hours. The resulting cheese was creamy, mildly tangy in just the right way, and ready for salads, pizza or crackers and smoked salmon. Slightly salting the finished cheese improves its flavor and shelf life.

Soft Homemade Goat Cheese

Ingredients

  • 1 cup powdered goat milk
  • 4 cups water
  • 2 tbsp white vinegar
  • salt to taste

Directions

  1. Mix powdered milk and water well in a medium pot.
  2. Over medium heat, bring the milk to between 165 degrees F to 180 degrees F.
  3. Remove pot from heat.
  4. Stir in vinegar. Milk should curdle. (This is the whey separating).
  5. Cover pot with clean dish towel and let sit for 2 hours.
  6. Lay a piece of cheesecloth over a sufficiently large container. (I used a 4 cup food storage container.) Secure the cheesecloth in place with a rubber band.
  7. Pour contents of pot onto cheesecloth. Whey should drain through, while curds remain in cheesecloth. You can toss the initial drained whey.
  8. Place container in refrigerator overnight to continue draining. It does not matter if the container is covered or not.
  9. In the morning, turn out cheese ball that is in cheesecloth to a larger bowl and mix in salt, to taste.
  10. Store goat cheese covered in refrigerator.

Recipe makes approximately 1 1/2 cups of goat cheese.

Cherry Almond Bagels

Cherry almond bagel_n

Laced with the essence of cherry and the crunch of toasted almonds, these bagels were chewy perfection waiting for a favorite schmear, cheese or creamy nut spread .

Every week or so I make a batch of yogurt for our breakfasts. Usually there’s nothing to it: I a bit of the previously made yogurt as the starter for the next batch, and in this way yogurt begets yogurt. And even though I use powdered milk (a blend of whole and nonfat) the flavor is excellent.

The ability to easily whip up a batch of yogurt from powdered milk is handy since our little Native store in the Arctic bush doesn’t stock plain yogurt and since milk goes for about four times what it does in places connected by roads. But last week, something strange happened. The yogurt came out, for lack of a better word, weird. It separated into yogurt and way too much whey. The yogurt tasted fine, but the consistency was off-putting. Always loathe to toss out food, I strained the entire batch through cheesecloth overnight, hoping for yogurt cheese. The next morning, we had a taste and agreed it had turned out delicious. So, add another culinary feat to the list: homemade yogurt cheese.

At this point, we needed bagels.

This week’s cherry almond bagels were inspired by our desire to spread yogurt cheese onto a bagel leaning slightly more toward sweet than savory. Dried cherries and almond extract seemed like a perfect combination to mix into the bagel dough. A 20 minute baking time is just right to toast the almond slices which added a very satisfying crunch to each bite – and no, the almond slices did not crumble off; they adhered quite well and were there till the last bite. These bagels are the sweet counterpart to savory favorites such as onion bagels or “everything” bagels.

Cherry Almond Bagels

Ingredients

  • 1  1/2 cups water
  • 4 tbsp honey
  • 1 tbsp almond extract
  • 4 cups all purpose flour
  • 1 1/2 tsp salt
  • 1 tbsp active dry yeast
  • 1/2 cup dried cherries, chopped
  • 3 quarts boiling water
  • 3 tbsp granulated sugar
  • 1 egg, beaten
  • sliced almonds for topping

Directions

  1. Place first 7 ingredients into bread machine pan in the order recommended by the manufacturer. Select dough setting.
  2. When cycle is complete, turn dough out onto a lightly floured surface and let rest.
  3. Bring 3 quarts of water to a boil. Add 3 tbsp of sugar.
  4. While water is coming to a boil, cut dough into 8 pieces. Roll each piece into a ball. Flatten balls into discs about 1/2 inch thick. Poke a hole in each disc and twirl the disk around your finger to enlarge the hole. Place bagels back on the lightly floured surface to rest until the water boils.
  5. Cover a baking sheet with parchment paper.
  6. Preheat oven to 375 degrees F.
  7. When water is boiling, place bagels in water. Boil for 1 minute, then flip to boil for an additional minute. (I fit 4 bagels at a time in my pot.)
  8. After bagels have boiled, remove them from the water with a slotted spoon or strainer spoon made for frying. Place bagels on a clean, dry towel.
  9. Arrange bagels on baking sheet. Brush tops of bagels with beaten egg. Sprinkle with sliced almonds.
  10. Bake for 20 – 25 minutes, until well browned.

Try bagels 3 ways if you’d rather have a savory version.

First Sea Ice, Point Hope 2013

snow arc point hope beach n

Wind and cold sculpted this mixture of sea spray and snow into a delicate arch. The sea ice has been late in coming to the Chukchi Sea this year. This photo was taken at 3:00 p.m. with the winter sun already skimming low on the horizon. Our month of day-long darkness will begin December 6.

The thick, slushy sea ice hisses and softly moans as it moves with the current past ice already frozen fast to shore. The hissing is vaguely reminiscent of a soft autumn breeze filtering through the dry leaves of oaks and maples in my native Pennsylvania. The moans sound like the muted voices of whales deep below the sea. All else is still, the ice stretching out as far as one can see. There is no wind, and there is no other sound.

sea jelly caught in ice n

This sea jelly, entombed in shore ice, is about the size of a polar bear’s paw.

We searched for signs of life, perhaps a seal out on the ice or a snowy owl coursing the shoreline, or even the tracks of an Arctic fox. There is nothing, just the steady hiss of the ice as it flows before us. We walk along the pebbled beach for maybe a mile and finally spot a small group of ravens. Tough birds, making a living up here during the winter.

point hope frozen beach n

If you look closely among the rocks along the Point Hope Beach, it’s common to find jade. Less common are fragments of mastodon tusks.

first sea ice 2013 n

Thick ice prevents the shore from eroding during winter storms. Polar bears depend on the ice to hunt seals. Things are changing up here. The ice seems to be coming later, and there is less of it. Red foxes are becoming more common, pushing out their smaller Arctic cousins. Once winter truly locks up the sea and the sun sinks below the horizon, there is no place on earth that is quieter. It is cold and stark but beautiful. 

sea jelly caught in ice b n

We don’t always take our big cameras along on walks. Today we relied on “Little Blue,” our Cannon PowerShot D10, our trusty point and shoot.

Light and Airy Smoked Salmon, Alaska Shrimp and Leek Frittata

frittata smoked salmon shrimp n

Breakfast, lunch or dinner, this frittata this is sure to draw rave reviews.

This past summer in Seward, we had a series of some of the best meals we’ve had in Alaska – or anywhere for that matter – at an inconspicuous little restaurant called The Smoke Shack. In our view, this is hands down Seward’s best restaurant. The head chef smokes all his seafood and meat himself, and combines these with a variety of proprietary sauces to provide an authentic Alaskan dining experience, complete with the kind of consistently good service that is hit and miss at Seward’s two mega-large waterfront tourist restaurants.

One of the meals that most impressed us at The Smoke Shack was the smoked salmon frittata. Light, airy, flavorful and standing over an inch tall, we made a mental note to attempt to replicate this breakfast dish in our own kitchen. There are two keys to this dish: Start with top-notch smoked salmon, and separate the egg whites and whip them before folding in the other ingredients. We added shrimp and leeks and our own blend of seasonings. The beauty of frittatas is that with a little imagination, you can come up with your own specialty. Here’s ours.

frittata ready for oven n

Splashed with Cholula sauce and ready for the oven. It helps to start the frittata by cooking it for a few minutes on the stove before placing it in the oven. A non-stick pan such as the excellent ones made by Swiss Diamond are a good choice, as they are oven safe.

fritatta baked n

Piping hot out of the oven and ready to serve, every piece is generously packed with smoked salmon, sweet Alaska shrimp and leeks.fritatta ingredients n

One pan, eggs, whatever additional ingredients are on hand, and seasoned to taste a frittata will feed a lot of hungry sailors, campers or house guests. 

Smoked Salmon, Alaska Shrimp and Leek Frittata

Ingredients (For an 11 inch pan)

  • non-stick, 11″ oven-safe pan
  • light olive oil or other frying oil
  • eight eggs, yolks and whites separated
  • 4 oz smoked salmon (canned or vacuum packed).
  • 4 oz Alaska shrimp, peeled
  • 1 large or 2 small potatoes such as Yukon golds, diced
  • 1 1/2 cups shredded Jarlsberg cheese (We chose this variety for its buttery, sweet flavor, but many other types of cheese would work well.)
  • 1 cup leeks, chopped course
  • fine sea salt, to taste
  • Cholula sauce
  • chili spice blend such as Penzeys’ Northwoods Fire, or any blend featuring a combination of black pepper, smoked chipotle, smoked paprika, cayenne or similar peppers and a pinch of oregano

Directions

  1. Preheat oven to 350 degrees F with rack at center position.
  2. Heat 3 tbsp olive oil in 11-inch pan over medium heat. Add potatoes and cook till tender, adding salt to taste. Remove from heat, set aside potatoes in bowl, wipe pan clean if necessary.
  3. Add 1 tbsp olive to pan over medium low heat. Add leeks and a pinch of salt and cook for about 5 minutes, until tender. Set aside leeks in bowl. Wipe pan clean if necessary.
  4. Meanwhile, place egg whites in mixing bowl, add 1/2 tsp sea salt and beat or whisk till soft peaks are formed. Do not create stiff peaks.
  5. Add chili spice blend to egg yolks, mix together, and add mixture to whites beating at slow speed until just incorporated. Do not over mix.
  6. Place a scant tablespoon of olive oil in pan over low heat and add cooked potatoes. Pour in egg mixture. Top with smoked salmon, shrimp and leeks. Add cheese. Add a few splashes of Cholula. Allow to cook approximately 5 minutes to firm up bottom.
  7. Place pan in oven and cook for 20 minutes.

This frittata pairs nicely with Champagne.

We use Alaska shrimp because they are uniquely tasty and are sustainably harvested. We harvest our own wild Alaska salmon and encourage readers to look for the “wild” or “wild-caught” label when purchasing salmon, as this is the only sustainable choice for salmon.