Roasted Stacked Beet Salad

Roasted Beets & Goat Cheese

Almost ten years ago, I went on a fabulous California North Coast honeymoon with my honey. As I’m sure you can imagine, that get-away was filled with culinary delights. We ate and drank at wonderful restaurants and Jack grilled us fabulous meals on the balcony outside our honeymoon suite. One of our favorite memories is of a dinner at the River’s End restaurant in Jenner, California. The chef included locally sourced food, some of which came from a garden right on the grounds outside the restaurant.

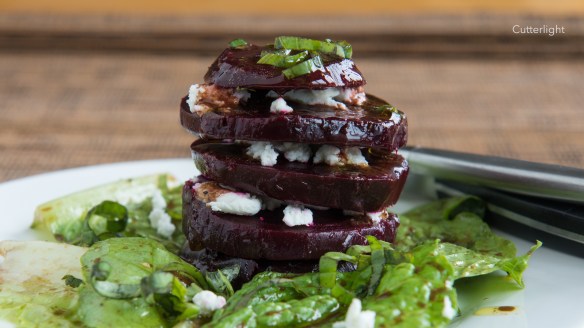
We’d just completed a fantastic run along a trail on a bluff looking out over the Pacific Ocean, and we were famished. We began our meal with oysters on the half shell and a crisp amber ale. Next, Jack and I ordered two entrées to share along with what proved to be a wonderful bottle of old vine Zinfandel from a California winery. Jack opted for roasted elk while I went for duck prepared three ways. While we were waiting for our entrées, we tucked into a pair of beautifully presented stacked beet salads. What a revelation! Growing up, I’d always been served canned, pickled beets. I developed a disdain for those beets. But roasted, fresh beets? Wow, who knew? River’s End’s creation featured three colors of perfectly roasted beet discs atop garden-fresh greens. In between each of the discs were crumbles of creamy goat cheese. A garnish of chiffonade basil and a drizzle of balsamic vinaigrette completed the presentation. The combination of flavors and textures were perfection.

Earlier this fall, beets showed up in our Farm Lodge vegetable box. With a lovely memory of our honeymoon meal, I set out to recreate this delicious salad. My version came out just as good as my memory. The combination of the earthiness of a roasted beet, a curl of basil, creamy goat cheese and tangy  vinaigrette can’t be beat.

Roasted Stacked Beet Salad

Ingredients

  • two portions of salad greens
  • two medium-sized beets
  • extra virgin olive oil
  • a few sprigs of basil
  • 2 tbsp goat cheese

Vinaigrette

  • 3 tablespoons balsamic vinegar
  • 1 tablespoon Dijon mustard
  • 1 garlic clove, minced
  • 1/2 cup olive oil
  • Salt and freshly ground pepper to taste

Directions

  1. Preheat oven to 425° F.
  2. Coat beet roots in olive oil.
  3. Wrap beets in aluminum foil.
  4. Roast for about an hour.
  5. Beets are done when easily pierced with a knife.
  6. Let them cool enough to handle. Using a paring knife, skin the beets.
  7. Slice the beets while warm. Set aside.
  8. Prepare the vinaigrette by mixing vinaigrette ingredients well.
  9. Place greens on plates. Top greens with one slice of roasted beet. Sprinkle beet slice with goat cheese. Continue with remaining beet slices and cheese. Repeat this process on another plate with the second beet.
  10. Roll up basil leaves and slice into thin strips. Sprinkle strips atop each salad plate.
  11. Drizzle each salad with vinaigrette dressing.
  12. Serve with freshly baked bread to sop up every crumb and delicious drop left on the plate.

Light and Airy Raspberry Mousse

Airy and light, but packing a powerful raspberry punch, this raspberry mousse is a delightful dessert after a rich meal.

Two of my favorite culinary pastimes are making jams and ice creams. We love to pick local berries. The usual varieties around Chignik Lake are blueberries, cranberries, crowberries, currants, and raspberries. Unfortunately, this year was a terrible year for berries. Our usual spots are yielding small amounts or no berries at all. Except for the raspberries. Years ago, someone planted a garden of raspberries and currants. The raspberries, as raspberries do, have spread out from their original patch to a nearby hill. Last year, this hill was crazy with berries. This year, it was the only place we could find a decent amount of berries of any kind. So this winter portends many creations featuring the delicious raspberry.

Today’s recipe stemmed from my other joy – ice cream. Many of our favorite ice creams are the custard type, requiring several egg yolks. This tends to leave us with quite a bit of leftover egg whites at times. What to do? Omelets are good, up to a point. I’ve made batches of meringues, too. But this time, I wanted to do something different. What about whipping the egg whites into a foamy mousse?

This is a simple recipe that can be made in minutes and is best whipped up right before it’s eaten. The first time I made it, I whipped up heavy cream to top it off. That was good, but a little too heavy for this airy-light dessert. Today’s version is topped with a whipped topping made from nonfat powdered milk and ice water. It, too, must be made just before serving. Drizzled with a little raspberry jam, this mousse makes for a light and delicious dessert fit to end a beautiful feast.

Light and Airy Raspberry Mousse

Ingredients

  • 1/2 cup egg whites (or whites from 4 eggs)
  • 4 tsp granulated sugar
  • 4 tbsp raspberry jam
  • whipped topping

Directions

  1. Whip egg whites until stiff peaks are formed.
  2. Add sugar to whites and continue to whip until well mixed.
  3. Fold in raspberry jam.
  4. Divide egg white mixture into two parfait glasses.
  5. Top with whipped topping.

The End of Summer in Chignik Lake: A river full of Silver Salmon, a Two-Day Storm and Halibut Chowder

Smokey Halibut Chowder

With a freezer brimming with Sockeyes and Coho, entering September we have salmon security for the coming winter. The Coho have been particularly fun to put away. These silvery bright ocean-fresh eight to 12 pound fish often hit our lures right at our feet as we cast, swing and retrieve through the Chignik River’s clear green water. We caught and filleted the last fish we need Friday evening just before two straight days of gale force winds lashed our village with heavy rain and turned our lake into an angry, white-capped sea. Today was a good day to stay inside. While José González played quietly in the background on our Bose speaker, Barbra bottled a couple of cases of beer – a red ale and an amber – and turned out two handsome loaves of her famously delicious sourdough bread. I cured a couple of skeins of salmon eggs and tucked in with David McCullough’s fascinating Pulitzer Prize winning biography, John Adams.

A few days ago, a friend presented us with halibut and alder-smoked Sockeye salmon. Today was the perfect day to thaw the halibut and put these gifts to use. The secret to this recipe is to cook the potatoes and the vegetables separately and to then put the chowder together. Roasting the potatoes adds to the depth of flavor and texture. When cutting ingredients up, you want pieces small enough so that more than one item can fit on a soup spoon, but big enough to carry flavor. Celery and bell pepper can be strongly flavored, so cut these finer and go easy on the amount of each. Precooking will significantly soften and sweeten the flavor of these vegetables.

Smokey Halibut Chowder

Ingredients

  • 1 pound halibut cut into chunks
  • 1 1/2 cups of smoked salmon, skin removed diced (or substitute bits of crispy bacon or salt pork and use less)
  • About double the amount of potatoes as halibut, skin on, diced
  • 1 leek, sliced into fairly thin discs
  • 3/4 cup of bell pepper, diced small
  • 1/2 cup celery, diced small
  • 1 can of sweet corn (or 2 cobs worth)
  • about 4 cups of milk
  • about 1 cup of heavy cream
  • olive oil
  • butter
  • smoked sea salt
  • tarragon
  • oregano
  • nutmeg
  • black pepper
  • sherry (or white wine or mirin)

Directions

  1. Place a tray suitable for roasting on the oven’s center rack and preheat to 450° F. (230° C)
  2. Lightly salt the halibut and set aside
  3. Place the diced potatoes into a bowl. Toss with olive oil and smoked sea salt.
  4. Roast the potatoes till soft and beginning to brown and crisp – about 10 minutes. Remove from heat.
  5. Meanwhile, heat some butter in a large pan. Add the bell pepper and some sherry and cook for about 2 minutes. Then add the celery, leeks and sweet corn. Add smoked sea salt, and perhaps a little more sherry, to taste, stirring occasionally. When the vegetables have just cooked through and become soft, add the tarragon, oregano, nutmeg and black pepper, tasting as you go. Toss together thoroughly and remove from heat.
  6. Add the potatoes and the cooked vegetables to a large pot making sure to scrape out all the butter & sherry mixture from the vegetable pan. Add the halibut and salmon and toss everything together well. Add enough milk and cream in about a 4 to 1 ratio to sufficiently cover all the ingredients. Add additional salt as needed. Heat on high heat just until the chowder is steaming and the halibut is cooked through. Don’t boil and don’t overcook.
  7. Serve piping hot with sour dough bread and butter.

Let the weather do its worst.

What to do with leftover instant oatmeal packets? Maple and Brown Sugar Muffins, Of Course!

Instant oatmeal packets – overly sticky-sweat on their own –  can be transformed into moist, tasty, healthy breakfast treats. 

I really hate to see food wasted. So when we recently discovered several instant oatmeal packs fated to be thrown out, I grabbed them up thinking they might make decent breakfast fare for backpacking. Unfortunately, as it turns out the oatmeal is way over-processed and there’s far too much sugar. So I began thinking about how else they might be used. Muffins! I added leftover trail mix to the batter as well as to the topping to add some crunch and flavor. Moist and flavorful,  these muffins along with some fruit and freshly brewed coffee make for a quick and delicious breakfast. In fact, we’ve found ourselves snacking on them throughout the day!

Maple and Brown Sugar Oatmeal Muffins

Ingredients

Streusel Topping

  • 3 tbsp all purpose flour
  • 3 tbsp brown sugar
  • 1/2 tsp cinnamon
  • 1/4 cup nuts, chopped coarse
  • 2 tbsp unsalted butter, melted

Muffins

  • 1 3/4 cup all purpose flour
  • 1/2 cup brown sugar
  • 1 tbsp baking powder
  • 1/4 tsp salt
  • 2 packets flavored instant oatmeal
  • 2 eggs, beaten
  • 1/4 cup milk
  • 3/4 cup plain yogurt
  • 1/4 cup vegetable oil
  • 1 tsp vanilla
  • 2 tbsp real maple syrup
  • 1 cup trail mix, chopped coarse

Directions

  1. Preheat oven to 400 degrees F (200 degrees C). Grease 12-muffin cup tin.
  2. In a small bowl, combine all streusel ingredients. Mix with fork until the mixture resembles coarse crumbs. Break larger pieces. Set aside.
  3. In a large bowl, add first 5 muffin ingredients. Mix together using a whisk.
  4. In a medium bowl, whisk together eggs, milk, yogurt, oil, vanilla and syrup.
  5. Mix wet ingredients into dry.
  6. Fold in trail mix.
  7. Spoon batter into prepared muffin tin. Each cup will be about 2/3 full.
  8. Sprinkle streusel topping on each muffin.
  9. Bake in preheated oven for 15 minutes. When done, a wooden pick inserted into center of muffin will come out clean.
  10. Let cool in pan on wire rack for 5 minutes before serving.

Broiled Salmon Spine with Roasted Vegetables on Farfalle: Getting The Most out of Every Fish

Close to the bone, salmon meat near the skeleton is lean and tasty. Salmon spines (salmon carcasses with some meat still attached) are perfect candidates for the broiler. Add some vegetables to the broiling pan and you’ve got a gourmet meal for two.

No sooner did we return back home in Chignik Lake than we began turning our attention to filling our freezer and smoker with salmon. Wild salmon are precious, and every last bit of salmon meat is delicious. I don’t always get the fillets off the bones as cleanly as I’d like. That’s where this dish comes in. While the photos depict a Sockeye salmon, other species work well, too, and of course a fillet works as well as a spine in this recipe.

1. Position your oven rack to the second level below the broiler. Place a broiling pan on the rack and turn on the broiler to preheat the pan and the oven.

2. Chop up some of your favorite vegetables. Pick ones that are hardy enough to withstand a few minutes under the broiler. Whole garlic cloves roast up soft, slightly charred and delicious in this recipe. Fruit such as pitted olives work well, too.

3. To serve two, measure out about two cups of Farfalle pasta. Other types of pasta are fine.

Mise en place: whole garlic cloves, bell peppers, Brussels sprouts, fresh oregano, sea salt, pasta and Kalamata olives. You’ll also need a good extra virgin olive oil, a broiling pan, and, of course, the salmon spine or fillet. 

4. Toss the vegetables together in a bowl along with sea salt and olive oil. Fresh or dried thyme or oregano are good herb choices.

Sprinkle salt into the vegetables to taste, add a couple of tablespoons of olive oil, then mix together. As an additional option, a tablespoon or so of mirin – a light, sweet cooking wine – adds a hint of sweetness and helps the vegetables brown and char.

5. Next, rinse the salmon in cold water and dry and clean it with paper towels. There may be some dark matter running along the spine inside the skeletal cavity. That’s the kidney. If there’s a lot of this, you can use a knife or even a spoon to scrape it out. It can be further cleaned up with a stiff brush. A toothbrush works well for this.

6. Place the salmon spine on a cutting board and give it a fairly generous sprinkling of salt.

A good sea salt (we like gray sea salt) really brings out the flavor of salmon.

7. Take the preheated broiling pan out of the oven. Use a brush or spatula to coat the surface with olive oil. Arrange the salmon and the vegetables on the pan.  It should be sizzling hot. Place the pan back into the oven and broil for about 8 or 9 minutes.

8. While the salmon is broiling, prepare the pasta according to the maker’s directions.

Colored bell peppers and Brussels sprouts char and caramelize beautifully under a broiler.

9. After about 8 or 9 minutes, remove the broiling pan from the oven. Transfer the salmon to a cutting board and use a fork to pull the meat off the bones. You want chunks of a good size to go on a fork along with a bite of vegetable and a bit of pasta.

10. Finally, plate up the pasta. Add the salmon and vegetables. Finish with freshly grated Parmesan cheese and a couple of grinds of freshly cracked pepper. Serve hot with a bright Willamette Valley Pinot Gris.


Bourbon Chocolate Chip Mini Skillet Cookie for Two

Warm and gooey, straight from the oven. Watch out – this cookie has been found to be highly addictive.

Several years ago, we were introduced to the cast iron skillet cookie. This giant chocolate chip cookie is best served nearly straight from the oven. No need for fancy serving dishes, we were handed spoons and in mere moments the 10-inch cast iron pan was emptied. 

This terribly addictive cookie came back into my thoughts during our last trip to Anchorage. Jack and I went to a restaurant where we were served a delicious skillet breakfast of country fried potatoes, a fried egg, and an Alaskan reindeer sausage all presented in a cute, single-serving cast iron pan. That presentation was as clever as it was practical. The mini-skillet was the perfect serving size for one and kept the breakfast piping hot. We could imagine all kinds of tasty creations that would work perfectly in these clever pans. When we got home, I ordered two, and was pleasantly surprised to find that they are relatively inexpensive.

When the pans arrived, the first order of the day was a skillet cookie… but not just any skillet cookie. We love the flavor of bourbon. It happens to perfectly complement the buttery, carmely, flavors of a chocolate chip cookie. (See our post about melty chocolate chip cookies.) So I decided to punch up the skillet cookie with a bit of bourbon. After a couple of different successful experiments, I came up with just the right balance of ingredients for my recipe.

The bad things about this cookie? It is ridiculously delicious. We found it impossible to eat part of it and save the other part for later. It is easy to make, which only contributes to the addiction problem. And if you happen to have some rich vanilla ice cream to scoop on the top? You may as well call your boss and tell him/her that you won’t be coming in this week.

With fair warning, I give you the –

Bourbon Chocolate Chip Skillet Cookie for Two

Ingredients

  • 1/4 cup unsalted butter, melted
  • 8 tsp granulated sugar
  • 1/4 cup brown sugar
  • 2 tbsp egg, whisked
  • 1 tsp vanilla extract
  • 2 tsp bourbon
  • 1/4 tsp baking soda
  • pinch salt
  • 1/2 cup all purpose flour
  • 1/3 cup semi-sweet chocolate chips

Directions

  1. Preheat oven to 350° F (180° C)
  2. Have a 6 1/2” cast iron skillet available
  3. Whisk melted butter with sugars
  4. Whisk in egg
  5. Whisk in vanilla and bourbon
  6. Stir in flour, baking solda and salt
  7. Fold in chocolate chips
  8. Pour batter into cast iron skillet
  9. Bake for 20 minutes. Cookie will be puffed up and will have pulled away from edge when finished.
  10. Let cool slightly. Serve while still warm plain or topped with creamy vanilla ice cream.

Bourbon Raspberry Beret

The perfect drink for when you’re “doing something close to nothing.” We went down to the beach and gathered a little snow for the staging.

Drinks for Two:

Have two 8-ounce glasses with two or three ice cubes in each ready, and then to a cocktail shaker add:

  • 3  jiggers raspberry syrup*
  • 2 jiggers simple syrup
  • 1/2 jigger lemon juice
  • 2 jiggers bourbon
  • 3 cubes ice

Shake well and serve.

*This is easy to make by adding simple syrup to raspberry juice, to taste.

The Blueberry Bourbon Bomb – It’s Friday… Bombs Away!

This one’s easy to make and even easier to drink. Happy Friday!

Blueberry Bourbon Bomb

  1. Place two or three ice cubes in an 8-ounce glass
  2. In a cocktail shaker, place:
    • 3/4 ounce blueberry syrup (or blueberry juice with simple syrup)
    • 1 tsp lime juice
    • 1.5 ounces bourbon
    • 3 ice cubes
  3. Shake vigorously.
  4. Pour into glasses, top off with carbonated water and gently stir.

It’s five o’clock somewhere! Bombs away!

Razzle Dazzle ‘Em with Raspberry Cream Pie

Looking to expand my cookie recipe collection, I bought a new baking recipe book a couple of weeks ago. I found a beautiful book which boasted over 150 interesting cookie ideas. After reading the book cover-to-cover, I decided to try a layered chocolate biscuit. It was a disaster. The biscuit dough completely and totally fell apart when I rolled it out and there seemed to be no way to salvage it. I really hate wasting anything, so I baked the crumbs of dough anyway figuring that if they tasted good, I’d find a way to put them to good use. Well, they did taste good, and so for several days they sat on the counter in an air-tight container awaiting inspiration.

This past weekend I reached for my tried and true Williams-Sonoma Baking Book. The book fell open to a beautiful picture of a pie with a deep brown cholatey crust and a creamy pink filling. Raspberry cream pie – of course! As luck would have it, we still have a good supply of frozen raspberries from last summer’s berry picking. Raspberries and chocolate are a perfect match, in my book.

What a delight! The look of this lovely pie certainly suggests Valentine’s Day, but any day would be a good day for this light, airy dessert. I think the best way to describe the flavor is to imagine a 50/50 bar, otherwise known as a Dreamcicle – creamy vanilla ice cream in the middle surrounded by a slightly tart, fruit exterior, usually orange. This pie filling has that same creaminess with a slight tang of sour from the fresh raspberries. The crunch of the chocolate crust provides the perfect textural counterbalance. Next time you want to tell someone you love them, make them a raspberry cream pie!

Raspberry Cream Pie

Ingredients

  • 1 1/4 cups chocolate cookie crumbs
  • 5 tbsp unsalted butter, melted
  • 3 tbsp granulated sugar
  • 1/4 cup cold water
  • 1 package (2 tsp) unflavored powdered gelatin
  • 2/3 cup natural raspberry juice or fresh raspberry purée
  • 2 large eggs
  • 1/2  cup granulated sugar
  • 3/4 cup heavy whipping cream

Directions

  1. Place oven rack in the middle of oven and preheat to 350° F (180° C).
  2. In a medium bowl, combine chocolate cookie crumbs, butter, and granulated sugar. Stir until all is evenly mixed.
  3. Press the cookie crumb mixture into bottom of 9-inch pie pan or springform pan.
  4. Bake until firm, about 5 minutes.
  5. Let crust cool on wire rack.
  6. Pour cold water into a saucepan. Sprinkle with gelatin and let sit until gelatin softens and swells (about 5 minutes).
  7. Heat gelatin over medium heat. Stir until it is clear and fluid.
  8. Stir gelatin mixture into raspberry juice. Set aside.
  9. In a medium bowl, whisk eggs, sugar, and salt until pale yellow. Set aside.
  10. In a large bowl, beat or whisk the cream until thick, soft peaks form.
  11. Add egg mixture to whipped cream. Whip until smooth.
  12. Add raspberry mixture to cream mixture. Whip until smooth.
  13. Pour filling into the crumb crust. Even out with a rubber spatula.
  14. Refrigerate until the filling is cold and firm (4-6 hours).
  15. Let the pie stand at room temperature for about 20 minutes before serving.
  16. Serve topped with sweetened whipped cream and fresh berries.

Waiter! Another oven fresh Soft Pretzel with a Deep Red Ale, please

A couple of weeks ago, Jack and I took our biannual trip to the big city – Anchorage. Since we’ve been brewing our own beer this year, we felt it was our moral and professional obligation to sample different types of beers in order to best serve our customers. All right, morals and professions have nothing to do with this tasting quest. And we happen to be our own best customers, but whatever. Tasting beer is fun and actually educational! We met up with a guy at the 49th State Brewing Company who told us he is studying to be a Cicerone (think beer sommelier). He will become a trained and certified beer professional! After talking through the beer menu with him, we diligently read descriptions and critically tasted several beers in order to get a handle on what we really liked and what food pairings we could imagine with 49th State’s brews. By the way, they have a diverse selection with beers featuring imaginative and complex flavors. We highly recommend making 49th State Brewing a stop on your tour of Anchorage. We came back home with a new appreciation of the levels of complexity we are producing in our little home brewery.

When we returned to Chignik Lake, one of our batches of new beer was ready to try. This beer recipe was produced by a company called Brew Demon. The brew, Deep Red Ale, came out nicely. It had a deep red-brown color with a slight nutty flavor, mildly hoppy, with a touch of malt and a beautiful head. Jack says, “When I drink this beer, I imagine enjoying it with fried or grilled by the campfire.” 

One night in Anchorage, we decided to enjoy a Giant pretzel along with our beer tasting. The bakers at 49th State Brewing nailed this pretzel. It was delightfully chewy with that expected glossy exterior speckled with high quality salt. And it was Huge. It was a perfect accompaniment to a delicious beer – and a perfect idea to recreate in my home bakery. To go with our deep red ale, this time I stuck to my time-tested regular-sized pretzel recipe. The giant pretzel is on the baking goal list. Stay tuned for that recipe.

Soft Pretzels

Ingredients

  • 4 tsp active dry yeast
  • 1 tsp granulated sugar
  • 1 1/4 cups warm water (110° F/45° C)
  • 4 cups all purpose flour
  • 2 tbsp granulated sugar
  • 1 1/2 tsp salt
  • 1 tbsp extra virgin olive oil
  • 1/4 cup baking soda
  • 4 cups hot water
  • kosher salt for topping

Directions

  1. In a large bowl, dissolve yeast and 1 tsp sugar in warm water. Let stand about 10 minutes.
  2. Mix one cup of flour and 2 tbsp sugar into the yeast mixture.
  3. Mix an additional cup of flour and salt into the dough mixture.
  4. Continue adding flour by half cups.
  5. Add additional flour if dough is too wet.
  6. Knead dough until smooth (about 7 minutes).
  7. Oil a large bowl. Place dough in bowl and turn until coated.
  8. Cover bowl with plastic wrap and let dough list un a warm place for an hour. Dough should double in size.
  9. Preheat oven to 450° F (230° C). Line a baking sheet with parchment paper.
  10. In a large pot, dissolve baking soda in hot water.
  11. Divide dough into 12 equal pieces.
  12. Roll each piece into a rope and twist into a pretzel shape.
  13. Once the dough pieces are shaped, dip them into the hot baking soda solution.
  14. Placed dipped pretzels onto prepared baking sheets. Sprinkle with kosher salt.Bake in preheated oven for 8 minutes. Finished pretzels will be golden brown.
  15. Let pretzels cool slightly and enjoy them with your favorite mustard and a delicious red ale.