Wonderfully Silky, Sumptuous Chanterelle Mushroom Soup

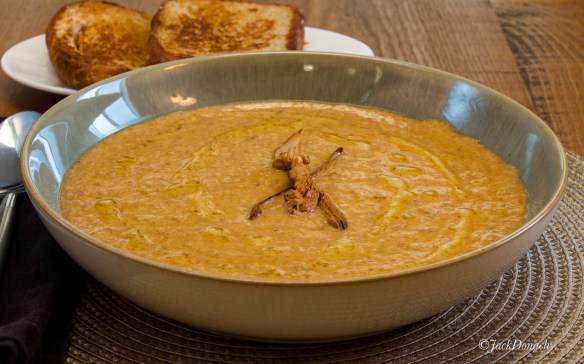
Forget everything you know about mushroom soup and slip a spoon into chanterelle magic.

This past fall when Costco (which we can now have delivered to our home in the Alaska bush) offered fresh, wild-picked chanterelle mushrooms, I couldn’t resist ordering a few pounds. I wasn’t sure what I wanted to do with them other than savor them with a little olive oil, garlic and mozzarella on one of Barbra’s homemade thin pizza crusts, or perhaps present them in an egg-white omelette, but I was confident I’d find something. An internet search brought up Escoffier’s Chanterelle Soup. Reading through the recipe, I began mentally picking out the bottle of Chardonnay I’d pull from the rack to serve with it.

While I stayed fairly true to Auguste Escoffier’s Veloute Agnes Sorel – based on the various English versions of the recipe I scanned through – I made a few adjustments, particularly the second time around. We don’t stock brandy, but we have bourbon on hand; that was an easy swap and it worked well. The chicken broth the original recipe calls for is fine… but we felt that lobster stock, made with Better than Bouillon’s Lobster Base, worked exceptionally well. And toward the end of cooking, a taste suggested that not only serving a Chard with this soup would make for an excellent pairing, but that a quarter cup or so to finish the soup might be warranted as well. In fact, we were amazed at the way in which a little Chardonnay brought this soup together, making the already subtle, silky transitions in the flavors of cream, butter, bourbon, saffron and chanterelles even smoother.

This is not a difficult recipe, but it does have distinct preparation steps. A velouté (vәl-ü-tā) must be created – a mixture of butter, flour and broth. And in the creation of a liaison of egg yolks and cream lies much of the secret of this soup’s silky feel.

Oh, and don’t skimp on the saffron.

Ingredients  (Serves 4+)

For the Velouté

  • 6 cups lobster stock (use Better than Bouillon Lobster Base)
  • 2 tbsp unsalted butter
  • 2 tbsp all purpose flour

For the Soup

  • 1 pound of chanterelle mushrooms, chopped fine
  • salt
  • 1/2 cup shallots, chopped fine
  • 1 tbsp unsalted butter
  • 3 egg yolks
  • 1/2 cup heavy whipping cream
  • 2 oz bourbon
  • saffron – approximately 2 full pinches
  • 1/4 cup or slightly more of Chardonnay
  • salt to taste/if necessary
  • a few especially nice chanterelles set aside as a garnish for each bowl

Directions

  1. Heat the stock, but try to keep the temperature just below simmering.
  2. Meanwhile, in a separate pot or pan (a large sauteuse pan works well for this) over medium-low heat, melt the butter until it begins to froth. Whisk in the flour. Continue whisking until mixture is cooked through and smooth, but do not allow to brown. This is called a roux.
  3. Whisk the broth into the roux and bring to a low simmer, stirring frequently. Cook this down by about a fourth or slightly more. Don’t let it boil. A very gentle simmer will reduce the velouté in about 30 minutes.
  4. Meanwhile, sweat the chopped mushrooms and shallots with a little salt over medium-low heat in a dry pan. Stir occasionally and cook till the shallots are translucent and the mushrooms have given up moisture and have browned. When they’re ready, add a tablespoon of butter and stir together.
  5. Crumble the saffron into the bourbon. This can be done earlier. The idea is to allow the saffron to begin releasing its flavor and color.
  6. Add the bourbon and saffron mixture to the mushroom mixture. Turn the heat up and stir until most of the bourbon has evaporated.
  7. Purée the mushroom mixture in a food processor or with a stick blender.
  8. When the velouté has cooked down by 1/4 or slightly less of its original volume, add the mushroom purée and stir well. Try to keep the temperature just below simmering or at a very low simmer. When the mushroom mixture is thoroughly incorporated, turn the heat to low to keep the soup hot without simmering.
  9. In a mixing bowl, whisk together the egg yolks and cream. This is a liaison. The intention here is to create a binding agent that will thicken the soup.
  10. Into the egg yolk and cream mixture, whisk in about 1/4 cup of soup at a time. By introducing the hot soup a little at a time while whisking, you will ensure that the liaison remains smooth and doesn’t break up. Once you’ve whisked in a total of about two cups of soup, you can now stir all of the liaison into the soup. Again, keep the soup hot, but at or below a very low simmer. Do not let it boil.
  11. Add 1/4 cup of Chardonnay. Give the soup a taste. Add a little more wine or salt, if necessary.
  12. To serve, garnish each bowl with a chanterelle and perhaps a drizzle of melted butter. Enjoy with a crusty piece of bread and a favorite Chardonnay.

Salmon (or any fish) in Saffron Broth with New Potatoes

Salmon worked wonderfully in this easy yet exotic meal, but halibut would also shine as would walleye, rockfish and most other fillets.

Saffron, the dried stigmas of crocus flowers, imbues food with a rich yellow-orange color and distinctive flavor that goes especially well with fish. Since it only takes a healthy pinch of the crumbled filaments, it’s not as expensive to use as you might think. We’ve been using Spanish coupe grade saffron from Penzeys Spices and have been very happy with it.

Crocus sativus, the saffron crocus – https://commons.wikimedia.org/wiki/File:Saffron8.jpg

This is our take on a recipe we found in a recent addition to our cookbook collection, The Complete Mediterranean Cookbook from America’s Test Kitchen. Their recipe calls for hake, chorizo and clam juice. Along with a few other minor changes, we substituted salmon fillets, thick-cut bacon and fish broth made from salmon and added a bit of powdered chipotle, cayenne and mesquite to emulate chorizo’s spicy smokiness. With most of the fat rended from the bacon, and the cooked bacon then pressed between paper towels, this is a healthful, satisfying one-bowl dinner. Add hunks of crusty rustic-style bread, and while you can seldom go wrong with salmon and Chardonnay, try pairing this dish with a Riesling that has a hint of sweetness to it.

Salmon in Saffron Broth with New Potatoes

Ingredients

  • extra virgin olive oil
  • sweet onion, chopped fine
  • thick-cut bacon, fried, pressed between paper towels and cut into small pieces
  • garlic cloves, minced
  • saffron
  • fish stock – clear, preferably homemade from fresh fish as we’ve found it difficult to obtain quality fish stock otherwise. Or use clam juice.
  • water
  • dry white wine
  • small red or yellow potatoes
  • seasonings: bay leaf, marjoram, soy sauce (or sea salt), chipotle powder, cayenne pepper,   and mesquite (for additional smokiness)
  • salmon fillets, skin removed and fillets patted dry (We felt that almost any type of fish   would work well in this dish.)
  • freshly ground black pepper
  • chervil or parsley
  • fresh lime juice

Directions

This works best in a sauteuse pan. You don’t need a lot of broth in this dish – perhaps a cup or so per serving. The potatoes and fish should rest in the broth, not be completely covered by it.

  1. Sauté the onions in olive oil. When they just begin to caramelize, add the minced garlic and crumble in the saffron. Cook for about 30 seconds, just till the garlic releases its aroma.
  2. Stir in fish stock and wine.
  3. Add potatoes and the seasonings – just a little of each as you can always add more if you need to. Give the broth a taste. If the flavor of the fish stock or clam juice is too strong, add a bit of water.
  4. Keep heat fairly low, at – or preferably just below – a low simmer. Cook until potatoes are tender – almost ready to serve. Taste broth and adjust seasonings as desired.
  5. Season the salmon fillets with freshly cracked pepper. Create space in the pan and position the salmon fillets skinned side down in the broth. Cook at or just below a low simmer for 7 to 12 minutes, depending on the thickness of the fillet. With salmon, you’ll see white albumin form on the fillet when it is cooked through. You can check with a thermometer – 140° F for fish.
  6. Remove pan from heat. Gently stir in a little lime juice and a sprinkle of chervil or parsley.
  7. Serve in shallow bowls, spooning some broth over the fillet.

Hot off the Grill: Two-Cheese Alaska Salmon Burgers

Wild Alaska Salmon on pan toasted homemade English muffins, wild Alaska blueberries and a big mug of coffee – a wild way to start the weekend.

This is easy. Take a wild salmon fillet, remove the skin, chop up the fillet and put it in a bowl. Add equal parts grated mozzarella and crumbled goat cheese. Sprinkle in a spicy seasoning – something with smoked chipotle is especially nice. No salt needed as the cheese should be salty enough. That’s it. Now shape the mixture into burgers and fry in olive oil, flipping once.

Served on English muffins that have been pan toasted in olive oil, these make for a terrific weekend brunch. Or put the burgers in traditional hamburger buns. Try them with a little Dijon mustard. Bon appétit!

Nobu West Comes North: Paper-Thin Salad with Wild Alaska Sockeye Tataki

Crisp, paper thin vegetables and a tangy, spicy jalapeño dressing accent flash fried Sockeye salmon in this fusion salad from chefs Nobu Matsuhisa and Mark Edwards. 

For the first time this summer, yesterday was downright cool. We rode our Hondas 25 miles over a combination of paved road and then ever narrowing dirt and gravel to see the falls on the Tazimina River, northeast of Newhalen. Our jackets were zipped against the fall-like chill in the air. With most of the fireweed going to seed, the Sockeye run long over and Barbra due to begin her school year later this week, I wanted to prepare a dish that might capture a sense of summer’s fleeting final days in a land where autumn comes early. A bottle of Sauvignon Blanc was already chilling in the refrigerator.

I found what I was looking for in the cookbook Nobu West, a joint effort between Nobu Matsuhisa and Mark Edwards. The key to this salad is to use a mandolin to slice the vegetables as thin as possible and then to soak them in ice water to make them as crisp.

Salmon Tataki with Paper-Thin Salad (from Nobu West, by Nobu Matsuhisa & Mark Edwards)

Ingredients

Vegetables

  • small red beet
  • carrot
  • zucchini
  • summer squash
  • red radish
  • cucumber
  • other vegetables as desired

Jalapeño Dressing

  • 1 jalapeño pepper, seeds removed, diced fine
  • 6½ tbsp rice vinegar
  • 1 tbsp garlic chopped fine
  • 1 tsp sea salt
  • 1/2 cup grape seed oil (or extra virgin olive oil, etc.)

Salmon Tataki

  • sashimi grade salmon fillet(s), skin removed, seasoned with coarsely ground black pepper
  • bowl of ice water
  • stainless steel or cast iron pan and cooking oil with a high smoking point (such as avocado oil)

Directions

1.  Vegetables: Prepare two bowls of ice water. Use a mandolin to slice vegetables lengthwise as thin as possible. Immerse slices in ice water for an hour to make the vegetables crisp. Do the beets separately, using a separate bowl, to keep them from coloring the other vegetables. (You might want to wear nitrile gloves to keep the beets from staining your fingers.)

2. Jalapeño Dressing: You will need a stick blender or food processor for this.
– Place diced jalapeño, vinegar, garlic and sea salt in food processor (or in a narrow container suitable to a stick blender). Purée ingredients.
– Continuing to process ingredients, slowly drizzle in olive oil. (If the ingredients separate, whisk together just before serving.)

3.  Salmon Tataki:
– Place cooking oil in a frying pan and heat on medium-high.
– When oil is ready to sizzle, sear salmon fillet, frying for about 5 seconds on each side. Outside of salmon should be white where cooked.
– Plunge seared salmon into ice water to stop cooking and to firm up flesh. Pat dry with paper towels and refrigerate till ready for use.
– Just before serving , cut salmon fillet into thin strips, about ¼ inch thick. Do this at the last moment so that the salmon remains flavorful.

4. Serving the salad:
– Pour jalapeño dressing on serving plates so that it covers the plates.
– Arrange salmon strips on plates.
– Place vegetables on salmon to form a mound.

Serve immediately while vegetables and salmon are still chilled.


Wild About Wild Mushrooms – Lentil and Wild Porcini Pâté

Wild Alaskan porcini mushrooms star in this pâté recipe – the perfect snack or appetizer served on rice crackers, summer squash or zucchini. 

Many years ago, Jack and I took a mushroom foraging class from a park ranger in Oregon. With the help of our instructor, we learned about local mushrooms and actually found one King Bolete mushroom. At the end of that experience, I had more fear of “false mushrooms” that could make me sick or even kill me than anything else. Since then, I’ve been on countless hikes and found countless mushrooms I wouldn’t dare eat – even though they look perfectly safe. When we moved to Newhalen and began fishing and foraging for berries, we began noticing mushrooms the color of browned bread. Big ones. As usual, Jack and I wondered if they were edible. After one quick wondering, we resigned ourselves to knowing our mushrooms would come from a store and went back to the task at hand.

We were delighted to learn that one of the locals here in Newhalen is an expert on mushrooms. She volunteered to take a few of us out a couple of weeks ago and teach us about Newhalen fungi. Turns out, all those big mushrooms we had been seeing are types of boletes (otherwise known as porcini) and are not just edible, but are delicious!

Many people dry these mushrooms. We also heard that they can be frozen. After a bit of experimenting, we decided to vacuum-pack them and freeze them for the winter. Of course, we’ve kept out a few for now. Many have already starred in our recent evening meals – sautéed with garlic in olive oil to serve over pasta and atop Swiss mushroom burgers. Mmmm. Both of us are alive and kicking and now armed with confidence to continue foraging for these delicious beauties on our local hikes.

I came up with this mushroom pâté recipe a couple of years ago with store-bought ingredients. It was created with an intent to mimic one of my favorite Jewish foods – chopped chicken liver. This recipe not only tastes surprisingly like the delicious spread from my memory, but it brings it into the category of good for you, not just tasty. Traditional chopped chicken liver recipes are loaded with flavorful, but not so healthy fats. The chicken liver itself is low in fat but is high in cholesterol. You can use store-bought crimini, button, or shiitake mushrooms. But if you have access to wild porcini or other wild mushrooms, they will up the flavor of this pâté. Also, don’t save this recipe for a special occasion. This scrumptious mushroom and lentil spread is packed with flavor, is low in fat and cholesterol and high in fiber and protein, which makes it a go-to for a pre-run snack or a mid-afternoon pick-me-up.

Nutrition Info Lentil Wild Porcini Pâté

Wild Porcini Mushroom and Lentil Pâté

Ingredients

  • 2 cups cooked lentils, any color
  • 2 cups chopped wild porcini mushrooms
  • 4 tbsp extra virgin olive oil
  • 1 small onion, diced
  • 4 cloves garlic, diced
  • 1 cup almond flour
  • 1 tbsp freshly squeezed lemon juice
  • 1 tbsp soy sauce
  • 1 tsp rosemary
  • 1 tsp thyme
  • 1 tsp honey
  • pinch cayenne pepper
  • salt to taste
  • extra olive oil, needed

Directions

  1. In a large sauté pan, heat 4 tbsp olive oil over medium heat.
  2. Add onions and sauté until translucent.
  3. Add garlic and sauté for 2 minutes.
  4. Add mushrooms and cook until they are soft and cooked through. Remove from heat and set aside.
  5.  In a large bowl, combine almond flour, lemon juice, soy sauce, rosemary, thyme, sage, honey, and cayenne.
  6. Stir in mushroom mixture.
  7. Using a stick blender (or food processor), purée the mixture.
  8. Add in cooked lentils.
  9. Purée the mixture until smooth.
  10. If the mixture feels too thick, thin it with additional olive oil.
  11. Salt to taste.

Cedar Planked Mushroom Caps Stuffed with Salmon, Blueberries and Goat Cheese

Cedar planks on the grill infuse salmon and mushroom caps with an irresistibly smokey flavor, and the indirect heat ensures for a deliciously moist, perfectly cooked bite.

With enough freshly caught, silver-bright Sockeye Salmon vacuum packed and in the freezer, we’ve lately turned our attention to gathering wild blueberries (while waiting for Coho Salmon – the stars of the fly-fishing season – to begin running). This recipe is a snap, and although grilling over charcoal on cedar requires a bit of extra effort, you’ll be glad you took the trouble.

Cedar Planked Mushroom Caps Stuffed with Salmon, Blueberries and Goat Cheese

Ingredients: You will need one or more untreated cedar planks soaked in water for at least a couple of hours

  • Crimini or Portobella mushroom caps (stems removed and set aside and a shallow depression cut into each cap’s center)
  • Mushroom stems, chopped coarse
  • Fillet of wild-caught Pacific Salmon seasoned with Italian herbs (or your own favorites) and broiled, grilled or pan fried till just cooked through. (Should flake easily). This step will remove some of the liquid from the fillets and result in a firmer dish.
  • Goat cheese, crumbled or cut into bean-sized pieces
  • Blueberries
  • Garlic chopped fine
  • Soy sauce
  • Extra virgin olive oil
  • Additional herbs and spices to taste
  • Sherry or dry white wine

Directions

  1. Fire up the grill.
  2. Combine ingredients in a mixing bowl and gently fold together. Fingers work best for this. Take care not to overwork the mixture.
  3. Stuff each mushroom cap and place on a cedar plank that has been well soaked in water.
  4. Place plank with stuffed mushrooms over hot charcoal. Cover grill with vented lid to ensure for high temperature.
  5. Depending on how hot the grill is, allow for 10 to 20 minutes cooking time. Mushrooms should be completely cooked through.
  6. Serve warm.

Thank You Molly! Cloudberry Sorbet Recipe

Thanks Molly! Here’s the recipe for cloudberry sorbet. It’s one of our favorites! We sure do miss picking cloudberries. (But, we think we found a “secret patch” for next year!)

Years ago, we were introduced to cloudberries in Point Hope. I was immediately smitten. Looking back over our blog recipes, I could see how my imagination was fired up with these fragile salmon-colored beauties. I turned out cloudberry jams, syrups, cakes, cookies, scones and our very favorite – cloudberry sorbet.

In the late summer, we would pick these jewels out on the Arctic tundra. They grew in soggy marsh atop small, rounded knolls. North of the Arctic Circle, berry picking was always wet and cold and sometimes mosquito-infested. Looking across the tundra, I would first see the dark plants hugging the ground on bumps of land. As soon as my eyes adjusted, bright orange berries seem to magically appear. In spite of the cold or the thrum of mosquitoes, I loved berry season and the stillness and quiet of the open tundra toward summer’s end. And I loved dreaming up ways to use these berries. My berry picking method? One, two and three for the bucket and one to sample for inspiration. Repeat until container is filled.

Our first cloudberry-picking session was the inspiration for this recipe. We had gone out on a frost-chilled morning. As we were sampling the cloudberries, Jack remarked that the berries tasted just like sorbet. I agreed and was determined to make that morning’s catch into just that, sorbet.

We had heard rumors that cloudberries grow somewhere around our new home by the shores of Lake Iliamna. As we’re getting to know our surroundings here, we’ve been on the lookout for these little treasures. The good news is that we’ve come across quite a few plants. The bad news is that we missed them this year. But maybe we found a place… It’s something to look forward to next year!

Cloudberry Sorbet

Ingredients

  • cups water
  • 1 1/2 cups granulated sugar
  • 4 cups fresh cleaned cloudberries

Directions

  1. Mix water and sugar in a medium saucepan over medium-low heat. Cook mixture until the sugar is fully dissolved to make a simple syrup.
  2. Remove pan from heat.
  3. Add cloudberries to the simple syrup.
  4. Using an immersion blender, blend the mixture until smooth.
  5. Strain half of the mixture through a fine mesh strainer or cheesecloth to remove the seeds.
  6. Discard seeds.
  7. Repeat with the second half of berry mixture.
  8. Cover and refrigerate 2 to 3 hours, or overnight.
  9. Using an ice cream maker, pour chilled mixture into frozen freezer bowl. Turn machine on and let it do its magic. It will take about 20 minutes to thicken. Sorbet will be soft and creamy.
  10. To store, transfer sorbet to an airtight container and keep in the freezer.
  11. To serve, allow sorbet to thaw for about 15 minutes before scooping and enjoying.

Really Ugly – But Pretty Tasty: Baked Moose “Empanadas”

Moose meat hand pies on a borrowed plate and a bit wonky looking. Maybe the beautiful Chignik Woodblock Mountains in the background will distract you. They are gorgeous!

We’re about one week out from the big move. That means almost all of our household goods are either waiting for us in Newhalen or they are en route care of the good ‘ol postal service. It also means there is one cook in the house who is longing for all of her mailed kitchen equipment. (Jack is being a much better sport about this.)

With what amounts to a random selection of pantry items that need to be finished and mostly borrowed kitchen items to get us through the next few days, we need to be either very creative or not think about it and just eat. Like I said, Jack is being a good sport. He has been creatively transforming the case of macaroni and cheese boxes we have for our remaining lunches by adding ingredients like rehydrated mushrooms, roasted Brussels sprouts, cans of diced tomatoes, and even the last bit of chorizo. This morning, he created a delicious hot breakfast out of the last bag of cous cous, bacon, cream cheese and toasted pecans.

With our very last pound of ground moose meat thawed in the fridge, I decided to take a turn at being cheery with this challenge and see what I could create. I thought it would be tasty to make turnovers inspired by Mongolian Khuushuur. Under a variety of local names, this type of meat-filled pastry seems to be found the world over. Our southern neighbors make a delicious version called empanadas.

Time to get to work. Yeast? Nope, mailed that. All-purpose flour? Yeah, that’s gone, too. What in the world do I have left? I gathered whole wheat flour, an egg, butter, salt, ground moose meat, Jack’s spicy seasoning mix, and a can of green chilis. Khuushuur and empanadas are both traditionally fried and are made with a bread type dough. No oil. These pastries would be baked. Based on my ingredient list, the dough was going to be of the savory pie variety. I whipped up some pie dough and stuck it in the fridge while I cooked up the filling.

When it was time to make the little meat hand pies, I realized I had no rolling pin, no parchment paper, and no pastry brush. Ugh. A greased cookie sheet did the trick sans parchment paper. And did you know that a skinny bottle of olive oil can double as a rolling pin? I didn’t either. The only disappointment was that wadded up paper towel does not really work as a pastry brush. It definitely wasted too much egg. Any ideas on that one?

At the end of the day, our hand pies were not pretty but we did wind up with a delicious dinner.  I’m still not yet as cheery and creative as Jack. Just wait till we get our kitchen set up again, that’ll cheer me up!

Baked Moose Meat Hand Pies
Ingredients
  • 1 1/2 cups whole wheat flour
  • 1/2 tsp salt
  • 3 tbsp cold unsalted butter
  • 1 egg
  • 6 tbsp cold water
  • 1 egg, beaten for brushing
Directions
  1. Whisk together flour and salt.
  2. Grate cold butter (with cheese grater) into flour mixture. Mix butter and flour together with hands or a fork. Stir in egg. Stir in water. Continue stirring until shaggy dough forms. You may need to add additional water if the dough won’t come together.
  3. Break dough into 8 pieces. Create small balls of dough and place balls in fridge while you are making the filling.*
  4. Roll the dough balls out into small thin circles.
  5. Place meat mixture in center of dough circles. Fold dough over meat filling and close up edges by using tines of a fork.
  6. Brush the tops with egg wash for a nice golden top. Cook at 375 for 18-24 minutes depending on the size of your empanadas.
  7. Serve with slices of avocado and your favorite salsa.

*I sautéed ground meat with one can of green chilis. I added a spice mix and salt to taste. Any type of filling would work inside these hand pies. See what’s in your pantry for inspiration.

Shioyaki Wild-Caught Alaska Salmon – It couldn’t be Easier, Even if You aren’t an Experienced Cook

Sea salt, olive oil and heat are the only ingredients you need to turn out great salmon every time. Particularly if you’re just getting into cooking and you try this recipe, we’d love to hear from you with any comments or questions and of course a report on how your salmon came out!

Over the years, one question has repeatedly come our way: “I really don’t do much cooking, but I’d like to be able to make salmon. Is there an easy recipe you know of?”

Not only is the answer to this question a resounding “Yes,” the recipe happens to be our favorite. I learned about shioyaki (salting and cooking) when I lived in Japan where shioyaki can refer either to charcoal grilled fish or, more commonly in home kitchens, broiling.

In addition to being the definition of simplicity, the genius of this recipe is that, unlike more elaborate recipes, the salt brings out rather than masks the flavor of the fish. This is exactly what you want when dealing with a fresh, wild-caught salmon. On the other hand, because the flavors are simple, the finished dish is easily enhanced with toppings. Try it with raspberry chipotle sauce (easily made at home) or with Mae Ploy Sweet Chili Sauce. Here’s how it’s done.

Ingredients & Preparation

  • You’ll need a broiling sheet. A standard cookie sheet works fine, but a heavier sheet is even better.
  • Salmon fillets – any species of wild-caught salmon
  • A favorite kosher salt or sea salt. We’ve found coarse Grey Sea Salt to work especially well.
  • Extra virgin olive oil

Directions

  1. Place oven rack in center or one position below center. (This is the one “trick” you might need to experiment with. Ovens vary. So don’t be discouraged if your first attempt doesn’t work out as you expected. Adjust the rack position and go for it again! Once you have this dialed in, the rest is a snap.)
  2. Place the broiling sheet in the oven and preheat on Broil. (10 minutes is generally the right amount of time.)
  3. Meanwhile, rinse salmon fillet(s) in cold water. Pat dry with paper towel and place skin side down on cutting board.
  4. Sprinkle salt on fillet.
  5. Put a little olive oil on the hot broiling sheet – enough to cover the area where you’ll place the fillet.
  6. Place salmon fillet skin side down on prepared sheet and place in oven. It should vigorously sizzle when it touches the sheet. If it doesn’t, simply place the sheet back in the oven and continue preheating.
  7. Cooking time will vary depending on fillet thickness. 8 to 10 minutes is usually about right. An oil-like liquid will begin to emerge from the top of the fillet when it is done. Again, if your first attempt produces an undercooked or overcooked fillet, make a note, stick it on your fridge, and adjust the cooking time. If the fillet comes out overly dry on top or burnt, you probably need to lower the rack. Keep simple notes till you get it dialed in.

Fillets prepared this way are superb served on rice, on pasta, served along with tartar sauce or avocado spread as a sandwich or broken into pieces to top a superb Alaska-style pizza. Going for an added touch with a glass of wine? It’s tough to beat a lightly chilled Chardonnay.

See also:

Alaska Silver Salmon Pizza

Raspberry Chipotle Sauce Recipe

Broiled Salmon Spine: Getting the Most out of Every Salmon


Springtime Alaska: Who Needs Asparagus? Poached Eggs on Sautéed Fireweed Shoots

Poached egg yolk mixes with garlic-infused yogurt to make a sumptuously tangy dressing for sautéed fireweed.

When we first moved to Alaska, a friend suggested we swing by the Fireweed Festival in Trapper Creek. I’d already fallen for fireweed the previous summer during our initial visit to this great state. The love was based on this beautiful flowering plant’s visual appeal as it blanketed summertime hillsides in stunning fuchsia. Any festival evoking those images had to be good, so there was no way we’d pass up a festival in fireweed’s honor! In addition to local crafts and great live music, there was a food stall dedicated to teaching the culinary uses of this ubiquitous plant. I walked away from the stall with a new book on harvesting Alaska’s wild plants and new ideas of how to use fireweed in our kitchen. One thing that stuck with me from talking with the people at the festival is that new fireweed shoots can be used just like asparagus in any recipe. True? Absolutely! 

My internet news feed is made up mostly of recipe posts from blogs I follow. I have to tell you it is a much more gentle and uplifting type of reading than the mainstream media feed offers. Jack and I had planned to grill bacon-wrapped fireweed exactly as one would asparagus to continue testing whether all asparagus recipes work with fireweed shoots. But before we could get to that experiment, a recipe for asparagus with yogurt dressing popped up on my news feed. I immediately envisioned a recipe makeover, and with everything I needed available in my ever-shrinking, pre-move pantry, I got to work.

This dish is quick to make. I recommend preparing the yogurt dressing ahead of time to ensure that the garlic becomes infused. We served this dish as the salad course of our dinner, but it would work wonderfully as part of a light lunch or as a side dish for brunch. Make sure you have crusty pieces of sourdough bread available to sop up the extra dressing. It tastes too good to waste!

Now is the time to get out and harvest these young fireweed shoots. I like them best when they are about six inches tall and still mostly purple. The ones with an agreeable snap (just like a nice skinny asparagus stalk) when harvested (near the ground) taste best. The fireweed near our lake is now fully green and too old to harvest. A hike to higher elevations should still provide fresh young shoots to pick.

Poached Eggs on Sautéed Fireweed Shoots for Two

(recipe can easily be doubled or tripled)

Ingredients

  • 2 large eggs
  • 2 tbsp white vinegar
  • 1/4 cup almonds, slice and toast them, or buy them sliced and toast them
  • 1/4 cup plain yogurt (strained or Greek-style if you can find it)
  • 1/2 tablespoons lemon juice
  • 1/4 teaspoon smoked paprika
  • 1 small clove garlic, minced
  • pinch salt
  • 1 tablespoon olive oil
  • 1/2 pound fireweed shoots

Directions

  1. Combine yogurt, lemon juice, paprika, garlic and salt. Place in covered container in fridge. Can be made a day to a couple of hours ahead of time.
  2. Place olive oil in a medium pan over medium heat.
  3. In a separate saucepan, bring 3 cups water to a simmer. Add vinegar. Gently crack eggs into hot water being careful not to break the yolk. Cook until whites appear to be cooked through, about 3 minutes.
  4. Sauté fireweed in pan while eggs are poaching.
  5. Place fireweed on serving dish. Place poached eggs on fireweed. Drizzle with yogurt dressing. Top with toasted almonds.
  6. Serve immediately with crusty toasted sourdough bread.

Recipe inspired from The Smitten Kitchen.