Birds of Chignik Lake: Common Loon

Common Loon – Chignik Lake, August 17, 2018

Words such as “common,” “uncommon” and “rare” can be vexingly imprecise. So, what are the chances of seeing a Common Loon on Chignik Lake? Generally pretty good, which prompts the question: Have Common Loons – which David Narver recorded us “uncommon” back in the early ’60’s – become more common on The Lake in recent years? And if so, does that explain the relative absence of the smaller Red-throated Loon – which Narver reported as “common?” I love questions like this, even if the answers are tough to know.

These Commons appeared to be cooperatively feeding as they worked their way along the shoreline. (Chignik Lake, January 14, 2018)

We encountered Common Loons with some frequency – as individuals, in pairs, and at times in what appeared to be family groups of four or five. Commons’ diets are comprised mainly of small fish – lots and lots of them. According the Cornell Lab of Ornithology, a pair with two chicks can consume about half a ton over a 15-week period. Unlike River Otters, mergansers and goldeneyes, Commons usually swallow their prey underwater. I was therefore unable to observe what species of fish they might be targeting. Sticklebacks, small char and juvenile salmon are all likely candidates. The system also holds populations of smelt and sculpins.

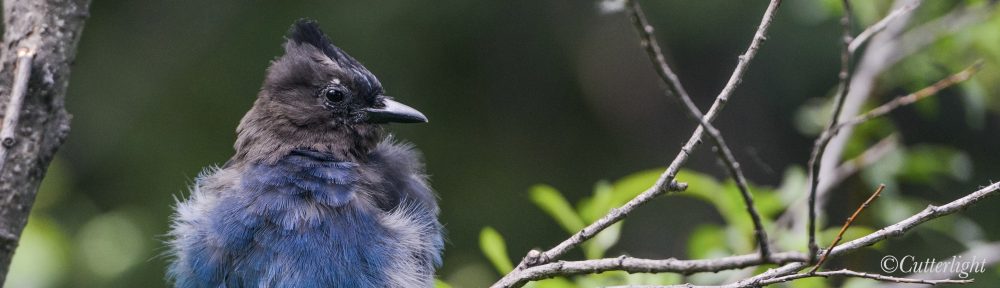
Right down to it’s gem-like eye and armed with a serious bill, Common Loons surely rank as one of North America’s most striking birds. (Chignik Lake, August 17, 2018)

Even in silhouette, there’s no mistaking a loon. (Common Loon, Chignik Lake, August 20, 2016)

Common Loon Range Map: with permission from The Cornell Lab of Ornithology, Birds of the World

Common Loon Gavia Immer
Order: Gaviiformes
Gavia: sea mew
immer: perhaps from the Latin immergo – to immerse; or from the Swedish immer – which refers to the ashes of a fire and suggesting the loon’s coloration

Status at Chignik Lake 2016-19: Common to Uncommon

David Narver, Birds of the Chignik River Drainage, summers 1960-63Uncommon

Alaska Peninsula and Becharof National Wildlife Refuge Bird List, 2010:
Common in Spring and Summer; Uncommon in Fall; Rare in Winter

Aniakchak National Monument and Preserve Bird List: Presence Documented

Previous Article: Pacific Loon

Next Article: Yellow-billed Loon

*For a clickable list of bird species and additional information about this project, click here: Birds of Chignik Lake

© Photographs, images and text by Jack Donachy unless otherwise noted.


Birds of Chignik Lake: Pacific Loon

A Pacific Loon stretches between dives on a cold winter day. The Pacifics we encountered on Chignik Lake and Chignik River were wintertime visitors and therefore in their more drab plumage.  (Chignik River, January 12, 2018)

Pacific Loons are uncommon to occasional wintertime visitors on Chignik Lake and Chignik River. Although they sometimes appear in pairs, they didn’t arrive until well into wintertime and I saw no Pacifics in breeding plumage. As this species is known to nest on the Alaska Peninsula, it is possible that Pacific Loons could be found in spring and summer on Black Lake.

Abundant fish attract loons and other piscivorous birds to The Lake. As with other loons, in wintertime the estuary might be the best place to look for them. (Chignik Lake, December 5, 2017)

Several years before I got into birding (or serious photography), Barbra and I encountered this beautiful specimen in breeding plumage on a pond near Point Hope, Alaska. At the time, I didn’t realize that there is more than one species of loon! (Point Hope, Alaska, August 24, 2012)

Pacific Loon Range Map: with permission from The Cornell Lab of Ornithology, Birds of the World

Pacific Loon Gavia pacifica
Order: Gaviiformes
Gavia: sea mew
pacifica: of the Pacific region

Status at Chignik Lake 2016-19: Uncommon/Occasional

David Narver, Birds of the Chignik River Drainage, summers 1960-63: Not Observed

Alaska Peninsula and Becharof National Wildlife Refuge Bird List, 2010:
Rare in Spring and Summer; Uncommon in Fall and Winter

Aniakchak National Monument and Preserve Bird List: Probably Present but not Documented

Previous Article: Red-throated Loon

Next Article: Common Loon

*For a clickable list of bird species and additional information about this project, click here: Birds of Chignik Lake

© Photographs, images and text by Jack Donachy unless otherwise noted.


Birds of Chignik Lake: Red-throated Loon

Fine and far off. In fly-fishing, the phrase refers to light tippets and long casts to wary trout. Here it refers to my lone Red-throated Loon sighting on Chignik Lake. It’s difficult to see the eponymous star-like speckling on its back in this photo, but a fine bill angled up slightly, a face showing more white than in other loons, and a smaller, more rounded overall profile add up to Red-throated. A pair of male Red-breasted Mergansers nap to the right on an icy Chignik Lake. (April 1, 2017)

Although Narver regularly encountered Red-throated Loons during his summertime observations in the early 1960’s, I recorded only one specimen during my three years at The Lake. This could reflect that in summertime Red-throateds mainly reside further up the watershed at Black Lake – and possibly breed there -, or it could indicate that in recent years Common Loons have supplanted their smaller cousins in the Chignik Drainage. Except for the breeding season, Red-throated Loons show a decided preference for salt water, so from fall through early spring Chignik Lagoon and nearby ocean waters – areas beyond the scope of this study – might be good places to check for them.

Red-throated in breeding plumage: Photo by David Karnå / Wikimedia Commons / CC BY 3.0

Red-throated Loon Range Map: with permission from Birds of North America

Red-throated Loon – Gavia stellata
Order: Gaviiformes
Gavia: sea mew
stellata: set with stars

Status at Chignik Lake 2016-19: Rare

Status on other relevant checklists:

David Narver, Birds of the Chignik River Drainage, summers 1960-63:
Common on Black Lake; Occasional on Chignik Lake

Alaska Peninsula and Becharof National Wildlife Refuge Bird List, 2010:
Uncommon in Spring and Summer; Rare in Fall and Winter

Aniakchak National Monument and Preserve Bird List: Presence Documented

Swallow Silhouette

Previous Article: Loons of Chignik Lake

Next Article: Pacific Loons

*For a clickable list of bird species and additional information about this project, click here: Birds of Chignik Lake

© Photographs, images and text by Jack Donachy unless otherwise noted.


Delightfully Sweet and Delightfully Sour – Lingonberry Chess Pie

While baking, tangy lingonberries, also known as lowbush cranberries, rise to the top of a custard-like pie filling. The combination of the tart berries and the sweet, creamy filling all in a crispy pie shell is possibly the best reward for shoveling out a driveway’s worth of fresh snow.

It’s been endlessly snowing for the past day. Our Alaskan home now resembles the Alaska home I imagined before we moved to this famously frozen state. As I left home this morning for my very short walk to school, I was surrounded by blinding white. The trees were covered. Rooftops were blanketed and fringed with shimmering icicles. A splash of bright red peeked through two feet of snow where our ATVs are parked. My first-floor classroom windows have shoulder-high drifts piled a quarter of the way up. The plow crews can barely keep up, and Jack has become the John Henry of snow shovelers. Sitting on her trailer, Gillie is up to her gunwales in a sea of white. We’re socked in with snow like we have never before been socked in. I love it!

With only two months of school remaining (unbelievable!), we are at that time of year where we challenge ourselves to empty out our freezer and pantry. There is one lonely gallon-sized bag left from one of our treasured fall harvests – lingonberries. Most of the lingonberries we picked have been baked into muffins, upside down cake, and fruit breads or pressed into juice for hot lingonberry tea. The snow outside spurred me to action last night. Baking is not only entertaining but also has three wonderful outcomes – a warm house, a delightful aroma, and of course, the delicious results. This recipe was slightly adapted from my favorite baking book, The Williams-Sonoma Baking Book. According to the recipe book, chess pies may be named such because they keep well in traditional storage cabinets, otherwise known as pie chests. Another explanation is that “chess” is a corruption of the word cheese, derived from a chess pie’s cheese-like filling. Whatever the etymological origins may be, the way the folded in lingonberries all rise to the top of the pie during baking is magical – and visually quite appealing. The effect when you eat the pie is interesting as well: The sweet and the sour are notably separate and in so become complementary flavors.

As to the shelf life of chess pie… It’s unlikely one has ever lasted long enough to tell!

Lingonberry Chess Pie

Ingredients

  • dough for a single crust pie
  • 1 1/3 cups granulated sugar
  • 1/2 cup unsalted butter, melted
  • pinch salt
  • 3 eggs
  • 1/4 cup all purpose four
  • 1/3 cup plain yogurt
  • 1 tsp cider vinegar
  • 1 tbsp orange zest, finely chopped
  • 2 cups frozen or fresh lingonberries

Directions

  1. Roll out pie dough to cover a 9-inch pie dish.
  2. Trim off excess. Leave plain or pinch edge to decorate.
  3. Chill dough-covered pie dish in refrigerator for 30 minutes.
  4. Place oven rack in lower third of oven. Preheat to 375° F.
  5. Blind bake pie by covering it with foil, weighting down the foil with rice or pie beads and baking for about 20 minutes. Crust should be very lightly browned and no longer look wet.
  6. Leave oven on and slightly cool crust on a wire rack while making the filling.
  7. In a large bowl, whisk together sugar, butter, salt, eggs, flour, yogurt and vinegar.
  8. Stir in orange zest.
  9. Fold in lingonberries.
  10. Pour the filling into the pie shell.
  11. Bake pie until top is golden brown and filling is firm, about 50 – 60 minutes.
  12. Cool on wire rack completely before serving.

Ice-Fishing on the Newhalen River

We were on the ice mostly to have a look and get a photo or two, but when I was offered a turn at fishing… how could I say “No?” It didn’t take long to put a pan-sized rainbow on ice. It took me back to being a kid on Pennsylvania’s Clarion River trying to get a few tasty perch for a wintertime fish-fry.

From an upstairs window, we could see the anglers begin to gather across the river. “Let’s go see what they’re up to!” It’s about a quarter mile walk to the river from our place and another three-quarters of a mile across the frozen water. No worries. The ice is over two feet thick.

Ray Wassillie had organized the gathering and brought along the power ice auger. Now we want one! Between the Newhalen River and local lakes, there is an abundance of wintertime quarry: Northern Pike, Lake Trout, Dolly Varden Char, Rainbow Trout, Grayling and Burbot!

We’re both battling colds and therefore didn’t hang around long. The fishing was just starting to heat up as we were leaving and I really wanted a shot of someone pulling in a decent fish. This woman had the hot hand, so I kept my camera trained on her. Of course, that put the jinx on her. After a lull that seemed to last forever, she finally had a bite… and pulled out this tiddler! Some of the fish were pushing 20 inches… guess you’ll have to take our word for it.

In addition to a “Big Fish” contest, there was a side event to see who could chop through 30 inches of hard ice the old fashioned way – with a steel pike. Up from New York on a student teaching stint, Griffin was game. Talk about work though. I think he sufficiently had the “idea” of it by the time he got a foot or so into it and wisely put the pike aside to get back to fishing.

I had not intended to fish, but when Ray offered a line, what could I say? My first fish through the ice in… geez, over 40 years. As it is with any addiction, I should have known not even to unscrew the cap from the bottle. We’re now shopping ice augers!


m

Alaska Moose Wonton Soup

Hot, spicy, hearty – a perfect meal for this frigid Alaska weather.

Nothing beats hot soup on a cold day. What about after a hike on a cold day? Yup. Hot, hearty soup. Jack upped the ante on this soup by floating my homemade moose wontons in his hot and sour soup – beef broth, lots of hot spices paired with freshly squeezed lime juice and a dash of sesame oil. “Ooooh, Andy!” (Calm yourself Aunt Bee.) This spicy fusion warmed the heart, then the soul, and then traveled from the top of my head to the tips of my chilled toes.

A couple of weeks ago, I experimented with making my own wonton wrappers. The egg noodle recipe I used for my pasta worked extraordinarily well for the little dumplings. Instead of slicing the noodles into strands, I left them in three inch sheets which I cut into squares. Having already made the seasoned ground moose, I did nothing more than gather the dough around portions of meat and voila! – wontons. A big batch kept in the freezer allows us to throw a few into simmering soups. After a few minutes of cooking, wonton soup’s on!

Alaska Moose Wonton Soup

Ingredients

  • 2/3 lb ground moose (any ground meat will work)
  • 2 tsp soy sauce
  • 2 tsp chives, chopped small
  • 1 tsp rice wine vinegar
  • 1 tsp corn starch
  • 1 tsp dried ginger
  • 1 garlic clove, chopped fine
  • 1/2 tsp red pepper flakes or 1/2 tsp of your favorite spice mix like Jack’s
  • 1/2 tsp sesame oil
  • 1 package wonton wrappers or homemade pasta cut into 3” squares

Directions

  1. Quickly sauté ground meat, careful to just cook through
  2. Place meat in a bowl
  3. Mix next eight ingredients into cooked meat
  4. Place about a tablespoon of the meat mixture onto the center of a wonton wrapper
  5. Gather all the edges up to make a bag shape
  6. Gently squeeze together the closure or the neck of the wonton
  7. Place on a baking sheet if you are planning to freeze the wontons and place the baking sheet in the freezer until the wontons are frozen solid. Then store the frozen product in a zip top bag in the freezer until you want to use them.
  8. To cook, place wontons in simmering soup for 3 minutes. If frozen, cook for 4 minutes.

Adzuki Bean Truffles – Something to Celebrate

Happy New Year! Happy Birthday! Happy Whatever! Creamy sweet chocolate adzuki bean truffles invite celebration any day.

Ever since my first bite of sweet adzuki bean paste, I was hooked. After tossing away the store-bought can and creating my own homemade paste, I knew this love had turned into a lifelong relationship. Adzuki beans have brought me endless fascination and innumerable streams of culinary consciousness. If you search “adzuki beans” on Cutterlight, you will see there is quite a history. The red bean paste is smooth, sweet, and delicious. It is unusual enough to be interesting and easily fits into so many recipes. Forget about the healthful aspects of adding beans to your diet. I mean it. Forget it. The sweet paste texture reminds me of nut pastes – like marzipan or chestnut paste. This texture and flavor inspired me to create Twisted Adzuki bean rolls, Matcha Adzuki Bean glazed rolls, and Adzuki Maple bars with Matcha Frosting to name a few. If you want to tiptoe into this world, try a good quality canned product to experiment with. If you want to go all in, I have directions on how to make your own paste here.

Years ago, a nutritionist visited my classroom to present ways my 6th graders could “sneak” healthy ingredients into their diets. They were very impressed with the smoothies created from only frozen fruit. They were blown away with the deep chocolate cakey brownies that were made with fiber-rich black beans instead of bleached white flour. With a surfeit of dried black beans left in our pantry and a desire to make our sweets more healthful, I began my own experiments with this ingredient. Of course, I was able to create delicious and nutritious treats that fueled our active lifestyle.

But black beans can have an ever-so-slight mealy texture. So what about adzuki beans? When they are cooked down into a paste, they definitely have a more pleasant texture. Armed with free time over my winter break and a few pounds of dried adzuki beans, I got to work in the kitchen with the excitement of a mad scientist ready to solve an insolvable, albeit with my hair tied back into a neat bun. The first success was a lovely little bite-sized confection that I called a truffle. The beans are slightly sweetened with maple syrup. The cooled bean balls are dipped in chocolate. Then, let your imagination go. They can be rolled in sprinkles, coffee powder, candied fruit pieces, toffee bits, nuts, cocoa powder, or whatever you desire.

I could imagine adding additional flavors to the beans, such as a bit of Grand Marnier or bourbon for a boozy twist. Or maybe almond extract or orange extract for a non-boozy twist. The possibilities seem endless.

Adzuki Bean Truffles

Ingredients

  • 2 cups cooked adzuki beans
  • 2 tbsp pure maple syrup
  • 5 tablespoons Dutch processed cocoa powder
  • 3/4 cup semi sweet chocolate chips
  • your choice of topping

Directions

  1. With a stick blender or in a food processor, combine the black beans, maple syrup, and cocoa powder. Pulse and process for a couple minutes, until the mixture is well combined and doughy. I used a potato masher to manually process the beans. If the dough seems too dry, add a bit more maple syrup until you are happy with the texture. The dough should not be sticky, just gooey and fudgy.
  2. Roll the dough into 24 balls (approximately 1 tablespoon each) and place on a baking sheet lined with parchment paper. Place baking sheet in refrigerator while you prepare the topping.
  3. Melt the chocolate chips in a double boiler.
  4. Drop a ball into melted chocolate. Roll it around with a fork. Use a second fork to pick up the coated balls like a claw machine. Place the coated ball back on the parchment-covered baking sheet.
  5. Sprinkle truffle ball with your toppings.
  6. Repeat with remaining balls.
  7. Place back in the refrigerator for 10 minutes to set. Store in an airtight container in the refrigerator to keep fresh.

Two-Cheese Stuffed Artichokes Appetizers – (Shhh! It’s really a meal)

Days on end with temperatures stuck below zero, occasionally warming into the single digits or teens to snow. Winter is here, a time when comfort food is never more comforting.

For the first time in several days, we woke this morning to temperatures above 0° Fahrenheit. With the relative warmth, a fresh layer of snow is beginning to accumulate. Black-capped and Boreal Chickadees are nearly constant visitors to the feeders outside our living room window, and from our home’s southwest windows is a view of a river locked in ice.

Aside from summer-caught salmon fillets and wild blueberries, lingonberries and mushrooms gathered near our Newhalen home, most of our groceries come to us by small plane from Anchorage. Out of the asparagus we’d asked for, our shopper at Costco recently substituted artichokes. They’re beautiful, but other than steaming them and creating some sort of buttery dip, we don’t have much experience with this vegetable.

As it happens, we’ve been watching Italian Food Safari, a show created in Australia where Italian families have lived for generations preserving and expanding on the gustatory traditions they brought with them to their new country. It was in one of the show’s episodes that we were introduced to the wonderful idea of stuffing artichokes.

While this dish requires a certain amount of passive preparation time in the form of soaking and steaming the artichokes, the actual preparation is fairly simple. Create a mixture that will steam well and compliment the vegetable, chill a bottle of Pinot Gris or dry Riesling, prepare couscous, brown rice or something similar as a bed for the finished artichoke, and if you’ve never served an artichoke this way before, prepare yourself to be amazed.

Directions

  1. For each artichoke, cut the stem off so that the artichoke will sit upright in a steaming pot. Then cut off the top 1½ inches or so of the artichoke as these ends are mostly prickly and inedible. Next, use a melon baller or paring knife to remove the fine, thistle-like down (the choke) in the center of the artichoke. Taking a moment to do this will result in a more pleasant dining experience. Soak the artichokes in cold water for 30 minutes. You will want to use something to keep them fully submerged. This will ensure they steam nicely.
  2. There are probably all kinds of ingredients that would work well as the stuffing, but you’ll want to avoid items that will overwhelm the subtle flavor of the vegetable. We started by peeling the artichoke stems, chopping them fine and placing them in a bowl. To this, we added chopped garlic, crumbled feta cheese, grated Comté cheese, panko, Italian herbs, olive oil and fresh lemon juice. The cheeses were sufficiently salty that we didn’t add additional salt. Adding a splash of sherry or whatever wine you plan to serve works well. Although we didn’t add any type of meat or seafood to this mixture – and after serving the artichokes agreed that most meat and seafood wouldn’t work very well – we did think that Dungeness or Blue crab might do the trick. Italian-style breadcrumbs would work well as a substitution for the panko. Mix the ingredients together.
  3. Remove artichokes from the cold water where they’ve been soaking and push and pull the petals apart to create spaces into which the mixture can be stuffed. Fill as many of these spaces as you reasonably can.
  4. Arrange the stuffed artichokes stem-side down in a steaming pan – one you’ve prepared so that the artichokes can steam without being immersed in water. A canning rack, or even canning jar lids, works well for this. Steam for 45 minutes.
  5. Finish the artichokes with a drizzle of olive oil and a dusting of smoked paprika. Serve hot on a bed of rice, couscous, quinoa or something similar and celebrate the day with a glass of Oregon Pinot Gris. Don’t forget to provide a bowl for the discarded petals.


Salmon and Bleu Cheese Appetizers with Spicy Mayo

Served hot or cold, these appetizers will go fast at your next get together. Or reimagine them served in a toasted bun as a salmon meatball po’ boy!

Looking forward to a recent Friday night get-together (and football playoff snacks beyond that), I wanted to come up with something new in the salmon appetizer category – hopefully something even kids and non-fish-eaters would happily dig into.

This is it, and here’s how to make them. And by the way, we urge readers to always choose wild-caught salmon. By valuing wild salmon, you are helping to ensure that the ecosystems wild salmon depend on are also valued and will be protected for generations to come. This is vital not just for preserving the beauty of these landscapes, but for ensuring that everything that depends on wild salmon – orcas, bears, eagles, countless other animals and the salmon forests themselves – will continue to thrive. Choosing wild-caught salmon is quite likely the single most environmentally important food choice consumers can make. Read more at: Salmon Make a Landscape More Beautiful. 

Salmon and Blue Cheese Appetizers with Spicy Mayo

Ingredients for the Salmon Appetizers

  • 1 pound wild-caught salmon fillets, skinned, boned, rinsed and patted dry with paper towels
  • 1 large egg
  • soy sauce
  • smoked paprika
  • black pepper
  • mesquite seasoning (optional, but the smoky flavor of a mesquite seasoning such as the Kirkland brand available at Costco works very well with the soy sauce to add umami to this recipe)
  • 3/4 cup bleu cheese, crumbled fairly small
  • 1 or 2 strips thick-cut bacon, fried and cut into small pieces
  • 3/4 cup panko (or substitute crushed saltine crackers)
  • extra virgin olive oil – enough to generously cover the bottom of whatever pan you use to cook the appetizers

Directions

  1. Use a meat grinder, food processor or stick blender to mince the salmon. Place in a mixing bowl.
  2. Add egg, soy sauce, paprika, black pepper and mesquite seasoning. Use a spoon or spatula to thoroughly mix.
  3. Fold in bleu cheese, panko and bacon with your hands.
  4. Shape into bite-sized balls.
  5. While these could be cooked using a variety of methods, the combination of a sauteuse pan (a frying pan with high sides) with about 1/8 inch (3mm) of oil and a pair of tongs or chopsticks works especially well for cooking these appetizers as you’ll be able to ensure that all sides of the salmon are seared. As long as you make sure the oil doesn’t get too hot – just enough to make a gentle sizzle – extra virgin olive oil is a good choice for the additional flavor it will impart. Over medium to medium-low heat, bring the oil to a gentle sizzle. Arrange the appetizers so that there is a little space between them. After about 3 minutes, turn them over. You can use tongs or chopsticks to briefly position them to touch up sides that didn’t get seared. (This is mainly a cosmetic concern rather than something that will affect their taste.) Cook about 6 minutes total.
  6. Serve hot, chilled or in-between along with a dipping sauce and lemon wedges.

Directions for Spicy Mayo

While you can use store-bought mayonnaise, homemade is very flavorful. Here’s a quick, easy recipe: One Cup Mayo, and Hold the Preservatives! Stir in a favorite spicy seasoning blend. Here, too, there are all kinds of store-bought options, but if you’d like some inspiration for creating your own, see: Smoky & Spicy: Our Go-To Mix

A Lovely Pumpkin Genoise Cake for Two

It was fun to share this elegant sponge cake featuring layers of creamy pumpkin mousse with my best friend and still be able to walk away (instead of stagger away for a post-food coma nap). 

Hidden in the middle of my favorite baking book is a beautiful photo of a slice of golden layered cake. It draws my attention every time I peruse The Williams-Sonoma Baking Book. The  recipe begins with “makes 10-12 servings.” As lovely as the image of that pumpkin mousse cake is, those words are where I stop reading and turn the page. But recently, I thought to myself that there has to be a way to scale this recipe down to create an intimate dessert for two. I thought my skills were up for the challenge.

The recipe lost nothing in pairing it down; the flavor is wonderful. My 6-inch springform helped turn out a decidedly cute cake, the perfect finale to our Thanksgiving meal for two. The mousse part of the recipe will make an extra cup, which we kept in two half-cup canning jars as a dessert for the next day.

Pumpkin Mousse Cake for Two

Ingredients for the Cake

  • 1 egg
  • 2 tbsp sugar
  • 3 tbsp all-purpose flour
  • 1 tbsp unsalted butter, melted

Directions for the Cake

  1. Preheat an oven to 375°F. Line the bottom of a 6-inch round springform pan with parchment paper.
  2. In the bowl of a stand mixer, whisk together the egg and sugar by hand until combined. Place the bowl over but not touching simmering water in a saucepan and gently whisk until the mixture registers 140°F on an instant-read thermometer, about 3 minutes. Put the bowl on the mixer fitted with the whisk attachment and beat on high speed until the mixture is pale and almost tripled in volume, 5 to 8 minutes.
  3. Remove the bowl from the mixer. Sift 2 tablespoons of the flour over the egg mixture in two additions and carefully fold in with a large rubber spatula. Fold the third tablespoon of the flour into the melted butter, then fold back into the egg mixture.
  4. Pour the batter into the prepared pan and smooth the top. Bake until the top is browned, about 20 minutes. Transfer the pan to a wire rack and let cool completely. Run a table knife around the edge of the pan and invert the cake onto a work surface. Turn the cake right side up.

Ingredients for Pumpkin Mousse

  • 1 1/4 tsp. (1/2 envelope) unflavored gelatin
  • 1 tbsp cold water
  • 1 cup canned pumpkin purée
  • 1/4 cup granulated sugar
  • tiny pinch salt
  • 1/4 tsp ground cinnamon
  • 1/4 tsp freshly grated nutmeg
  • 1/2 tbsp good quality bourbon
  • 1 cup heavy whipping cream

Directions for the Mousse and Assembling the Cake

  1. Cut the cake into 2 equal layers.
  2. In a small bowl, sprinkle the gelatin over the cold water, stir and let soften until opaque, about 3 minutes.
  3. In a saucepan over medium heat, combine about 1/2 cup of the pumpkin purée, the granulated sugar and salt. Then heat, stirring, until the sugar dissolves.
  4. Stir in the softened gelatin and let cool to room temperature.
  5. In a bowl, stir the pumpkin mixture into the remaining pumpkin purée. Whisk in the cinnamon, nutmeg and bourbon.
  6. Using a stand mixer, whip the whipping cream to soft peaks. Using a large rubber spatula, gently fold one-third of the whipped cream into the purée, then fold in the remaining whipped cream, making a mousse.
  7. Peel off the parchment paper from the bottom cake layer.
  8. Put the layer, cut side up, into the bottom of a 6-inch round springform pan.
  9. Spread half of the mousse evenly over the cake. Trim 1/2 inch from the outside edge of the remaining layer. Center it, cut side down, on top of the mousse. Top with the additional mousse, pushing it between the cake and the pan and smoothing the top. Refrigerate until set, at least 4 hours or up to overnight.
  10. Divide the remaining mousse into two containers and store, covered, in the refrigerator.
  11. To remove, run a small knife around the inside of the pan. Open the springform and remove the pan sides.
  12. Cut into two pieces and serve.